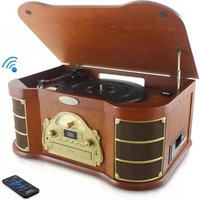
PTCD54UB - DJ Equipment Pyle - Free user manual and instructions
Find the device manual for free PTCD54UB Pyle in PDF.


| Product Type | Turntable System with CD/MP3/USB, Bluetooth, Cassette, and Radio |
| Brand | Pyle |
| Model | PTCD54UB |
| Power Supply | AC 120V ~60Hz |
| Turntable Speeds | 33⅓, 45, 78 RPM |
| Turntable Type | Belt drive (assumed) |
| CD Player | Compatible with CD and MP3 discs |
| USB Playback | USB flash drive playback and recording |
| Bluetooth | Wireless audio streaming, pairing name "ClassicAudio" |
| Cassette Player | Analog cassette tape playback |
| Radio | FM/AM tuner with antenna wire |
| Recording | Record from CD, USB, Phono, or Cassette to USB |
| Remote Control | Included with full function |
| Built-in Speakers | Yes (assumed, with volume control) |
| Cabinet Material | Wooden vintage design |
| Stylus | Included with protective cover |
| 45 RPM Adapter | Included |
| Transit Screw | Yes, for transport lock |
| Safety | Grounded outlet required; do not expose to rain or moisture |
| Cleaning | Use dry cloth only; avoid chemical solvents |
| Warranty | Not specified |
Frequently Asked Questions - PTCD54UB Pyle
User questions about PTCD54UB Pyle
0 question about this device. Answer the ones you know or ask your own.
Ask a new question about this device
Download the instructions for your DJ Equipment in PDF format for free! Find your manual PTCD54UB - Pyle and take your electronic device back in hand. On this page are published all the documents necessary for the use of your device. PTCD54UB by Pyle.
USER MANUAL PTCD54UB Pyle
natural_image
Wooden vintage gramophone with open lid and gold case, featuring a vinyl record and signal icon (no text or symbols on main body)Model:
PTCD54UB
CAUTION
TO PREVENT FIRE OR SHOCK HAZARD, DO NOT USE THIS PLUG WITH AN EXTENSION CORD, RECEPTACLE OR OTHER OUTLET UNLESS THE BLADES CAN BE FULLY INSERTED TO PREVENT BLADE EXPOSURE. TO PREVENT FIRE OR SHOCK HAZARD, DO NOT EXPOSE THIS APPLIANCE TO RAIN OR MOISTURE.

The lightning flash with arrowhead symbol, within an equilateral triangle is intended to alert the user to the presence of uninsulated 'dangerous voltage" within the product's enclosure that may be of sufficient magnitude to constitute a risk of electric shock to persons.
CAUTION
RISK OF ELECTRIC SHOCK DO NOT OPEN
WARNING: TO REDUCE THE RISK OF ELECTRIC SHOCK DO NOT REMOVE COVER (OR BACK), NO USER SERVICEABLE PARTS INSIDE REFER SERVICING TO QUALIFIED SERVICE PERSONNEL

The exclamation point within an equilateral triangle is intended to alert the user to the presence of important operating and maintenance (servicing) instructions in the literature accompanying the appliance.
IMPORTANT SAFETY INSTRUCTIONS
1) Please read these instructions and keep them for future reference.
2) Pay attention to all warnings.
3) Follow all instructions.
4) Do not use this apparatus near water.
5) Clean only with a dry cloth.
6) Do not block any ventilation openings.
7) Install in accordance with the manufacturer's instructions.
Do not install near any heat sources such as radiators, heaters, stoves, or other apparatus (including amplifiers) that produce heat.
8) Protect the power cord from being walked on or kinked, in particular where the plug is fitted and at the point where it exits from the apparatus.
9) Only use attachments / accessories specified by the manufacturer.
10) Unplug this apparatus during lightning storms or when unused for long periods of time.
11) Refer all servicing to qualified service personnel. Servicing is required when the apparatus has been damaged in any way, such as power-supply cord or plug is damaged, liquid has been spilled or objects have fallen into the apparatus, the apparatus has been exposed to rain or moisture, does not operate normally, or has been dropped.
12) This appliance should not be exposed to dripping or splashing water and no object filled with liquids, such as vases, should be placed on the apparatus.
13) Do not overload the wall power outlet. Use only power source as indicated - i.e. 120V AC mains.
IMPORTANT NOTES
Avoid installing this unit in places exposed to direct sunlight or close to heat radiating appliances such as electric heaters, on top of other stereo equipment that radiates too much heat, places lacking ventilation or dusty areas, places subject to constant vibration and/or humid or moist areas.
Do not attempt to clean this unit with chemical solvents as this might damage the finish. Use a clean dry cloth. Operate controls and switches as described in the manual. Before tuning on the power, make certain the AC power cord is plugged in. Store your CDs, in a cool area to avoid damage from heat. When moving the set, be sure to first disconnect the power cord.
PREPARATION FOR USE UNPACKING AND SET UP
- Carefully remove the unit from the display carton and remove all packing material from the unit.
- Unwind the AC power cord and extend it to its full length.
- Unwind the FM Antenna wire and extend it to its full length.
- Place the unit on a stable, level surface, convenient to an AC outlet, out of Direct sunlight, and away from sources of excess heat, dust, moisture, humidity or strong magnetic fields.
- Raise the lid to expose the phonograph. The phonograph has been secured for shipment with a transit screw. Use a coin or screwdriver to turn the transit screw clockwise. This will allow the Turntable to "float".
- Remove the opaque white plastic stylus cover from the phonograph stylus by sliding it Forward and down.
• Discard the stylus cover.
- Remove the twist-tie that was used to secure the tone arm during shipment.
- Release the tone arm lock lever.
- Connect the plug to your AC outlet.

To prevent any damage to your furniture we strongly recommend that you purchase small self-adhesive felt pads, available at hardware stores and home improvement centers everywhere, and apply these pads to the bottom of the rubber teef before you place the product on fine wooden furniture.
IMPORTANT: Raising and Lowering the Lid
To open the lid, raise it as far as it will go until the lid support bracket locks in the open position. To close the lid, lift it upward slightly until the lid support bracket unlocks, and then gently lower the lid.
TO AVOID DAMAGING THE CABINET OR THE LID, NEVER FORCE THE LID CLOSED. ALWAYS RAISE THE LID TO RELEASE THE LID SUPPORT BRACKET.
LOCATION OF CONTROLS AND INDICATORS FRONT PANEL
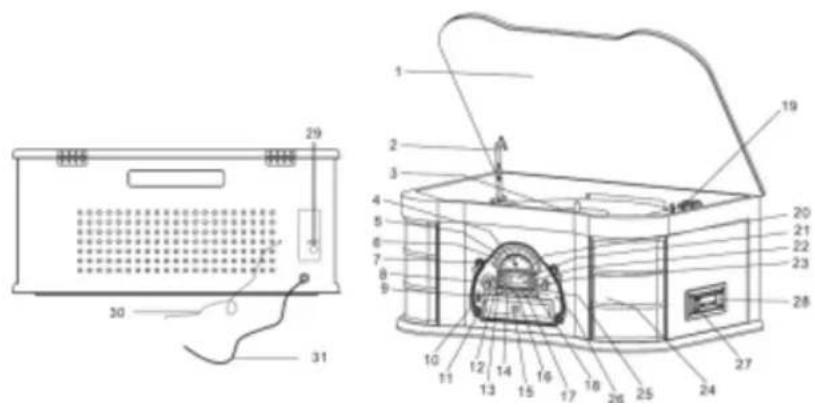
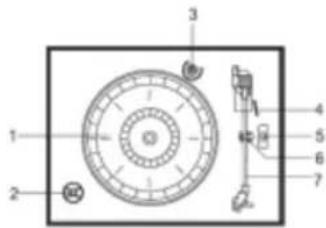
PHONOGRAPH:
1) Turntable
2) 45 RPM Adapter
3) Transit Screw
4) Cue Lever
5) Speed Selector (33 / 45 / 78 RPM)
6) Tone arm Lock
7) Tone arm with Stylus
REMOTE CONTROL OPERATION:
R1. OPEN / CLOSE
R2 RECORD
R3. REPEAT
R4.PLAY/PAUSE
R5.DN/FB (SKIP REV)
R6.DN/FF (SKIP Forward)
R7. STOP
RB. TRACK - 10
R9. TRACK +10
R10.RANDOM
R11.DELETE
R12.PROGRAM

NOTE: ALL of the buttons on the remote control have the same function as these buttons in the unit. This remote control just used for CD/MP3, USB mode.
OPERATING INSTRUCTIONS
To turn the system on, select the AM or FM function, adjusting the TUNING button to receive stations, when
NOTE:
Level hold PLAY/PAUSE button to enter function change as follows: CD-USB When the CD function model has not put in CD/MP3 disc, inserts USB card, will automatic switching to USB card the playback. To confirm recording successful or not, select the CD function and level hold PLAY/PAUSE button to enter into USB function, insert USB card the unit will read the USB songs.
CD/MP3 FUNCTION OPERATION:
Select to the CD function. Press the OPEN/CLOSE button to open the CD door and the unit LCD displays
- Place your CD or MP3 disc in the drawer with the printed label side facing up.
- Press the OPEN/CLOSE button once more to close the CD door and the unit LCD display
. The disc will spin for a few seconds while the player reads the disc and will automatism playback.
PLAY CONTROL IN CD/MP3/USB MODEL:
- Place your CD or MP3 disc in the drawer or insert USB card. Will automatism playback. Play will continue until the end of the DISC or USB card. When the disc ends, the display again shows the total number of tracks on the disc or USB card. You may also stop playback at any time by press the STOP button.
- Adjust the OFF/VOLUME control to the desired level.
- In play model: Press the SKIP FWD button on the unit front panel or UP/FF button on the remote control to begin the next song.
- Press the SKIP REV button on the unit front panel or DN/FB button on the remote control to begin the previous song that has just been played.
- Press the FOLDER +10 or FOLDER -10 button to skip forward or recede 10 tracks in CD/MP3/USB MODEL.
SELECTING THE FOLDER PLAYBACK FOR MP3/USB:
In stop model: Press FOLDER +10 or FOLDER -10 button to selected the FOLDER+ or FOLDER- to confirm the FOLDER tracks number. Press PLAY/PAUSE button to playback. The song number and folder number of your selected track will be shown consecutively in every 2 seconds. You may also stop playback at any time by press the STOP button.
SELECTING YOUR DESIRED PART FOR CD/MP3/USB:
Depress and hold SKIP FWD or SKIP REV button on the unit front panel or UP/FF or DN/FB button on the remote control to select your desired part of the currently playing track and then release the buttons. The playback will resume normal from that point.
PAUSE CONTROL IN CD/MP3/USB MODEL:
In CD/MP3/ USB playing mod: Press the PLAY/PAUSE button once. Play stops but the disc continues to spin and the LCD indicator of the track number will flash. Press the PLAY/PAUSE button once more to cancel pause and of track number stop flashing.
RECORD CD/MP3/USB/PHONO/CASSETTE FUNCTION:
In CD/MP3/USB/PHONO and CASSETTE playing mode, select to the desired track songs. Insert USB and press REC button once, the unit displays
NOTE: In PHONO / CASSETTE model record: To confirm record model, the unit display
The unit plays the song in USB: You dislike, pressing and hold the STOP button or DELETE button on the remote control 2 seconds to cancel, the unit LCD will be displays .
REPEAT PLAYBACK IN CD/MP3/USB MODE:
In CD/MP3/USB play mode: Press REPEAT button once will play the present track repeat playback and the repeat indicator lamp will shows and flash.
Press the REPEAT button second time, will start repeat-all-song and the repeat indicator lamp stop flashes. To cancel repeat playback: Press the REPEAT button third, until the repeat Indicator lamp goes off. Repeat playback is also cancelled by pressing the STOP button.
PROGRAM FUNCTION IN CD/MP3/USB MODE:
This feature allows you to program of the CD 20 tracks and MP3/USB 99 tracks on a disc for playback in any desired order.
In CD/MP3/USB stop model: Press the PROGRAM button to enter the program mode. The program number briefly shows '0 0 1', and the program indicator lamp flash. Press the SKIP FWD or SKIP REV button on the unit front panel or UP/FF or DN/FB button on the remote control to select the first track number you wish to enter in the program memory, example: Track number'008'. When the desired track number appears on the display, press the PROGRAM button again to memorize the track. The program number briefly shows '0 0 2', then a program indicator lamp will shows and flashes.

Repeat step of the above, select a different track number each time until you have entered up to Co 20 tracks and MP3/USB 99 tracks in the program memory.
Press the PLAY/PAUSE button to begin programmed playback. The PROGRAM indicator lamp stop flashing. Playback will begin with the first track you have programmed and will continue until the last programmed track has been played.
The programmed sequence may be cancelled by press STOP button twice.

CASSETTE FUNCTION OPERATION:
- Select to the CASSETTE function. Insert your cassette into the slot, as shown in the illustration, with the side you wish to play fading up and the open end on the right side.

Select to the PHONO function. Make sure that you have removed the stylus cover from the stylus.
-
Place your PHONO DISC on the center spindle.
-
Adjust the OFF VOLUME control to the desired level.
NOTE: Do not turn or stop the turntable manually. Moving or jarring the turntable without securing the Tone Arm clamp could result in damage to the Tone Arm.
-
Set the turntable speed selector to the appropriate speed, 33, 45, or 78 RPM. If you are playing 45 RPM singles, place the 45 RPM adapter on the center spindle.
-
To turn the system off, rotate the OFF/VOLUME control knob counter clockwise until a dick is heard.
-
When turntable finishes playing, tone arm will return to original position automatically.
-
Move up or move down the speed adjustor to adjust PHONO playing speed. When the Speed display indicates not exact 33 & 45 & 78.
BLUETOOTH FUNCTION OPERATION:
- Turn on the unit, rotate the Volume control to desired level.
Turn the Function knob to PH mode, and make sure the tone-arm is on the resting state. A short Bluetooth starting tone can be heard, then the Bluetooth indicator will be flashing.
-
Turn on your Bluetooth device, search for "ClassicAudio" and pair. Pairing code is "0000" if needed.
-
A short and delight tone will indicate successfully pairing. Play your Bluetooth device as you normally do and the sound will be played from this unit. Enjoy the music.
NOTE:
-
Make sure your Bluetooth device and this unit is within 10 meters.
-
Check and see if there are other Bluetooth devices nearby interfering the signal and connection.
-
this unit could be paired by multiple different Bluetooth devices, but could only be connected and played by
One of them at a time. Make sure no other device is actively connected to it already when you are trying to connect the one you are working on.
IMD/ODTANTH
CASSETTE CARE
Two common causes of trouble experienced when using cassettes are:
1) Tape jamming-Leading to uneven speed in playback.
2) Tape entangling the tape wraps itself around vital parts of the mechanism.
To reduce the likelihood of these problems occurring, the following precautions should be observed:
Check that there are no loose layers of tape visible through the cassette center window (see Fig. 1). Take up any loose layers, using a pencil or hexagonally Barreled ballpoint pen, before inserting the cassette into the machine (see Fig. 2).
If the cassette feels tight while performing operation shown (see Fig. 2), the tape may be jamming due to ridges formed in the winding of the tape (visible through the center window). These may be removed in most cases, by fast winding of the cassette from one end to the other and back again.


Use only well-known brands of tape. Avoid use of C-120 Cassettes. Furthermore, do not expose cassettes to direct sunlight, dust or oil, and do not touch the tape surfaces.
COMPACT DISC CARE
To remove a disc from its storage case, press down on the center of the case and lift the disc out, holding it carefully by the edges.


Fingerprints and dust should be carefully wiped off the disc s recorded surface with a soft cloth. Unlike conventional vinyl or shellac records, compact discs have no grooves to collect dust and microscopic debris, so gently wiping with a soft cloth should remove most particles. Wipe in a straight line from the inside to the outside of the disc. Small dust particles and light stains will have absolutely no effect on sound reproduction quality.


- CAUTION
- IMPORTANT SAFETY INSTRUCTIONS
- IMPORTANT NOTES
- PREPARATION FOR USE UNPACKING AND SET UP
- IMPORTANT: Raising and Lowering the Lid
- PHONOGRAPH:
- REMOTE CONTROL OPERATION:
- OPERATING INSTRUCTIONS
- NOTE:
- CD/MP3 FUNCTION OPERATION:
- PLAY CONTROL IN CD/MP3/USB MODEL:
- SELECTING THE FOLDER PLAYBACK FOR MP3/USB:
- SELECTING YOUR DESIRED PART FOR CD/MP3/USB:
- PAUSE CONTROL IN CD/MP3/USB MODEL:
- RECORD CD/MP3/USB/PHONO/CASSETTE FUNCTION:
- REPEAT PLAYBACK IN CD/MP3/USB MODE:
- PROGRAM FUNCTION IN CD/MP3/USB MODE:
- CASSETTE FUNCTION OPERATION:
- BLUETOOTH FUNCTION OPERATION:
- CASSETTE CARE
- COMPACT DISC CARE
Brand : Pyle
Model : PTCD54UB
Category : DJ Equipment