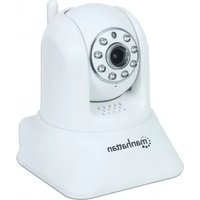
HomeCam HD - Security Camera MANHATTAN - Free user manual and instructions
Find the device manual for free HomeCam HD MANHATTAN in PDF.


| Product Type | Security Camera |
| Brand | Manhattan |
| Model | HomeCam HD |
| Connectivity | Ethernet (RJ-45) and Wi-Fi (802.11 b/g/n) |
| Video Resolution | Up to 1280x720 (720p HD) |
| Lens | Pan and tilt (PTZ) with up to 8 presets |
| Motion Detection | Yes, with up to 4 configurable windows and adjustable sensitivity (1-100) |
| Audio | Two-way audio with built-in microphone and speaker, supports G.726 and G.711 codecs |
| Night Vision | Yes (IR LEDs) |
| Storage | MicroSD card slot, FTP, and email |
| Video Compression | MPEG-4 AVC (H.264) with Main and Baseline profiles |
| Video Streams | 4 independent streams (3 for web, 1 dedicated for mobile) |
| Frame Rate | Up to 30 fps at 720p |
| Power Supply | DC 5V/2A (typical) |
| Dimensions | 120 x 100 x 100 mm (estimated) |
| Weight | 300 g (estimated) |
| Operating Temperature | 0°C to 40°C (estimated) |
| Warranty | See manhattanproducts.com/warranty |
| Supported Protocols | TCP/IP, HTTP, SMTP, FTP, DDNS |
| Mobile Access | Yes (iOS and Android via app) |
| Package Contents | Camera, network cable, power adapter, installation CD, mounting hardware |
| Reset Button | Yes (restore factory defaults via software) |
Frequently Asked Questions - HomeCam HD MANHATTAN
User questions about HomeCam HD MANHATTAN
0 question about this device. Answer the ones you know or ask your own.
Ask a new question about this device
Download the instructions for your Security Camera in PDF format for free! Find your manual HomeCam HD - MANHATTAN and take your electronic device back in hand. On this page are published all the documents necessary for the use of your device. HomeCam HD by MANHATTAN.
USER MANUAL HomeCam HD MANHATTAN
natural_image
White smart camera with 'manhattan' branding on base (no other text or symbols visible)manhattan®
Life just got easier. ^TM
MAN-551496/551502/551519-UM-0715-03
Contents
- Hardware Installation....3
- Connect to the camera with your computer 3
- Video Plug-in Installation Procedure 6
- Live Video Camera Page 11
- Configuration Menu, Camera Settings.... 13
- Warranty Information 26
1. Hardware Installation
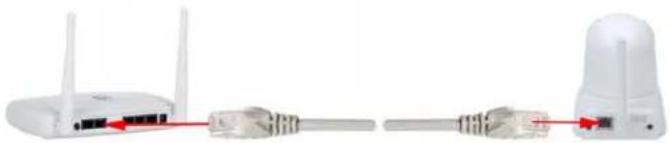
- Connect the camera to one of your router's LAN ports with the included network cable.
natural_image
Two wireless devices connected via USB cable, one with antenna and one with antenna (no text or symbols visible)-
Power on the camera.
-
Allow the camera to properly start up. The startup sequence has ended when the camera stops moving its lens up and down and to the left and right.
2. Connect to the camera with your computer
-
Connect your computer to the same router as the camera, either wirelessly or with a network cable.
-
Insert the installation CD into the CD or DVD drive of your computer.
-
Wait for the CD to automatically start (or manually locate and run "AutoRun.exe").
AutoRun.exe
- Select the third option: "EasyCam Installer for Windows Users."

- EasyCam Installer will launch now. In some cases, you may encounter a Windows Security Alert (see below). You must click on "Allow Access", otherwise EasyCam Installer will not be able to detect the camera.

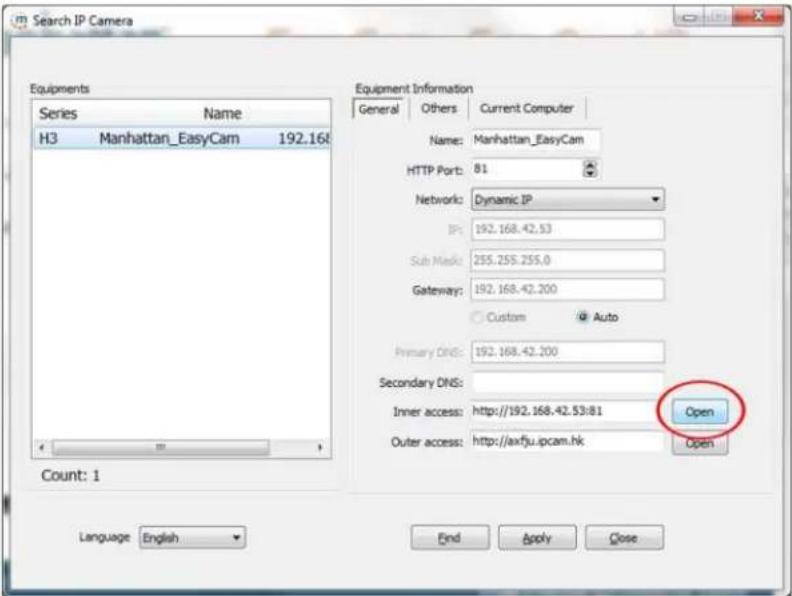
- EasyCam Installer shows all network cameras found in the window on the left ("Equipment"). Click on the camera, and then click on the "Open" button.
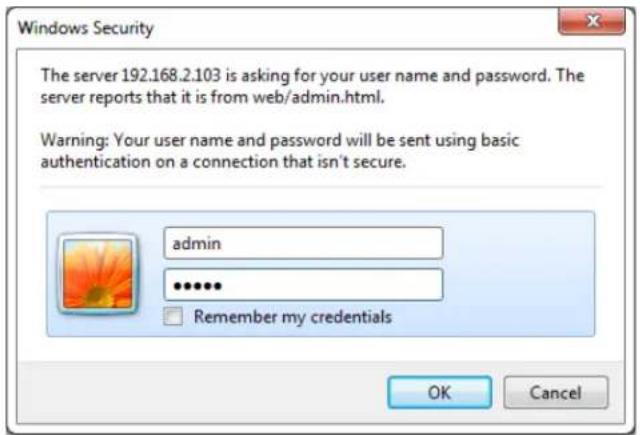
- Log in to the camera with the user name "admin" and the password "admin." Note that if the password has been changed before, you will, of course, need to use the updated password.
- Select the correct Sign In method (below). Note that if you are using Microsoft MS Internet Explorer ("IE"), Google Chrome or Mozilla Firefox, you will need to install a video plugin first. The installation of the plugin requires administrator rights on your computer.
IP Camera
For IE, FireFox, Google, Safari Browser Sign in
Mobile Phone (For Browser that supports Javascript)
Sign in
iPod touch / iPhone 2G, 3G, 3GS, 4 and iPad dedicated
Sign in
Language English
☐ do not show next time
3. Video Plug-in Installation Procedure
Right-click on the link (green circle), then select "Save target as..." or "Save link as ..."

Select the location — e.g., the desktop — and then save the file.

Once the download has finished, on Windows 7 and 8 you will likely see a warning message that this file could harm your computer. This is perfectly normal and should not alarm you. Click "Actions."

Click "Run anyway." If you are not currently logged on as a computer administrator, you will be asked to enter administrator credentials. After you have done so, the installation of the ActiveX control will commence. Windows XP users: Simply double-click the Manhattan.exe to start the installation process.

The installation will only take a few moments. Click "Finish" when done.
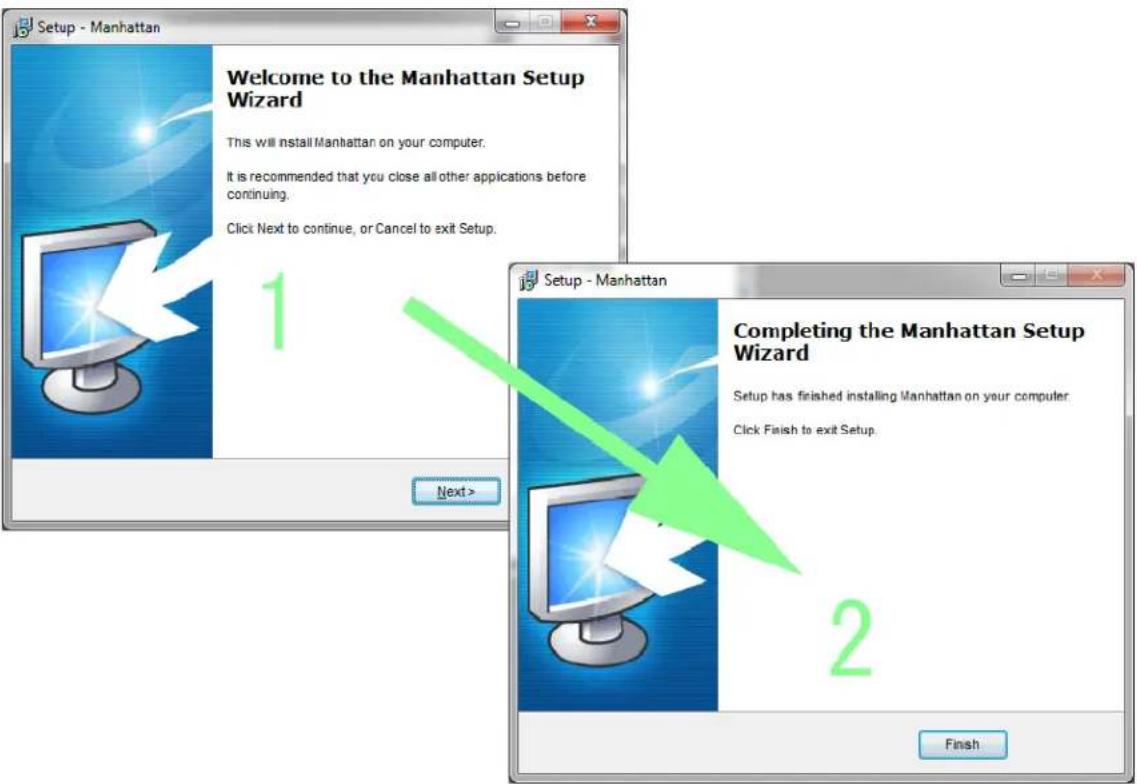
In the MS Internet Explorer window, and click "Refresh." Notice the message on the bottom of the screen. Click "Allow."

Click again on ActiveX for IE, and you will then see the camera's live video.
If this does not work, and you keep seeing the message about the missing control, proceed as follows.
a) Open up the Options menu
b) Open the Compatibility View settings page

c) Click "Add."

Note: The website address varies. It is perfectly normal if it is not 192.168.2.100 when you perform this step.
If you are using Mozilla Firefox, you will see the message below. Click "Activate OcxWebPlugin."

If you're using Google Chrome, the message looks similar. Click on "Run this time" or "Always run on this site."

4. Live Video Camera Page
This page lets you view and control the camera. (Some options only work with MS Internet Explorer.)


Use the directional arrows to control the movement of the camera.

If you have more than one Manhattan EasyCam, you can view multiple cameras in a Web browser. For that to work, the other cameras will need to be added to the camera configuration, which is explained in the next section.
Stream: First stream
The camera supports two independent video streams, which can be set up with different parameters, such as video size, quality or frame rate. The streams can be defined on the Video & Audio Settings page of the camera Settings menu.

Enable or disable the horizontal or vertical patrol. Once enabled, the camera will continuously pan from left to right and back, or up and down.

(MSIE only)
With these controls you can record video on your computer's hard drive, or you can take a snapshot and either view it or save it anywhere you like. Before you can use the record or snapshot function, you first need to define the location where you wish to save the video and images. You do that by clicking on the "Path" button.

(MSIE only)
Listen to the sound the camera picks up or enable your own microphone and send audio to the camera, which it outputs through its internal speaker.

You can store ("Set") or recall ("GO") up to eight preset positions with these controls.
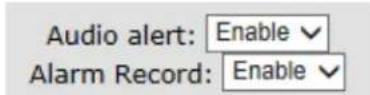
If motion detection is activated in the camera settings, you can enable these two options for additional functionality.
Audio alert: Every time a motion has been detected, the Web browser plays back an alarm sound. Alarm record: Every time a motion has been detected, the Web browser records a video of the event on your computer's HDD. Do not forget to set the storage directory using the "Path" button.

Click this button to open the camera's Options menu, which provides access to many of the camera's configuration options.
5. Configuration Menu, Camera Settings
| System Settings |
| Networking |
| Advanced Settings |
| Alarm Settings |
| Video & Audio Settings |
The camera's Settings menu provides access to the configuration parameters of your EasyCam. Under normal conditions there is no need to make any changes here, but you may do so if you are experienced enough to change network-related settings of the camera.
| Item Explanation | |
| System Settings-Device Info-Time Settings-System Maintenance | Device Info:Status information of the camera, including firmware version, MAC addresses and language settings.Time SettingsCurrent Date Time:2015-05-14 10:41:44ChangeNetwork Time Server✓NTP server: time windows.comSync interval: 01 ▼HTime Zone: (GMT-05.00)Eastern Time (U.S. and Canada).Bogota,Lima✓Automatically adjust the timeSynchronized tothe PC time OKYour EasyCam is equipped with an internal clock, which you set up here. Select the time zone that matches your location, pick an NTP server from the drop-down list, and activate the automatic time update.System MaintenanceSystem MaintenanceReboot the system: RestartRestore factory default values: DefaultvaluesBackup configuration data: SaveTo restore configuration data:Browse_ No file selected. OKSystem upgrade:Browse_ No file selected. OKThis menu allows you to reboot the EasyCam, restore all configuration values to the factory defaults, and upgrade the firmware. A new firmware version may be released from time to time to improve the performance of the camera or to add new features. You can find the latest firmware for your EasyCam at manhattanproducts.com. |

Item Explanation
Networking
-Networking
-Wireless Settings
-Remote Access
Wireless Network Settings
Wireless Settings
SSID:
Manhattan
Search
Connection mode:
Routing
(If you have a wireless router, select the routing mode)
Security Type:
WPA2-PSK ▼
Encryption method:
AES ▼
Key:
●●●●●●●●●●●●
Confirmation key:
●●●●●●●●●●●
Check the wireless settings:
Check
OK
Refresh
With this screen you can connect your EasyCam to your wireless network. Click "Search" to find wireless networks in range. Select a network, then enter the correct password for the wireless network in the Share Key field. Click "OK" to activate the settings. If you want to make sure that the settings are correct, click "Check."
Remote Access:
The camera supports DDNS providers, such as NO-IP.com or DYN.COM. You can set them up here. However, if you connect to the EasyCam primarily with your smartphone or tablet, then you won't need to set up DDNS at all. DDNS stands for "Dynamic DNS." DDNS is useful for all users who have an Internet service with a dynamic IP address. Most DSL services utilize IP addresses that are highly dynamic and change as often as once every 24 hours. Cable modem services typically keep the IP address assigned to a user for a longer period of time; e.g., up to 30 days. In any case, after a certain amount of time the IP address of your network will change unless you have a more business-type Internet service that provides a permanent, static IP address.
Why does it matter if the IP address that the ISP assigns to you changes? If you never want to access the camera remotely over the Internet, it wouldn't matter — and you can skip this section.
If you want to connect to your camera from outside your network, however, the changing IP addresses will make this very complicated, as you never know under which IP address you can reach your camera. DDNS is the solution. Services like DYNDNS.ORG allow you to sign up for an account and set up domain names like "mycamera.dyndns.org." The DDNS service assigns the current IP address that your ISP has assigned to you to the domain name you've set up, so that you can always reach your camera at http://mycamera.dyndns.org (example).
Note: We recommend using the DDNS client that is integrated into your router for the DDNS service instead of the camera's DDNS client.
The network camera supports four DDNS providers:
DYNDNS.ORG, Oray, 9299.ORG and 3322.ORG.
Server name: Select the service (e.g., DYNDNS.ORG)
User ID: Enter your DDNS user account password here.
Password: Enter the password of your DDNS account here.
Confirm: Repeat the DDNS account password here.
Hostname: Enter the dynamic hostname (e.g.,
"mycamera.dynsns.org")
here. Do not enter http://.
Item Explanation
| Advanced Settings |
| -Alias Setting |
| -User Accounts |
| -Capture time |
| -Timer record |
| -FTP |
| -PTZ Protocol |
Alias Settings:
Define the name of your camera here. This is how the camera will identify itself on your network.

The camera's user account can be defined here. It is recommended to change the default password ("admin") into something more secure as soon as you can.

On this screen you can enable the camera's image capture function. Two functions — Save image on SD card and Save image on FTP server — can be enabled or disabled independently. Below that is a table that allows you to activate or deactivate the capture for each hour of the day and each day of the week. This function captures still images (JPEG).
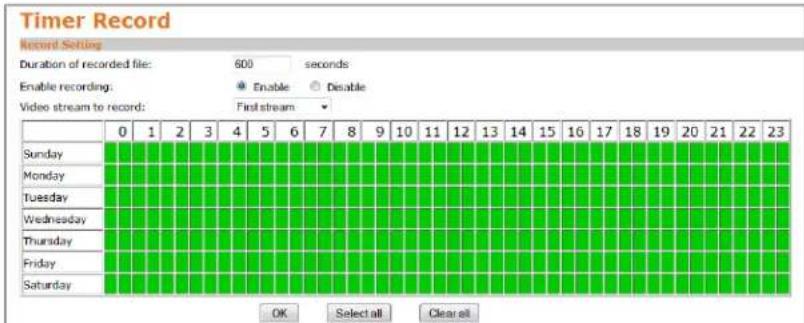
Timer record functions similarly to capture time, except the camera does not record still images, but AVI videos instead. You can control the length of the video, the time of day, and the day of the week on which you wish to enable the time recording.
Item Explanation
| -Advanced Settings |
| -Alias Settings |
| -User Accounts |
| -Capture Time |
| -Timer Record |
| -FTP |
| -Multiple Settings |
| -PTZ Protocol |
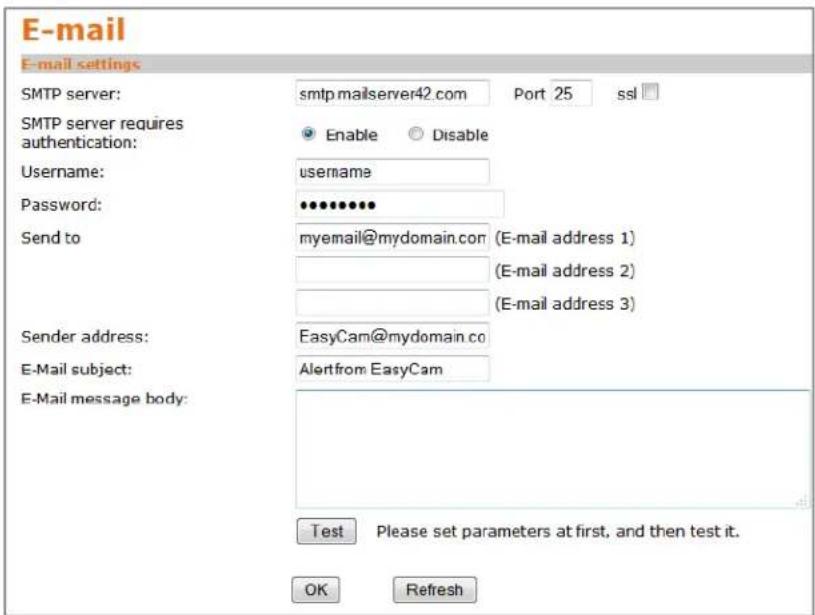
EasyCam is equipped with an e-mail client, which can be used to send alert messages to your e-mail address in case of an alert event (e.g., motion has been detected). Note that using this function requires knowledge about SMTP-related settings. If you do not know any of these settings, you should contact your network admin or your ISP.
SMTP Server: The address of your outgoing mail server.
Port / SSL: The standard port is 25, but your mail server may not be using that port. SSL may or may not be required by your mail server.
SMTP server requires authentication: Some e-mail servers require authentication to prevent unauthorized use, mainly as an anti-spam measure. If enabled, a username and password must be given. In many cases the username and password is the same information that you use to download your e-mail with your e-mail client.
Send to: Up to three e-mail addresses to which the message is to be sent.
Sender address: Some e-mail servers do not deliver mail from clients that do not have an e-mail address specified. To maximize compatibility, and to be able to differentiate your cameras, you can enter an e-mail address here; e.g., easycam@mydomain.com. The e-mail address does not need to be a real address, but it must follow the standard format for e-mail adresses.
E-Mail subject and E-Mail message body: Just like any other e-mail, the e-mail from the camera should have a proper subject as well as a message body.
Click "OK" to save and activate the settings. Use the "Test" button in order to verify that the e-mail settings are correct.
| Item Explanation | |
| Advanced SettingsAlias Settings-User Accounts-Capture Time-Timer Record-E-mail-FTP-Multiple Settings-PTZ Protocol |  In order to use EasyCam's FTP client, it must first be set up. You need to provide the address of your FTP server, the username and password. Should you want to upload images into a specific subdirectory, you can enter the directory name into the field "Path"; e.g., "./images".If your FTP server supports passive FTP connections, you should enable this setting; otherwise, leave it disabled.Click "OK" to save and activate the settings. Use the "Test" button in order to verify that the FTP settings are correct. In order to use EasyCam's FTP client, it must first be set up. You need to provide the address of your FTP server, the username and password. Should you want to upload images into a specific subdirectory, you can enter the directory name into the field "Path"; e.g., "./images".If your FTP server supports passive FTP connections, you should enable this setting; otherwise, leave it disabled.Click "OK" to save and activate the settings. Use the "Test" button in order to verify that the FTP settings are correct. |
| PTZ Settings |  This section allows controlling the pan/tilt behavior of the EasyCam. The camera allows you to store up to 8 predefined locations, which you can recall from the live video page. This configuration screen provides additional options.Cruise Laps: In Cruise mode, the camera pans from side to side or up, down and up again. Set this parameter to the amount of laps you wish the camera to perform. The maximum is 50 laps. This is to ensure that the camera won't endlessly pan back and forth in case you forget to disable the Cruise mode, wearing the pan tilt drive unnecessarily, which could shorten the life span of your Manhattan EasyCam HD.PTZ speed: Determines how fast the camera moves to a PTZ preset.Centered while self check: When enabled, the camera will move to the center position during the start-up sequence.Activate Pan Tilt movement on alarm: One of the possible alarm actions of your EasyCam is the ability to move to a specified PTZ positon, when an alarm event has occurred. You can enable or disable this function here. The menu "Alarm Settings" -> "Alarm Actions" allows you to determine to which of the PTZ presets you wish the camera to move to. This section allows controlling the pan/tilt behavior of the EasyCam. The camera allows you to store up to 8 predefined locations, which you can recall from the live video page. This configuration screen provides additional options.Cruise Laps: In Cruise mode, the camera pans from side to side or up, down and up again. Set this parameter to the amount of laps you wish the camera to perform. The maximum is 50 laps. This is to ensure that the camera won't endlessly pan back and forth in case you forget to disable the Cruise mode, wearing the pan tilt drive unnecessarily, which could shorten the life span of your Manhattan EasyCam HD.PTZ speed: Determines how fast the camera moves to a PTZ preset.Centered while self check: When enabled, the camera will move to the center position during the start-up sequence.Activate Pan Tilt movement on alarm: One of the possible alarm actions of your EasyCam is the ability to move to a specified PTZ positon, when an alarm event has occurred. You can enable or disable this function here. The menu "Alarm Settings" -> "Alarm Actions" allows you to determine to which of the PTZ presets you wish the camera to move to. |
Item Explanation
Alarm Settings
-Motion Detection
-Audio Alert
-Alarm Actions
-Alarm Time Settings
Motion Detection

natural_image
Interior view of an office with a person seated at a desk, no visible text or symbols on equipment or signageWindow1
Sensitivity:
□
50
Window2
Sensitivity:
图
50
Window3
Sensitivity
图
50
Window4
Sensitivity
图
动
OK
Your EasyCam HD is equipped with a motion detection function. You can define four different motion detection windows, also called "hot zones." For each window, you can adjust the sensitivity from "1" to "100", where "1" is the least sensitive and "100" is the most sensitive setting. You can define which action the camera is to take — if it detects a motion — on the "Alarm Actions" screen.
Audio Alert
Audio alert:
Sensitivity:

Enable
No
50
(1-100)
0
Refresh
The EasyCam is equipped with an internal microphone, and you can also connect an external microphone to the camera. The audio alert function operates similarly to the motion detection, except that the camera will look for changes in the audio level it picks up. The higher you set the sensitivity, the smaller the changes in ambient noise need to be to trigger an alarm event. The lower the sensitivity, the louder the noise has to be before an alarm gets triggered.
Item Explanation
Alarm Settings
-Motion Detection
-Audio Alert
-Alarm Actions
-Alarm Time Settings
Alarm Actions
E-Mail alarm
E-mail settings
Save image on FTP server
FTP server settings
Save the video to FTP server
Save image on SD card
Save video on SD card
Alarm Preset
1
OK
Refresh
Select the alarm action(s) you wish the EasyCam to perform, if an alarm event has occurred. You can select one or many actions. If you wish to use e-mail or FTP alarms, be sure to set up the corresponding e-mail and FTP settings correctly.
Alarm Time Settings

On this screen you can define on which day of the week and at which hour of the day you wish to activate the alarm function. The example above shows that the alarm is active from Friday night at 8 pm (2000 hours) until Monday morning at 6 am (0600 hours).
| Item Explanation | |
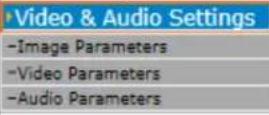
| -Video & Audio Settings-Image Parameters-Video Parameters-Audio Parameters |  This screen provides basic controls over image parameters, such as brightness, contrast or saturation. The Aperture mode controls how much light can reach the surface of the camera's image sensor at any given time. The camera provides three settings:“Auto” – This is the default value and it usually works just fine.“Indoor” – Use this option only if your camera never captures any outside images, not even through a window.“Outdoor” – If your camera is always monitoring an outside location, then you can enable this mode. This screen provides basic controls over image parameters, such as brightness, contrast or saturation. The Aperture mode controls how much light can reach the surface of the camera's image sensor at any given time. The camera provides three settings:“Auto” – This is the default value and it usually works just fine.“Indoor” – Use this option only if your camera never captures any outside images, not even through a window.“Outdoor” – If your camera is always monitoring an outside location, then you can enable this mode. |
 The correct value depends on the power frequency of the country you live in. For instance, North, Central and large parts of South America run on 60 Hz, whereas pretty much the result of the world runs on 50 Hz. You should set this value accordingly. Failure to do so can result in a reduced image quality.“mainprofile” vs. “baseline”The MPEG-4 AVC video codec has three core profiles, two of which are supported by your EasyCamHD. The “baseline” option is the least complex of the profiles. While the video streams generated with “baseline” are typically larger than those encoded with the “mainprofile” option, they are less CPU intensive for the playback device, which is beneficial for mobile devices such as smartphones and tablets. If you are primarily streaming in 720P (1280 x 720), you are not concerned with the CPU usage required in order to play back the stream. For example, if you are viewing the camera mostly on your computer or laptop and you value image quality above all else, then “mainprofile” is the right choice for you. Typically, though, “baseline” is a good choice for all applications. The correct value depends on the power frequency of the country you live in. For instance, North, Central and large parts of South America run on 60 Hz, whereas pretty much the result of the world runs on 50 Hz. You should set this value accordingly. Failure to do so can result in a reduced image quality.“mainprofile” vs. “baseline”The MPEG-4 AVC video codec has three core profiles, two of which are supported by your EasyCamHD. The “baseline” option is the least complex of the profiles. While the video streams generated with “baseline” are typically larger than those encoded with the “mainprofile” option, they are less CPU intensive for the playback device, which is beneficial for mobile devices such as smartphones and tablets. If you are primarily streaming in 720P (1280 x 720), you are not concerned with the CPU usage required in order to play back the stream. For example, if you are viewing the camera mostly on your computer or laptop and you value image quality above all else, then “mainprofile” is the right choice for you. Typically, though, “baseline” is a good choice for all applications. |
Item Explanation
Video & Audio Settings
-Image Parameters
-Video Parameters
-Audio Parameters
Your Manhattan EasyCamHD provides four video profiles, all of which can be set up with a unique image resolution and image quality.
The first three streams be accessed with your Web browser. Stream number four is dedicated to access using a mobile device, such as your smartphone.
First stream
Resolution
Rate:
Frame rate:
Key frame interval:
Video coding control:
1280x720
4096
kbps (32-6144)
30 fps
60
(2-150)
©
Fixed bit rate
。
Variable bit rate
3
(The smaller the value, the better the image quality)
Resolution: This defines the size of the video. The first stream should be set to the maximum resolution of 1280 x 720 pixels, the second stream is limited to 640 x 352 pixels, the third stream is fixed at 320 x 176 pixels, and the mobile stream should be set to a maximum of 640 x 352 pixels.

natural_image
Abstract graphic with circuit board elements and icons (no readable text or symbols)low quality
Rate: If you enable fixed bit rate (see "Video coding control"), then this parameter controls the actual bit rate that the camera uses to encode the video. The higher the value, the better the resulting image quality, and vice versa.

natural_image
Abstract graphic with circuit board and gear icons (no readable text or symbols)The lower the bit rate, the fewer details are visible, and the more compression damage is done to the image.
The higher the bit rate, the sharper and more detailed the image becomes.
high quality
Frame rate: The higher the frame rate, the smoother the video. Note that if you set your camera to 50 Hz, the maximum frame rate is 25 (25 frames per second is considered full-motion video).
Key frame interval: In video compression, only changes that occur from one frame to the next are stored in the data stream in order to greatly reduce the amount of information that must be stored. A key frame, however, is a frame that contains the complete image.
| Item Explanation | |
 | Video coding control: If set to “Fixed bit rate,” the camera will generate a video stream that will always be the same size, regardless of the contents of the frame and regardless of whether or not there is a lot of motion.This setting is useful if you want to make sure that the video will never exceed a certain amount of bandwidth. If you set this paramater to “Variable bit rate,” then you can use the parameter “Video coding quality” to define the desired quality of the video, and the camera will then adjust the required bit rate on the fly based on the the actual image contents (e.g., a lot of movement, no movement). Use this option to activate or deactivate the overlay of the camera name as well as the date and time on the camera live image (see below). Use this option to activate or deactivate the overlay of the camera name as well as the date and time on the camera live image (see below). 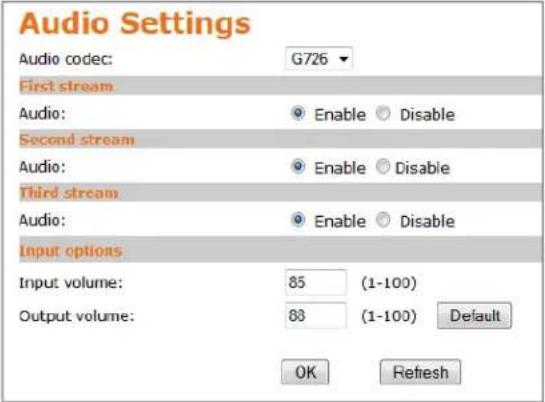 In this section you can enable or disable audio for the individual video streams. You can also define which audio codec you wish to utilize. Use G.726 is you wish to keep the network footprint of the audio portion of your video stream as small as possible, even if it means sacrificing some quality. Use G.711 if sound quality is more important than the size of the data.Finally, you can adjust the input and output volume to fit your needs.Consider this an input and output gain control that works like a pre-amplifier for the audio signals in both directions. In this section you can enable or disable audio for the individual video streams. You can also define which audio codec you wish to utilize. Use G.726 is you wish to keep the network footprint of the audio portion of your video stream as small as possible, even if it means sacrificing some quality. Use G.711 if sound quality is more important than the size of the data.Finally, you can adjust the input and output volume to fit your needs.Consider this an input and output gain control that works like a pre-amplifier for the audio signals in both directions. |
6. Warranty Information
English For warranty information, go to manhattanproducts.com/warranty.
manhattanproducts.com
© IC Intracom. All rights reserved.
Intellinet is a trademark of IC Intracom, registered in the U.S. and other countries.

- manhattan®
- Contents
- Hardware Installation
- Connect to the camera with your computer
- IP Camera
- Video Plug-in Installation Procedure
- Live Video Camera Page
- Configuration Menu, Camera Settings
- Item Explanation
- Networking
- Wireless Network Settings
- Wireless Settings
- Remote Access:
- Alarm Settings
- Audio Alert
- Alarm Actions
- Video & Audio Settings
- First stream
- high quality
- Warranty Information
Brand : MANHATTAN
Model : HomeCam HD
Category : Security Camera