
EP3203R - Screen VIEWSONIC - Free user manual and instructions
Find the device manual for free EP3203R VIEWSONIC in PDF.


| Product Type | Monitor |
| Model | EP3203R |
| Brand | ViewSonic |
| Screen Size | 32 inches |
| Resolution | 1920 x 1080 (Full HD) |
| Refresh Rate | 60 Hz |
| Response Time | 5 ms (typical) |
| Panel Type | IPS |
| Aspect Ratio | 16:9 |
| Brightness | 250 cd/m² |
| Contrast Ratio | 1000:1 (typical) |
| Viewing Angle | 178° / 178° |
| Connectivity | HDMI (2), VGA, Audio Out |
| Power Consumption | 40 W (typical), 0.5 W (standby) |
| Dimensions with Stand (WxHxD) | 28.9 x 20.7 x 8.1 inches |
| Weight with Stand | 14.5 lbs (6.6 kg) |
| VESA Mount | 100 x 100 mm |
| Special Features | Flicker-Free technology, Blue Light Filter, Eco Mode |
| Included Accessories | Power cable, HDMI cable, Quick start guide |
| Cleaning | Wipe with a soft dry cloth. Do not use abrasive cleaners. |
| Safety | Use only with the provided power supply. Do not open the casing. |
| Spare Parts & Reparability | Available from ViewSonic authorized service centers. |
Frequently Asked Questions - EP3203R VIEWSONIC
User questions about EP3203R VIEWSONIC
0 question about this device. Answer the ones you know or ask your own.
Ask a new question about this device
Download the instructions for your Screen in PDF format for free! Find your manual EP3203R - VIEWSONIC and take your electronic device back in hand. On this page are published all the documents necessary for the use of your device. EP3203R by VIEWSONIC.
USER MANUAL EP3203R VIEWSONIC
EP2203r/EP3203r/EP3204r/EP4203r
Multimedia Digital Poster
User Guide
IMPORTANT: Please read this User Guide to obtain important information on installing and using your product in a safe manner, as well as registering your product for future service. Warranty information contained in this User Guide will describe your limited coverage from ViewSonic Corporation, which is also found on our web site at http://www.viewsonic.com in English, or in specific languages using the Regional selection box in the upper right corner of our website. "Antes de operar su equipo lea cu idadosamente las instrucciones en este manual"
Model No. VS15139/VS15140/VS15141
Compliance Information
FCC Statement
This device complies with Part 15 of the FCC Rules. Operation is subject to the following two conditions: (1) this device may not cause harmful interference, and (2) this device must accept any interference received, including interference that may cause undesired operation.
NOTE: This equipment has been tested and found to comply with the limits for a Class A digital device, pursuant to Part 15 of the FCC Rules. These limits are designed to provide reasonable protection against harmful interference when the equipment is operated in a commercial environment. This equipment generates, uses, and can radiate radio frequency energy and, if not installed and used in accordance with the instructions, may cause harmful interference to radio communications. Operation of this equipment in a residential area is likely to cause harmful interference in which case the user will be required to correct the interference at his own expense.
- Reorient or relocate the receiving antenna.
- Increase the separation between the equipment and receiver.
- Connect the equipment into an outlet on a circuit different from that to which the receiver is connected.
- Consult the dealer or an experienced radio/TV technician for help.
Warning: To comply with the limits for the Class A digital device, pursuant to Part 15 of the FCC Rules, this device must be installed in computer equipment certified to comply with the Class A limits. All cables used to connect the computer and peripherals must be shielded and grounded. Operation with non-certified computers or non-shielded cables may result in interference to radio or television reception. Changes and modifications not expressly approved by the manufacturer could void the user's authority to operate this equipment.
For Canada
CAN ICES-3 (B)/NMB-3(B)
Important Safety Instructions
- Read these instructions completely before using the equipment.
- Keep these instructions in a safe place.
- Heed all warnings.
- Follow all instructions.
- Do not use this equipment near water. Warning: To reduce the risk of fire or electric hock, do not expose this apparatus to rain or moisture.
- Do not block any ventilation openings. Install the equipment in accordance with the manufacturer's instructions.
- Do not install near any heat sources such as radiators, heat registers, stoves, or other devices (including amplifiers) that produce heat.
- Do not attempt to circumvent the safety provisions of the polarized or grounding-type plug. A polarized plug has two blades with one wider than the other. A grounding type plug has two blades and a third grounding prong. The wide blade and the third prong are provided for your safety. If the plug does not fit into your outlet, consult an electrician for replacement of the outlet.
-
Protect the power cord from being tread upon or pinched, particularly at the plug, and he point where if emerges from the equipment. Be sure that the power outlet is located near the equipment so that it is easily accessible.
-
Only use attachments/accessories specified by the manufacturer.
-
Use only with the cart, stand, tripod, bracket, or table specified by the manufacturer, or sold with the equipment. When a cart is used, use caution when moving the cart/equipment combination to avoid injury from tipping over.

-
Unplug this equipment when it will be unused for long periods of time.
-
Refer all servicing to qualified service personnel. Service is required when the unit has been damaged in any way, such as: if the power-supply cord or plug is damaged, if liquid is spilled onto or objects fall into the unit, if the unit is exposed to rain or moisture, or if the unit does
Declaration of RoHS2 Compliance
This product has been designed and manufactured in compliance with Directive 2011/65/EU of the European Parliament and the Council on restriction of the use of certain hazardous substances in electrical and electronic equipment (RoHS2 Directive) and is deemed to comply with the maximum concentration values issued by the European Technical Adaptation Committee (TAC) as shown below:
| Substance | Proposed Maximum Concentration | Actual Concentration |
| Lead (Pb) 0.1% < 0.1% | ||
| Mercury (Hg) 0.1% < 0.1% | ||
| Cadmium (Cd) 0.01% < 0.01% | ||
| Hexavalent Chromium ( Cr^6+ ) 0.1% < 0.1% | ||
| Polybrominated biphenyls (PBB) 0.1% < 0.1% | ||
| Polybrominated diphenyl ethers (PBDE) 0.1% < 0.1% |
Certain components of products as stated above are exempted under the Annex III of the RoHS2 Directives as noted below:
Examples of exempted components are:
- Mercury in cold cathode fluorescent lamps and external electrode fluorescent lamps (CCFL and EEFL) for special purposes not exceeding (per lamp):
(1) Short length ( ≤ 500 mm): maximum 3.5 mg per lamp.
(2) Medium length (>500 mm and ≤1,500 mm): maximum 5 mg per lamp.
(3) Long length (>1,500 mm): maximum 13 mg per lamp.
- Lead in glass of cathode ray tubes.
- Lead in glass of fluorescent tubes not exceeding 0.2% by weight.
- Lead as an alloying element in aluminium containing up to 0.4% lead by weight.
- Copper alloy containing up to 4% lead by weight.
- Lead in high melting temperature type solders (i.e. lead-based alloys containing 85% by weight or more lead).
- Electrical and electronic components containing lead in a glass or ceramic other than dielectric ceramic in capacitors, e.g. piezoelectronic devices, or in a glass or ceramic matrix compound.
Copyright Information
Copyright ^© ViewSonic ^® Corporation, 2013. All rights reserved.
ViewSonic ^© , the three birds logo, OnView, ViewMatch, and ViewMeter are registered trademarks of ViewSonic Corporation.
Disclaimer: ViewSonic Corporation shall not be liable for technical or editorial errors or omissions contained herein; nor for incidental or consequential damages resulting from furnishing this material, or the performance or use of this product.
In the interest of continuing product improvement, ViewSonic Corporation reserves the right to change product specifications without notice. Information in this document may change without notice.
No part of this document may be copied, reproduced, or transmitted by any means, for any purpose without prior written permission from ViewSonic Corporation.
Product Registration
To meet your future needs, and to receive any additional product information as it becomes available, please register your product on the Internet at: www.viewsonic.com.
The ViewSonic® Wizard CD-ROM also provides an opportunity for you to print the registration form, which you may mail or fax to ViewSonic.
For Your Records
Product Name:
EP2203r/EP3203r/EP3204r/EP4203r
ViewSonic Multimedia Digital Poster
Model Number:
VS15139/VS15140/VS15141
Document Number:
EP2203r/EP3203r/EP3204r/EP4203r_UG_ENG
Rev. 1C 04-24-13
Serial Number:
Purchase Date:
Product disposal at end of product life
ViewSonic respects the environment and is committed to working and living green. Thank you for being part of Smarter, Greener Computing. Please visit ViewSonic website to learn more.
USA & Canada: http://www.viewsonic.com/company/green/recycle-program/
Europe: http://www.viewsoniceurope.com/uk/support/recycling-information/
Taiwan: http://recycle.epa.gov.tw/recycle/index2.aspx
Contents
Packing list.... 1
1. Product Introduction...... 1
1.1 Overview ...... 1
1.2 Product function .... 1
1.3 I/O ports introduction....2
1.4 Supported media files format 2
2. Remote Control....3
3. Main Menu Operation Instructions .... 4
3.1 System Settings 5
3.2 Playback Control 7
3.3 Network Settings 9
3.4 Date & Time....13
3.5 On / Off Timer....14
3.6 Screen Mode 17
3.7 File Management....18
3.8 Exit 18
4. Other Setting....19
4.1 Source Setting....19
4.2 Image Setting 19
5. ePoster Manager Express Plus Introduction......20
5.1 Installation 20
5.2 Playlist Creation 25
5.3 Player Settings .... 31
5.4 Save to USB....32
5.5 Terminal Creation 34
6. Content Update......36
6.1 Update content directly....36
6.2 Update content via ePoster Manager Express Plus....36
7. PhotoShop Guidelines....37
Packing list
In the carton, you will find the following:
Multimedia Digital Poster
Remote control
Power cable
User manual CD wizard
Quick Start Guide
1. Product Introduction
1.1 Overview
High definition Multimedia Digital Poster, support picture, video, text, time & date, 1080P HD media files. ePoster Manager Express Plus software can provide multi zone function for both horizontal and vertical mode, customized template is available for users with different requirement.
1.2 Product function
● Built in 4GB flash memory, can store thousands of high definition pictures
- Plenty of different transition modes are available
● Support scrolling text function
- Set the timer On/Off function by daily and weekly
- Set different schedule, and playback it accordingly
● Horizontal and vertical modes are available
● Support multi zone screen function, different templates are available
● An external media player can be used via the screens VGA or HDMI input ports
● High security, encryption function can be used to protect the content
- Read media files from USB stick directly, or input the media files from USB stick to internal flash memory
1.3 I/O ports introduction

- RESET: Restart button for the unit
● LAN: Network port, connect it with internet
● HDMI: High definition HDMI signal input port
● VGA: VGA signal input port
● Audio: Audio input port - USB: USB stick port, used to input media files
The unit can playback media files from internal flash memory or USB stick directly.
1.4 Supported media files format
| Image | File extension *.jpg, *.jpeg, *.gif, *.bmp, *.png |
| Codec Standard RGB | |
| Max. image resolution Baseline :JPG : 4096 x 4096GIF : 1920 x 1080BMP : 1920 x 1080PNG : 1920 x 1080 | |
| Max. file name length 128 letters |
| Video | File extension *.mpg, *.avi, *.mkv, *.flv, *.mov, *.mp4, *.rm, *.rmvb, *.ts, *.tp | |
| Codec & Bitrate MPEG-1 | bitrate<20MbpsMPEG-4bitrate<20MbpsH.264bitrate<20MbpsAVCbitrate<20MbpsVC-1bitrate<20MbpsRMbitrate<20Mbps | |
2. Remote Control
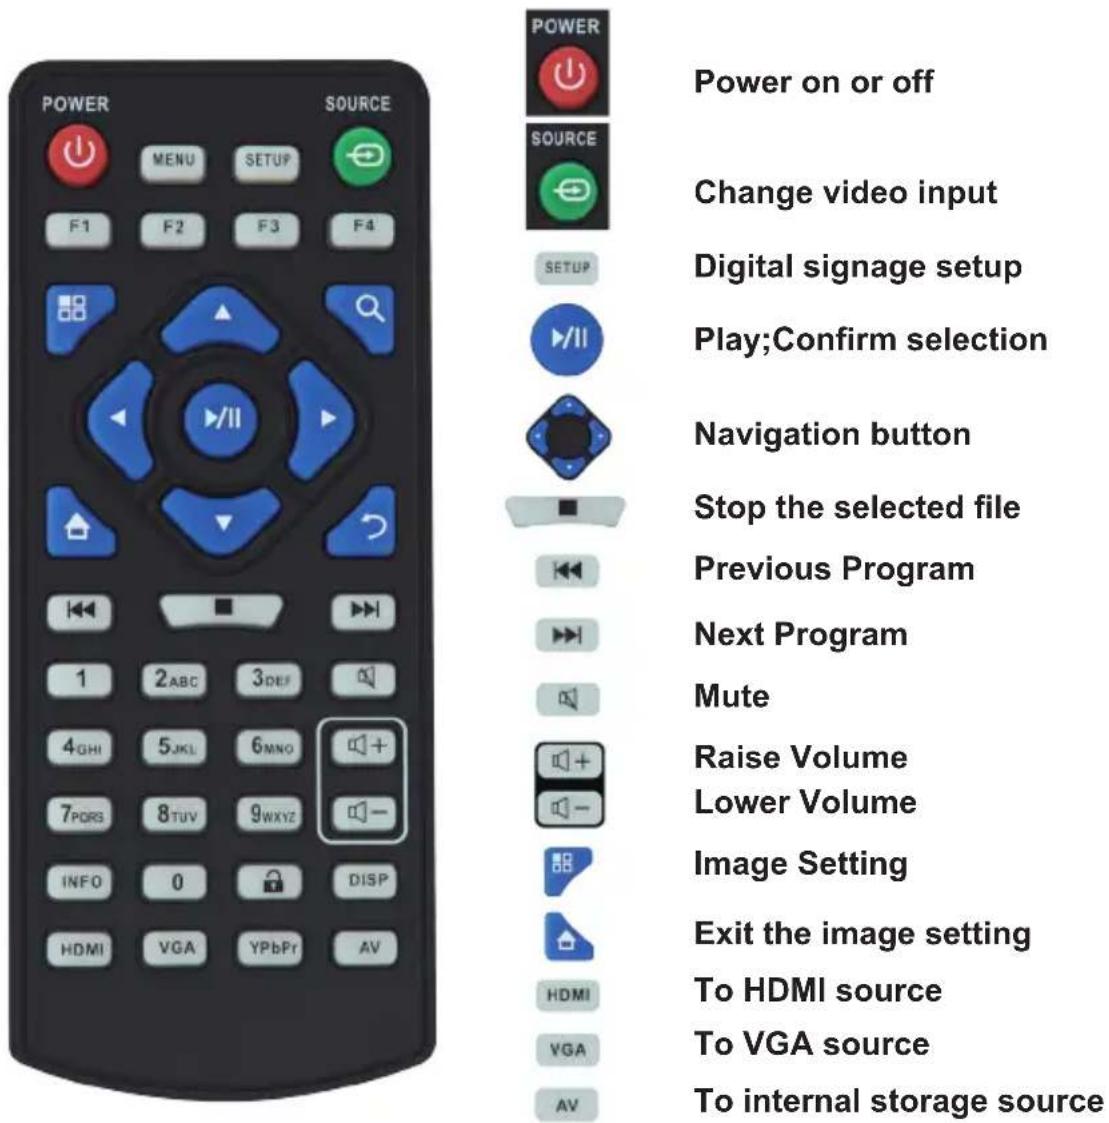
Notice:
- The buttons don't mention above are reserved for work with other version in the future.
- The setup button (SETUP) only works in Internal Storage channel
3. Main Menu Operation Instructions
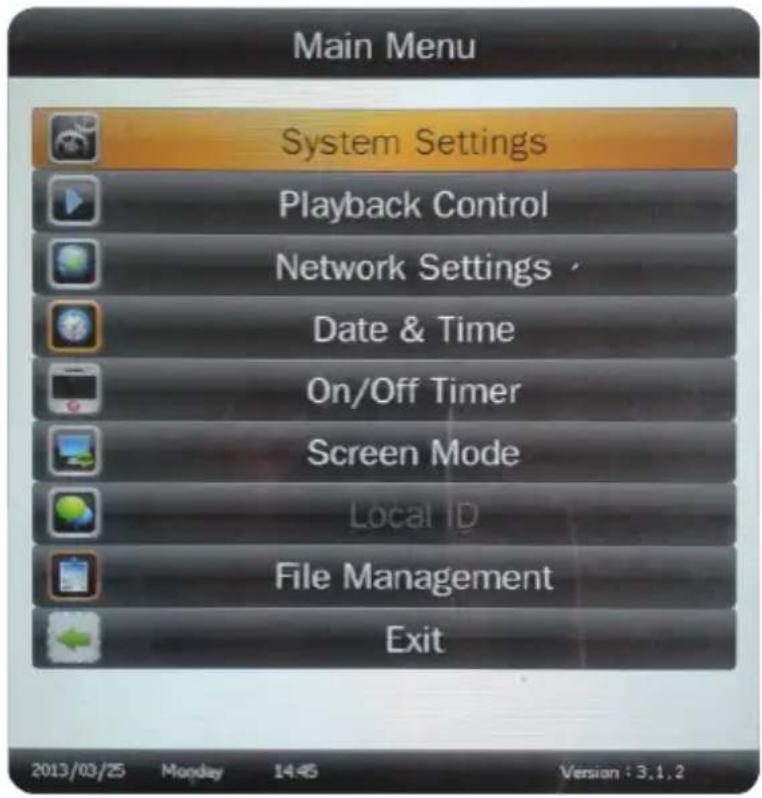
Currently, the digital poster has 8 menu functions: System Settings, Palyback Control, Network Settings, Date & Time, On/Off Timer, Screen Mode, File Management and Exit.
3.1 System Settings
Press Setup button to enter the Main Menu setup interface. Press Up, Down buttons to select System Settings, and press Play button to display System Settings options. There are 7 options available in all: OSD Lnaguage, Clock Display, Scrolling Text, USB Port, Sync. Settings, Restore to Factory Settings and Return to Main Menu.
OSD Language: Simplified Chinese, English
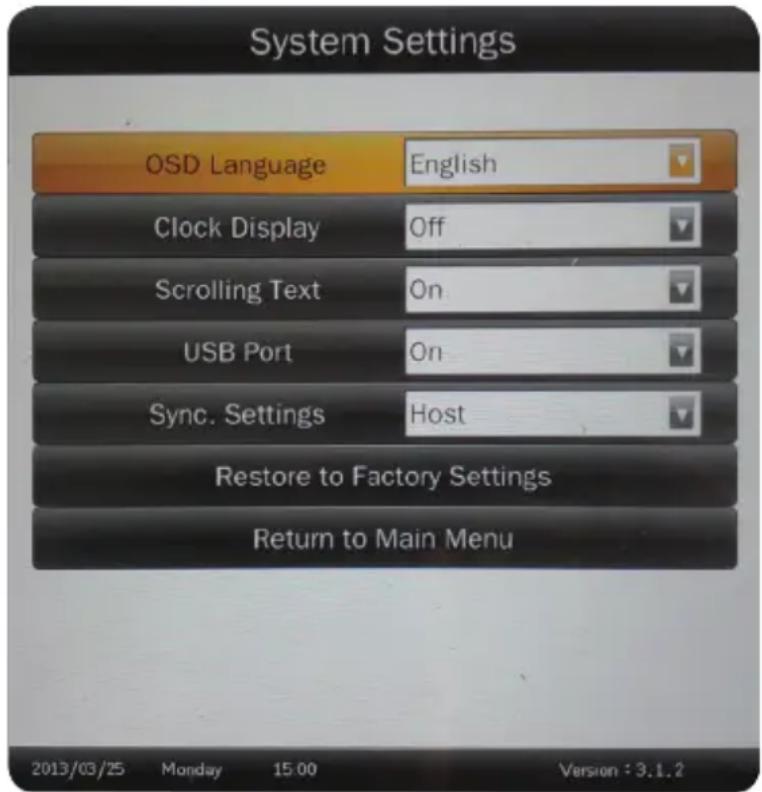
Clock Display: Top Left, Bottom Left, Top Right, Bottom Right, Off.
Scrolling Text: Off or On.
USB Port: On or Off
Sync. Settings: Off, Host, Slave.
Note: When Host or Slave had selected, Previous Program and Next Program functions will disable.
Restore to Factory Settings: Restore the menu settings to default.
3.2 Playback Control
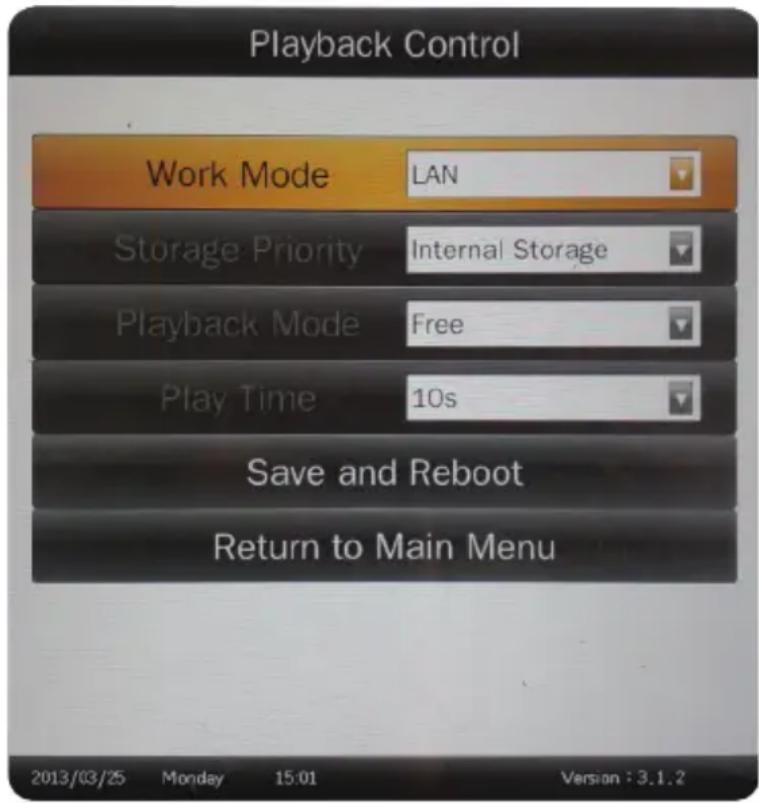
Work Mode
This is used to set the Multimedia Digital Poster to Stand-alone or LAN mode.
- Stand-alone: Storage Priority, Playback Mode and Play Time functions will enable.
● LAN: Network settings will enable.
Note: When Work Mode has changed, please select Save and Reboot first.
Storage Priority
This is used to set the Multimedia Digital Poster to read media files from Internal Storage or USB Disk. There are two options as pictured below:
- Internal Storage: The Multimedia Digital Poster reads media files from internal storage only.
- USB Disk: The Multimedia Digital Poster reads media files from USB disk only.
Playback Mode
There are three options as pictured below:
- Free: The user copies the media files into USB stick and the Multimedia Digital Poster will read it directly
- Encrypted: The user makes playlist with encryption by using the ePoster Manager Express Plus software, the Multimedia Digital Poster will read the media files after verifying password. (The default password is 12345678)
- None Encrypted: The user makes playlist without encryption by using the ePoster Manager Express Plus software, the Multimedia Digital Poster will read the media files directly.
Note: Under the Free Playback Mode, the Multimedia Digital Poster will playback the media files according to the file name. For example, it will playback like this: 001.avi, 002.jpg, 003.mov, or a.avi, b.jpg, c.mov.
Do Not use special characters in the file name (!@#¥%&* ), and blank space is not supported.
Play Time
This is used to set the play time for pictures under the Free Playback Mode and is not valid for video file.
Save and Reboot
After change the Work Mode, please select Save and Reboot first.
3.3 Network Settings
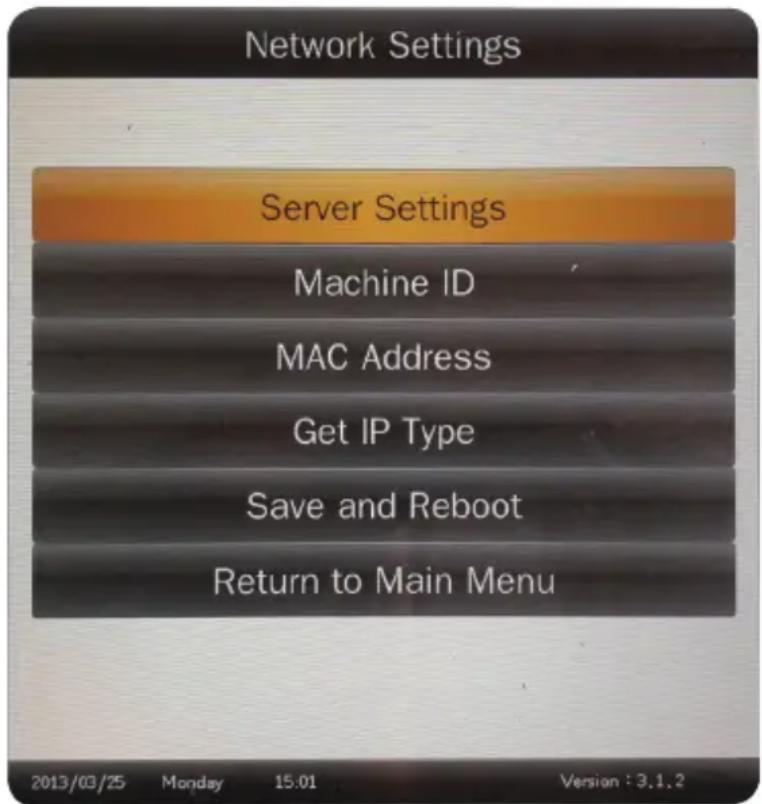
The terminal has been set before delivery from factory. You cannot change Local ID or MAC Address. You can set Server Settings and Get IP Type according to the current network environment through the remote control.
Press Setup button to enter menu setup home page. Press Up, Down buttons to select Network Settings, and press Play button to display Network Settings options. There are totally 6 options available: Server Settings, Machine ID, MAC Address, Get IP Type, Save and Reboot and Return to Main Menu.
Server Settings
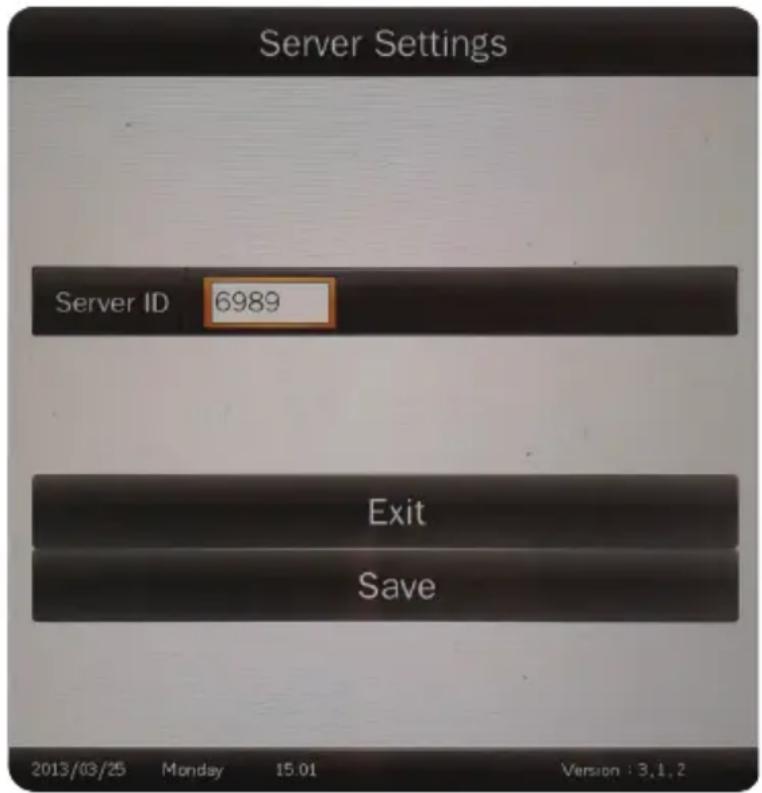
Select Server Settings menu, and press PLAY button to confirm. If you need to modify the Server ID, you can press PLAY button to display the numeric soft keyboard. Use the naviga-tion buttons on the remote control to select numbers on the soft keyboard. The range is 0000\~9999. Select Save to exit the settings.
Machine ID
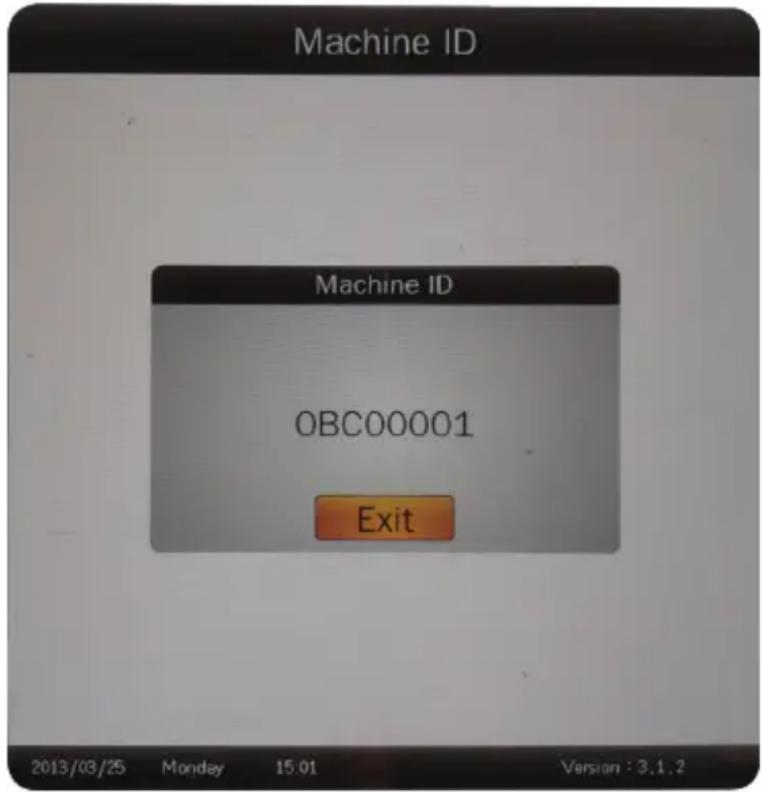
Machine ID is the serial number (SN) of the terminal and can only be viewed.
MAC Address
This information can only be viewed.
Get IP Type
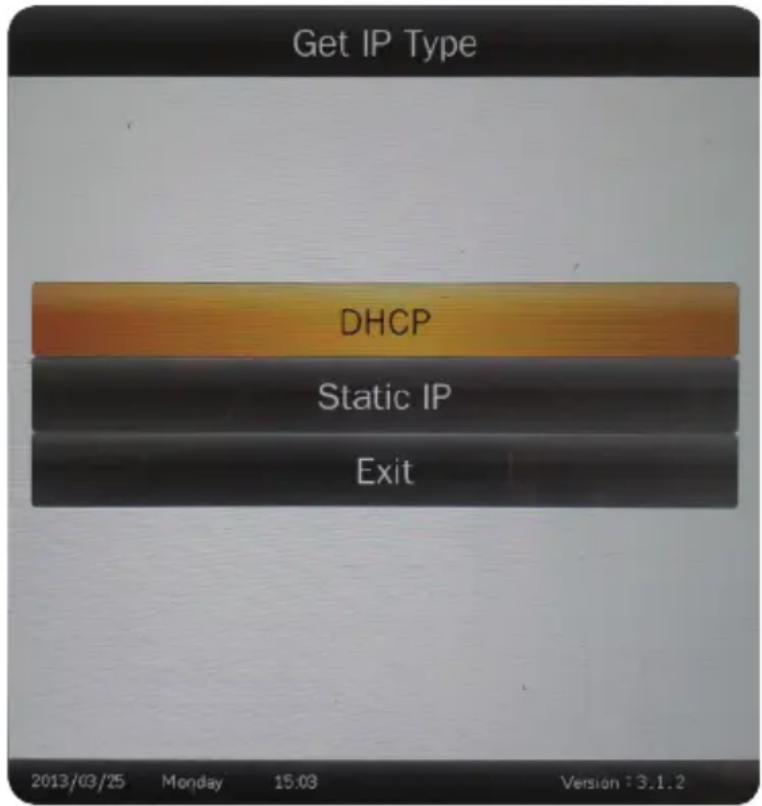
DHCP and Static IP available. The former can obtain an IP address automatically; the latter can be specified through the soft keyboard.
Save and Reboot
Select the Save and Reboot menu to save your settings.
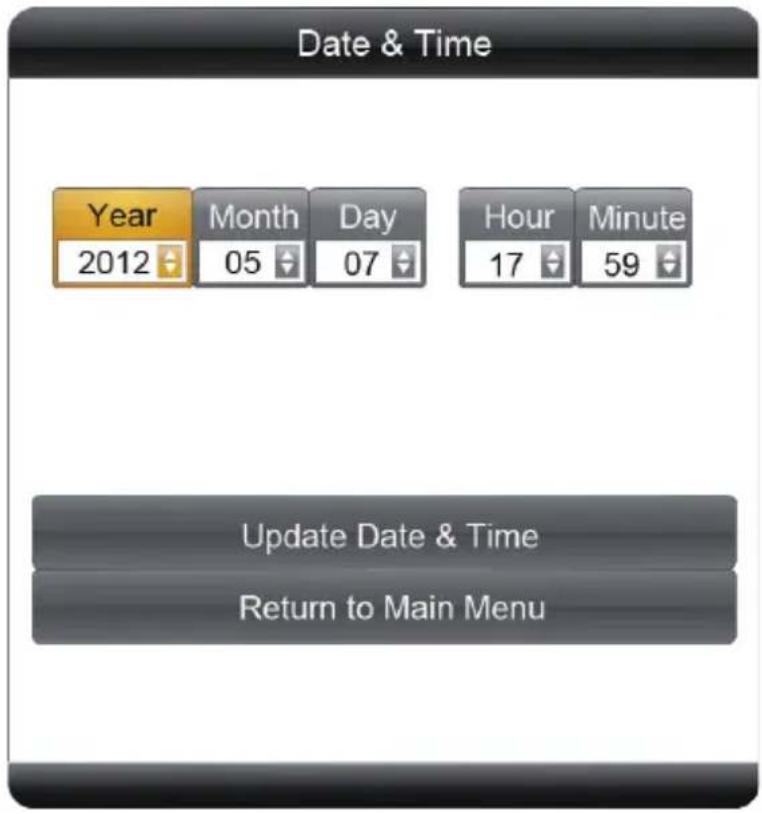
3.4 Date & Time
Use Left and Right buttons to select Year, Month, Day, Hour or Minute. When one option is selected, press Up and Down buttons to specify the values. After changes are made, press Left and Right buttons to select Update Date & Time then press Play button to save.
3.5 On / Off Timer
Two settings available: Weekly, Daily.
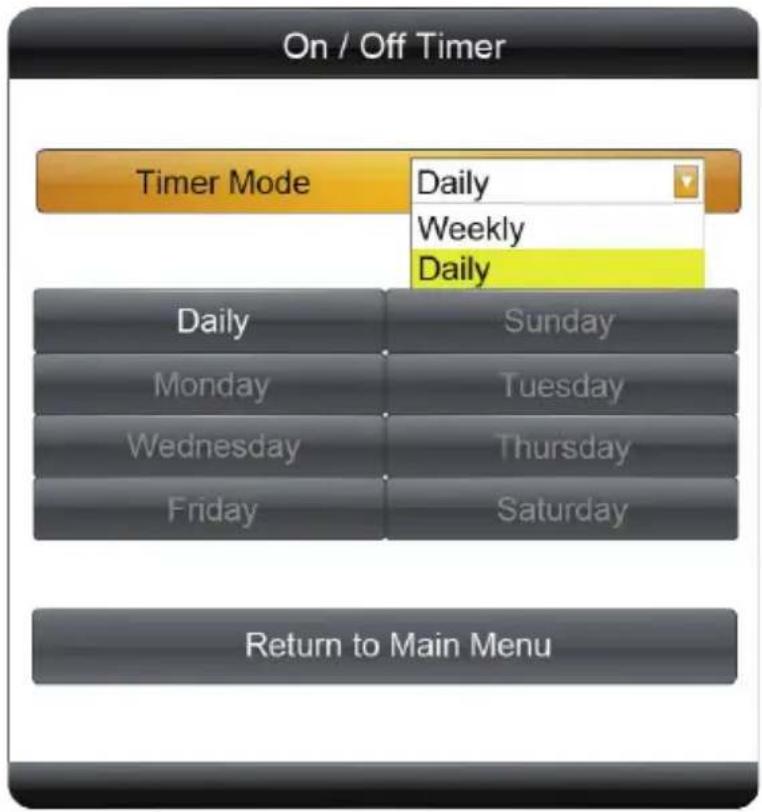
- Weekly
Set different values for each day in a week. You can set to Time On/Off from Monday to Friday, set Saturday and Sunday. User can set the on/off timer weekly. For example, Sunday, 09:00 on, 22:00 off:
- Select Weekly in the On/Off Timer menu, press PLAY/PAUSE to confirm.
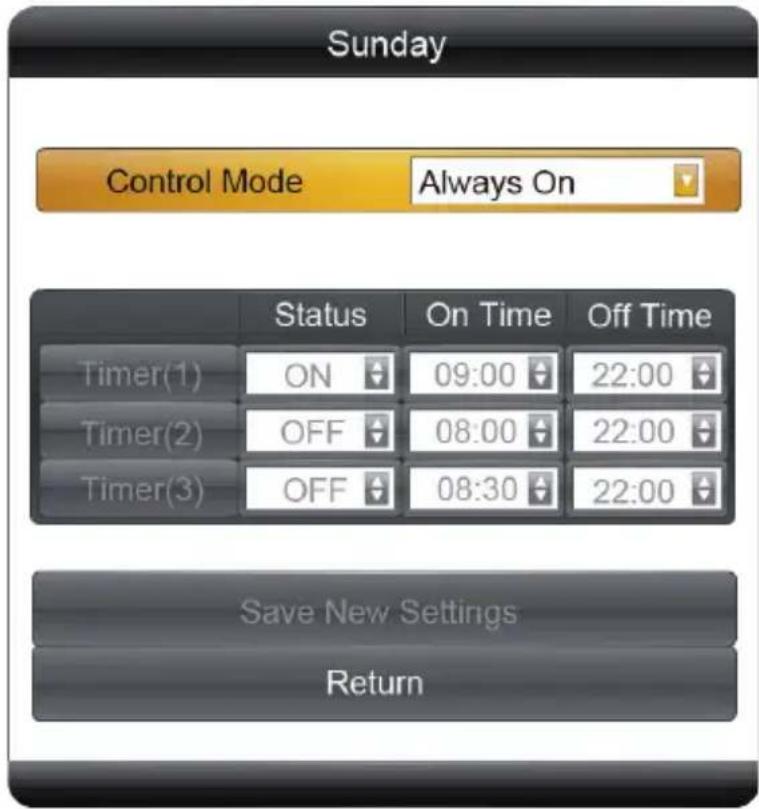
- Select Control Mode to Timer, then three Timer items are valid.
- Set Status of Timer(1) to ON, then adjust On Time to 09:00 and Off Time to 22:00.
- Select Save New Settings to finish the setting
Note: When using multiple schedules only 1 schedule can have an ON value greater than the OFF value. (Over night)
- Daily
Set the same value from Monday to Sunday.
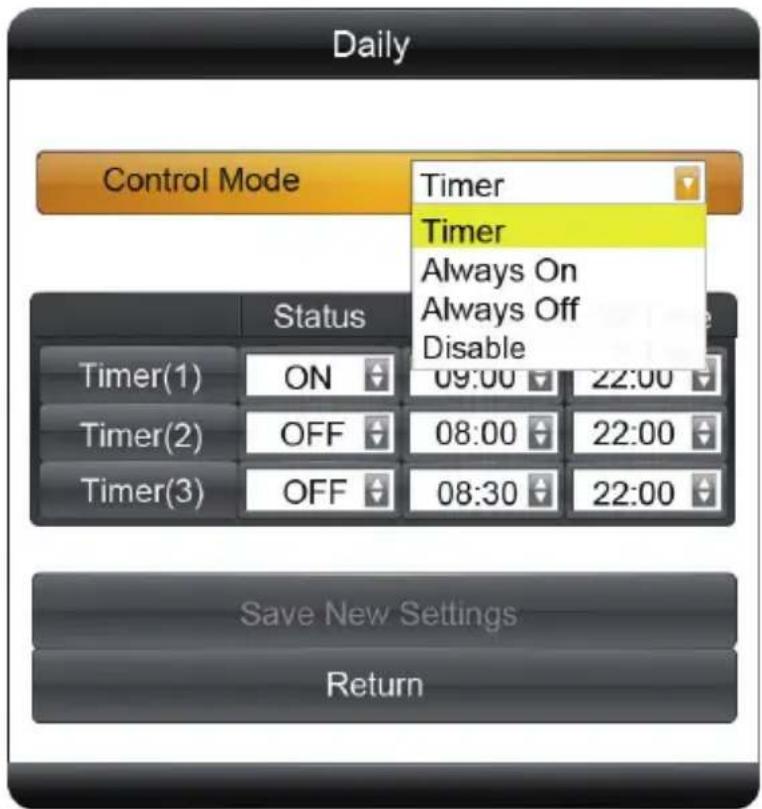
There are 4 items in Control Mode:
A. Timer: user can set 3 Timers, each timer can set "On" or "Off".
B. Always On: after connecting the power cable, the product will keep power on.
C. Always Off: after connecting the power cable or turn on the unit by remote control, the product will power off automatically one minute later.
D. Disable: turn on and off normally.
Note: When using multiple schedules only 1 schedule can have an ON value greater than the OFF value. (Over night)
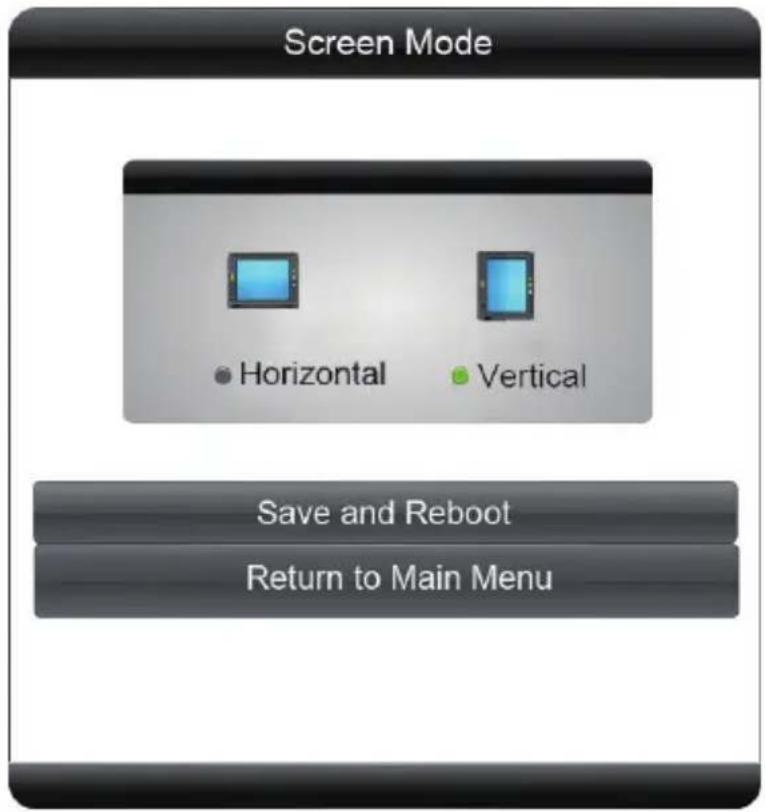
3.6 Screen Mode
Set the screen to horizontal or vertical display for landscape or portrait use.
3.7 File Management
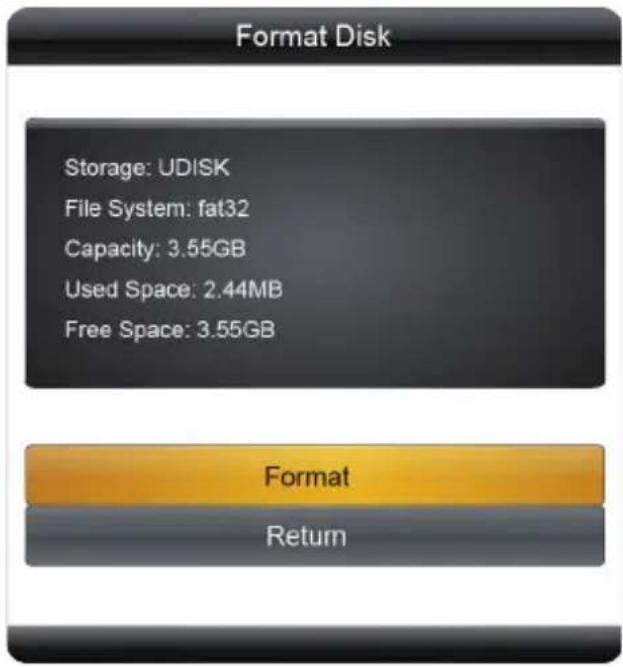
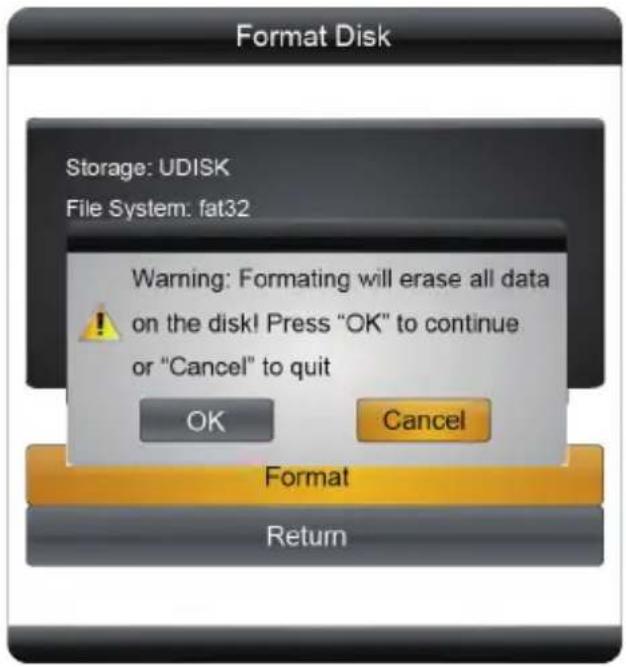
Here user can check the storage and Format the disk. Format Disk will erase all data.
3.8 Exit
Exit the main menu.
4. Other Setting
4.1 Source Setting
Press button on remote control. There are HDMI, VGA, and Internal Storage for selection.
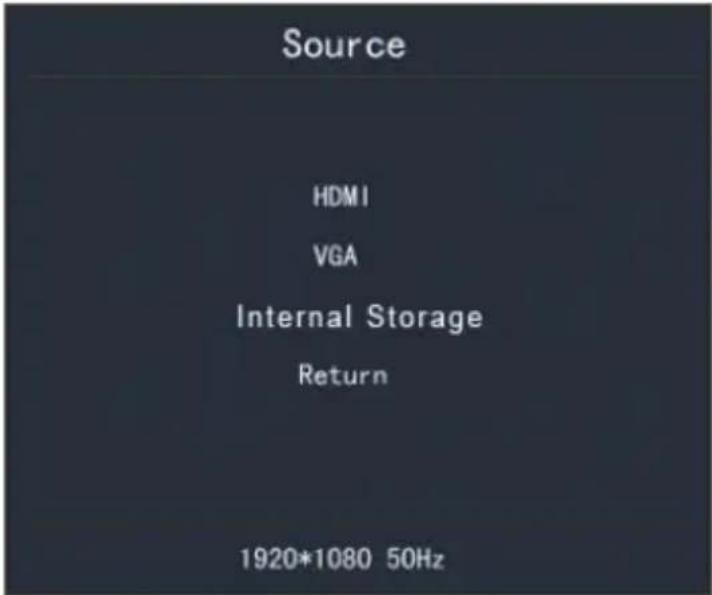
HDMI: Display the content from external HDMI signal port
VGA: Display the content from external VGA signal port
Internal storage: Display the content from internal storage
4.2 Image Setting
Press to set Brightness, Contrast, Saturation, Color Temp and Reset.
Press to exit the image setting or waiting 5 sec. to exit automatically.
5. ePoster Manager Express Plus Introduction
ePoster Manager Express Plus is a fantastic solution for digital signage, it is an innovation that entertain while maximizing the impact of your message. Create your own signage content by using your PC and the free ePoster Manager Express Plus software.
Transfer that content by using a USB stick and plug it into the LCD display to run the content, no additional hardware is needed.
5.1 Installation
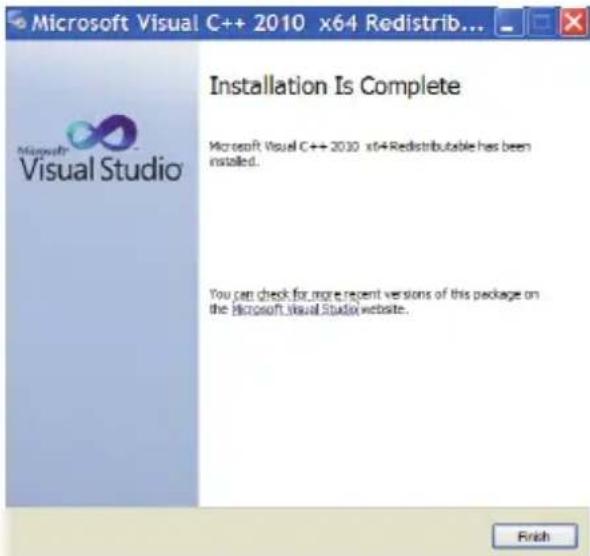
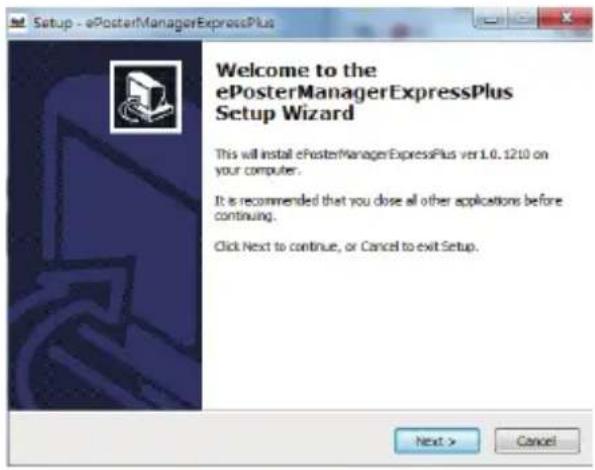
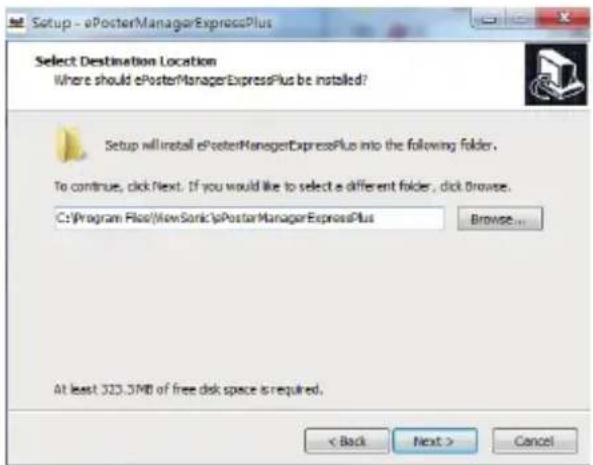
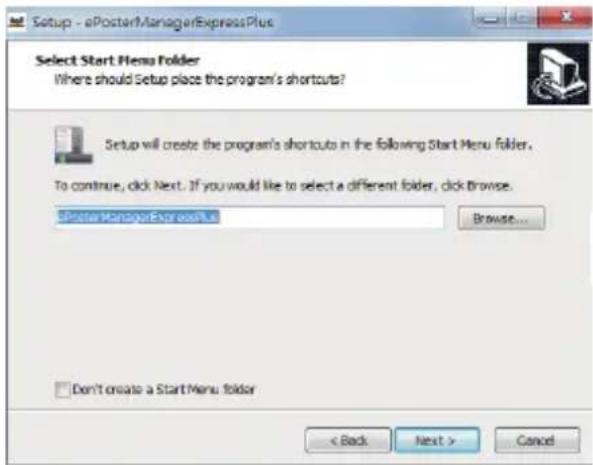
Double click on the installer "ePosterManagerExpressPlus.exe" and follow the on-screen instructions.
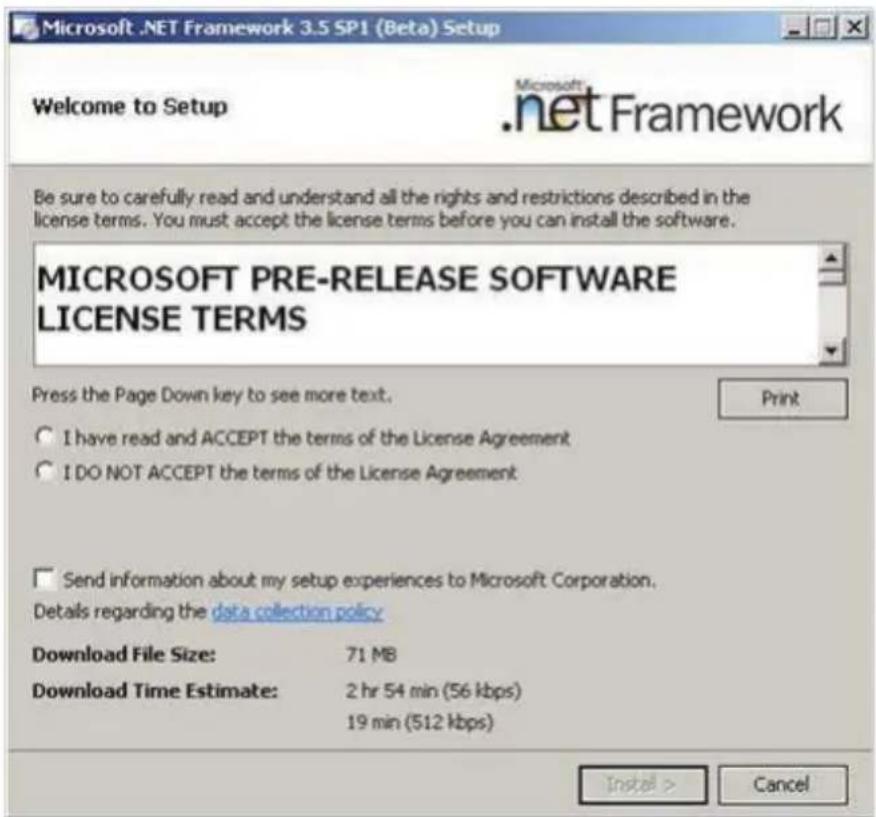
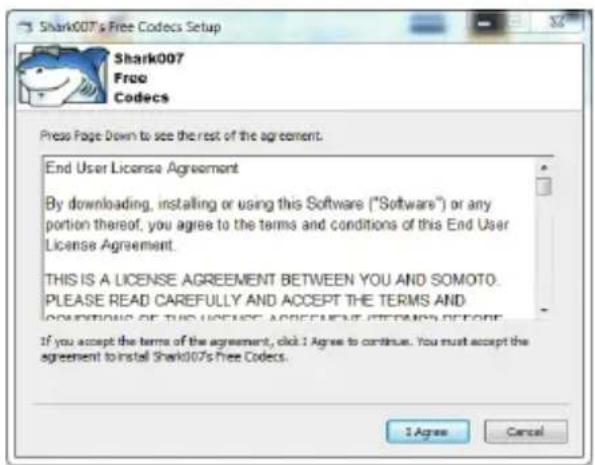
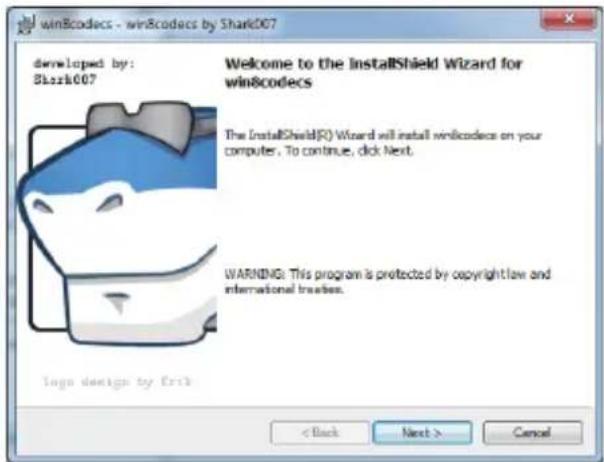
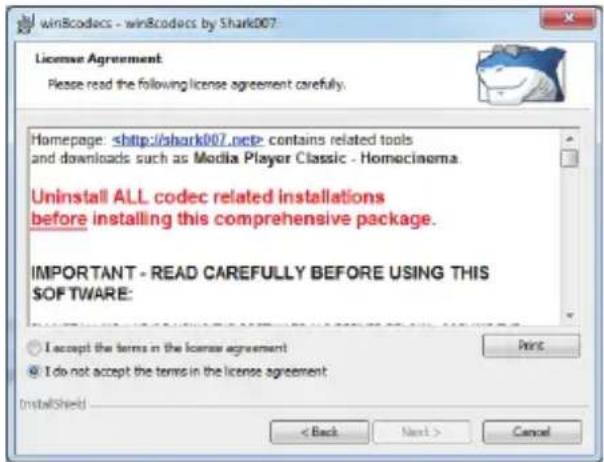
Note: If your computer has never install Microsoft .Net Framework, FinalCodecs and Vcredist_X86 files, the procedure will ask you to install these files first.
● Install Microsoft .Net Framework
Note: Win 8 OS PC needs to connect to internet for download procedure.
- Install FinalCodecs


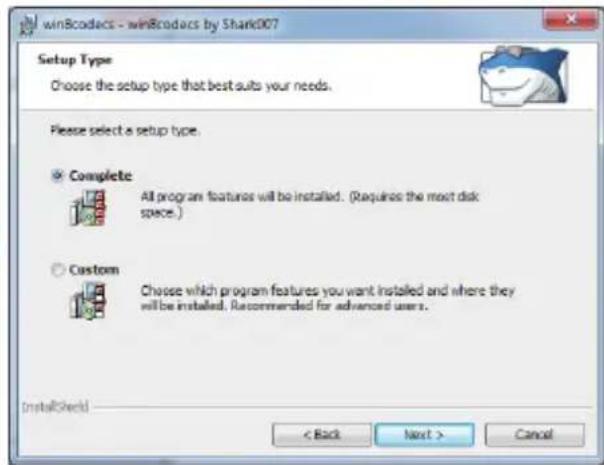
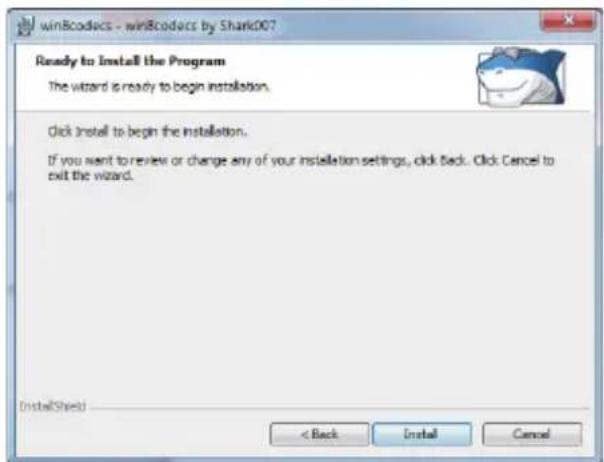

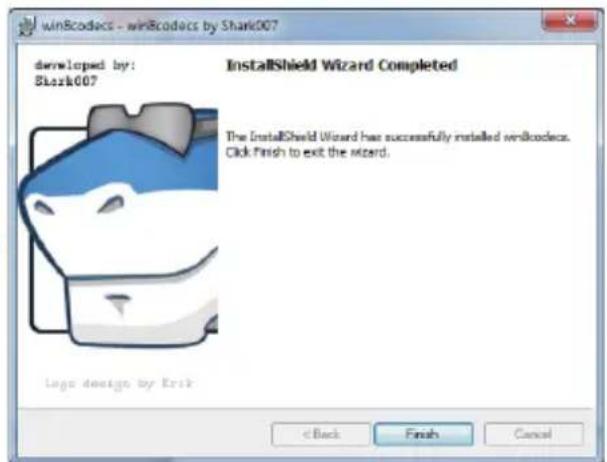
- Install Visual C++
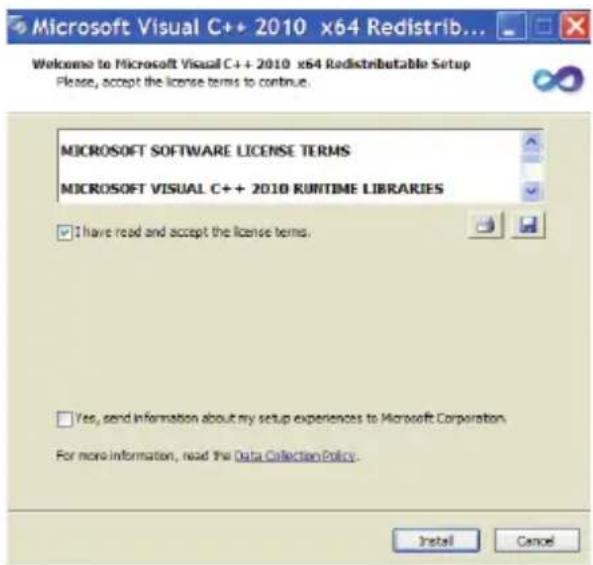

• Install ePoster Manager Express Plus


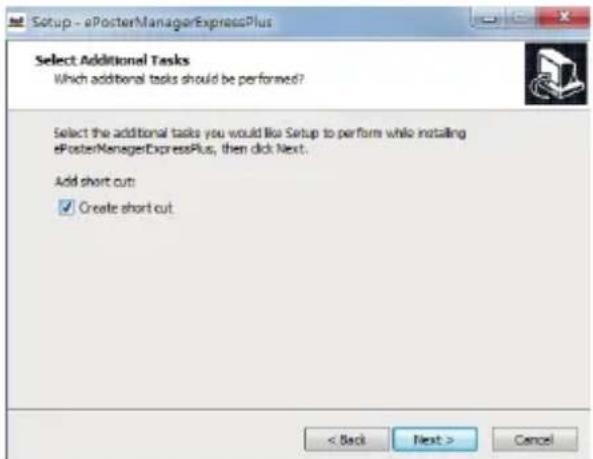
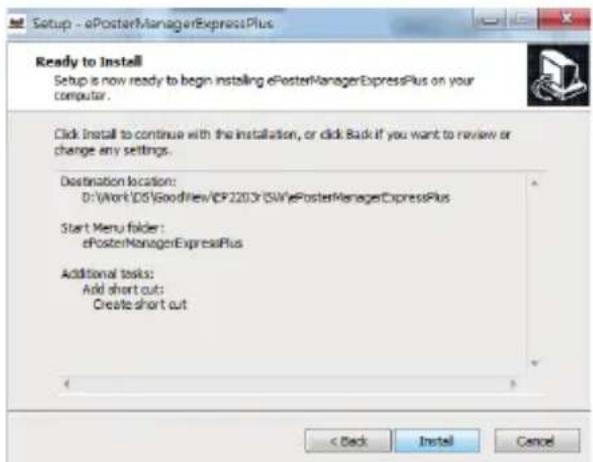

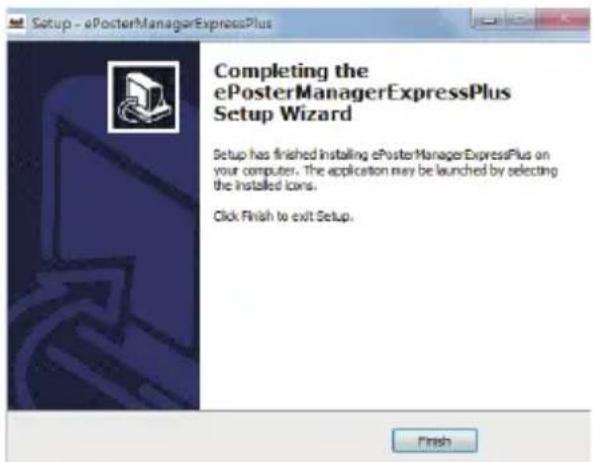
Programming Mode Interface
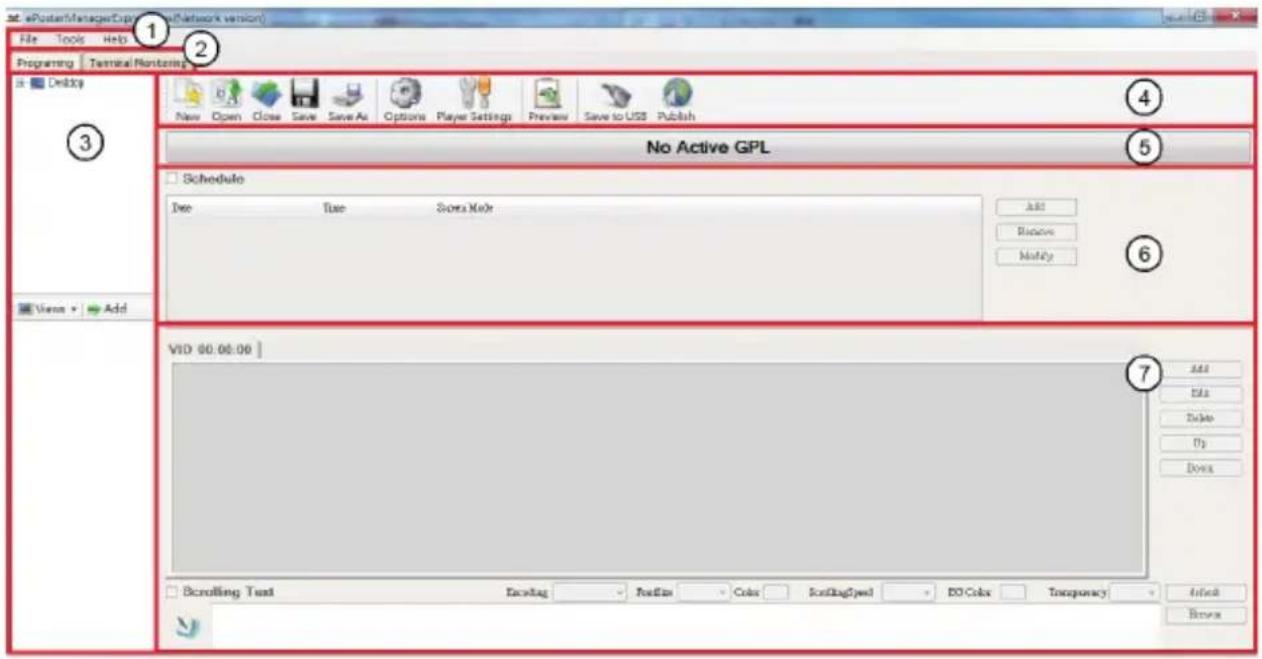
- Menu Bar: Provide access to all the features of this software.
- To display Programming or Terminal Monitoring mode.
-
Media Library: Help user to locate media files on your computer and give previews in the bottom box. Supported formats include:
-
Video: *.mpg, *.mpeg, *.avi, *.mp4, *.divx, *.vob, *.mkv, *flv, *.mov, *.rm, *.rmvb, *.ts, *.tp
• Image: jpg, bmp, png, gif, jpeg
• Audio: mp3, wma, ogg, aac, wav -
Text: txt
-
Tool Bar: Provide access to the main functions.
• New - create a new program.
- Open - open a program file already exists.
- Close - close all the current works and clear the work space.
- Save/Save As - save your current work with the name as *.gpl.
- Options – allow user to setup a playback duration and transition style for all the images.
- Player Settings – allow the user to change the settings on their screens.
- Preview - preview the current file.
- Save to USB - save the content and schedule a USB disk.
- Publish - send the content and schedule to selected ePoster directly.
- Program Name: Display the name of the current program. It will be named as Untitled-*.gpl by default.
- Schedule Section: Define the start and end time of a file, as well as the screen layout.
- Playlist Section: Allow user to add media files to the playback zones.
5.2 Playlist Creation
- New Screen
First choose the screen mode.
Click File -> New in the menu bar or click the button New on the tool bar to get below dialog box.
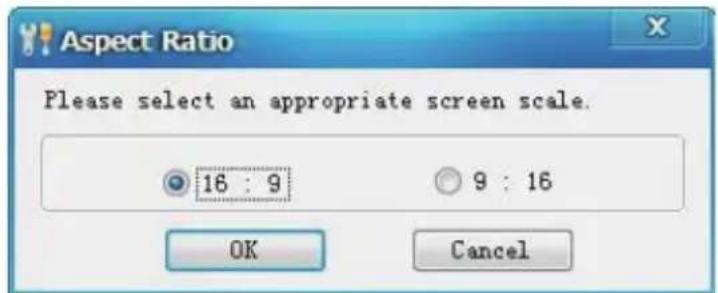
Select the appropriate screen mode, this must be the same as the screen mode in the main menu, otherwise it will affect the display performance.
- Schedule
User can set the schedule according to the requirement.

Add – add an extra new schedule
Remove - delete the selected schedule
Modify - edit the selected schedule
To add a new schedule, click Add to get Schedule Editor as below.
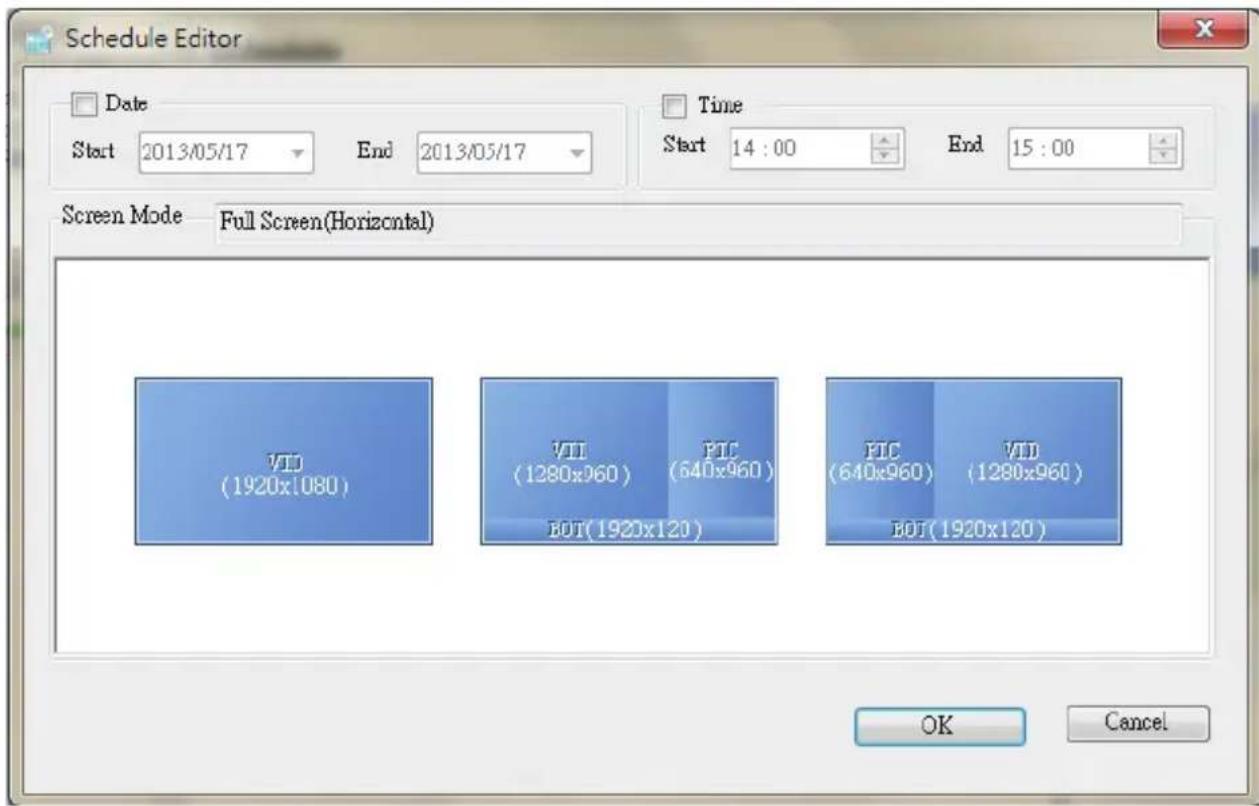
Selecting the checkboxes Date and Time allows the user to setup the playback duration. It also allows user to change the screen mode.
TIPS 1: There are three Screen modes for option as example under 16:9: VID which can display videos or pictures only, VID+PIC+BOT which can display videos on left, pictures on right and scrolling text at bottom, PIC+VID+BOT which can display pictures on left, videos on right and scrolling text at bottom.
Below is the suggested size of the media files.
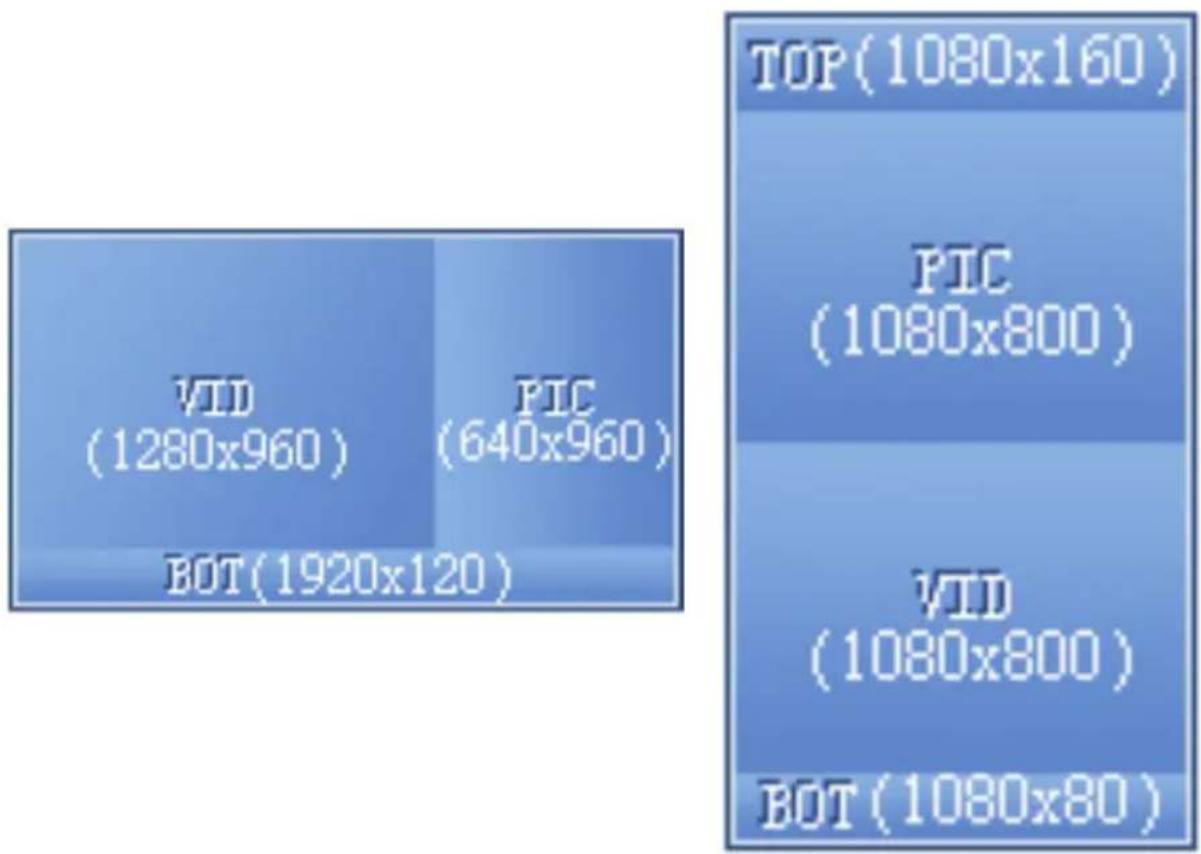
other
| Category | Value | | :--- | :--- | | VTD (1280x960) | 1280 | | PIC (640x960) | 640 | | BOT (1920x120) | 1920 | TOP (1080x160) | 1080 | PIC (1080x800) | 800 | VTD (1080x800) | 800 | BOT (1080x80) | 80 |TIPS 2: One period time allows one schedule only, otherwise conflict alert will be given. If you don't set the Date and Time, the content will display continually.
The playlist with specific playback date and time will be played prior to those with no pre-definition. Take the following schedule for example:
| Date | Time | Screen Mode |
| ----/--/-- | -- : -- | Full Screen(Horizontal) |
| 2012-05-16 -> 2012-05-16 | 13 : 00 -> 14 : 00 | Split1 VID(L)+PIC(R)+BOT |
The second playlist will be played first during 13:00->14:00 on 2012-05-16 and the first playlist will be played second.
- Set up Playlist
Playlist section allows user to add media files to playback zones to setup a playlist.
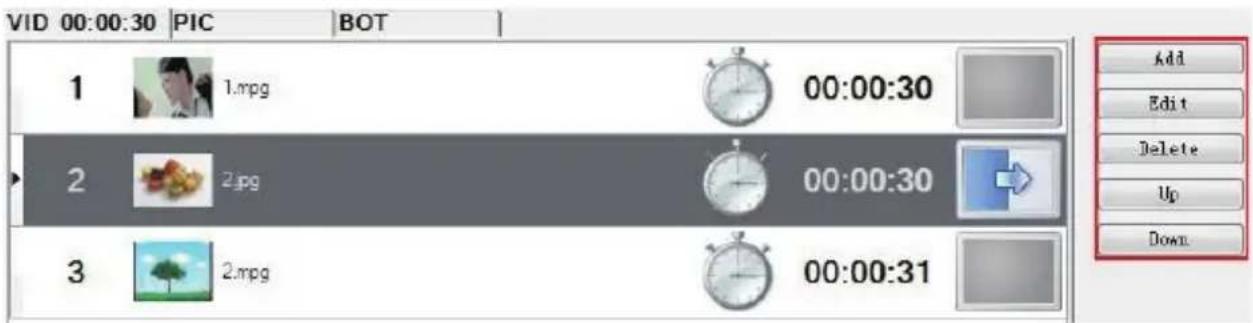
Click the relevant tab title to edit content for the zone:
VID - video zone, PIC - image zone, BOT - bottom zone
Add - Add a media file to the current zone.
Edit - Allow user to edit a media file in the playlist.
Delete - Remove a media file from the playlist.
Up/Down - Allow user to adjust the playback sequence of listed items.
For example, in VID tab, clicking Add to get PlayList Item Editor.
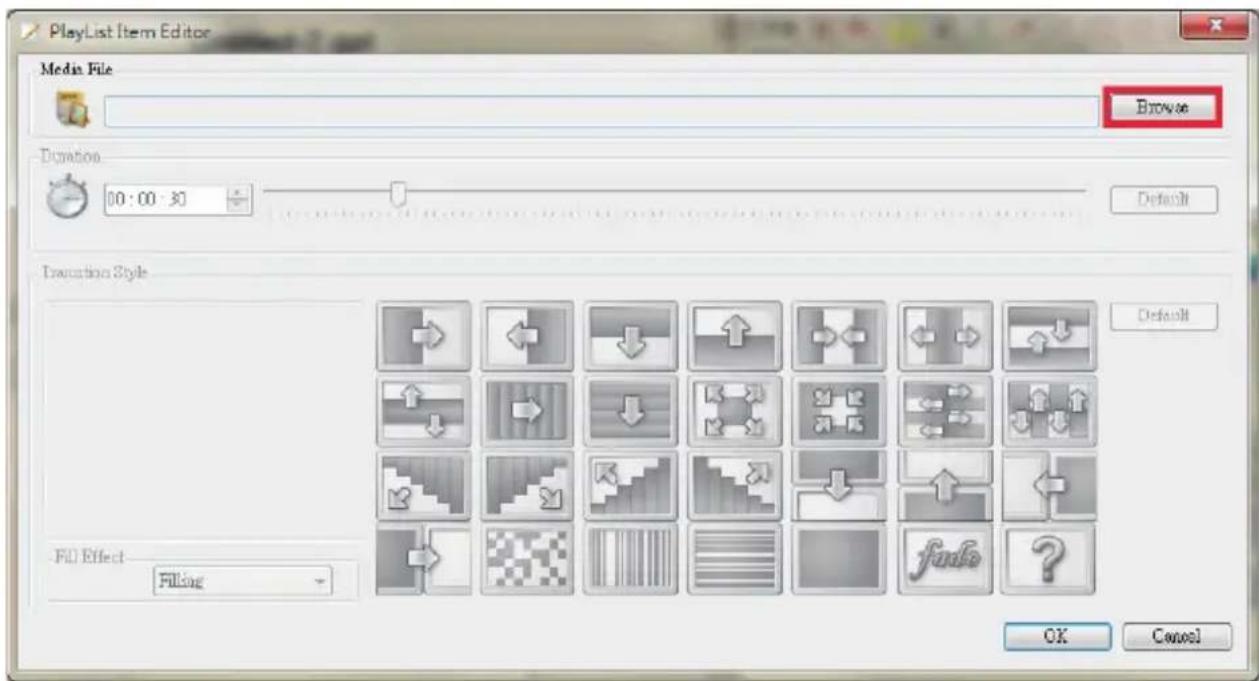
Media File
To add video, image and audio file, click the button Browse in PlayList Item Editor window.
TIPS: User can only click the Add button in Media Library part to add media files.
NOTE: Only image files can be added to PIC and BOT zones.
The maximum number of media files is 100 for PIC and BOT zones. Only one media file can be added to BOT zone.
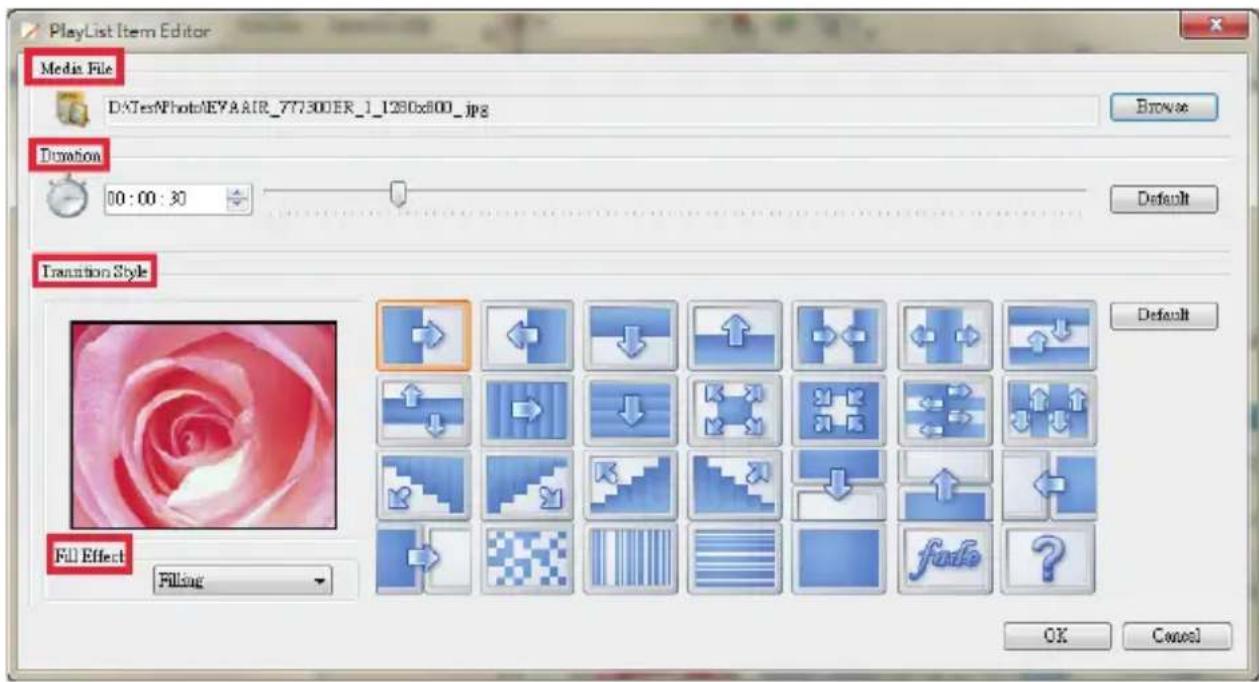
The Duration and Transition Style portions will only be available when an image is selected as the media file.
Duration: Set the period that the image will be played. User can define the playback duration for each image by entering a figure in the time box or dragging the time bar. The supported maximum duration is 2 hours.
Transition Style: The transition effect is used to introduce the next image. User can define the transition style for each image.
Fill Effect: The fill effect is used to change the image ratio to fit the screen or not.
TIPS: The Options button in the Tool Bar allows you to setup a uniform duration and transition style for all images.
Scrolling Text: To add or edit scrolling text, select the checkbox at the lower part of the Playlist section.

- To add a scrolling text, click the button Browse to select a pre-prepared text file which will then be displayed in the edit box.
NOTE: Only *.text file is supported. - To edit a scrolling text, just enter the text in the edit box.
- To delete a scrolling text, just uncheck Scrolling Text.
User can set the Encoding, Font size, Color, Scrolling speed, back ground color and Transparency of the scrolling text.
The scrolling text will be displayed at the bottom of the screen in full-screen mode, or in BOT zone in split-screen mode.
Now the user can preview and save the finished playlist.
5.3 Player Settings
The Player Settings button on the tool bar allows user to make settings on the player. These settings can be imported to the player via the feature Save to USB.
TIPS: To import these settings to players, the user needs to enable this feature by clicking Player Settings box in the Save to USB window.
Click Player Settings to get the window pictured below:
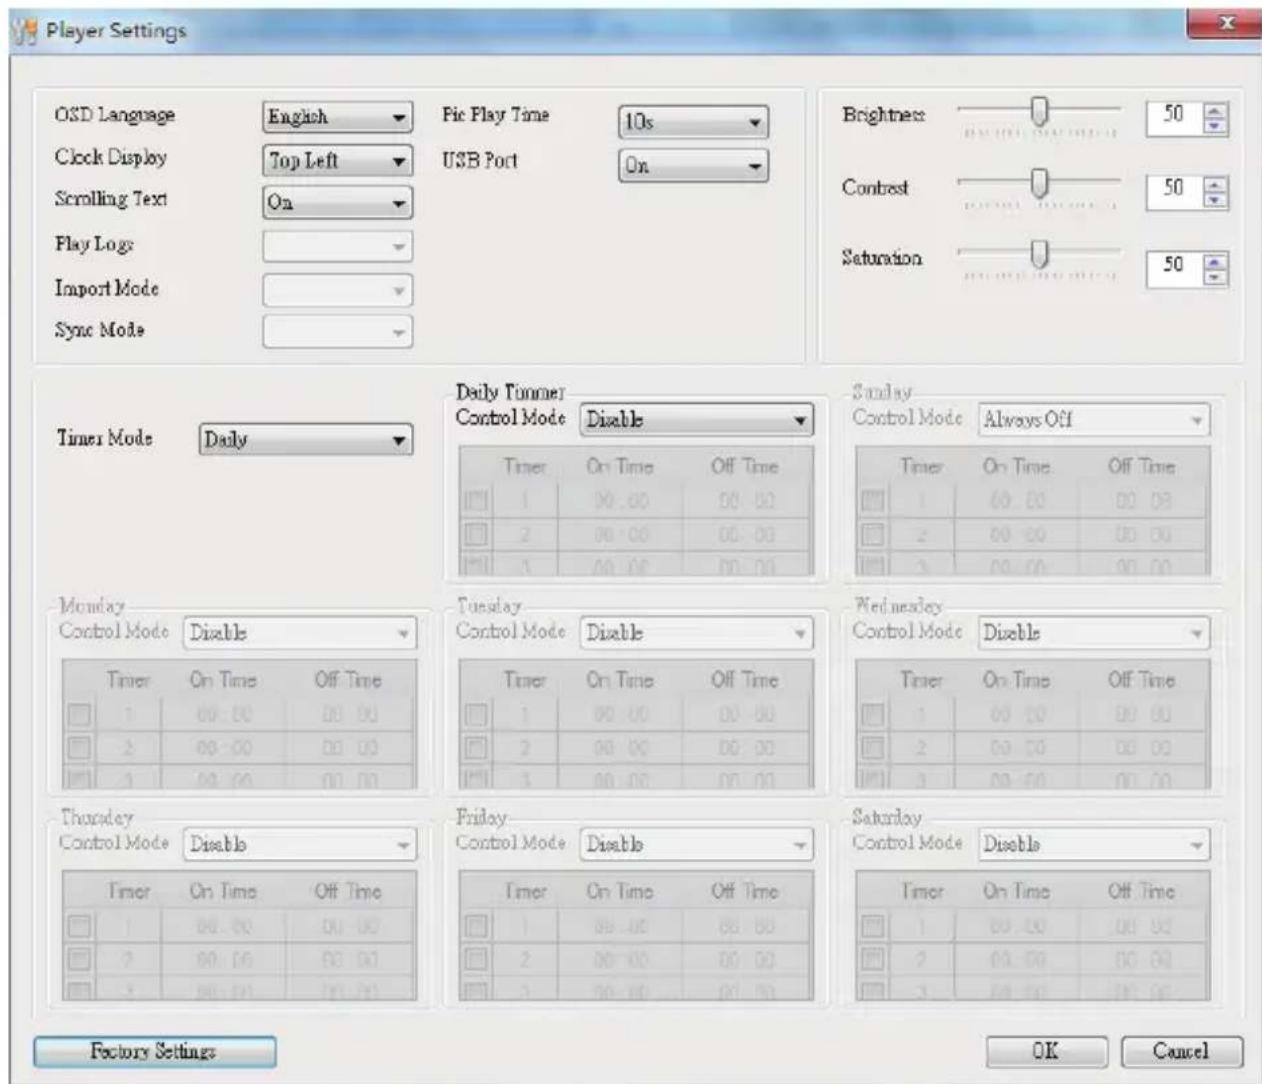
The above menu is the same as the Main Menu set by remote control.
5.4 Save to USB
The function Save to USB allows user to save the finished playlist to a USB disk for input into LCD display.
Click Save to USB in the Tool bar or click Tools -> Save to USB.
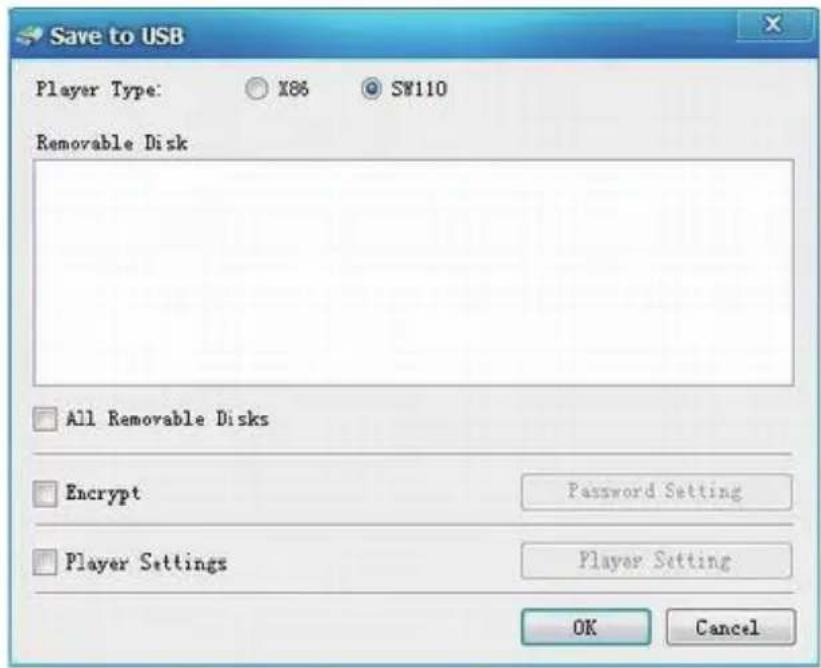
- Select the player type, X86 or SW110. SW110 is for standalone type LCD display.
- Insert a USB disk, and then select the disk you wish to save to.
- Choose whether to encrypt the playlist. This step is not necessary.
Select the checkbox Encrypt to enable this function. Then click the button Password Setting to change the password if necessary.
Please note that the password should be the same as the player password, otherwise the playlist cannot be imported into the LCD display.
TIPS: The password can also be setup via Tools -> Password Setting, and the player password via Tools -> Player Password Update. The default password is 12345678.
● Player Settings. This step is not necessary.
Select the checkbox Player Settings to enable this function. Then click the button Player Setting to change the settings if necessary.
TIPS: The player settings will be packed together with the playlist and then imported into LCD display. This step is not necessary.
Click OK to finish.
Terminal Monitoring Mode Interface
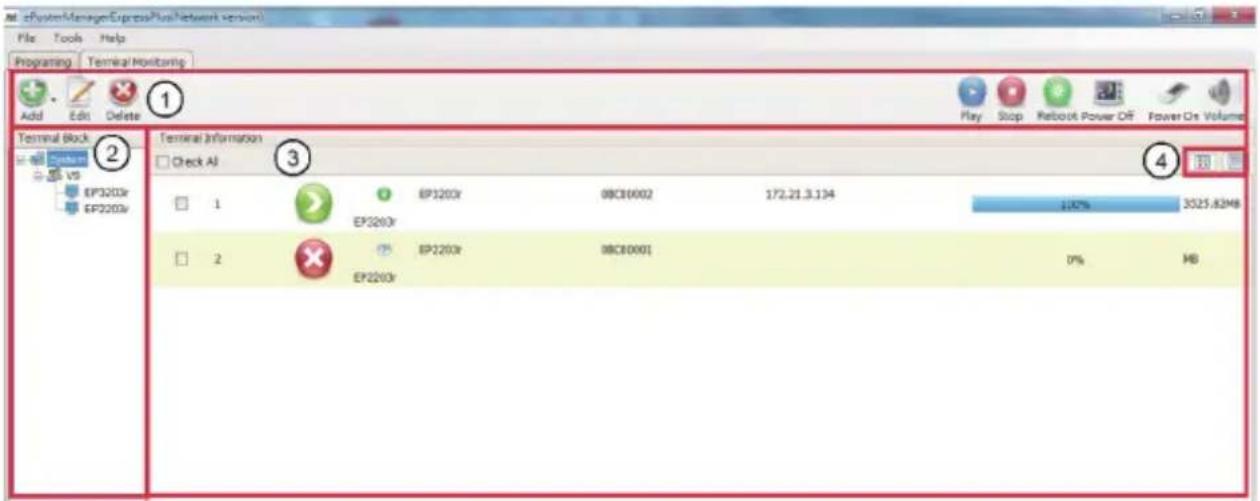
- Tool Bar: Provide access to the main functions.
- To create, edit or delete group or terminal. - To publish play, stop, reboot, power off, power on or volume order to the selected terminal.
-
Terminal Block: Help user to locate group or terminal.
-
Terminal Information: To display terminal status. First times to catch the status, it'll spend 3min..
5.5 Terminal Creation
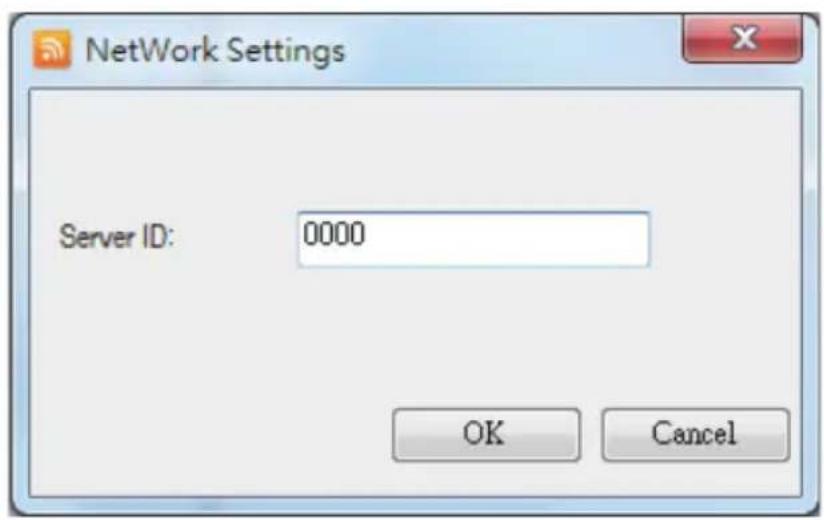
- Server ID setting
Click Tools / NetWork Settings -> The number must the same as ePoster Server ID.
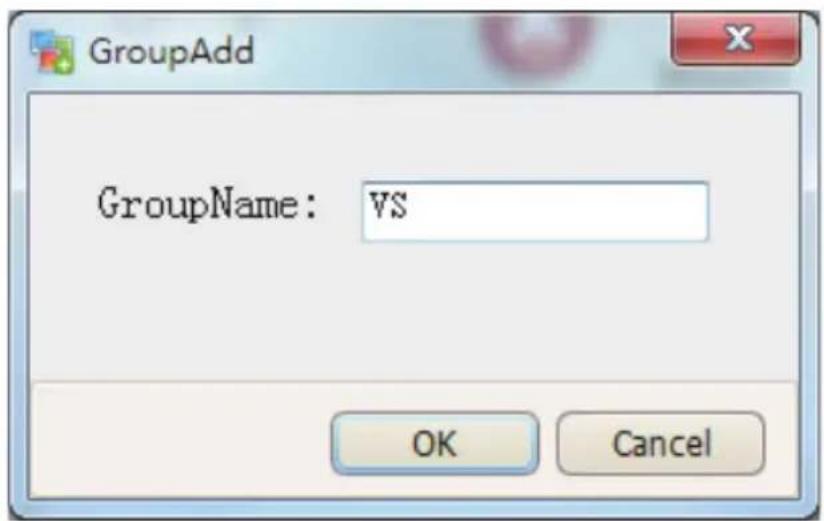
- Add Group and Terminal
To select Terminal Monitoring mode, to add Group first.
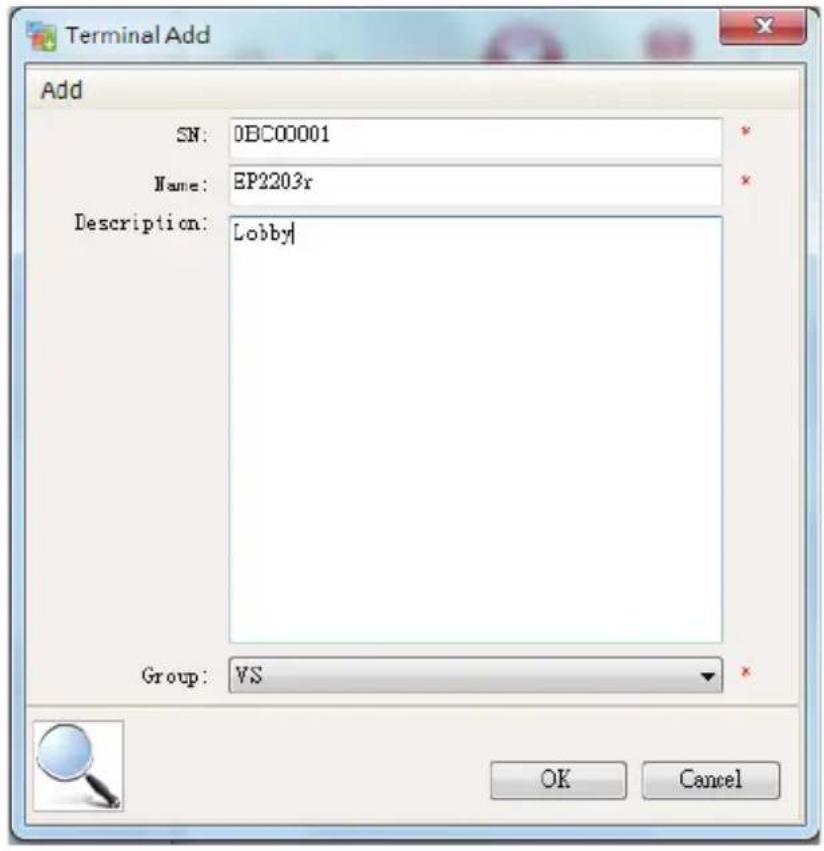
To add Terminal, please make sure SN must the same as Machine ID, Name and Description can be any word you want to fill in. Group item needs to be selected then select OK.
6. Content Update
6.1 Update content directly
If user doesn't want to use ePoster Manager Express Plus to make playlist, they can copy their media files into a USB stick, and plug it into the USB port of the LCD display.
If the Storage Priority in Playback Control Menu is set to USB Disk, then the LCD display will playback the media files directly.
If the Storage Priority in Playback Control Menu is set to Internal Storage, then the media files will be imported into the internal storage, and will playback the media files after they are uploaded.
6.2 Update content via ePoster Manager Express Plus
After making a playlist and saving it to the USB successfully by ePoster Manager Express Plus, plug the USB into the USB port of the LCD display.
If the Storage Priority in Playback Control Menu is set to USB Disk, then the LCD display will playback the media files in the playlist directly.
If the Storage Priority in Playback Control Menu is set to Internal Storage, then the playlist will be imported into the internal storage, and will playback the media files after they are uploaded.
7. PhotoShop Guidelines
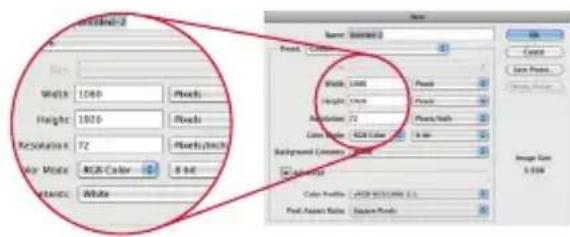

Create your Graphic at 1920 x 1080 pixels (1366 x 768 for the 32" ePosters) at 72 DPI – 150 DPI (dots per inch). Use higher DPI if the image is for print use.
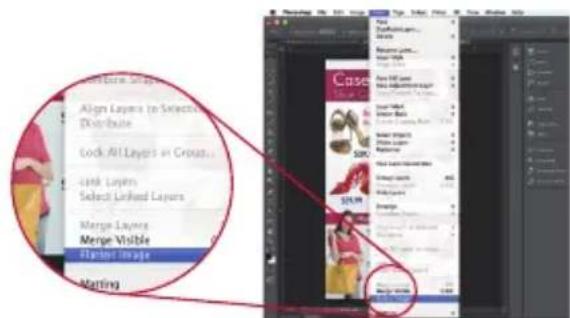

Ensure you flatten the image if there are multiple layers. (Menu: Layer / Flatten Image)
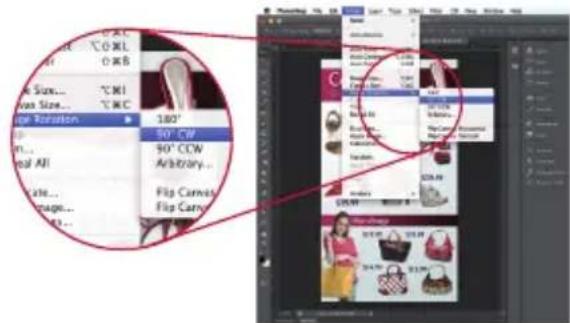

Rotate the image 90 degrees clockwise. (Menu: Image / Image Rotation / 90 degree CW)
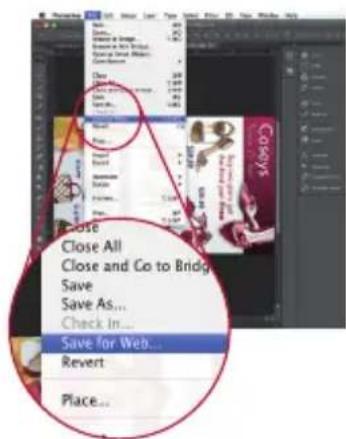

Finally, Save the image as a web file (Menu: File / Save for Web) with the following options:
- Change the dropdown menu from GIF (default) to JPEG
- Set the quality to High or Very High. Note the higher the quality, the larger the file will be.
- Optimized is checked
- Convert to sRGB is checked
- Change Metadata to None
- Save the file name without spaces and no special characters such as / \ <> | : &
![Preset: [Unnamed] JPEG Very High Progressive Optimized Embed Color Profile Convert to sRGB Preview: Monitor Color Metadata: None Color Table](/content/2026/05/1068668/images/201ea6cf4f37caf683471d209c1d004b95d0132efa2510f14c9b6843656bc8a6.jpg)
Customer Support
For technical support or product service, see the table below or contact your reseller.
Note : You will need the product serial number.
| Country/Region Website | T = TelephoneF = FAX | ||
| Australia/New Zealand www.viewsonic.com.au | AUS= 1800 880 818NZ= 0800 008 822 | service@au.viewsonic.com | |
| Canada www.viewsonic.com | T (Toll-Free)= 1-866-463-4775T (Toll)= 1-424-233-2533F= 1-909-468-3757 | service.ca@viewsonic.com | |
| Europe www.viewsoniceurope.com | www.viewsoniceurope.com | /uk/support/call-desk/ | |
| Hong Kong www.hk.viewsonic.com | T= 852-3102-2900 service | @hk.viewsonic.com | |
| India www.in.viewsonic.com | T= 1800 266 0101 service@in.viewsonic.com | ||
| Korea www.kr.viewsonic.com | T= 080 333 2131 service@kr.viewsonic.com | ||
| Latin America(Argentina) | www.viewsonic.com/la/ T= 0800 | -4441185 soporte@viewsonic.com | |
| Latin America (Chile) | www.viewsonic.com/la/ | T= 1230-020-7975 | soporte@viewsonic.com |
| Latin America(Columbia) | www.viewsonic.com/la/ | T= 01800-9-157235 | soporte@viewsonic.com |
| Latin America (Mexico) | www.viewsonic.com/la/ | T= 001-8882328722 | soporte@viewsonic.com |
| Renta y Datos, 29 SUR 721, COL. LA PAZ, 72160 PUEBLA, PUE. Tel: 01.222.891.55.77 CON 10 LINEASElectroser, Av Reforma No. 403Gx39 y 41, 97000 Mérida, Yucatán. Tel: 01.999.925.19.16Other places please refer to http://www.viewsonic.com/la/soporte/index.htm#Mexico | |||
| Latin America (Peru) | www.viewsonic.com/la/ | T= 0800-54565 | soporte@viewsonic.com |
| Macau | www.hk.viewsonic.com | T= 853 2870 0303 | service@hk.viewsonic.com |
| Middle East | ap.viewsonic.com/me/ | Contact your reseller | service@ap.viewsonic.com |
| Puerto Rico & Virgin Islands | www.viewsonic.com | T= 1-800-688-6688 (English)T= 1-866-379-1304 (Spanish)F= 1-909-468-3757 | service.us@viewsonic.comsoporte@viewsonic.com |
| Singapore/Malaysia/Thailand | www.viewsonic.com.sg | T= 65 6461 6044 | service@sg.viewsonic.com |
| South Africa | ap.viewsonic.com/za/ | Contact your reseller | service@ap.viewsonic.com |
| United States | www.viewsonic.com | T (Toll-Free)= 1-800-688-6688T (Toll)= 1-424-233-2530F= 1-909-468-3757 | service.us@viewsonic.com |
Limited Warranty
VIEWSONIC® Multimedia Digital Poster
What the warranty covers:
ViewSonic warrants its products to be free from defects in material and workmanship, under normal use, during the warranty period. If a product proves to be defective in material or workmanship during the warranty period, ViewSonic will, at its sole option, repair or replace the product with a like product. Replacement product or parts may include remanufactured or refurbished parts or components.
How long the warranty is effective:
ViewSonic Multimedia Digital Poster are warranted for 1 year for all parts excluding the light source and 1 year for labor from the date of the first customer purchase.
Who the warranty protects:
This warranty is valid only for the first consumer purchaser.
What the warranty does not cover:
- Any product on which the serial number has been defaced, modified or removed.
- Damage, deterioration or malfunction resulting from:
a. Accident, misuse, neglect, fire, water, lightning, or other acts of nature, unauthorized product modification, or failure to follow instructions supplied with the product.
b. Any damage of the product due to shipment.
c. Removal or installation of the product.
d. Causes external to the product, such as electrical power fluctuations or failure.
e. Use of supplies or parts not meeting ViewSonic's specifications.
f. Normal wear and tear.
g. Any other cause which does not relate to a product defect.
- Any product exhibiting a condition commonly known as "image burn-in" which results when a static image is displayed on the product for an extended period of time.
- Removal, installation, one way transportation, insurance, and set-up service charges.
How to get service:
- For information about receiving service under warranty, contact ViewSonic Customer Support (Please refer to Customer Support page). You will need to provide your product's serial number.
- To obtain warranty service, you will be required to provide (a) the original dated sales slip, (b) your name, (c) your address, (d) a description of the problem, and (e) the serial number of the product.
- Take or ship the product freight prepaid in the original container to an authorized ViewSonic service center or ViewSonic.
- For additional information or the name of the nearest ViewSonic service center, contact ViewSonic.
4.3: ViewSonic Multimedia Digital Poster
Page 1 of 2 EP_LW01 Rev. 1a 02-11-09
Limitation of implied warranties:
There are no warranties, express or implied, which extend beyond the description contained herein including the implied warranty of merchantability and fitness for a particular purpose.
Exclusion of damages:
ViewSonic's liability is limited to the cost of repair or replacement of the product. ViewSonic shall not be liable for:
- Damage to other property caused by any defects in the product, damages based upon inconvenience, loss of use of the product, loss of time, loss of profits, loss of business opportunity, loss of goodwill, interference with business relationships, or other commercial loss, even if advised of the possibility of such damages.
- Any other damages, whether incidental, consequential or otherwise.
- Any claim against the customer by any other party.
- Repair or attempted repair by anyone not authorized by ViewSonic.
Effect of state law:
This warranty gives you specific legal rights, and you may also have other rights which vary from state to state. Some states do not allow limitations on implied warranties and/or do not allow the exclusion of incidental or consequential damages, so the above limitations and exclusions may not apply to you.
Sales outside the U.S.A. and Canada:
For warranty information and service on ViewSonic products sold outside of the U.S.A. and Canada, contact ViewSonic or your local ViewSonic dealer.
The warranty period for this product in mainland China (Hong Kong, Macao and Taiwan Excluded) is subject to the terms and conditions of the Maintenance Guarantee Card.
For users in Europe and Russia, full details of warranty provided can be found in www.viewsoniceurope.com under Support/Warranty Information.

natural_image
Illustration of three colorful bird characters perched on grass, with 'ViewSonic' branding at the bottom (no other text or symbols)- EP2203r/EP3203r/EP3204r/EP4203r
- Multimedia Digital Poster
- User Guide
- Compliance Information
- FCC Statement
- For Canada
- Important Safety Instructions
- Declaration of RoHS2 Compliance
- Copyright Information
- Product Registration
- For Your Records
- Product disposal at end of product life
- Contents
- Packing list.... 1
- Product Introduction...... 1
- Remote Control....3
- Main Menu Operation Instructions .... 4
- Other Setting....19
- ePoster Manager Express Plus Introduction......20
- Content Update......36
- PhotoShop Guidelines....37
- Packing list
- Product Introduction
- Overview
- Product function
- I/O ports introduction
- Supported media files format
- Remote Control
- Notice:
- Main Menu Operation Instructions
- System Settings
- Playback Control
- Work Mode
- Storage Priority
- Playback Mode
- Play Time
- Save and Reboot
- Network Settings
- Server Settings
- Machine ID
- MAC Address
- Get IP Type
- Date & Time
- On / Off Timer
- - Weekly
- - Daily
- Screen Mode
- File Management
- Exit
- Other Setting
- Source Setting
- Image Setting
- ePoster Manager Express Plus Introduction
- Installation
- - Install FinalCodecs
- - Install Visual C++
- • Install ePoster Manager Express Plus
- Programming Mode Interface
- Playlist Creation
- - New Screen
- - Schedule
- - Set up Playlist
- Media File
- Player Settings
- Save to USB
- Terminal Monitoring Mode Interface
- Terminal Creation
- Content Update
- Update content directly
- Update content via ePoster Manager Express Plus
- PhotoShop Guidelines
- Customer Support
- Limited Warranty
- VIEWSONIC® Multimedia Digital Poster
- What the warranty covers:
- How long the warranty is effective:
- Who the warranty protects:
- What the warranty does not cover:
- How to get service:
- Limitation of implied warranties:
- Exclusion of damages:
- Effect of state law:
- Sales outside the U.S.A. and Canada:
Brand : VIEWSONIC
Model : EP3203R
Category : Screen