ICE800TTWRS - Loudspeaker OSD Audio - Free user manual and instructions
Find the device manual for free ICE800TTWRS OSD Audio in PDF.


| Product Type | In-Ceiling Speaker |
| Brand | OSD Audio |
| Model | ICE800TTWRS |
| Speaker Configuration | 2-way (woofer and tweeter) |
| Woofer Size | 8 inches |
| Tweeter Size | 1 inch (estimate) |
| Sensitivity | 90 dB (estimate) |
| Frequency Response | 50 Hz - 20 kHz (estimate) |
| Impedance | 8 ohms (typical) |
| Power Handling | Minimum 10 watts; recommended 20-80 watts RMS |
| Mounting Type | In-ceiling with dog-ear brackets |
| Grille Type | Paintable, magnetic or snap-fit |
| Cutout Diameter | Approximately 9.5 inches |
| Depth Behind Ceiling | Approximately 4 inches |
| Weight | Approximately 3 lbs |
| Special Features | 15° angled woofer (LCR models); Bass and Treble adjustment switches; Gold-plated compression terminals |
| Installation Tools Required | Pencil, wire cutter, utility knife, drill, Phillips screwdriver, safety eyewear, tape measure, sandpaper, gloves |
| Wire Gauge Recommendation | 18 AWG up to 10 ft, 16 AWG 10-50 ft, 14 AWG 50-100 ft |
| Warranty | 10 years limited |
| Color | White (typical) |
Frequently Asked Questions - ICE800TTWRS OSD Audio
User questions about ICE800TTWRS OSD Audio
0 question about this device. Answer the ones you know or ask your own.
Ask a new question about this device
Download the instructions for your Loudspeaker in PDF format for free! Find your manual ICE800TTWRS - OSD Audio and take your electronic device back in hand. On this page are published all the documents necessary for the use of your device. ICE800TTWRS by OSD Audio.
USER MANUAL ICE800TTWRS OSD Audio
Tools needed for installation
- Pencil
- Wire cutter
- Utility knife
- Drill
- Philips-head screwdriver
- Safety eyewear
- Tape Measure
- Sandpaper
- Gloves
Quick installation guide
- Where is the best place to install the speakers
- Where do the speakers sound the best?
- Try to separate the speakers 6 - 10 feet apart.
- When placing the speakers in the ceiling, try to install them so that the fixed 15° angle woofer is pointed towards the main listening area. (For LCR model only)
- If you intend to paint the grilles, try to do so before installation.
Speaker wire
To determine the length and the gauge of speaker wire, you will need to measure the distance between your receiver/amplifier to the speakers.
- Always buy more than you think you would need.
- Equal wire lengths should always be used to maintain an equal balance in sound volume.
- Sound quality is lost when using thin wire gauge over a long distance.
18AWG minimum - for distances up to 10 ft
16AWG - from 10 to 50 ft
14AWG - from 50 to 100ft
STEP 1: Cutout Tracing
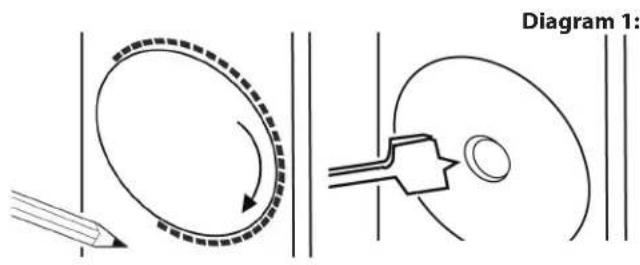
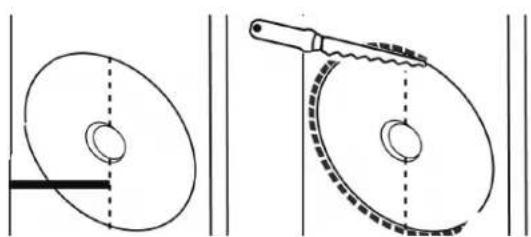
Trace along the inclusive template. Cut along the traced line using a drywall saw or rotary drill. A simple, inexpensive drywall saw (about \$10 at your local hardware store) is the best choice for beginners.
Caution: This is the most important part of the entire installation. If you are not certain whether any obstructions exist behind the desired mounting area, you should start by cutting a small hole in the center of your penciled mounting hole with a drywall saw. Use a piece of sandpaper to sand down the cut out edge for a smoother contour. (See Diagram 1)
natural_image
Technical line drawing showing two mechanical components with dashed alignment lines (no text or symbols)STEP 2: Connection
Run the cable into the cut out location while leaving an extra two feet to make the connection to the speaker easier. Strip back approximately 12 inch of the speaker cable insulation and twist the copper wires tightly for easy insertion.
On the back of the speaker, press down on the gold-plated compression terminal to reveal the "eye" and insert the speaker cable through the eye for secure connection. Release the compression terminal to lock each cable securely.
STEP 3: Tweeter Adjustment
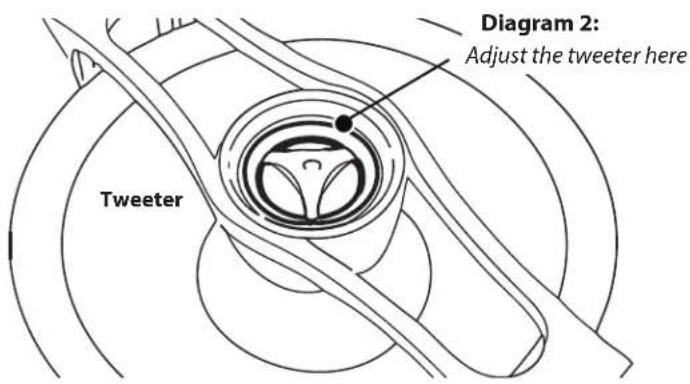
Your in-ceiling speakers come from the factory with the tweeter facing straight out from the baffle. This will result in the overall smoothest response. However, you can adjust the tweeter to focus the sound at your listening location. In order to do this, gently press on the grill (See Diagram 3). Caution: Do not touch the tweeter dome while adjusting for your hearing preference. (See Diagram 2 Tweeter Model Only.
STEP 4: Mounting Dog Ear
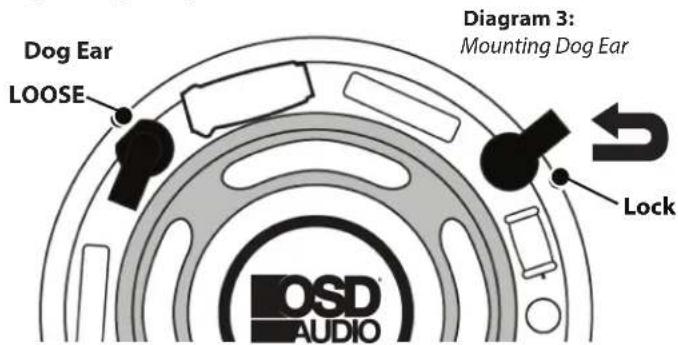
Tighten the dog-ear brackets by simply turning the screws on the speaker's front baffle. Use a Phillips head screwdriver to turn the screws slowly clockwise. The quick-turn mounting system and frame will "sandwich" or clamp around the wall to hold the speaker securely in place. (See Diagram 3)
STEP 5 (Not applicable to certain models)
TIP: Adjust the bass and the treble setting on your speakers by shifting the knob either to the left or right. Speakers positioned closer to a corner often produce more bass and will usually benefit with the tweeter switch in the +3dB position. Speakers located within a few feet of a listener's ear will often sound better with the tweeter switch set to -3dB. Furthermore, rolled in insulation materials, such as a foam bedding would work as a dampening material and offer better acoustics. (See Diagram 4)
Diagram 4
Adjustment Switches
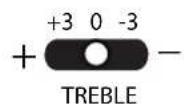
Treble Adjustment Switch
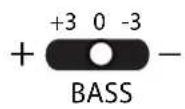
Bass Adjustment Switch
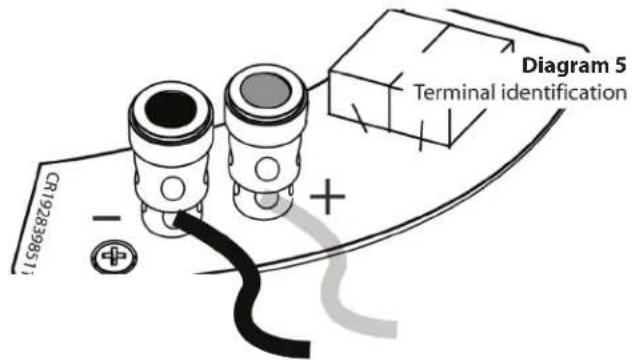
TIP: Blown-in insulation can sometimes work its way into the moving components of the speaker, negatively impacting performance. It is best to replace about a one square foot section directly behind the speaker with rolled-in (bat) insulation. (See Diagram 5)
Note: The wire for both speakers should be about the same length. If one speaker is placed closer to the amplifier than the other. Hide the excess wire behind the wall
Amplifier/Receiver Considerations.
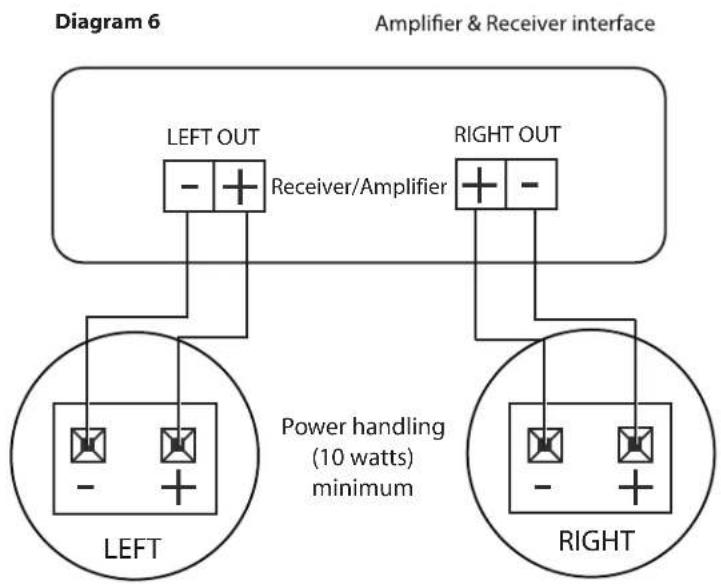
Not all receivers/amplifiers can safely operate 2 pair of speakers at the same time. It is important that the amplifier or the receiver's output wattage is comparable to the speaker's power handling. Please refer to your owner's manual for reference.
When connecting any speakers to the amplifier or receiver, always make sure the power is off. Locate the connection terminals on the back of your receiver or amplifier. Always make sure to connect audio out from the back of your receiver or amplifier to the speakers. (See Diagram 6)
flowchart
graph TD
    A["LEFT OUT"] --> B["Receiver/Amplifier"]
    C["RIGHT OUT"] --> D["Power handling (10 watts) minimum"]
    style A fill:#f9f,stroke:#333
    style C fill:#f9f,stroke:#333
    style B fill:#ccf,stroke:#333
    style D fill:#ccf,stroke:#333
Note: Speaker terminals have corresponding (+) and (-) terminals. It is important to connect both speakers in phase. Out of phase will result in thin sound and weak bass.
Warranty & Repair
All OSD AUDIO speaker products have (10) year Limited Warranty against defects in materials and workmanship. Proof of purchase must accompany all claims. During the warranty period OSD AUDIO will replace any defective part and correct any defect in workmanship without charge for either parts or labor
OSD AUDIO may replace returned speakers with a product of equal value and performance. In such cases, some modifications to the mounting may be necessary and are not OSD AUDIO's responsibility.
For this warranty to apply, the unit must be installed and used according to its written instructions. If necessary, repairs must be performed by OSD AUDIO. The unit must be returned to OSD AUDIO at the owner's expense and with prior written permission. Accidental damage and shipping damage are not considered defects, nor is damaged resulting from abuse or from servicing performed by an agency or person not specifically authorized in writing by OSD Audio
OSD AUDIO sells products only through authorized dealers and distributors to ensure that customers obtain proper support and service. Any OSD AUDIO product purchased from an unauthorized dealer or other source, including retailers, mail over dealers and online sellers will not be honored or serviced under existing OSD AUDIO warranty policy. Any sale of product by an unauthorized source or other manner not authorized by OSD AUDIO shall void the warranty on the applicable product.
Damage to or destruction of components due to application of excessive power voids the warranty on those parts. In these cases, repairs will be made on the basis of the retail value of the parts and labor. To return for repairs, you must email customer service at RMA@audiogeargroup.com for a Returned Merchandise Authorization (RMA) number#. The unit must be shipped to OSD AUDIO at the owner's expense, along with a note explaining the nature of service required. Be sure to pack the speaker(s) in a corrugated container with at least 3 inches of resilient material to protect the unit from damage in transit.
This Warranty Does Not Cover:
Damage caused by abuse, accident, misuse, negligence, or improper operation (installation) • Any products that have been altered or modified • Any product whose identifying number of decal, serial #, etc. has been altered, defaced or removed • Normal wear and maintenance.
Brand : OSD Audio
Model : ICE800TTWRS
Category : Loudspeaker