AP840 - Loudspeaker OSD Audio - Free user manual and instructions
Find the device manual for free AP840 OSD Audio in PDF.


| Product Type | Outdoor Patio Speakers |
| Brand | OSD Audio |
| Model | AP840 |
| Impedance Options | 8 ohms (default), 70V, 100V |
| Weather Resistance | Weather resistant, not waterproof |
| Mounting | Bracket included, install under eaves or overhangs |
| Recommended Spacing | No more than 7 feet apart |
| Recommended Height | Slightly above ear level |
| Wiring | Connect with proper polarity (+ to +, - to -) |
| 70/100V Feature | Daisy chain multiple speakers in parallel |
| Grilles | Removable, paintable with thin paint (5:1 ratio) |
| Input Selection | Select 8 ohm, 70V, or 100V before connecting |
| Warranty | 1 year limited warranty against defects |
| Installation Caution | Do not mount on unreinforced drywall or plasterboard |
| Repairs | Must be performed by OSD Audio with prior RMA |
| Included Accessories | Mounting brackets, large plastic knobs |
| Application | Outdoor patios, eaves, overhangs |
Frequently Asked Questions - AP840 OSD Audio
User questions about AP840 OSD Audio
0 question about this device. Answer the ones you know or ask your own.
Ask a new question about this device
Download the instructions for your Loudspeaker in PDF format for free! Find your manual AP840 - OSD Audio and take your electronic device back in hand. On this page are published all the documents necessary for the use of your device. AP840 by OSD Audio.
USER MANUAL AP840 OSD Audio
Thank you for giving OSD AUDIO the chance to earn your business! We are confident you will find that OSD offers an outstanding combination of performance and value in everything we make. To ensure you get the most out of your new patio speakers, please take a moment to read this manual before you get started.
Installing Speakers
These weather resistant patio speakers are manufactured to resist a variety of weather condition. The most ideal place to install these speakers is the undersides of most eaves and overhangs as they provide the best protection.
Like all speakers, they sound the best when placed no more than seven feet apart from each other, and slightly higher than ear level. If the speakers are more than seven feet apart, toe them in toward the center of the listening area.
These speakers are not waterproof and cannot be submerged under water.
Placing Speakers
If your application requires the speaker to be mounted, please follow these directions. Mount thebracket first.
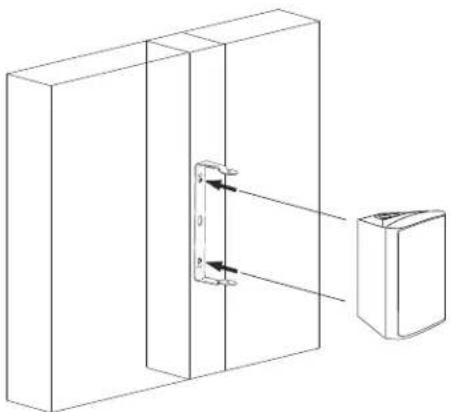
Attach the speakers to the brackets using the large plastic knobs supplied. Never mount a speaker on a wall made of unreinforced drywall or plasterboard. If you are unsure, consult a professional contractor. (See Diagram 1)
natural_image
Technical line drawing of a door panel with a close-up view of the internal structure (no text or symbols)Painting the grilles
The metal grilles may also be painted. Use very thin paint (5:1). It will be easier to paint the grilles while it is off the speaker. Avoid plugging up the holes with excess paint.
First remove the grille from the speaker then using spray paint lightly go over the front of the grille and then go over the back of the grille. Two coats may be nessesary for desired look.
Diagram 1
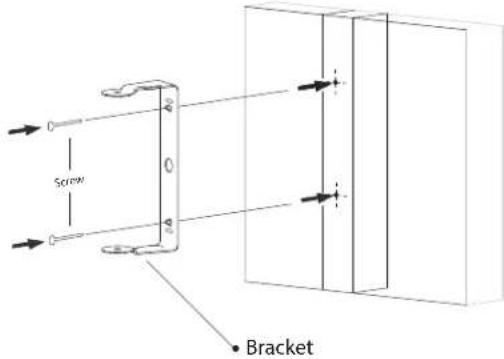
Diagram 2
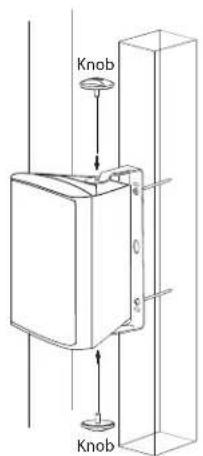
Mounting
To install the bracket on the speaker. Screw the bracket knobs into the cabinet. Point the speaker toward the listening area. Once the direction of the speaker has been determined tighten the bracket knobs securely. (See Diagram 2)
WIRING
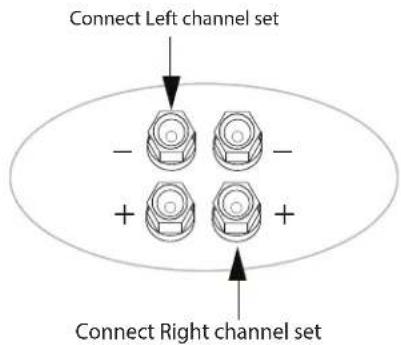
Connect the speaker cable to the speaker cable terminals, matching the proper polarity with your amplifier, + to + (red) and - to - (black). Make sure to connect the right channel to the right speaker and the left channel to the left speaker. Either channel may be attached to either terminals set, however, be sure that polarity (+ and -) is correct on each channel or the performance of the speaker will be seriously affected as one channel will cancel out the other.
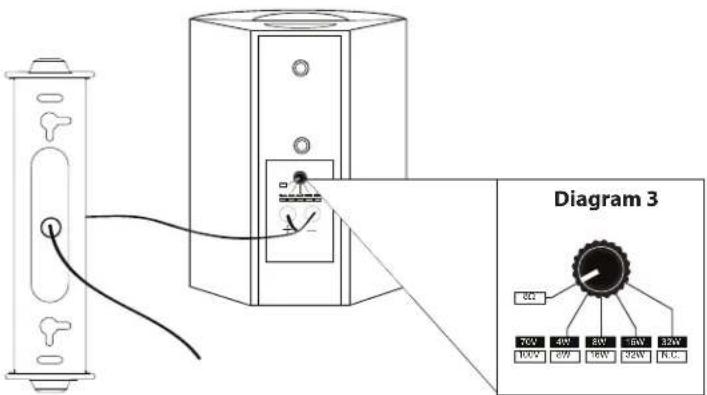
NOTE: To avoid damage please select correct input 8 Ohm, 70 volt or 100v, prior to connecting
Single - Stereo
70/100 Volts Considerations (Only for Speakers with 70/100V Option)
The 70/100V transformer offers you the ability to daisy chain multiple number of speakers in parallel. In doing so, you would simply connect 1 pair of outputs to each speaker and daisy chain to subsequential speaker/s. If you don't intend to daisy chain the speakers, set the default setting to 8 ohms. (See Diagram 3 - Example of Settings)
Warranty & Repair
All OSD AUDIO speaker products have (1) year Limited Warranty against defects in materials and workmanship. Proof of purchase must accompany all claims. During the warranty period OSD AUDIO will replace any defective part and correct any defect in workmanship without charge for either parts or labor
OSD AUDIO may replace returned speakers with a product of equal value and performance. In such cases, some modifications to the mounting may be necessary and are not OSD AUDIO's responsibility.
For this warranty to apply, the unit must be installed and used according to its written instructions. If necessary, repairs must be performed by OSD AUDIO. The unit must be returned to OSD AUDIO at the owner's expense and with prior written permission. Accidental damage and shipping damage are not considered defects, nor is damaged resulting from abuse or from servicing performed by an agency or person not specifically authorized in writing by OSD Audio
OSD AUDIO sells products only through authorized dealers and distributors to ensure that customers obtain proper support and service. Any OSD AUDIO product purchased from an unauthorized dealer or other source, including retailers, mail over dealers and online sellers will not be honored or serviced under existing OSD AUDIO warranty policy. Any sale of product by an unauthorized source or other manner not authorized by OSD AUDIO shall void the warranty on the applicable product.
Damage to or destruction of components due to application of excessive power voids the warranty on those parts. In these cases, repairs will be made on the basis of the retail value of the parts and labor. To return for repairs, you must email customer service at RMA@audiogeargroup.com for a Returned Merchandise Authorization(RMA) number# then the unit must be shipped to OSD AUDIO at the owner's expense, along with a note explaining the nature of service required. Be sure to pack the speaker(s) in a corrugatedontainer with at least 3 inches of resilient material to protect the unit from damage in transit.
This Warranty Does Not Cover:
Damage caused by abuse, accident, misuse, negligence, or improper operation (installation) • Any products that have been altered or modified • Any product whose identifying number of decal, serial #, etc. has been altered, defaced or removed • Normal wear and maintenance.
Brand : OSD Audio
Model : AP840
Category : Loudspeaker