GW22606 - Rice cooker GoWISE USA - Free user manual and instructions
Find the device manual for free GW22606 GoWISE USA in PDF.

| Product Type | Rice Cooker |
| Brand | GoWISE USA |
| Model | GW22606 |
| Capacity | 6 cups (uncooked rice), approx. 12 cups cooked |
| Power | 700 W |
| Voltage | 120 V ~ 60 Hz |
| Dimensions (L x W x H) | 25.4 cm x 25.4 cm x 29.2 cm (10 x 10 x 11.5 in) |
| Weight | 2.7 kg (6 lbs) |
| Control Type | One-touch mechanical switch (cook/warm) |
| Functions | Cook, keep warm, reheat |
| Inner Pot Material | Non-stick aluminum |
| Accessories Included | Measuring cup, rice paddle, steaming tray |
| Cleaning & Care | Wipe outer body with damp cloth; inner pot and lid washable with mild soap |
| Safety Features | Auto keep warm, overheat protection, cool-touch handles |
| Warranty | 1-year limited warranty |
| Spare Parts Availability | Inner pot, measuring cup, paddle available via manufacturer website |
| Repairability | Simple construction; user-replaceable parts (pot, lid seal); service center available |
| Energy Efficiency | Energy-saving keep warm cycle |
| Compatible Rice Types | White, brown, jasmine, basmati, sushi |
Frequently Asked Questions - GW22606 GoWISE USA
User questions about GW22606 GoWISE USA
0 question about this device. Answer the ones you know or ask your own.
Ask a new question about this device
Download the instructions for your Rice cooker in PDF format for free! Find your manual GW22606 - GoWISE USA and take your electronic device back in hand. On this page are published all the documents necessary for the use of your device. GW22606 by GoWISE USA.
USER MANUAL GW22606 GoWISE USA
GW22601/GW22602/GW22606
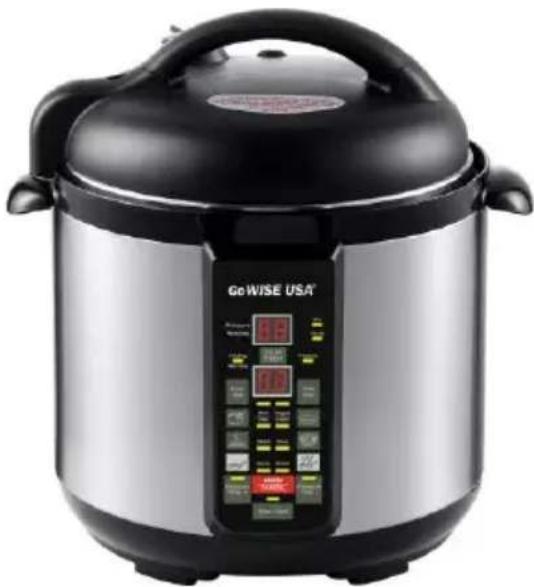
natural_image
Exterior view of a modern rice cooker with digital display and control buttons (no visible text or symbols on the device body)GoWISE USA®
www.gowiseusa.com
sales@gowiseusa.com
1-855-233-9199
■ Thank you for purchasing this GoWISE USA® Electric Pressure Cooker.
■ To ensure correct use of this appliance, read these instrucons carefully and thoroughly.
■ Please keep the manual for future reference.
Table of Contents:
Product Introducon....3
Important
Safeguards....4-6
Product Structure &
Features....7
Before First Use....8-9
Pressure Cooker Sengs....10-11
How To Use Your Pressure Cooker....11-13
Cleaning....12-15
Troubleshoong....16
Warranty....17
PRODUCT INTRODUCTION
GoWISE USA® GW22601/GW22602/GW22606 is a new model of programmable pressure cooker. It is an 8-in-1 mulfuncon cooker: pressure cooker, rice cooker, bean cooker, food warmer, steamer, sauté, brown, and slow cooker. The pressure is preset depending on what cooking opon you use. It has 10 cooking opons with preset mes that make cooking easy for you. They are “Brown Rice”, “White Rice”, “Steam”, “Soup”, “Meat”, “Beans”, “Sauté”, “Brown”, “Slow Cook” and a manual me seer, “Pressure Time +” and “Pressure Time –” for those who want to do it themselves. It also features a delay mer for people who want their food to be cooked and ready by a certain me and a pressure reading display to show how much pressure is being used for the duraon of the cooking me. It comes with a stainless steel steam rack, rice scooper, and measuring cup.
Important Safeguards
- READ THE MANUAL.
- This appliance cooks under pressure; please do not aempt to remove the lid while the cooker is operang. Improper use may result in scalding or injury.
- Do not touch hot surfaces. Always use the handles.
- Do not overll the cooking pot because the food such as rice or vegetables may expand during cooking. Overlling the cooker may result in developing more pressure or clogging the vent pipe.
- Be aware that certain foods, such as applesauce, cranberries, pearl barley, oatmeal or other cereals, split peas, noodles, macaroni, rhubarb, or spaghe can foam, froth, and spuer, and clog the pressure release device (steam vent). These foods should not be cooked in a pressure cooker at all.
- Do not use this cooker for pressure frying with oil.
-
Always check the pressure release vent for clogs before use.
-
Do not immerse cord, plugs, or appliance in water or any other liquids to avoid electrical shock.
-
Keep away from children. This appliance is not intended for use by children.
-
Unplug the appliance when not in use and before cleaning. Wait for the parts to cool before removing or replacing them.
-
Do not operate this appliance with a damaged cord or plug or aer it has experienced any malfuncons or has been damaged in any way.
-
Do not let the cord hang over edge of table or counter. Keep cord away from hot surfaces.
-
Do not use outdoors.
-
Do not use under hanging cabinets because it may cause damage when steam occurs from pressure release.
-
Use of any accessories that is not for this product may damage the unit.
-
Always attach plug into the appliance rst before plugging into the wall outlet.
-
Do not place on an unstable surface. It is strictly prohibited to use it on newspaper, foam, or any other material that may block the vent at the boom.
A short power-supply cord is provided to prevent the risks of becoming entangled in or tripping over a longer cord.
An extension cord may be purchased and must be used properly.
If a long extension cord is used, the marked electrical rang of the extension cord must be at least as great as the electrical rang of the appliance. The longer cord must not drape over the surface where it can be pulled on by children or tripped over.
PRODUCT STRUCTURE & FEATURES
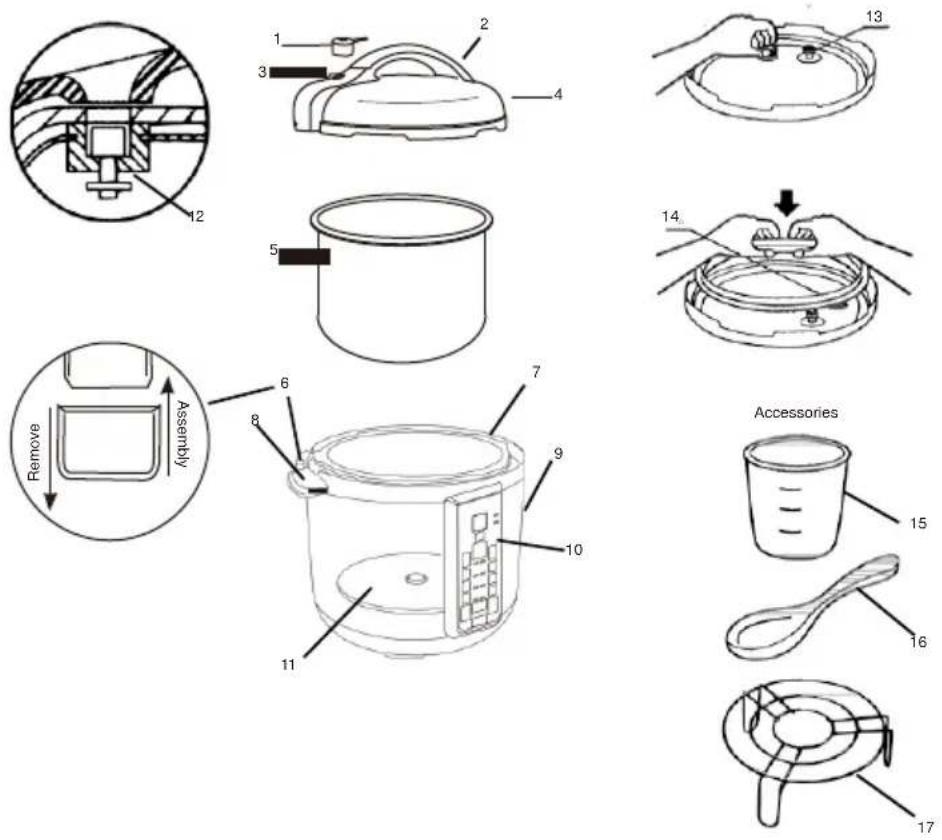
| 1. Regulator knob | 2. Handle | 3. Floang valve |
| 4. Lid | 5. Removable pot | 6. Condensaon collector |
| 7. Inner pot | 8. Handle | 9. Outer body |
| 10. Control panel | 11. Heang plate | 12. Floater |
| 13. An-blocking case | 14. Sealing ring | 15. Measuring cup |
| 16. Rice spoon | 17. Steam rack | |
(May vary depending on model)
■ The lid has a safety lock pin. The cooker will not start unl the lid is closed and locked in place.
■ Once the correct pressure is reached, it is maintained through the duraon of the cooking me.
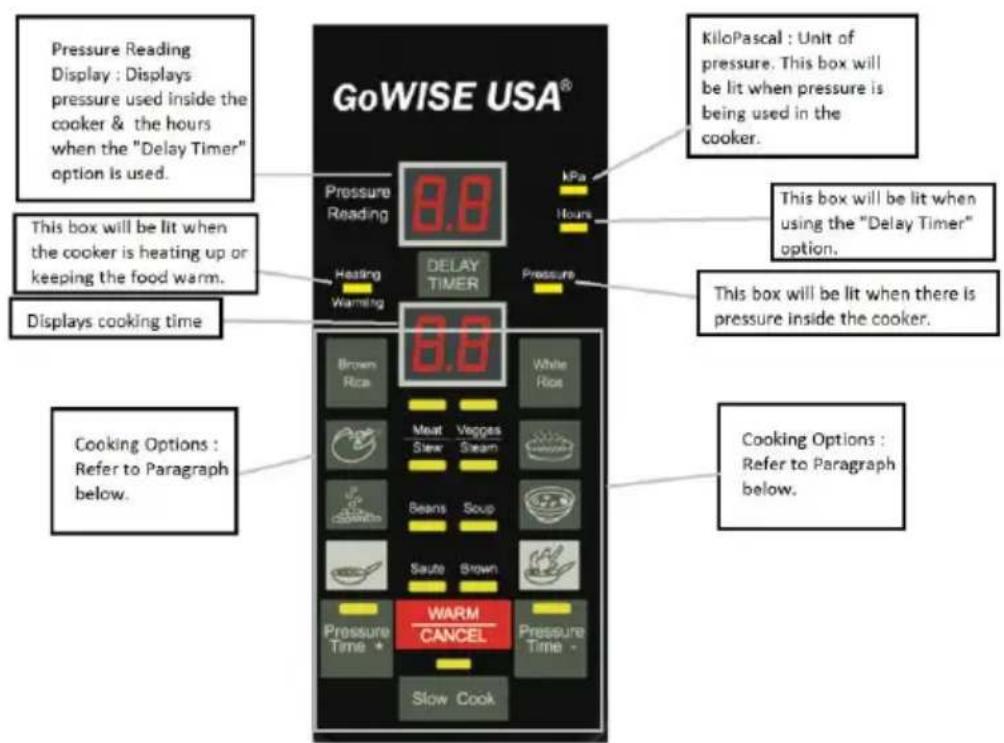
■ Pressure Reading LED Display shows when the amount of pressure that is being used in kPa (KiloPascal : unit used to measure pressure) units and also shows when the pressure is being released.
■ Regulator knob is used to release pressure instantly.
■ The cool touch handles are for transporting the cooker properly.
BEFORE FIRST USE
Remove any packing materials and labels from your electric pressure cooker. Be sure to remove cook pot and check for parts.
Be sure that all of the products parts are included before you dispose of the packing materials. However, you may want to store the box and packing material to use at a later me.
Before you use your GoWISE USA® Electric Pressure cooker for the rst me, wipe the cooker clean with a damp cloth. Clean the lid and the cooking pot. The cooking pot can be cleaned with warm soapy water. Do not put the cooking pot in the
dishwasher. Rinse with clean water, towel or let the pot air dry, and place it into the pressure cooker.
You must also install the sealing ring onto the inside of the lid as shown below:
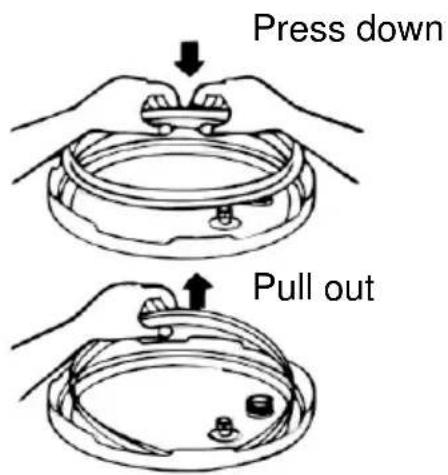
NOTE: You can take out the sealing ring aer cooking your meals to clean it. You can clean the sealing ring with warm soapy water. Make sure to dry it before inserng it back into the lid. If you have the 8 quart, the sealing ring will be on a metal plate, which you can take out by pulling the plate o from the lid.
PRESSURE COOKER SETTING S
There are 10 sengs that you can use on this pressure cooker. All sengs have preset mes and preset pressure. You can choose one of the preset mes or if you want something in between the preset mes or for much longer, you are able to change mes by pressing the buon repeatedly to the desired me.
You are able to choose one of the preset mes by pressing the buon repeatedly. This pressure cooker comes with the following cooking opons and mes:
■ Brown Rice : 10, 15, 20 minutes
■ White Rice: 5, 8, 10 minutes
■ Meat/Stew: 20, 35, 45 minutes
■ Veg / Steam: 1, 3, 5 minutes
■ Beans: 25, 30, 45 minutes
■ Soup: 20, 30, 40 minutes
■ Brown: 30 minutes (no pressure)
■ Saute : 30 (no pressure)
■ Slow Cook: 0.5 – 10 hours
■ Pressure + / - : 1 – 99 mins (You can also use this opon to choose a me between the preset mes above)
■ Warm/Cancel: To keep food warm or cancel your sengs.
■ Delay Timer : up to 12 hours
NOTE: The cooking options “Brown” and “Sauté” do not use pressure and do not require the lid; however, when using this opon, you must be present to watch over the food that is being cooked to prevent it from burning.
How To Use Your Pressure Cooker
When all the parts are assembled properly, you are ready to start cooking with your pressure cooker.
- To remove the lid, grasp the top handle and turn clockwise and li.
- Take the cooking pot from the pressure cooker and add food and liquids. NOTE: Do not ll more than 60% of the capacity of the cooking pot. For food that expands, such as dried vegetables and beans, you must not exceed 50% of the capacity of the pot. When cooking with pressure, you must always use at least 12 cup of water.
- Put the cooking pot back into the cooker and
close the lid. To lock the lid in place, place the lid on the cooker and turn it counterclockwise. NOTE: When opening and closing the lid, there is a locking pin on the side of the lid that goes out when you are opening the lid and goes back into the lid to indicate that the lid is closed and locked.
-
Set the regulator knob located at the top of the lid to the dot that is labeled “Pressure” by pushing the knob down and turning it clockwise.
-
Plug in the power cord into the pressure cooker then into the wall outlet. The two LED displays will show -.-. You can use one of the preset cooking opons or set the cooking me yourself. For example, you decide to set a me yourself, so you can set the me by pressing on the “Pressure Time +” buon repeatedly (or hold down for faster me change) until you need the me you want.
-
Once you have chosen the cooking opon or set the me, the cooker will automatically start after 5 seconds.
-
The cooker will beep when there is enough heat and pressure starts to build. The me does not start until there is enough heat and pressure level has been reached.
-
When the cooker is done, it will beep. DO NOT REMOVE THE LID. There is sll pressure being used inside the cooker. You can either wait for the cooker to slowly release the pressure on its own, it will show on the LED display and beep when all the pressure has been released,
or you can release the pressure immediately by turning the regulator knob on the lid. NOTE: When turning the regulator knob to release pressure, keep hands and face as far from the knob as possible to prevent from injury or scalding from the steam that will be released.
Using the Slow Cooking Opon
-
Remove the lid and ll the cooking pot with foods and liquids then put the cooking pot back into the cooker.
-
Set the cooking me by pressing on the "Slow Cook" buon repeatedly, they come in half hour increments, unl you reach the me that you want.
-
The cooker will automacally start aer 5 seconds. The "Heang / Warming" light will be on and there will be three dashes that will appear repeatedly on the top display and the cooking me will show on the boom display.
-
When there is enough heat, the top display will show a
-.- and the “Heang/Warming” light will be blinking. On the boom display, a dot on the far right of the cooking me should be blinking as well.
If you are have any quesons regarding your pressure cooker, please contact Customer Service at 1-855-233-9199.
CLEANING
- Always unplug the cooker and let it cool down before you clean it.
- Use a clean dry or damp so cloth to wipe the cooker with. Do not immerse or spray the cooker with any kind of liquid.
-
Remove the condensation collector by pulling it down. Clean it with warm soapy water. Rinse and dry it thoroughly. Put the condensaon collector back by pushing it up.
-
Clean the cooking pot with warm soapy water.
■ Always use a sponge or nonmetal brush to clean it.
- Clean all parts of the inner side of the lid.
Regulator Knob Cleaning Instrucons:
- Press down and turn the regulator knob counterclockwise to “Clean” and the knob should come off.
- Clean the space of any food or foreign parcles that may be in there.
■ Replace the regulator knob by lining up the notches and locking it into place.
Sealing Ring Cleaning Instrucons:
■ Remove the sealing ring and clean with warm soapy water. Be sure to dry the sealing ring before placing it back into the lid.
■ 8 Quart Pressure cookers : Pull o the metal plate and take the sealing ring of the plate to clean both the sealing ring and plate. Be sure to dry them both before pung them back together.
TROUBLESHOOTING
| No. | Problem | Reason | Soluon |
| 1 | Difficult to cover the lid | The seal gasket is not well placed.Floang valve is stuck on the bar. | Place the seal gasket in the proper posion.Push the bar slightly. |
| 2 | Difficult to open the lid | Floang valve does not drop aer pressure release. | Take up the regulator knob to release steam unl the oating valve drops, then turn the lid to open it. |
| 3 | Steam leaking around the lid | Seal gasket is not placed.Food remains in the seal gasket.Damaged seal gasketThe lid is not well placed | Place the seal gasket.Clean the seal gasket.Replace the seal gasket.Cover the lid according to the direcons. |
| 4 | Steam leaking around oang valve | Food remains in the seal gasket of oang valve.The seal gasket of the oang valve is worn out. | Clean the seal gasket of the oang valve.Replace the seal gasket of the oang valve. |
| 5 | The oang valve cannot rise. | Too lile food and water.Leakage around the lid or pressure displaying valve. | Add food and water according to the direcons.Send it to a designated repair center |
For any other problems that are not described above, please contact Customer Service at 1-855-233-9199.
WARRANTY
This product is warranted against defects in materials and workmanship for one year from the date of purchase, when used in accordance with the instrucons provided. This warranty does not cover damages or wear resulting from accident, misuse, abuse, commercial use, or unauthorized adjustment and/or repair.
Ming's Mark Inc. dba GoWISE USA® shall not be liable for loss of use or any other incidental, consequential or indirect costs, expenses or damages. There are no express warranes except as listed above. This warranty gives you specific legal rights, and you may have other rights which vary from state to state.
Should this product require service (or replacement at our opon) while under warranty, CALL 1-855-233-9199 for RETURN INSTRUCTIONS. Be sure to keep your receipt showing the date of purchase.
GoWISE USA®
3550 W Clarendon Ave Suite #7
Phoenix, AZ 85019
www.gowiseusa.com
1-855-233-9199