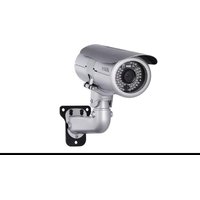
FB3028-RT2 - Security Camera AVERMEDIA - Free user manual and instructions
Find the device manual for free FB3028-RT2 AVERMEDIA in PDF.


| Product Type | Security Camera (IP) |
| Model | FB3028-RT2 |
| Brand | AVerMedia |
| Image Sensor | 1/2.8" Progressive CMOS (est.) |
| Resolution | Up to 3MP (est.) |
| Lens | Motorized varifocal lens with MFZ function |
| IR Distance | Up to 30m (est.) |
| Day/Night | IR-cut filter with auto switch |
| Wide Dynamic Range | Yes (3 levels) |
| Video Compression | H.264, MPEG4, MJPEG |
| Multi-Stream | Yes, up to 3 streams |
| Audio | Two-way audio, built-in mic, external mic support |
| Network Protocols | TCP/IP, HTTP, RTSP, ONVIF, QoS, SNMP, DDNS, UPnP |
| Security | IP filter, 802.1X, RTSP authentication |
| Storage | SD/microSD card slot, NAS, FTP |
| Power | PoE (IEEE 802.3af) (est.) |
| Dimensions | 70mm x 180mm x 70mm (est.) |
| Weight | 0.5 kg (est.) |
| Operating Temperature | -10°C to 50°C (est.) |
| Mount Type | Wall/ceiling mount (bracket included) |
| Warranty | 2 years (est.) |
Frequently Asked Questions - FB3028-RT2 AVERMEDIA
User questions about FB3028-RT2 AVERMEDIA
0 question about this device. Answer the ones you know or ask your own.
Ask a new question about this device
Download the instructions for your Security Camera in PDF format for free! Find your manual FB3028-RT2 - AVERMEDIA and take your electronic device back in hand. On this page are published all the documents necessary for the use of your device. FB3028-RT2 by AVERMEDIA.
USER MANUAL FB3028-RT2 AVERMEDIA
USING THE MFZ FUNCTION ....4
USING QUICK FOCUS....7
SYSTEM > GENERAL 9
SYSTEM > GENERAL > MAINTENANCE....9
To Upgrade the IP Camera Firmware....10
SYSTEM > GENERAL > DATE & TIME....11
SYSTEM > GENERAL > SYSTEM LOG ....12
SYSTEM > USER MANAGEMENT ....13
SYSTEM > USER MANAGEMENT > ACCOUNT....13
To Create a User Account ....13
To Delete or Edit a User Account....14
SYSTEM > USER MANAGEMENT > CONNECTION....15
SYSTEM > NETWORK 16
SYSTEM > NETWORK > SETTING....16
SYSTEM > NETWORK > SERVER....18
SYSTEM > NETWORK > STREAMING ....19
SYSTEM > NETWORK > QOS ....20
SYSTEM > NETWORK > OTHERS ......21
SYSTEM > SECURITY ....23
SYSTEM > SECURITY > IP FILTER....23
To Add Filter 23
SYSTEM > SECURITY > 802.1X ......25
SYSTEM > SECURITY > RTSP AUTH....26
SYSTEM > IMAGE....27
SYSTEM > IMAGE > OSD 27
SYSTEM > IMAGE > PREFERENCE....28
SYSTEM > IMAGE > EXPOSURE ....29
SYSTEM > IMAGE > ADVANCED....30
SYSTEM > IMAGE > PRIVACY MASK 32
APPLICATION > CROSS DETECTION ....40
To Set the Cross Detection....41
APPLICATION > EPTZ....42
To Setup the ePTZ....42
EVENT SETTING 44
To Setup the Event 44
STATUS INFORMATION 47
USING RTSP AND ONVIF PROTOCOL TO ACCESS THE IP CAMERA 48
COPYRIGHT 49
NOTICE......49
Using the IP Camera Browser Interface
The admin user has full access to the IP camera browser interface. Going through the menu on the left, you can expand and navigate to access all features configurable on the camera.
Open the IE browser and enter the IP address of IP camera to access the Web configuration interface. In login dialog, enter the ID and Password (default is admin/admin).
Live View
In the Live View page, all three user levels can view and change the language setting, the IP camera video stream setting, use the digital or RS-485 Pan and Patrol control, capture screen shot, record video, turn on/off 2-way talk, mic and volume, and adjust the zoom and volume level.
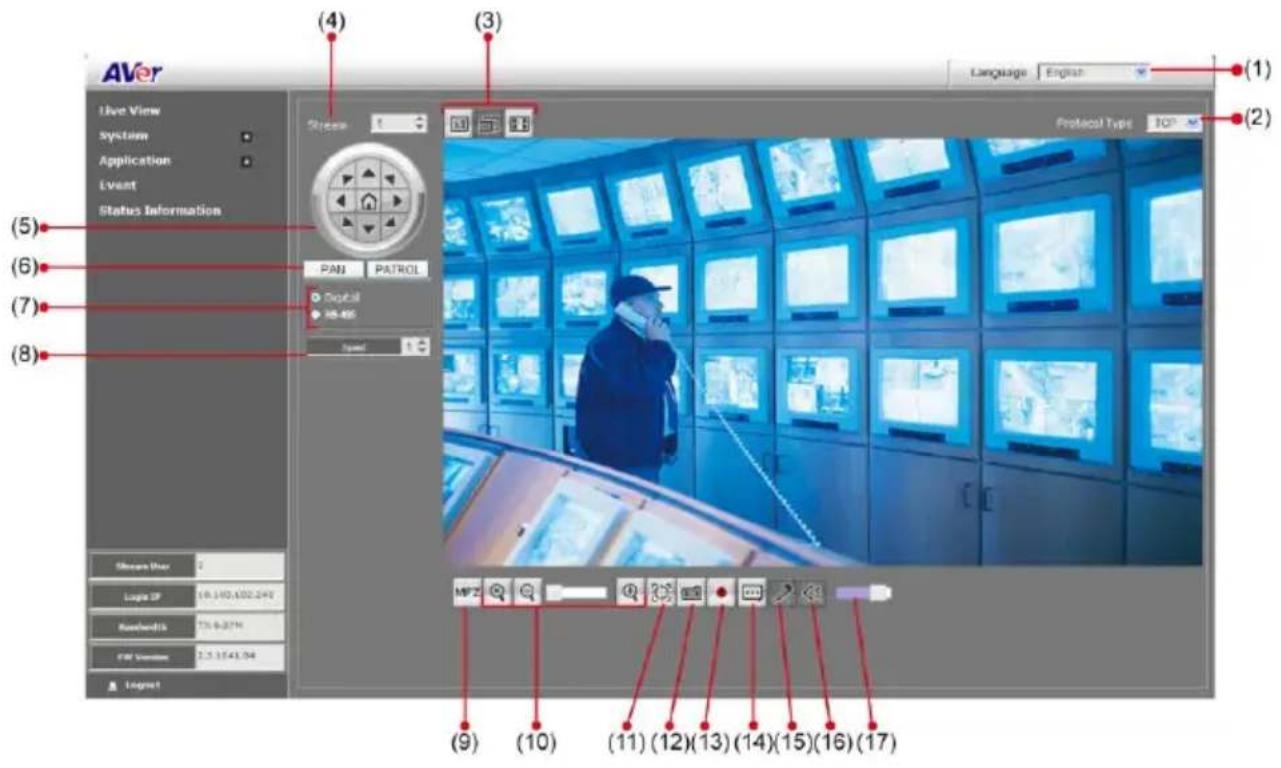
| Name | Function |
| (1) Language | Select the browser interface language. |
| (2) Protocol Type | Select the protocol for the live view video stream. |
| (3) Video screen | Change the video screen display. Display the actual video pixel size. Display the actual video pixel size. Display the video screen in compact size. Display the video screen in compact size. Display the video on the entire screen. Press ESC to exit full screen mode. Display the video on the entire screen. Press ESC to exit full screen mode. |
| (4) Stream | Switch to view the video stream type. The IP camera can send multiple video streams of up to 3 types. To change the video stream setting, go to System > Video Stream. |
| (5) Direction buttons | - Use to move the position of the view point while in zoom mode.- Use to control the position of the RS-485 pan tilt device |
| (6) Pan & Patrol button | Pan: automatically move the view point from left to right when in zoom in mode.Patrol: automatically move the view point around the preset locations in Application >Patrol. |
| (7) Digital /RS-485 | - Select Digital to control the IP camera ePTZ operation. This allows you to closely view the target area without having to physically move the IP camera. The image will be zoomed in and you can use the directional control to pan the zoomed image.- Select RS-485 to control the PTZ driver or scanner via RS-485 connection to I/O terminal block. The IP camera is mounted on an RS-485 pan tilt device. |
| (8) Speed control | Set the speed when panning, tilting, or zooming. |
| (9) MFZ function | Motorized focus and zoom the IP camera(see aslo Using MFZ Function) |
| (10) Zoom control |  Reset zoom level. Reset zoom level. Increase zoom level. Increase zoom level. Decrease zoom level. Decrease zoom level. |
| (11) Quick Focus | It help user to adjust foucs of IP camera more easily(see aslo Using Quick Focus). |
| (12) Capture |  Capture and save the image on the screen in *.bmp format. Capture and save the image on the screen in *.bmp format. |
| Name | Function | |
| (13) Record |  | Start/stop audio and video recording. The recorded video will be saved in *.mp4 format. |
| (14) 2-way talk |  | Enable/disable mic from IP camera browser side. |
| (15) Mic |  | Enable/disable mic from the IP camera side. |
| (16) Sound |  | Enable/disable audio from the IP camera side. |
| (17) Volume bar | Adjust the volume. | |
Using the MFZ Function
Only IP cameras that have motorized lens can perform the MFZ function(motorized focus and zoom).
■ MFZ supported model list
| Camera Type | Model |
| Rugged Bullet | FB2028-TM |
| Rugged Bullet | FB3028-RTM |
| Vantal Dome | FV2028-TM |
| Vantal Dome | FV3028-RTM |
| Dome | FD2020-M |
| Dome | FD3020-M |
To user MFZ function
- In preview UI, click (MFZ button).
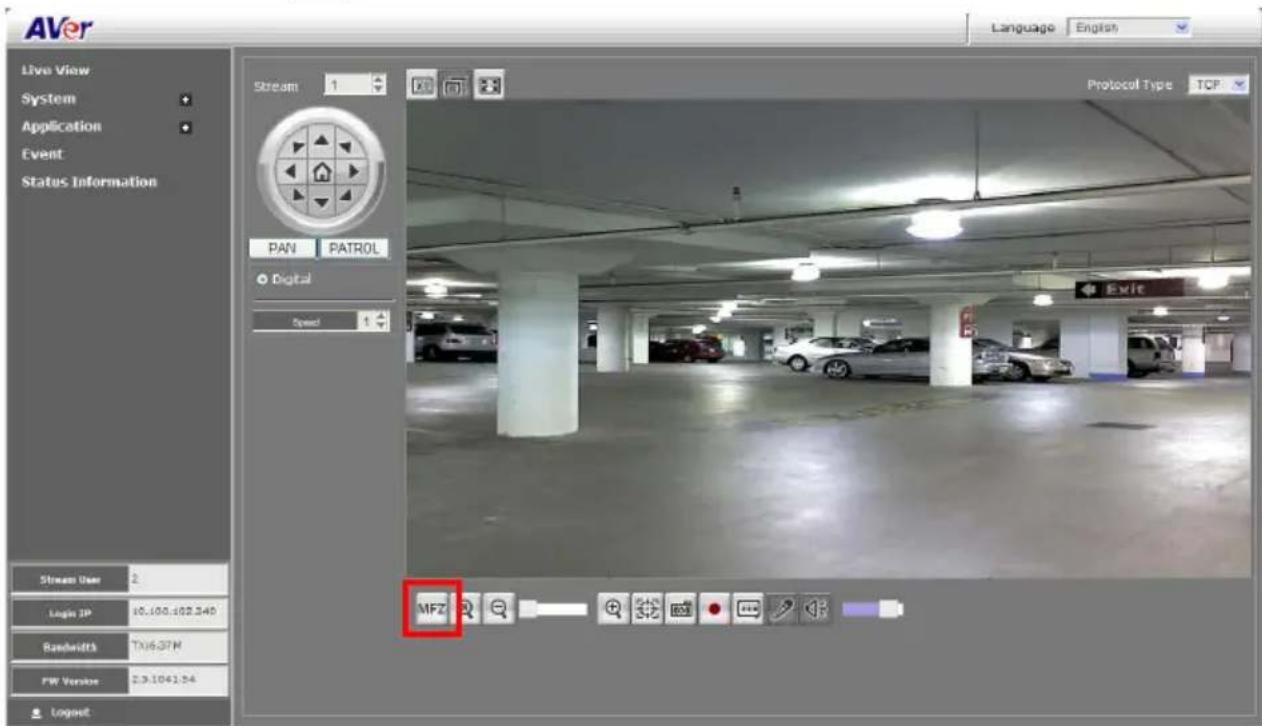
- A MFZ window will show up on the screen.

- User can click the object or point on screen to foucs or use the function buttons on MFZ window to do the focus adjustment.
- The function buttons of the MFZ window are described below:
![MFZ (10) (9) [AF] (1) (2) (3) (4) (5) (6) (7) (8)](/content/2026/05/1068237/images/efe4e5c6a6f3d4c555b639afb084b755c72aecdd6e3f99f95bc1ae3e661b9e06.jpg)
| Name | Function |
| (1) Auto focus | Automatically focus on the center of the screen view. If user clicked on any point/object in the view, the focus will be centered on the point/object the user has clicked on. |
| (2) One step zoom out | To zoom in step by step for finer focus adjustment. |
| (3) One step zoom in | To zoom out step by step for finer focus adjustment. |
| (4) Zoom out | To zoom in for focus adjustment. |
| (5) Zoom in | To zoom out for focus adjustment. |
| (6) Focus near side | To adjust the near side of focus. |
| (7) Focus far side | To adjust the far side of focus. |
| (8) Reset | To reset the zoom back to the center of screen view with default value (1x). |
| (9) Focus cursor | A focus cursor; click the screen to set the focus point. |
| (10) Close | Click to close the MFZ window. |
Using Quick Focus
The Quick Focus function helps the user to adjust focusing of IP camera easier and quicker. There are 2 ways to use Quick Focus as described in the following:
■ Web UI Interface
Open the browser of your PC and enter the IP address of the IP camera to make a connection. After connecting, click button to enable the Quick Focus function.
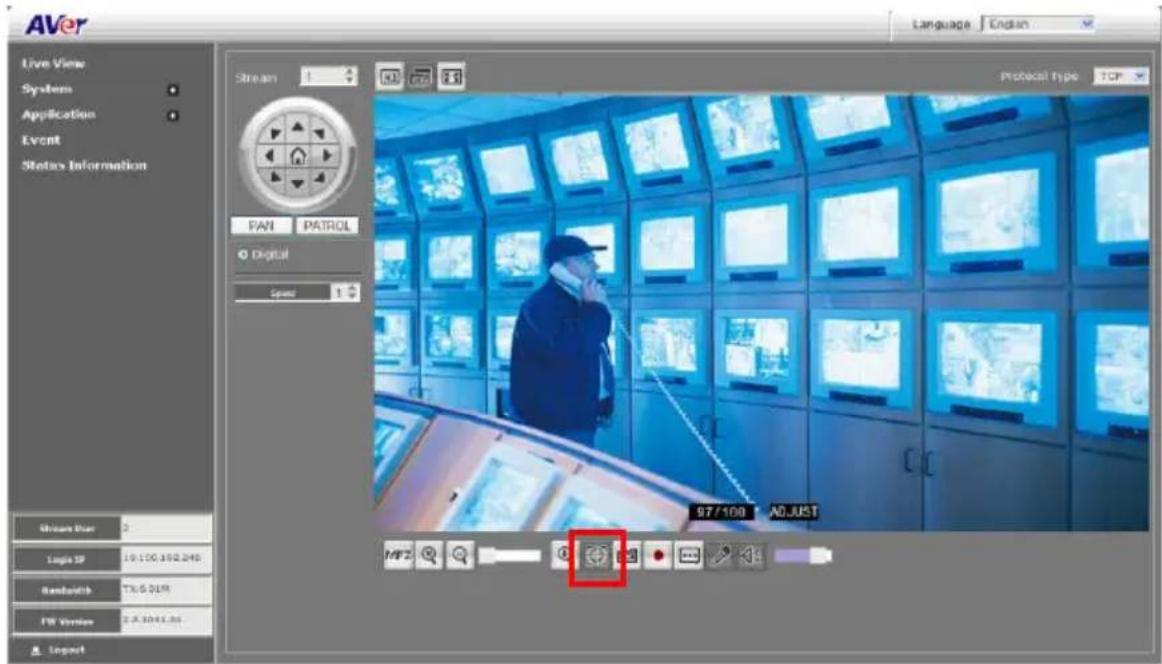
In the preview screen, user should see 2 black blocks (number and text)appearing in the view. The numbers indicate the accuracy of focus as a value and the text shows the current focus status.
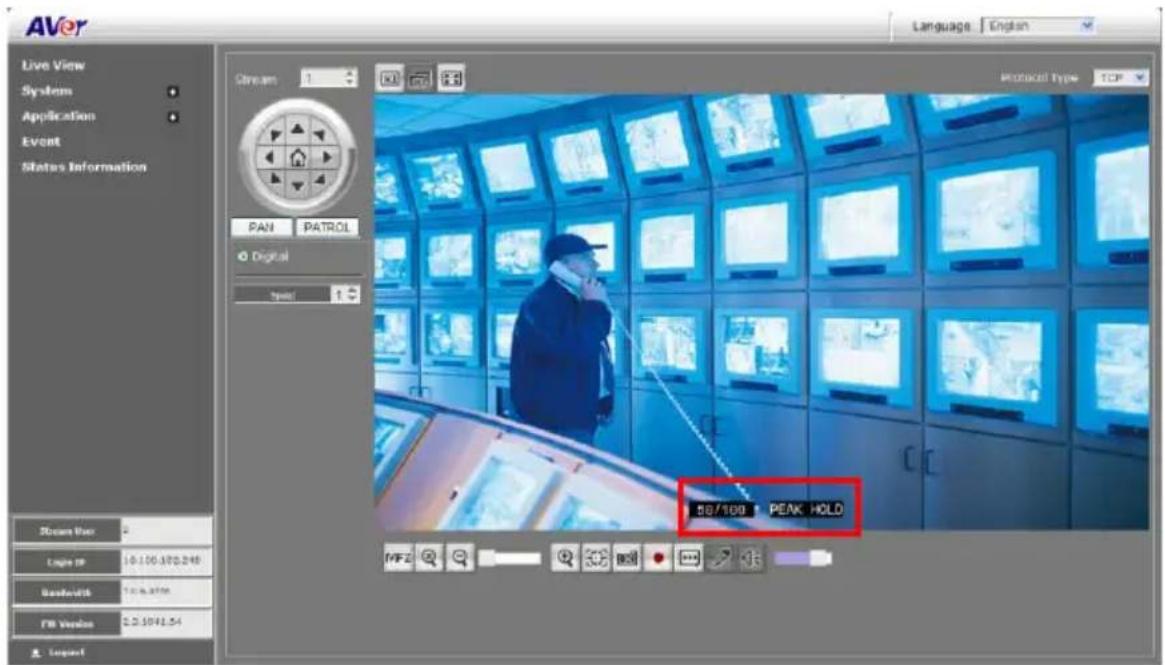
75/100: The first number's value changes as you adjust the focus and will reach 100 when the object to focus on is completely in focus. The second number is the best focused value and will always be presented as 100.
Adjust: This means the Quick Focus is enabled and ready for focus adjustment.
PEAK HOLD : It shows the focus is adjusting.
BEST FOCUS : It shows the current focus value is 100% focused.
■ CCTV Test Monitor
- Connect the CCTV test monitor to IP camera.
- Create a file named "FocusAssistant.txt" (The file name is case sensitive) on an SD card. The FocusAssistant.txt file should not have any content; just an empty file.
- Insert the SD card into the SD card slot of the IP camera. Then, the Quick Focus feature will be activated automatically.
User should be able to see 2 black blocks (number and text) appearing in the view. The numbers indicate the accuracy of focus as a value and the text shows the current focus status. See above for the descriptions.
System > General
In this section, only the admin level user is authorized to configure the IP camera general settings. There are 3 tabs in General settings: Maintenance, Date & Time, and System Log.
System > General > Maintenance
In the Maintenance tab, the admin can easily backup and restore the IP camera setting, reboot the IP camera, reset all settings to factory default, and upgrade the IP camera firmware.

| Name | Function |
| (1) Reboot | Restart the IP camera. |
| (2) Information | Displays the explanation of Reboot, Reset, and Factory default. |
| (3) Reset | Set all the configuration settings back to default except the user management and network settings. |
| (4) Factory Default | Set all the configuration settings back to factory default. |
| (5) Export Settings | Backup all the configuration settings. |
(6) Import Settings
Restore or replace the current settings from a backup file.
(7) Firmware Upgrade
Upgrade the firmware to the latest version.
To Upgrade the IP Camera Firmware
- Download the file from our website and save it onto your computer hard disk.
- Click Browse. Locate and select the file and click Open.
- Click Apply. Wait until you see the massage "Firmware

Upgrade OK!!". You may now click the IE browser refresh button or press F5. The login page will appear.

System > General > Date & Time
In the Date & Time tab, admin can manually set the date and time setting or synchronize it with an Internet time server or the computer date and time setting. This is used to record the time whenever there is a significant occurrence listed in system log and is also used in event scheduling. After completing the setting, click Save to apply the new setting and Cancel to keep the old setting.

| Name | Function |
| (1) Current Date & Time | Display the current date and time setting. |
| (2) Date Format | Select the date display format. |
| (3) Time Zone | Set the local time zone. |
Name
Function
(4) Setting Method
Select the date & time setting method.
Sync with current PC: obtain the date and time setting on the current login computer.
Sync with NTP Server: obtain the date and time setting from NTP server. In the drop-down list, select the NTP host name.

Manual: manually set the date and time. Click Now to set the date base on the computer time setting and Done to close the date and time interface.
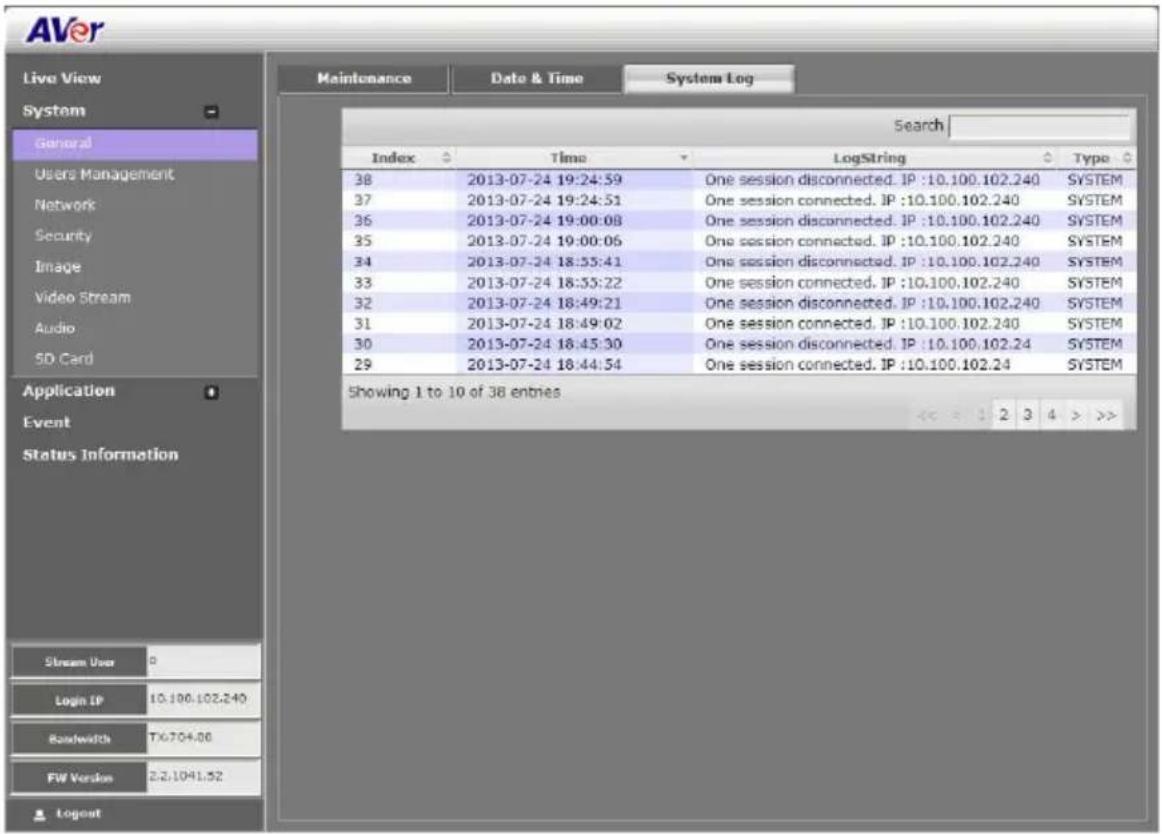
System > General > System Log
In the System Log, admin can view and search any significant event that occurred in the IP camera.
System > User Management
In User Management, only admin level is authorized to create, delete, and edit account to connect to the IP camera and configure the client connection setting. There are 2 tabs in User Management setting: Account and Connection.
System > User Management > Account
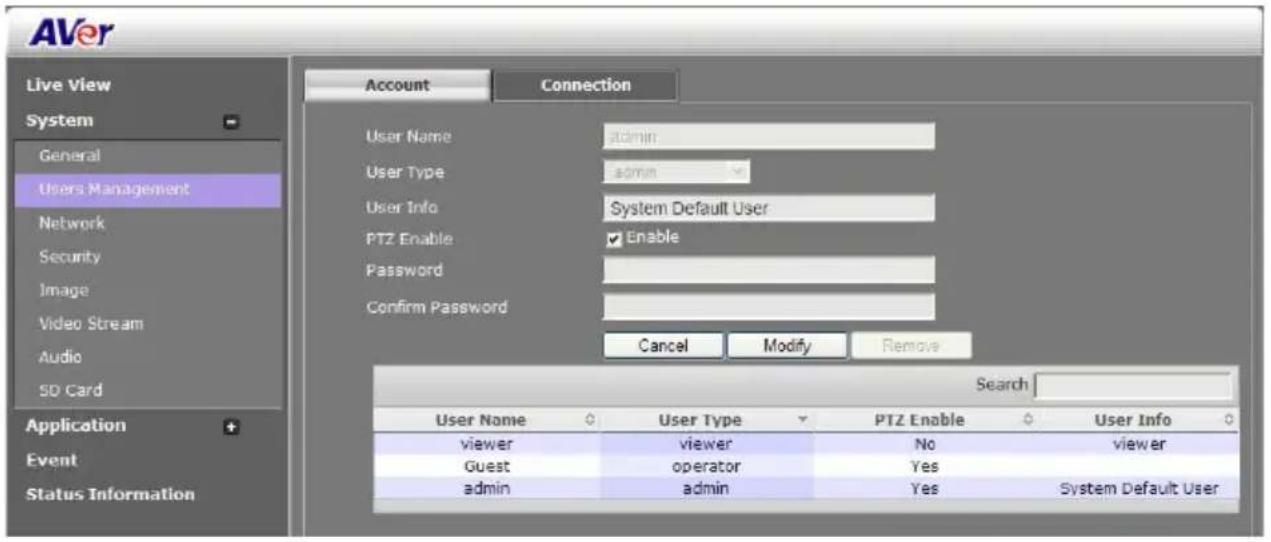
In Account page, admin can create, delete and set the access level of the user account.
To Create a User Account
- Click System > User Management > Account tab.
- Enter the User Name, User Info, and select the User Type. Then, click Create.

| User Type | Access rights |
| Admin | Allowed access to all configuration pages. |
| Operator | Allowed to preview live image, modify and adjust certain settings; except in System > General, User Management, Network, and SD/microSD Card > Management. As for the I/O Control, admin could enable/disable to allow operator to access it. |
| Viewer | Only allowed to access the preview and status information pages. |
- Enter the same password in Password and Confirm Password column. Then click Add.

To Delete or Edit a User Account
Select the user account that you want to delete or edit.
■ Click Cancel to cancel the operation.
- Click Modify to apply the new changes. Make sure to edit the account before clicking the Modify button.
■ Click Remove to delete the account.
System > User Management > Connection
In the Connection page, admin can set the total number of users that can access the IP camera at any one point, and filtering the IP address to allow or deny access to the IP camera.
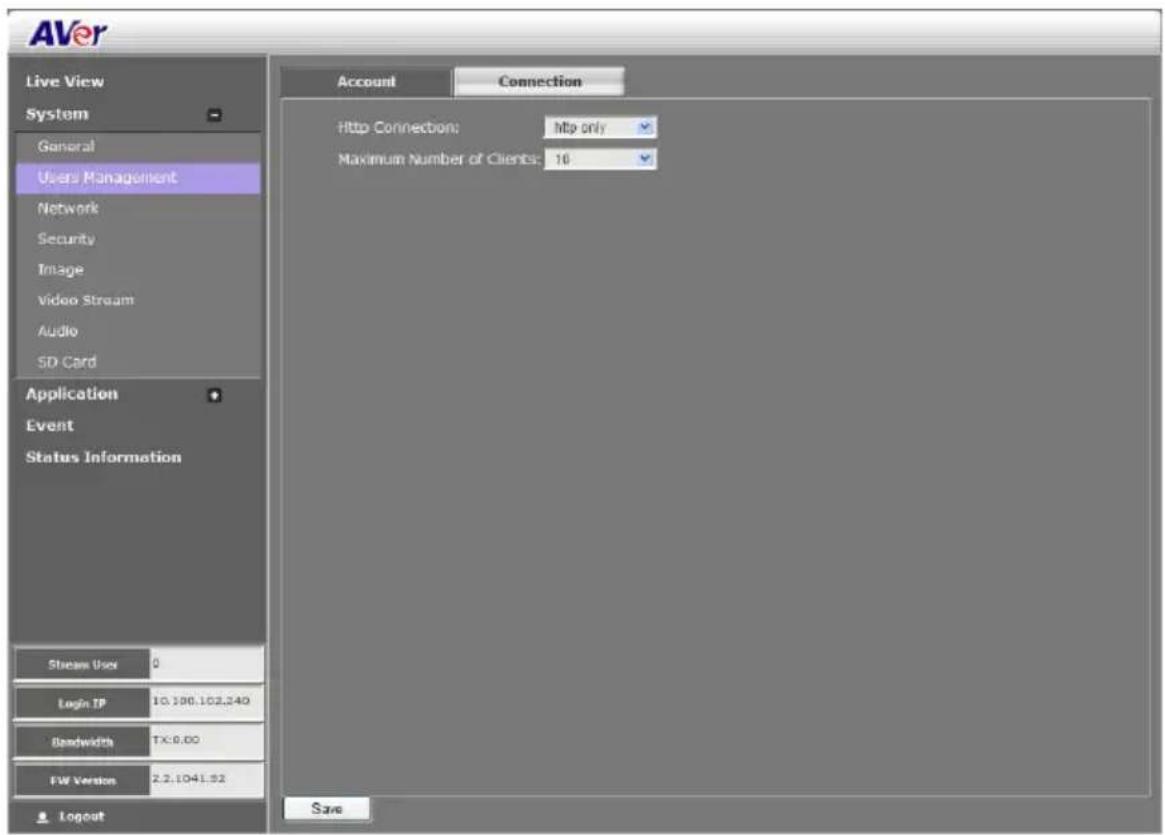
- Http Connection: Select the connection type. For higher security data transmission level, select http & https. With https, the authenticated and encrypted data is sent over a secure SSL (Secure Socket Layer) Internet connection.
■ Maximum Number of Clients: Select the max number of users that can simultaneously access the IP camera.
System > Network
In this section, only admin level is authorized to configure the Network settings.
System > Network > Setting
In the Setting page, you can configure the type of network connection for the IP camera and assign a name for the IP camera. Depending on the network connection, the IP camera can be accessed from the computer within the same local area network (LAN) or anywhere with an Internet connection. After completing the settings, click Save to apply the new setting and Cancel to keep the old setting.

Name
Function
(1) Device Name
Assigned name for the IP camera.
(2) Network Type
Select the type of IP camera network connection.
Name
Function
DHCP: select this option to automatically obtain an IP address from the DHCP server, whenever the IP camera is connected to the network. You can use the IP camera UPnP Discovery software on the CD to easily setup the IP camera network.

Static IP: select this option to manually assign a fix IP address to the IP camera.

PPPoE: select this option to access the IP camera anywhere with Internet connection. To use this option, this requires an account provided by the ISP. Set this setting while connected to the LAN and click Save. Connect the IP camera directly to DSL or cable modem.

(3) IPv6 Settings
Enable IPv6 support
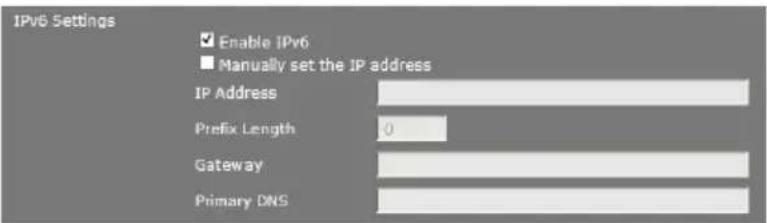
Select "Manually set the IP address" to specify IP address manually.
System > Network > Server
In Server page, you can configure the Email, FTP, and NAS setting. It is necessary to configure the server settings so that the IP camera can perform the task in the Event setting when a trigger is activated. You can configure either one or all of it. After completing the setting, click Save to apply the new setting and Cancel to keep the old setting.

System > Network > Streaming
In the Steaming page, you can configure HTTP, HTTPS, RTSP port and Multicast setting. The multicast setting will work when the user has selected the video stream protocol as multicast in the main UI.

- HTTP Port: Setup web page connecting port and video transmitting port (Default is 80).
■ HTTPS Port: AVer IP Camera supports encrypted browsing using HTTPS.
■ RTSP Port: Setup port for RTSP transmitting (Default is 554).
■ Multicast group address1/2/3: Set an IP address for multicast.
■ Multicast video port 1/2/3: Assign a port for multicast video.
■ Multicast RTCP video port 1/2/3: The port number is a pair with multicast video port. The multicast RTPC video port will be assigned automatically when video port is assigned.
■ Multicast TTL 1/2/3: Assign a value for multicast packet to drop.
System > Network > QoS
In QoS page, you can configure the Quality of Service setting. Enabling the QoS allows you to set the parameter and prioritize the IP camera to provide a stable streaming performance at a certain level in a high traffic network.

System > Network > Others
In the Others page, you can enable/disable the UPnP setting, DDNS function, and SNMP configuration. If your router does not support UPnP function, you can enable the UPnP forwarding and set the port mapping.

■ UPnP Support: The IP camera supports UPnP, if this service is enabled on your computer.
[Note] UPnP must be enabled on your PC.
■ UPnP Port Forwarding: If the IP camera is installed behind a firewall, please select ON to enable it.
■ DDNS Provider: Enter the DDNS provider which you have registered your domain name.
■ DDNS DomainName: Enter the domain name that you have registered.
■ DDNS User: Enter the user name that you have used to apply your domain name on DDNS provider website.
■ DDNS User: Enter the password that you have used to apply your domain name on DDNS provider website.
■ DDNS Status: It shows the DDNS function status.
■ DDNS Enable: Mark the check box to enable or disable the DDNS function.
■ SNMP (Simple Network Management Protocol) provides a simple framework for administering networked hardware. SNMPv1, SNMPv2c, and SNMPv3 can be enabled simultaneously.
SNMPv1 and SNMPv2: The term "Community name" in SNMPv1 and SNMPv2 can be roughly regarded as key. The person who has the community name has the authority to read or edit the information of IP camera via SNMP. Check the box to enable SNMPv1 and SNMPv2 protocol, and specify the community name for Read/Write and Read only community. The user who uses read community name to access the IP camera cannot modify any data of this camera
SNMPv3: For data security reason, the authentication and encryption assurances are added when developing SNMPv3. The user has to give not only the security name (the same as "community name" in v1&v2, or sometimes we call it "context name") but the password in order to access the IP camera. Please set Security name, Authentication type, Authentication password, Encryption type, Encryption password of Write/Read and Read Only respectively. The password must be 8\~64 bits in length.
System > Security
Only admin levels can adjust the Image setting. There are 2 function tabs: IP Filter, 802.1x, RSTP Auth...
System > Security > IP Filter

■ Enable Filter List: Select to turn the IP address filtering on or off.
■ Filter Type: Select to allow or deny the IP address in the filtered list to access the IP camera.
■ Filter List: Create and display the filtered IP address.
To Add Filter
- Click System > Security > IP Filter tab, then, click Add Filter.
- In Rule drop down list, select from the 3 types of rules: Single, Network and Range.
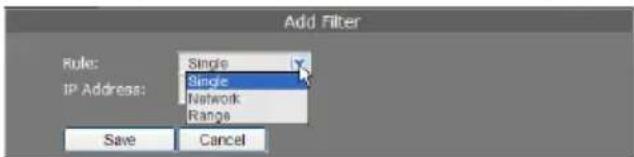
Single – add an IP address

Network – assign a network address and the corresponding subnet mask to be filtered.
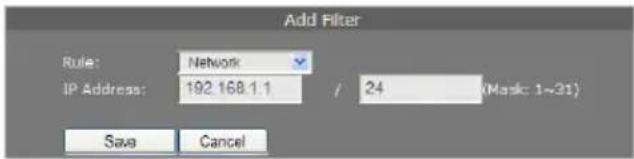
Range – assign a range of IP addresses to be filtered.

- Click Save to add the created data in the filter list or click Cancel to exit without saving data.
■ IPv6 Filter: Please follow the IPv4 filter rules to set up IPv6 filter. The IPv6 setting needs to be enabled first(System > Network > Setting).
System > Security > 802.1X
IEEE 802.1X is an IEEE Standard for port-based Network Access Control. It provides an authentication mechanism to devices wishing to attach to a LAN or WLAN.
Mark the check box to Enable 802.1X protocol. Select the EAPOL (EAP over LAN) version, Authentication method and enter the ID and Password.

System > Security > RTSP Auth.
Enable/disable RTST authentication.

System > Image
Both admin and operator levels can adjust the Image setting. There are 5 function tabs: OSD, Preference, Exposure, Advanced, and Privacy Mask.
System > Image > OSD
In OSD page, you can enable/disable overlaying time stamp, text title and add logo. After completing the setting, click Save to apply the new setting and Cancel to keep the old setting.

| Name | Function |
| (1) Time Stamp | Select the location of the Time Stamp. Click the checkbox to enable/disable the display of the date and time stamp. |
| (2) Customize Title | Select the location of the Text Title. Click the checkbox to enable/disable the display of the text title. |
| (3) Title Text | Enter the title text, e.g. AVer. |
| (4) Logo | Select the location of the logo image file. Click the checkbox to enable/disable the display of the logo. |
| (5) Cross Detection Display | Set the time for cross detection line to be displayed on the live view screen when cross detection is triggered. If user selects “Always” then the cross detection line will be displayed on the live view screen all the time. |
| (6) Customize Logo | Upload your company logo. The maximum size is 64 x 64 pixels. |
System > Image > Preference
In the Preference page, you can tune the IP camera white balance, select display color or black & white, set the flicker frequency, change the video orientation, and adjust the brightness and contrast. After completing the setting, click Save to apply the new setting and Cancel to keep the old setting.

System > Image > Exposure
In the Exposure page, you can set the exposure zone, exposure mode, and calibrate the DC Iris. After completing the setting, click Save to apply the new setting and Cancel to keep the old setting.
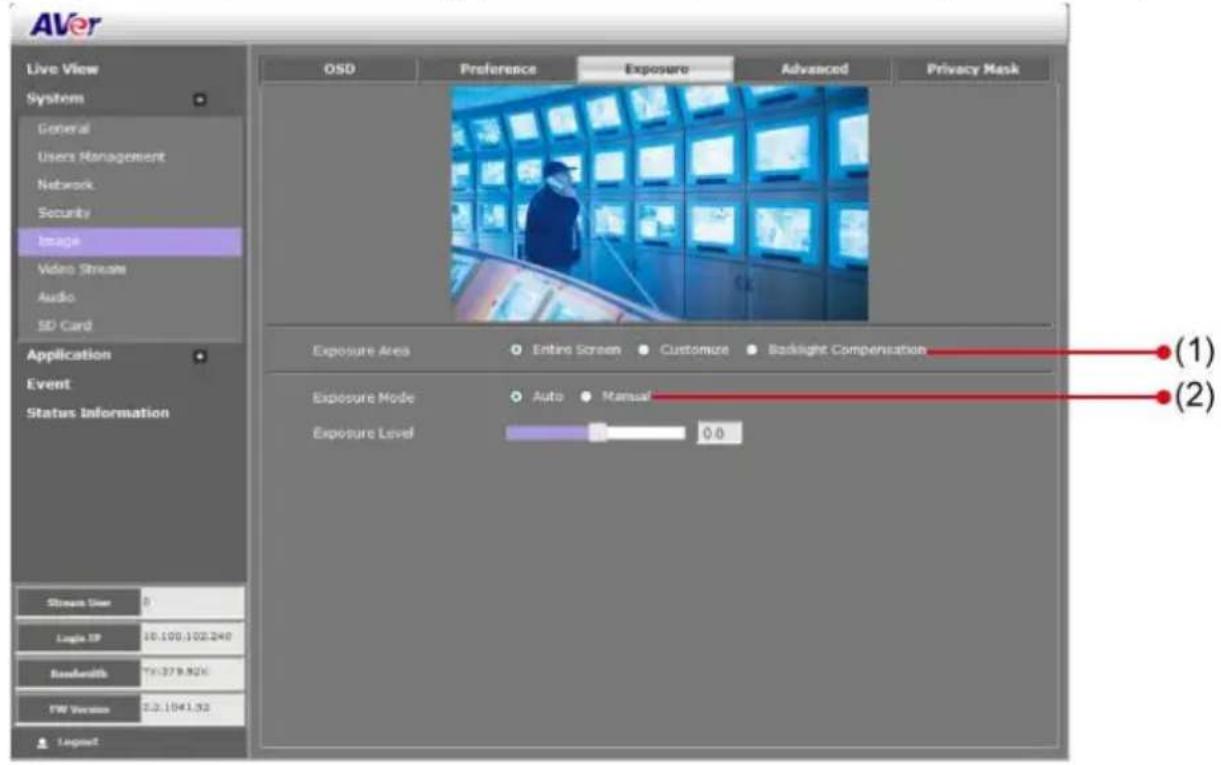
| Name | Function |
| (1) Exposure Area | Select the exposure area to define the light distribution and bring out more details.Entire screen:measure the entire screen to adjust the exposure.Customize:measure the exposure to where the adjustable and movable frame on the screen is located. Move the spot to dark zone to adjust the light condition.Backlight compensation:measure the exposure at the center of the screen. |
| (2) Exposure Mode | Select to automatically or manually adjust the exposure.Auto:adjust exposure level from -2.0 to +2.0 Manual:adjust max shutter and gain control Manual:adjust max shutter and gain control |
System > Image > Advanced
In the Advanced page, you can configure the Wide Dynamic Range, Denoise, IR-Cut Filter, B/W image at night and IR LED Strength. After completing the setting, click Save to apply the new setting and Cancel to keep the old setting.
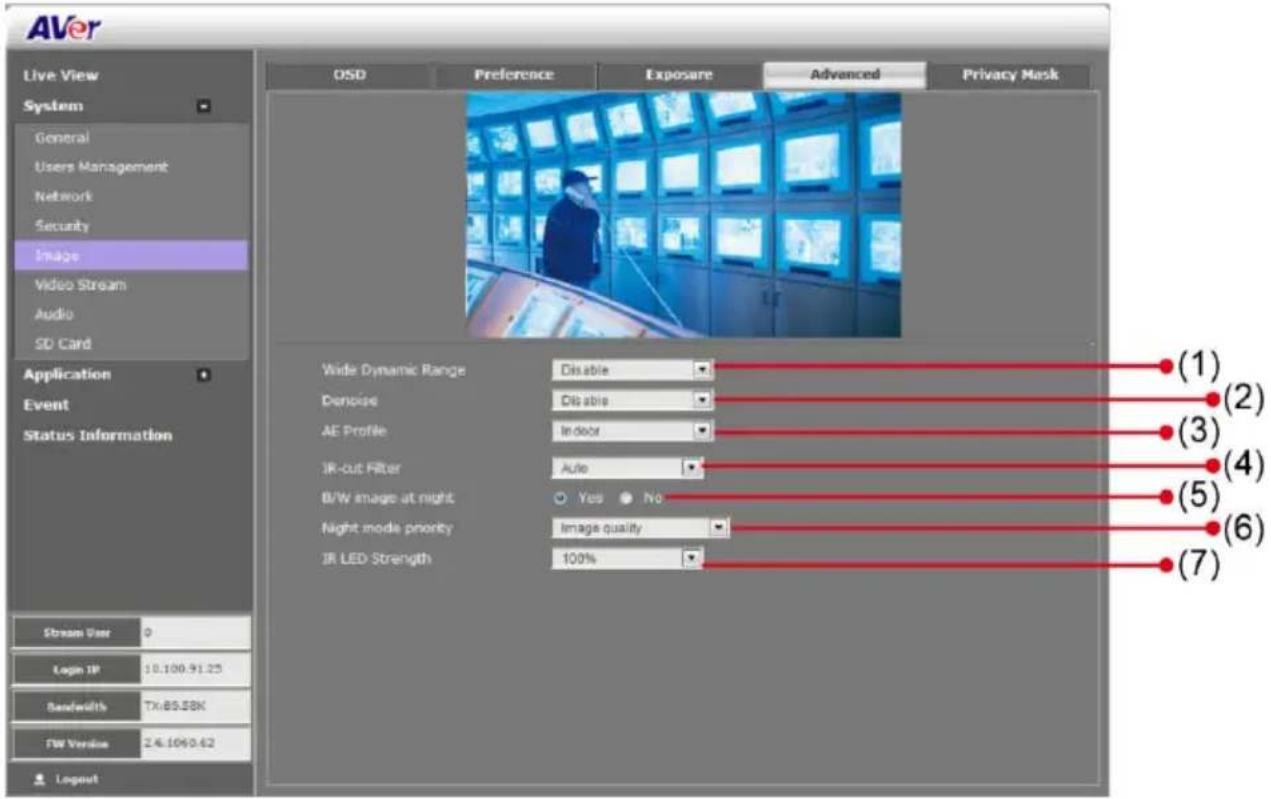
| Name | Function |
| (1) Wide Dynamic Range | WDR effectively balances the video image on the screen in both bright and dark areas making it possible to see clear details. There are 3 levels for your choice or disable WDR. |
| (2) Denoise | Select Disable/2D/Auto to reduce the excessive noise on the video image. Auto: automatically switch between 2D and Disable. Use Sensitivity option to adjust sensitive level. The higher level means the higher the sensitivity.Denoise Auto Sensitivity 0 Auto: automatically switch between 2D and Disable. Use Sensitivity option to adjust sensitive level. The higher level means the higher the sensitivity.Denoise Auto Sensitivity 0 |
| (3) AE Profile | Select auto exposure mode – Indoor, outdoor, ManualIRIS. |
| (4) IR-cut Filter | The IR cut filter is a mechanism that prevents the infrared light from hitting the sensor. During day time the IR light has an interfering effect on the image quality of the camera, which leads to corruption of color and contrast as well as blurring. At night time, the infrared light is used to achieve more detailed images in the dark or with low ambient light.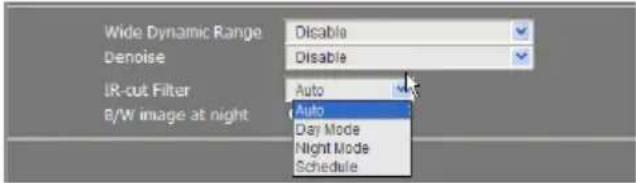 Auto: automatically switch on/off the IR cut filter. It uses the light sensor in front of the camera to determine the level of ambient light.Day Mode: switch on the IR cut filter at all times to prevent the IR light from hitting the sensor so that the color will not be corrupted.Night Mode: switch off the IR cut filter at all times to let the sensor receives the IR light which could help improve low light sensitivity.Schedule: specify the time on when to switch off the IR cut filter to night mode. The time format is hh:mm and in 24-hour clock time. Auto: automatically switch on/off the IR cut filter. It uses the light sensor in front of the camera to determine the level of ambient light.Day Mode: switch on the IR cut filter at all times to prevent the IR light from hitting the sensor so that the color will not be corrupted.Night Mode: switch off the IR cut filter at all times to let the sensor receives the IR light which could help improve low light sensitivity.Schedule: specify the time on when to switch off the IR cut filter to night mode. The time format is hh:mm and in 24-hour clock time. |
| (5) B/W image at night | Select to enable/disable switching to B/W during night mode. |
| (6) Night mode priority | Select the one you want to prioritize during night mode image quality, frame rate or auto. |
| (7) IR LED Strength | Select the intensity of IR LED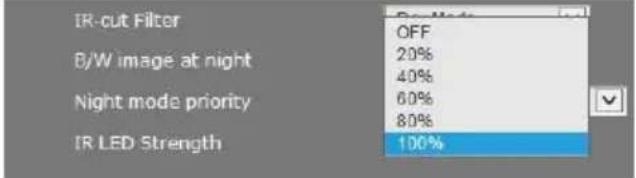 [Note] The IR LED Strength isn't support in the SF2121H Series, FX2000, and FX3000-R. [Note] The IR LED Strength isn't support in the SF2121H Series, FX2000, and FX3000-R. |
System > Image > Privacy Mask
In the Privacy Mask page, you can enable 3 privacy masks. Simply adjust the size and position the mask on the area you want to conceal. The viewer will not be able to see the masked area. It will cover the video screen with black frame.

System > Stream Setting
Both admin and operator levels can configure the Video Stream. After configuring the video stream setting, click Save to apply the new setting and Cancel to keep the old setting.
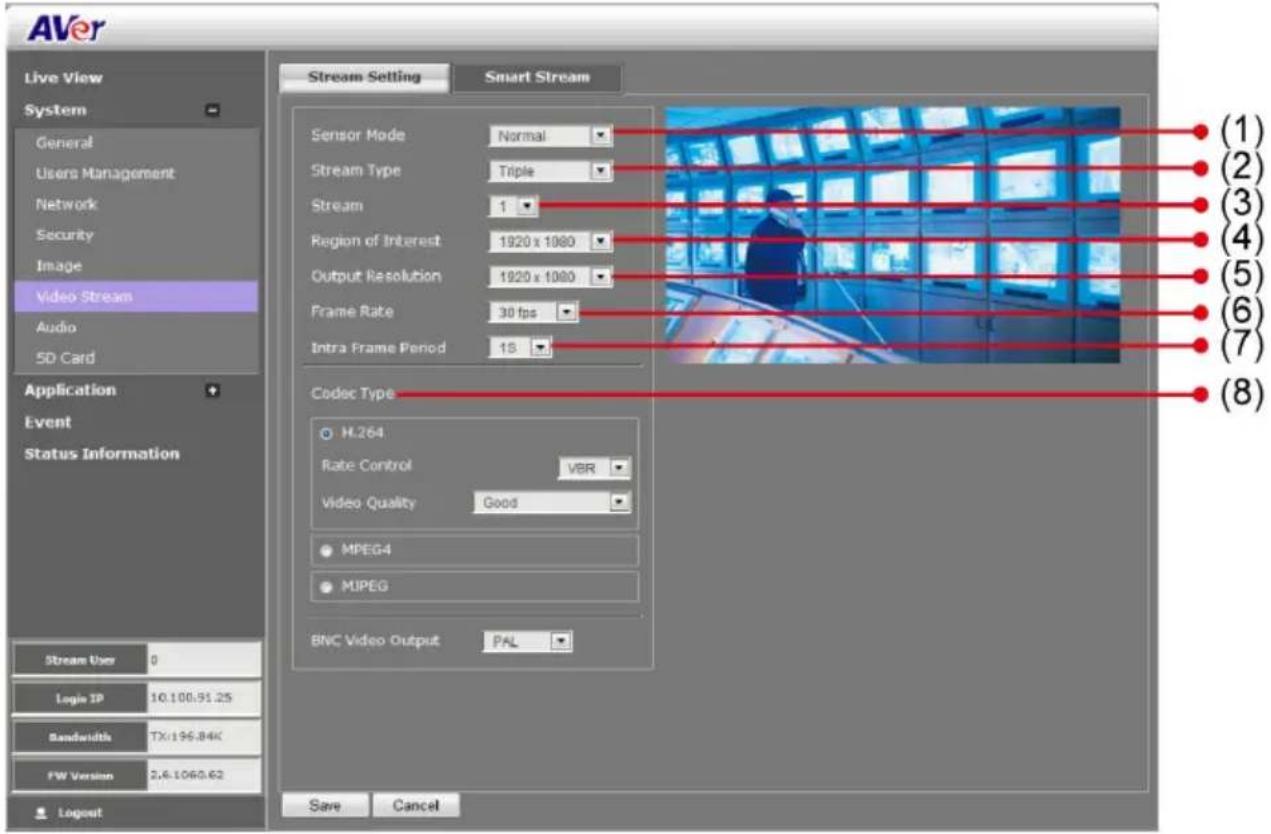
| Name | Function |
| (1) Sensor Mode | Select sensor input resolution from Normal, Wide Angle, Corridor 90°, or Corridor 270°. In corridor mode, the screen will flip to allow more deep view. * ( Available for 3M pixel or above model ) * ( Available for 3M pixel or above model ) |
| (2) Stream Type | Select to transmit single or simultaneous multiple streams of 2 or 3 videos. |
| (3) Stream | Select the streaming source. |
| (4) Region of Interest | Select the cropping size of video. |
| (5) Output Resolution | Select the video size. |
| (6) Frame Rate | Select frame rate per second of video |
| (7) Intra Frame Period | Select frame rate interval time period. |
| (8) Code Type | Select the type of video compression codec. The supported codec is H.264, MPEG4, and MJPEG. On each stream, adjust rate control and video quality setting. VBR (Variable Bit Rate): by default use this setting if there is a need to maintain the image quality whenever there is lot of activities on the scene or no motion. This setting keeps the video stream as constant as possible which increases the bandwidth requirement when there is high motion and decreases when there is no motion. The bandwidth must be able to accommodate high throughputs.CBR (Constant Bit Rate): use this setting if there is bandwidth concern. This setting is restricted to keep the bit rate setting. This could affect the image quality and frame rate if there is high activity that result in a bit rate that is higher than the set bit rate. VBR (Variable Bit Rate): by default use this setting if there is a need to maintain the image quality whenever there is lot of activities on the scene or no motion. This setting keeps the video stream as constant as possible which increases the bandwidth requirement when there is high motion and decreases when there is no motion. The bandwidth must be able to accommodate high throughputs.CBR (Constant Bit Rate): use this setting if there is bandwidth concern. This setting is restricted to keep the bit rate setting. This could affect the image quality and frame rate if there is high activity that result in a bit rate that is higher than the set bit rate. |
System > Smart Stream

| Name | Function |
| (1) Stream | Select the streaming source. This option only applies to H.264. |
| (2) Quality | High:video quality of selected area is better than that of un-selected area.Low:video quality of selected area is worse than that of un-selected area |
System > Audio
Both admin and operator levels can configure the IP camera audio setting. After configuring the Audio setting, click Save to apply the new setting and Cancel to keep the old setting.
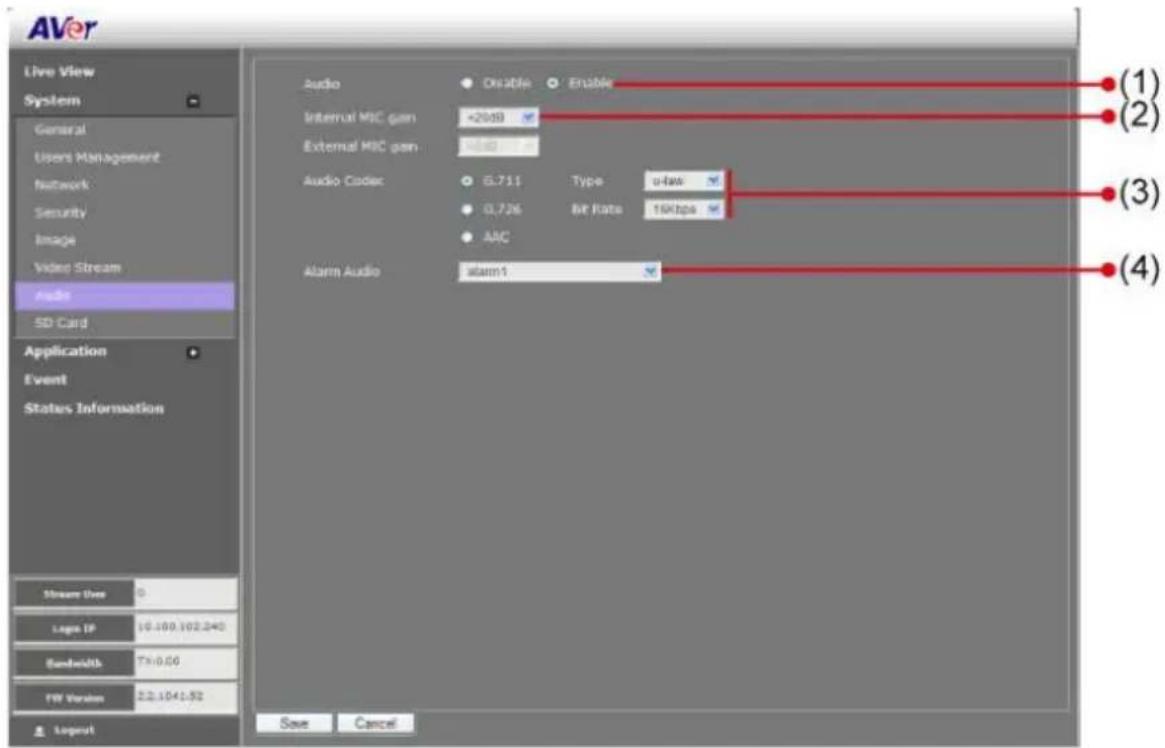
| Name | Function |
| (1) Audio | Select to enable/disable the IP camera built-in mic and mic port. |
| (2) Internal/External MIC gain | Select to boost up the internal/external mic gain or set to normal. |
| (3) Audio Codec | Select the audio protocol, algorithm, and audio bit rate.G.711: uses Pulse code modulation (PCM) of voice.G.726: uses 40, 32, 24, 16 kbit/s adaptive differential pulse code modulation (ADPCM)AAC: uses AAC codec |
| (4) Alarm Audio | Select to choose from 2 types of alarms sound or customer alarm to use the uploaded alarm sound. The supported sound format is in *.wav (PCM 8KHz/16bit Mono, 10 seconds). |
System > SD/microSD Card > Management
Both admin and operator levels can manage the SD/microSD Card local storage. After managing the SD/microSD Card setting, click Save to apply the new setting and Cancel to keep the old setting. We recommend formatting the SD/microSD card when using it for the first time.

| Name | Function |
| (1) SD/microSD Card Info | Shows the SD/microSD card details. No details will appear if SD/microSD Card is not inserted. |
| (2) Cycle Storage | Enable/disable cycle recording. The old file in the SD/microSD card will be overwritten with the latest one when it has reached the maximum capacity. |
| (3) Automatic Cleanup | Enable/disable automatic clear the data in SD/microSD card. The file will be deleted when it reaches the number of days set in Delete data after [xx] days. |
| (4) Delete data after | Enter the number of days you wish to retain a file. |
| (5) Format | To delete all the data in the SD/microSD card. |
System > SD/microSD Card > File Search
Use this to search the captured images in the SD/microSD card.

Application > Motion Detection
Both admin and operator levels can specify up to 3 areas on the screen to monitor the motion. In the motion detection page, the frame will blink when the motion detected has reached the percentage threshold setting. This feature can be utilized to trigger a response in the Event setting.

To Set the Motion Detection
- Click Application > Motion Detection.
- Enable the region check box (Region 1, Region 2, Region 3) to create a motion detection frame.
- Move and adjust the frame to the area you want to detect the motion.
- Adjust the sensitivity and percentage. Sensitivity detects the motion on the screen and assesses the changes in pixel thru percentage. The motion detection will activate when the Monitor level reaches the defined percentage.
- Click Save to apply the new setting and Cancel to keep the old setting.
Application > Cross Detection
The cross detection function is used to detect moving objects that cross a virtual line that user has set up in the IP camera application in order to trigger alarms.
[Note] The cross detection function is available under the following conditions:
- CODEC type set to H264 or MPEG4.
- Stream type set to [triple] and Stream 3 resolution set to 640x480.

To Set the Cross Detection
- Click Application > Cross Detection.
- Enable Cross Detection Area 1/2 check box
- You will see the red/green line as shown on the video screen.
- Drag the red line (area 1) or green line (area 2) to set the area for cross detection. You can set both line for cross detection or one line only. There is no priority in terms of either of the line; the colors exist so users could tell the difference when both lines are set.
- After setting the cross detection area, click the arrow to set the cross detection direction. The direction of the arrow points to when detection should occur whenever something moves across the line in the same direction as the arrow.
- Click Save to save the setting.

- Go to System > Image > Cross Detection Display to set the cross detection line(s) display status. If user wants to see the cross detection line(s) always on display on the screen, select always. If user only wants to see the cross detection line(s) when the cross detection has triggered, select the time in second (1s, 2s, 3s, 4s, or 5s) to display the cross line(s) on screen.
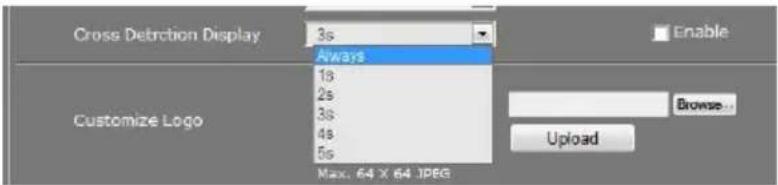
- To set the cross detection alarm, please go to the Event Setting.
Application > ePTZ
Both admin and operator levels can customize the ePTZ setting. In this section, you can set the patrol target area, patrol sequence and dwelling time.

To Setup the ePTZ
- Click Application > ePTZ.
- Use the direction buttons and zoom button to locate the patrol target area. Press 🔒 to view the full image and reset the zoom level.
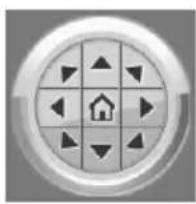
natural_image
Circular icon with a house symbol at center, surrounded by eight directional arrows (no text or labels)
- Type a name for the patrol shooting area e.g. type "UpperLeft" in the Name text box and press Add button. The preset target area will be listed in the User Preset Locations. Click ✗to delete the preset target area and ☑to show the preset target area. Repeat step 2 and 3 to add more preset locations.

- Select the preset target area in the list and press to create the patrol sequence. The selected present target area will be listed in the Patrol Locations.
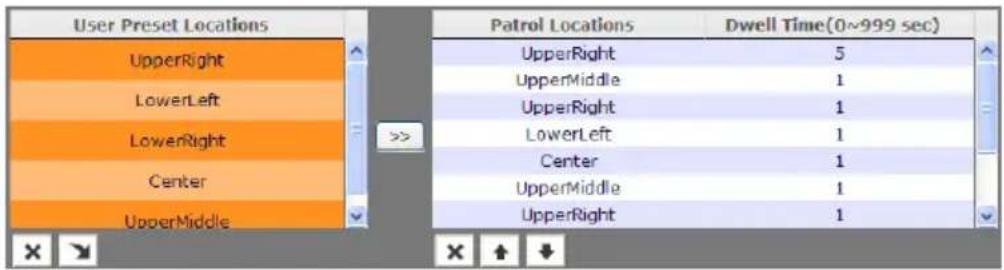
- Set the dwelling time for how long you want to stay in the preset target area. Double-click and enter the time. Then click OK or press enter to apply the changes.

- Click ☐ to delete the selected preset location in the Portal Locations list and to arrange the patrol order.
- Click Save to implement the preset patrol setting.
Event Setting
Both admin and operator levels can configure the Event setting. In this section, the IP camera can be configured to perform an action when an event is triggered at the specified time.

To Setup the Event
- Click Event.
- On the time table, click-drag to select the time period to specify the period of the event.
- Type a name for the event. The naming rule is no space between each character and number and no special character. The length of name is 20 in both characters and numbers.
- Select the color to represent the event
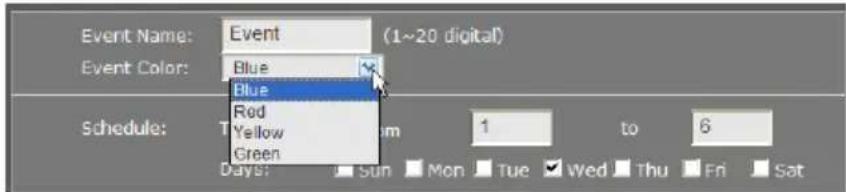
- Set the schedule. You can set the time period and choose another day(s) to apply the same event setting.

- Enable the type of event for the IP camera to trigger.

- Alarm Interval
This triggers the IP camera based on the time that use has set in Minutes column. The interval time rage is 1\~60 minutes.
- Motion Detection Region 1/2/3
This triggers the IP camera when a motion is detected on the motion detection region.
- Cross Detection Area 1/2
This triggers the IP camera when a cross detection is detected on the cross detection area.
- Digital Input
This triggers the IP camera when the external digital input device or sensor is activated.
- SD Card / microSD Card
This triggers the IP camera when the SD/microSD card is removed.
- Network
This triggers the IP camera when the Internet connection is disconnected.
- Select the type of action for the IP camera to perform when a trigger is activated. Set the duration. Choose Digital Output to send recorded video or still image, Alarm Audio to sound the alarm, or Event Booster to adjust frame rate back to 30fps for alarm video capturing. Then, select the type of server/media to where to send the file. To configure the FTP and NAS setting, go to System >
Network > Server tab.
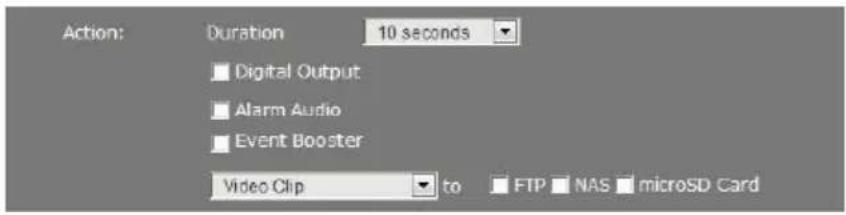
[Note]
a. Snapshot and System log support sending the file thru Mail, and storing in FTP, NAS or SD/microSD card. You can enable multiple options to send and save the captured image.
b. Video Clip supports storing in FTP, NAS or SD/microSD card. You can only select one storage option to save the video file. For better performance, we recommend to set the video stream is default value.
- Click OK to add the event setting, Delete to remove, and Cancel to without save and close the
event setting.
Status Information
Show the information about the device and network setting.

Using RTSP and ONVIF Protocol to Access the IP Camera
When use the RTSP and ONVIF protocol to access the IP camera, please refer to the below path link and port information.
RTSP
| Stream 1 | RTSP://:554/live_st1 |
| Stream 2 (if stream 2 is enable) | RTSP://:554/live_st2 |
| Stream 3 (if stream 3 is enable) | RTSP://:554/live_st3 |
■ ONVIF
ONVIF protocol port = 80
COPYRIGHT
© 2014 AVer Information Inc. All rights reserved.
All rights of this object belong to AVer Information Inc. Reproduced or transmitted in any form or by any means without the prior written permission of AVer Information Inc. is prohibited. All information or specifications are subject to change without prior notice. "AVer" is a trademark owned by AVer Information Inc. Other trademarks used herein for description purpose only belong to each of their companies.
NOTICE
SPECIFICATIONS ARE SUBJECT TO CHANGE WITHOUT PRIOR NOTICE. THE INFORMATION CONTAINED HEREIN IS TO BE CONSIDERED FOR REFERENCE ONLY.
- Using the IP Camera Browser Interface
- Live View
- Using the MFZ Function
- ■ MFZ supported model list
- To user MFZ function
- Using Quick Focus
- ■ Web UI Interface
- ■ CCTV Test Monitor
- System > General
- System > General > Maintenance
- To Upgrade the IP Camera Firmware
- System > General > Date & Time
- Name
- Function
- Setting Method
- System > General > System Log
- System > User Management
- System > User Management > Account
- To Create a User Account
- To Delete or Edit a User Account
- System > User Management > Connection
- System > Network
- System > Network > Setting
- System > Network > Server
- System > Network > Streaming
- System > Network > QoS
- System > Network > Others
- System > Security
- System > Security > IP Filter
- To Add Filter
- System > Security > 802.1X
- System > Security > RTSP Auth.
- System > Image
- System > Image > OSD
- System > Image > Preference
- System > Image > Exposure
- System > Image > Advanced
- System > Image > Privacy Mask
- System > Stream Setting
- System > Audio
- System > SD/microSD Card > Management
- System > SD/microSD Card > File Search
- Application > Motion Detection
- To Set the Motion Detection
- Application > Cross Detection
- To Set the Cross Detection
- Application > ePTZ
- To Setup the ePTZ
- Event Setting
- To Setup the Event
- - Alarm Interval
- - Motion Detection Region 1/2/3
- - Cross Detection Area 1/2
- - Digital Input
- - SD Card / microSD Card
- - Network
- [Note]
- Status Information
- Using RTSP and ONVIF Protocol to Access the IP Camera
- RTSP
- ■ ONVIF
- COPYRIGHT
- NOTICE
Brand : AVERMEDIA
Model : FB3028-RT2
Category : Security Camera