
TA2047B - Car kit Scosche - Free user manual and instructions
Find the device manual for free TA2047B Scosche in PDF.


| Product Type | Car Stereo Installation Kit |
| Brand | Scosche |
| Model | TA2047B |
| Compatible Vehicles | Select 2007-2014 Toyota, Scion, and Lexus models |
| Material | High-grade ABS plastic |
| Color | Black |
| Dimensions (H x W x D) | 4.0 x 7.0 x 1.5 inches |
| Weight | 0.5 lbs |
| Mounting Type | Replaces factory radio housing |
| ISO Din Support | Single DIN or Double DIN with included adapter |
| Main Function | Enables installation of aftermarket stereo with factory look |
| Included Components | Dash kit, mounting brackets, screws, trim ring |
| Warranty | 1 year limited |
| Maintenance | Wipe with dry or slightly damp cloth |
| Safety | Ensure secure fit to prevent vibration or dislodging |
| Spare Parts | Available through Scosche customer service |
| Repairability | Not repairable; replace if damaged |
| Country of Origin | China |
| Certification | ISO 9001 compliant manufacturing |
Frequently Asked Questions - TA2047B Scosche
User questions about TA2047B Scosche
0 question about this device. Answer the ones you know or ask your own.
Ask a new question about this device
Download the instructions for your Car kit in PDF format for free! Find your manual TA2047B - Scosche and take your electronic device back in hand. On this page are published all the documents necessary for the use of your device. TA2047B by Scosche.
USER MANUAL TA2047B Scosche
natural_image
Black-and-white photo of various electronic components including a central device and multiple connectors (no visible text or symbols)1987-UP TOYOTA VEHICLES
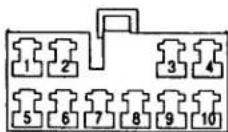
Front Speaker and PowePlug
1 = Right Front Negative
2 = Left Front Negative
3 = Accessory +12V
4 = +12V Constant, Battery
5 = Right Front Positive
6 = Left Front Positive
7 = Chassis Ground
8 = Empty
9 = Empty
10 = Illumination +12V
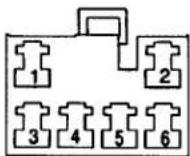
Rear Speaker Plug
1 = Right Rear Negative
2 = Left Rear Negative
3 = Right Rear Positive
4 = Empty
5 = Empty
6 = Left Rear
Positive
LIABILITY DISCLAIMER
This instruction booklet is based on carefully documented data and research of automobile dash disassembly, wire harness/codes and information pertaining to installation of this kit (142TA2047B) in 2001-UP Toyota RAV4 / 2000-UP MR2 Spydar vehicles. Scosche Industries, Inc. can not be held responsible for discrepancies/inconsistencies that may occur due to the automobile manufacturing changes or options, or damage that may occur in the automobile during the installation of components while using this booklet.
If you have any further questions, call
©2001 SCOSCHE INDUSTRIES, INC.
TECH HELP 1-800-621-3695, ext. 3
SI 9/01-142TA2047B (3000005)
INTRODUCTION
This premium installation kit is for 2000-Up Toyota MR2 Spyder and 2001-Up RAV4 vehicles. Included are all of the parts you need to mount your car stereo/cassette or CD player into your vehicle's dash. Refer to the individual instruction in this manual to remove your vehicle's factory radio and assemble the kit.
CAUTION: Disconnect your vehicle's negative battery terminal before the installation to help prevent electrical damage. We recommend the use of a volt/ohm meter over a test light to check wiring. A test light or grounded wire probe can cause damage to the vehicle's computer and/or diagnostic systems. Avoid all factory air bag wiring - air bags can accidentally deploy causing serious injury or death.
NOTES:
• See your vehicle's instructions for any special tools your installation requires.
- Read all instructions accompanying your car stereo/cassette player for proper wiring and mounting instructions.
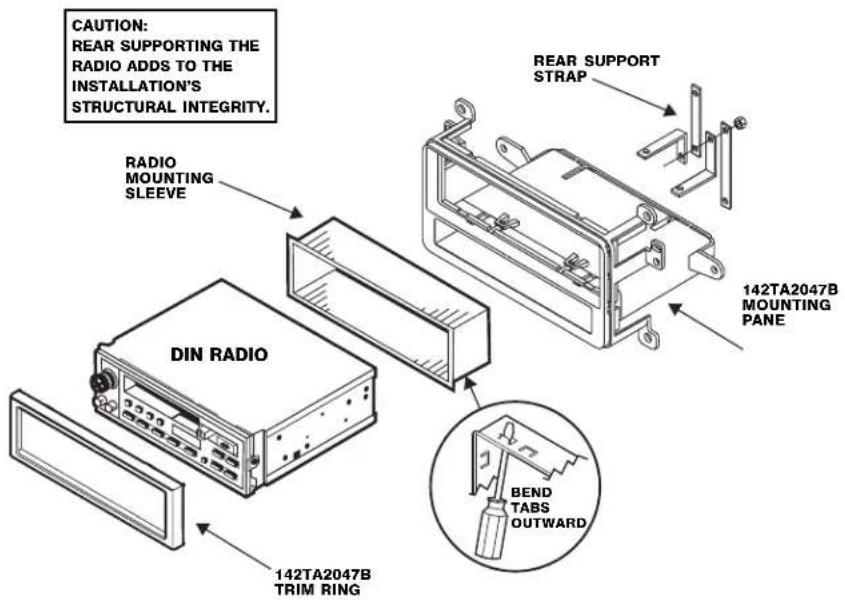
DIN RADIO INSTALLATION (DETACHABLE FACE/PULLOUT)
Slide the mounting sleeve (metal shroud) into the panel's radio opening and bend all available mounting tabs outward (see inset). Once the radio mounting sleeve has been fastened to the kit panel, slide the radio into the mounting sleeve until it locks into place.
NOTE: The mounting sleeve must be removed from the radio first!
Your radio may be snapped into its sleeve. Slide the mounting
sleeve (metal shroud) off the radio towards the back.
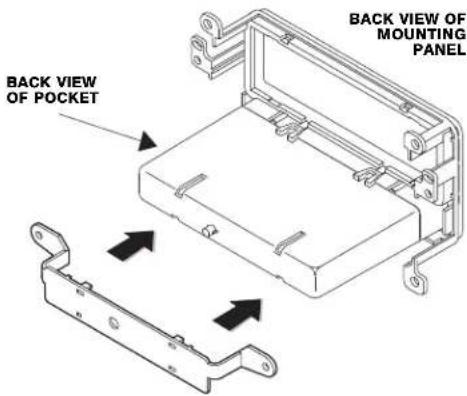
RAV4 BRACKET ASSEMBLY
RAV4 BRACKET INSTALLATION
- The bracket is only used for installation in Toyota RAV4.
- Align the snaps of RAV4 mounting bracket with the pocket slots.
- When aligned, snap bracket carefully into position until locked.
CAUTION: REAR SUPPORTING THE RADIO ADDS TO THE INSTALLATION'S STRUCTURAL INTEGRITY.
2000-UP TOYOTA MR2 SPYDER
RADIO REMOVAL AND IN-DASH INSTALLATION:
Note: The factory radio provision is for a Double ISO/DIN style radio.
- Use panel removal tool to remove left and right plastic side panels, extract (1) Phillips screw from behind each panel.
- Remove climate control knobs, and extract (2) Phillips screws.
- Remove radio trim bezel.
- Remove ash tray and extract (1) 10mm bolt on the right side, carefully pry out ash tray trim bezel, disconnect and remove.
- Extract (4) Phillips screws securing radio, disconnect and remove from dash.
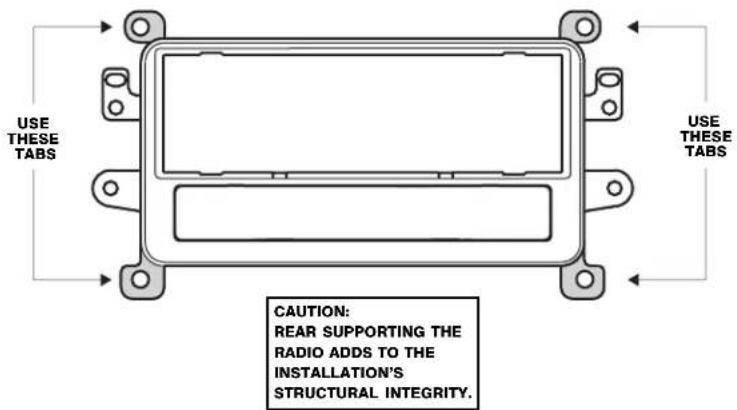
USE THE SHADED MOUNTING TABS. CUT OFF THE REMAINING TABS AND DISCARD.
2001-UP TOYOTA RAV4
RADIO REMOVAL AND IN-DASH INSTALLATION:
Note: The factory radio provision is for a double ISO/DIN style radio.
1. Extract (4) 5mm Hex screws from radio trim bezel and pry off using panel removal tool.
2. Extract (4) 10mm bolts securing radio, pull away, disconnect, and remove.
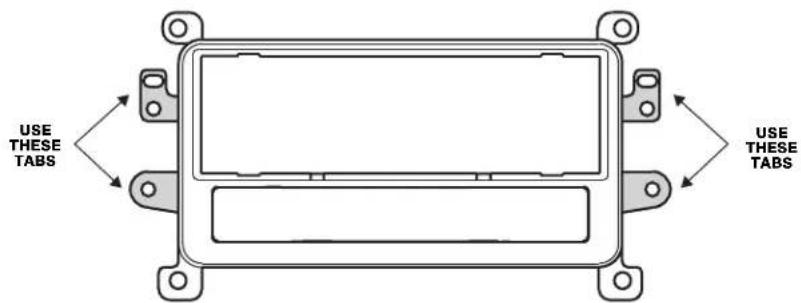
CAUTION: REAR SUPPORTING THE RADIO ADDS TO THE INSTALLATION'S STRUCTURAL INTEGRITY
USE THE SHADED MOUNTING TABS. CUT OFF THE REMAINING TABS AND DISCARD.
Brand : Scosche
Model : TA2047B
Category : Car kit