A08-LS1500-W - Barcode scanners Atlantis Land - Free user manual and instructions
Find the device manual for free A08-LS1500-W Atlantis Land in PDF.

| Product type | Handheld barcode scanner |
| Brand | Atlantis Land |
| Model | A08-LS1500-W |
| Dimensions (approx.) | 170 x 70 x 100 mm |
| Weight (approx.) | 150 g |
| Interface | USB |
| Power source | USB bus-powered |
| Scan type | 1D Laser |
| Scan rate | 100 scans per second |
| Operating system compatibility | Windows, macOS, Linux |
| Main functions | Reading barcodes, data transmission via USB-HID |
| Maintenance and cleaning | Clean lens with a soft, dry cloth; avoid liquids |
| Safety precautions | Do not drop or expose to extreme temperatures |
| Spare parts and reparability | Replacement USB cable available; no user-serviceable parts |
| General information | Includes user manual in PDF (2 pages) |
Frequently Asked Questions - A08-LS1500-W Atlantis Land
User questions about A08-LS1500-W Atlantis Land
0 question about this device. Answer the ones you know or ask your own.
Ask a new question about this device
Download the instructions for your Barcode scanners in PDF format for free! Find your manual A08-LS1500-W - Atlantis Land and take your electronic device back in hand. On this page are published all the documents necessary for the use of your device. A08-LS1500-W by Atlantis Land.
USER MANUAL A08-LS1500-W Atlantis Land
How Do You Program Your Scanner?
1. Scan Start Configuration


Start Configuration
-
Scan all necessary able for parameters that Meet your application

Interface selection
Reading mode
Language .....etc. -
Scan end configuration to save to save the changes.


End Configuration
Resetting The Standard Product Defaults
If you aren't sure what programming options are in your scanner, or you've changed some options and want the factory settings restored, scan the bar code below.

Standard Product
Default Setting

Industrial 2 of 5 on

Matrix 2 of Box
GS1 DataBar Limited on

[Barcode]
GS1 DataBar Expanded on
- Disable

[NO TEXT]

1

1

EAN13 off

FAN8 off

1
1

*G51 DataBar Limited off

*GS1 Datafter Expanded of
USB Keybaord Language
* Please scan the following barcode directly with your USB receiver on.

* US

Itlian
Terminator selection

None * CR + LF


Tab CR

LF

Atlantis
Wireless BARCODE SCANNER
Quick Start Guide
Before Getting Started
Open the package and check every accessory


About your Atlantis wireless scanner
KC-32007B is one on one wireless data communication protocol. The scanner is already paired with the USB receiver. Just easily plug USB receiver and start the operation. The scanner on a real time basis, if the scanner is connected, the barcode is decoded and transmitted to the remote host without any delay. If the scanner is not connected or out of range, the data is lost (status: 4 boeps)
Note:
New batteries should be fully charged before their first use.
Wake up your Atlantis wireless scanner
Press and release the trigger on your scanner to activate it. Your scanner is ready to work when blue LED comes on.
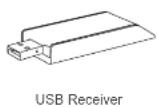
Connect USB receiver to a host computer
The device can be quickly recognized by host computer without any software/driver installation. Within less than 10 seconds the receiver will double flash blue to inform the Initialization is completed.
Recharging the battery
The Red LED comes on when the battery level is low, please recharge the scanner immediately. When the scanner is charging, the LED is green (solid). A full recharge (from completely drained battery) takes approximately 4 hours. When the scanner is fully charged, the green LED will go off.
Scanner LED indicator
| Status / indicator | Beeper | Blue LED | Green LED | Red LED |
| Good Scan | 1 beep | 1 blink | ||
| Transmission failure | 4 boops | |||
| Low battery | On | |||
| Recharge | On | |||
| Operation mode | On | |||
| Sleeping | None | None | None | None |
USB receiver LED indicator
| Color | Indication |
| Red | LED will flash to present the success of transmission |
Default setting of wireless scanner
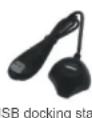
The default setting of wireless scanner is 2425MHz and power saving with 10min period of line. The default values can be modified by re-pairing the scanner and USB receiver. The setting switch and pairing button are located at USB receiver as shown


Setting switch 1 is associated with volume of beeper
| #1 | Volume of beep |
| ON | Low |
| OFF | High |
Setting switch 2 is associated with frequency
| #2 | Frequency |
| ON | 2480MHz |
| OFF | 2425MHz |
Setting switch 3 & 4 is associated with power management
| #3 | #4 | Power saving (sleep mode) |
| OFF | OFF | switch off after 10min.of inactivity |
| ON | ON | Scanner is always on |
| ON | OFF | switch off after 30min.of inactivity |
| OFF | ON | switch off after 1min. of in activity |
Note: Before configure the switch setting, please first remove the USB receiver from host computer.
How to pair your scanner and receiver?
Scanner
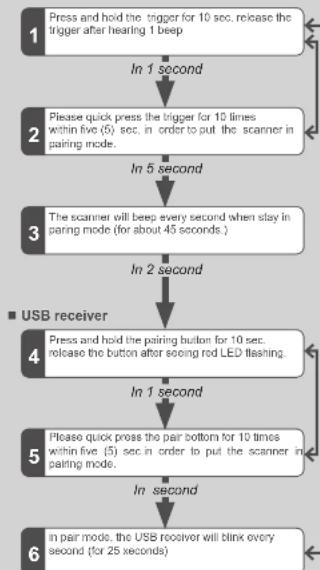
flowchart
graph TD
    A["1 Press and hold the trigger for 10 sec. release the trigger after hearing 1 beep"] --> B["2 Please quick press the trigger for 10 times within five (5) sec. in order to put the scanner in pairing mode."]
    B --> C["3 The scanner will beep every second when stay in pairing mode (for about 45 seconds.)"]
    C --> D["4 Press and hold the pairing button for 10 sec. release the button after seeing red LED flashing."]
    D --> E["5 Please quick press the pair bottom for 10 times within five (5) sec. in order to put the scanner in pairing mode."]
    E --> F["6 In pair mode, the USB receiver will blink every second (for 25 seconds)."]
    F --> D
    D --> G["■ USB receiver"]
** When devices are successfully paired you will hear beeps three times from scanner and see three blinks from USB receiver.