
LL-P202V - Screen SHARP - Free user manual and instructions
Find the device manual for free LL-P202V SHARP in PDF.


| Product Type | Interactive Touch Display |
| Model | LL-P202V |
| Brand | Sharp |
| Software | Touch Display Link (full version on host, lite version preinstalled on monitor) |
| Wireless Connectivity | Wi-Fi (requires wireless LAN environment) |
| Host OS Compatibility | Windows Vista, Windows 7, Windows 8, Windows 8.1 (32-bit or 64-bit) |
| Client OS Compatibility | Android 2.3.3 or later, iOS 5.0 or later, Windows 7/8/8.1 |
| Maximum Clients (Windows 8) | Up to 50 clients (25 per access point) |
| Maximum Clients (Windows 7) | Up to 20 clients |
| Maximum Clients (Windows Vista) | Up to 10 clients |
| Functions | Screen sharing, remote control, handwriting, file transfer, user memo, whiteboard integration |
| Pen Software Support | Requires Pen Software version 2.9 or later (included with monitor or separately) |
| File Transfer | Host to client, client to host, client to client (recommended file size ≤10 MB) |
| Security | Connection ID authentication (auto-create or specify) |
| Network Protocol | TCP/UDP (configurable port) |
| Supported File Types for Pen Software | JPEG, PNG, TIFF, PDF, Excel, Word, PowerPoint (with appropriate host applications) |
| Monitor Preinstalled Software | Touch Display Link lite version (acts as host) |
| Host Requirements | CPU: Intel Celeron/AMD Sempron 1.6 GHz or faster, RAM: at least 2 GB, HDD: at least 100 MB |
| Client Requirements | SD card recommended for Android devices; Wi-Fi capability |
| Installation | CD-ROM for host; Google Play/App Store for mobile clients; contact dealer for Windows device client |
Frequently Asked Questions - LL-P202V SHARP
User questions about LL-P202V SHARP
0 question about this device. Answer the ones you know or ask your own.
Ask a new question about this device
Download the instructions for your Screen in PDF format for free! Find your manual LL-P202V - SHARP and take your electronic device back in hand. On this page are published all the documents necessary for the use of your device. LL-P202V by SHARP.
USER MANUAL LL-P202V SHARP
Operating Environment......4
Installing the software....6
Host....6
Client 7
Starting the application....8
Host 8
Client 9
Screen guide....10
Main screen on host (Host menu)....10
Main screen on client 11
Sharing screen display 13
Operating a monitor from a client....14
Handwriting on the screen of the monitor 16
Handwriting by importing the screen....17
Sending files from the host to the client....19
Host operation....19
Client operation 19
Sending files from the client to the host....20
Client operation (Android Device / iOS Device) 20
Client operation (Windows device)....23
Host operation....24
Transferring files between clients....25
Receiving-side operation....25
Sending-side operation 25
Opening files....26
Android/iOS device 26
Windows device 28
Viewing Operation Guide....29
Connecting hosts 30
Connecting to another host 30
Operations when connected 30
Configuring host settings....31
Exiting the application ....34
Host (full version only)....34
Client 34
Uninstalling the software....35
Host....35
Client 35
Trademarks 36
Introduction
Touch Display Link is software that allows you to send and receive files between a monitor and a mobile device such as a tablet device and to share and operate a screen on a Wi-Fi network.
• You can operate and write to the screen of a monitor from a mobile device. • You can capture and handwrite memos on the screen of a monitor with a mobile device. • You can transfer files between a monitor and a mobile device. • You can transfer files between mobile devices. • You can share the screen of a monitor in a remote location. (This software is additionally required by the connected devices.)
■ Important Information
- This software has been shipped after strict quality control and product inspection. If, however, you find any failure or malfunction, contact your product dealer.
- Please understand that SHARP CORPORATION bears no responsibility for errors made during use by the customer or a third party, nor for any other malfunctions or damage to this software arising during use, except where indemnity liability is recognized under law.
- Transcribing or duplicating part or all of this manual and/or this software without permission from our company is not permitted.
- As part of our policy of continuous improvement, SHARP reserves the right to make design and specification changes for product improvement without prior notice.
- File names and numbers of characters that can be handled by this software comply with the specifications of Windows, Android, and iOS.
■ Notation Conventions
- Keystrokes are indicated with square brackets. E.g. [Home] key, [Back] key, etc.
- Menus, windows, dialog boxes, buttons, and tabs etc are indicated with square brackets.
E.g. 1. Tap the [Show host menu tag] on the desktop.
The Host menu appears.
- Items, check boxes, and option buttons, etc., are indicated with quotation marks. E.g. "Detect Paper", "Verify by connection ID", etc.
- This manual assumes that Touch Display Link has been installed in the following location. If you have installed Touch Display Link in a different location, this can be interpreted to refer to the folder where you installed it.
C:\Program Files\SHARP\Touch Display Link (default)
• The screenshots and operational procedures in this manual are only examples. These may change depending on your monitor, screen settings, or the version of the OS you are using and other factors. • This manual does not contain basic operating manuals for Windows, Android, and iOS. - In this manual, the terms "microSD memory card" and "microSDHC memory card" are shortened to "SD card". - The version of this software that is installed and used on your computer is referred to as the "full version". - The version of this software that is preinstalled on the monitor is referred to as the "lite version".
• The following devices are referred to as the "host" in this manual.
- A computer that is connected to an applicable monitor and that has this software installed on it (When differentiating between this host and the below host, this host is referred to as the "full version host".)
- A monitor with this software preinstalled on it
(When differentiating between this host and the above host, this host is referred to as the "lite version host".)
• The following mobile devices are referred to as the "client" in this manual. - Android devices, iOS devices, and Windows devices with this software (client version) installed on it - In this manual, the operation to select a menu or other item on the screen is called a "tap". When using the mouse on a Windows computer, please left click. • In this manual, "Windows 8" refers to both Windows 8 and Windows 8.1.
Operating Environment
A host with this software installed on it is required.
A client with this software (client version) installed on it is required.
A wireless LAN environment is required.
■ Example System Configuration![graph TD A["Computer (Host)"] --> B["Monitor"] B --> C["Client"] D["Wireless LAN Access point"] --> B style A fill:#f9f,stroke:#333 style B fill:#ccf,stroke:#333 style C fill:#cfc,stroke:#333 style D fill:#fcc,stroke:#333](/content/2026/05/1068048/images/70ee7cd2089bf02f3c1ec4519d7774cd4200f2207f3e8d38bce31f377f1a412d.jpg)
Monitor preinstalled with this software (Host [lite version host])
You can transfer files between clients.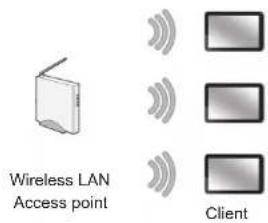
Monitor
SHARP monitors (as of February 2014)
(Available models differ according to region.)
PN-L601B / PN-L602B / PN-L702B / PN-L802B /
PN-L603A*1 / PN-L703A*1 / PN-L603B*2 / PN-L703B*2 / PN-60TA3*1 / PN-70TA3*1 /
PN-60TB3*2 / PN-70TB3*2
*1: Includes the full version of the software.
The software has also been installed on the monitor. (Lite version)
For a lite version host, a maximum of 20 clients can be connected at the same time.
*2: Includes the full version of the software.
Host
The computer must fulfill the requirements below.
| CPU | Intel Celeron or AMD Sempron 1.6 GHz or fasterIntel Core 2 Duo or AMD Athlon II X2 2.8 GHz or faster recommended |
| OS | Windows Vista (32-bit or 64-bit version), Windows 7 (32-bit or 64-bit version), Windows 8 (32-bit or 64-bit version), Windows 8.1 (32-bit or 64-bit version) |
| Memory At least 2 GB | |
| Free space on hard drive | At least 100 MB |
| CD-ROM drive Required during installation | |
Pen Software version 2.9 or later must be installed in order to use Pen Software functions.
■ Client
Android devices (as of February 2014)
• Asus Eee Pad Transformer TF101 • Samsung Galaxy Tab 10.1 GT-P7510, Galaxy Note 10.1 • Motorola Xoom MZ604, Xoom2 MZ615
• Google Nexus7/10
(Android 2.3.3 or later with English language support) * Insert an SD card.
The software may not function properly if an SD card is not inserted.
* When the user is changed in Android 4.2.2 or later, the connection with the previous user is ended.
iOS devices (as of February 2014)
Apple iPad, iPad 2, iPad (third generation), iPad (fourth generation), iPad mini, and iPhone (iOS 5.0 or later with English language support)
Windows devices (as of February 2014)
The computer must fulfill the requirements below.
| CPU | Intel Celeron or AMD Sempron 1.6 GHz or fasterIntel Core 2 Duo or AMD Athlon II X2 2.8 GHz or faster recommended |
| OS | Windows 7 (32-bit or 64-bit version),Windows 8 (32-bit or 64-bit version),Windows 8.1 (32-bit or 64-bit version) |
| Memory At least 2 GB | |
| Free space on hard drive | At least 100 MB |
Recommended device: Microsoft Surface
■ Wireless LAN environment (Wi-Fi)
Requires a local network with wireless LAN connection capabilities.
Ensure that the client is ready to connect to the local network.
For connection settings, refer to the manual for the client or access point.
TIPS
- The number of clients that can be connected to a single host at the same time varies by the host's OS.
Windows 8: A maximum of 50 clients*
Windows 7: A maximum of 20 clients
Windows Vista: A maximum of 10 clients
* The number of client connections for one access point is 25 or fewer clients.
When connecting 25 or more clients, add an access point and cascade them.
- Depending on the network environment, the number of clients that can be connected may decrease or the amount of time for processing may increase.
- If this application goes into standby mode because a client is locked, the Home button is pressed, another application is started, or a similar event occurs while this application is running, the following happens:
Android device
The current process is canceled.
File transmission and reception is processed in the background.
To start using the software again, reconnect to the host.
iOS device
The current process is canceled.
File transmission and reception continues but is interrupted once the time that iOS can process background tasks (maximum 10 minutes) has elapsed.
To start using the software again, reconnect to the host.
Windows device
The current process continues, but if the network adapter stops due to the device settings, communication is ended.
To start using the software again, reconnect to the host.
Installing the software
Host
Ensure you are logged in with administrator privileges.
The license code is required for installation.
- Exit all application software.
- Insert the supplied CD-ROM into the CD-ROM drive of the computer.
- Open the CD-ROM in "Computer".
- Double-tap the "TouchDisplayLink" folder.
- Double-tap the setup program "Setup.exe".
- Follow the instructions on the screen.
- If a "User Account Control" window appears, tap [Yes] (or [Allow]).
- If a security warning saying ("The publisher could not be verified.") is displayed, tap [Run].
- If you do not want the application to start automatically when the computer starts up, clear the "Automatically start Touch Display Link" check box.
For the upgrade version, you must enter the license code used for Touch Display Link Version 1.0.
Client
■ Android device
Download and install the application from Google Play.
TIPS
• Refer to the manuals that came with your Android device.
- Tap [Google Play] or [Play Store]. When the Details screen is displayed, check the app's functions, developer, and other detailed information.
- Tap the search field, type "Touch Display Link", and tap [Search].
- Tap the [Touch Display Link] that appears in the search results.
- Tap [Install].
- If you agree to the security permissions that the app requires, tap [Accept & download].
The download will start.
If Version 1.0 is already installed, tap [Google Play] or [Play Store], and then upgrade Touch Display Link. For details, refer to the manuals that come with your Android device.
■ iOS device
Download and install the application from the App Store.
TIPS
• Refer to the manuals that came with your iOS device.
- Tap [App Store].
- Tap the search field, type "Touch Display Link", and tap [Search].
- Tap the [Touch Display Link] that appears in the search results.
- Tap the [FREE] icon.
- Tap the [INSTALL APP] icon. The installation will start.
If Version 1.0 is already installed, tap [App Store], and then upgrade Touch Display Link. For details, refer to the manuals that come with your iOS device.
Windows device
For how to obtain the installer, contact your product dealer.
TIPS
• Refer to the manuals that came with your Windows device. • A host can also be used as a client.
- Exit all application software.
- Double-tap the setup program "Setup.exe".
- Follow the instructions on the screen.
- If a "User Account Control" window appears, tap [Yes] (or [Allow]).
- If a security warning saying ("The publisher could not be verified.") is displayed, tap [Run].
- If you do not want the application to start automatically when the computer starts up, clear the "Automatically start Touch Display Link" check box.
Starting the application
Host
- Tap [Touch Display Link] () on the taskbar. The start menu appears.

(1) Edit User Info: Sets the host name and icon. (page 31) (2) Start up as a host: Starts the host. (3) Start up as a participant: Starts the client. (page 9) (4) Send to Other User: Sends a file to another client. (page 25) (5) Receive from Other: Receives a file from another client. (page 25) (6) Receive Folder: Opens the folder that stores received files. (page 28)
- Tap [Start up as a host].
The Host menu appears. (page 9)
TIPS
- To start the application manually, follow the procedure below. - Double-tap the "Touch Display Link shortcut" ( ) on the desktop and tap [Start up as a host]. - From the [Start] button on the Windows taskbar, tap [All Programs] - [SHARP Touch Display Link] - [Touch Display Link], and then tap [Start up as a host].
- When the application is started for the first time, if a message saying "Windows Firewall has blocked some features of this program" appears, select all of the check boxes, and then select "Allow access".
- The Touch Display Link automatic start setting is set for each login user. When logged in as a different user, check the "Auto Start" setting from [Settings] on the Host menu. (page 33)
- The Host menu can be displayed from the toolbar. Check the "Minimized" setting from [Settings] on the Host menu. (page 33)
- When the computer is started and the "Failed to initialize CPCP. Check settings?" message is displayed, tap "Yes", and then check the "Network Adaptor" settings on the "Others" tab. (page 33)
If the settings are correct, run the following program to restart the CPCP Service: C:\Program Files\SHARP\Touch Display Link\CPCRefresh.exe
If the problem continues after the service is restarted, run the above program and implement a delayed start of the CPCP Service.
For a lite version host, tap "Restart CPCP" on the "Others" tab to restart.
For a lite version host, start from the launcher screen.
- Tap "Attended Users" on the launcher screen.
Client
TIPS
• Refer to the manuals that came with the client.
1. Android/iOS device: Tap [Touch Display Link].
Windows device: Tap [Touch Display Link] on the desktop and tap [Start up as a participant].
Touch Display Link starts and a list of hosts connected to the same network is displayed.

2. Tap a host that you want to connect to.
To manually enter the IP address of a host, tap [Manual Entry].
A login information screen appears.
3. Enter login information.
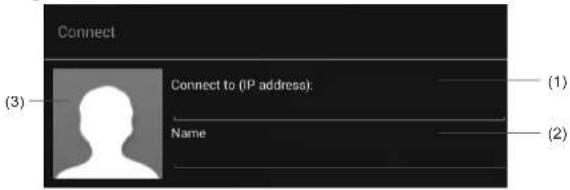
(1) Connect to
Do not enter this information if you selected a host in step 2.
If you selected [Manual Entry] in step 2, enter the IP address of the host that you want to connect to.
(2) Name
Enter a user name. (Maximum length: 12 half-width characters/6 full-width characters)
The name you enter will be displayed on the host (monitor).
(3) Icon
Set an image that will be displayed on the host (monitor) when logging in.
To change the image, tap the icon and select a different image.
4. When you have completed the settings, tap [Connect].
The main screen on the client appears. (pages 11 to 12)
TIPS
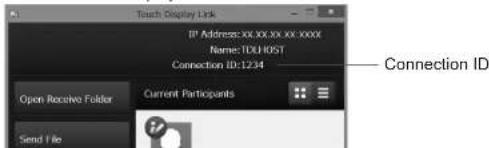
- When authentication via connection ID is set, a connection ID entry screen appears. Enter the connection ID displayed in "Connection ID" on the Host menu.
Screen guide
Main screen on host (Host menu)

(1) Open Receive Folder
Opens the folder where files downloaded from the client are stored.
(2) Send File
Sends files to the client. (page 19)
(3) Settings
Configures host operation settings. (page 31)
(4) Start (Stop) Screen Sharing
The host screen can be displayed on the client. (page 13)
When it can be displayed, [Stop Screen Sharing] is displayed. If you do not want to display the screen on the client, tap [Stop Screen Sharing].
(5) Close All Connections
Forcibly ends the connections with all connected clients.
(6) Connect to Other
Connects to another host. (page 30)
(7) Exit (full version only)
Exits the host application.
(8) Current Participants
Displays the connected clients.
When granting a client operation permission, tap the participant and then tap [Grant Control].
The (i) icon is displayed for the client with operation permission.
When canceling the client's operation permission, tap the participant and then tap [Cancel Control].
When disconnecting a client, tap the participant and then tap [Eject].
(9) Name/Connection ID
Displays the name and connection ID set for the host. (page 31)
Main screen on client
Tap [Open menu] to display the menu.
Tap [Close menu] to close the menu.


Android device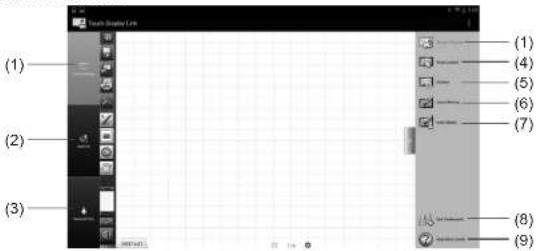
Displays the host screen on the client screen. (page 13)
(2) Send File
Sends client files to the host or another client. (page 20, page 25)
(3) Received Files
Used to operate files sent from the host to the client. (page 26)
(4) Host Control
Used to operate the host from the client. (page 14)
(5) Pointer
Displays the pointer on the host. (page 15)
(6) Hand Writing
Used to draw on the host screen. (page 16)
(7) User Memo
Used to capture the host screen and import it into the client. (page 17)
(8) Join Conference/Exit Conference
To end the connection with the host without exiting the application, tap [Exit Conference].
To reconnect, tap [Join Conference] and select a host to connect to. (page 9)
(9) Operation Guide
Displays operation guides. (page 29)
(10) License Information
Displays the license information for this software.
The first time the application is used, an operation guide will appear when a function button is tapped.
Tapping the screen closes the operation guide.
To see operation guides again, tap [Open menu] and then [Operation Guide].
Windows Device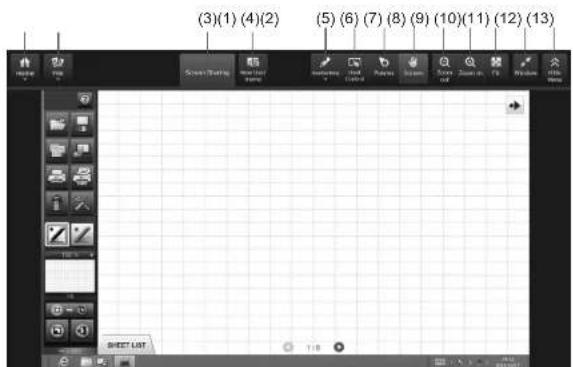
(1) Home
Operation Guide: Displays operation guides. (page 29)
Join Conference/Exit Conference:
To end the connection with the host without exiting the application, tap [Exit Conference].
To reconnect, tap [Join Conference] and select a host to connect to. (page 9)
License Information: Displays the license information for this software.
Exit: Exits this software.
Resize Menu: Changes the size of the menu.
(2) File
Send to Host: Sends a file to the host. (page 20)
Send to Other Users: Sends a file to another client. (page 25)
Receive from Other Users: Receives a file from another client. (page 25)
Open Receive Folder: Opens the folder that stores received files. (page 28)
(3) Screen Sharing: Displays the host screen on the client screen. (page 13)
(4) User memo: Used to capture the host screen and import it into the client. (page 17)
(5) Handwriting: Used to draw on the host screen. (page 16)
(6) Host Control: Used to operate the host from the client. (page 14)
(7) Pointer: Displays the pointer on the host. (page 15)
(8) Screen: Adjusts which portion of the host screen is displayed on the client side.
(9) Zoom out: Reduces the current screen.
(10) Zoom in: Enlarges the current screen.
(11) Fit: Returns the screen from an enlarged or reduced state to its normal size. The entire screen is displayed maintaining its aspect ratio.
(12) Window: Maximizes the window. Restores a maximized window to a window.
(13) Show Menu/Hide Menu: Shows/hides the menu.
Sharing screen display
When joining a conference and screen sharing is allowed on the host, you can display the host screen on client screens.
- Android/iOS device: On the main screen on the client, tap [Open menu] - [Screen Sharing].
Windows Device: On the main screen on the client, tap [Screen Sharing].
The monitor screen appears on client.
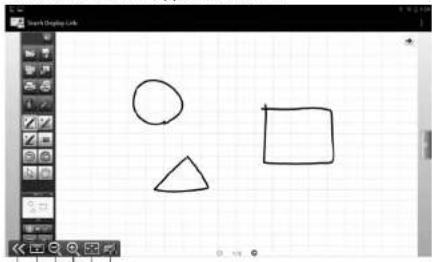
(1) (2)(3)(4)(5) (6)
You can zoom in or out by pinching in or out.
You can scroll by dragging.
Windows Device
(1) Show/Hide operation menu Shows/hides the operation menu.
(2) Change operation menu position Changes the display position of the operation menu.
(3) Zoom out Reduces the current screen.
(4) Zoom in Enlarges the current screen.
(5) Fit Returns the screen from an enlarged or reduced state to its normal size. The entire screen is displayed maintaining its aspect ratio.
(6) User Memo Used to capture the host screen and draw on it with the client screen. (page 17)
TIPS
- If "Stop Screen Sharing" is selected in the Host menu on the host, screen display is not synchronized.
Operating a monitor from a client
You can operate the host from a client.
■ Remote operation (Host Control mode)
You can operate the host from a client.
- Android/iOS device: On the main screen on the client, tap [Open menu] - [Host Control].
Windows device: On the main screen on the client, tap [Host Control].
The host control mode screen appears.

Windows Device
(1) Remote operation area Operate the host with this area. (Tap: left click, long touch: right click, drag: drag) (2) Show/Hide operation menu Shows/hides the operation menu. (3) Change operation menu position Changes the display position of the operation menu. (4) Undo Undoes the previous operation. (5) Redo Redoes the operation that was previously undone. (6) File Import Imports a file with Pen Software. (7) Display previous sheet Displays the previous sheet. Cannot be tapped when the first sheet is displayed. (8) Display next sheet Displays the next sheet. Cannot be tapped when the last sheet is displayed. (9) Zoom out Reduces the current sheet. (10) Zoom in Enlarges the current sheet. (11) Fit Returns the zoom ratio of the current sheet to 100%. (12) Presentation operations Operates the host's Pen Software presentation support tool.
TIPS
- In host control mode, operation permission is automatically obtained from the host.
- When "Do not allow remote control" is selected in "Control Setting" for the host (page 31), remote operation is not possible.
■ Remote operation (Pointer mode)
Displays the pointer on the host.
- Android/iOS device: On the main screen on the client, tap [Open menu] - [Pointer]. Windows device: On the main screen on the client, tap [Pointer].
The client enters pointer mode. When you tap the client, the pointer is displayed at the corresponding part of the host.

Windows Device
(1) Remote operation area: Drag this area to move the position of the pointer on the monitor. (2) Show/Hide operation menu: Shows/hides the operation menu. (3) Change operation menu position: Changes the display position of the operation menu. (4) Zoom out: Reduces the current screen. (5) Zoom in: Enlarges the current screen. (6) Fit: Returns the zoom ratio of the current screen to 100%. (7) Highlight pointer: Highlights the position of the pointer on the host (monitor).
Handwriting on the screen of the monitor
You can handwrite a memo on the Pen Software screen of the host with a client.
- Android/iOS device: On the main screen on the client, tap [Open menu] - [Hand Writing].
Windows device: On the main screen on the client, tap [Handwriting], and then select a pen.
- Draw on the handwriting area.
When you handwrite on the screen displayed on the client, the content that you write appears on the Pen Software screen of the host.

Windows Device
(1) Handwriting area: The area where handwriting operations are possible. (2) Show/hide operation menu: Shows/hides the operation menu. (3) Change operation menu position: Changes the display position of the operation menu. (4) Pen: Configures the pens and draws text and graphics. (page 18) For Windows devices, touch and select the pen type from the displayed pull-down menu. (5) Zoom out: Reduces the current screen. (6) Zoom in: Enlarges the current screen. (7) Fit: Returns the screen from an enlarged or reduced state to its normal size. The entire screen is displayed maintaining its aspect ratio. (8) Screen: Adjusts which portion of the screen to display.
TIPS
- In handwriting mode, operation permission is automatically obtained from the host.
- When "Do not allow remote control" is selected in "Control Setting" for the host (page 31), remote operation is not possible.
Handwriting by importing the screen
You can capture the screen displayed on the host, import it into the client, and draw on it with the client.
- Android/iOS device: On the main screen on the client, tap [Open menu] - [User Memo].
Windows device: On the main screen on the client, tap [User Memo].
The screen displayed on the host is imported into the client.
- Draw on the handwriting area.

(1) Handwriting area: The area where handwriting operations are possible. (2) Show/hide operation menu: Shows/hides the operation menu. (3) Change operation menu position: Changes the display position of the operation menu. (4) Pen: Configures the pens and draws text and graphics. (page 18) For Windows devices, touch and select the pen type from the displayed pull-down menu. (5) Eraser: Deletes a drawn line. (6) Save: Saves the handwritten memo. (Save format: JPG) (7) User Memo List: Displays the history of handwritten memos. (page 18) (8) Zoom out: Reduces the current screen. (9) Zoom in: Enlarges the current screen. (10) Fit: Returns the screen from an enlarged or reduced state to its normal size. The entire screen is displayed maintaining its aspect ratio. (11) Screen: Adjusts which portion of the screen to display.
■ Configuring the pen
Configure the pen settings when using the pen function in User Memo or handwriting.
- Android/iOS device: On the User Memo or handwriting screen, tap [Pen]. Windows device: On the User Memo or handwriting screen, tap [Handwriting], and tap [Edit] for "Pen1 - 3". The pen settings dialog appears.
- Configure the pen settings.

(3) (1) (2) (3) (1)
Windows Device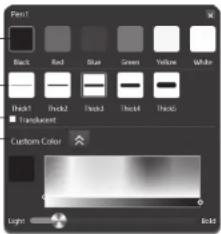
(1) Color/Custom Color: Selects the line color. (2) Thickness: Selects the line thickness. (3) Make translucent: Select this check box to make the line translucent.
- Android/iOS device: When finished configuring the settings, tap [OK]. Windows device: When finished configuring the settings, tap ✗.
■ Viewing past User Memo
A list of User Memos saved in the past can appear.
- On the User Memo screen, tap [User Memo List]. The User Memo List appears.

Saving
User Memo can be saved as PDF files.
- On the User Memo List, tap the image you want to save. (You can select multiple images)
- Tap Output PDF.
Deleting
- On the User Memo List, tap the image you want to delete. (You can select multiple images)
- Tap Delete.
To delete all of the images, tap [Clear All].
Sending files from the host to the client
You can send files from the host to the client. (Recommended file size: 10MB or less) It is possible to send images, documents, and other data files.
Host operation
You can send files from the host to the client.
- In the Host menu, tap [Send File].
- Tap [Select File], select files to transfer (multiple files can be selected), and tap [Open].
Or select files to transfer using a drag-and-drop operation.
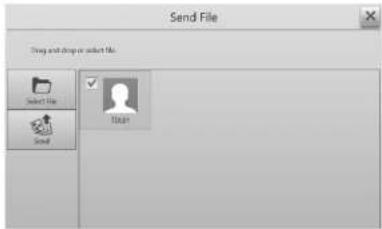
- Select a destination user.
Tapping [Select All] selects all destination users. To cancel, tap [Cancel All].
- Tap [Send].
The selected files are sent to the client.
Client operation
- Android/iOS device: On the main screen on the client, tap [Open menu] - [Received Files].
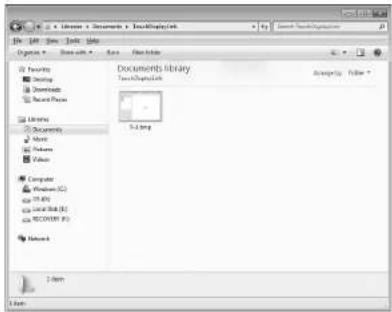
Windows device: On the main screen on the client, tap [File] - [Open Receive Folder].
A list of files received from the host appears.
Android Device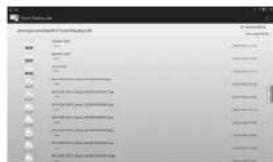
iOS Device

Windows Device
Sending files from the client to the host
You can send files from the client to the host. (Recommended file size: 10MB or less) It is possible to send images, documents, and other data files.
Client operation (Android Device / iOS Device)
- On the main screen on the client, tap [Send File].
- Tap [Open menu] on the right of the screen.
A menu appears.
- Select the files you want to send.
(1) Select Image
Selects images saved on the client.
→Selecting images (See the description on the right.)
(2) Select File
Selects files saved on the client.
→Selecting files (page 22)
(3) Camera
Starts the camera and selects captured data as images.
→Camera (page 21)
When a file is selected, the selected file appears.
To cancel selected files, tap [Clear].
- Select a transfer method and send the files. (page 22)
TIPS
While a client is sending files to the host, other clients cannot send files to the same host.
■ Selecting images
You can send image files to the host.
- From the Send File screen, tap [Open menu] and then tap [Select Image].
- Select images.
If using an Android device, select images from "Gallery".
If using an iOS device, select images from "Photos".
Image previews are displayed for JPEG and PNG files. For other image files, an icon

is displayed. (page 22)
TIPS
- For details on selecting images, refer to the client manual.
■ Scan by camera (iOS Device)
When you take a picture of paper documents or other materials, scan by camera can detect the dimensions of the paper and make an image with only that area.
TIPS
- The normal camera starts for models that do not support scan by camera. The captured image is displayed in the preview area. (page 22)
- From the Send File screen, tap [Open menu] and then [Camera]. Scan by camera is started.

2. Tap [Take photo].
- If the "Detect Paper" check box is selected, a cropping frame (purple) is displayed at the portion where the paper is detected in the image. When the paper detection is successful, [?] in the upper right of the screen changes to [OK].
- If the "Auto Shutter" check box is selected, the image is captured automatically when the paper is successfully detected. This option can only be selected when "Detect Paper" is enabled.
3. Correct the image.

(1) Original image display area
Shows the original image before it is corrected.
When "Ar. Com" is enabled, the cropping frame (purple) for the portion detected as the paper is displayed. The cropping frame area can be modified by dragging it.
(2) Corrected preview display area
Shows the preview of the image after correction.
(3) Adjust image quality level
When "Qty Cor" is enabled, you can adjust the image quality level. Drag the slider left or right to adjust.
4. Tap [OK].
The image preview appears. (page 22)
TIPS
- It may not be possible to properly correct the image depending on the capturing environment and the original document.
■ Selecting files
You can send files saved on a client to the host.
- From the Send File screen, tap [Open menu] and then [Select File]. A list of files appears.

- Tapping a folder ( ) displays a list of the files in that folder. Tapping displays a list of files in the folder above the current folder. (These functions are only available on Android devices.)
- When an image file (JPEG or PNG) is selected, an image preview is displayed. (See the description on the right.)
- When an image file (except JPEG or PNG) or a non-image file is selected, a file icon is displayed in the preview display area.
- If the file extension is not recognized by the client, the default icon (other) is displayed.
■ Sending selected files
When files to be sent are selected, a preview screen is displayed.

- Tap [Open menu].
- Select a transfer method and send the files.
(1) Paste on Current Sheet The selected images are pasted to the current sheet of the whiteboard in Pen Software. (2) Send to Pen Software Imports selected files as images just like those printed on a printer to the whiteboard in Pen Software. (3) Send to Folder Sends and saves selected files to a specified host folder.
TIPS
- If you tap "Adjust Image", you can correct the selected image. (page 21)
* The method by which a file can be sent differs according to file type.
| Paste on Current Sheet JPEG (.jpe, .jpeg, .jpg), PNG (.png) | |
| Send to Pen Software | JPEG (.jpe, .jpeg, .jpg), PNG (.png), TIFF (.tif, .liff), PDF (.pdf)*1, Excel (.xls, .xlsx)*2, Word (.doc, .docx)*2, PowerPoint (.ppt, .pptx)*2 |
| Send to Folder All types (It is not possible to send certain file types.) | |
*1: Requires that Adobe Reader is installed on the host.
*2: Requires that Microsoft Office is installed on the host.
Password-Protected Files and macro-enabled files will not work correctly.
TIPS
- When the image displayed on the preview screen is flicked up, it can be sent using "Paste on Current Sheet".
- When the "Shake to Send File" check box is selected, you can send an image with "Paste on Current Sheet" by holding the client on the preview screen and gently shaking it. * Take care not to drop the device.
- Files cannot be sent if the "Accept file" check box on the host is not selected.
- Pen Software may operate slowly if high-resolution images are used.
- When sending PDF files to Pen Software, ensure that the Adobe Reader license agreement and dialog is not displayed. If they are displayed, the application will not function correctly.
!CAUTION
Do not change the name of "Send print data to SHARP Pen Software" in "Devices and Printers". If the name is changed, the application will not function correctly.
Client operation (Windows device)
- On the main screen on the client, tap [File].
- Tap [Send to Host].
- Select the file and tap [Open].
- Select a transfer method and send the files.

(1) Paste on Current Sheet The selected images are pasted to the current sheet of the whiteboard in Pen Software. (2) Send to Pen Software Imports selected files as images just like those printed on a printer to the whiteboard in Pen Software. (3) Send to Folder Sends and saves selected files to a specified host folder.
Host operation
■ Files sent using "Paste on Current Sheet"
- Images received from a client are pasted to the Pen Software whiteboard.
■ Files sent using "Send to Pen Software"
- When data is received from a client, "Import images" (☐) in Pen Software (whiteboard mode) flashes. Tapping "Import images" imports the data.
- For Pen Software version 3.0, the receive data dialog box is displayed. Tap the dialog box to import the data.
TIPS
- Refer to "Importing a Document as an Image (Pen Software Printer Driver)" in the Pen Software Operation Manual.
- You can also import data by tapping "Import Sent Image File" in the client menu.
- When sending a PDF file from the client and pasting it into Pen Software, configure the print settings in Adobe Reader as follows in advance. If you do not configure the settings, the PDF file may not be pasted in the intended direction.
- Select the [Choose Paper Source by PDF page size] check box.
- Clear the [Auto-Rotate and Center] check box or select [Auto portrait/landscape] in [Orientation].
The name of the item differs according to the version of Adobe Reader. Refer to the Adobe Reader manual.
■ Files sent using "Send to Folder"
- Tapping [Open Receive Folder] in the Host menu opens the folder where files received from the client are stored.
Transferring files between clients
You can transfer files between clients without them being connected to the host. First set the client that will receive the file to the standby to receive state, and then send the file from the other client. (Recommended file size: 10MB or less)
Receiving-side operation
■ Android device/iOS device
- On the receiving-side client, tap [Received Files].
- Tap [Open menu] on the right of the screen.
- Tap [Receive from Others]. The client enters the standby to receive state.
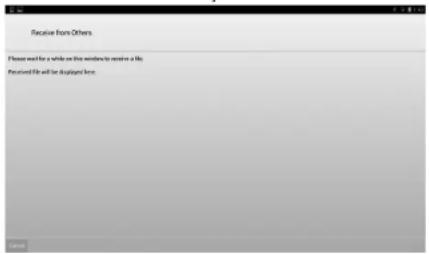
When a file is received, you are notified of that on the screen. You can view the received file in the received folder. (page 26) Tap [Cancel] to end the standby to receive state.
Windows device
- On the main screen on the receiving-side client, tap [File].
- Tap [Receive from Other Users].
The client enters the standby to receive state.
When a file is received, you are notified of that on the screen. You can view the received file in the received folder. (page 26)
Tap [Cancel] to end the standby to receive state.
Sending-side operation
TIPS
- Do not send files from multiple devices at the same time. Depending on the network environment, this may not work correctly.
■ Android device/iOS device
- On the sending-side client, tap [Send File].
- Tap [Open menu] on the right of the screen.
- Select the file to send. (page 20)
You cannot send an adjusted image file.
- Tap [Open menu] - [Send to Other Users]. Clients in the standby to receive state are displayed in a list.
- Tap the destination.
- Tap [OK].
- Tap [Yes].
■ Windows device
- On the main screen on the sending-side client, tap [File] - [Send to Other Users].
- Select the file to send.
Clients in the standby to receive state are displayed in a list.
- Tap the destination.
- Tap [Send].
Opening files
You can open files received.
On Android devices you operate files in the Downloads folder on the SD card.
On iOS devices you operate files saved on the device's own memory
Android/iOS device
- On the main screen on the client, tap [Received Files].
A list of files received from the host appears.

(1) Current folder display area
Displays the directory path of the file.
(2) Received file list/User memo file list
Displays a list of the selected files.
TIPS
- If the file extension is not recognized by the client, the default icon (other) is displayed in a list.
- Select file.
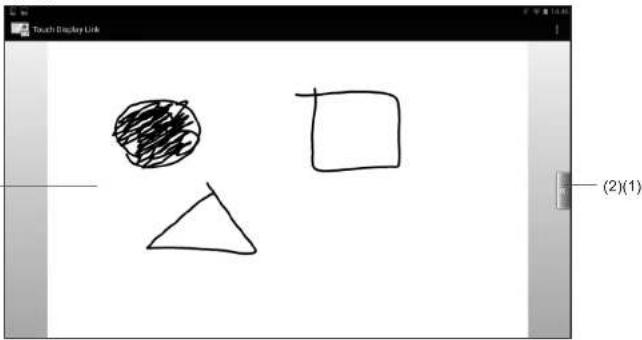
(1) Preview area
The area where a preview of the selected file is displayed.
Zoom in or out by pinching in or out.
If previews cannot be displayed, an icon image for each type of data is displayed.
Android devices can display previews of JPEG and PNG files.
iOS devices can display previews of JPEG, PNG, TIFF, PDF, Excel (.xls/.xlsx),
Word (.doc/.docx), and PowerPoint (.ppt/.pptx) files. (Layouts may not be displayed correctly.)
(2) Open/Close menu
Shows/hides the Preview screen menu.
3. Tap [Open menu].
The file open menu appears.

(1) Send by e-mail
Attaches the selected files to an e-mail. (See the description on the right.)
(2) Send to Other Application
Displays the selected files in the specified application. (page 28)
(3) Change File Name
Edits the name of the selected file. (page 28)
(4) Delete
Deletes selected files (page 28)
TIPS
- The above actions can also be made by long-pressing a file name from the list and displaying a popup menu. (Android devices only)
■ Sending files by e-mail
You can send a selected file as an e-mail attachment.
The e-mail application installed on the client is started up.
- From the file operation screen, tap [Open menu] and then tap [Send by e-mail].

- Enter the necessary details and send the e-mail.
For details on sending e-mail, refer to the client manual.
TIPS
- If several applications are installed, a message prompting you to select an application may appear.
■ Sending files to an application
You can open the selected file in an application.
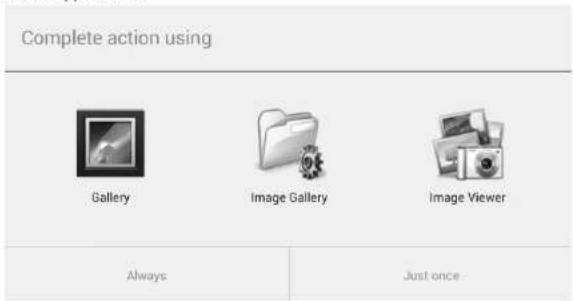
- From the file operation screen, tap [Open menu] and then tap [Send to Other Application].
If the file can be opened in multiple applications, a message prompting you to select an application may appear.
Select an application.
TIPS
- The applications displayed will differ depending on the applications installed on the client.
■ Editing file names
You can edit the name of the selected file.
- From the file operation screen, tap [Open menu] and then [Change filename].

- Edit the name of the file in the file name entry field.
- Tap [Yes].
■ Deleting files
You can delete the selected files.
- From the file operation screen, tap [Open menu] and then [Delete].
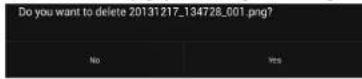
- Tap [Yes].
Windows device
- On the main screen on the client, tap [File] - [Open Receive Folder]. The folder that stores received files opens.
Viewing Operation Guide
You can display operation guides.
- Android/iOS Device: Tap [Open menu]. Windows Device: Tap [Home].
- Tap [Operation Guide].

To hide the operation guide, tap the screen.
Connecting hosts
- You can connect hosts on the same network to share screens and perform remote operation.
- Depending on the network environment, the amount of time for processing may increase.
Connecting to another host
- On the Host menu, tap [Connect to Other]. For a lite version host, tap [Remote Meeting] on the launcher screen. The connection selection screen appears.
- Tap [Manual Input] and enter the IP address and name of the host.

When the "Add to the list of hosts" check box is selected, the entered host is displayed in the connection selection screen from the next time.
3. Tap [Connect].
TIPS
- If you tap "Edit Host Information", you can enter or delete connection information.
Operations when connected
You can operate the connected host.

(1) Minimize: Minimizes the screen.
(2) Acquire Control/Release Control: Tap [Acquire Control] when obtaining remote operation permission for the connected host. When you obtain operation permission, you can operate the screen displayed on the connected host. Tap [Release Control] to release the obtained operation permission.
(3) Exit: Ends the connection with the host.
TIPS
- To operate the Pen Software on the connected device, in the Pen Software settings, set "Pen Drawing" to "Both touch pen and finger" and clear the "Use auto switching" check box.
- For Pen Software version 3.0, in the Pen Software settings, set the "Touch Pen" setting to "Other".
- Operating connected host from multiple hosts simultaneously may result in erratic behavior.
Configuring host settings
You can configure a variety of settings including those for the host name, communications, security, and action when a file is received.
TIPS
• Before adjusting these settings, consult the network administrator.
- Tap the [Settings] on the Host menu. The settings screen appears.
- Set the options as necessary. (See the description below.)
- When you have completed the settings, tap [Apply].
■ [Basic Setting] tab
(1) User Info Tap [Edit] and set the host name and icon. (Up to 6 full-width or 12 half-width characters) This name and icon are displayed on the client when logging in. (2) Place Sets the location of the host. (Up to 50 half-/full-width characters) Content entered here is displayed on the client's login screen. (3) Shared Display Selects the display for which the screen will be shared with the client. (4) Security Settings Restricts the connected clients to only those that enter the connection ID. Do not use Connection ID Does not restrict the connected clients. Auto-create Connection ID Automatically creates a connection ID for each conference. Use specified Connection ID Sets the connection ID. (Up to 8 half-width alphanumeric characters) (5) Control Setting Allow remote control from multiple computers Remote control is possible from multiple clients at the same time. Restrict remote control terminal to one. (Latest request) Remote control is only possible for the client that obtains operation permission. Restrict remote control terminal to one. (Admission by host) Remote control is only possible for the client that the host grants operation permission to. Do not allow remote control Remote control is not possible from a client. (6) Remaining number of days in trial period Shows the number of days of the trial period remaining if the software is registered with a trial license. (7) Version Shows the software version. (8) License registry To officially register software that has already been registered with a trial license, enter a license code.
■ [Performance Setting] tab

(1) Animation when file arrives
Selects whether to use animation when a file is received.
(2) Animation when a client joins
Selects whether to use animation when a user joins a meeting. If the computer is slow, select "Do not use animation".
(3) Sound effect at file receiving
Select this option if you want a sound effect to be played when a file is received.
(4) Screen Sharing Settings
Adjusts whether to give priority to speed (low image quality) or image quality (slow speed) when screen sharing. Drag the slider in either direction to adjust.
■ [Send/Receive Setting] tab

(1) Accept file
Clear this check box if you want to prevent clients from sending files to the host.
(2) Prohibit file reception from a person without control.
Select this check box to disallow receiving files from clients that have not obtained operation permission.
(3) Save files sent to Pen Software
Select this check box to save files sent from a client to the host using "Paste on Current Sheet" or "Send to Pen Software". If this check box is selected, files are saved in the folder specified in "Receive Folder".
(4) Receive Folder
Specifies the host folder in which to save received files when sending a file using "Send to Folder".
(5) Run shell script
Sets whether to run a shell script on received files. To run a shell script, select the "Run shell script" check box, and select a script. The number of characters in the file path and file name may differ depending on the type of computer used. For details, refer to the computer manual.
■ [Connect Other] tab
(1) Enable host collaboration
Enables or disables connections with other hosts.
To disallow connections from other hosts, clear this check box.
(2) TCP/UDP port
Sets the port number to use for TCP/IP communication with other hosts.
(3) Network Adaptor
Selects the network adapter to use for connecting to other hosts.
(4) Host
Enters or deletes connection information (name, IP address).
The entered information is displayed in the connection selection screen on the Connect to Other function.
[Others] tab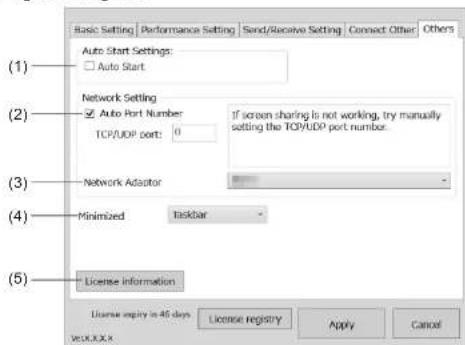
(1) Auto Start
Select this check box to start Touch Display Link (host) automatically when the computer starts.
This setting is set for each login user.
(2) TCP/UDP port
Sets the port number to use for communicating with clients.
You should normally select the "Auto Port Number" check box. This automatically sets the port number.
To set an arbitrary port number, clear the "Auto Port Number" check box, and enter a port number (from 0 to 65535) in the "TCP/UDP port" box.
(3) Network Adaptor
Selects the network adapter to use for connecting to clients.
(4) Minimized
Selects whether to store the host menu when minimized in the taskbar/toolbar.
(5) License information
Shows software license information.
Exiting the application
Host (full version only)
- Tap [Exit] on the Host menu screen.
Client
■ Android device
- Press the [Back] key twice.
■ iOS device
- Press the [Home] key.
- Press the [Home] key on the Home screen twice. A list of currently running applications appears at the bottom of the screen.
- Long-press "TDLink". The icon vibrates.
- Tap [-] at the top left.
■ Windows device
- Tap [Home].
- Tap [Exit].
Uninstalling the software
Host
TIPS
- Ensure you are logged in with administrator privileges. • This operation is only for the full version.
- Exit all application software.
- From the "Start" menu, select "Control Panel".
- Tap "Uninstall a program". In icon display mode (classic view), double-tap "Programs and Features".
- Select [Touch Display Link] and then tap [Uninstall].
- Follow the instructions on the screen. If a User Account Control window appears, tap [Continue].
This completes the uninstallation process.
Client
■ Android device
- Press the [Menu] key, and then tap [Settings], [Applications], and [Manage applications].
- In the list of applications, tap [Touch Display Link].
- Tap [Uninstall].
■ iOS device
- Long-press [TDLink]. The icon vibrates.
- Tap the black [x] at the top left. A confirmation dialog appears.
- Tap [Delete].
■ Windows device
TIPS
- Ensure you are logged in with administrator privileges.
- Exit all application software.
- From the "Start" menu, select "Control Panel".
- Tap "Uninstall a program". In icon display mode (classic view), double-tap "Programs and Features".
- Select [Touch Display Link] and then tap [Uninstall].
- Follow the instructions on the screen. If a User Account Control window appears, tap [Continue].
Trademarks
- Microsoft, Windows, Windows Vista, Surface, Excel, and PowerPoint are either registered trademarks or trademarks of Microsoft Corporation in the United States and/or other countries. • Apple and App Store are trademarks of Apple Inc., registered in the U.S. and other countries. iPad and iPhone are trademarks of Apple Inc. • Google, Android and Google Play are trademarks or registered trademarks of Google Inc. • The trademark, Android, is used under license from Google Inc. • Adobe, Acrobat, and Reader are either registered trademarks or trademarks of Adobe Systems Incorporated in the United States and/or other countries.
- microSD and microSDHC are trademarks of the SD Association. • The trademark, iOS, is used under license from Cisco Systems, Inc., in the U.S. and other countries. • Wi-Fi is a trademark or registered trademark of the Wi-Fi Alliance. • Intel, Celeron, and Intel Core 2 Duo are trademarks or registered trademarks of Intel Corporation or its subsidiaries in the U.S.A. and other countries. • AMD, AMD Sempron, AMD Athlon, and combinations thereof are trademarks of Advanced Micro Devices, Inc. • ASUS is a trademark of ASUSTeK Computer Inc. • Samsung, Galaxy and Galaxy Tab are registered trademarks of Samsung Electronics Co., Ltd.
- MOTOROLA and XOOM™ are trademarks or registered trademarks of Motorola Trademark Holdings, LLC. • This software uses the ImageKit7 technology. ImageKit7 Copyright © 2005 Newtone Corp.
- All other brand and product names are trademarks or registered trademarks of their respective holders.
OpenCV License Agreement
License Agreement
For Open Source Computer Vision Library
Copyright (C) 2000-2008, Intel Corporation, all rights reserved.
Copyright (C) 2008-2010, Willow Garage Inc., all rights reserved.
Third party copyrights are property of their respective owners.
Redistribution and use in source and binary forms, with or without modification, are permitted provided that the following conditions are met:
* Redistributions of source code must retain the above copyright notice, this list of conditions and the following disclaimer. * Redistributions in binary form must reproduce the above copyright notice, this list of conditions and the following disclaimer in the documentation and/or other materials provided with the distribution.
* The name of the copyright holders may not be used to endorse or promote products derived from this software without specific prior written permission.
This software is provided by the copyright holders and contributors "as is" and any express or implied warranties, including, but not limited to, the implied warranties of merchantability and fitness for a particular purpose are disclaimed.
In no event shall the Intel Corporation or contributors be liable for any direct, indirect, incidental, special, exemplary, or consequential damages (including, but not limited to, procurement of substitute goods or services; loss of use, data, or profits; or business interruption) however caused and on any theory of liability, whether in contract, strict liability, or tort (including negligence or otherwise) arising in any way out of the use of this software, even if advised of the possibility of such damage.
libtiff
Copyright (c) 1988-1997 Sam Leffler
Copyright (c) 1991-1997 Silicon Graphics, Inc.
Permission to use, copy, modify, distribute, and sell this software and its documentation for any purpose is hereby granted without fee, provided that (i) the above copyright notices and this permission notice appear in all copies of the software and related documentation, and (ii) the names of Sam Leffler and Silicon Graphics may not be used in any advertising or publicity relating to the software without the specific, prior written permission of Sam Leffler and Silicon Graphics.
THE SOFTWARE IS PROVIDED "AS-IS" AND WITHOUT WARRANTY OF ANY KIND, EXPRESS, IMPLIED OR OTHERWISE, INCLUDING WITHOUT LIMITATION, ANY WARRANTY OF MERCHANTABILITY OR FITNESS FOR A PARTICULAR PURPOSE.
IN NO EVENT SHALL SAM LEFFLER OR SILICON GRAPHICS BE LIABLE FOR ANY SPECIAL, INCIDENTAL, INDIRECT OR CONSEQUENTIAL DAMAGES OF ANY KIND, OR ANY DAMAGES WHATSOEVER RESULTING FROM LOSS OF USE, DATA OR PROFITS, WHETHER OR NOT ADVISED OF THE POSSIBILITY OF DAMAGE, AND ON ANY THEORY OF LIABILITY, ARISING OUT OF OR IN CONNECTION WITH THE USE OR PERFORMANCE OF THIS SOFTWARE.
libjpeg
This software is based in part on the work of the Independent JPEG Group.
SHARP®
SHARP CORPORATION
V2.0 M EN14E(3)
- INTRODUCTION
- IMPORTANT INFORMATION
- NOTATION CONVENTIONS
- E.G. 1. TAP THE [SHOW HOST MENU TAG] ON THE DESKTOP
- THE HOST MENU APPEARS
- C:\PROGRAM FILES\SHARP\TOUCH DISPLAY LINK (DEFAULT)
- OPERATING ENVIRONMENT
- MONITOR
- HOST
- CLIENT
- ANDROID DEVICES (AS OF FEBRUARY 2014)
- IOS DEVICES (AS OF FEBRUARY 2014)
- WINDOWS DEVICES (AS OF FEBRUARY 2014)
- WIRELESS LAN ENVIRONMENT (WI-FI)
- TIPS
- ANDROID DEVICE
- IOS DEVICE
- WINDOWS DEVICE
- INSTALLING THE SOFTWARE
- STARTING THE APPLICATION
- ANDROID/IOS DEVICE: TAP [TOUCH DISPLAY LINK]
- TAP A HOST THAT YOU WANT TO CONNECT TO
- ENTER LOGIN INFORMATION
- CONNECT TO
- NAME
- ICON
- WHEN YOU HAVE COMPLETED THE SETTINGS, TAP [CONNECT]
- SCREEN GUIDE
- MAIN SCREEN ON HOST (HOST MENU)
- MAIN SCREEN ON CLIENT
- HOME
- FILE
- SHARING SCREEN DISPLAY
- OPERATING A MONITOR FROM A CLIENT
- REMOTE OPERATION (HOST CONTROL MODE)
- REMOTE OPERATION (POINTER MODE)
- HANDWRITING ON THE SCREEN OF THE MONITOR
- HANDWRITING BY IMPORTING THE SCREEN
- CONFIGURING THE PEN
- VIEWING PAST USER MEMO
- SAVING
- DELETING
- SENDING FILES FROM THE HOST TO THE CLIENT
- HOST OPERATION
- CLIENT OPERATION
- SENDING FILES FROM THE CLIENT TO THE HOST
- CLIENT OPERATION (ANDROID DEVICE / IOS DEVICE)
- SELECTING IMAGES
- SCAN BY CAMERA (IOS DEVICE)
- TAP [TAKE PHOTO]
- CORRECT THE IMAGE
- ORIGINAL IMAGE DISPLAY AREA
- CORRECTED PREVIEW DISPLAY AREA
- ADJUST IMAGE QUALITY LEVEL
- TAP [OK]
- SELECTING FILES
- SENDING SELECTED FILES
- CAUTION
- CLIENT OPERATION (WINDOWS DEVICE)
- FILES SENT USING "PASTE ON CURRENT SHEET
- FILES SENT USING "SEND TO PEN SOFTWARE
- FILES SENT USING "SEND TO FOLDER
- TRANSFERRING FILES BETWEEN CLIENTS
- RECEIVING-SIDE OPERATION
- ANDROID DEVICE/IOS DEVICE
- SENDING-SIDE OPERATION
- OPENING FILES
- ANDROID/IOS DEVICE
- TAP [OPEN MENU]
- SENDING FILES BY E-MAIL
- SENDING FILES TO AN APPLICATION
- EDITING FILE NAMES
- DELETING FILES
- VIEWING OPERATION GUIDE
- CONNECTING HOSTS
- CONNECTING TO ANOTHER HOST
- TAP [CONNECT]
- OPERATIONS WHEN CONNECTED
- CONFIGURING HOST SETTINGS
- [PERFORMANCE SETTING] TAB
- [SEND/RECEIVE SETTING] TAB
- EXITING THE APPLICATION
- HOST (FULL VERSION ONLY)
- UNINSTALLING THE SOFTWARE
- TRADEMARKS
- OPENCV LICENSE AGREEMENT
- LICENSE AGREEMENT
- FOR OPEN SOURCE COMPUTER VISION LIBRARY
- LIBTIFF
- LIBJPEG
- SHARP®
- SHARP CORPORATION
Brand : SHARP
Model : LL-P202V
Category : Screen