TVGo C03 - Digital decoder GENIUS - Free user manual and instructions
Find the device manual for free TVGo C03 GENIUS in PDF.

| Product Type | Digital Decoder |
| Brand | Genius |
| Model | TVGo C03 |
| Color | Black |
| Dimensions (W x D x H) | 120 mm x 80 mm x 30 mm |
| Weight | 200 g |
| Power Supply | 5V DC via USB adapter (included) |
| Power Consumption | 5 W (maximum) |
| Input | Antenna (coaxial) or cable |
| Output | HDMI, CVBS (AV composite) |
| Video Resolution | 720p, 1080i, 1080p |
| Supported TV Standards | DVB-T/T2, DVB-C, MPEG-4 |
| USB Port | USB 2.0 for media playback and PVR |
| Media Playback | MP4, AVI, MKV, JPEG, MP3 |
| Remote Control | IR remote included |
| Channel Search | Automatic and manual |
| Electronic Program Guide (EPG) | Yes, up to 7 days |
| Parental Lock | Yes |
| Cleaning Instructions | Wipe with a dry, soft cloth; avoid liquids |
| Safety Instructions | Keep away from water and heat sources |
| Spare Parts Availability | Remote control and power adapter available from manufacturer |
Frequently Asked Questions - TVGo C03 GENIUS
User questions about TVGo C03 GENIUS
0 question about this device. Answer the ones you know or ask your own.
Ask a new question about this device
Download the instructions for your Digital decoder in PDF format for free! Find your manual TVGo C03 - GENIUS and take your electronic device back in hand. On this page are published all the documents necessary for the use of your device. TVGo C03 by GENIUS.
USER MANUAL TVGo C03 GENIUS
SNAPSHOT PICTURES....10
MORE PICTURES....10
SETTINGS 11
PICTURE CONTROL BAR....12
RADIO ....13
CHANNEL LIST 13
SCHEDULE....13
SETTINGS 14
RADIO CONTROL BAR 16
SETTINGS....17
TV....17
VIDEOS....17
PICTURES 17
RADIO 17
GENERAL SETTINGS 18
Introduction
Thank you for choosing this Genius product. Before you start using your system, read this manual carefully and follow the installation instructions.
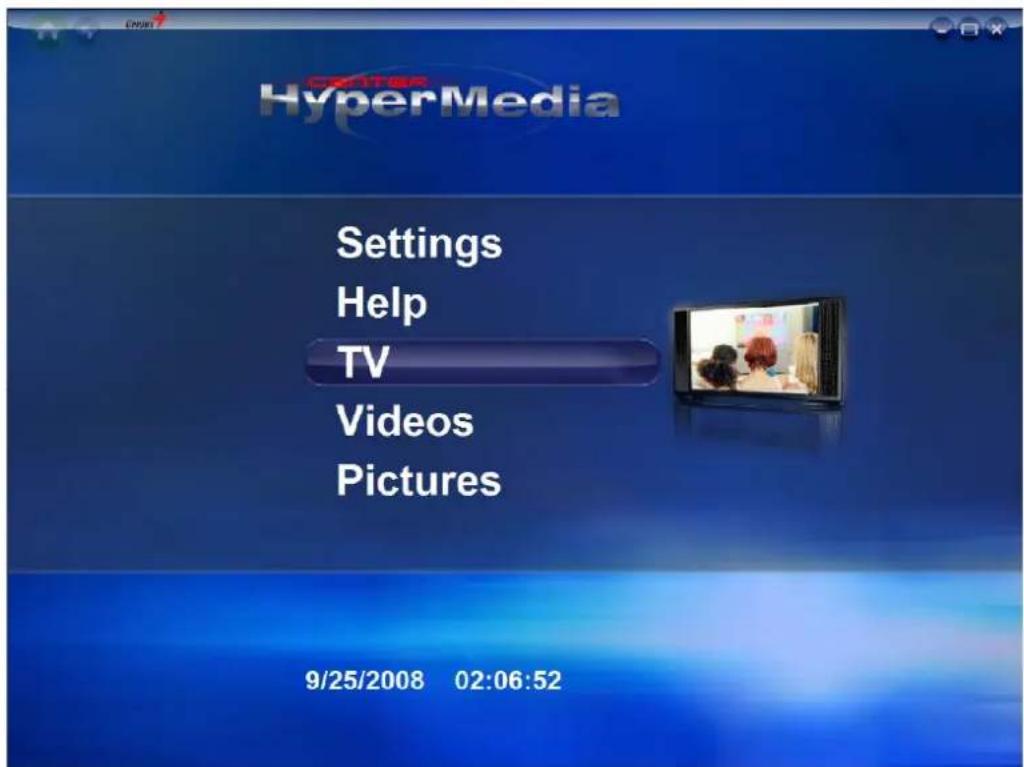
HyperMedia Center is an integrated multimedia application that allows you to enjoy all of your digital entertainment - TV, home videos and photos. HyperMedia Center is especially designed for turning your PC/Laptop into an entertainment solution.
Player Controls
There are several methods to control HyperMedia Center
- By Keyboard
Control the application by using the Arrow keys, ESC, and Enter keys.
- By Mouse
Select items by left-click or scroll wheel.
- By Remote Control (optional: depends on the model)
Navigation Bar

 | Return to Home page |
 | Return to previous page |
 | Minimize HyperMedia Center to the task bar. |
 | Adjust the display size |
 | Exit HyperMedia Center. |
My TV
HyperMedia Center is an all-in-one entertainment solution for the modern life. Now you can watch and record your favorite TV programs anytime you like. The first time you run HyperMedia Center, the setup wizard will guide you to configure the TV settings.
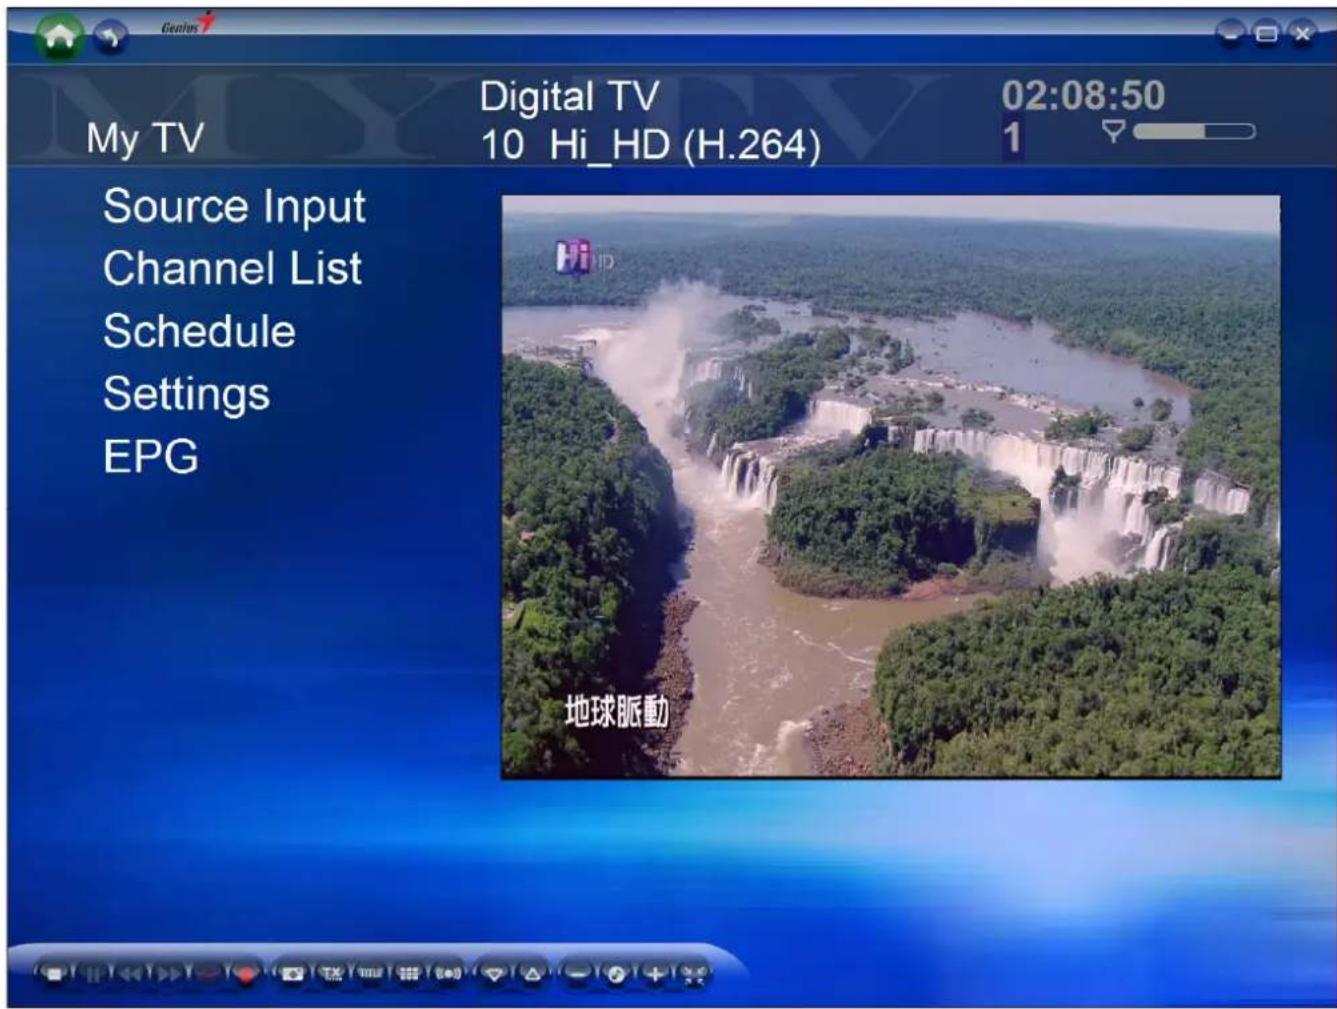
Source Input
Choose your TV signal source such as TV / Composite / S-Video.
Channel List
It will assist you to select TV channel.
Schedule
Schedule the recording of TV program. If you want to cancel a schedule, enter the Schedule and choose Cancel.
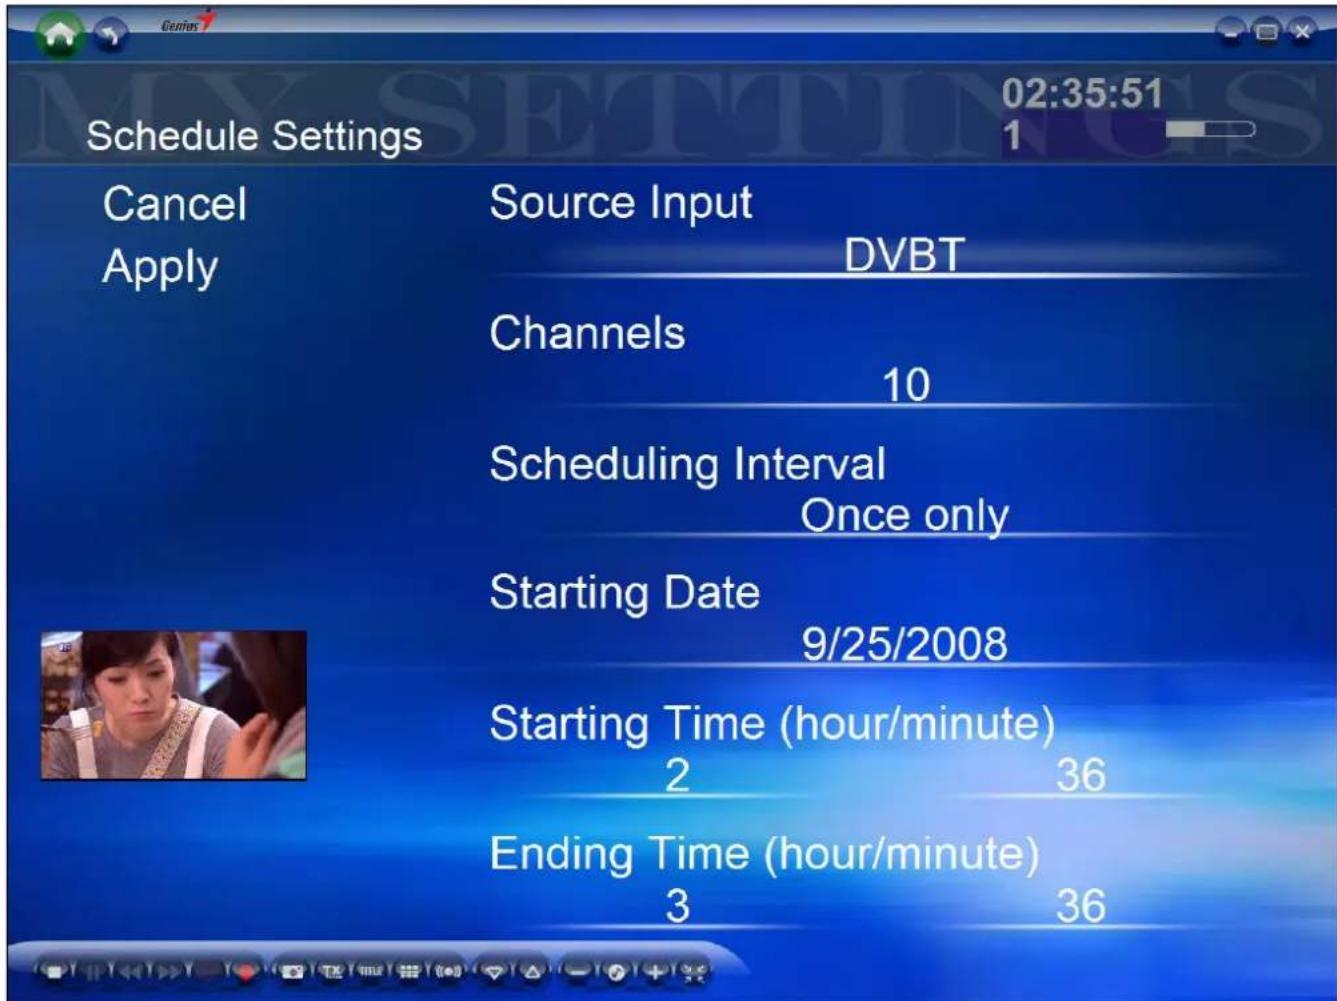
Source Input: Select your TV signal source.
Channels: Choose the channel you want to record
Scheduling Interval: Define the recording rules. The default value is "Once only".
Starting Date: Set the recording date.
Starting/Ending Time: Set the Time to start/end recording (hour/minute).
TV Settings
Adjust TV signal, recording and display settings here.
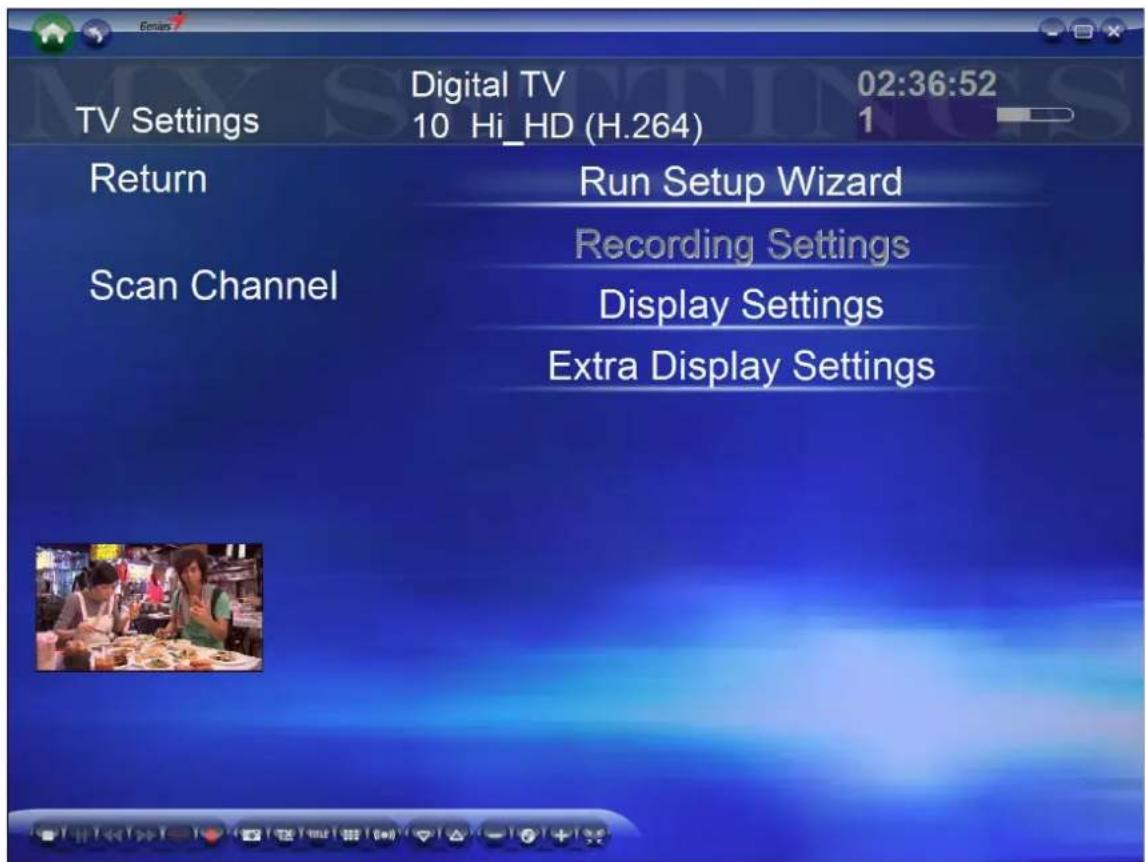
Run Setup Wizard: Run Setup Wizard is an easy setup function. It can help you to complete the overall settings of TV function including TV tuner, region and automatic scan of TV channels.
Recording Settings: Configure the recording format: MPEG 1/2/4 (Analog only) For digital TV system, you cannot change the setting because it only supports the default MEPG II format.
Display Settings: Adjust the display settings (Brightness, Contrast, Saturation, Hue, Sharpness or default setting)
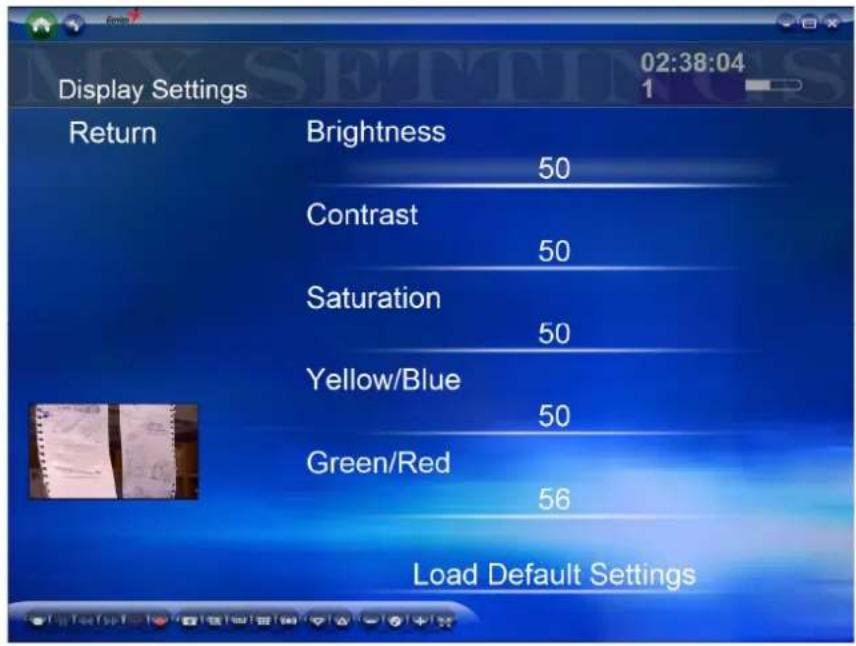
Extra Display Settings: Adjust the display aspect ratio (4:3, 16:9, 16:10)

Extra Display Settings: De-noise function for Analog TV. Open it will improve Analog TV quality.

EPG
EPG (Electric Program Guide) allows you to receive the information for each channel.
TV Control Bar
 | Stop |  | Pause Backward |  | |
 | Forward |  | Time-Shifting |  | Capture |
 | Snapshot |  | Close Caption Subt |  | |
 | Channel Preview |  | SAP |  | Previous Channel |
 | Next Channel |  | Volume Down Mu |  | |
 | Volume Up |  | Switch to Hypermedia center |
My Videos
In the Videos page, you can play video files stored in your computer.
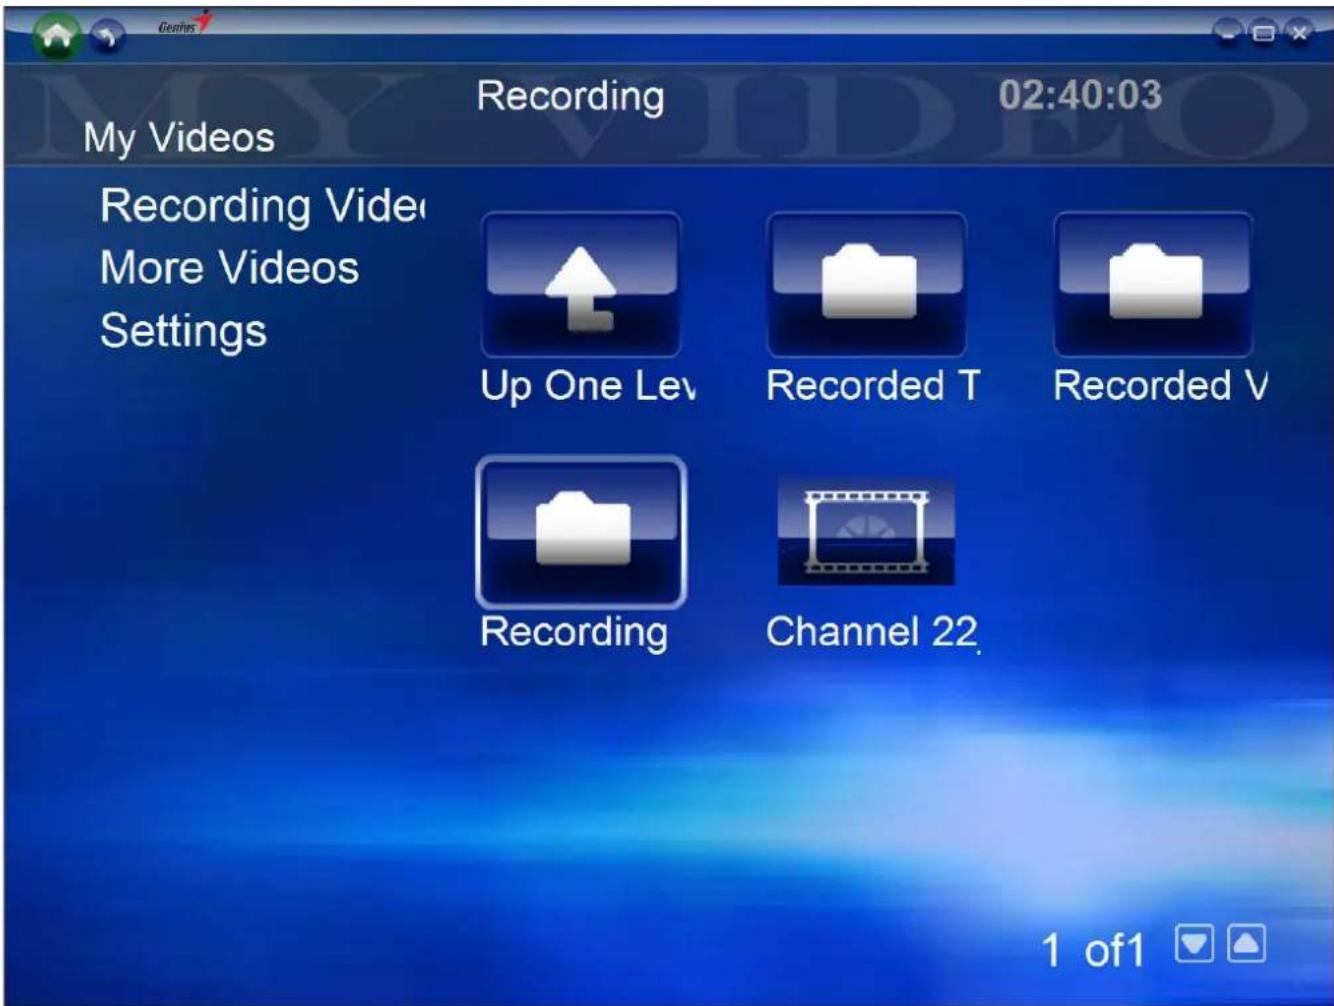
Recording Videos:
Play the video files in a specific folder.
More Videos
HyperMedia Center is also applicable for playing other video files.
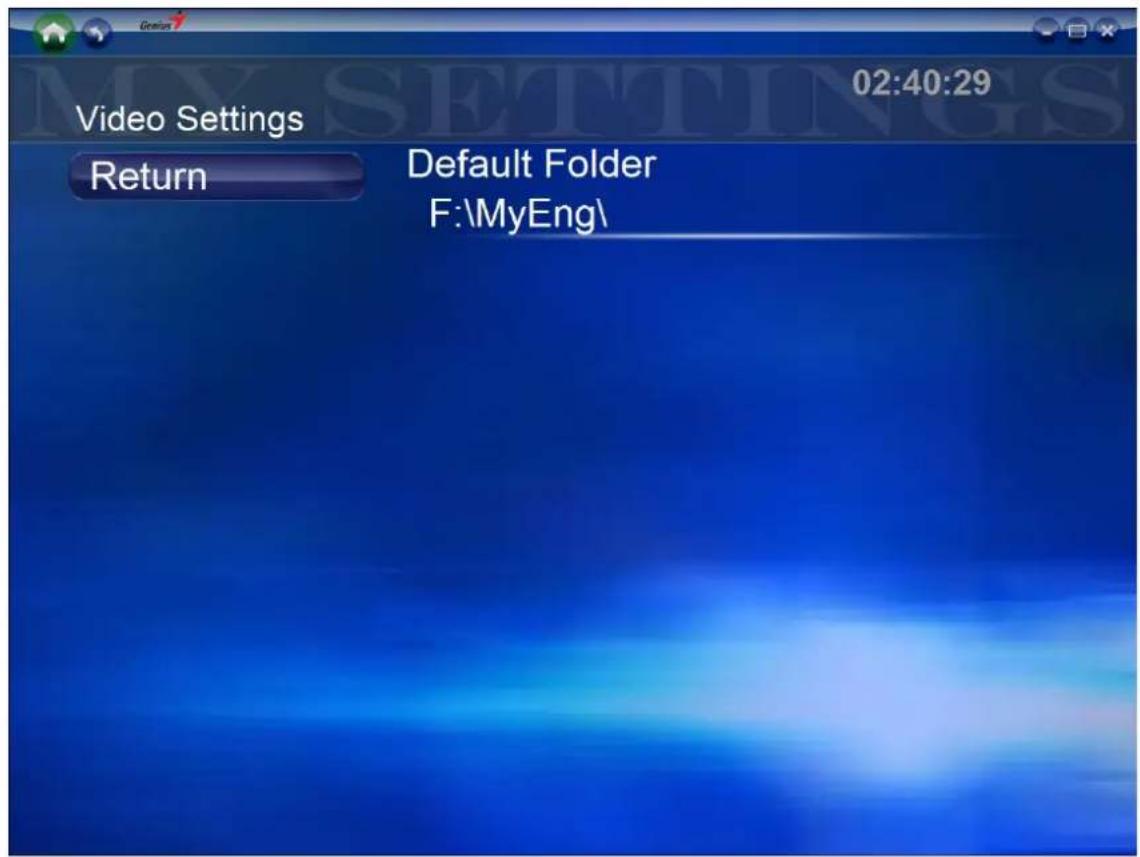
Settings
Create a specific folder to save recorded video files.
Video Control bar
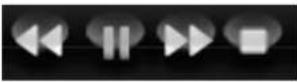 | Backward | |
| Pause | ||
| Forward | ||
| Stop |
Pictures
In My Pictures page, you can view pictures stored in any folder.
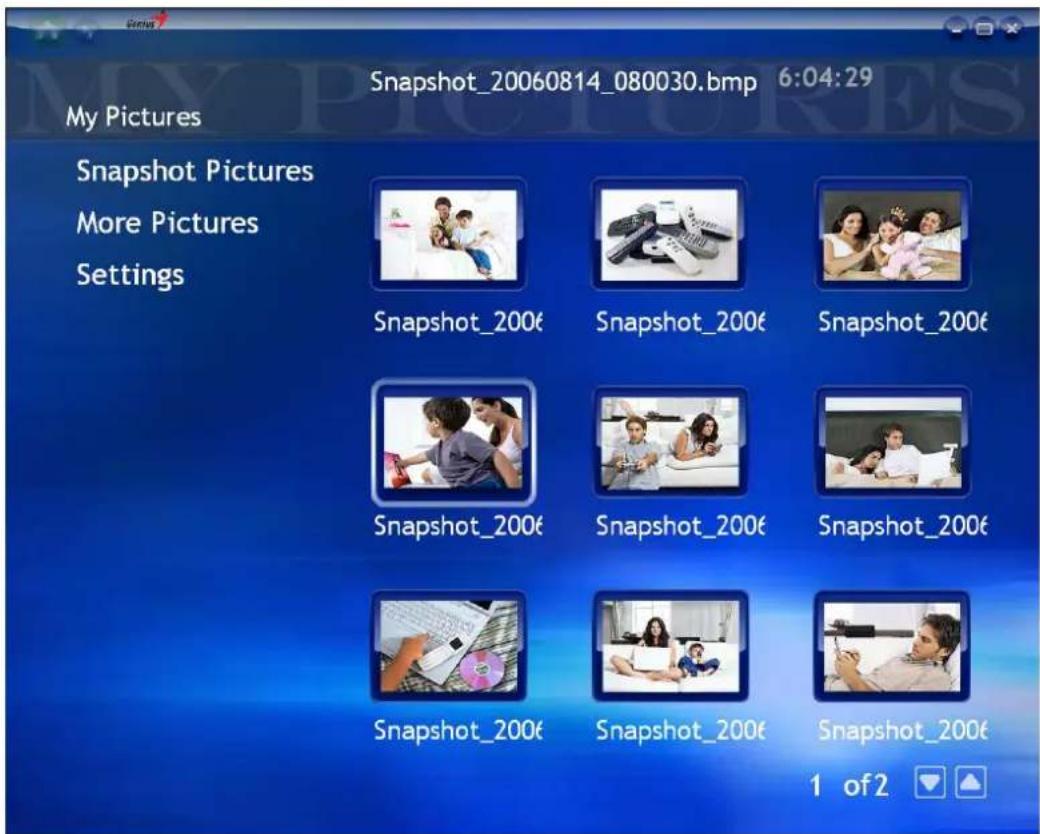
Snapshot Pictures
Click Snapshot Pictures button to review the picture files you captured. In addition, you can also check pictures in the slideshow mode.
More Pictures
Show other picture files in your computer.
Settings
In Settings, you can create a specific folder to save pictures. Meanwhile, the timeframe of Slideshow can also be set in this option. Besides you can set multi-snapshot pictures from 1 to 10 in “Total pictures” option, and set “Time interval” from 0.2sec to 10sec.
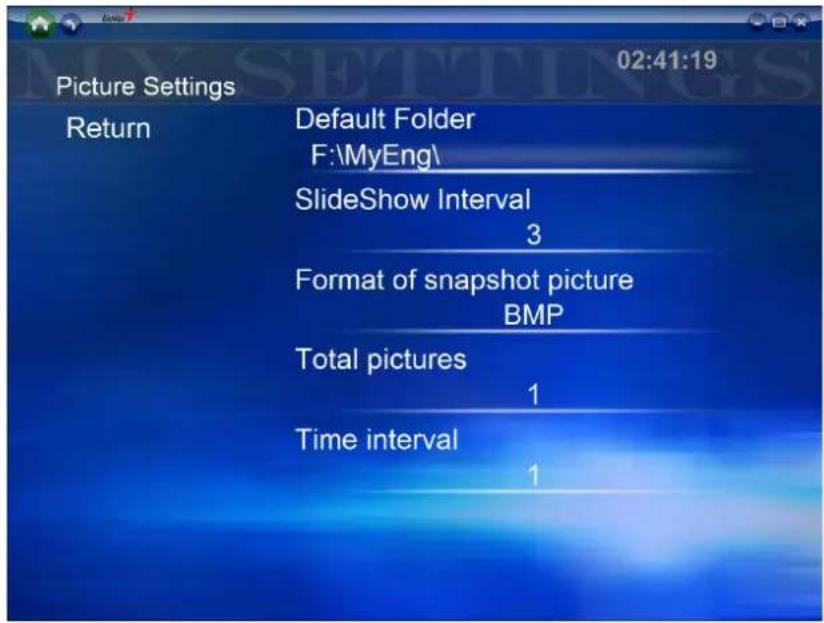
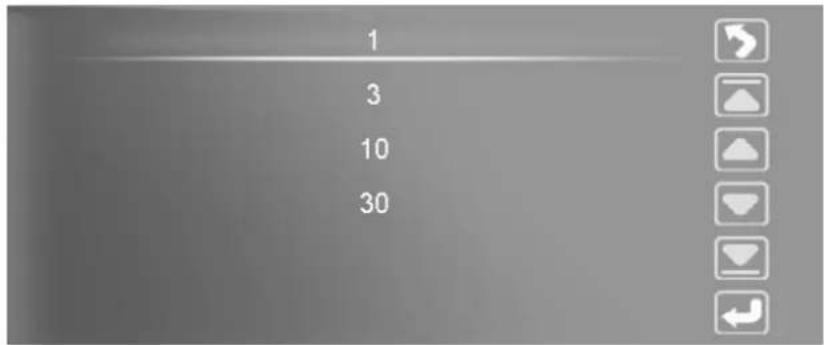
SlideShow Interval: Configure the interval : 1sec , 3 sec , 10sec or 30sec
Format of snapshot picture: Please select your favorite format: BMP or JPEG

Total Pictures: Configure Multi-Snapshot pictures: From 1 picture to 10 pictures

Time interval: Configure Multi-Snapshot interval: From 0.2sec to 10 sec

Picture Control bar
| Stop | ||
| Backward | ||
| Forward | ||
| Slideshow |
Radio
This model doesn't support FM radio.
Channel List
It provides a channel list for you to select the preferred FM program.
Schedule
Schedule allows you to schedule the recording of FM program. You can set up a new schedule to record the FM program, or choose Cancel if you wish to call off the recording request.
Settings
In Radio, it allows you to choose saving destination of the FM recording files. More than that, you can also set up the recording format and channel scanning in this option.
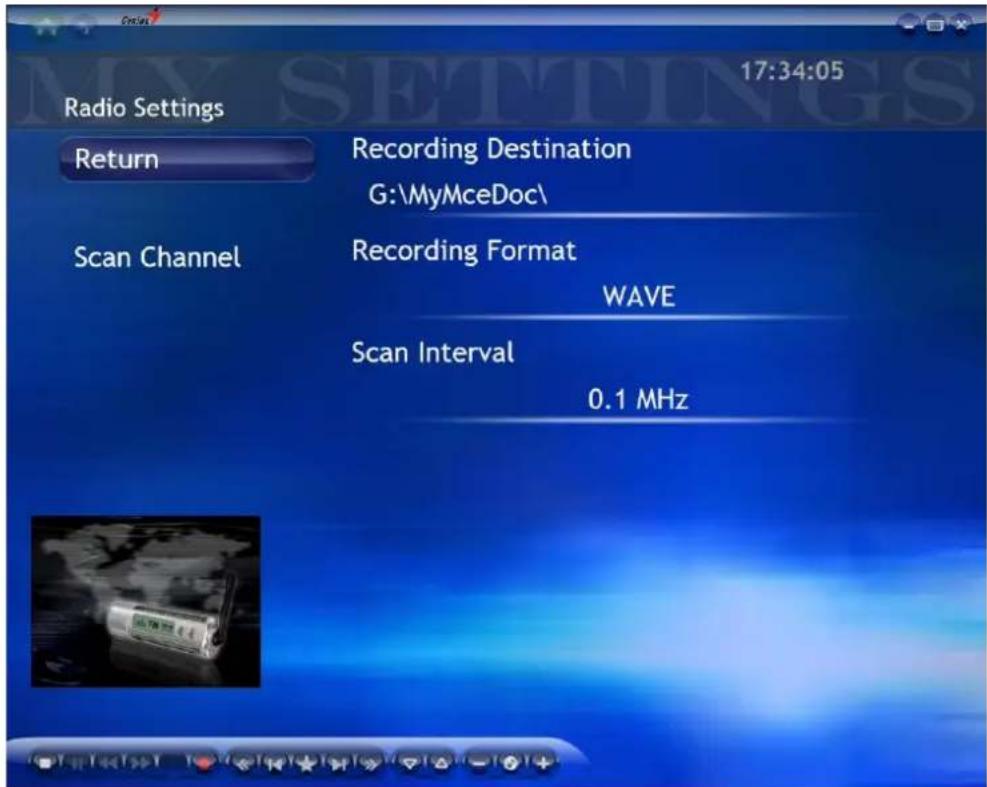
Recording Format: Configure the recording format: WAVE or WAM

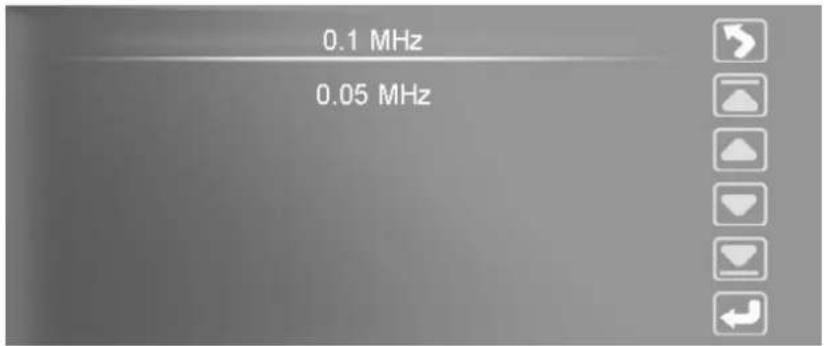
Scan Interval: Configure scan channel interval: 0.1 MHz or 0.05 MHz.
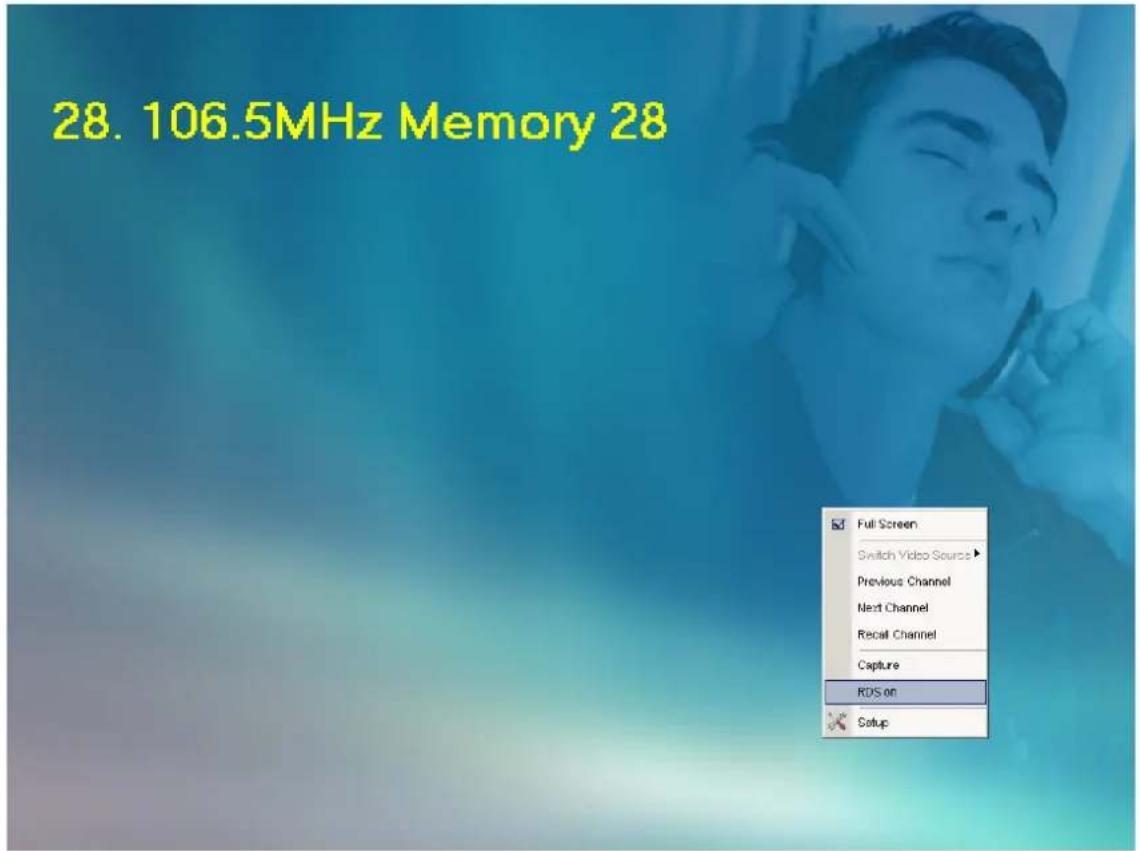
FM RDS function: Click the right mouse button and it will pop-up a small window.
Select "RDS on" and click left mouse button to enable RDS function.
Radio Control Bar
 | Stop |  | Pause Backward |  | |
 | Forward |  | Capture |  | Tune Downward |
 | Last receivable FM Station |  | Memorize FM Station |  | Next receivable FM Station |
 | Tune upward |  | Last Preset FM Station |  | Next Preset FM Station |
 | Mute |  | Volume Up Volu |  own own |
Settings
Click Home Page to open the HyperMedia Center Setting menu. Here you can find the general settings for HyperMedia Center software, and duplicated control settings for other options such as TV, Videos and Pictures.
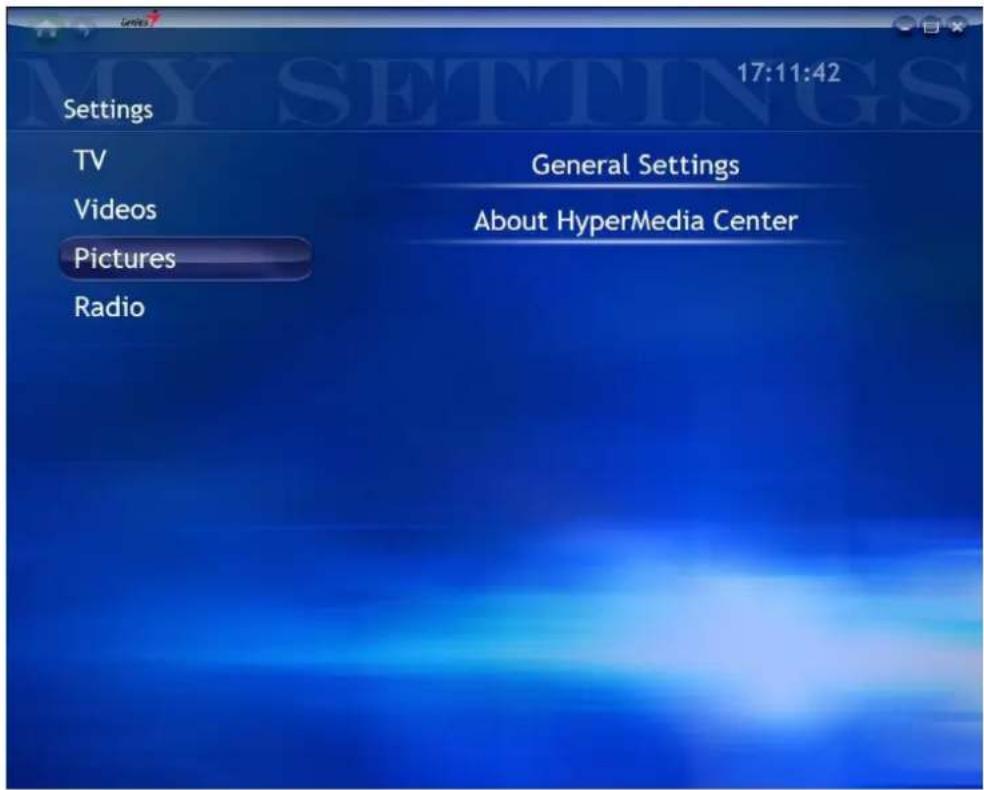
TV
Please refer to the setting description in TV section
Videos
Please refer to the setting description in Video section
Pictures
Please refer to the setting description in Picture section
Radio
Please refer to the setting description in Radio section
General Settings
In General Settings, there are many options for you to choose:
Language: English, Chinese, French, German, Russian and Spanish, Multi-language to meet your need.
Background Color: 10 vivid backgrounds for you to select. It is wonderful to freshen up your vision by changing background colors every day.