
NST-600NU - Network Card/Adapter Vantec - Free user manual and instructions
Find the device manual for free NST-600NU Vantec in PDF.


| Product Type | Network Adapter |
| Model | NST-600NU |
| Brand | Vantec |
| Interface | USB 3.0 |
| Network Speed | 10/100/1000 Mbps |
| Dimensions (L x W x H) | 6.5 x 2.0 x 1.0 cm |
| Weight | 30 g |
| Power Source | USB bus-powered |
| Operating Systems Supported | Windows, macOS, Linux |
| LED Indicators | Link, Activity |
| Cable Length | 30 cm |
| Maintenance | Clean with dry cloth; avoid liquids |
| Safety Certifications | CE, FCC |
| Package Contents | Adapter, USB cable, driver CD, manual |
| Repairability | No user-serviceable parts; contact support |
Frequently Asked Questions - NST-600NU Vantec
User questions about NST-600NU Vantec
0 question about this device. Answer the ones you know or ask your own.
Ask a new question about this device
Download the instructions for your Network Card/Adapter in PDF format for free! Find your manual NST-600NU - Vantec and take your electronic device back in hand. On this page are published all the documents necessary for the use of your device. NST-600NU by Vantec.
USER MANUAL NST-600NU Vantec
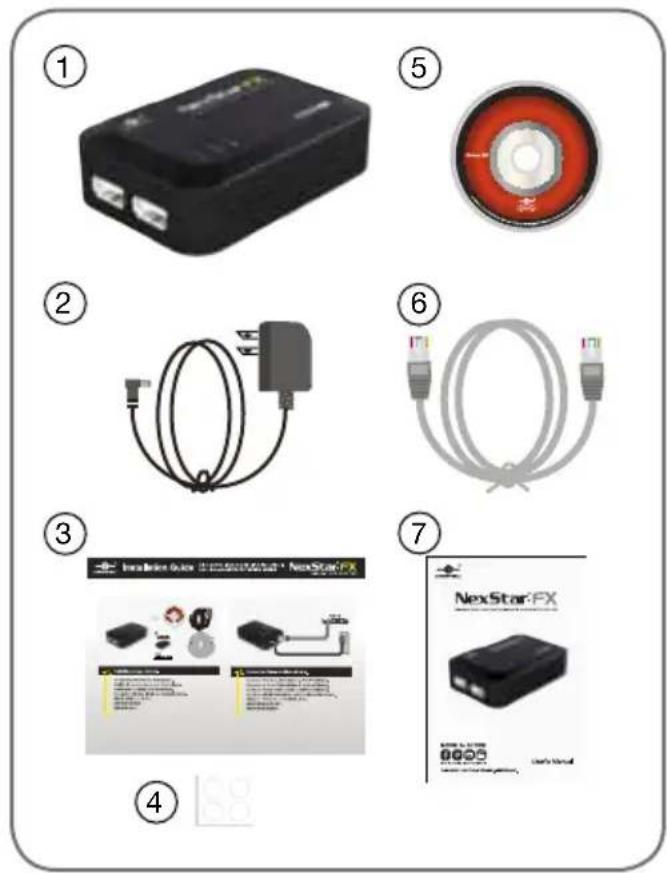
① NextStar FX Gigabit NAS Adapter x1
② AC Adapter x1
③ Installation Guide x1
④ Rubber Feet x4
⑤ User's CD x1
⑥ Ethernet Cable x1
⑦ User's Manual x1
TRADEMARKS
MS-DOS, Xbox, Microsoft, Windows NT/2000/XP/Vista/7 are trademarks of Microsoft Corporation.
PS3 and Playstation are trademarks of Sony Corporation.
Apple, iTunes, Macintosh and Mac are trademarks of Apple Computer.
NexStar is a registered trademark of Vantec Thermal Technologies.
*All other third-party brands and names are the property of their respective owners.
Table of Contents
- Product Introduction / Features 02
- Parts Layout 03
- NexStar FX NAS Manager 04
- NexStar FX NAS GUI 06
- SAMBA Server (SMB) 12
- FTP Server 16
- Media Server Connection-Xbox / PS3 19
- Printer Server 22
- Mac Installation (Mac 10.5.4 or above) 26
- Mapping Network Drives 31
- Q&A 32
- Warranty 34
- Contact 34
1. Product Introduction / Features
Thank you for purchasing NexStar FX Gigabit NAS Adapter. Now you can easily install the NexStar FX Gigabit NAS Adapter into your network environment. Before using this device, please read the Key Features below.
Key Features
- Supports One USB Storage Device
- Gigabit Ethernet LAN For Blazing Fast Speeds
- Share Your Printer Over Home Or Office Network
- Easy To Use User Interface
- FTP & SMB Server To Store And Share Your Files
- Media Server To Stream Files On Network
- Cross Platform Friendly: PS3 & Xbox 360 & Media Centers
- Share Your Mp3s Over iTunes
- User Friendly Control Interface
- Add Storage To Any Network – Quick And Easy
The NexStar FX Gigabit NAS Adapter is a flexible, economical and powerful unit for your network. Please follow the instructions below which will help you to connect, to set up, and to configure the device.
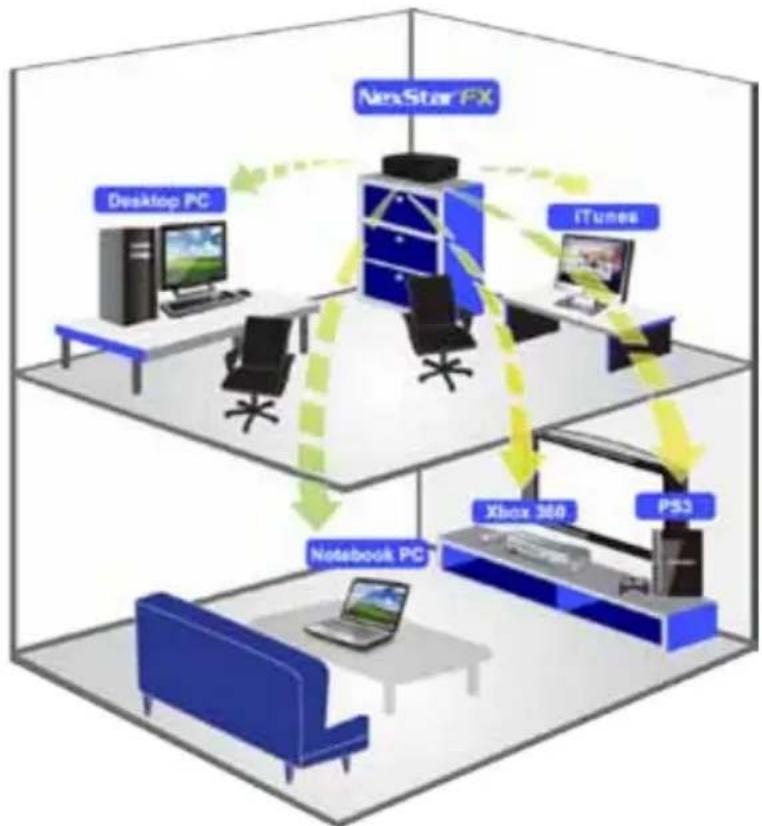
Network environment
There are 3 different setup conditions you can choose:
- Setup NexStar FX Gigabit NAS Adapter as DHCP Client:
If your NexStar FX Gigabit NAS Adapter operates under a built-in DHCP server router (ex. Internet Sharing Hub), it will obtain an IP address from the DHCP Server automatically.
-
Setup NexStar FX Gigabit NAS Adapter as DHCP Server: If your operating environment does not support DHCP server, NexStar FX Gigabit NAS Adapter will immediately act as DHCP server and assign an IP for installation.
-
In Static IP environment: You need to first configure the IP for NexStar FX Gigabit NAS Adapter to operate in the static IP environment. For configuration details, please refer to "LAN Config" setup page.
flowchart
graph TD
    A["Desktop PC"] -->|Green Arrow| B["NexStar PX"]
    C["Laptop"] -->|Green Arrow| B
    D["Notebook PC"] -->|Green Arrow| B
    E["Xbox 360"] -->|Yellow Arrow| B
    F["PSS"] -->|Yellow Arrow| B
    G["iTunes"] -->|Yellow Arrow| B
    B --> H["Computer"]
    style A fill:#f9f,stroke:#333
    style C fill:#bbf,stroke:#333
    style D fill:#bfb,stroke:#333
    style E fill:#ffb,stroke:#333
    style F fill:#fbb,stroke:#333
    style G fill:#fbb,stroke:#333
    style H fill:#fff,stroke:#333
2. Parts Layout

3. NexStar FX NAS Manager
3.1 Search NexStar FX Gigabit NAS Adapter by SearchDisk
- Run the Utility CD enclosed in package and navigate to the "Search Utility" folder. Run "SDisk.jar".

- Select "Search Next" and when the NexStar FX is found, click "Connect".

- The default login is "admin" for both user name and password, click "OK" to enter configurations.

3.2 Search NexStar FX Gigabit NAS Adapter by using Windows Internet Explorer.
- Open IE browser and type in the default host name "NST-600NU" in the search bar.

- The default login is "admin" for both user name and password, click "OK" to enter configurations.

4. NexStar FX NAS GUI
NexStar FX NAS supports multi-language user interface. Please click on the respective flags to select your language.

4.1 Hard Disk format
For first time installation, you need to format the hard disk into FAT32 file system. This procedure can be done by clicking on the format button.

Note: All existing data will be deleted from the format.
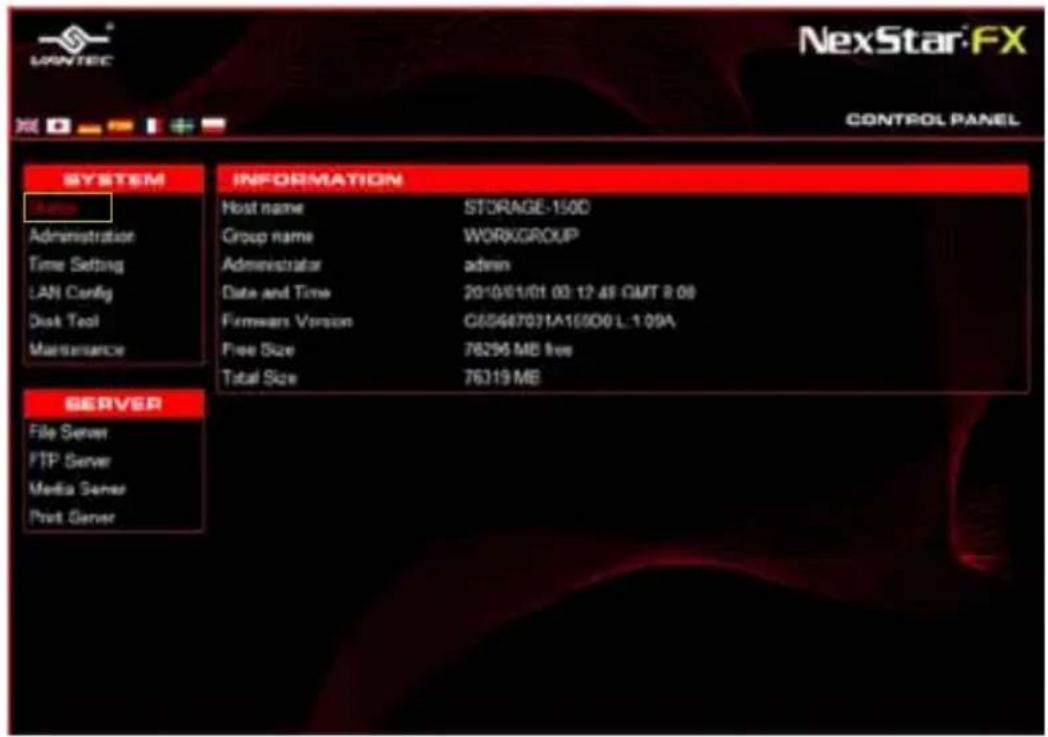
4.2 Status
This tab provides the basic information for the NexStar FX Gigabit NAS Adapter. Users can check firmware version and available hard drive capacity on this page.
4.3 Administration
You can change and modify your host & group name, and password from this page. Click "Apply" to save the settings.
- Host Name: This is used to identify your device on the network. If you prefer a different name, type in the new name and click “Apply” to save setting.
- Group Name: This should be same as your workgroup. In general, the default "WORKGROUP" will be OK. But if your workstation belongs to a different workgroup, type in the correct group name to modify.
In Windows OS, right click on "My Computer", choose "Properties", and go to the computer name tab to see your current workgroup.
For Mac OS to join Windows workgroup, open the directory access utility (under Applications->Utilities), select SMB and click configure to modify the settings (Administrator access is required to access this option.)

Note: We strongly suggest you to change the password as soon as you logged in to prevent unauthorized access.
4.4 Date/Time setting
You can change time setting from this page. Click “Apply” to save the setting. By default, SNTP is in network time service, your can also select “Synchronize to PC”. If internet access is available, we recommended setting SNTP to Network time service instead.

4.5 LAN Config
By default, the "IP Setting" is set to "Automatic IP". This is the recommended setting and will allow the NexStar FX Gigabit NAS Adapter to obtain its IP address automatically. If you prefer setting it manually, select the static IP option, enter your own value and click apply to confirm the new setting.
Setting manually is useful when you have a static IP address in order to mount the network drive or setup port forwarding.

4.5.1 PPPoE Setting
PPPoE (Point-to-Point Protocol over Ethernet) is an internet connection protocol allowing users to connect to the internet without a router. All local users can share one PPPoE connection to access the internet.
If you want to configure the setting of PPPoE for your NAS, click the "Set" button.

Status: Display PPPoE connection status.
Service Name: This is an optional field. You can enter the name you desire which could help you remember the configuration.
Account Name: Enter your user name provided by your ISP.
Password: Enter your password provided by your ISP.
Service on Demand: The router will ONLY connect itself to your ISP when there's internet request demanded by any LAN user and disconnect itself when the transaction is done.
Idle Time (Seconds): Idle time means the storage will disconnect itself from the ISP after being idle for a specific time. If the time is set to 0, the storage will not disconnect itself.
Max Connection Time (Hours): A specific time that indicate how long the storage can stay connected with ISP.
IP Address Negotiation: IP Address and Subnet Mask should be assigned within the same network as the PPPoE-enabled DSL modem.
Fixed IP Address: Use to assign an IP address manually.
AC Name: This is an optional field. Use it to configure an Access Concentrator (AC) name on the PPPoE interface.
WAN IP: This shows what the current Storage IP address.

4.6 Disk Tool
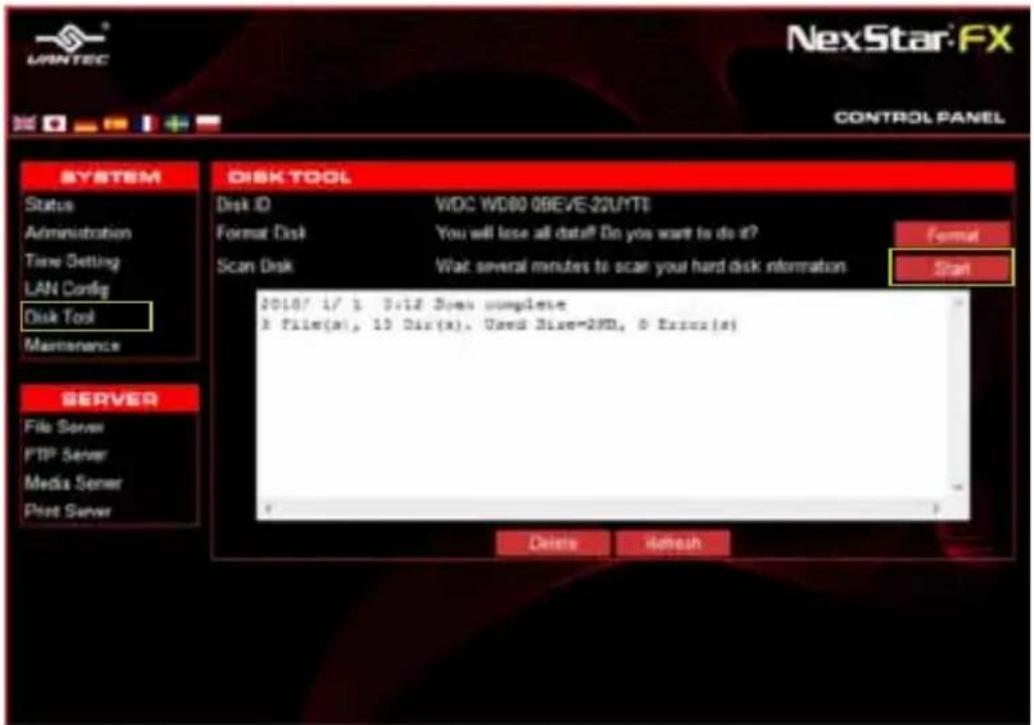
In this page, you can manage the hard disk setting.
- Format: For the first time installation, you need to format the hard disk into FAT32 system file, this procedure applies to both new or used hard disk.
- Scan Disk: After the scan, it will show the number of file content and health status for the hard disk.
4.7 Maintenance
This page allows you to update the NexStar FX NAS firmware, to go back to the default settings, or to reboot the NAS system.
- Firmware update: Follow the steps below to update the loader and firmware for the NexStar FX NAS.
■ Obtain the latest firmware from www.vantecusa.com.
■ Store the firmware file on to your computer and decompress it if necessary.
■ Browse your system and locate the firmware (BIN file).
- Click on "update".
■ Confirm the pop-up message to start the update.
■ Wait and DO NOT power off or remove the device during the firmware update. This might take a few minutes.
■ Once the update is complete, it will prompt you to reboot the device.
- Click on "Reboot" to restart the device.
■ Wait for about one minute and then go to the status page to confirm that the update is successful.
- Factory defaults: Forgot your admin password? Click "Reset" under the factory defaults and it will revert back to the default password setting. SAMBA/FTP account setting will still remain in the NexStar FX NAS, other settings will be restored to factory default.
- System reboot: This can be used to restart the network drive after a firmware update.

SMB server allows you to share data or files through LAN environment. A default “guest” folder is created and shared to all users from under the same network as the NexStar FX NAS.

Note: Use only "English alphabet" for folder names and no special characters when creating new folders.
5.1 How to create User account.
Click on the "Add" button. Type new account name, password and click "OK".

Here, we name the account "User1" to demonstrate, enter password and click "Next" to enter share management.
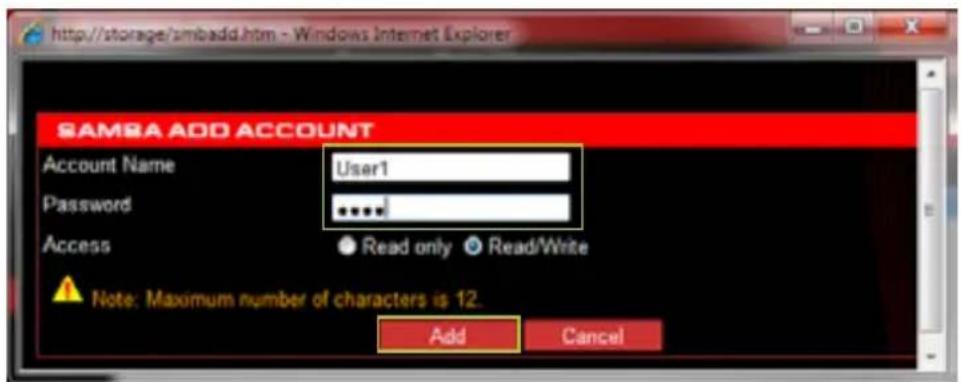
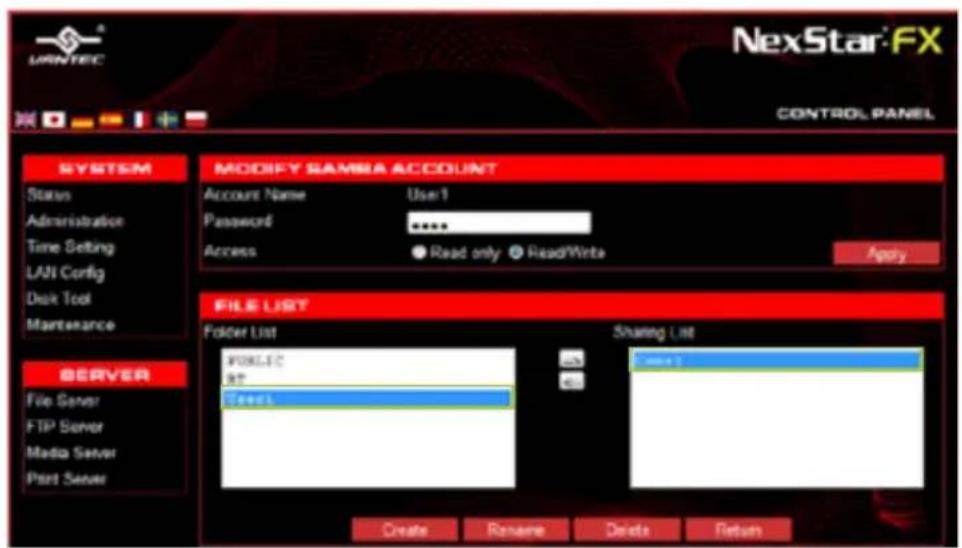
You can "Run" from Windows start button, type "\" and follow by the NexStar FX's IP address (eg:\192.168.1.10), and click "OK" to continue.

Type "User1" and password to login.

Now you have successfully set up the folder that you wish to share on your NexStar FX NAS. This folder can be accessed from other computers on your local network.

5.2 How to modify user account password
Select the account name ("User1") and then click "Modify".

Enter new password and click "Apply" to save setting.

5.3 How to delete a user account
Select an account you wish to delete, click "Delete" to proceed. Please note that all the data inside the folder will be lost after the delete.

6. FTP Server
Remember to "Enable" the FTP service on the status page, when you plan on using FTP server.
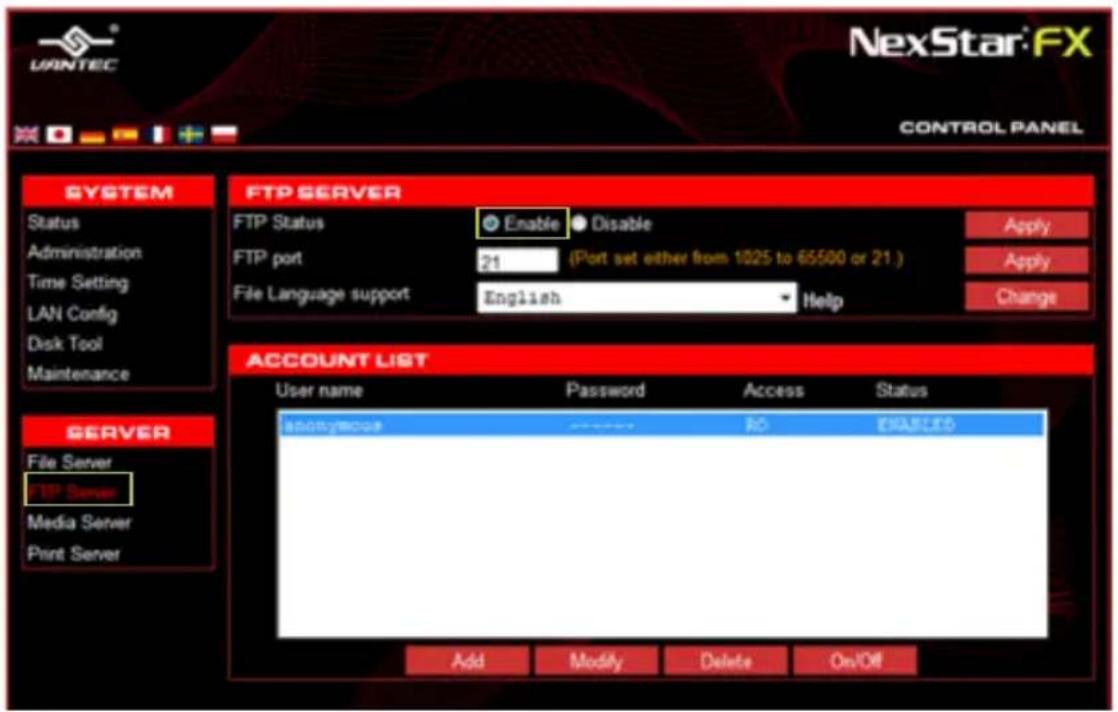
FTP Server Configuration: The standard port for FTP service is 21. If required, you can change it into any port ranging from 1025-6550. But in general, we recommended using the default port of 21.

File Language Support: By default, the encoding is set to English. If you want to store or transfer files with a different encoding (different language), choose the corresponding language from the drop down list. In order to transfer and view the files correctly, it is important that you select the correct language!
Anonymous: By default an anonymous user name has been created, it allows FTP users to login without username and password. For security reasons, it is best to add a password!

Note: To be able to share FTP resource via internet, you need a router to assign the external IP to your NexStar FX NAS. Please refer to your router's instructions on how to assign the external IP.
6.1 How to create FTP account
FTP server allows you to share your data through internet, so an internet resource and router is required before setting up FTP server.
Select FTP server and clicks "Add" button and enter a name and password for the new FTP account and click "OK" to continue.
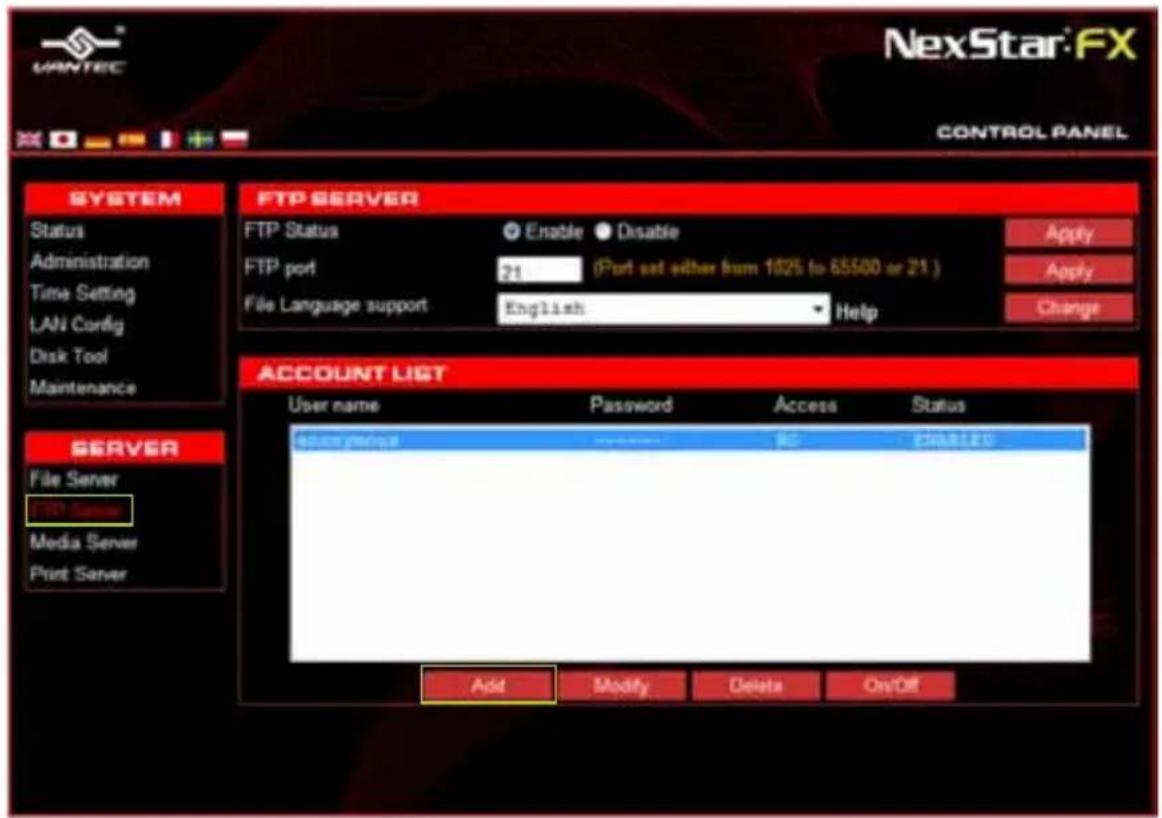

In the account list, you can see an overview of the existing accounts and status. For FTP file transfers, we recommend to use other dedicated FTP client software e.g. SyncQuick FTP, Cute FTP etc.

Note: When creating FTP accounts, please use ONLY English alphabet and no special character or space for FTP account name.
6.2 How to delete FTP account
In the “Account List”, you can see an overview of the existing accounts and status; you can change them at any time by selecting the account and modifying, disabling or deleting it.

Note: Deleting a folder will also erase all the files stored inside that folder.
7. Media Server Connection-Xbox / PS3
7.1 Xbox
When you turn on the Xbox 360, DLNA Media Servers on the same network are automatically detected.

flowchart
graph LR
    A["NAS (DLNA Media Server)"] --> B["Router"]
    B --> C["Modem (ADSL / DSL, Cable, etc.)"]
    C --> D["To Internet"]
    B --> E["Xbox 360 (DLNA Client)"]
    E --> F["TV"]
    style A fill:#f9f,stroke:#333
    style B fill:#ccf,stroke:#333
    style C fill:#cfc,stroke:#333
    style D fill:#fcc,stroke:#333
    style E fill:#cff,stroke:#333
    style F fill:#ffc,stroke:#333
- Move to the "My Xbox" page
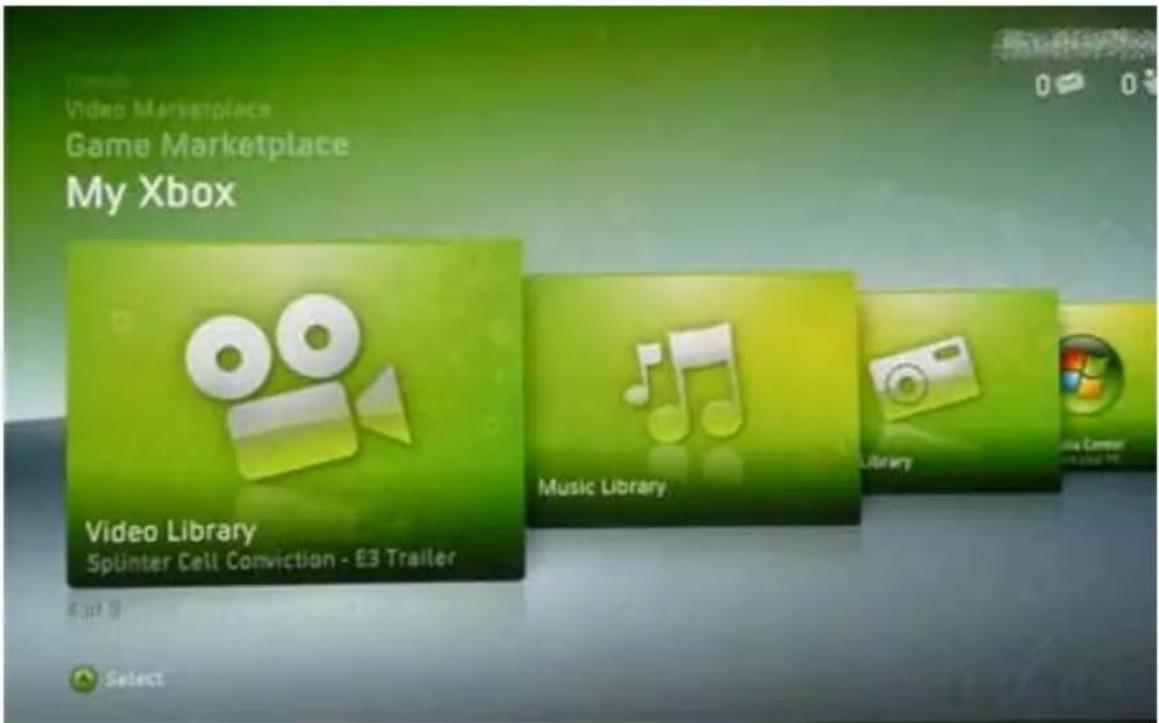
- Choose the DLNA media server that was connected and select the file you want to play.
![Select Source Downloaded Videos Current Disk Portable Device PS3 Media Server (Livingroom) PS3 Media Server [Livingroom] Stream videos from your Windows-based PC.](/content/2026/05/1067411/images/5fc5d34973cbb96ec4517d7e44eab94f7af9ec129e7c25e3c75f7dc29e4c78e8.jpg)
7.1 PS3TM
When you turn on the PS3™ system, DLNA Media Servers on the same network are automatically detected and icons for the detected servers are displayed under (Photo), (Music), and
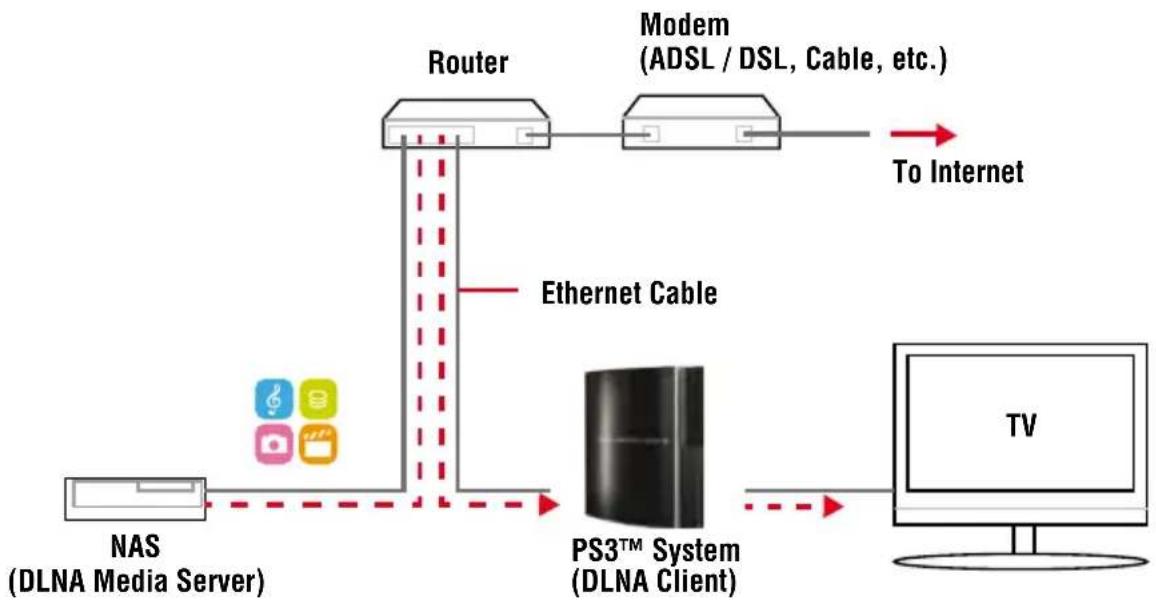
flowchart
graph LR
    A["NAS (DLNA Media Server)"] --> B["Router"]
    B --> C["Modem (ADSL / DSL, Cable, etc.)"]
    C --> D["To Internet"]
    B --> E["PS3™ System (DLNA Client)"]
    E --> F["TV"]
    style A fill:#f9f,stroke:#333
    style B fill:#ccf,stroke:#333
    style C fill:#cfc,stroke:#333
    style D fill:#fcc,stroke:#333
    style E fill:#cff,stroke:#333
    style F fill:#ffc,stroke:#333
- Select the icon of the DLNA Media Server that you want to connect to under (Photo), (Music), or (Video). All available folders and files that can be played by the PS3™ system will be displayed.
- Select the file that you want to play.

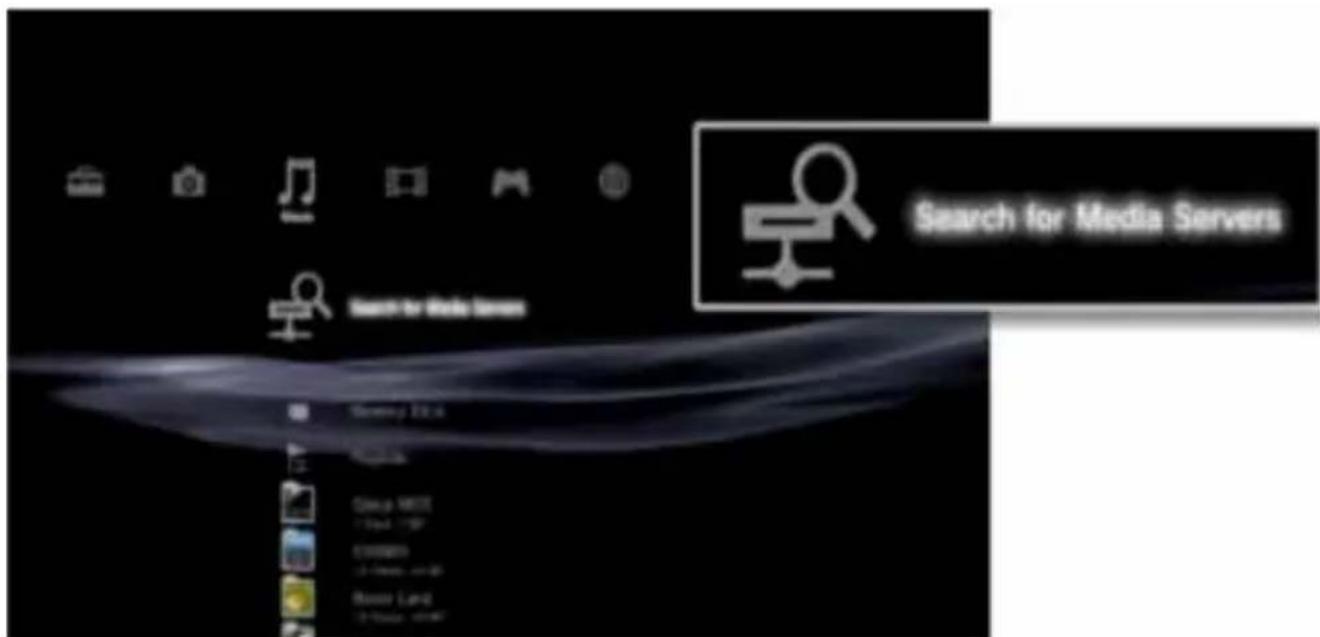
NOTE : The PS3™ system must be connected to a network. For details on network settings, see 📄 (Settings) > 🌐 (Network Settings) > [Internet Connection Settings] in this guide. You can initiate a search for DLNA Media Servers on the same network. Use this feature if no DLNA Media Server is detected when the PS3™ system is turned on.
3. Select (Search for Media Servers) under (Photo), (Music) or (Video). When the search results are displayed and you return to the XMB™ menu, a list of DLNA Media Servers that can be connected will be displayed.
8. Printer Server
- Firstly, install your Printer driver into your computer, (for example. if Epson PL-6200L Printer is connected to the NAS, you must install PL-6200L driver into your computer first). After driver installation, please click "Start"→"Setting"→"Printer and Faxes"→"Add a printer"→"Next".
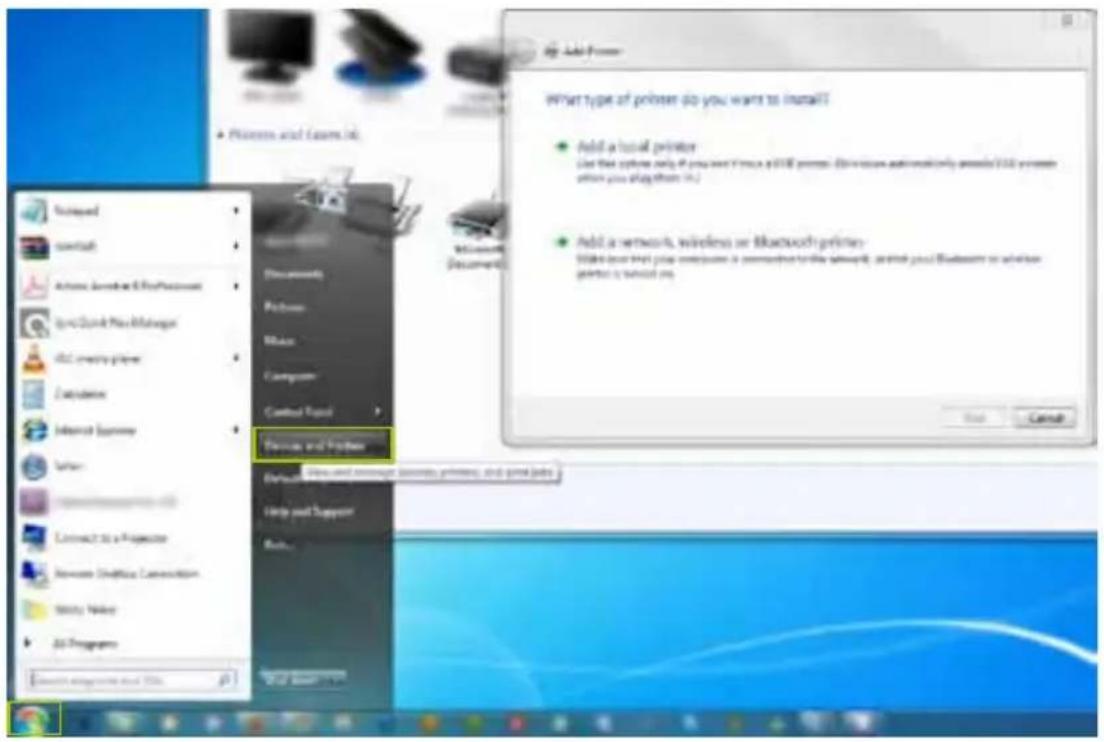
- Connect the USB printer to NexStar FX NAS's USB Printer Port.

- Go to "Add Printer Wizard", select "Local printer" and click "Next" to continue.

- Select "Create a new port," "Type of port:", choose "Standard TCP/IP Port", and click "Next" to continue.

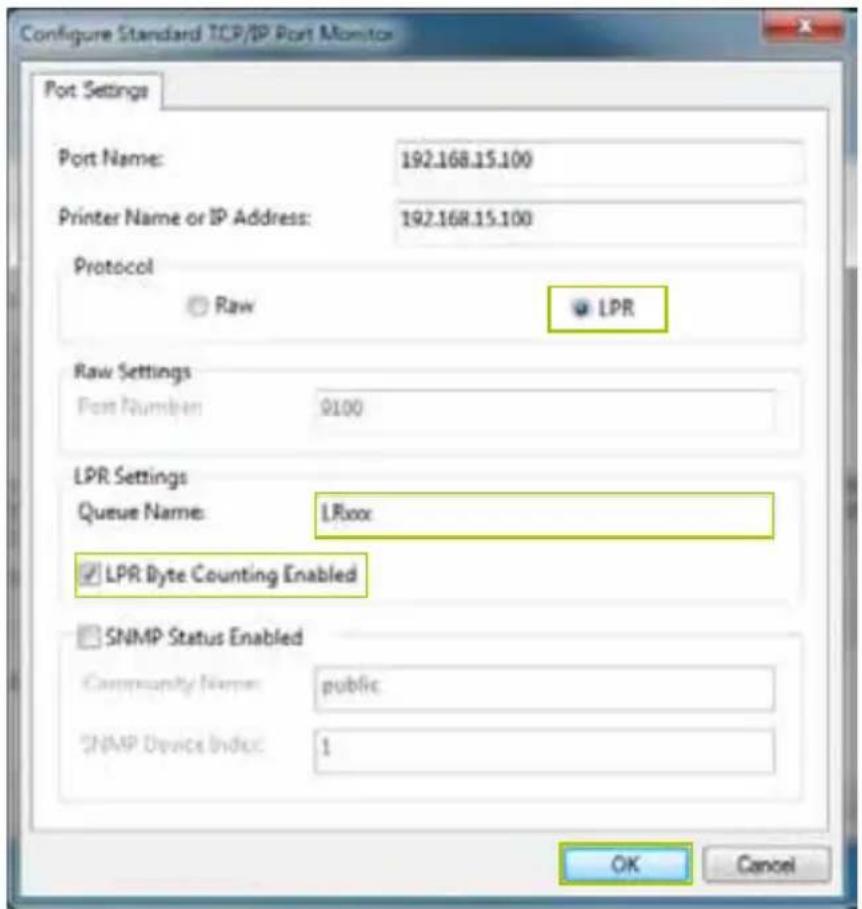
- Enter the NexStar FX NAS IP address (Eg. 192.168.15.100), then click "Next" to continue.

- Select "Custom" and go to "Setting".

- Select "LPR" in protocol, and give a queue name E.g. LRxxx; select LPR byte enable and click "OK" to finish the port setting.
-
Click "Finish" to complete TCP/IP printer setup.
-
Go to "Printer server page and check printer server status. If status shows "OK", the printer is setting up successfully.
Notes: NexStar FX Printer server does not support GDI/Host-based printers. For some Multi-Function Printers (MFP); scanning functions may not work. Please contact the printer manufacture for detailed specifications.
9. Mac Installation (Mac 10.5.4 or above)
9.1 Finding NexStar FX's IP Using the Search Disk Utility (SDisk.jar)
- Copy the software tool "SDisk.jar" from the CD-ROM.

- Run SDisk.jar. Click 'Search Next' and the NexStar FX's IP address will be listed. Click connect to load your Web Browser and proceed with setting up the NexStar FX.

- You will be prompted for login. (Default - Name: admin/ Password: admin)

9.2 How to Access Files Using SMB(Samba)
- Click 'Go' and navigate to 'Computer' or use Shift-Command-C.
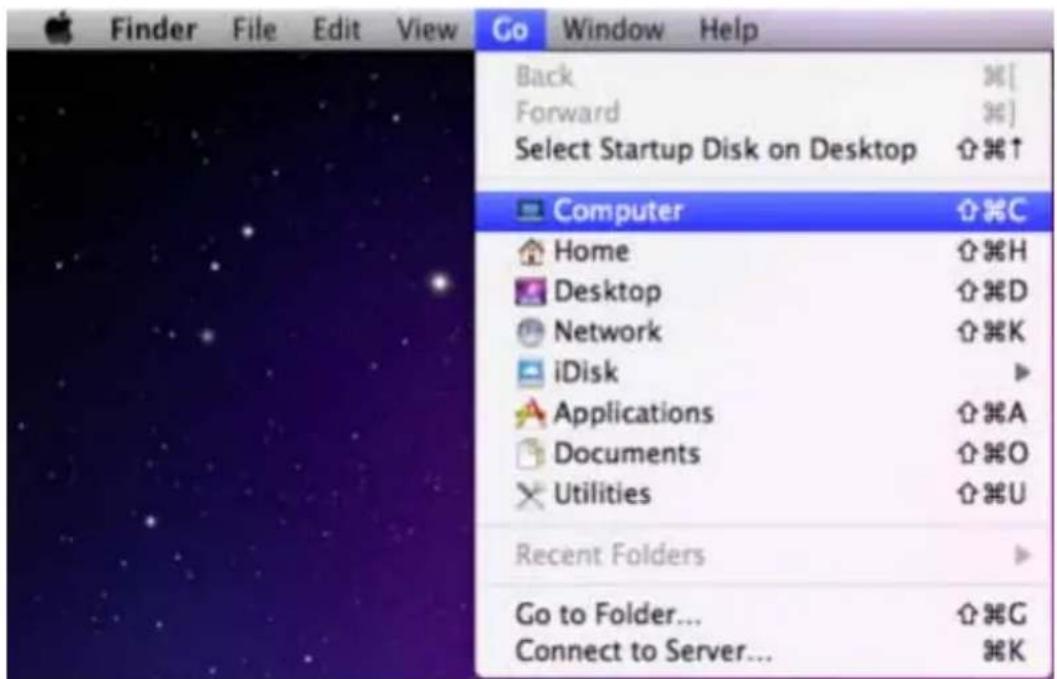
- If the NexStar FX is in the same Workgroup it will appear under Shared Devices( ▼ SHARED ). If the Workgroup is different, please click "All..." and look for the NexStar FX.

- After you enter into the NexStar FX you can choose the existing folders and access its contents.
- You will be prompted for log in. You can use "Guest" or other identities you have created.
-
Once you have properly logged in, it will appear below "".
-
After you enter into the NexStar FX you can choose the existing folders and access its contents.
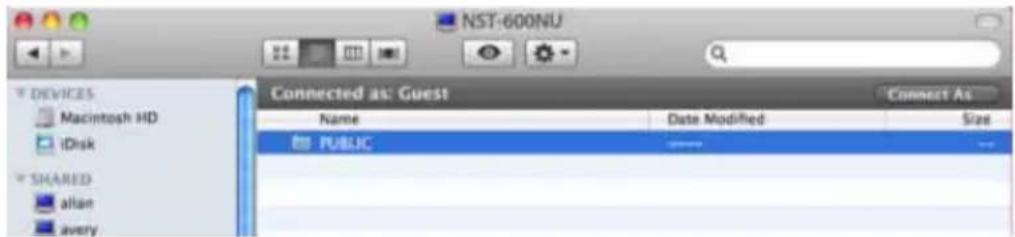
- You will be prompted for log in. You can use "Guest" or other identities you have created.

- Once you have properly logged in, it will appear below "SHARED".

9.3 How to Access the NexStar FX Using 'Connect to Server'
- Click 'Go' and navigate to 'Connect to Server...' or use Command-K.

- Type in the following: 'smb://192.168.1.112/' (Eg. If the NexStar Fx's IP is 192.168.1.112)
- You must log in. You can use "Guest" or other identities you have created.
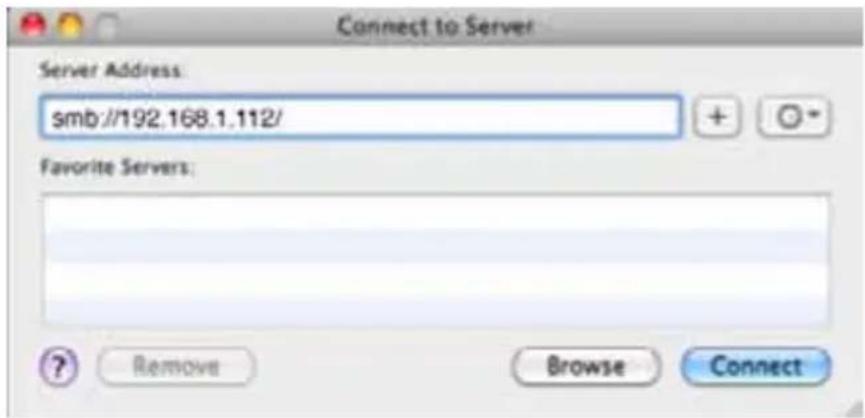

- Once the authentication has gone through, the NexStar FX folder will be listed under
"SHARED"

10. Mapping Network Drives
Below are directions to map the shared folders on your NexStar FX Gigabit NAS Adapter as Network Drives on your computer system (Showing NAS disk drive in network).
- Press the "Start" button on Windows desktop.
- Open up "Computer" and navigate to "Network."
- Search through the list of devices connected to your network for the NexStar FX.
- Double click to enter the NexStar FX (Eg. NST-610NU-N1).
- You may be asked for authentication. Please enter the User login and Password you have created under SMB.

- Choose the folder you wish to map.
- Right-click the mouse button and select "Map Network Drive".
- You can designate the drive path for the respective folder.


Note: For faster connection and usability, we recommend that you map folders which you use constantly as network drives. This creates a direct access to the shared folders on the NAS from My Computer.
11.Q&A
Q: What is NexStar FX NAS's default IP?
A: The default IP address is 169.254.0.1 or enter "NST-600NU" in IE browser bar to search for it.

Q: What is NexStar FX NAS default login name and password?
A: The default Login name is: "admin", default password: "admin".
Q: Forgot my login password, what should I do?
A: Please follow the steps below.
■ Press and hold the reset button.
■ Unplug and reconnect the power.
■ Wait for 30 seconds, and then release the reset button.
■ NexStar FX NAS will go back to the factory defaults.
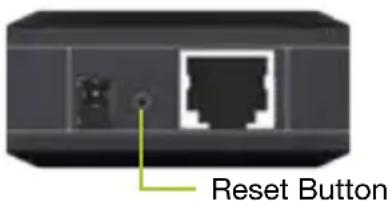
Note: Only SAMBA/FTP account settings will remain in the NexStar FX NAS; other settings will revert back to factory default.
Q: Why can't I create/share folders in SMB or FTP server?
A: To avoid languages support issue, we suggest to create/share folders with English characters only.
Q: Why can't I upload the files via LAN connection or get disconnected?
A: Please make sure you are connected to the network properly and you have access rights (read & write) for the folders.
Q: How to setup NexStar FX with daylight saving time?
A: The NexStar FX does not support daylight saving time setting.
Q: Why can I not enter the SMB folder with password via Windows XP/7?
A: Please update Windows XP to SP2 or above. After the update, if you have Norton Internet Security installed, please check with Norton Service Center.
Q: What Operating Systems does NexStar FX NAS support?
A: The NexStar FX NAS supports Microsoft Windows 2000/XP/Vista/7 and Apple Macintosh OS 10.5.4 above.
Q: How do I access NexStar FX NAS via the Internet?
A: If your NexStar FX NAS is configured with a fixed public IP, please perform the following steps.
■ Enter the NexStar FX web management, and go to the FTP Server page to enable FTP Status.
■ Create user account and user restrictions
■ Open Microsoft Internet Explorer or other FTP client software (recommended), and enter the respective FTP network internet IP address (Example: ftp://192.168.1.100)
Q: Why can I not connect via FTP or show link time out when using IE?
A: Due to IE FTP is not compatible with some routers; you are suggested to use FTP client software to start with. If you would like to use IE FTP to link to the NexStar FX, please refer to the following steps:
- Please open port 21 and 20 on your Router and link to NexStar FX's IP address.
■ Open IE > Tool > Internet Options > Advance. - Click "Enable folder view for FTP site" and click "OK".
Q: Why does my FTP client software not link to the NexStar FX or fail during file transfer?
A: Due to software design, it's possible that certain FTP software is not compatible with the NexStar FX. The NexStar FX NAS is tested with the most popular FTP client software such as CuteFTP or SyncQuick FTP software.
Q: What are the limitations to user accounts for FTP and Samba server?
A:
| Samba Server | User Level Access (maximum create 16 user accounts, 16 folders shared by one account) |
| FTP Server | maximum create 16 user account, 16 folders shared by one account |
| Maximum User Login | FTP 8 User/Samba 8 User (Total 64 TCP connection at the same time) |
Q: Are there any limitations for NexStar FX NAS file name length?
A: The limitation of length of file folder name is 64 bytes.
Q: What can the NexStar FX do with DHCP?
A: You can setup the NexStar FX as a DHCP server if there is aren't any other DHCP Server existing in your local network. Otherwise, the NexStar FX will automatically turn off its DHCP server function and become a DHCP client. For example, if you have installed a router with built-in (activated) DHCP Server, the NexStar FX NAS will automatically setup itself as a DHCP client.
12. Warranty
The NexStar FX Gigabit NAS Adapter comes with a 1 year limited warranty (90 days parts). If your unit should become defective within that time frame, please go to www.vantecusa.com for information on how to receive warranty exchange or repair. Cosmetic defects and missing parts are not covered under this warranty. Please check the content of the unit to make sure you received all parts. Also, check for any cosmetic flaws. If any parts are missing or if there are cosmetic defects, please contact the retailer from which you purchased the unit immediately and ask for a replacement.
13. Contact
Vantec Thermal Technologies
website: www.vantecusa.com


- TRADEMARKS
- Table of Contents
- Product Introduction / Features
- Key Features
- Network environment
- Parts Layout
- NexStar FX NAS Manager
- Search NexStar FX Gigabit NAS Adapter by SearchDisk
- Search NexStar FX Gigabit NAS Adapter by using Windows Internet Explorer.
- NexStar FX NAS GUI
- Hard Disk format
- Status
- Administration
- Date/Time setting
- LAN Config
- PPPoE Setting
- Disk Tool
- Maintenance
- How to create User account.
- How to modify user account password
- How to delete a user account
- FTP Server
- How to create FTP account
- How to delete FTP account
- Media Server Connection-Xbox / PS3
- Xbox
- PS3TM
- Printer Server
- Mac Installation (Mac 10.5.4 or above)
- Finding NexStar FX's IP Using the Search Disk Utility (SDisk.jar)
- How to Access Files Using SMB(Samba)
- How to Access the NexStar FX Using 'Connect to Server'
- Mapping Network Drives
- 11.Q&A
- Q: What is NexStar FX NAS's default IP?
- Q: What is NexStar FX NAS default login name and password?
- Q: Forgot my login password, what should I do?
- Q: Why can't I create/share folders in SMB or FTP server?
- Q: Why can't I upload the files via LAN connection or get disconnected?
- Q: How to setup NexStar FX with daylight saving time?
- Q: Why can I not enter the SMB folder with password via Windows XP/7?
- Q: What Operating Systems does NexStar FX NAS support?
- Q: How do I access NexStar FX NAS via the Internet?
- Q: Why can I not connect via FTP or show link time out when using IE?
- Q: Why does my FTP client software not link to the NexStar FX or fail during file transfer?
- Q: What are the limitations to user accounts for FTP and Samba server?
- Q: Are there any limitations for NexStar FX NAS file name length?
- Q: What can the NexStar FX do with DHCP?
- Warranty
- Contact
Brand : Vantec
Model : NST-600NU
Category : Network Card/Adapter