KIL240BF-2 - Fridge KELVINATOR - Free user manual and instructions
Find the device manual for free KIL240BF-2 KELVINATOR in PDF.

| Product Type | Refrigerator |
| Brand | Kelvinator |
| Model | KIL240BF-2 |
| Dimensions (H x W x D) | Approx. 1700 x 600 x 600 mm |
| Weight | Approx. 50 kg |
| Power Supply | 220-240 V, 50 Hz |
| Energy Consumption | Estimated 150 kWh/year |
| Climate Class | N/ST (16°C to 38°C) |
| Noise Level | < 42 dB (A) |
| Refrigerant | R600a |
| Temperature Control | Mechanical thermostat with dial |
| Shelves | Tempered glass, adjustable |
| Door Reversibility | Yes (user reversible) |
| Defrost | Automatic in refrigerator compartment |
| Interior Light | LED |
| Storage Features | Egg tray, ice cube tray, bottle rack, salad crisper |
| Usable Capacity | Approx. 240 liters (refrigerator only) |
| Warranty | 1 year (parts and labor) |
| Repairability | Replaceable door gasket, shelves, thermostat |
| Maintenance | Clean with mild soap and water; avoid abrasives |
| Safety | Do not use extension cord; ensure proper ventilation |
| Certification | CE, RoHS |
Frequently Asked Questions - KIL240BF-2 KELVINATOR
User questions about KIL240BF-2 KELVINATOR
0 question about this device. Answer the ones you know or ask your own.
Ask a new question about this device
Download the instructions for your Fridge in PDF format for free! Find your manual KIL240BF-2 - KELVINATOR and take your electronic device back in hand. On this page are published all the documents necessary for the use of your device. KIL240BF-2 by KELVINATOR.
USER MANUAL KIL240BF-2 KELVINATOR
text_image
Kelvinator®DOUBLE DOOR REFRIGERATOR
MODEL: KIL240BF-2/KIL240BFM-2
INSTRUCTION MANUAL
Parts and Features

text_image
1 2 3 4 5 6 7 8 9 10- Lamp and thermostat control
- Refrigerator Shelf
- Crisper Glass 4. Crisper Drawer
- Drawer 6. Adjustable Foot
- Fridge door 8. Door shelf
- Lower Door Shelf 10. Freezer door
Transportation and Handing
- When transporting, hold the base and lift the refrigerator carefully at a tilted angle not more than 45 degrees.
• Never hold the door handle as support. - Never place it upside down or horizontally.
- Push refrigerator on the two back roller feet and then tilt slightly to get through doorways.
Installation
- Install the refrigerator on a flat, firm floor, in order to prevent vibration and noise.
- Choose a well-ventilated place. A space of no less than 10cm must be left around the refrigerator.
- Choose a location where there is no heat source. Keep the refrigerator away from direct sunlight and the oven etc..
- Choose a dry and well-ventilated place where there is no corrosive air.
Testing
- Turn the thermostat knob to the "3" position, then turn on electricity. The compressor and the light inside the refrigerator will come on.
- When the refrigerator operates for a period of time, the temperature controller will automatically set the temperature within limits it opens.
- If the above steps are successful, the trial operations finish. The refrigerator works normally.
Temperature Control
-
The temperature in the refrigerator compartment and freezer compartment is controlled by the thermostat control located on the inside wall of the refrigerator compartment.
-
The marks on the thermostat control knob, are the temperature grades, and not the the degrees of temperature.
"0" shows a forced STOP and "6" shows the lowest temperature.
-
Turn the knob from "1" to position "7", the temperature decreases continuously. You may set the temperature control selector to any position according to your needs.
-
Please set the selector to "3" position in normal use.
Storage of Food
- How to Use the Freezer Compartment
• Freeze food when it it still fresh in order to preserve the nutrients.
- Wrap food to be frozen in ALUMINIUM FOIL or place it in AIRTIGHT boxes.
• If you buy frozen food, place it in freezer as quickly as possible.
-
How to Use the Refrigerator Compartment
-
Hot cooked meals can be put into refrigerator to keep fresh after their temperature decreases to room temperature.
- Egg pockets and bottle pockets for eggs, butter, milk and bottle drinks, etc.
- Food such as MEAT, FISH, in addition to becoming dry, may cause smells. To prevent this, they should be wrapped in aluminum foil, placed in suitable polythene bags or stored in proper airtight containers.
3. Fast Freezing
• Our freezers have a function of fast freezing.
- Fresh fish and meat to be stored for a long period of time should be fast frozen for this purpose.
- When fast freezing, please set the temperature control selector to the mark "7", After fast freezing, set it to normal position.
Defrosting
-
After a period of time, the freezer will form a layer of white frost. It may raise the electricity consumption and lessen the effect of refrigeration. Then you should defrost your freezer.
-
When defrosting, cut off the power, open the door and move frozen foods to a shady and cooling place. Defrost with a plastic scraper (do not use a knife), or let the temperature rise naturally until frost melts by itself. Then wipe away remaining ice and water, and switch on electricity again.
Notes: Never use sharp metal tools as it will damage the refrigerator.
General Notes:
- The appliance should be so positioned that the plug is easily accessible.
- If the supply cord is damaged, it must be replaced by a special cord or assembly available from the manufacturer or its service agent.
- The appliance shall not be used in open air and shall not be exposed to rain.
- Do not store something like ether, methanol, gasoline etc., which is easy to evaporate, burn or explode.
- Do not put something too heavy on the top of refrigerator and do not pour water on it.
- Connect your refrigerator to an independent electrical socket and use a safe ground wire. The voltage should be limited within the ranges from 187V to 242V, or the main motor will be damaged.
- If the electricity trips, wait 5 minutes after power has returned before putting the power to the refrigerator back on. Otherwise, the compressor may be damaged.
- Be sure to keep the electrical cable away from compressor and condenser, or its insulation function will be spoiled by high temperature.
- To save the energy, you should reduce the frequency and duration of the opening of the doors.
- When the frost in freezer is removed, or where there is no electricity or when refrigerator ceases to be used, it should be cleaned in time in order to prevent it from smelling. Too much frost may affect refrigeration.
- It is not recommended to use any extension cords.
- If your refrigerator has a lock, to avoid children getting shut in the refrigerator, do not leave the key near the refrigerator or other places easy to be reached by children.
- Warning-Do not use mechanical devices or other means to accelerate the defrosting process, other than those recommended by the manufacturer.
• Warning-Do not damage the refrigerant circuit.
- Warning-Do not use electrical appliances inside the food storage of the appliance unless they are of the type recommended by the manufacturer.
General Instructions for Care and Maintenance
Wipe the inside and outside of the refrigerator with a wet soft cloth.
If it's too dirty, clean with a soft cloth soaked with neutral detergent and clean water, remove the moisture with dry cloth.
Remember to clear the defrost drain situated at the back just above the glass cover.
If you are going away on holiday or for any other reason, wish to leave the refrigerator idle for any period of time, proceed as follows:
- Disconnect the refrigerator from the electric power supply by removing the plug from the wall socket.
- Remove all food.
- Clean and dry the inside as instructed in the direction given above for cleaning.
- Leave the doors open to prevent any unpleasant smells from building up while the refrigerator is not used.
Replacing the light bulb
Should the light fail, switch off at the socket outlet and pull out the mains plug. Then ensure the bulb is screwed securely in the bulb holder. Replace the plug and switch on. If the light still fails, obtain a replacement E14 screw-cap type 15 Walt (Max) bulb from your local
electrical sore and then fit it. Carefully dispose of the burnt-out light bulb immediately.
Working Defects and Failures
Symptom: Appliance will not work at all.
- Check the following:
Is the power supply plug inserted in the wall socket correctly
Try plugging in another appliance or electrical item into the same plug socket to check that the power supply is working
Symptom: Noisy running.
Cause:
The appliance has not been properly leveled.
The refrigerator contact with the wall.
The accessories in the refrigerator are placed wrong position.
Symptom: Appliance does not cool sufficiently.
Cause:
Door has been opened too often, or it has been left open for a while.
The refrigerator is too near to the wall.
Too much food in the refrigerator.
Have not regulate the temperature correctly.
Symptom: Smell inside the appliance.
Cause:
Some of the food is not properly wrapped or covered.
The inside of the refrigerator needs cleaning.
If your refrigerator shows other symptoms from those described above, or if you have check all items listed as the causes and the symptom still exist, then call the service department.
The Following Are not Breakdowns
- Refrigerant running in pipes gives forth a gentle sound of water running in pipes.
- In a moist season, the outer surface of refrigerator may be covered with moisture which should be simply wiped away.
- The compressor and the rear condenser may be heated to the extent that scalding your hand in summer during refrigerator operation.
- Door frame heat means the anti-dew tube is working during refrigerator operation.
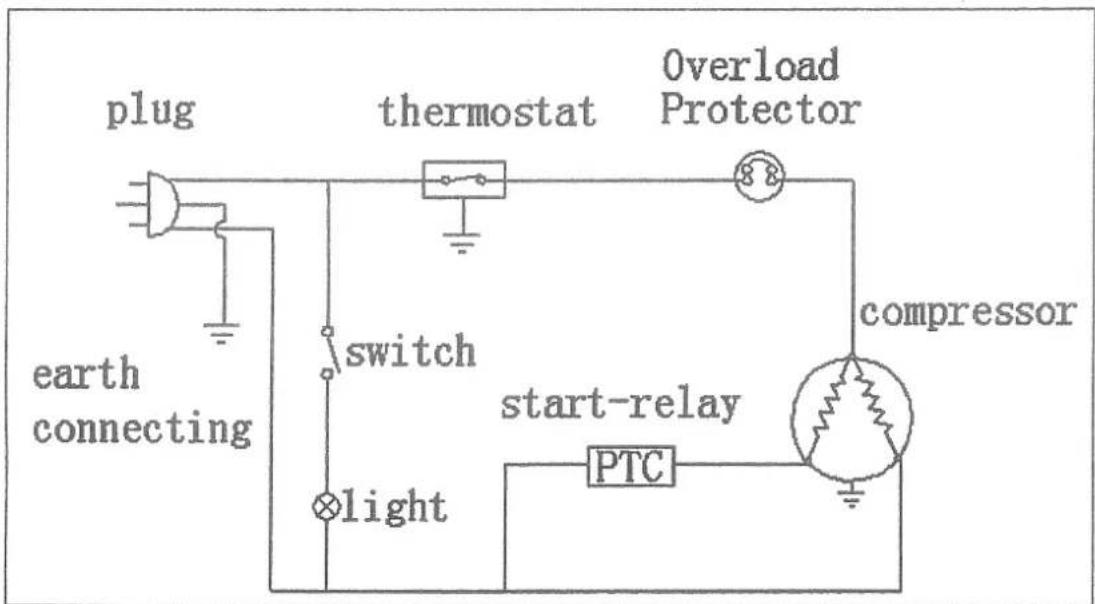
Diagram of Circuit Principles
text_image
plug thermostat Overload Protector earth connecting switch light PTC compressor start-relayReversing the Door
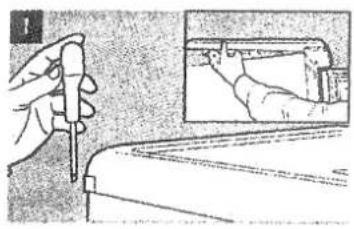
Before you reverse the refrigerator door, you should ensure the refrigerator is unplugged and empty and have someone to help you. During the process Screwdriver and adjustable spanner will be used.
natural_image
Illustration of a hand holding a pen, with an inset showing a close-up of hands using a tool (no text or symbols visible)Undo the four retaining screws of the worktop and remove the worktop
natural_image
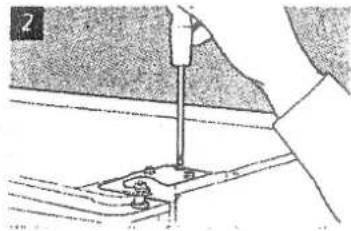
Illustration of a hand using a tool to adjust or install a component, with no visible text or symbols.Undo the retaining screws of the top bracket and remove the top bracket. Then take away the upper door and put it in a safe place.
natural_image
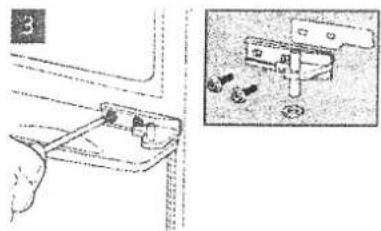
Diagram showing a device with a handle and a close-up view of its internal components (no text or symbols)While supporting the lower door, remove the central bracket by undo the 2 screws.
natural_image
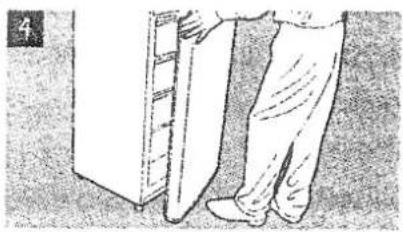
Illustration of a person standing beside a book with visible pages (no text or symbols)Take away the lower door from the bottom hinge pin. Tilt the fridge onto its back and rest it on a firm surface.
natural_image
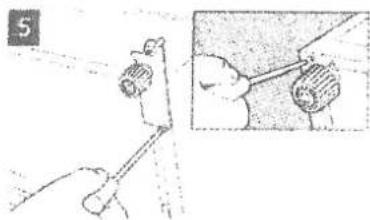
Illustration of a hand holding a tool near a wall, with an inset showing a close-up of hands holding a cylindrical object (no text or symbols present)Remove the bottom bracket by unscrewing. Remove and reverse the adjustable foot from left side to right side and remove the fixed screw in the left side.
natural_image
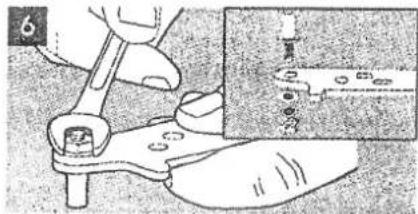
Illustration of a hand using a tool to adjust a mechanical component, with an inset showing a magnified view of a component (no text or symbols present)Remove the lower hinge pin using a spanner. Turn the hinge bracket over and replace it in the same slot. Replace the bottom bracket on the other side and lift the refrigerator upright.
natural_image
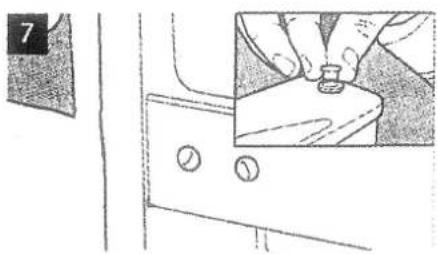
Illustration of a hand holding a small object on a wooden surface with control buttons (no text or symbols)Reverse the blanking plugs. Remove the door hinge caps on both doors (top and bottom) and insert on the opposite side of the door.
natural_image
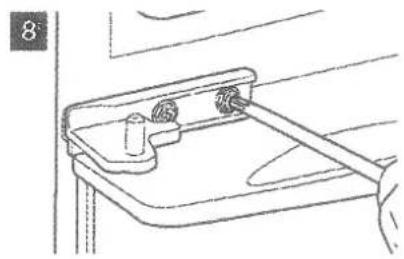
Line drawing of a hand holding a tray with a handle and two circular components (no text or symbols)Replace the central bracket while refitting the lower door, To assist with final adjustment do not fully tighten the bracket screws.
natural_image
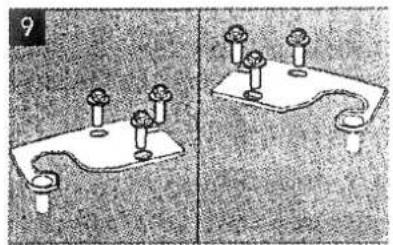
Two mechanical bracket components with mounting holes and a base, shown from different angles (no text or symbols)Unscrew the hinge pin from the top bracket using the spanner. Turn the bracket over and replace it in the same slot.
natural_image
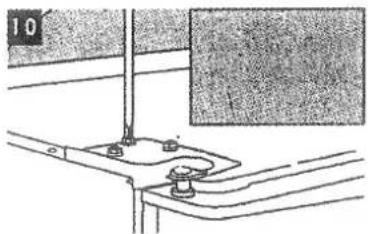
Technical line drawing of a mechanical assembly with mounting brackets and a vertical rod (no text or symbols)Refit the top bracket while refitting the upper door. Do not fully tighten screws.
natural_image
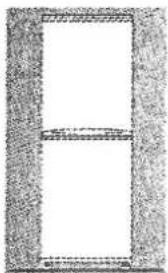
Simple geometric diagram with a vertical frame and horizontal bar, no text or symbols present.Check that doors are aligned horizontally and vertically and that all seals are closed on the cabinet before finally tighten the central hinge and the top bracket. Remove and reverse the plastic insert of the worktop before refit the worktop. Re-adjust the levelling feet.