
SY-7834 - Mp3 player Sytech - Free user manual and instructions
Find the device manual for free SY-7834 Sytech in PDF.


| Product Type | MP3 Player |
| Model | SY-7834 |
| Brand | Sytech |
| Storage Capacity | 8 GB (typical) |
| Expandable Storage | microSD card slot up to 32 GB |
| Display | 1.8-inch TFT color screen |
| Audio Formats | MP3, WMA, WAV, FLAC |
| Battery Type | Lithium-ion rechargeable |
| Battery Life | Up to 12 hours of playback |
| Charging Time | Approximately 2 hours |
| Dimensions | 95 x 40 x 10 mm |
| Weight | 50 g |
| Power Supply | USB 5V DC charging |
| Connection | USB 2.0 for data and charging |
| FM Radio | FM tuner with station save |
| Recording | Voice & FM recording (WAV) |
| Headphone Output | 3.5mm stereo jack |
| Supported OS | Windows, macOS, Linux (no driver required) |
| Care Instructions | Keep dry, clean with soft cloth, avoid extreme temperatures |
| Safety Warnings | Do not disassemble, avoid water exposure, use only supplied charger |
| Spare Parts | Available: USB cable, earphones, screen protector |
| Repair Information | Contact Sytech support or authorized service centers |
Frequently Asked Questions - SY-7834 Sytech
User questions about SY-7834 Sytech
0 question about this device. Answer the ones you know or ask your own.
Ask a new question about this device
Download the instructions for your Mp3 player in PDF format for free! Find your manual SY-7834 - Sytech and take your electronic device back in hand. On this page are published all the documents necessary for the use of your device. SY-7834 by Sytech.
USER MANUAL SY-7834 Sytech

Thank you for having purchased the SY-7834. In order to fully benefit from the MP4 player, read the user manual carefully.
Cautions
- Do not expose the device to severe impact or drop it from high position.
- Do not use the player in extreme temperatures, dusty or damp field. Do not expose it to direct sunshine.
● Excessive sound pressure from earphones and headphones can cause hearing loss.
● Avoid using the player in strong magnetic field. - Keep the device away from water or other liquids. In the event that water or other liquids enter the device, turn the power off immediately clean the device and wait for it to dry before reuse.
- Do not use chemical solution to clean the device in order to avoid corrosion. Clean it with a dry cloth.
- We are not responsible for the damages or lost data caused by malfunction, misusing, repairing the device or battery replacement.
- Do not attempt to disassemble, repair or modify the product. This will invalidate guarantees.
- The design of the player or actual display may be different from what is shown in this manual. It should be subject to the actual display or design.
on the desktop, you will see two removable disks which indicate the internal flash memory and the external memory card. Just use the removable disks as a regular local disk, copying files from or to them.
(3) Removing the player from the PC safely.
For Windows2000/XP/ME/Vista:
a) Left click the icon at the bottom right hand corner of the taskbar.
b) Click the pop-up mini-window indicating "Stop the USB Mass Storage Device ...".
c) Remove the device when you are prompted to.
For Win98, please make sure the data transfer is completed before unplugging the MP3 player.
Charge the Battery
The device has a built-in lithium-icon rechargeable battery. It is charged via USB connection. You are required to charge it when you use it for the first time. It takes about 3 hours to fully charge the battery. Connect the larger end of the USB cable to the USB interface of PC, and connect the other smaller end of the USB cable to the USB interface of this player. The device is connected to PC and being charged.
NOTICE: For maximum performance, lithium-ion batteries need to be used often. If you don't use the device often, be sure to recharge the battery at least once per month.
Use a Memory Card
The device has a memory card slot for reading data from a micro-SD card.
(1) Insert a Micro-SD card to the card slot on the unit body.
(2) Press and hold the MENU button to display the main menu.
(3) Select "Explorer" and press the MENU button to enter the folder browser mode.
(4) In the folder browser mode, you see two folders named "Internal memory" and "Memory Card". To play the audio or video files stored on the MicroSD card, access the "Memory Card" folder.
Keys Description

A. LCD Display
B. Play/Pause: Turn on or turn off the device. Also play or pause audios.
C. MENU: Hold for a while to enter the main menu. Briefly press to confirm selection or enter the folder navigation mode.
D. Previous: Play the previous track/Move up
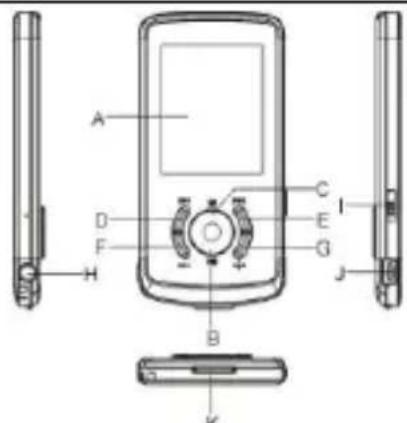
E. Next: Play the next track/ Move down.
F. VOL+: Turn up the volume.
G. VOL-: Turn down the volume.
H. Earphone Jack
I. Power Switch: Turn on or turn off the power.
J. USB Port: Connect to a computer.
K. Memory Card Slot: For inserting a Micro SD-card
Power On/Off
To turn on the device, slide the Power Switch to "ON" to turn on the power and then press and hold the PLAY/PAUSE button until you see Sytech Welcome menu on the display.
To turn off the power, press and hold the PLAY/PAUSE button until you see the Sytech Closing menu on the display and then slide the Power Switch to "OFF" to turn off the power. (Be sure to complete this step for saving battery charge.)
Note: This player has a power-saving feature which enables the device to switch off automatically if it is idle for about 3 minutes.
Basic operation
| Function | Operation |
| Play/Pause | Press the PLAY/PAUSE button to play or pause. |
| Adjust Volume | Shortly press the VOL+/VOL- button to decrease or increase volume. |
| Previous Track | Shortly press the PREVIOUS button. |
| Next Track | Shortly press the NEXT button. |
| Fast Forward | Press and hold the NEXT button. |
| Rewind | Press and hold the PREVIOUS button. |
| A-B Repeat | To repeat a specified section of a track,(1) During playback, press and hold the VOL+ button to select the start point of the repeat.(2) Press and hold the VOL+ button again to select the stop point. The music section between the start point and the stop point is repeated.(3) To stop A-B repeat, press the VOL+ button. |
| Lock/Unlock buttons | To protect the buttons against being pressed accidentally or unlock buttons, hold down the PLAY/PAUSE button and the VOL- together. |
Playing music
- Enter the music mode
Press and hold the MENU button to display the main menu.
Use the PREVIOUS/NEXT button to select the "Music" menu, and press the PLAY/PAUSE button to confirm selection. Now you are in MUSIC mode, refer to the basic operations to playback music.
- Search for Tracks
(1) When the music is playing, you can press the MENU button to enter the folder explorer mode.
(2) Press the PREVIOUS/NEXT button to select a folder or track, and press the PLAY/PAUSE button to confirm selection, or press the MENU button to return.
- Display Lyrics
To display lyrics while you are listening music,
(1) Copy a lyric file in LRC format to your player. Please note that the LRC file should be in the same directory and have the same name of the track that you wish to hear.
(2) Locate and play the track. When the music is playing, press and hold the VOL- button to switch between lyric and ID3 info mode.
Playing videos
(1) Press and hold the MENU button to display the main menu.
(2) Use the PREVIOUS/NEXT button to select the "Video" menu, and press the PLAY/PAUSE button to enter the video player mode.
(3) Press the PREVIOUS/NEXT button to select the memory that you want to use – Internal Memory or Memory Card, and press the PLAY/PAUSE button to confirm.
(4) Press the PREVIOUS/NEXT button to select a video file that you want to play, and press the PLAY/PAUSE button to play it. For detailed information about playing, see the “Basic Operation” section.
(5) Press the MENU button to stop playing and exit.
Note: This player can only play AVI videos. For other formats, you need to use the converting tool included on the driver CD to convert them. For detailed information about the converter, see AVI Converter Quick User Guide on the CD.
FM Radio (optional)
On the main menu, select "FM Radio" and press the MENU button to turn on the FM radio.
- Search Station
(1) Shortly press the MENU button to show the submenus.
(2) Press the PREVIOUS/NEXT button to select "Auto" or "Manual", and press the MENU button to enter the auto-search or manual-search mode. In the Manual mode, press the PREVIOUS/NEXT button to adjust the frequency slightly by the step of 0.1MHz. Optionally, you can save the found station manually (see "Save Station" for detail information).
- Save station
To save the desired station,
(1) Shortly press the MENU button to activate the submenus.
(2) Press the PREVIOUS/NEXT button to select "Save" and press the MENU button to confirm.
(3) Press the PREVIOUS/NEXT button to select an empty location for the station, and press the PLAY/PAUSE button to continue.
(4) Press the PREVIOUS/NEXT button to select "YES" or "NO", and press the PLAY/PAUSE button to confirm.
- Listen to Station
To listen to a saved station,
(1) Shortly press the MENU button to activate submenus.
(2) Press the PREVIOUS/NEXT button to select "Preset" menu and press the MENU button to enter the PRESET mode.
(3) In the PRESET mode, press the PREVIOUS/NEXT button to select a saved station for listening.
- Delete station
(1) Shortly press the MENU button to activate submenus.
(2) Press the PREVIOUS/NEXT button to select "Delete" and press the MENU button to continue.
(3) Press the PREVIOUS/NEXT button to select the station that you want to delete, and press the PLAY/PAUSE button to continue.
(4) Press the PREVIOUS/NEXT button to select "YES" or "NO", and press the MENU to confirm.
Viewing Photos
(1) Press and hold the MENU button to display the main menu.
(2) Select "Photo" and press the PLAY/PAUSE button to confirm.
(3) Press the PREVIOUS/NEXT button to select the memory that you want to use – Internal Memory or Memory Card, and press the PLAY/PAUSE button to confirm.
(4) Press the PREVIOUS/NEXT button to select a folder or image, and press the PLAY/PAUSE to confirm.
(5) When you are viewing a single photo, you can:
press the PREVIOUS/NEXT button to display the previous or the next photo.
press the PLAY/PAUSE to start or stop an auto slide show.
press the MENU button to enter the file explorer mode for searching for other photos.
Note: Some images may not be displayed. Try to use an image viewer to convert them into supported formats.
Reading E-books
- Reading
(1) Press and hold the MENU button to display the main menu.
(2) Select "E-book" and press the PLAY/PAUSE button to confirm.
(3) Press the PREVIOUS/NEXT button to select the memory that you want to use – Internal Memory or Memory Card, and press the PLAY/PAUSE button to confirm.
(4) Press the PREVIOUS/NEXT button to select a .txt file, and press the PLAY/PAUSE button to open the selected file.
(5) Press the PREVIOUS/NEXT button to turn the pages up or down manually, or press the PLAY/PAUSE button to turn the pages up or down automatically (by setting the time interval in Settings/Auto Slide show/Text).
(6) While reading, you can use the bookmark to mark the page for resuming reading later. For information about bookmark, see "Using bookmark" section.
- Using Bookmark
(1) Go to the page that you want to mark.
(2) Briefly press the VOL+ button to show up a "Save Bookmark" window for saving a bookmark.
(3) Press the PREVIOUS/NEXT button to select a bookmark number and press the MENU button to confirm. The bookmark is saved. It starts from the first line of current page.
(4) To read the page that you marked, shortly press the VOL- button to show up the "Load Bookmark" window. Press the PREVIOUS/NEXT button to select a bookmark and press the MENU button to confirm. You will be guided to that page.
Voice Recording
- Record
(1) Press and hold the MENU button to display the main menu.
(2) Select "Record", and press the PLAY/PAUSE button to enter the recorder mode.
(3) Shortly press the PLAY/PAUSE button to start recording. During recording, you can press the PLAY/PAUSE button to pause or resume recording.
(4) Shortly press the MENU button to stop and save recording.
(5) Press and hold the MENU button to exit.
- Play recordings
(1) Select "Explorer" on the main menu to access folder navigation mode.
(2) Open the "VOICE" folder, and select the recording file that you want to play.
File Explorer
To browse all files stored in the player,
(1) Press and hold the MENU button to display the main menu.
(2) Select "Explorer", and press the PLAY/PAUSE button to access browser mode.
(3) Press PREVIOUS/NEXT button to select a file or folder that you want to view, and press the PLAY/PAUSE button to confirm or press the MENU button to return to the higher hierarchy of the directory.
Delete File
(1) Select "Explorer" on the main menu to enter the file explorer mode.
(2) Select the file that you want to delete.
(3) Press and hold the VOL- button to delete the selected file.
(4) Press the PREVIOUS/NEXT button to select "YES" and press the PLAY/PAUSE button to confirm.
System Setting
(1) On the main menu, select the "Settings" item and press the PLAY/PAUSE button to enter the system settings mode.
(2) Press the PREVIOUS/NEXT button to select setting item and press the PLAY/PAUSE button to confirm or press the MENU button to cancel/return.
| Music | Repeat mode | Once - Play current track once and then stopRepeat One - Repeat current trackFolder Once - Play all audio files in the current folder onceFolder Repeat - Repeat all audio files in the current folderNormal - Play all audio files stored in the player and stop after playing allRepeat All - Repeat all audio files stored in the playerIntro - Play the first 10 seconds of every audio file |
| Play mode | Order - Play audio files in orderShuffle - Play audio files randomly | |
| Preset EQ | Select a preset EQ mode | |
| User EQ | User-defined equalizer setting | |
| (1) Press the PREVIOUS/NEXT to switch EQ column.(2) Press the VOL-/VOL+ button to adjust the level.(3) Repeat pressing the NEXT button until the cursor is on the YES button, and then press the PLAY/PAUSE button to confirm. Or, select “No” to quit.(4) Go to the Preset EQ menu, and select User EQ to enable the equalizer setting. | ||
| Auto slide show | Text | Set the time interval between the previous and the next page in the auto slideshow mode. |
| Photo | Set the time interval between the previous and the next slide in the slideshow mode. | |
| FM Radio | Stereo Switch | Enable or disable stereo effect |
| FM Region | Set the frequency band for the local area | |
| Display | Backlight Time | Set the duration of the backlight after a key press. |
| Brightness | Set the brightness of the screen | |
| Backlight mode | Normal – Half darken the screen when there is no activity within a few minutesPower Save - Entirely darken the screen when there is no activity within a few minutes. | |
| Power Off | Set the continuous working time before the player is turned off automatically. | |
| Language | Select the language for on-screen texts | |
| System | About | Display firmware version and capacity information of the player |
| Upgrade | Upgrade the firmware | |
| Load Defaults | Restore system settings to defaults | |
Troubleshooting
| Problem | Possible Cause | Solution |
| The LCD displays nothing when the device is started. | Battery is too low. | Charge the battery. |
| No sound when playing an audio file. | The volume is too low. | Adjust the volume. |
| Bad audio file. | Delete or skip the file. | |
| The player cannot be connected to the PC. | The USB interface is not supported by PC's motherboard. | Update or replace the PC's motherboard. |
| The displayed time is changing constantly. | The bit rate of the MP3 file is changing during playback. | Try to use fixed bit rate to compress the MP3 file. |
| The PC has error when you plug and unplug the player. | The player is disconnected from the PC abruptly while transferring files. | Do not disconnect the player from the PC when transferring files. |
Total memory
displayed on the player is not in accordance with the marked amount.
Part of the memory is used to store programs and display characters.
| Some of MP3 files cannot be played properly. | The MP3 file is compressed by a standard, such as MPEG I Layer 1 or Layer 2 that the player does not support. | 1. Delete the unsupported MP3 files.2. Use MPEG I Layer 3 standard to compress the unsupported MP3 files. |
| The video cannot be played. | The file format is not supported.The video data is corrupted | Make sure the video is in AVI format. If not, use the provided converting tool to convert it.Skip it or reload another file |
| The photo cannot be displayed | The file format is not supportedThe image resolution is too high. | Try to use an image editor (ACDSee for example) to convert it to a supported format.Make sure the image resolution does not excess the limitation by the device. |
| The TXT file cannot be read | The file format is not supported. | Skip it or reload another file. |
Technical Specifications
| Item | Specification |
| Capacity | 512MB, 1GB, 2GB, 4GB, 8GB(optional) |
| Battery Type | Rechargeable lithium-ion polymer battery |
| Battery Life | About 10 Hours of music playback or 4 hours of video playback |
| LCD Display | 1.8-inch screen, 160 x 128 pixel |
| Video Format | AVI (XviD) |
| Audio Format | MP3, WMA, WMA-DRM9 |
| Photo Format | JPEG, BMP |
| Image Resolution | 7000 X 7000 (Max.) |
| Bit Rate | MP3: 8-320kbps; WMA: 8-320kbps |
| Recording Format | WAV(32kbps/8KHz) |
| SNR | >90dB |
| USB Port | USB2.0 |
| Operational Temperature | 0°C ~ +50°C |
| Storage Temperature | -20°C ~ +65°C |
| Operational Relative Humidity * | 20% ~ 90% (40°C) |
| Storage Relative Humidity * | 20% ~ 93% (40°C) |


- Cautions
- Charge the Battery
- Use a Memory Card
- Keys Description
- Power On/Off
- Playing music
- - Enter the music mode
- - Search for Tracks
- - Display Lyrics
- Playing videos
- FM Radio (optional)
- - Search Station
- - Save station
- - Listen to Station
- - Delete station
- Viewing Photos
- Reading E-books
- - Reading
- - Using Bookmark
- Voice Recording
- - Record
- - Play recordings
- File Explorer
- Delete File
- System Setting
Brand : Sytech
Model : SY-7834
Category : Mp3 player