
LC40LE550U - Television SHARP - Free user manual and instructions
Find the device manual for free LC40LE550U SHARP in PDF.


| Product Type | LED TV |
| Brand | Sharp |
| Model | LC40LE550U |
| Screen Size (diagonal) | 40 inches |
| Resolution | 1920 x 1080 (Full HD) |
| Aspect Ratio | 16:9 |
| Refresh Rate | 60 Hz |
| Contrast Ratio (Dynamic) | 1,000,000:1 |
| Brightness | 300 cd/m² |
| Viewing Angle | 178° horizontal / 178° vertical |
| Audio Output | 10 W + 10 W |
| HDMI Inputs | 3 |
| USB Ports | 1 |
| Power Consumption (Typical) | 100 W |
| Standby Power | < 0.5 W |
| Weight with Stand | Approx. 15 kg |
| Dimensions (W x H x D) with Stand | 970 x 640 x 250 mm |
| VESA Mount Pattern | 200 x 200 mm |
| Energy Class | A |
| Picture Technology | Aquos with Fine Motion Enhanced |
| Cleaning Instructions | Use a soft, dry cloth; avoid harsh chemicals. |
| Safety Precautions | Keep away from moisture; ensure proper ventilation. |
| Spare Parts Availability | Contact Sharp support or authorized service centers. |
Frequently Asked Questions - LC40LE550U SHARP
User questions about LC40LE550U SHARP
0 question about this device. Answer the ones you know or ask your own.
Ask a new question about this device
Download the instructions for your Television in PDF format for free! Find your manual LC40LE550U - SHARP and take your electronic device back in hand. On this page are published all the documents necessary for the use of your device. LC40LE550U by SHARP.
USER MANUAL LC40LE550U SHARP
natural_image
Front view of a flat-screen computer monitor with blank screen (no text or symbols visible)



LC-40LE550U
LIQUID CRYSTAL TELEVISION ENGLISH
OPERATION MANUAL
IMPORTANT:
To aid reporting in case of loss or theft, please record the TV's model and serial numbers in the space provided. The numbers are located at the rear of the TV.
Model No.:
Serial No.:
IMPORTANT INFORMATION
WARNING: TO REDUCE THE RISK OF FIRE OR ELECTRIC SHOCK, DO NOT EXPOSE THIS PRODUCT TO RAIN OR MOISTURE.

CAUTION
RISK OF ELECTRIC SHOCK DO NOT OPEN

CAUTION: TO REDUCE THE RISK OF ELECTRIC SHOCK, DO NOT REMOVE COVER (OR BACK). NO USER-SERVICEABLE PARTS INSIDE. REFER SERVICING TO QUALIFIED SERVICE PERSONNEL.

The lightning flash with arrow-head symbol, within an equilateral triangle, is intended to alert the user to the presence of uninsulated "dangerous voltage" within the product's enclosure that may be of sufficient magnitude to constitute a risk of electric shock to persons. The exclamation point within a triangle presence of important operating and maintenance(servicing) instruction in the literature accompanying the product.

IMPORTANT INFORMATION
CAUTION: TO PREVENT ELECTRIC SHOCK, MATCH WIDE BLADE OF PLUG TO WIDE SLOT, FULLY INSERT.
WARNING: FCC Regulations state that any unauthorized changes or modifications to this equipment not expressly approved by the manufacturer could void the user's authority to operate this equipment.
CAUTION:
This product satisfies FCC regulations when shielded cables and connectors are used to connect the unit to other equipment. To prevent electromagnetic interference with electric appliances such as radios and televisions, use shielded cables and connectors for connections.
DECLARATION OF CONFORMITY:
SHARP LIQUID CRYSTAL TELEVISION, MODEL LC-40LE550U
This device complies with Part 15 of the FCC Rules. Operation is subject to the following two conditions: (1) This device may not cause harmful interference, and (2) this device must accept any interference received, including interference that may cause undesired operation. RESPONSIBLE PARTY:
SHARP ELECTRONICS CORPORATION
Sharp Plaza, Mahwah, New Jersey 07495-1163
TEL: 1-800-BE-SHARP
For Business Customers: URL http://www.sharpusa.com
INFORMATION:
This equipment has been tested and found to comply with the limits for a Class B digital device, pursuant to Part 15 of the FCC Rules. These limits are designed to provide reasonable protection against harmful interference in a residential installation. This equipment generates, uses and can radiate radio frequency energy and, if not installed and used in accordance with the instructions, may cause harmful interference to radio communications. However, there is no guarantee that interference will not occur in a particular installation. If this equipment does cause harmful interference to radio or television reception, which can be determined by turning the equipment off and on, the user is encouraged to try to correct the interference by one or more of the following measures:
— Reorient or relocate the receiving antenna.
— Increase the separation between the equipment and receiver.
— Connect the equipment into an outlet on a circuit different from that to which the receiver is connected.
— Consult the dealer or an experienced radio/TV technician for help.
Note to CATV system installer: This reminder is provided to call the CATV system installer's attention to Article 820 of the National Electrical Code that provides guidelines for proper grounding and, in particular, specifies that the cable ground shall be connected to the grounding system of the building, as close to the point of cable entry as practical.
This product qualifies for ENERGY STAR when "Home" is selected for "TV Location".
Setting "TV Location" to "Home" allows the TV to achieve an energy-saving status for household use.
TRADEMARKS
- The terms HDMI and HDMI High-Definition Multimedia Interface, and the HDMI Logo are trademarks or registered trademarks of HDMI Licensing LLC in the United States and other countries.
- Manufactured under license from Dolby Laboratories. Dolby and the double-D symbol are trademarks of Dolby Laboratories.
Thank you for your purchase of the Sharp Liquid Crystal Television. To ensure safety and many years of trouble-free operation of your product, please read the Important Safety Instructions carefully before using this product.
IMPORTANT SAFETY INSTRUCTIONS
1) Read these instructions.
2) Keep these instructions.
3) Heed all warnings.
4) Follow all instructions.
5) Do not use this apparatus near water.
6) Clean only with dry cloth.
7) Do not block any ventilation openings. Install in accordance with the manufacturer's instructions.
8) Do not install near any heat sources such as radiators, heat registers, stoves, or other apparatus (including amplifiers) that produce heat.
9) Protect the power cord from being walked on or pinched particularly at plugs, convenience receptacles, and the point where they exit from the apparatus.
10) Only use attachments/accessories specified by the manufacturer.
11) Use only with the cart, stand, tripod, bracket, or table specified by the manufacturer, or sold with the apparatus. When a cart is used, use caution when moving the cart/apparatus combination to avoid injury from tip-over.
12) Unplug this apparatus during lightning storms or when unused for long periods of time.
13) Refer all servicing to qualified service personnel. Servicing is required when the apparatus has been damaged in any way, such as power-supply cord or plug is damaged, liquid has been spilled or objects have fallen into the apparatus, the apparatus has been exposed to rain or moisture, does not operate normally, or has been dropped.

14) WARNING: To reduce the risk of fire or electric shock, do not expose this apparatus to rain or moisture.
15) Where the MAINS plug or an appliance coupler is used as the disconnect device, the disconnect device shall remain readily operable.
16) The apparatus shall not be exposed to dripping or splashing and that no objects filled with liquids, such as vases, shall be placed on the apparatus.
Additional Safety Information
17) Power Sources—This product should be operated only from the type of power source indicated on the marking label. If you are not sure of the type of power supply to your home, consult your product dealer or local power company. For products intended to operate from battery power, or other sources, refer to the operating instructions.
18) Overloading—Do not overload wall outlets, extension cords, or integral convenience receptacles as this can result in a risk of fire or electric shock.
19) Object and Liquid Entry—Never push objects of any kind into this product through openings as they may touch dangerous voltage points or short-out parts that could result in a fire or electric shock. Never spill liquid of any kind on the product.
20) Damage Requiring Service—Unplug this product from the wall outlet and refer servicing to qualified service personnel under the following conditions:
a) When the AC cord or plug is damaged,
b) If liquid has been spilled, or objects have fallen into the product,
c) If the product has been exposed to rain or water,
d) If the product does not operate normally by following the operating instructions. Adjust only those controls that are covered by the operating instructions as an improper adjustment of other controls may result in damage and will often require extensive work by a qualified technician to restore the product to its normal operation,
e) If the product has been dropped or damaged in any way, and
f) When the product exhibits a distinct change in performance - this indicates a need for service.
IMPORTANT SAFETY INSTRUCTIONS
21) Replacement Parts—When replacement parts are required, be sure the service technician has used replacement parts specified by the manufacturer or have the same characteristics as the original part. Unauthorized substitutions may result in fire, electric shock, or other hazards.
22) Safety Check—Upon completion of any service or repairs to this product, ask the service technician to perform safety checks to determine that the product is in proper operating condition.
23) Wall or ceiling mounting—Use a wall mount bracket that has been listed by an independent laboratory (such as UL, CSA, ETL).
CAUTION
- These servicing instructions are for use by qualified service personnel only. To reduce the risk of electric shock do not perform any servicing other than that contained in the operating instructions unless you are qualified to do so.
- Outdoor Antenna Grounding — If an outside antenna is connected to the television equipment, be sure the antenna system is grounded so as to provide some protection against voltage surges and built-up static charges.
Article 810 of the National Electrical Code, ANSI/NFPA 70, provides information with regard to proper grounding of the mast and supporting structure, grounding of the lead-in wire to an antenna discharge unit, size of grounding conductors, location of antenna-discharge unit, connection to grounding electrodes, and requirements for the grounding electrode.
EXAMPLE OF ANTENNA GROUNDING AS PER NATIONAL ELECTRICAL CODE, ANSI/NFPA 70

NEC - NATIONAL ELECTRICAL CODE
- Warning statement indicating that Class I apparatus shall be connected to a mains socket outlet with a protective earthing connection.
• Statement indicating that when the mains plug or appliance coupler shall remain readily operable. - Where the MAINS plug or an appliance coupler is used as the disconnect device, the disconnect device shall remain readily operable.
- Where an all-pole MAINS SWITCH is used as the disconnect device, the location on the apparatus and the function of the switch shall be described, and the switch shall remain readily operable.
- Water and Moisture — Do not use this product near water - for example, near a bath tub, wash bowl, kitchen sink, or laundry tub; in a wet basement; or near a swimming pool; and the like.
- Stand — Do not place the product on an unstable cart, stand, tripod or table. Placing the product on an unstable base can cause the product to fall, resulting in serious personal injuries as well as damage to the product. Use only a cart, stand, tripod, bracket or table recommended by the manufacturer or sold with the product. When mounting the product on a wall, be sure to follow the manufacturer's instructions. Use only the mounting hardware recommended by the manufacturer.
- Selecting the location — Select a place with no direct sunlight and good ventilation.
- Ventilation — The vents and other openings in the cabinet are designed for ventilation. Do not cover or block these vents and openings since insufficient ventilation can cause overheating and/or shorten the life of the product. Do not place the product on a bed, sofa, rug or other similar surface, since they can block ventilation openings. This product is not designed for built-in installation; do not place the product in an enclosed place such as a bookcase or rack, unless proper ventilation is provided or the manufacturer's instructions are followed.
-
The Liquid Crystal panel used in this product is made of glass. Therefore, it can break when the product is dropped or applied with impact. Be careful not to be injured by broken glass pieces in case the panel breaks.
-
Heat — The product should be situated away from heat sources such as radiators, heat registers, stoves, or other products (including amplifiers) that produce heat.
- The Liquid Crystal panel is a very high technology product with 2,073,600 pixels, giving you fine picture details. Occasionally, a few non-active pixels may appear on the screen as a fixed point of blue, green or red. Please note that this does not affect the performance of your product.
- Lightning — For added protection for this television equipment during a lightning storm, or when it is left unattended and unused for long periods of time, unplug it from the wall outlet and disconnect the antenna. This will prevent damage to the equipment due to lightning and power-line surges.
- Power Lines — An outside antenna system should not be located in the vicinity of overhead power lines or other electric light or power circuits, or where it can fall into such power lines or circuits. When installing an outside antenna system, extreme care should be taken to keep from touching such power lines or circuits as contact with them might be fatal.
• To prevent fire, never place any type of candle or flames on the top or near the TV set.
• To prevent fire or shock hazard, do not place the AC cord under the TV set or other heavy items. - Do not display a still picture for a long time, as this could cause an afterimage to remain.
- To prevent fire or shock hazard, do not expose this product to dripping or splashing.
No objects filled with liquids, such as vases, should be placed on the product.
- Do not insert foreign objects into the product. Inserting objects in the air vents or other openings may result in fire or electric shock. Exercise special caution when using the product around children.

Precautions when transporting the TV
- When transporting the TV, never carry it by holding or otherwise putting pressure onto the display. Be sure to always carry the TV by two people holding it with two hands — one hand on each side of the TV.
Caring for the Cabinet
- Use a soft cloth (cotton, flannel, etc.) and gently wipe the surface of the cabinet.
- Using a chemical cloth (wet/dry sheet type cloth, etc.) may deform the components of the main unit cabinet or cause cracking.
- Wiping with a hard cloth or using strong force may scratch the surface of the cabinet.
- If the cabinet is very dirty, wipe with a soft cloth (cotton, flannel, etc.) soaked in neutral detergent diluted with water and thoroughly wrung out, and then wipe with a soft dry cloth.
- The cabinet is primarily made of plastic. Avoid using benzene, thinner, and other solvents, as these may deform the cabinet and cause the paint to peel off.
- Do not apply insecticides or other volatile liquids.
Also, do not allow the cabinet to remain in contact with rubber or vinyl products for a long period of time. Plasticizers inside the plastic may cause the cabinet to deform and cause the paint to peel off.
Caring for the Liquid Crystal panel
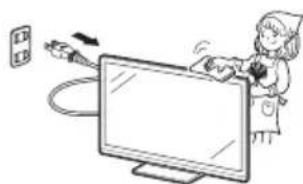
- Turn off the main power and unplug the AC cord from the wall outlet before handling.
- Gently wipe the surface of the display panel with a soft cloth (cotton, flannel, etc.).
To protect the display panel, do not use a dirty cloth, liquid cleaners, or a chemical cloth (wet/ dry sheet type cloth, etc.). This may damage the surface of the display panel.
- Wiping with a hard cloth or using strong force may scratch the surface of the display panel.
- Use a soft damp cloth to gently wipe the display panel when it is really dirty. (It may scratch the surface of the display panel when wiped strongly.)
- If the display panel is dusty, use an anti-static brush, which is commercially available, to clean it.
- To avoid scratching the frame or screen, please use a soft, lint free cloth for cleaning. Approved cleaning cloths are available directly from Sharp in single (00Z-LCD-CLOTH) or triple (00Z-LCD-CLOTH-3) packs.
Call 1-800-BE-SHARP for ordering, or VISIT http://www.sharpusa.com/SharpDirect.
natural_image
Illustration of a person using a computer monitor with cable, no text or symbols presentCHILD SAFETY:
PROPER TELEVISION PLACEMENT MATTERS

natural_image
Two people interacting near a display table in an indoor setting (no visible text or symbols)
natural_image
Black-and-white photo of three people smiling and interacting (no visible text or symbols)
natural_image
Two people holding a large rectangular board (no visible text or symbols)
natural_image
Black-and-white photo of a smiling person sitting at a desk with a TV and small objects (no visible text or symbols)THE CONSUMER ELECTRONICS INDUSTRY CARES
to making home entertainment safe and enjoyable.
supported on proper stands or installed according to the manufacturer's recommendations. Televisions that are inappropriately situated on dressers, bookcases, shelves, desks, speakers, chests, carts, etc., may fall over, resulting in injury.
TUNE IN TO SAFETY
television.
television is placed.
chest of drawers.
tripped over, pulled or grabbed.
WALL OR CEILING MOUNT YOUR TELEVISION
about your ability to safely mount your television.
has a safety certification by an independent laboratory (such as UL, CSA, ETL).
appropriate.
Some mounts are not designed to be mounted to walls and ceilings with steel studs or cinder block construction. If you are unsure, contact a professional installer.
installation.
MOVING AN OLDER TELEVISION TO A NEW PLACE IN YOUR HOME
room after the purchase of a flat-panel television. Special care should be made in the placement of older CRT televisions.
appropriate for its size and weight.
tempted to use the drawers to climb.
your furniture.
CE.org/safety

CEA
Consumer Electrator Association
Supplied Accessories
Make sure the following accessories are provided with the product.

Remote control unit
(×1)
Page 8

"AAA" size battery
(×2)
Page 10

Stand (X 1)
with Screws
Page 7
Operation manual
(X 1) (X 1)
Connection guide
NOTE
• Always use the AC cord supplied with the TV.
- The illustrations above are for explanation purposes and may vary slightly from the actual accessories.
Attaching/Detaching the Stand
- Before attaching (or detaching) the stand, unplug the AC cord from the AC INPUT terminal.
- Before performing work spread cushioning over the base area to lay the TV on. This will prevent it from being damaged.
CAUTION
- Attach the stand in the correct direction.
-
Be sure to follow the instructions. Incorrect installation of the stand may result in the TV falling over.
-
Put the TV face down on a safe surface that is covered by a soft and smooth cloth.
- Adjust the TV stand to the bottom of the TV.
- Fasten the screws by using a cross-head screwdriver (Not supplied).

CAUTION
- Do not push too hard or put excessive pressure to the stand neck to avoid the damages when you turn the TV for the most comfortable viewing angle.
- When you are going to assemble or disassemble it, you need to take hold of it tightly in case of drop.
NOTE
- To detach the stand, perform the steps in reverse order.
Quick Installation Tips
-
Attach your antenna to the back of the television. (See page 9.)
-
Connect the AC plug for the television into the AC outlet.

natural_image
Technical line drawing of a mechanical or electrical enclosure with internal components and wiring (no text or symbols)- Place the TV close to the AC outlet, and keep the power plug within reach.
- This product must only be connected to a 120V, 60Hz AC outlet. Connecting it to any other kind of outlet will damage the product and invalidate the warranty.
NOTE
• TO PREVENT RISK OF ELECTRIC SHOCK, DO NOT TOUCH UN-INSULATED PARTS OF ANY CABLES WITH THE AC CORD CONNECTED.
- How to turn on the television for the first time.
A) Press POWER on the television.
B) The POWER indicator on the front of the television lights Green.

NOTE
- Speakers cannot be detached from the TV.
- Insert the batteries into the remote control unit. (See page 10.)
Using the Remote Control Unit
Use the remote control unit by pointing it toward the remote control sensor on the TV. Objects between the remote control unit and the remote control sensor may prevent proper operation.
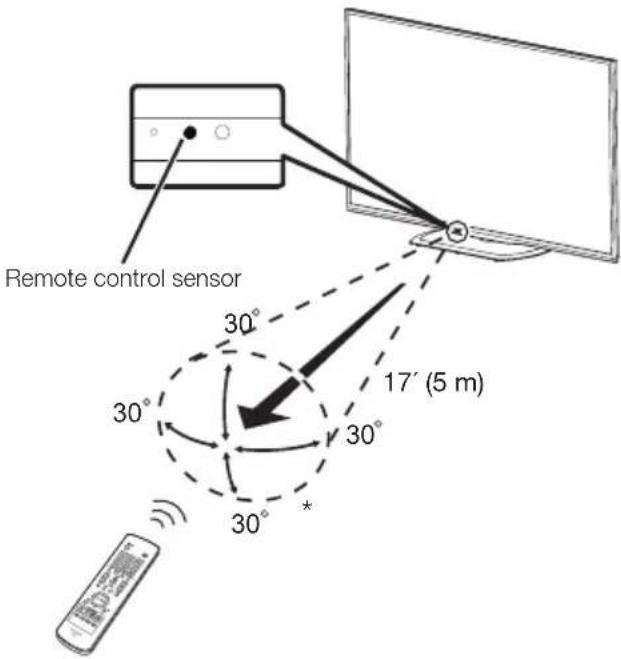
* The angle is 22° when the stand is attached.
■ Cautions regarding the remote control unit
- Do not expose the remote control unit to shock. In addition, do not expose the remote control unit to liquids, and do not place in an area with high humidity.
- Do not install or place the remote control unit under direct sunlight. The heat may cause deformation of the remote control unit.
- The remote control unit may not work properly if the remote control sensor on the TV is under direct sunlight or strong lighting. In such cases, change the angle of the lighting or the TV, or operate the remote control unit closer to the remote control sensor.

IMPORTANT:
IF THE UNIT DOES NOT POWER ON - UNPLUG THE TELEVISION FROM THE OUTLET AND REPEAT THE INSTALLATION STEPS.
IF YOU STILL ENCOUNTER NO POWER, PLEASE CONTACT US AT 1-800-BE-SHARP.
Antennas
To enjoy a clearer picture, use an outdoor antenna. The following is a brief explanation of the types of connections that are used for a coaxial cable. If your outdoor antenna uses a 75-ohm coaxial cable with an F-type connector, plug it into the antenna terminal at the rear of the TV set.
- A 75-ohm system is generally a round cable with F-type connector that can easily be attached to a terminal without tools (Commercially available).
- A 300-ohm system is a flat "twin-lead" cable that can be attached to a 75-ohm terminal through a 300/75-ohm adapter (Commercially available).

NOTE
When connecting the RF cable to the TV set, do not tighten F-type connector with tools. If tools are used, it may cause damage to your TV set. (The breaking of internal circuit, etc.)

Connecting Antenna Cable
Connect the antenna cable to the TV using one of the methods in the illustration as shown (1.204).
○ Cable without a CATV converter1

flowchart
graph TD
    A["Cable TV lead-In"] --> B["Home Antenna terminal (75-ohm)"]
    B --> C["Coaxial cable (commercially available)"]
    D["VHF/UHF antenna2"] --> E["75-ohm coaxial cable (round)"]
    E --> F["Home Antenna terminal (75-ohm)"]
    F --> G["Coaxial cable (commercially available)"]
    H["Combination VHF/UHF antenna3"] --> I["75-ohm coaxial cable (round)"]
    I --> J["or"]
    J --> K["300/75-ohm adapter (commercially available)"]
    L["300-ohm twin-lead cable (flat)"] --> M["300/75-ohm adapter (commercially available)"]
    N["Separate VHF/UHF antenna4"] --> O["VHF ANTENNA UHF ANTENNA"]
    O --> P["300-ohm twin-lead cable"]
    P --> Q["in OUT"]
    Q --> R["Combiner (commercially available)"]
    S["ANT./CABLE"] --> T["To TV antenna terminal"]
Installing Batteries in the Remote Control Unit
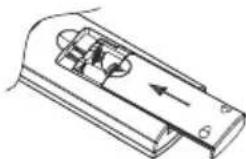
If the remote control fails to operate TV functions, replace the batteries in the remote control unit.
1 Open the battery cover.

natural_image
Technical line drawing of a mechanical component with internal components and an arrow indicating direction (no text or symbols)3 Close the battery cover.
natural_image
Technical line drawing of a mechanical component with internal components and an arrow indicating direction (no text or symbols)2 Insert two "AAA" size batteries (supplied with the product).
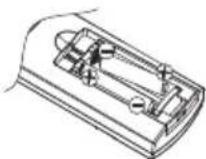
Place the batteries with their terminals • corresponding to the (+) and (−) indications in the battery compartment.
CAUTION
Improper use of batteries can result in chemical leakage or explosion. Be sure to follow the instructions below.
- Do not mix batteries of different types. Different types of batteries have different characteristics.
- Do not mix old and new batteries. Mixing old and new batteries can shorten the life of new batteries or cause chemical leakage in old batteries.
- Remove batteries as soon as they are worn out. Chemicals that leak from batteries come in contact with skin can cause a rash. If you find any chemical leakage, wipe thoroughly with a cloth.
- The batteries supplied with this product may have a shorter life expectancy due to storage conditions.
- If you will not be using the remote control unit for an extended period of time, remove batteries from it.
- The batteries (batteries installed) shall not be exposed to excessive heat such as sunshine, fire or the like.
Contents
IMPORTANT INFORMATION .... 1
TRADEMARKS 2
IMPORTANT SAFETY INSTRUCTIONS .... 3
QUICK REFERENCE 7
Supplied Accessories 7
Attaching/Detaching the Stand 7
Quick Installation Tips 8
Using the Remote Control Unit 8
Antennas 9
Connecting Antenna Cable 9
Installing Batteries in the Remote Control Unit 10
Contents 11
Part Names 12
TV (Front) 12
TV (Side/Rear) 12
Remote Control Unit 13
Introduction to Connections 14
Experiencing HD Images 14
Types of Connection 14
Connecting to External Equipment 15
Connecting a Blu-ray Disc/DVD Player or HD Cable/Satellite Set-top Box 15
Connecting a Game Console, VCR, Camcorder or Cable/Satellite Set-top Box 16
Connecting an Audio Amplifier 17
Connecting an AV Amplifier 17
Connecting a PC 18
Watching TV 19
Turning On/Off the Power 19
EZ Setup 19
Direct Button Operation 21
On-Screen Display Menu 24
Menu Items 24
On-Screen Display Menu Operation 25
Menu Operation Button 26
Picture Settings 26
Audio Settings 28
Power Control 28
System Options 29
Initial Setup 31
Information 34
Enjoying Photo/Music/Video Playback 35
Appendix 38
Troubleshooting 38
Specifications 39
PC Compatibility Chart 40
RS232 Port Specifications 41
Legal notices 42
Calling for Service 43
Dimensional Drawings
- The dimensional drawings for the LCD TV set are shown on the inside back cover.
TV (Front)

*1: Optical Picture Control (See Page 27)
TV (Side/Rear)


natural_image
Pure mechanical diagram showing a lever and pivot point without any text, numbers, or symbols
natural_image
Illustration of a person sitting at a desk viewing a large screen mounted on a stand (no text or symbols visible)Anti-tip Auxiliary Screw Hole:
- In the event of failure to fasten the screws on the table, please use another two bolts (recommended size: T4*22) to fasten the screws on the wall mount hole and fix the LCD Display to the wall with a wire for safety. (Fig. 1)
- In case that the table on which you place your LCD Display cannot be locked with screws, use two additional screws (the recommended size: M6 x 16) to mount the LCD Display via the wall mounting hole in the rear and fasten with a steel wire (Fig. 2) to ensure safety.
NOTE
- The illustrations in this operation manual are for explanation purposes and may vary slightly from the actual operations.
Remote Control Unit

NOTE
- When using the remote control unit, point it at the TV.
- INPUT: Select a TV input source. (See page 21.)
- 0-9: Set the channel.
- ENT: Jumps to a channel after selecting with the 0-9 buttons.
- FLASHBACK: Press to switch to the previously tuned channel or external input mode. Press again to switch back to the currently tuned channel or external input mode.
-
AUDIO: Display the MTS/SAP setting menu. (See page 22.)
-
MUTE: Mute the sound. (See page 21.)
- CH^/∨: Select the channel. (See page 21.)
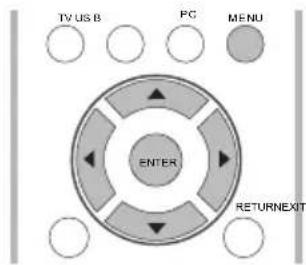
- MENU: Display the menu screen.
- PC: Direct switch PC source.
- ▲/▼/◄/►, ENTER: Select a desired item on the screen. (See page 26.)
- RETURN: Return to the previous menu screen.
- FAVORITE CH:
A,B,C,D: Selects preset favorite channels in four different categories. While watching, you can toggle the selected channels by pressing A, B, C and D. The every key of the favorite can select the many channels.
- AV MODE: Select an adjusted picture settings. User, Standard, Movie, Game, PC, Dynamic, Dynamic(Fixed). (See page 22.)
- VIEW MODE: Select the Picture Mode. (See page 23.)
- : Only for USB.
- POWER: Switch the power on or enters standby mode. (See page 19.)
- • (DOT): (See page 21.)
- DISPLAY: Display the current channel (or input source) information on the screen.
- FREEZE: Set the still image. Press again to return to normal screen.
- VOL +/- : Set the volume. (See page 21.)
- SURROUND: Display the surround setting menu. (See page 21.)
- TV: Direct switch TV source.
- USB: Direct switch USB source.
- EXIT: Turn off the menu screen.
- SLEEP: Allows you to set a time when the TV automatically switches to standby. This display will disappear after a few seconds, and the sleep timer automatically starts counting down. (See page 21.)
- CC: Display captions during closed-caption source.(See page 22.)
Experiencing HD Images
An HDTV without an HD source is just an ordinary TV.
To enjoy HD images on the TV, you should get HD programming from the following:
NOTE
Types of Connection
| Image Quality | Terminal on external equipment | Cable | Terminal on the TV |
 |  |  → Page 15 → Page 15 | |
| Standard Quality | 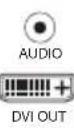 | 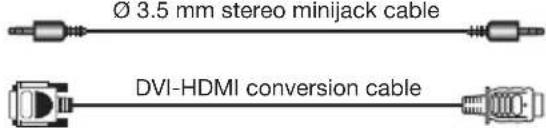 | 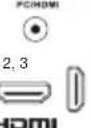 → Page 15 → Page 15 |
 |  |  → Page 16 → Page 16 | |
 |  |  → Page 16 → Page 16 | |
Displaying an External Equipment Image Display


Example


flowchart
graph LR
    INPUT1 --> INPUT2 --> INPUT3
    INPUT1 --> TV <-- USB <-- PC IN <-- INPUT4
Connecting to External Equipment
You can connect many types of external equipment to your TV. To view external source images, select the input source from INPUT on the remote control unit or on the TV. (See pages 13 and 21.) For connecting the TV to external equipment, use commercially available cables.
CAUTION
Connecting a Blu-ray Disc/DVD Player or HD Cable/Satellite Set-top Box
■ When using HDMI cable (INPUT 1, 2, or 3):
connection for audio and video signals using a single cable. The HDMI terminal supports

flowchart
graph TD
    A["HDMI OUT"] --> B["USB Port"]
    B --> C["USB Port"]
    C --> D["Device 1: HDMI INPUT 1"]
    C --> E["Device 2: HDMI INPUT 2"]
    C --> F["Device 3: HDMI INPUT 3"]
NOTE
cable
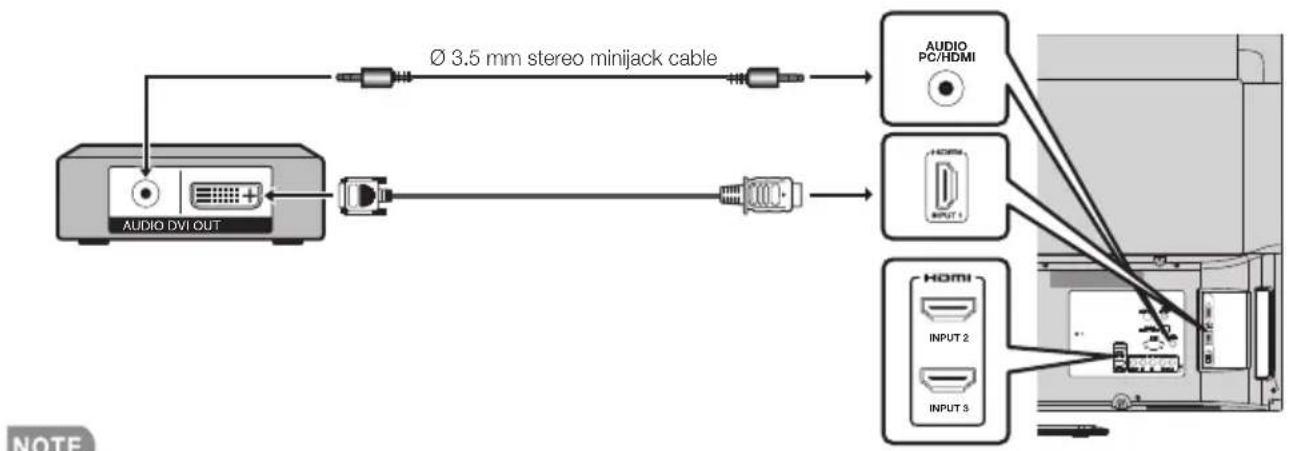
■ When using DVI-HDMI conversion cable (INPUT 1, 2, or 3):
flowchart
graph LR
    A["AUDIO DVI OUT"] -->|Ø 3.5 mm stereo minijack cable| B["AC/DC"]
    A --> C["AC/DC"]
    B --> D["AC/DC PC/HDMI"]
    C --> E["AC/DC HDMI"]
    D --> F["Output 1"]
    E --> G["Output 2"]
    E --> H["Output 3"]
NOTE
terminal.
■ When using Component cable (INPUT 4):

flowchart
graph TD
    A["COMPONENT OUT"] --> B["R AUDIO"]
    A --> C["L Y"]
    A --> D["Pb"]
    A --> E["Pr"]
    F["INPUT 4"] --> G["Y/VIDEO PB PR L-AUDIO-R"]
NOTE
Connecting a Game Console, VCR, Camcorder or Cable/Satellite Set-top Box
■ When using Composite cable (INPUT 4):

flowchart
graph TD
    A["AV OUT"] --> B["Resistor"]
    B --> C["Device 32"]
    D["INPUT 4"] --> E["Y/VIDEO PB PR L-AUDIO-R"]
    F["INPUT 4"] --> G["Y/VIDEO PB PR L-AUDIO-R"]
    H["AV OUT"] --> I["Resistor"]
    I --> J["Device 32"]
    K["INPUT 4"] --> L["Y/VIDEO PB PR L-AUDIO-R"]
    M["Input"] --> N["Computer Panel"]
    O["Input"] --> P["Computer Panel"]
Connecting an Audio Amplifier
■ When using coaxial cable:
It is possible to output audio through the DIGITAL AUDIO terminal. PCM audio outputs from the terminal.
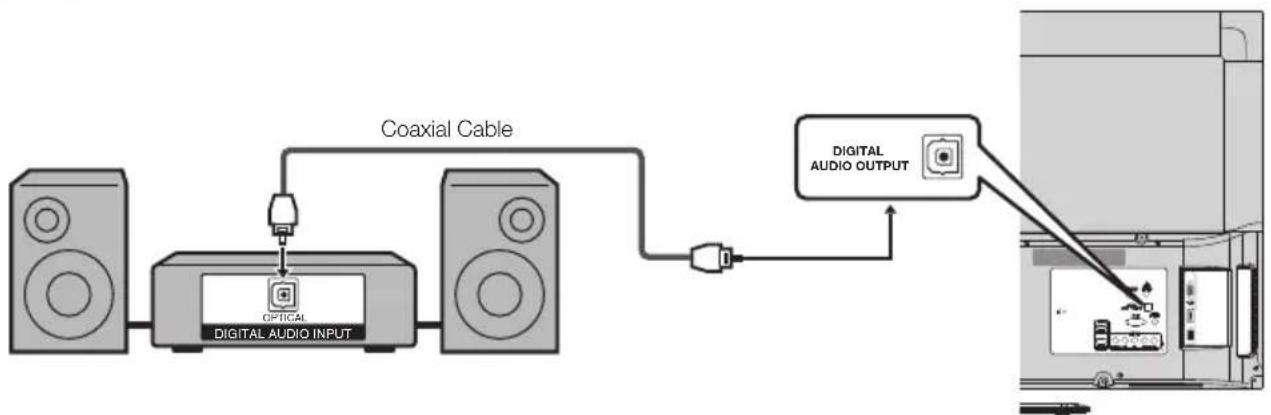
flowchart
graph LR
    A["Speaker"] --> B["Digital Audio Input"]
    B --> C["Coaxial Cable"]
    C --> D["Digital Audio Output"]
    D --> E["Output"]
NOTE
• Digital Audio output is not available when using an HDMI input.
Connecting an AV Amplifier
HD Cable/Satellite set-top box
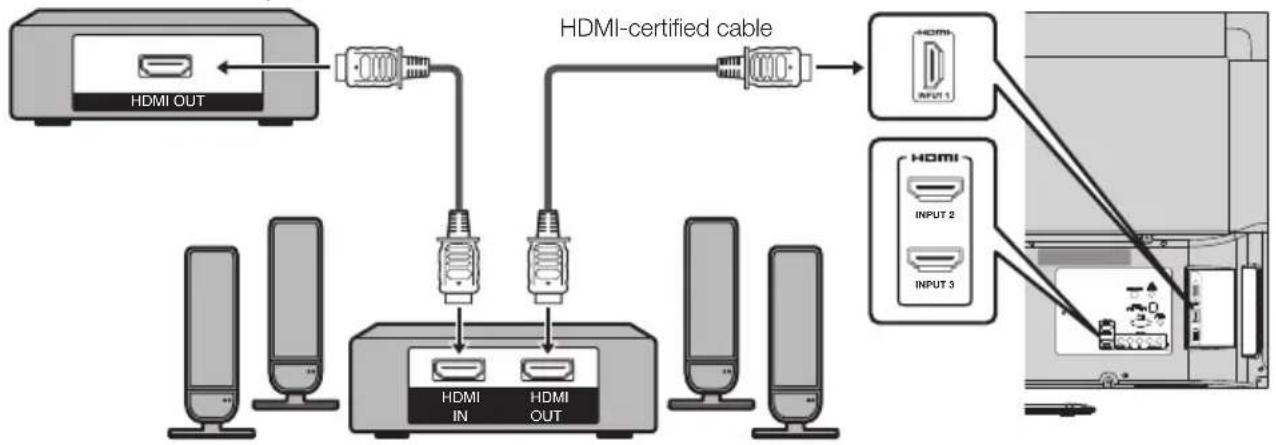
flowchart
graph TD
    A["HDMI OUT"] --> B["+0.000"]
    B --> C["+0.000"]
    C --> D["+0.000"]
    D --> E["HDMI certified cable"]
    E --> F["HDMI INPUT 1"]
    E --> G["HDMI INPUT 2"]
    E --> H["HDMI INPUT 3"]
    I["HDMI IN"] --> J["HDMI OUT"]
    K["Computer Interface"] --> L["Output"]
NOTE
- If the image is not in sync with the audio, check the settings of the connected surround system.
- Letting the TV output the audio to an AV amplifier.
Connecting a PC
Refer to page 41 for a list of PC signals compatible with the TV.
■ When using HDMI cable (INPUT 1, 2 or 3):

flowchart
graph TD
    A["Laptop"] --> B["HDMI OUT"]
    B --> C["Switch"]
    C --> D["OUTPUT 1"]
    C --> E["OUTPUT 2"]
    C --> F["OUTPUT 3"]
■ When using DVI-HDMI conversion cable (INPUT 1,2,3):

flowchart
graph LR
    A["Computer"] --> B["DVI OUT"]
    B --> C["Audio"]
    B --> D["PCI"]
    C --> E["PCI"]
    D --> F["PCI"]
    E --> G["AUDIO PC/HDMI"]
    F --> G
    G --> H["Output Module"]
    I["Hardware 1"] --> G
    J["Hardware 2"] --> G
    K["Hardware 3"] --> G
terminal.
■ When using analog RGB cable (PC IN):

flowchart
graph TD
    A["Laptop"] --> B["Audio Input"]
    B --> C["PC IN"]
    B --> D["PC/HDMI"]
    C --> E["Computer"]
    D --> E
    style A fill:#f9f,stroke:#333
    style B fill:#ccf,stroke:#333
    style C fill:#cfc,stroke:#333
    style D fill:#fcc,stroke:#333
    style E fill:#ffc,stroke:#333
Turning On/Off the Power

Press POWER on the TV, or POWER on the remote control unit to turn the power on.
Press POWER on the TV, or POWER on the remote control
EZ Setup
When you turn on the TV for the first time, the Initial Setup will guide you through the setup process. Perform the following steps before you press POWER on the remote control unit.
- Insert the batteries into the remote control unit. (See page 10.)
- Connect the antenna cable to the TV. (See page 9.)
- Plug in the AC cord to the AC outlet. (See page 8.)

1. Initial Setup
- The Initial Setup screen display at the first use. Press ENTER to start the EZ setup.
![Thank You for Your Purchase of our SHARP Liquid Crystal Television Please press [Enter] to start the Wizard.](/content/2026/05/1067123/images/51119b0a8cbf8e9534aea88ba945dee14c4af4ab6101596f9995ed7aa8bd2600.jpg)
2. Language setting
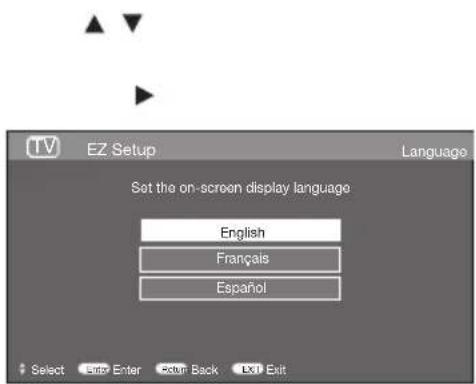
TV Location
NOTE
3. Location setting
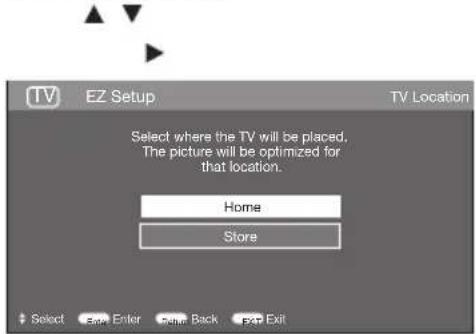
Home: "Power Saving" is set to "On", and AV MODE is set to "STANDARD".
Store: "Power Saving" is set to "Off" and AV MODE is set to "DYNAMIC (Fixed)".
4. Air/Cable(Antenna setting)
- Make sure what kind of connection is made with your TV when selecting "Air" or "Cable".
- Press ▲/▼ to select "Air" or "Cable" and press ▶ to the next step.

CH Search (Channel search)
Channel auto search makes the TV look for all channels viewable in the set area.
5. When "Air" or "Cable" is selected in Antenna setting:
Press ▲/▼ to select "Start", and then press ENTER.

6. Start channel searching
- Wait until the channel scan to complete.
- If you press EXIT, the process will return to the previous step.
- If you skip this step, the channel search can be performed in the TV Menu. (See page 32.)

7. Completed
After setting complete, the screen will show "EZ Setup Completed", press ENTER to finish the EZ Setup. The TV will then switch to the first channel found.

NOTE
- Auto programming may take 20+ minutes to complete. Please wait until you see the Auto programming complete message.

Changing Channels
You can change channels by pressing CH ∧/∨ or 0-9, or • (DOT).
Examples:
To select a 1 or 2-digit channel number
(e. g., Channel 5):
Press 5 → ENT.
To select a 3-digit channel number
(e. g., Channel 115):
Press 1 → 15 ENT. →
To select a 4-digit channel number
(e. g., Channel 22.1):
Press 2 → 2 • (DOT) 1 → → ENT.
NOTE
- When selecting a 1-digit channel number, it is not necessary to press 0 before the number.
Changing Volume
You can change the volume by pressing
VOL + / - on the TV or on the remote control unit.
• To increase the volume, press VOL +.
- To decrease the volume, press VOL-.
INPUT
To view external source images, select the input source using INPUT on the remote control unit or INPUT on the TV.
- Press INPUT.
- A list of selectable sources appears.
-
Press INPUT again to select the input source.
-
An image from the selected source automatically displays.
- Each time INPUT is pressed, the input source toggles.
- If you press ▲/▼ to select the input source, press ENTER to confirm your selection.
NOTE
• See page 14-18 for external equipment connection.
MUTE
Mutes the current sound output.
Press MUTE.
NOTE
- Mute can be canceled by using the method below. Mute will be canceled if you press VOL + / - or MUTE.
SLEEP
Allows you to set a time when the TV automatically switches to standby.
Press SLEEP.
- The remaining time displays when the sleep timer has been set.
- Each time you press SLEEP, the remaining time switches as shown below.

- When set, the time automatically starts counting down.
- If you want to adjust the sleep timer, you can press SLEEP twice then change the time setting.
NOTE
- Select "Off" by pressing SLEEP to cancel the sleep timer.
- The TV will enter standby mode (power indicator lights red) when the remaining time reaches zero.
FLASHBACK
Press FLASHBACK to switch to the previously tuned channel or input.
- Press FLASHBACK again to switch back to the currently tuned channel or input.
SURROUND
The surround function produces Surround effect from the speakers. Each time you press
SURROUND, the mode changes between On and Off.
- On: Makes it possible to enjoy natural, realistic surround sound.
- Off: Outputs the normal sound.
NOTE
- You can have the same settings by choosing "Surround" on the menu items. (See page 28.)
FREEZE
Allows you to capture and freeze a moving image that you are watching.
Press FREEZE.
- A moving image is captured.
- Press FREEZE again to cancel the function.
AV MODE
AV MODE gives you several viewing options to choose from to best match the surrounding environment of the TV, which can vary due to factors like room brightness, type of program watched or the type of image input from external equipment.
Press AV MODE. Current AV MODE displays.
- Press AV MODE again before the mode displayed on the screen disappears.
- You can have the same settings by choosing "AV MODE" on the menu items. (See page 27.)
AUDIO
■ MTS/SAP stereo mode
The TV has a feature that allows reception of sound other than the main audio for the program. This feature is called Multi-channel Television Sound (MTS). The TV with MTS can receive mono sound, stereo sound and Secondary Audio Programs (SAP). The SAP feature allows a TV station to broadcast other information, which could be audio in another language or something completely different like weather information.
You can enjoy Hi-Fi stereo sound or SAP broadcasts when available.
- Stereo broadcasts: View programs like live sporting events, shows and concerts in dynamic stereo sound.
- SAP broadcasts: Receive TV broadcasts in either MAIN or SAP sound.
MAIN sound: The normal program soundtrack (either in mono or stereo).
SAP sound: Listen to a second language, supplementary commentary or other information. (SAP is mono sound.)
If stereo sound is difficult to hear.
- Obtain a clearer sound by manually switching to fixed mono-sound mode.
You can change MTS as shown below to match the television broadcast signal.
Press AUDIO to toggle between audio modes.
Examples: when receiving MTS and SAP
MAIN + SAP mode: MAIN←→ SAP MONO mode: MONO
■ Digital broadcasting audio mode
The types of audio transmitted in a digital broadcast include SURROUND as well as MONO and STEREO. In addition, it is possible for multiple audio tracks to accompany a single video track.
Press MTS/SAP to toggle between audio modes.
Example: when receiving Digital broadcasting
STEREO (Audio1) STEREO (Audio2)
SURROUND (Audio3)
NOTE
- MTS only operates while in TV mode.
Closed Captions (CC)
Your TV is equipped with an internal Closed Caption decoder. It allows you to view conversations, narration and sound effects as subtitles on your TV. Closed Captions are available on some TV programs and on some VHS home video tapes at the discretion of the program provider.
Digital Closed Caption service is a new caption service available only on digital TV programs (also at the discretion of the service provider). It is a more flexible system than the original Closed Caption system, because it allows for a variety of caption sizes and font styles. When the Digital Closed Caption service is in use, it will be indicated by the appearance of a 3-letter abbreviation that also indicates the language of the Digital Closed Captions: ENG (English), SPA (Spanish), FRA (French) or other language codes.
Not all programs and VHS videotapes offer closed captions.
In the Closed Caption system, there can be more than one caption service provided. Each is identified by its own number. The “CC1” to “CC4” services display subtitles of TV programs superimposed over the program's picture. In the Closed Caption system, the “TEXT1” to “TEXT4” services display text that is unrelated to the program being viewed (e.g., weather or news). These services are also superimposed over the program currently being viewed.
1. Press CC.
- This will display the current Closed Caption information. Press CC to turn the Closed Caption on or off.
Example:
Analog:

Digital:

flowchart
graph TD
    A["CC1"] --> B["CC2"]
    B --> C["CC3"]
    C --> D["CC4"]
    D --> E["TT1"]
    E --> F["TT2"]
    F --> G["TT3"]
    G --> H["TT4"]
    H --> I["CS6"]
    I --> J["CS5"]
    J --> K["CS4"]
    K --> L["CS3"]
    L --> M["CS2"]
    M --> N["CS1"]
NOTE
- Caption Display will not work when viewing a 480i, 480p, 720p, 1080i or 1080p input via the COMPONENT: Y-PbPr or HDMI inputs.
- This feature is only available in TV, AV and component mode.
- Closed Captions and Digital Captions availability and content depends on the broadcaster. Closed Caption are available when the Closed Caption icon is displayed on screen.
VIEW MODE

You can select the screen size.
1 Press VIEW MODE.
• The View Mode menu displays.
- The menu lists the View Mode options selectable for the type of video signal currently being received.
2 Press VIEW MODE or ▲/▼ while the View Mode menu is displayed to select a desired item on the menu.
- You can sequentially select a View Mode that has its own aspect ratio.
NOTE
- You can have the same settings by choosing "View Mode" on the menu items. (See page 29.)
■ For HD programs
| Stretch | Dot by Dot (Full Screen) | S.Stretch (Smart stretch) | Zoom |
 Suitable for viewing wide-screen 1.78:1 aspect ratio program, stretch mode will still show very thin black bands at the top and bottom of the screen. Suitable for viewing wide-screen 1.78:1 aspect ratio program, stretch mode will still show very thin black bands at the top and bottom of the screen. | 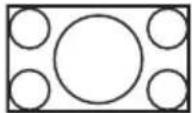 Dot by Dot (1080i/p only): Detects the resolution of the signal and displays an image with the same number of pixels on the screen.Full Screen (720p only): You can select "Full Screen" only when receiving a 720p signal. Dot by Dot (1080i/p only): Detects the resolution of the signal and displays an image with the same number of pixels on the screen.Full Screen (720p only): You can select "Full Screen" only when receiving a 720p signal. |  Suitable for stretching 4:3 programs to fill the screen. Suitable for stretching 4:3 programs to fill the screen. |  Suitable for viewing wide-screen 2.35:1 aspect-ratio programs in full screen. Suitable for viewing wide-screen 2.35:1 aspect-ratio programs in full screen. |
NOTE
When using Dot by Dot or Full Screen, it is possible to see noise or bars around different outer portions of the screen. Please change view mode to correct this.
■ For 4:3 programs
For USB-Video
Example: Screen size images
| Normal | S.Stretch (Smart stretch) | Zoom | Stretch |
 Suitable for viewing conventional 4:3 programs in their normal format. Suitable for viewing conventional 4:3 programs in their normal format. | 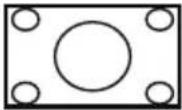 Suitable for stretching 4:3 programs to fill the screen. Suitable for stretching 4:3 programs to fill the screen. |  Suitable for viewing wide-screen 2.35:1 anamorphic DVDs in full screen. Suitable for viewing wide-screen 2.35:1 anamorphic DVDs in full screen. | 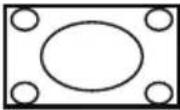 This mode is useful for 1.78:1 DVDs.When viewing 1.85:1 DVDs, stretch mode will still show very thin black bands at the top and bottom of the screen. This mode is useful for 1.78:1 DVDs.When viewing 1.85:1 DVDs, stretch mode will still show very thin black bands at the top and bottom of the screen. |
■ For PC input mode
NOTE
- Connect the PC before making adjustments. - Selectable screen size may vary with input signal type.
Example: Screen size images
| Input | signalNormal | Cinema | Full Screen | Dot by Dot |
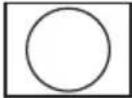 |  | 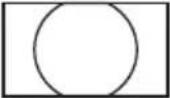 |  | 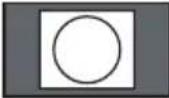 |
| 4:3 | Keeps the original aspect ratio in a full screen display. | For viewing widescreen programs. The top and bottom of the image is cropped. | An image fully fills the screen. | Detects the resolution of the signal and displays an image with the same number of pixels on the screen. |


16:9 An image fully fills the

screen.
Menu Items
For TV Mode
Picture Settings ......26
AV MODE (Changing Pic.Quality) 27
OPC 27
Backlight 26
Contrast ......26
Brightness ....26
Color 26
Tint 26
Sharpness ....26
Advanced 27
Color Temp. (Color Temperature) ......27
Active Contrast 27
DI Film Mode 27
Digital Noise Reduction 27
Audio Settings 28
Treble 28
Bass 28
Balance 28
Surround 28
Power Control 28
No Signal Off 28
Power Saving 28
System Options ......29
View Option 29
View Mode 29
Freeze 29
Change Audio 29
MTS 29
Audio Language 29
Change CC 29
Analog Closed Caption 30
Digital Closed Caption 30
Input Terminal Setting 30
Audio Setup 30
PC Input 30
Auto Sync. (for Analog PC Input Mode Only) ....30
Fine Sync. 30
Audio Select 30
HDMI Setup 31
Speaker 31
Caption Setup ....31
Initial Setup ....31
EZ Setup ....31
Broadcasting Setup 32
CH Setup 32
Favorite CH (Favorite Channel Setting) ......32
Language 32
Individual Setup 32
Secret No. 32
Parental CTRL (Parental Control Setting) ......32
V-Chip 33
V-Chip(DTV Only) 32
Status 32
Reset 32
Information 34
Identification 34
Connecting a USB Memory Device/
USB Hard Drive ....35
Select the Files to Play Back ....35
Playing Back Files on a USB Memory Device ...35
Photo Mode 35
Viewing Thumbnails 35
Viewing Individual Photos 36
Slide Show 36
Music Mode ....38
Video Mode 37
USB Device Compatibility ....37
NOTE
- Some menu items may not be displayed depending on the selected input source.
On-Screen Display Menu Operation
![System Options Initial Setup Information Picture Settings Menu Select Menu Select Enter View Exit Picture Settings STANDARD AV MODE [STANDARD] OPC Backlight [ 92 ] Contrast [ 51 ] Brightness [ 90 ] Color [ 50 ] Tint [ 6 ] Sharpness [ 19 ] Advanced Reset Example ① ② ③](/content/2026/05/1067123/images/78d8a7c6b377272ee91e3a88aaacdda8ab495a54355886c69b2518e83920cc8c.jpg)
-
Press MENU to display the MENU screen.
-
① Press ◀/▶ to select the desired menu.
② Press ▲/▼ to select a specific adjustment item, and then press ENTER.
- Additional related adjustment items may be displayed. Press ▲ /▼ to select the desired item.
③ Adjust the item while referring to the guide display.
- Operations vary depending on the function or item. Refer to the guide display corresponding to the menu setting screen for button operations.
- Press MENU to exit.
Example
![System Options Initial Setup Information Picture Settings Menu Adjust Select Enter View Back Picture Settings AV MODE STANDARD STANDARD OPC [On] Backlight 62 Contrast 3 Brightness [50] Color [50] Tirt [1] Sharpness [19] Advanced Reset ① ② ③ ④](/content/2026/05/1067123/images/5f7adf54fbdfb937b8f14e7881af777c19af26a6e22f99d6152f2afbe003cdef.jpg)
① Guide display
- This indicates the buttons that can be operated on the displayed screen. The guide display varies depending on the menu setting screen.
- The operations for some selected items may be displayed in the operational guide bar at the bottom of the screen.
② Item displayed in blue
- This indicates the item currently selected.
- Press ◀/▶ to go to the adjustment screen for this item.
③ Item in brackets
• This indicates the current setting for the item.
④ Item displayed in gray
• This indicates that the item can be selected.
⑤ Item displayed in black
- This indicates that the item cannot be selected. There are various reasons why the items cannot be selected, but the main reasons are as follows:
—Nothing is connected to the selected input terminal.
—The function is not compatible with the current input signal.
NOTE
- Menu options differ in the selected input modes, but the operating procedures are the same.
- The screens in the operation manual are for explanation purposes (some are enlarged, others cropped) and may vary slightly from the actual screens.
- The order of explanations for each menu item in the following pages is not necessarily in accordance with the alignment of the items on the screen.
Menu Operation Button
Using the remote control
Use the following buttons on the remote control to operate the menu.

MENU : Press to open or close the menu screen.
▼/▲/◄/►: Press to select a desired item on the screen or adjust a selected item.
ENTER: Press to go to the next step or complete the setting.
RETURN: Press to return to the previous step.
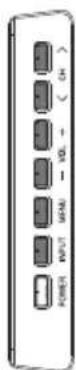
Using the control panel of the main unit
You can also operate the menu with the control panel of the main unit.
Button operations on the control panel correspond to the ones on the remote control as shown below.
CH ∧/▼Cursor ▲ ▼ on the remote control.
VOL ≠: Cursor ↕ on the remote control.
MENU: MENU on the remote control or EXIT on the remote control while OSD menu is on.
INPUT: ENTER on the remote control.
Picture Settings
Adjusts the picture to your preference with the following picture settings.
Example
![Picture Settings Menu Picture Settings STANDARD AV MODE [STANDARD] OPC [On] Backlight [80] Contrast [50] Brightness [50] Color [50] Tint [0] Sharpness [10] Advanced Reset](/content/2026/05/1067123/images/9ab4ec895ea5c56319a394269050171e86af82b9aa3a2fc9f9abc6946f6f571c.jpg)

- Press MENU to display the MENU screen, and then press ◀/▶ to select "Picture Settings" and press ENTER or ▼ to enter it.
- Press ▲/▼ to select a specific adjustment item and press ENTER or ▶ to enter the setting.
- Press ◀/▶ to adjust the setting.
- Press MENU to exit.
| Selected item | button button | |
| Backlight | The screen dims | The screen brightens |
| Contrast | For less contrast | For more contrast |
| Brightness | For less brightness | For more brightness |
| Color | For less color intensity | For more color intensity |
| Tint | Skin tones become reddish | Skin tones become greenish |
| Sharpness | For less sharpness | For more sharpness |
NOTE
- Backlight control is disabled when OPC is "On".
AV MODE (Changing Pic.Quality)
The audio and video settings can be changed to suit the program or input content being watched.
Select from the following AV modes.
USER/STANDARD/MOVIE/GAME/PC/DYNAMIC/DYNAMIC (Fixed)
Example:
When the input source is TV, COMPONET/AV, PC IN or HDMI 1 to 4

flowchart
graph LR
    A["STANDARD MOVIE GAME"] --> B["PC"]
    B --> C["DYNAMIC"]
    C --> D["DYNAMIC (Fixed)"]
    E["STANDARD"] <--_F["USER"]
    F <--_G["DYNAMIC (Fixed)"]
STANDARD: For a highly defined image in a normal lighting.
MOVIE: For a movie.
GAME: Lowers image brightness for easier viewing.
PC: For PC.
USER: Allows the user to customize settings as desired. You can set the mode for each input source.
DYNAMIC: For a clear-cut image emphasizing high contrast, useful for sports viewing.
DYNAMIC (Fixed): Changes the image and sound settings to the factory preset values. No adjustments are allowed.
NOTE
- You can select AV MODE by pressing AV MODE on the remote control unit. See page 22 for details of AV MODE settings.
OPC
Automatically adjusts the brightness of the screen.
Off: The brightness is fixed at the value set in "Backlight".
On: Automatically adjusts.
NOTE
- When set to "On", the Optical Picture Control (OPC) senses the surrounding light and automatically adjusts the backlight brightness. Make sure nothing obstructs the OPC sensor, which could affect its ability to sense surrounding light.
Advanced
This TV provides various advanced functions for optimizing the picture quality.
NOTE
- For resetting all adjustment items to the factory preset values, press ▲ / ▼ to select "Reset", and then press ENTER.
Color Temp. (Color Temperature)
For a better white balance, use color temperature correction.
Warm:
White with reddish tone
Standard:

Cool:
White with bluish tone
User:
White balance can be adjusted manually through the R/G/B Gain between a maximum of 255 and a minimum of 0 for each color temperature.
NOTE
- For resetting all adjustment items to the factory preset values, press ▲ /▼ to select "Reset", and then press ENTER.
Active Contrast
Automatically adjusts the image contrast according to the scene.
On: Automatically adjusts the image contrast.
Off: No adjustment.
DI Film Mode
Automatically detects a film-based source (originally encoded at 24 frames/second), analyzes it then recreates each still film frame for high-definition picture quality.
Auto: Detects, analyzes, converts film source.
Off: Normal viewing mode.
NOTE
- "DI Film Mode" does not function depending on input signal type.
- "Auto" does not function when channel display shows an input signal resolution of 480p, 720p, or 1080p.
- "DI Film Mode" is not available during PC format input.
Digital Noise Reduction
Produces a clearer video image.
Auto: Automatically adjusts the level of noise reduction.
High/Medium/Low: Select a desired level for viewing a clearer video image.
Off: No adjustment.
NOTE
- "Digital Noise Reduction" is not available when you set PC format is being input.
- This feature is only available in ATV, AV and component mode.
Audio Settings
You can adjust the sound quality to your preference with the following settings.
Example
![Audio Settings Menu Audio Settings STANDARD Treble [ 50 ] Bass [ 50 ] Balance [ 0 ] Surround [Off] Reset](/content/2026/05/1067123/images/84682dd0eeeab98f1a59a0b6e1626cdff701ba59436be4d8b4fb6c9c6660e019.jpg)
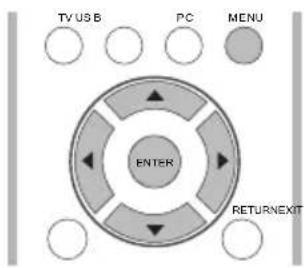
-
Press MENU to display the MENU screen, and then press ◀/▶ to select "Audio Settings".
-
Press ▲/▼ to select a specific adjustment item.
- Select "Surround" and then press ◀/▶ to set.
-
Press ▲/▼ (or ◀/▶) to select the desired setting, and then press ENTER.
-
Press MENU to exit.
| Selected item | button | button |
| Treble For weaker treble | For stronger treble | |
| Bass For weaker bass | For stronger bass | |
| Balance Decrease audio from the right speaker | Decrease audio from the left speaker | |
NOTE
- For resetting Audio adjustment items to the factory preset values, press ▲/▼to select "Reset", press ENTER, press ▲/▼to select "Yes", and then press ENTER.
Surround
The surround function produces Surround effect from the speakers.
On: Makes it possible to enjoy natural, realistic surround sound.
Off: Outputs the normal sound.
NOTE
- For some discs, setup may be required on your DVD/BD player. In this case, please refer to the operation manual of your DVD/BD player.
Power Control
Power control setting allows you to save energy.
Example
![Power Control Menu Power Control No Signal Off [Enable] Power Saving [On]](/content/2026/05/1067123/images/5f8392a40e767f50277fa54c6e7a6930bad689a2fd79c95e5a8dceff3597eb1b.jpg)
-
Press MENU to display the MENU screen, and then press ◀/▶ to select "Power Control".
-
Press ▲/▼ to select a specific adjustment item, and then press ENTER.
-
Press ▲/▼ ( or ◀/▶ ) to select the desired setting, and then press ENTER.
-
Press MENU to exit.
No Signal Off
This function allows the TV to automatically shut the power down when there is no signal received.
Enable: The power will automatically shut down if there is no signal for 15 minutes.
Disable: This function does not work.
Power Saving
This function allows you to set the Power Saving level in order to decrease the power consumption and increase the backlight lifespan.
On: Optimizes power reduction based upon video content.
Off: This function does not work.
NOTE
- "Power Saving" does not function when you set AV MODE to DYNAMIC (Fixed)".
- You cannot select a different Power Saving item for each AV MODE.
System Options
Example


- Press MENU to display the MENU screen, and then press ◀/▶ to select "System Options".
- Press ▲/▼ to select a specific adjustment item and then press ENTER.
- Press ▲/▼ (or ◀/▶) to select the desired setting, and then press ENTER.
- Press MENU to exit.
View Option
These functions are useful for adjusting the audio and video settings. The View Option functions can be operated with the remote control unit.
View Mode
This function changes the screen size.
Select "View Option" on the menu to display the View Mode menu screen.
The View Mode menu varies depending on the input source.
NOTE
- You can select View Mode by pressing VIEW MODE on the remote control unit. See page 23 for adjusting the video being input from a TV, PC, other audiovisual equipment, USB-Video.
Freeze
Allows you to capture and freeze a moving image that you are watching.
NOTE
- You can select Freeze by pressing FREEZE on the remote control unit. See page 21 for details of Freeze function.
Change Audio
MTS
The TV has a feature that allows reception of sound other than the main audio for the program. This feature is called Multi-channel Television Sound (MTS). The TV with MTS can receive mono sound, stereo sound and Secondary Audio Programs (SAP). The SAP feature allows a TV station to broadcast other information, which could be audio in another language or something completely different like weather information.
You can enjoy Hi-Fi stereo sound or SAP broadcasts where available.
- Stereo broadcasts: View programs like live sporting events, shows and concerts in dynamic stereo sound.
- SAP broadcasts: Receive TV broadcasts in either MAIN or SAP sound. MAIN sound: The normal program soundtrack (either in mono or stereo). SAP sound: Listen to a second language, supplementary commentary or other information. (SAP is mono sound.)
If stereo sound is difficult to hear.
- Obtain a clearer sound by manually switching to fixed mono-sound mode.
You can change MTS as shown below to match the television broadcast signal.
Press ENTER to toggle between audio modes.
Examples: when receiving MTS and SAP
STEREO mode: STEREO MONO
STEREO + SAP mode: ST(SAP) - CAP(ST) - MONO
MAIN + SAP mode: MAIN ↔ SAP
MONO mode: MONO
Digital broadcasting audio mode
The types of audio transmitted in a digital broadcast include SURROUND as well as MONO and STEREO. In addition, it is possible for multiple audio tracks to accompany a single video track.
Press ENTER to toggle between audio modes.
Example: when receiving Digital broadcasting
STEREO (Audio 1) → STEREO (Audio 2)

NOTE
• MTS only operates while in TV mode.
Audio Language
Gives you the possibility to swap between main and alternative language, when it is available in digital channel.
Change CC
Allows you to change the Closed Caption display. Select "Change CC" on the menu to display the Closed Caption information.
NOTE
- You can change Closed Caption by pressing CC on the remote control unit. See page 22 for details of Closed Caption function.
Analog Closed Caption
This allows you to select the Closed Captions service levels of analog broadcasting to be displayed. Closed captioning allows you to read the voice content of television programs on the TV screen. Designed to help the hearing impaired, this feature uses on-screen “text boxes” to show dialogues and conversations while the TV program is in progress. Captions will appear on the screen during captioned broadcasts.
- CC1, 2, 3, or 4
Dialogues (and descriptions) for the action on the captioned TV program shows on screen. Usually CC1 is the most used. CC2 can be used for alternate languages if they are being transmitted.
- TEXT1, 2, 3, or 4
Often used for channel guide, schedules, bulletin board information for Closed captions programs, news, weather information, or stock market reports. Not all Caption services are necessarily being used by a TV channel during the transmission of a Closed Caption program.
Digital Closed Caption
This allows you to configure the way you choose to view digital captioning. Select one of the digital service channels made available by the caption provider. There are six standard services. Service 1 is designated as the Primary Caption Service. This service contains the verbatim, or near-verbatim captions for the primary language being spoken in the accompanying program audio. Service 2 is designated as the Secondary Language Service. This service contains captions in a secondary language, which is a translation of the captions in the primary Caption Service. The other service sub channels are not pre-assigned. It is up to the discretion of the individual caption provider to utilize the remaining service channels.
Input Terminal Setting
Audio Setup
You can output digital audio to an AV amplifier or similar device whose DIGITAL AUDIO INPUT terminal is connected to the DIGITAL AUDIO OUTPUT terminal on the TV. Please select an audio output format compatible with the audio format of the program you are watching and the equipment connected.
PCM: The optical output terminal outputs audio signal in PCM form. If your digital audio system does not support Dolby Digital, select "PCM".
Dolby Digital: The optical output terminal outputs audio signal in Dolby Digital form. It reproduces sound from surround program of digital.
Off: Disables digital audio output.
PC Input
Auto Sync. (for Analog PC Input Mode Only)
The Auto Sync. is only available when the input source is PC and your TV is receiving a computer signal. Select Auto Sync. for adjusting the settings automatically.
NOTE
- Be sure to connect the PC to the TV and switch it on before starting "Auto Sync.".
Fine Sync.
Ordinarily you can easily adjust the picture as necessary to change image position using "Auto Sync.". In some cases, however, manual adjustment is needed to optimize the image.
H-Pos.: Centers the image by moving it to the left or right.
V-Pos.: Centers the image by moving it up or down.
Clock: Adjust when the image flickers with vertical stripes.
Phase: Adjust when characters have low contrast or when the image flickers.
NOTE
- The default cursor position may not be in the center, because the screen position variable ranges may be asymmetrical.
- The screen position variable ranges depend on the View Mode or the signal type. The ranges can be seen on the position -setting screen.
Audio Select
This function sets the terminal to output the computer audio.
The adjustment items vary depending on the input source. Select the input source corresponding to the terminal connected to the PC and then adjust the desired item.
PC IN
Video: Select this when the TV and PC are connected using an analog RGB cable and the audio is not input.
Video+Audio: Select this when the TV and PC are connected using an analog RGB cable and the audio is input via a ∅ 3.5 mm stereo minijack.
HDMI IN
Auto: Audio path is set to HDMI or PC line in automatically.
HDMI(Digital): Select this when the TV and PC are connected using an HDMI-certified cable and audio is input via the same cable.
HDMI+Analog: Select this when the TV and PC are connected using a DVI-HDMI conversion cable and the audio is input via a ∅ 3.5 mm stereo minijack.
NOTE
- When "Audio Select" is set to "HDMI(Digital)", sound will not be produced if you use only an HDMI-certified cable to connect HDMI-compatible equipment. To produce sound, you should make an analog audio connection.
- If you want to connect HDMI-compatible equipment using only an HDMI-certified cable, set "Audio Select" to "HDMI(Digital)".
HDMI Setup
HDMI Mode only shows and is available when HDMI device is connected. Select from Auto, Graphic or Video.
Auto: The HDMI input timing is set to Video mode or Graphic mode automatically.
Graphic: HDMI input timing set to Graphic mode (PC). The image is full scan.
Video: HDMI input timing set to Video mode. The image is over scan.
NOTE
- HDMI Mode is only workable for HDMI Video & Progressive timing as followed: 1920x1080p, 1280x720p, 720x480p, 720x576p.
Speaker
Choose to turn on or off the TV internal speaker. The audio output signals will not be turned off even though the TV speaker is off. The default setting is On.
Caption Setup
This function allows you to adjust the closed caption screen appearance to suit your preference. You can adjust 8 items:
- Caption Style: Set to As Default or Custom mode. If Custom mode is selected, user can modify the detail styles described below. The setting result will be shown immediately on the bottom of the submenu OSD.
Note : This feature is only available in TV, AV and component mode.
- Caption Size: Selects this option to choose a caption display size according to your own preference. Select "Small", "standard", or "Large".
- Foreground Color: Choose the caption display text color.
• Foreground Opacity: Select the text opacity. - Background Color: Choose one of the background color.
- Background Opacity: Choose one of the background opacity options.
- Window Color: Choose one of the display windows color.
- Window Opacity: Select one of the display window opacity options.
Initial Setup
Example
![Initial Setup Menu Initial Setup EZ Setup Broadcasting Setup Language [English] Individual Setup Reset](/content/2026/05/1067123/images/fb404a42ef441f4f8f922a6d1a7f5466646aa43b0686682869eea068d1d500b2.jpg)

- Press MENU to display the MENU screen, and then press ◀/▶ to select "Initial Setup".
- Press ▲ /▼ to select a specific adjustment item, and then press ENTER.
- When you select Individual Setup, you can enter the 4-digit secret number here. See page 32 for setting a secret number.
-
Press ▲/▼ (or ◀/▶) to select the desired setting, and then press ENTER.
-
Press MENU to exit.
EZ Setup
You can run EZ Setup again, even after setting up the preset channels.
Language: Select from among 3 languages (English, French and Spanish).
TV Location: Select "Home" or "Store" for the location where you plan to install the TV.
Home: "Power Saving" is set to "On", and AV MODE is set to "STANDARD".
Store: "Power Saving" is set to "Off" and AV MODE is set to "DYNAMIC (Fixed)".
- ENERGY STAR qualification is based on AV MODE "STANDARD".
Air/Cable: Make sure what kind of connection is made with your TV when selecting "Air" or "Cable".
CH Search: Channel auto search makes the TV look for all channels viewable in the set area.
- If "Cable" is selected for Antenna setting, scrambled channels are removed after the Channel search has been completed.
Completed: The settings confirmation screen is displayed. Confirm the information displayed on the screen.
NOTE
• See EZ Setup on pages 19 to 20 for setting each item.
- If no channel is found, confirm the type of connection made with your TV and try "EZ Setup" again.
Broadcasting Setup
CH Setup
If Initial Installation does not memorize all the channels in your region, follow the instructions below to manually memorize the channels.
Air/Cable: Make sure what kind of connection is made with your TV when selecting "Air" or "Cable".
CH Search: Channel auto search makes the TV look for all channels viewable in the set area.
CH Memory: You can select the channels to skip in each ANALOG (Air), ANALOG (Cable), DIGITAL (Air) and DIGITAL (Cable).
NOTE
- If no channel is found, confirm the type of connection made with your TV and try channel search again.
- If you press ENTER after CH search finish, CH search is re-start.
Favorite CH (Favorite Channel Setting)
This function allows you to program 4 favorite channels, in 4 different categories. By setting the favorite channels in advance, you can select your favorite channels easily.
To register your favorite channel:
- Press MENU on the remote control and select "Initial Setup"/"Broadcasting Setup"/"Favorite CH".
- Press ▲/▼ to select the category that you want to store your favorite channel.
- Press ▲/▼ to select your desired channel and press ENTER button to confirm.
To delete your favorite channel
- Press MENU on the remote control and select "Initial Setup"/"Broadcasting Setup"/"Favorite CH".
- Press ▲/▼ to select "All data clear" and press ENTER to start clearing all favorite channel data.
NOTE
- While watching, you can toggle the selected channels by pressing the A,B,C, and D button on the remote control.
Language
You can also select a language from the Initial Setup menu. Select from among 3 languages: English, French and Spanish.
Reset
If complex adjustments are made and the settings cannot be restored to normal, you can reset the settings to the factory preset values.
NOTE
- The Channel Setup settings will not be changed.
- The Language settings will not be changed.
- The Secret number settings will not be changed.
- The TV Location settings will not be changed.
Individual Setup
Before entering the Individual Setup, user has to key in the Secret No. first.Enter a 4-digit Secret No. with the number buttons on the remote control. The default Secret No. is 0000.
Secret No.
Allows you to use a secret number to protect certain settings from being accidentally changed.
New Secret No.:
Enter a 4-digit Secret No. with the number buttons on the remote control to change your secret No. .
Confirm Secret No.:
Enter your new 4-digit Secret No. again to confirm.
NOTE
- As a precautionary measure, make a note of your secret number and keep it in a familiar place.
Parental CTRL (Parental Control Setting)
Status
Used to enable or disable the parental control function. This function will not be selectable from the menu if you do not first configure your secret number.
Yes: Enables Parental CTRL.
No: Disables Parental CTRL.
V-Chip(DTV Only)
The “V-Chip (DTV Only)” will only be selectable when a new rating system can be downloaded via digita broadcasting in the U.S.
V-Chip
V-CHIP is an electronic filtering device built into your TV. This tool gives parents a great degree of control over broadcasts accessed by their children. It allows parents to select programs judged suitable for child viewing while blocking ones judged not suitable. It does so automatically once you activate the V-CHIP feature in your TV. "V-Chip" and "Status" will not be selectable from the menu if you do not first configure your secret number.
- The U.S. has two rating systems for viewing content: TV Parental Guidelines and movie ratings.
- The TV Parental Guidelines work in conjunction with the V-CHIP to help parents screen out inappropriate television shows from their children.
- Movie ratings are used for original movies rated by the Motion Picture Association of America (MPAA) as watched on cable TV and not edited for television. The V-CHIP can also be set to block MPAA-rated movies.
NOTE
- The setting automatically enters "Block" for any ratings below your selection.
- If Status is not set to "On", the configuration settings will not work.
■ MPAA (Voluntary movie rating system)
Example

Press ▲/▼ to adjust the item to your desired position." 🔒 " indicates the item is blocked.
Press MENU to exit.
G: General audiences. All ages admitted.
PG: Parental guidance suggested. Some material may not be suitable for children.
PG-13: Parents strongly cautioned. Some material may be inappropriate for children under 13.
R: Restricted. Under 17 requires accompanying parent or adult guardian (age varies in some jurisdictions).
NC-17: No one 17 and under admitted.
X: X is an older rating that is unifi ed with NC-17 but may be encoded in the data of older movies.
NOTE
- Voluntary movie rating system only uses an age-based rating.
■ TV Parental Guidelines
Example
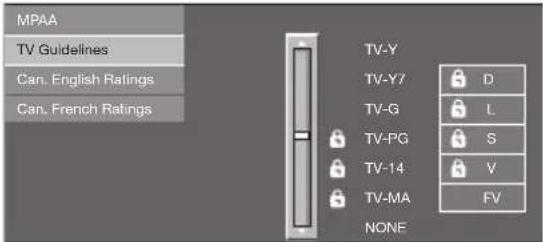
Press ▲/▼ to adjust the item to your desired position." 🔒 " indicates the item is blocked.
Press MENU to exit.
Suggested age
TV-Y: All children.
TV-Y7: Directed to older children.
TV-G: General audience.
TV-PG: Parental Guidance suggested.
TV-14: Parents strongly cautioned.
TV-MA: Mature audience only.
Example

When setting an individual content-based rating item:
- Press ▶ or ENTER to access blocked content items from the currently selected age-based rating item.
- Press ▲/▼ to select an individual item, and then press ENTER to unblock it ("☐" is removed). Repeat the same steps for the other items.
- Press ◀ or RETURN to register after all individual content rating items are set.
Content
FV: Fantasy violence.
V: Violence.
S: Sexual situation.
L: Adult language.
D: Sexually suggestive dialog.
| Rating | Content | |||||
| FV V | S L | D | ||||
| Suggested age | TV-Y | ☒ | ☒ | ☒ | ☒ | ☒ |
| TV-Y7 | ✕ | ☒ | ☒ | ☒ | ☒ | |
| TV-G | ☒ | ☒ | ☒ | ☒ | ||
| TV-PG | ✕ | ✕ | ✕ | ✕ | ||
| TV-14 | ✕ | ✕ | ✕ | ✕ | ||
| TV-MA | ✕ | ✕ | ✕ | |||
☒: The content rating can be set, but this rating is not normally broadcast by TV stations.
× : Content rating can be set.
Canadian Rating Systems (Canadian English ratings and Canadian French ratings)
- The TV rating systems in Canada are based on the Canadian Radio-Television and Telecommunications Commission (CRTC) policy on violence in television programming.
- While violence is the most important content element to be rated, the structure developed takes into consideration other program content like language, nudity, sexuality and mature themes.
- When setting the V-CHIP on the Canadian system you can choose either the Canadian English ratings or the Canadian French ratings.
■ Canadian English Ratings
Example

Press ▲/▼ to adjust the item to your desired position. " 🔊" indicates the item is blocked.
Press MENU to exit.
E: Exempt: Includes news, sports, documentaries and other information programming; talk shows, music videos, and variety programming.
C: Children: Intended for younger children under the age of 8 years. Pays careful attention to themes that could threaten their sense of security and well-being.
C8+: Children over 8 years old: Contains no portrayal of violence as the preferred, acceptable, or only way to resolve conflict; nor encourage children to imitate dangerous acts which they may see on the screen.
G: General: Considered acceptable for all age groups. Appropriate viewing for the entire family, contains very little violence, physical, verbal or emotional.
PG: Parental Guidance: Intended for a general audience, but may not be suitable for younger children (under the age of 8) because it could contain controversial themes or issues.
14+: Over 14 years: Could contain themes where violence is one of the dominant elements of the storyline, but it must be integral to the development of plot or character. Language usage could be profane and nudity present within the context of the theme.
18+: Adults: Intended for viewers 18 years and older and might contain depictions of violence, which while related to the development of plot, character or themes, are intended for adult viewing. Could contain graphic language and portrayals of sex and nudity.
■ Canadian French Ratings
Example

Press ▲/▼ to adjust the item to your desired position. " 🔒" indicates the item is blocked. Press
MENU to exit.
E: Exempt programming.
G: General: All ages and children, contains minimal direct violence, but may be integrated into the plot in a humorous or unrealistic manner.
8ans+: General but inadvisable for young children: May be viewed by a wide public audience, but could contain scenes disturbing to children under 8 who cannot distinguish between imaginary and real situations. Recommended for viewing with parent.
13ans+: Over 13 years: Could contain scenes of frequent violent scenes and therefore recommended for viewing with parent.
16ans+: Over 16 years: Could contain frequent violent scenes and intense violence.
18ans+: Over 18 years: Only for adult viewing. Could contain frequent violent scenes and extreme violence.
■ How to temporarily release the V-CHIP BLOCK
When the V-CHIP BLOCK is working and censors a broadcast, "V-CHIP HAS BEEN ACTIVATED." displays.
- Press ENTER while the V-CHIP is working, and then the secret number setting menu displays.
- Input the 4-digit secret number by using 0–9. At this time V-CHIP BLOCK temporarily releases.
■ Reactivating the temporarily released V-CHIP BLOCK
You can reactivate the temporarily released V-CHIP BLOCK as shown below.
- Select "Status" setting from the Parental CTRL menu to reactivate BLOCK. (See page 32.)
- Select "V-Chip" setting ("MPAA", "TV Guidelines", "Can. English Ratings" or "Can. French Ratings") from the Parental CTRL to reactivate BLOCK. (See pages 33 to 34.)
- Switch off the TV power.
NOTE
- Performing any of the three above will activate the V-CHIP BLOCK.
Information
Example
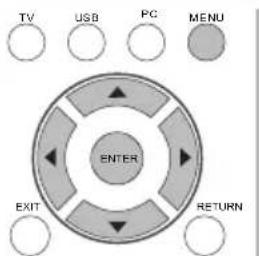
flowchart
graph TD
    A["ENTER"] --> B["EXIT"]
    A --> C["RETURN"]
    D["PC"] --> E["USB"]
    F["MENU"] --> G["TV"]
    F --> H["PC"]
- Press MENU to display the MENU screen, and then press ◀/▶ to select "Information".
- Press ▲ /▼ to select a specific adjustment item, and then press ENTER.
- Press ▲/▼ (or ◀/▶) to select the desired setting, and then press ENTER.
- Press MENU to exit.
Identification
The current version of the TV software is displayed.
Enjoying Photo/Music/Video Playback
You can connect the TV to a USB memory device, USB hard drive to enjoy viewing pictures, listening to music, and watching videos.
NOTE
TV may not be able to recognize the recorded data.
character set) may not be displayed.
Connecting a USB Memory Device/USB Hard Drive
photos, music or videos into the USB terminal on the TV.

a hard drive with an AC adapter.
CAUTION
connecting a USB memory device to the USB terminal on the TV.
memory device may prevent the TV from performing correctly.
Select the Files to Play Back
list or press USB direct button to enter it.

"Video", and then press ENTER.

and then press ENTER.
NOTE
displayed.
Playing Back Files on a USB Memory Device
Photo Mode
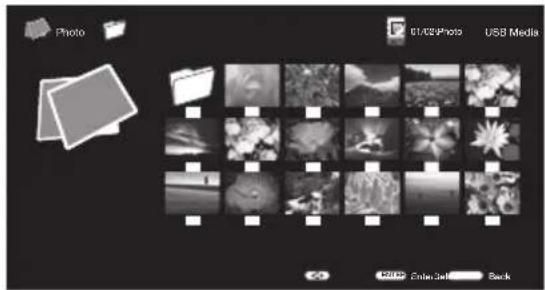
Buttons for thumbnails operations
| Buttons | Description |
| ▲/▼/◄/► | Select a desired item. |
| ENTER | |
| RETURN | Return to the previous process. |
| Menu |
Press MENU to display the sub-menu. You can browse the files by the following options.
- Sort
- Media Type
- Thumbnail size
NOTE
- When there are invalid photo files, the X mark will be display for the file.
- You can see the file name, shooting date, file size and pixel size of the selected photo in the top-left corner of the screen (shooting date is only available in the EXIF file format).
Slide Show
The photo selected on the thumbnail selection screen by press ENTER.
Example
![Photo 1x | [1] IMG_880.jpgNone Short 1/28 Menu Realization Effects/Audio ICP](/content/2026/05/1067123/images/c550ddfb0f8338f9fd6c10885ecad9c85e8dcb226b5cc7b3e81a451c7429ae84.jpg)
Buttons for slide show operation
| Buttons Description | |
| EXIT Return to the thumbnail selection screen. | |
| A (red) | Repeat one / Repeat all. |
| B (green) Select slider show interval. | |
| C (blue) Select slide show effect. | |
| D (yellow) | Play the photo in random order. |
| ◀◀ / ▶◀ | Go to the previous/next photo. |
| II | Viewing individual photo. |
| DISPLAY Display the information. | |
| Menu Sub Menu. | |
Press MENU to display the sub-menu. You can select the following options to display the photos.
- Pause
- Repeat
- Shuffle
- Duration
- Effect
• Show Info
NOTE
- The key guide display disappears automatically after a set time. To display the key guide display again, press DISPLAY.
Viewing Individual Photos
The photo in slide show by pressing Ⅱ. Example

Buttons for viewing Individual Photos operation
| Buttons Description | |
| EXIT Return to the thumbnail selection screen. | |
| A (red) | Repeat one / Repeat all |
| B (green) | Rotate the photo by 90 degrees to the right. |
| C (blue) Zoom photo. | |
| D (yellow) | Play the photo in random order. |
| ◀◀ / ▶◀ | Go to the previous/next photo. |
| ▶ | Slider show. |
| DISPLAY Display the information. | |
| Menu Sub Menu | |
Press MENU to display the sub-menu. You can select the following options to display the photos.
- Play
- Repeat
- Shuffle
- Rotate
- Zoom
• Show Info
NOTE
- The key guide display disappears automatically after a set time. To display the key guide display again, press DISPLAY.
- Rotating photos only applies to the temporarily selected item and this setting is not saved.
Music Mode
Example

Buttons for music mode
| Buttons Description | |
| ▲/▼/◄/ ► | Select a desired item. |
| ENTER | When selecting a folder icon: Enter this directory.When selecting a music file: Play music. |
| RETURN | Return to the previous process. |
| Menu | Sub Menu |
Press MENU to display the sub-menu. You can browse the files by the following options.
- Sort
- Media Type
- Thumbnail size
Example

| Buttons Description | |
| EXIT | Return to the thumbnail selection screen. |
| A(red) | Repeat one / Repeat all |
| B(green) | Play the music in random order. |
| D(yellow) | Display the information. |
| ◀◀ / ▶◀ | Go to the next/previous photo. |
| ◀◀ / ▶◀ | Forward/Backward. |
| ▶ / ∥ | Play/Pause. |
| DISPLAY | Display the information. |
| Menu | Sub Menu |
Press MENU to display the sub-menu. You can select the following options to play the musics.
- Pause
- Repeat
- Shuffle On
• Show Info - Hide Spectrum
- Lyric options
Video Mode
Example

Buttons for Video mode
| Buttons Description | |
| ▲/▼/◄/► | Select a desired item. |
| ENTER | When selecting a folder icon: Enter this directory.When selecting a video file: Play video. |
| RETURN | Return to the previous process. |
| Menu | Sub Menu |
Press MENU to display the sub-menu. You can browse the files by the following options.
- Sort
- Media Type
- Thumbnail size
Example
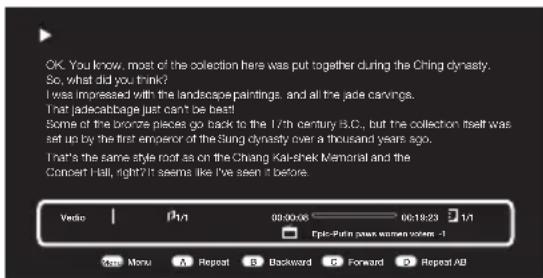
Buttons for playing VideoButtons for playing music
| Buttons Description | |
| EXIT | Return to the thumbnail selection screen. |
| A(red) | Repeat one / Repeat all |
| B(green) | Backward |
| C (blue) | Forward |
| D (yellow) | Repeat AB. Select the part you want to play repeatedly. |
| ◀◀ / ▶◀ | Go to the next/previous video. |
| ▶ / □□ / ■ | Play/Pause/Stop. |
| DISPLAY | Display the information. |
| Menu | Sub Menu |
Press MENU to display the sub-menu. You can follow the options to play the videos.
- Pause
- Repeat
- Program
• Show Info - AV Mode
- Title
- Edition
- Chapter
- View Mode
USB Device Compatibility
| USB device U | USB Memory, USB card reader (Mass Storage class), USB hard drive |
| FAT/FAT32/NTFS (USB hard drive only)File | |
| Photo file format | JPEG (.jpg .jpeg) Progressive JPEG (.jpg .jpeg) BMP (.bmp) PNG (.png) |
| Music file format | MP3 (.mp3)Bitrate: 32k, 40k, 48k, 56k, 64k, 80k, 96k, 112k, 128k, 160k, 192k, 224k, 256k, 320kbpsSampling frequency: 32k, 44.1k, 48kHz |
system
| Video file format | |||
| File extension | Container | Video Audio | |
| .avi AVI | XviDH.264MPEG4Motion JpegMPEG2MPEG1 | MP3AC3LPCMADPCM | |
| .mkv MKV | XviDH.264MPEG4MPEG2 | MP3AC3LPCMADPCM | |
| .asf | ASF | XviDH.264 | MP3AC3LPCMADPCM |
| .mp4 | MP4(SMP4) | XviDH.264MPEG4 | MP3AAC-LC/HEAAC |
| .mov | MP4(SMP4) | XviDH.264MPEG4Motion Jpeg | MP3AAC-LC/HEAAC |
| .mpg.mpeg | PS | MPEG2MPEG1 | AC3LPCM MPEG |
NOTE
• Operation using USB hubs is not guaranteed.
- Some video file formats may not be played depending on the file.
- Some images may not be displayed in the appropriate aspect ratio depending on the file format.
Troubleshooting
| Possible SolutionProblem | |
| No power | Check if you pressed POWER on the remote control unit. (See page 19.) If the indicator on the TV is still red, press POWER on the TV.Is the AC cord disconnected? (See page 8.)Has the power been turned on? (See page 19.) |
| Unit cannot be operated. | External influences such as lightning, static electricity, may cause improper operation. In this case, operate the unit after first turning off the power of the TV or unplugging the AC cord and re-plugging it after 1 or 2 minutes. |
| Remote control unit does not operate. | Are batteries inserted with polarity (+,-) aligned? (See page 10.)Are batteries worn out? (Replace with new batteries.)Are you using it under strong or fluorescent lighting?Is a fluorescent light illuminated near the remote control sensor? |
| Picture is cut off/with sidebar screen. | Are screen mode adjustments such as picture size made correctly? (See page 23.) |
| Strange color, light color, or color misalignment. | Adjust the picture tone. (See page 26 and 27.)Is the room too bright? The picture may look dark in a room that is too bright. |
| Power is suddenly turned off. | Is the sleep timer set? (See page 21.)The unit's internal temperature has increased. Remove any objects blocking vent. |
| No picture | Is connection to other components correct? (See page 16.)Is the correct input selected? (See page 14.) |
| No sound | Is the volume too low? (See page 21.)Have you pressed MUTE on the remote control unit? (See page 21.) |
| The TV sometimes makes a cracking sound. | This is not a malfunction. This happens when the cabinet slightly expands and contracts according to change in temperature. This does not affect the TV's performance. |
CLEARING THE MASTER PASSWORD
If you forgot the password number, reset the secret number by following the procedures below:
- Press MENU
- Select "InitialSetup", press "ENTER"
- Select "Individual Setup", press "ENTER"
- Press number 7071
- Select "Secret No."
- Enter new password
NOTE
- As a precautionary measure, make a note of your secret number above, cut it from this manual, and keep it in a safe place.
Cautions regarding use in high and low temperature environments
- When the unit is used in a low temperature space (e.g. room, office), the picture may leave trails or appear slightly delayed. This is not a malfunction, and the unit will recover when the temperature returns to normal.
- Do not leave the unit in a hot or cold location. Also, do not leave the unit in a location exposed to direct sunlight or near a heater, as this may cause the cabinet to deform and the Liquid Crystal panel to malfunction.
Storage temperature: -4°F to +140°F (-20°C to +60°C)
Specifications
| Item | Model: LC-40LE550U | ||
| LCD panel | Size | 40" Class ( 40" Diagonal ) | |
| Resolution 2,073,600 pixels (1,920 x 1080) | |||
| TV Function | TV-standard (CCIR) American TV Standard ATSC/NTSC System | ||
| Receiving Channel | VHF/UHF VHF 2-13ch, UHF 14-69ch | ||
| CATV 1-135ch (non-scrambled channel only) | |||
| Digital Terrestrial Broadcast (8VSB) | 2-69ch | ||
| Digital cable*1(64/256 QAM) | 1-135ch (non-scrambled channel only) | ||
| Audio multiplex BTSC System | |||
| 10 W x 2Audio out | |||
| Terminals | Side | RS-232C 9-pin D-sub male connector | |
| INPUT 1 HDMI in with HDCP, Audio in (∅ 3.5 mm stereo jack) | |||
| USB Photo/Music/Video mode, Software update | |||
| Rear | Headphone Headphone out | ||
| DIGITAL AUDIO OUTPUT | Optical Digital audio output x 1 (PCM/Dolby Digital) | ||
| ANT/CABLE | 75Ω Unbalance, F Type x 1 for Analog And Digital (VHF/ UHF/ CATV) | ||
| PC IN | ANALOG RGB (PC) in (15-pin mini D-sub female connector) | ||
| AUDIO PC/HDMI | Audio in (∅ 3.5 mm jack) | ||
| INPUT 2 HDMI in with HDCP, Audio in (∅ 3.5 mm stereo jack) | |||
| INPUT 3 HDMI in with HDCP, Audio in (∅ 3.5 mm stereo jack) | |||
| INPUT 4 | COMPONENT/ AV in | ||
| English/French/SpanishOSD language | |||
| Power Requirement | AC 120V, 60Hz | ||
| ON MODE POWER | 50W | ||
| 89W (0.5W Standby with AC 120V)Power Consumption | |||
| Weight | TV + stand 20.5 lbs. / 9.3 kg | ||
| TV only 18.5 lbs. / 8.4 kg | |||
| Dimension *2(W x H x D) | TV + stand | 36 ^5 / _6 x 23 ^3 / _64 x 9 ^7 / _64 inch | |
| TV only | 36 ^5 / _6 x 23 ^47 / _64 ^19 / _32 inch | ||
| Operating temperature +32°F to +104°F (0°C to +40°C) | |||
*1 Emergency alert messages via Cable are unreceivable.
*2 The dimensional drawings are shown on the inside back cover.
- As part of policy of continuous improvement, SHARP reserves the right to make design and specification changes for product improvement without prior notice. The performance specification figures indicated are nominal values of production units. There may be some deviations from these values in individual units.
PC Compatibility Chart
It is necessary to set the PC correctly to display XGA and WXGA signal.
| PC Resolution | Horizontal Frequency | Vertical Frequency | VESA Standard | ||
| PC | VGA | 720 x 400 31.46 kHz 70.08 Hz — | |||
| 640 x 480 | 31.47 kHz 59.94 Hz O | ||||
| 37.50 kHz 75.00 Hz O | |||||
| SVGA 800 x 600 | 37.88 kHz 60.32 Hz O | ||||
| 48.08 kHz 72.19 Hz O | |||||
| 46.88 kHz 75.00 Hz O | |||||
| XGA 1024 x 768 | 48.36 kHz 60.00 Hz O | ||||
| 56.48 kHz 70.07 Hz O | |||||
| 60.02 kHz 75.03 Hz O | |||||
| WXGA 1366 x 768 47.71 kHz 59.79 Hz O | |||||
| WUXGA 1920 x 1080 66.58 kHz 59.94 Hz O | |||||
RS232 Port Specifications
■ PC control of the TV
- Attach an RS-232C cable cross-type (commercially available) to the supplied Din/D-Sub RS-232C for the connections.
NOTE
- This operation system should be used by a person who is accustomed to using computers.
■ Communication conditions
Set the RS-232C communication settings on the PC to match the TV's communication conditions. The TV's communication settings are as follows:
| Baud rate: | 9,600 bps |
| Data length: | 8 bits |
| Parity bit: | None |
| Stop bit: | 1 bit |
| Flow control: None |
■ Communication procedure
Send the control commands from the PC via the RS-232C connector.
The TV operates according to the received command and sends a response message to the PC.
Do not send multiple commands at the same time. Wait until the PC receives the OK response before sending the next command.
Command format
Eight ASCII codes + CR

Command 4-digits
Parameter 4-digits
Return code
Command 4-digits: Command. The text of four characters. Parameter 4-digits: Parameter 0–9, x, blank, ?
Parameter
Input the parameter values, aligning left, and fi ll with blank(s) for the remainder. (Be sure that 4 values are input for the parameter.)
When the input parameter is not within an adjustable range, "ERR" returns. (Refer to "Response code format".) Any numerical value can replace the "x" on the table.
When “?” is input for some
commands, the present setting value responds.

■ Response code format
Normal response

Return code (0DH)
Problem response (communication error or incorrect command)

Return code (0DH)
Command table
- Commands not indicated here are not guaranteed to operate.
| CONTROL ITEM COMMAND P PARAMETER | CONTROL CONTENTS | ||||||||||
| POWER ON COMMAND SETTING | R | S | P | W | 0 | - | - | - | Off | The Power On command rejected. | |
| - | - | - | The Power On command accepted.1 On | ||||||||
| POWER SETTING | It shifts to standby.P O W R C _ Power Off | ||||||||||
| 1 | - | - | - | Power On | The Power On Command must be waited until system is completely Power Off (LED power indicator turns to be Red) | ||||||
| INPUT SELECTION A | TOGGLE | I | T | G | D | x | - | - | - | (Toggle) | It input-switches by the toggle. (It is the same as an input change key) |
| TV | I | T | V | D | C | - | - | - | It input-switches to TV. (A channel remains as it is. (Last memory)) | ||
| INPUT1-6 | I | A | V | D | * | - | - | - | Input terminal number (1-6) | It input-switches to INPUT1--INPUT8. | |
| AV MODE SELECTION | A | V | M | D | * | - | - | - | 0;TOGGLE), 1:STANDARD,2:MOVIE,3:GAME,4:PC,5:DYNAMIC,6:DYNAMIC(FIXED),7:USER | Although it can choose now, it is toggle operation in inside. | |
| VOLUME | V | O | L | M | * | ^ | - | - | Volume (0-100) | ||
| POSITION | H-POSITION | H | P | Q | S | * | * | - | - | Only PC mode. (0-100,menu display range+/-50) | The screen position variable ranges depend on the View Mode or the signal type. The ranges can be seen on the position-setting screen. |
| V-POSITION | V | P | Q | S | * | * | - | - | Only PC mode. (0-10,menu display range+/-20) | ||
| CLOCK | C | L | C | K | * | * | - | - | Only PC mode. (0-180,monu display range+/-90) | ||
| PHASE | P | H | E | E | * | * | - | - | Only PC mode. (0-40,mcnu display range+/-20) | ||
| VIEW MODE | W | I | D | F | * | - | - | - | 0;Toggle) 1:Normal 2:S.Strech 3:Strech 4:Zoom 5:Full Screen 6:Dot by Dot 7:Cinema) | 0: Although it can choose now, it is toggle operation in available items.1: Available in [AV] SD timing and [PC] except some timing (*1;2.3.4: Only available when [AV] signal is being input.5: Available in [AV] 720p and [PC] except 1280x720, 1920x1080 timing.6: Available in [AV] 1080i and 1080ip timing and [PC] except 1600x1200, 1280x1024[i.C-3/SW40U;and 1400x1350/LC-32SW40U,7: Only available in [PC] except some timing(*2)(1):1360x768, 1366x768, 1250x1024, 1400x1050, 1600x1200, 1920x1090(*2):1360x768, 1366x768, 1250x720, 1920x1060 | |
| MUTE | M | U | T | E | * | - | - | - | 0; (Toggle), 1: On, 2: Off | ||
| SURROUND | A | C | S | U | - | - | - | - | 0; (Toggle), 1: On, 2: Off | ||
| AUDIO SELECTION | A | C | H | A | x | - | - | - | (Toggle) | ||
| SLEEP TIMER | O | F | T | M | * | - | - | - | 0; Off, 1: OFF TIMER - 30 MIN., 2: OFF TIMER - 60 MIN.,3: OFF TIMER - 30 MIN., 4: OFF TIMER - 120 MIN. | ||
| CHANNEL | DIRECT CHANNEL (ANALOG) | D | C | H | * | * | - | - | The channel number of TV(1-135) | An input change is included if it is not TV display.In Air, 2-69ch is effective.In Cable, 1-135ch is effective. | |
| DIRECT CHANNEL (DIGITAL) | D | A | 2 | P | * | * | * | - | DIGITAL Air (Two-Part numbers, 2-digit plus 2-digit)(0100-9999) | ||
| D | C | 2 | U | * | * | - | - | (1-999) | DIGITAL Cable (Two- Part numbers, 3-digit plus 3-digit);Front half of DIGITAL CABLE CHANNEL NO. (Designate major channel) | ||
| D | C | 2 | L | * | * | - | - | (0-999) | DIGITAL Cable (Two-Part numbers, 3-digit plus 3-digit);Rear half of DIGITAL CABLE CHANNEL NO. (Designate minor channel) | ||
| D | C | 1 | 0 | * | * | * | * | (0-9999) | DIGITAL Cable (One-Part numbers, 5-digit, less than 10,000) | ||
| D | C | 1 | 1 | * | * | * | * | (0-8383) | DIGITAL Cable (One-Part numbers, 5-digit, more than 10,000) | ||
| CH UP | C | H | U | P | x | - | - | - | The channel number of TV +1 | If it is not TV display, it will input switch to TV (same function as CH A) | |
| CH DOWN | C | H | D | W | x | - | - | - | The channel number of TV -1 | If it is not TV display, it will input-switch to TV, I amne function as CHV i | |
| REMOTE CONTROL BUTTONS | R | C | K | Y | * | * | - | - | 0-9: 0-9, 10: dot, 11: ENT, 12: POWER, 13: DISPLAY,16: ■ ,19: ■ ,20: ■ ,21: ■ ,24: SLEEP, 27: CC,28: AV MODE, 32: FLASH/BACK, 31: MUTE, 32: VOL-,33: VOL + ,34: CI *, 35: CI*, 36: INPUT, 38: MENU,40: ENTER, 41: ▲ ,42: ▼ ,43: ▲ ,44: ▲ ,45: RETURN,46: EXIT, 48: SURROUND, 49: AUDIO, 50: A (red),51: B (green), 52: C (blue), 53: D (yellow), 54: FREEZE,60: TV, 61: USB, 62: PC. | ||
| CC | C | L | C | P | x | - | - | - | Toggle operation of a closed caption.(Toggle) | ||
NOTE
- If an underbar (_) appears in the parameter column, enter a space.
- If an asterisk (*) appears, enter a value in the range indicated in brackets under CONTROL CONTENTS.
- Any numerical value can replace the "x" on the table.
Legal notices
■ FCC Part 15
This device complies with Part 15 of the FCC Rules. Operation of this product is subject to the following two conditions: (1) this device may not cause harmful interference, and (2) this device must accept any interference received, including interference that may cause undesired operation.
This equipment has been tested and found to comply within the limits for a class B digital device, pursuant to Part 15 of the FCC Rules. These limits are designed to provide reasonable protection against harmful interference in a residential installation.
This equipment generates, uses, and can radiate radio frequency energy and, if not installed and used in accordance with the instructions, may cause harmful interference to radio communications. However, there is no guarantee that interference will not occur in a particular installation. If this equipment does cause harmful interference to radio or television reception, which can be determined by turning the equipment off and on, the user is encouraged to try to correct the interference by one or more of the following measures:
- Reorient or relocate the receiving antenna.
- Increase the separation between the equipment and receiver.
- Connect the equipment into an outlet on a circuit different from that to which the receiver is connected.
- Consult the dealer or an experienced radio/TV technician for help.
■ FCC warning
Changes or modifications not expressly approved by the party responsible for compliance with the FCC Rules could void the user's authority to operate this equipment.
■ Cables
Connections to this device must be made with shielded cables with metallic RF/EMI connector hoods to maintain compliance with FCC Rules and Regulations.
For location of the nearest Sharp Authorized Service, or to obtain product literature, accessories, supplies, or customer assistance, please call 1-800-BE-SHARP.
LIMITED WARRANTY
CONSUMER LIMITED WARRANTY
SHARP ELECTRONICS CORPORATION warrants to the first consumer purchaser that this Sharp brand Liquid Crystal Display product (the "Product"), when shipped in its original container, will be free from defective workmanship and materials, and agrees that it will, at its option, either repair the defect or replace the defective Product or part thereof with a new or remanufactured equivalent at no charge to the purchaser for parts or labor for the period(s) set forth below.
This warranty does not apply to any appearance items of the Product or if the serial number or model number affixed to the Product has been removed, defaced, changed, altered or tampered with. This warranty does not cover installation or signal reception problems. This limited warranty will not apply if the Product has been or is being used in a commercial setting or application; this warranty is meant solely for the non-commercial, household use of the Product by consumers in their home or residence. If you intend to or already use this Product for commercial purposes or in a commercial setting, there are warranties available to cover your use of this Product, the terms of which may vary. Please contact 1-800-BE-SHARP for further information.
In order to enforce your rights under this limited warranty, you should follow the steps set forth below. You must be able to provide proof of purchase to the servicer, which proof must include the date of purchase.
To the extent permitted by applicable state law, the warranties set forth are in lieu of, and exclusive of, all other warranties, express or implied. Specifically ALL OTHER WARRANTIES OTHER THAN THOSE SET FORTH ABOVE ARE EXCLUDED, ALL EXPRESS AND IMPLIED WARRANTIES INCLUDING THE WARRANTIES OF MERCHANTABILITY, FITNESS FOR USE, AND FITNESS FOR A PARTICULAR PURPOSE ARE SPECIFICALLY EXCLUDED. IF, UNDER APPLICABLE STATE LAW, IMPLIED WARRANTIES MAY NOT VALIDLY BE DISCLAIMED OR EXCLUDED, THE DURATION OF SUCH IMPLIED WARRANTIES IS LIMITED TO THE PERIOD(S) FROM THE DATE OF PURCHASE SET FORTH BELOW. THIS WARRANTY GIVES YOU SPECIFIC LEGAL RIGHTS. YOU MAY ALSO HAVE OTHER RIGHTS WHICH VARY FROM STATE TO STATE.
The warranties given herein shall be the sole and exclusive warranties granted by Sharp and shall be the sole and exclusive remedy available to the purchaser and only for the time periods set forth herein. No other representations or promises made by anyone are permitted. Correction of defects, in the manner and for the period of time described herein, shall constitute complete fulfillment of all liabilities and responsibilities of Sharp to the purchaser with respect to the Product, and shall constitute full satisfaction of all claims, whether based on contract, negligence, strict liability or otherwise. Sharp does not warrant nor shall Sharp be liable, or in any way responsible, for Products which have been subject to abuse (including, but not limited to, improper voltage), accident, misuse, negligence, lack of reasonable care, alteration, modification, tampering, misuse, improper operation or maintenance or any damages or defects in the Product which were caused by repairs or attempted repairs performed by anyone other than a Sharp authorized servicer. Nor shall Sharp be liable or in any way responsible for any incidental or consequential economic or property damage. Some states do not allow limits on warranties or on remedies for breach in certain transactions; in such states, the limits herein may not apply.
THIS LIMITED WARRANTY IS VALID ONLY IN THE FIFTY (50) UNITED STATES, THE DISTRICT OF COLUMBIA. AND PUERTO RICO
Model Specific Section
Your Product Model Number & Description:
LC-40LE550U LCD Color Television
(Be sure to have this information and Proof of Purchase available when you need service for your Product.)
Warranty Period for this Product:
Additional Exclusions from
Warranty Coverage (if any):
One (1) year parts and labor from date of purchase.
Image Retention resulting from a fixed image being displayed for long periods of time is not covered by this Limited Warranty (see Operation Manual on how to prevent this).
Service is provided by a Sharp Authorized Service Center in the United States. To find the location of the nearest Sharp Authorized Service Center, call Sharp toll free at 1-800-BE-SHARP. Sharp will provide instructions on service options available for your Product.
What to do to Obtain Service:
If it is deemed the Product is to be shipped for servicing, be sure it is insured and packaged securely. Please use two persons to carry the Product, transport it in original packaging or packaging that provides comparable protection of the Product, and ensure that the Product is covered to avoid scratches and damage. Sharp shall not be responsible for lost, stolen or misdirected mail or for damage to the product incurred during shipping.
For Products that are deemed in home service, a servicer will come to your location. If necessary, the servicer may remove the unit for repair at the service facility and return it once completed. In home service is not available in all areas and Sharp may, at our option, elect to provide transportation of the Product to and from an Authorized Service Center in those areas.
TO OBTAIN PRODUCT INFORMATION OR PURCHASE ACCESSORIES, CALL 1-800-BE-SHARP OR VISIT www.sharpusa.com
SHARP®
SHARP ELECTRONICS CORPORATION
Sharp Plaza, Mahwah, New Jersey 07495-1163
SHARP CORPORATION
LC-40LE550U
TV DE CRISTAL LÍQUIDO ESPAÑOL
SHARP ELECTRONICS CORPORATION
Sharp Plaza, Mahwah, New Jersey 07495-1163
TEL: 1-800-BE-SHARP
natural_image
Illustration of a person using a computer on a monitor, with a cable and plug nearby (no text or symbols)natural_image
Two people interacting at a kiosk, one holding a document (no visible text or symbols)natural_image
Black-and-white photo of three people smiling and interacting (no visible text or symbols)natural_image
Two people holding a large rectangular object indoors (no visible text or symbols)natural_image
Black-and-white photo of a smiling person sitting at a desk with a TV and small objects (no visible text or symbols)CÓMO REUBICAR UN TELEVISOR VIEJO EN EL HOGAR
CEA® Consumer Electronics Association
PRECAUCIÓN
natural_image
Technical line drawing of a mechanical or electrical component with no visible text, numbers, or symbols.IMPORTANTE:
natural_image
Technical line drawing of a mechanical component with directional arrows indicating movement (no text or symbols)natural_image
Technical line drawing of a mechanical component with directional arrows (no text or symbols)natural_image
Technical diagram of a mechanical assembly with a downward arrow indicating motion (no text or symbols present)
natural_image
Illustration of a person sitting at a desk facing a large screen, with no visible text or symbols.SHARP ELECTRONICS CORPORATION
Sharp Plaza, Mahwah, New Jersey 07495-1163
SHARP CORPORATION
- LC-40LE550U
- LIQUID CRYSTAL TELEVISION ENGLISH
- OPERATION MANUAL
- IMPORTANT INFORMATION
- CAUTION
- CAUTION:
- DECLARATION OF CONFORMITY:
- INFORMATION:
- TRADEMARKS
- IMPORTANT SAFETY INSTRUCTIONS
- Additional Safety Information
- Precautions when transporting the TV
- Caring for the Cabinet
- Caring for the Liquid Crystal panel
- CHILD SAFETY:
- PROPER TELEVISION PLACEMENT MATTERS
- THE CONSUMER ELECTRONICS INDUSTRY CARES
- TUNE IN TO SAFETY
- WALL OR CEILING MOUNT YOUR TELEVISION
- MOVING AN OLDER TELEVISION TO A NEW PLACE IN YOUR HOME
- Supplied Accessories
- NOTE
- Attaching/Detaching the Stand
- Quick Installation Tips
- Using the Remote Control Unit
- IMPORTANT:
- Antennas
- Connecting Antenna Cable
- Installing Batteries in the Remote Control Unit
- Contents
- IMPORTANT INFORMATION .... 1
- TRADEMARKS 2
- IMPORTANT SAFETY INSTRUCTIONS .... 3
- QUICK REFERENCE 7
- Contents 11
- Part Names 12
- Introduction to Connections 14
- Connecting to External Equipment 15
- Watching TV 19
- Direct Button Operation 21
- On-Screen Display Menu 24
- Enjoying Photo/Music/Video Playback 35
- Appendix 38
- Calling for Service 43
- Dimensional Drawings
- Anti-tip Auxiliary Screw Hole:
- Remote Control Unit
- Experiencing HD Images
- Types of Connection
- Displaying an External Equipment Image Display
- Connecting to External Equipment
- Connecting a Blu-ray Disc/DVD Player or HD Cable/Satellite Set-top Box
- ■ When using HDMI cable (INPUT 1, 2, or 3):
- ■ When using DVI-HDMI conversion cable (INPUT 1, 2, or 3):
- Connecting a Game Console, VCR, Camcorder or Cable/Satellite Set-top Box
- Connecting an Audio Amplifier
- ■ When using coaxial cable:
- Connecting an AV Amplifier
- Connecting a PC
- Turning On/Off the Power
- EZ Setup
- Initial Setup
- Language setting
- Location setting
- Air/Cable(Antenna setting)
- CH Search (Channel search)
- When "Air" or "Cable" is selected in Antenna setting:
- Start channel searching
- Completed
- Changing Channels
- Changing Volume
- INPUT
- MUTE
- SLEEP
- FLASHBACK
- SURROUND
- FREEZE
- AV MODE
- AUDIO
- ■ MTS/SAP stereo mode
- You can enjoy Hi-Fi stereo sound or SAP broadcasts when available.
- If stereo sound is difficult to hear.
- Examples: when receiving MTS and SAP
- ■ Digital broadcasting audio mode
- Example: when receiving Digital broadcasting
- Closed Captions (CC)
- Press CC.
- VIEW MODE
- Press VIEW MODE.
- ■ For HD programs
- ■ For 4:3 programs
- For USB-Video
- ■ For PC input mode
- Menu Items
- For TV Mode
- Picture Settings ......26
- Audio Settings 28
- Power Control 28
- System Options ......29
- Initial Setup ....31
- Information 34
- Connecting a USB Memory Device/
- Select the Files to Play Back ....35
- Playing Back Files on a USB Memory Device ...35
- On-Screen Display Menu Operation
- Menu Operation Button
- Using the remote control
- Using the control panel of the main unit
- Picture Settings
- AV MODE (Changing Pic.Quality)
- Example:
- OPC
- Advanced
- Color Temp. (Color Temperature)
- User:
- Active Contrast
- DI Film Mode
- Digital Noise Reduction
- Audio Settings
- Power Control
- No Signal Off
- Power Saving
- System Options
- Example
- View Option
- Change Audio
- MTS
- You can enjoy Hi-Fi stereo sound or SAP broadcasts where available.
- Digital broadcasting audio mode
- Audio Language
- Change CC
- Analog Closed Caption
- Digital Closed Caption
- Input Terminal Setting
- Audio Setup
- PC Input
- Auto Sync. (for Analog PC Input Mode Only)
- Fine Sync.
- Audio Select
- PC IN
- HDMI IN
- HDMI Setup
- Speaker
- Caption Setup
- Initial Setup
- Broadcasting Setup
- CH Setup
- Favorite CH (Favorite Channel Setting)
- To register your favorite channel:
- To delete your favorite channel
- Language
- Reset
- Individual Setup
- Secret No.
- New Secret No.:
- Confirm Secret No.:
- Parental CTRL (Parental Control Setting)
- Status
- V-Chip(DTV Only)
- V-Chip
- ■ MPAA (Voluntary movie rating system)
- ■ TV Parental Guidelines
- ■ Canadian English Ratings
- ■ Canadian French Ratings
- MENU to exit.
- ■ How to temporarily release the V-CHIP BLOCK
- ■ Reactivating the temporarily released V-CHIP BLOCK
- Information
- Identification
- Enjoying Photo/Music/Video Playback
- Connecting a USB Memory Device/USB Hard Drive
- Select the Files to Play Back
- Playing Back Files on a USB Memory Device
- Photo Mode
- Slide Show
- Viewing Individual Photos
- Buttons for viewing Individual Photos operation
- Music Mode
- Video Mode
- CLEARING THE MASTER PASSWORD
- Cautions regarding use in high and low temperature environments
- PC Compatibility Chart
- RS232 Port Specifications
- ■ PC control of the TV
- ■ Communication conditions
- ■ Communication procedure
- Command format
- Parameter
- ■ Response code format
- Command table
- Legal notices
- ■ FCC Part 15
- ■ FCC warning
- ■ Cables
- LIMITED WARRANTY
- CONSUMER LIMITED WARRANTY
- THIS LIMITED WARRANTY IS VALID ONLY IN THE FIFTY (50) UNITED STATES, THE DISTRICT OF COLUMBIA. AND PUERTO RICO
- Model Specific Section
- Warranty Period for this Product:
- What to do to Obtain Service:
- SHARP®
- SHARP ELECTRONICS CORPORATION
- SHARP CORPORATION
- TV DE CRISTAL LÍQUIDO ESPAÑOL
- CÓMO REUBICAR UN TELEVISOR VIEJO EN EL HOGAR
- PRECAUCIÓN
- IMPORTANTE:
Brand : SHARP
Model : LC40LE550U
Category : Television