
POA-FIL131 - Projector accessory SANYO - Free user manual and instructions
Find the device manual for free POA-FIL131 SANYO in PDF.


| Product Type | Air Filter |
| Brand | Sanyo |
| Model | POA-FIL131 |
| Compatibility | Select Sanyo projectors (e.g., PLC-X series) |
| Material | Polyester synthetic fiber |
| Dimensions (W x H x D) | 100 x 100 x 20 mm |
| Weight | 50 g |
| Color | White / light gray |
| Function | Filters dust and particles from projector airflow |
| Replacement Interval | Every 500 hours of projector use |
| Installation | Slide into filter slot without tools |
| Cleaning | Vacuum gently or rinse with water, dry thoroughly |
| Maintenance | Check monthly and replace when dirty |
| Safety | Do not operate projector without filter |
| Storage | Keep in dry, cool place away from sunlight |
| Package Contents | 1 x replacement filter |
Frequently Asked Questions - POA-FIL131 SANYO
User questions about POA-FIL131 SANYO
0 question about this device. Answer the ones you know or ask your own.
Ask a new question about this device
Download the instructions for your Projector accessory in PDF format for free! Find your manual POA-FIL131 - SANYO and take your electronic device back in hand. On this page are published all the documents necessary for the use of your device. POA-FIL131 by SANYO.
USER MANUAL POA-FIL131 SANYO
Filter prevents dust from accumulating on the optical elements inside the projector. Should the filter becomes clogged with dust particles, it will reduce cooling fans' effectiveness and may result in internal heat buildup and adversely affect the life of the projector. This projector has an electrically operated filter which helps you to replace the filter easily. The projector monitors the condition of the filter at all time and replaces a filter with a new one automatically when it detects the clogging.
If the projector reaches a time set in the timer setting (p.55), a Filter replacement icon (Fig.1) appears on the screen and the WARNING FILTER indicator on the top panel lights up (p.70). When you see this icon, replace the filter as soon as possible (pp.29, 51) and reset the Filter counter (p.58). If the filter is out of scroll and the projector reaches a time set in the timer setting, Fig. 2 appears on the screen, indicating that the filter cartridge replacement is necessary.
When the filter scroll is counted down to 1, the Last scroll icon (Fig.3) appears on the screen, indicating that there is one scroll left in the filter cartridge (p.55).
If the projector detects that the filter is clogged and no scroll is left in the filter cartridge, a Filter cartridge replacement icon (Fig. 4) appears on the screen and the WARNING FILTER indicator on the top panel lights up (p.70). When you see this icon, replace the filter cartridge (p.57) and reset the Filter counter (p.58) and the Scroll counter (p.58).
When the filter is being scrolled using the remote control (p.29) or the Filter control function in the setting menu (p.51), a Filter replacement icon and "Please wait..." message (Fig.5) appear on the screen and the WARNING FILTER indicator blinks slow (approx. 2 seconds ON, 2 seconds OFF) (p.69).
The WARNING FILTER indicator blinks fast when the projector detects an abnormal condition, the filter cartridge is not installed properly, or the filter scroll is not working properly (p.70).

Fig.1 Filter replacement icon

Fig.2

Fig.3 Last scroll icon

Fig.4 Filter cartridge replacement icon

Fig.5 Filter replacement icon and "Please wait..." message.
√Note:
- Fig.1, Fig.2, Fig.3, Fig. 4 and Fig.5 will not appear when the display function is set to "Off" (p.48), during "Freeze" (p.28), or "No show" (p.29).
- The filter cannot be rewinded.
- Do not use the filter cartridge with other projector. The filter counter and the scroll counter do not recognize the correct number of remaining scrolls of the used filter cartridge and the reset function cannot work properly. It may cause a
- The filter can be scrolled 9 times since the filter cartridgebreakdown.
has 10 scrolls. • Make sure - The filter cartridge is disposable. Do not clean and reuse the replacing the filter cartridge. If you replace the filter filter cartridge.
- Do not expose the filter cartridge to water or liquid, or it will be shut down automatically for safety purpose
may cause a breakdown. - Replace the filter cartridge after all the scroll is used up. Replace the filter counter in the setting menu after you replace the filter cartridge when there are some scrolls left in the filter cartridge, the filter counter and the scroll
• Always reset the filter counter in the setting menu after replacing the filter. If you forget to reset the filter counter, the projector cannot recognize the correct number of remaining scrolls and may cause a breakdown.
counter do not recognize the correct number of remaining scrolls and the reset function cannot work properly. It may cause a breakdown. - Do not forget to reset the filter counter and the scroll counter in the setting menu after replacing the filter cartridge. If you forget to reset the filter counter and the scroll counter, the projector cannot recognize the correct number of remaining scrolls and may cause a breakdown.
Replacing the Filter Cartridge
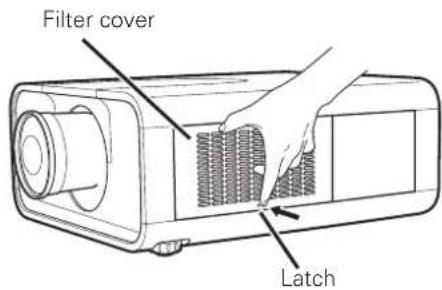
1 Turn off the projector, and unplug the AC power cord from the AC outlet.
2 First, clean up the dust on the projector and around the air vents.
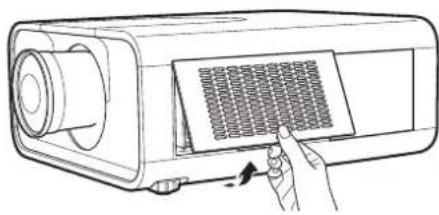
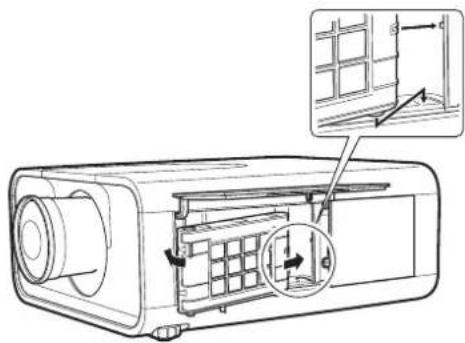
3 Press ▲ on the filter cover to release the latch and open the filter cover.
4 Pull out the filter cartridge. When taking out the filter cartridge, put your finger on the filter cartridge's tab and then pull.
5 Put the new one back into the position and close the filter cover. Make sure that the filter cartridge is properly and fully inserted.
6 Connect the AC power cord to the projector and turn on the projector.
7 Reset the filter counter and the scroll counter (p.58).

CAUTION
Make sure the filter cartridge is inserted in the projector. If the filter cartridge is not inserted, the projector cannot be turned on.
Do not put anything into the air vents. Doing so may result in malfunction of the projector.
RECOMMENDATION
We recommend avoiding dusty/smoky environments when operating the projector. Usage in these environments may cause a poor image quality.
When using the projector under dusty or smoky conditions, dust may accumulate on a lens, liquid crystal panels, or optical elements inside the projector. Such condition may degrade the quality of the projected image. When the symptoms above are noticed, contact your authorized dealer or service station for proper cleaning.
ORDER REPLACEMENT FILTER CARTRIDGE
Replacement filter cartridge can be ordered through your dealer. When ordering, give the following information to the dealer.
● Model No. of your projector
PLC-XP100L/ PLC-XP100BKL
● Replacement Filter Cartridge Type No.
Service Parts No. 610 334 3747
natural_image
Line drawing of a projector with a screen and hand interacting with it (no text or symbols)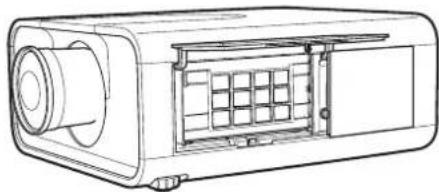
natural_image
Line drawing of a projector device with internal grid structure (no text or symbols)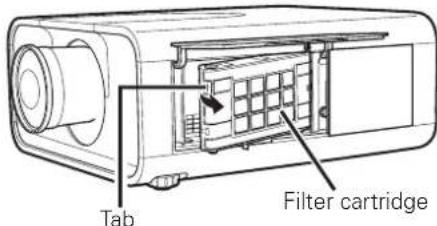
natural_image
Line drawing of a projector with internal grid structure and directional arrows indicating motion (no text or symbols)Resetting the Filter Counter
Be sure to reset the Filter counter after replacing the filter and the filter cartridge.
1 Press the MENU button to display the On-Screen Menu. Use the Point ◀▶ buttons to move the red frame pointer to the Setting Menu icon.
2 Use the Point ▲▼ buttons to move the red frame pointer to Filter counter and then press the SELECT button. A dialog box appears showing the Used time option and the Scrolls remaining option. Use the Point ▲▼ buttons to select Used time.
3 Used time shows the total accumulated time of the filter use, a timer setting option, and the Reset option. Select Reset and the "Filter counter Reset?" appears. Select [Yes] to continue.
4 Another confirmation dialog box appears, select [Yes] to reset the Filter counter.
Filter counter
![Filter counter 8VGA1 Used time Scrolls remainig Select "Used time" and the dialogue box below appears. 100 Hour(s) 400H Reset Select Reset and the "Filter counter Reset?" appears. Filter counter Reset ? Yes No Select [Yes], then another confirmation box appears. OK? Yes No Select [Yes] again to reset the Filter counter.](/content/2026/05/1067069/images/e5a300644acc4715ff77090b293de09b4b9b9c61af204c8d7372f0e8fcc7239f.jpg)
Resetting the Scroll Counter
Be sure to reset the Scroll counter after replacing the filter cartridge.
1 Press the MENU button to display the On-Screen Menu. Use the Point ◀▶ buttons to move the red frame pointer to the Setting Menu icon.
2 Use the Point ▲▼ buttons to move the red frame pointer to Filter counter and then press the SELECT button. A dialog box appears showing the Used time option and the Scrolls remaining option. Use the Point ▲▼ buttons to select Scroll(s) remaining.
3 Scroll(s) remaining shows the number of the remaining scrolls and the Reset option. Select Reset and the "Scroll counter Reset?" appears. Select [Yes] to continue.
4 Another confirmation dialog box appears, select [Yes] to reset the Scroll counter.
Scroll counter
![Filter counter 8VGA1 Used time Scrolls remaining Select "Scrolls remaining" and the dialogue box below appears. 9 Scroll(s) Reset Select Reset and the "Scroll counter Reset?" appears. Scroll counter Reset ? Yes No Select [Yes], then another confirmation box appears. OK? Yes No Select [Yes] again to reset the Scroll counter.](/content/2026/05/1067069/images/05c0a9f2719fa9919744634783ff94c11bd74b644c2666618b6af9606ee1dd7f.jpg)
Brand : SANYO
Model : POA-FIL131
Category : Projector accessory