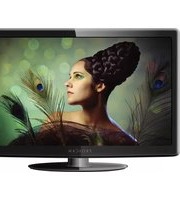
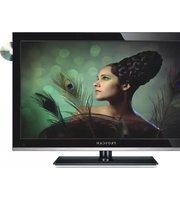
Proscan PLEDV1945A - Television CURTIS - Free user manual and instructions
Find the device manual for free Proscan PLEDV1945A CURTIS in PDF.


| Product Type | LED Television |
| Screen Size | 19.5 inches |
| Resolution | 1366 x 768 pixels |
| Aspect Ratio | 16:9 |
| Refresh Rate | 60 Hz |
| Power Consumption | 30 W (typical) |
| Power Supply | AC 100-240V, 50/60Hz |
| Dimensions (without stand) | 18.3 x 11.6 x 2.8 inches |
| Weight (without stand) | 5.5 lbs |
| Connectivity | 1x HDMI, 1x USB, 1x VGA, 1x Antenna, Audio Out |
| Tuner | ATSC / NTSC |
| Remote Control | Included |
| VESA Mount | 75 x 75 mm |
| Features | Teletext, Sleep Timer, Parental Lock, Closed Captions |
| Cleaning | Wipe with a soft, dry cloth |
| Safety | Place on a stable surface; avoid moisture |
| Spare Parts | Contact Curtis support for remote or stand |
| Repairability | Refer to qualified service personnel |
| General | User manual included (37 pages) |
Frequently Asked Questions - Proscan PLEDV1945A CURTIS
User questions about Proscan PLEDV1945A CURTIS
0 question about this device. Answer the ones you know or ask your own.
Ask a new question about this device
Download the instructions for your Television in PDF format for free! Find your manual Proscan PLEDV1945A - CURTIS and take your electronic device back in hand. On this page are published all the documents necessary for the use of your device. Proscan PLEDV1945A by CURTIS.
USER MANUAL Proscan PLEDV1945A CURTIS
PLEDV1945A
Table of Contents
Contents Page
Caution & Important Safety Precautions 1-2
Desktop TV Bracket Installation & Assembly 3-4
Getting Started 5
Front View 5
Rear View 6
Remote Control Key Functions 7
Select input source 8
Main Menu Description 9-10
Picture menu 11
Picture Settings 12
PC Settings 13
Advanced Picture Settings 14
SOUND MENU 15-17
Sound Settings 16
Equalizer Settings 17
CHANNEL MENU 18-21
Channel List 19
Favorite List 19
Auto Channel Search 20
Channel Setting 21
PARENTAL CONTROL 22-26
V-CHIP 23
TV Rating 24
Canada V-CHIP 25
CHANGE PASSWORD 26
Contents
Setup Menu 27
Closed Caption 27
Menu Language 27
Digital CC Style 28
Clock 29
OTHERS MENU 30
Blue Back 30
No Signal Power Off 30
All Reset 30
Audio Only 30
DVD 31-32
Help 33
Specifications 34
Caution

The lightening flash with arrowhead symbol, within an equilateral triangle is intended to alert the user to the presence of un-insulated "dangerous voltage" within the products enclosure that may be of sufficient magnitude to constitute a risk of electric shock to the persons.

The exclamation point within an equilateral triangle is intend to alert the user to the presence of important operating and maintenance (servicing) instructions in the literature accompanying the appliance.

Cor rect disposal of this Product
Waste Electrical & Electronic Equipment (WEEE)
Your product is designed and manufactured with high quality materials and components which can be recycled and reused.
This symbol means that electrical and electronic equipment, at their end-of-life, should be disposed of separately from your household waste.
Please dispose of this equipment at your local community waste collection/recycling centre.
In the European Union there are separate collection systems for used electrical and electronic products. Please help us to conserve the environment we live in!
Important Safety Precautions
1) Read these instructions.
2) Keep these instructions.
3) Heed all warnings.
4) Follow all instructions.
5) Do not use this apparatus near water.
6) Clean only with dry cloth.
7) Do not block any ventilation openings. Install in accordance with the manufacturer's instructions.
8) Do not install near any heat sources such as radiators, heat registers, stoves, or other apparatus (including amplifiers) that produce heat.
9) Do not defeat the safety purpose of the polarized or grounding-type plug. A polarized plug has two blades with one wider than the other. A grounding type plug has two blades and a third grounding prong. The wide blade or the third prong are provided for your safety, If the provided plug does not fit into your outlet, consult an electrician for replacement of the obsolete outlet.
10) Protect the power cord from being walked on or pinched particularly at Plugs, convenience receptacles, and the point where they exit from the apparatus.
11) Only use attachments /accessories specified by the manufacturer.
12) Use only with the cart, stand, tripod, bracket, or table specified by the manufacturer, or sold with the apparatus. When a cart is used caution when moving the cart/apparatus combination to avoid injury tip-over.

13) Unplug this apparatus during lightning storms or when unused for long periods of time.
Caution:
14) To reduce the risk of fire or electric shock, do not expose this apparatus to rain or moisture.2
15) The apparatus shall be disconnected from the mains by placing the power/standby switch in the standby position and unplugging the power cord of the apparatus from the AC mains receptacle.
16) The socket-out shall be installed near the equipment and shall be easily accessible.
17) This product should never be placed in a built-in installation such as a bookcase or rack unless proper ventilation is provided or the manufacture's instructions have been adhered to.
18) The apparatus shall not be exposed to dripping or splashing and that no objects filled with liquid, such as vases, shall be placed on the apparatus.
19) Do not place any sources of danger on the apparatus (e.g. liquid filled objects, lighted candles).
20) Wall or Ceiling Mounting - The appliance should be mounted to a wall or ceiling only as recommended by the manufacturer.
These servicing instructions are for use by qualified service personnel only. To reduce the risk of electric shock do not perform any servicing other than that contained in the operating instructions. unless you are qualified to do so.
Desktop TV Bracket Installation & Assembly
1 First put the TV on the table smoothly and put some soft cloth on the table to avoid scratching the screen.
2 Use the screw driver to take off the 4 pcs screws which are fixed on the bottom stand (the direction of the arrow, refer to the figure 1, figure 2). And take out the bottom stand (please keep the screws and bottom stand carefully)

Figure 1

Figure 2
- Mounting steps (See below figures 1 to 4 for details):
Step 1: Decide whether or not to use padding behind the wall mount brackets.
Step 2: Locate and fix the wall mount brackets with 4 studs into the wooden part of the plasterboard wall, Details see Figure4.
Step 3: Be sure that the wall mount brackets are level with each other.
Step 4: Hang the unit on the secured wall mount brackets.
To ensure a reliable and sturdy installation, please consult a professional installer before mounting the unit to the wall.
Moreover, the spacers can be used in combination to adjust unit's distance from the wall in order to match the mounted Flat-Panel TV. When using the 1/4", 1/2", 3/4", 1" padding, longer screws must be purchased.


Figure 4
Noted:
- The desktop TV bracket is optional, wall mount is not included in this package.
- We highly recommend using a qualified technician
- This products can be mounted on the plasterboard wall or other wall more better.
Note: Instruction manual for the TV stand assembly.
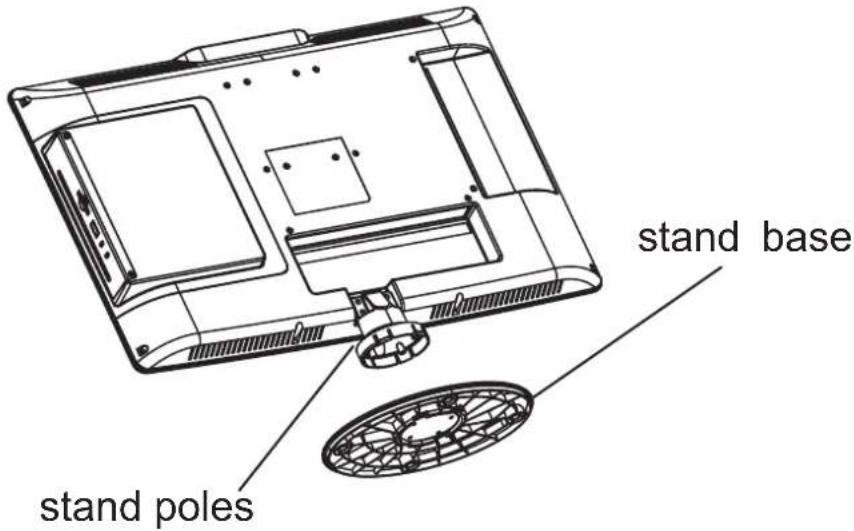
- To assemble the stand, the hooks on the stand poles should be fully inserted into the square holes on the stand base. (Please make sure keep same direction of the square holes and the hooks).
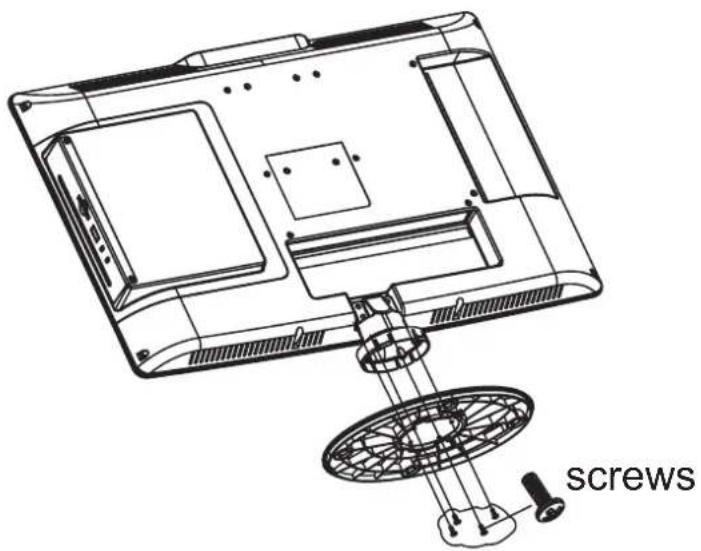
- Fix the stand and the stand poles with 4 pieces of BB3*8 screws
Getting started Front view


(IR) Infrared Receiver: Receives IR signals from the remote control. (Power on/Standby) LED Indicator: Press to turn on and off
Indicator on(Red) Indicator on(Green)
Standby mode Power on mode
The effective receiving scope for the signal is 5-8 meters from the front of the remote control window, and 30° to the left or right side and 20° above or below the control window.

- The functions of the buttons on the are as follows:TV
☐ : Turn on/standby the TV set.
SOURCE: External signal input selection and confirm the item selected.
MENU:
- Press Menu.
- Press SOURCE to enter.
- Use CH+/- to shift UP/DOWN.
- Press SOURCE to confirm, then press VOL+/-to adjust.
- Press SOURCE to confirm
CH+/-:When watching TV: select channels.
VOL +/-: Press to adjust the volume.
Rear view
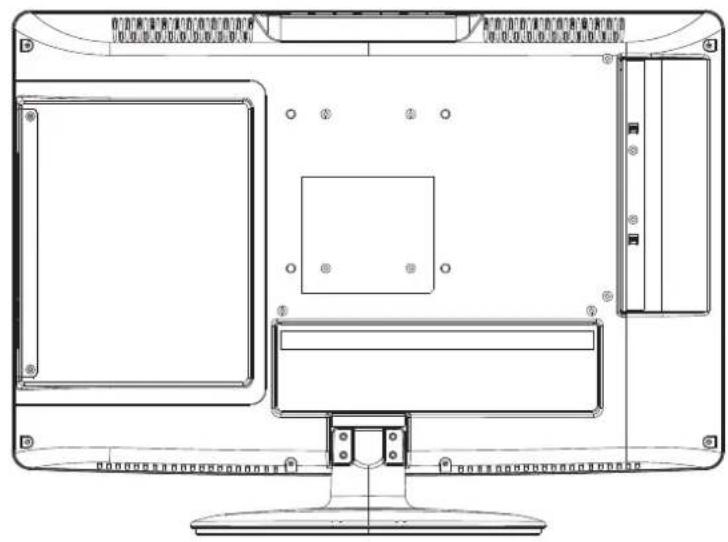

(Left Side)

(Back Side)
| Name | Function Description |
| Service Port | For Upgrade Use. |
| YPBPR | Connect to the composite terminal of your DVD/VCR |
| COAXIAL | Digital Audio Output |
| EARPHONE | Earphone output |
| PC AUDIO IN | PC audio input |
| ANT 75 Ω | Connect to ANT or cable source |
| VGA IN | VGA signal from computer output |
| AV INPUT | External AV signal input and relevant right/left sound channel |
| HDMI IN | Connect to HDMI of DVD or other equipment |
| POWER SOCKET | DC 12V ==4A |
Remote Control Key Functions

SELECT INPUT SOURCE
Input Source
Source Select
TV
AV
YPbPr
HDMI
PC
DVD
Press SOURCE to display the input source list.
Press ▲/▼ to select the input source and ENTER to confirm.
BASIC OPERATION
Main Menu

PICTURE

SOUND

CHANNEL

PARENTAL

SETUP

OTHERS
Press MENU to display the main menu or return to the previous menu or close the main menu. Press ◀/▶ to highlight the desired menu icon, and press ENTER to select.
If no buttons are pressed, the menu will close automatically after about 10 seconds.
Main Menu Description
Function
Description

PICTURE
Picture Settings

Screen Size
Normal
PC Settings
Color Temperature
Normal
Advanced Picture Settings

:Return

Move


:Go to Next Menu
Picture Menu
Adjust your picture settings. The operations are slightly different among different source. For details, see page11 to14.

SOUND
Sound Settings

Surround Mode

AVL
Analog Sound
Digital Sound
Digital Audio Output
PCM
Equalizer Settings

:Return

Move


Go to Next Menu

CHANNEL
ChannelList

Favorite List
Channel Settings
Air
Signal Type
Exeents
Auto Channel Search

:Return

Move

:Go to Next Menu
Sound Menu
Adjust the sound settings.
For details, see page15 to 17.
Channel Menu
Customize your channel settings.
For details, see page 18 to 21.
Function
Description

Parental Control Menu
Set program rating control and input source, keypad lock function
For details, see page 22 to 26.

Setup Menu
Select closed caption options, language and time.
For details, see page 27 to 29.

Other Menu
Set the OSD blue background, whether auto power off if no signal or no operation, clear all user settings, etc.
For details, see page 30.
Picture Menu

Press ▼/▲ to highlight one of the following options, then press ENTER or ▶ to enter next sub-menu to adjust it. Press EXIT to clear on-screen menu or MENU back to the previous menu.
Picture Settings Adjust the picture quality including brightness, contrast, color, tint, sharpness. For details, see page 12.
Screen Size Press ◀ /▶ to select the display aspect ratio till the picture is fit onto the screen. The options are different according to different input source. PC Wide/Dot by Dot. Dot by Dot means NOT any scaling to original input pixels size. AV/YPbPr/HDMI/TV Normal/Wide/Cinema/Zoom. Generally each aspect ratio is suitable for one input format. For example Normal is suitable to watch common TV program. Wide will do horizontal scaling on the wide panel. Cinema is for the 2.39:1 (perhaps marked as 2.40:1 on the disc) film. Zoom is suitable to view the analog TV which has wide(16:9) content on the 16:9 panel.
PC Settings The item is available only for PC DB15or PC DVI input mode, see page 13.
Color Temperature Press ◀/▶ to select the color temperature that you feel comfortable. Normal Basically will be accepted by most people. Cool means a high color temperature that will feel cool. Warm means a low color temperature that will feel warm.
Advanced Picture Settings The item is some special picture feature, see page 14.
Picture Settings

When Picture Mode is set to User, the following settings can be manually adjusted. Press PMODE shortcut button on the remote control to select picture mode directly.
Adjusting the values
Picture Mode
Highlight the item and Press ◀/▶ to select. Movie/Dynamic/Standard/User
Brightness/Contrast/Color/Tint/Sharpness
Highlight the item and press ▶, and a process bar appears, then press ◀/▶ to adjust the value. Tint is available when analog TV or NTSC-system AV. Press MENU to back the Picture Settings menu.

PC Settings
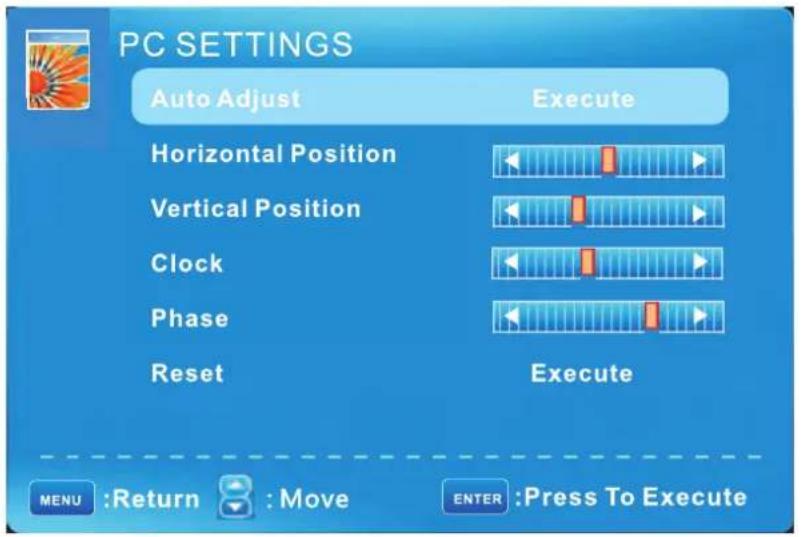
PC Settings Menu is available only in PC DB15 or DVI mode. When DVI signal input, only Horizontal Position and Vertical Position can be adjusted.
Press ▼/▲ to highlight one of the following options, then press ENTER to select it.

Auto Adjust Automatically adjust Clock, Phase, H-Position and V-Position settings. In order to get a good result, you should open a "filling the screen" picture before executing Auto Adjust.
Horizontal Position Shift the screen slightly to left or right.
Vertical Position Shift the screen slightly up or down.
Clock Adjust the DB15 picture signal sampling clock rate.
Phase Adjust the DB15 picture signal sampling phase. It may be affect the definition. Wrong value maybe result the interference.
Reset Reset the parameters of current menu to default value.
Advanced Picture Settings
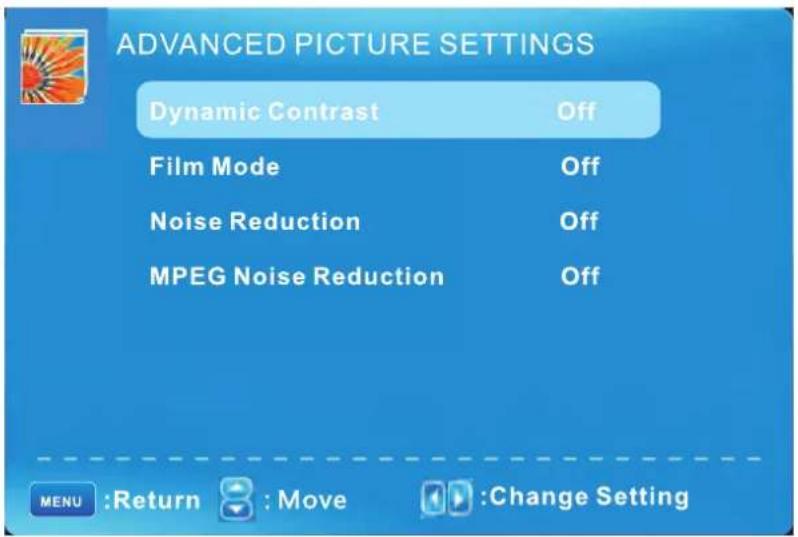
Press ▼/▲ to highlight the item and press ENTER or to display the sub-menu as following.
Dynamic Contrast Off/Low/Medium/High
The system will adjust the luminance curve by analyzing the picture content dynamically.
Film Mode Off/On
For the 2:2 or 3:2 format signal of cinema, enable special pixel process to reduce the flick of moving area.
Noise Reduction Off/Low/Medium/High
You can clear up analog TV signal by reducing the dot noise. This feature is not available at PC or Media source.
MPEG Noise Reduction Off/Low/Medium/High
Similar with the Noise Reduction, you can set to reduce the block noise.
Sound Menu

Sound Settings Set the sound mode, and Bass/Treble/Balance, see page 16.
Surround Mode Set to enjoy the virtual surround sound. Press ENTER to set or cancel.
AVL Auto Volume Level. Press ENTER to set or cancel. When AVL is set on, it will limit the sound being heard when sudden changes in volume occur during commercial breaks or channel changes. Usually be enabled at night.
Analog Sound Available at analog TV channels. SAP/Stereo/Mono
Set the preferred sound track of analog channels. Stereo and SAP exist on some channels.
Generally SAP is a second language sound or help the people with hearing impair.
Digital Sound Available at digital TV channels. English/French/Spanish
Set the preferred sound track of digital channels. French and Spanish exist on some channels.
Digital Audio Output PCM/Raw/Off
Set the audio output type of coax or optical terminal. Raw means output the original format of audio stream. PCM can be matched with most AV amplifiers.
Equalizer Settings Adjust the curve of 7 bands equalizer, see page 17.
Sound Settings

Sound Mode Standard/Dynamic/Soft/User
Only in User mode, the follow items can be adjusted.
Bass Adjust the low frequency band response.
Treble Adjust the high frequency band response.
Balance Adjust the level of sound coming from the left or right speaker.
Adjust the Bass/Treble/Balance
1 Set Sound Mode to User.
2 Highlight the item and press ▲/▼ to display the sub-menu, then press ◀/▶ to adjust the value.

Equalizer Settings

Mode Off/Rock/Pop/Jazz/User(only in User mode, the following can be manually adjusted.)
Adjust Equalizer Settings
Based on your favorites about which frequency band need to be adjusted, make small adjustment with certain frequency band at a time. Suggest NOT making too large changes.
1 Set Mode to User.
2 Press ▼ to select the first(100Hz) item, then press ◀/▶ to select the band to be turned.
3 Press ▼/▲ to adjust the value.
Channel Menu

Note: The menu is available only at TV source.
Channel List You can view all the channels and choose one quickly. For details of setting, see page 19.
Favorite List All of you favorite channels are listed in this menu, and you can choose them quickly. For details of setting, see page 19.
Channel Setting Set the favorite channels, skipped channels, label of channels, see page 21.
Signal Type Set to Air or Cable according to your antenna source. When set to Air, TV can catch 8VSB broadcasting signal. When set to Cable, TV can catch analog and clear 64QAM/256QAM broadcasting signal.
Auto Channel Search Highlight and press ENTER to start the auto searching, see page20.
Channel List

"ABC": Label of the Channel.
Press ▼/▲ to highlight a channel and press ENTER to view it.
Favorite List
The list shows channels that you set as favorite.
See" Channel Settings" on page 21 to understand how to set channels be favorite.

Auto Channel Search
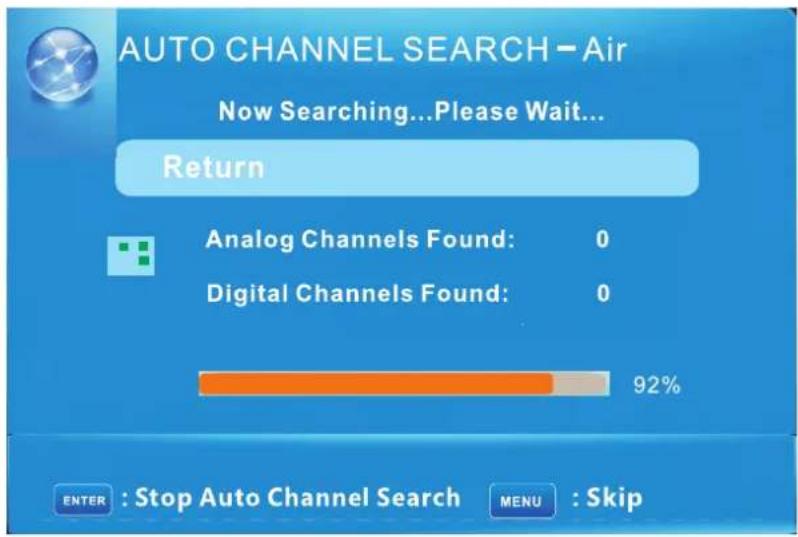
It will search analog channels first, then digital channels.
Before execute auto channel search, please confirm your antenna type is Air or Cable. Wrong setting of Signal Type maybe cause finding no channel. Found numbers do not include encryption programs.
Channel Settings

Skip Set the channel to be skipped when using CH+/Ch- to view channels.
Favorite Set the channel to your favorite list.
Label Rename label of the channel.
Change the settings
Skip & Favorite
1 Press ▼/▲ to select the channel you want to set.
2 Press ◀/▶ to highlight corresponding item, and press ENTER to set or cancel.
Label
1 Press ▼/▲ to select the channel and ENTER to enter the edit state.
2 Press ▼/▲ to select the character, press ◀/▶ to move the cursor. Total seven letters.
Parental Control
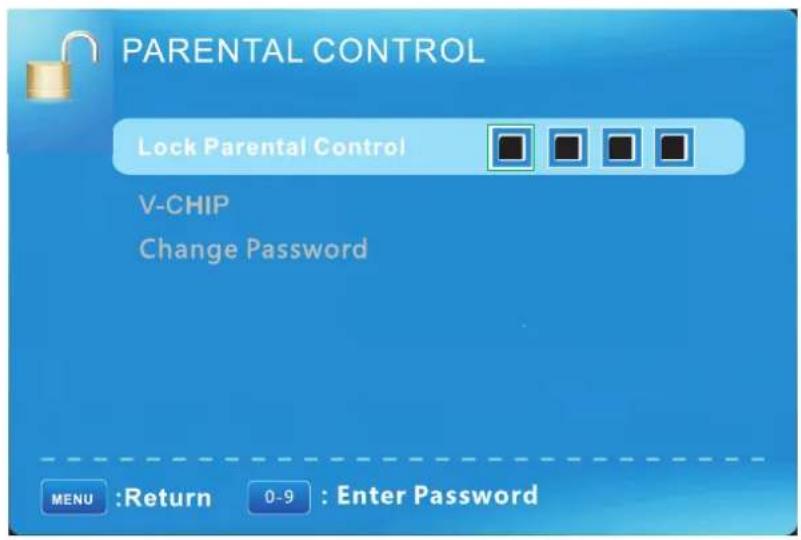
Note: The default user password is "0000", and if forget what you set, try "1470".
Lock Parental Control The following items are only available if the password input is correct.
V-CHIP Include below settings:
US V-Chip Rating system used at USA. See page 23.
Canada V-Chip Rating system used at Canada. See page 25.
Block UnRated Show Control whether lock the program that have not any valid rating flag.
Downloadable Rating Control the RRT5 setting which are valid only at some digital cable channels.
Clear Downloadable Data Select to clear the previous downloadable rating data.
Change Password Page26
US V-CHIP
For the United States, the rating setting basically include the following options: Movie Rating, TV Rating. (For Canada, see page23)
Moive Rating
This system defines the rating control which come from MPAA rules.

Rating Define
| G | General audience. All ages admitted. |
| PG | Parental guidance suggested. Some material may not be suitable for children. |
| PG-13 | Parents strongly cautioned. Some material may be inappropriate for children under 13. |
| R | Restricted. Children under 17 require accompanying parent or adult guardian. |
| NC-17 | No one 17 and under admitted. |
| X | Adult audience only. |
TV Rating
The TV rating compose of two aspects: age-based and content-based.
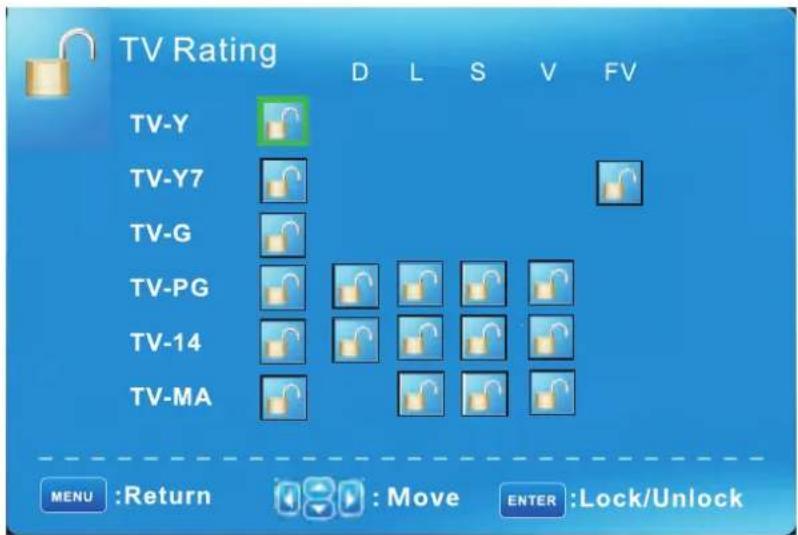
Age Define
| TV-Y | General audience |
| TV-Y7 | Parental guidance suggested |
| TV-G | Parents strongly cautioned |
| TV-PG | Retricted |
| TV-14 | No one 17 and under admitted |
| TV-MA | Adult audience only |
Content Define
| FV | Fantasy violence |
| D | Suggestive dialogue |
| L | Strong language |
| S | Sexual situations |
| V | Violence |
Note: The content ratings will increase depending on the level of the age-based rating. For example, a program with a TV-PG V(violence) rating may contain moderate violence, while a TV-14 V(violence) rating may contain intense violence. So locking a higher level option will automatically cause locking the options that has more sensitive level.
Canada V-CHIP
For Canada, the rating setting include the following options: English Rating, French Rating. (For the United States, see page22)
English Rating
These ratings are for programs which are using English rating system.
Rating Defined as
| C | Children |
| C8+ | Children 8 years and older |
| G | General programming |
| PG | Parental guidance |
| 14+ | Viewers 14 and older |
| 18+ | Adult programming |

French Rating
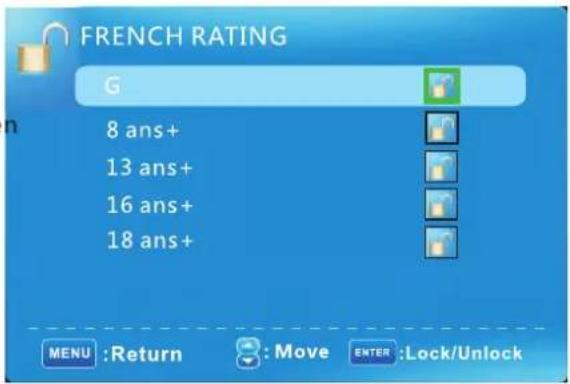
The ratings are for programs which are using French rating system.
Rating Defined as
| G | General |
| 8 ans+ | Not recommended for younger children |
| 13 ans+ | Not recommended for children under age 13 |
| 16 ans+ | Not recommended for ages under 16 |
| 18 ans+ | This program is restricted to adults |
Change Password

At first you should enter the correct old password then enter new password twice. If you lost your password, try to enter "1470".
Setup Menu

Closed Caption(CC) Include below options:
Caption Display Display or hide the CC.
Analog Caption Type Select from below closed-caption modes for analog programs. CC1,2,3,4 Displays corresponding caption channel of a analog program.(Usually be set to CC1 for most programs.) Text1,2,3,4 Displays corresponding text service channel of a analog program.
Digital Caption Type Applies only to digital channels with closed caption. Service1,2,3,4,5,6 These are different service data channels.
Digital CC Preset Default/Custom If set to Custom, Digital CC Style is available.
Digital CC Style
Menu Language Set the menu language. English/French/Spanish.
Clock Set the Time Zone/Auto Clock/Day of time/Daylight Saving, see page 29.
Digital CC Style
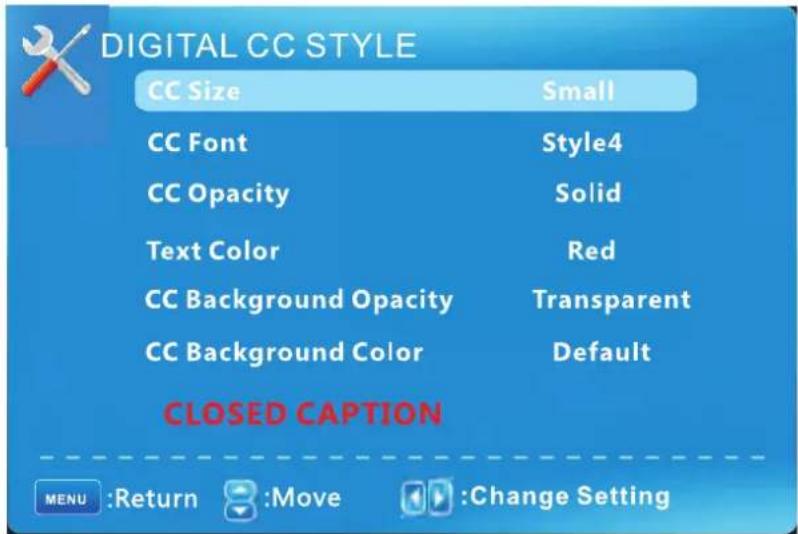
This menu is valid only for digital closed caption of digital channels.
CC Size Small/Standard/Large/Default
CC Font Style0\~7,Default
CC Opacity Flashing/Default/Solid/Translucent/Transparent/Default
Text Color Blue/Yellow/Red/Black/White/Green/Magenta/Cyan/Default
CC Background Opacity Flashing/Solid/Translucent/Transparent/Default
CC Background Color Blue/Yellow/Red/Black/White/Green/Magenta/Cyan/Default
Clock

Time Zone Hawaii/Alaska/Pacific/Central/Mountain/Eastern/Samoa/Newfounland/Altantic
Auto Clock If set it to ON, the TV will sync the local clock according to the DTV broadcasting time automatically. Otherwise you can set the time manually.
Setup Time Set Auto Clock to Off, then you can set the time manually.
Note: In the case of loss of power, the clock setting will be lost.
Day of Week The TV will calculate current day of week according to the time.
Daylight Saving Time When Auto Clock set to ON, this item is available to enable daynight saving option or not.
Ohters Menu
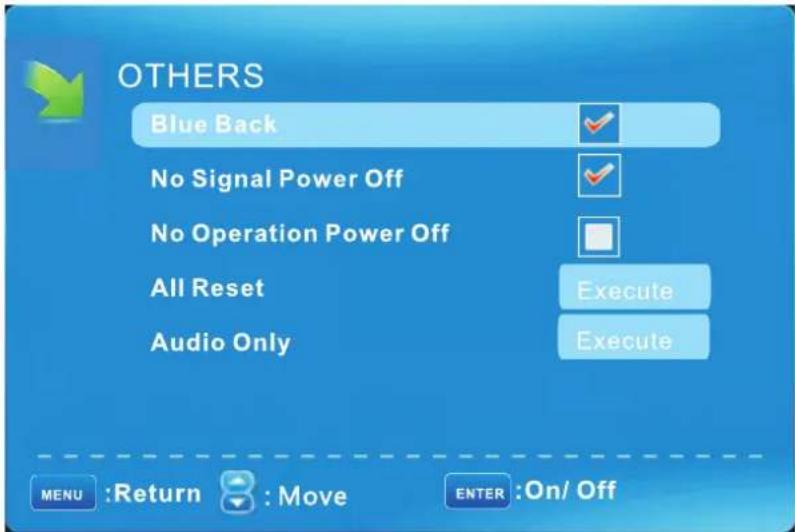
Blue Back Set the screen background color blue or not when no valid signal input. When analog TV input and has no signal, snow noise will display if this option is cleared.
No Signal Power Off If it is set, TV will automatically enter standby after 10 minutes without signal input.
No Operation Power Off If it is set, TV will automatically enter standby after 3 hours without any operation.
All Reset When you highlight the item, the system will note you that" Attention! If [All Reset] was executed, TV system is reset", and if you are sure to reset, press ENTER to reset.
Audio Only When you highlight the item, the system will note you that "Attention! Hold on power key 3 second to restore video", and if you are sure not need to view (backlight is turned off), press ENTER to confirm. As the attention, if you want to wake up the video, please hold on the power button for 3 seconds.
DVD
DVD SETUP
Press the "D.Setup" button to enter the DVD settings menu, use the "buttons" to select the desired menu page (General / Audio / Dolby / Video / Preferences), and use "buttons" to select the items in each menu, then use "buttonto" enter the selected item. If you then change any setting, press "ENTER" button to confirm the value you changed. Press the "button" to return to the left submenu; to go back up to one of the main DVD menu pages, press "EXIT" button.
1.General Setup Page
Osd Language:Set the language of the setup menu and screen display.
Screen saver:Set the screen protection.
Last Memory: Remember and resume from the position of the previous playback.

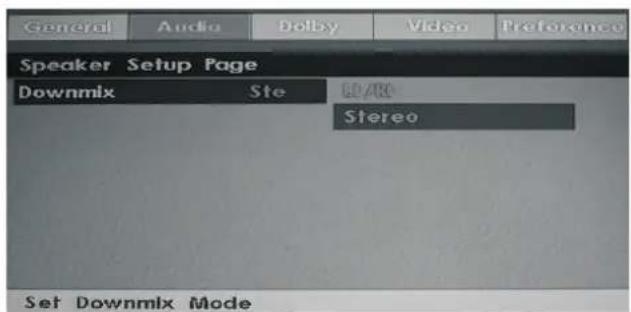
2.Speaker Setup Page
Downmix: This is DVD L/R and stereo output, default as stereo output.
DVD
3.Dolby Digital Setup
Dynamic: Adjust sound dynamic range

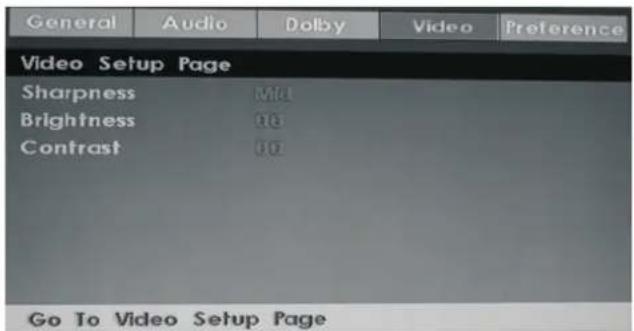
4. Video Setup Page
Sharpness: adjust the sharpness of the image.
Brightness: adjust the brightness of the image.
contrast:adjust the contrast of the image.
5. Preference Page (Note: This menu page will pop up before put the disc into DVD.)
TV Type: Select the local TV system (PAL/NTSC/Auto; Australia uses PAL)
Audio: Disc audio language selection (disc dependent)
Subtitle: Disc subtitle language selection (disc dependent)
Disc Menu: Disc Menu language selection (disc dependent)
Parental: Set the maximum disc rating (G / PG / M etc.) that can be viewed without a password (default password is 0000)
Password: Change the password
Default: Choose this to restore the original default Preference settings

| No Power | ·Check the AC Adaptor of LED TV is plug in or not. If still no power, please Pull out the plug and replug in after60 seconds. And turn on the TV again. |
| Signal receive not properly | ·To cause double image or phantom if there has high building or high mountain round TV. You can adjust image effect by manually operation: consult instruction of vernier regulation or change the direction of external antenna.·If you use the indoor antenna . under certain circumstance, receive will be more difficult .So you can change the direction of the antenna to adjust the image effect . If can't change image receiving effect either , you have to use external antenna. |
| No picture | ·Check the antenna at the back of LED TV is connected properly or not.·Try to select other channels and check whether the TV problem itself or not |
| Video is ok ,but without audio | ·Increase the volume.·Check the TV is in mute mode or not , and please press the mute button to make sound resume. |
| Audio is ok, but color error or no picture. | ·Increase contrast and brightness. |
| snow statics picture and noise | ·Check the antenna at the back of TV is connected or not . |
| Level broken line | ·Maybe has electrical appliance interfere, such as hair drier, vacuum cleaner and so on, please turn off these kinds of electrical appliance. |
| Dual-Image or "simulacrum" The LED TV no response with the Remote. | ·Perhaps the location for the antenna is not good. Use the tall beamed antenna can be improved quality of the display image.·Operate the remote direct to the remote sensor on the TV. If still no response for the TV, please check if the plastic bag on the remote take or not. And check if the location for the battery is correct. Change the new battery.·The TV will shift to the STAND BY if no response from the remote in the few minutes. |
| NO Video In. (PC Mode) | ·Please check if the display cable connect to the VGA correcte .·Please check if there has the bend on the display cable. |
| Vertical twinkling (PC Mode) | ·Enter the main menu, Use the clock regulator for the Video display noise to eliminate the vertical line. |
| horizontal ripping (PC Mode) | ·Adjust the Audio sound horizontal in the main menu to clear the horizontal ripping line. |
| The screen is too bright or too dark (PC Mode) | ·Adjust the contrast ratio or brightness in the main menu. |
| PC Function no response | ·Check the computer setting in the state of compatible display resolution |
| Ripping line in RCA connecting | ·Please use good quality connecting cable. |
| Problem still exist | ·Unplug the power adaptor and wait for 30 seconds then connect. If there is some problem with our TV, do not repair it by yourself, please contact with the customer service center. |
Note: There will be complete picture and the brightness will come down if the TV is in the static picture for too long time, So please do not keep the TV in a state of same Menu or same picture that has much difference in brightness and contrast ratio for too long time.
VGA
| Resolution | 640x480 800X600 1024x768 | 1360x768 | |
| Vertical frequency hz | 60HZ60HZ60HZ 60HZ | ||
HDMI
| Format | 480 i/P | 576 i/P | 720 P | 1080 i |
| Vertical frequency hz | 60HZ | 50HZ 50HZ/60HZ | 50HZ/60HZ |
Parameter specification
| TV system | NTSC / ATSC |
| Video system | PAL, NTSC |
| Preset Channels | AIR:2-69 CABLE:1-135 |
| Input/Output | IN:TV, AV, YPBPR, PC AUDIO, EARPHONE, HDMI.OUT: COAXIAL,EARPHONE. |
| Speaker Output | 3W+3W |
| Power requirement | DC 12V ---4A |
| Power consumption | 48W |
| Accessories | User's manual Remote controller AC adapter2 x AAA Batteries |
NOTE:
This user's manual is for reference only .Specifications are subject to change without notice

- TABLE OF CONTENTS
- CONTENTS PAGE
- CONTENTS
- CAUTION
- COR RECT DISPOSAL OF THIS PRODUCT
- IMPORTANT SAFETY PRECAUTIONS
- DESKTOP TV BRACKET INSTALLATION & ASSEMBLY
- NOTED
- NOTE: INSTRUCTION MANUAL FOR THE TV STAND ASSEMBLY
- REMOTE CONTROL KEY FUNCTIONS
- SELECT INPUT SOURCE
- INPUT SOURCE
- SOURCE SELECT
- BASIC OPERATION
- MAIN MENU
- MAIN MENU DESCRIPTION
- FUNCTION
- DESCRIPTION
- PICTURE
- PICTURE MENU
- SOUND
- CHANNEL
- SOUND MENU
- CHANNEL MENU
- PARENTAL CONTROL MENU
- SETUP MENU
- OTHER MENU
- PICTURE SETTINGS
- ADJUSTING THE VALUES
- PICTURE MODE
- BRIGHTNESS/CONTRAST/COLOR/TINT/SHARPNESS
- PC SETTINGS
- ADVANCED PICTURE SETTINGS
- DYNAMIC CONTRAST OFF/LOW/MEDIUM/HIGH
- FILM MODE OFF/ON
- NOISE REDUCTION OFF/LOW/MEDIUM/HIGH
- MPEG NOISE REDUCTION OFF/LOW/MEDIUM/HIGH
- SOUND SETTINGS
- ADJUST THE BASS/TREBLE/BALANCE
- EQUALIZER SETTINGS
- ADJUST EQUALIZER SETTINGS
- CHANNEL LIST
- FAVORITE LIST
- AUTO CHANNEL SEARCH
- CHANNEL SETTINGS
- CHANGE THE SETTINGS
- SKIP & FAVORITE
- LABEL
- PARENTAL CONTROL
- US V-CHIP
- MOIVE RATING
- TV RATING
- CANADA V-CHIP
- ENGLISH RATING
- FRENCH RATING
- CHANGE PASSWORD
- DIGITAL CC STYLE
- CLOCK
- OHTERS MENU
- DVD
- DVD SETUP
- 1.GENERAL SETUP PAGE
- 2.SPEAKER SETUP PAGE
- 3.DOLBY DIGITAL SETUP
- VIDEO SETUP PAGE
- PREFERENCE PAGE (NOTE: THIS MENU PAGE WILL POP UP BEFORE PUT THE DISC INTO DVD.)
- NOTE
Brand : CURTIS
Model : Proscan PLEDV1945A
Category : Television