
CSP652 - Loudspeaker PHILIPS - Free user manual and instructions
Find the device manual for free CSP652 PHILIPS in PDF.


| Product Type | Portable Bluetooth Speaker |
| Brand | Philips |
| Model | CSP652 |
| Dimensions (W x H x D) | 200 x 100 x 100 mm |
| Weight | 0.5 kg |
| Power Source | Built-in rechargeable battery (USB charging) |
| Battery Life | Up to 6 hours |
| Connectivity | Bluetooth, AUX-in, USB port |
| Audio Output | 10W RMS |
| Frequency Response | 100 Hz - 20 kHz |
| Controls | Power, Volume, Play/Pause, Next/Previous |
| Compatible Devices | Smartphones, tablets, laptops |
| Additional Features | Hands-free calling, FM radio |
| Cleaning Instructions | Wipe with a dry cloth. Do not use liquids. |
| Safety | Keep away from water and extreme temperatures. |
| Spare Parts | Contact Philips customer service for replacement parts. |
| Repairability | User-replaceable battery module |
| Package Contents | Speaker, USB cable, AUX cable, user manual |
Frequently Asked Questions - CSP652 PHILIPS
User questions about CSP652 PHILIPS
0 question about this device. Answer the ones you know or ask your own.
Ask a new question about this device
Download the instructions for your Loudspeaker in PDF format for free! Find your manual CSP652 - PHILIPS and take your electronic device back in hand. On this page are published all the documents necessary for the use of your device. CSP652 by PHILIPS.
USER MANUAL CSP652 PHILIPS
Register your product and get support at
www.philips.com/welcome

natural_image
Product photo of a multi-tiered speaker with two speakers and a power supply unit (no visible text or symbols)CSP550

natural_image
Product photo of a multi-tiered speaker with two speakers and a power supply unit (no visible text or symbols)CSP652

natural_image
Product photo of a multi-tiered speaker assembly with visible brand logos (no text or symbols on main components)CSP650
EN User manual
Contents
1 Important 4
Safety 4
Notice 4
2 Your car stereo speakers 5
Introduction 5
What's in the box 5
3 Installation 6
Mount the woofer 6
Mount the Tweeter 7
Mount the network 8
Connect the woofer/tweeter to the
network 9
4 Product information 10
5 Troubleshooting 11
1 Important
Safety
Read and understand all instructions • before you use the apparatus. If damage is caused by failure to follow instructions, the warranty does not apply.
Use only the supplied mounting hardware • for a safe and secure installation.
Do not continuously use the speaker • system beyond the peak power handling capacity.
Keep credit cards, watches, recorded • tapes etc. with magnetic coding away from the speaker system to prevent damage caused by the magnets in the speakers.
Clean the apparatus with soft, damp • cloth. Never use substances such as alcohol, chemicals or household cleaners on the apparatus.
Notice
Environmental information
All unnecessary packaging has been omitted. We have tried to make the packaging easy to separate into three materials: cardboard (box), polystyrene foam (buffer) and polyethylene (bags, protective foam sheet.)
Your system consists of materials which can be recycled and reused if disassembled by a specialized company. Please observe the local regulations regarding the disposal of packaging materials, exhausted batteries and old equipment.
Any changes or modifications made to this device that are not expressly approved by Philips Consumer Lifestyle may void the user's authority to operate the equipment.
2009 © Koninklijke Philips Electronics N.V. All rights reserved.
Specifications are subject to change without notice. Trademarks are the property of Koninklijke Philips Electronics N.V. or their respective owners. Philips reserves the right to change products at any time without being obliged to adjust earlier supplies accordingly.
2 Your car stereo speakers
Congratulations on your purchase, and welcome to Philips! To fully benefit from the support that Philips offers, register your product at www.philips.com/welcome.
Introduction
With the woofers and tweeters, you can enjoy high power music with vivid sound.
What's in the box
Check and identify the contents of your package:
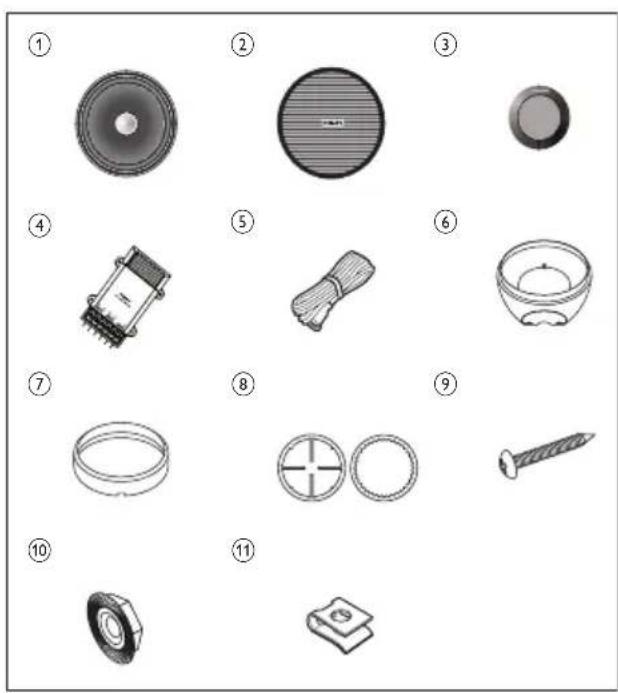
① Woofer (x2)
② Grille assembly (x2)
③ Tweeter (with wire) (x2)
④ Network (x2)
⑤ Speaker wire (x4)
⑥ Angle adapter (x2)
⑦ Fix frame (x2)
⑧ Mounting bracket (x4)
⑨ Screw
⑩ Screw nut
⑪ Shrapnel
3 Installation
A depth of at least 52mm is required to mount the woofer and a depth of at least 19mm is required to mount the tweeter. Measure the depth of the area where you are to mount the woofer/tweeter, and ensure that the woofer/tweeter does not obstruct any other components of the car.

Note
Make sure that nothing obstructs around the mounting location of the door.
•A hole for mounting may already be cut out of the inner panel of the door (front or rear). In this case, you need to modify the board only.
- Ensure that the speaker terminals, frame or magnet do not interfere with any inner parts, such as the window mechanism in the door (when you open or close the window), etc.
Also ensure that the speaker grille does not touch any inner fittings, such as the window cranks, door handles, arm rests etc.
Mount the woofer
Option 1: Mount on door (front or rear)
You can mount the woofers on the front/rear door of your car.

natural_image
Line drawing of a car interior showing the seat, dashboard, and window (no text or symbols)1 Turn off the car ignition key.
If the power is on, the click noise
generated by the connection may
damage the speakers.
2 Cut out the mounting template from the packing box and paste it on the location selected for mounting the woofer.
3 Mark the cut-off hole and the 4 bolt holes.

4 Cut out the marked area and drill the bolt holes.

natural_image
Illustration of a power tool with a circular component and a pair of pins (no text or symbols)5 Remove the grille net.
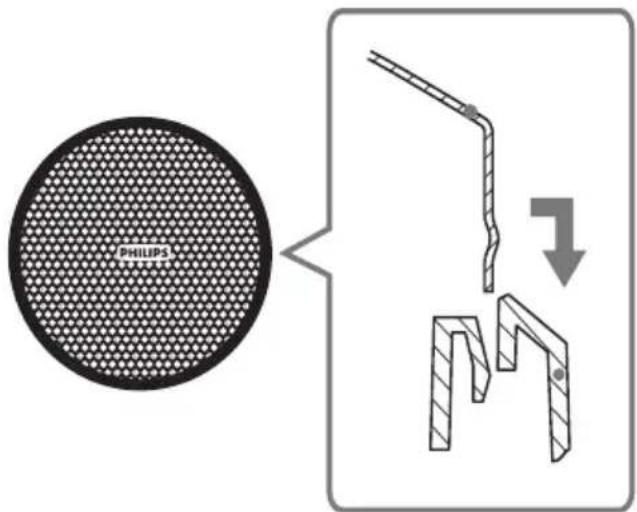
6 Connect the woofers to the network or car audio (see "Connect the woofer/tweeter to the network" section).
7 Mount on the speaker as shown below.
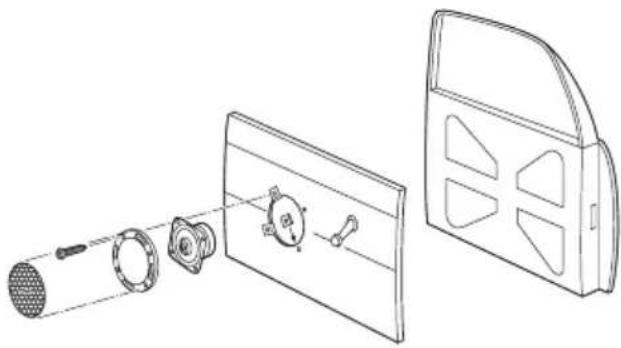
natural_image
Technical line drawing showing exploded view of a mechanical component with no visible text or symbols8 Press and insert the edges of the grille net.
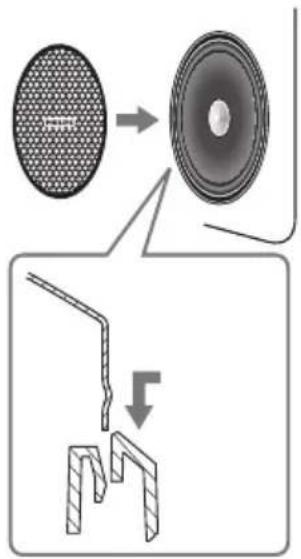

Tip
The speaker grille can be mounted without the grille net, if you like.
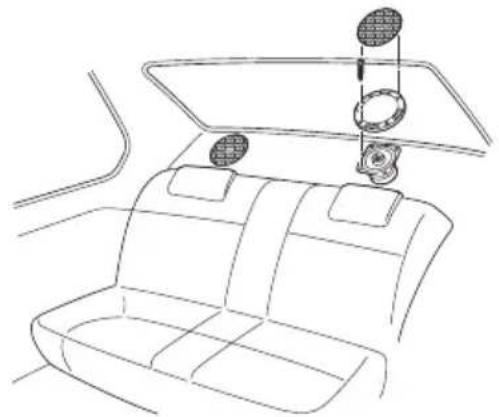
Option 2: Mount on rear tray
You can also mount the woofers into the surface of the rear tray.
natural_image
Line drawing of a car backseat with seat covers and overhead door panel (no text or symbols)Follow the steps in section "Option 1: Mount in door" to mount the speakers into the rear tray.
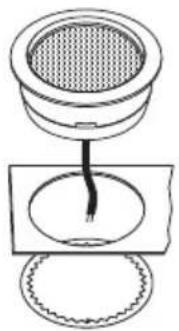
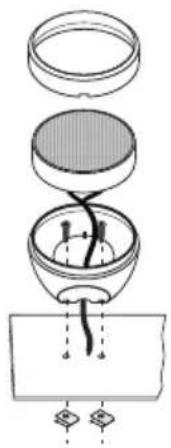
Mount the Tweeter
Follow steps mentioned in "Mount the woofer" section to mount the tweeters.
Option 1: Flush mounting
natural_image
Diagram of a mechanical setup with a meshed component and a curved base, no text or symbols present.Option 2: Flush mounting

natural_image
Diagram of a mechanical device with a top component and internal components, no visible text or symbolsOption 3: Surface mounting

natural_image
Diagram of a mechanical assembly with layered components and a base plate (no text or symbols)Option 4: Surface mounting

natural_image
Exploded view diagram of a mechanical assembly showing layered components and connections (no text or labels)Option 5: Angle mounting
natural_image
Diagram of a mechanical assembly showing layered components with no visible text or symbolsMount the network
1 Find a proper location to mount the networks.
2 Mount the networks onto the car with the supplied screws.

Connect the woofer/tweeter to the network

Note
- Match the "left", "right", "+" and "-" terminals correctly. Revised polarity may degrade sound quality.
- Two 4-ohm speakers, wired in stereo, present a 8 ohm load to each channel of the amplifier. Most two channel amplifiers work well in this configuration. However, if two 4-ohm speakers, wired in parallel to a bridged two -channel amplifier, present a 2-ohm mono load to the amplifier. Most 2-channel amplifiers do not support 2-ohm mono operation! Amplifier damage may result!
1 Connect the woofers and the tweeters to the 2-way crossover network first, then connect the network to your amplifier or car audio directly.

4 Product information

Note
Product information is subject to change without prior notice.
| Model CSP550 CSP650 CSP652 | |||
| Speaker type 13cm, 2-way | component speaker | 16.5cm, 2-way component speaker | 16.5cm, 2-way component speaker |
| RMS power (Watts) 40W 50W 60W | |||
| Peak music power (Watts) 210W 240W 300W | |||
| Sensitivity (dB/W/m) | 90dB | 90dB | 91dB |
| Frequency response (Hz) | 40-35kHz | 36-35kHz | 34-35kHz |
| Impedance (ohms) | 4ohm | 4ohm | 4ohm |
| Magnet mass(Oz) | 11Oz | 12.6Oz | 18.8Oz |
| Woofer mounting depth (mm) | 52mm | 61mm | 63mm |
| Tweeter mounting depth (mm) | 19mm | 19mm | 19mm |
5 Troubleshooting
To keep the warranty valid, never try to repair the system yourself.
If you encounter problems when using this apparatus, go to the Philips web site (www.philips.com/welcome). When you contact Philips, ensure that the apparatus is nearby and the model number and serial number are available.


- Contents
- Important 4
- Your car stereo speakers 5
- Installation 6
- Product information 10
- Troubleshooting 11
- Important
- Safety
- Notice
- Environmental information
- Your car stereo speakers
- Introduction
- What's in the box
- Installation
- Note
- Mount the woofer
- Option 1: Mount on door (front or rear)
- Tip
- Option 2: Mount on rear tray
- Mount the Tweeter
- Mount the network
- Connect the woofer/tweeter to the network
- Connect the woofers and the tweeters to the 2-way crossover network first, then connect the network to your amplifier or car audio directly.
- Product information
- Troubleshooting
Brand : PHILIPS
Model : CSP652
Category : Loudspeaker