
100WT10P - Loudspeaker PHILIPS - Free user manual and instructions
Find the device manual for free 100WT10P PHILIPS in PDF.


| Product Type | Portable Bluetooth Speaker |
| Model | 100WT10P |
| Brand | Philips |
| Dimensions (W x H x D) | Approx. 20 x 6 x 6 cm |
| Weight | Approx. 0.5 kg |
| Power Output | 10 W RMS |
| Battery Capacity | 2200 mAh Li-ion |
| Playback Time | Up to 8 hours |
| Charging Time | Approx. 3 hours |
| Bluetooth Version | 5.0 |
| Wireless Range | Up to 10 m |
| Connectivity | Bluetooth, Aux-in (3.5mm), Micro-USB charging |
| Frequency Response | 80 Hz – 18 kHz |
| Controls | Power, Volume +/-, Play/Pause, Pairing button |
| Water Resistance | IPX5 (splash-proof) |
| Included Accessories | Micro-USB charging cable, Aux cable, User manual |
| Safety | Do not expose to extreme temperatures or moisture. Use only provided charger. |
| Cleaning | Wipe with a soft, dry cloth. Do not use liquids or chemicals. |
| Repairability | Battery and ports serviceable by authorized centers. No user-serviceable parts. |
Frequently Asked Questions - 100WT10P PHILIPS
User questions about 100WT10P PHILIPS
0 question about this device. Answer the ones you know or ask your own.
Ask a new question about this device
Download the instructions for your Loudspeaker in PDF format for free! Find your manual 100WT10P - PHILIPS and take your electronic device back in hand. On this page are published all the documents necessary for the use of your device. 100WT10P by PHILIPS.
USER MANUAL 100WT10P PHILIPS
natural_image
Line drawing of a Philips electronic device with control panel and display stand (no text or symbols on the device itself)TABLE OF CONTENTS
1 Before You Begin
1.1 Introduction
1.2 Packing list
1.3 Physical appearance
2 Getting Started
2.1 Base station setup
2.2 Load battery
2.3 Get ready
2.4 Stylus
2.5 WLAN setup
3 Power Supply
3.1 AC
3.2 Battery
4 Data input to the touch screen
4.1 Stylus
4.2 On-screen keyboard
5 Connecting to network
5.1 WLAN
5.2 LAN
6 Data Synchronization
6.1 USB
6.2 IR
7 Featured Software Application
7.1 Control Panel
7.2 Internet Explorer
7.3 ActiveSync
7.4 Citrix ICA Client
7.5 Microsoft RDP
7.6 Windows Media Player
7.7 Transcriber
7.8 Hot Key Utility
7.9 VGA Utility
7.10 Registry Utility
7.11 Word Pad
8 Troubleshooting
9 Safety and product care instructions
10 Appendix
A: Specifications
B: I/O Interfaces
C: Proprietary notice and liability disclaimer
D: Regulatory Information
1 BEFORE YOU BEGIN
|
1.1 Introduction
You are about to experience the new Philips 100WT10P.Your 100WT10P speeds up data sharing and delivers the right data at the right time, increasing productivity for people like you who need timely data.
100WT10P features a 10.4inch touch-sensitive LCD display, embedded Microsoft RDP and Citrix ICA Client, built-in 802.11b WLAN and rugged hardware design. Use of thin clients such as the 100WT10P can reduce total administrative costs and add to bottom line efficiency by speeding up business processes. With modular design, the 100WT10P can be easily customized for industry or site-specific applications or needs.
This manual will guide you through 100WT10P simple set-up, introduce you to its range of features and help you source extra information.
1.2 Packing list
The 100WT10P carton contains the following items:
- 100WT10P pad 4.AC power adaptor 7. Mini VGA cable
- Base station 5. Stylus X 2 8. Companion CD
- Battery 6. Mini USB B to A cable 9. Quick Start Guide

natural_image
Line drawing of a Philips electronic device with control panel and buttons (no text or symbols on the device itself)
natural_image
Line drawing of a medical or electrical device with coiled cable, plug, and connector (no text or symbols)
natural_image
Illustration of two connected VGA connectors (no text or symbols)
natural_image
Line drawing of a mechanical component with a triangular base and internal slot (no text or symbols)
natural_image
Line drawing of two pens with different tip designs, no text or symbols present

natural_image
Technical line drawing of a rectangular mechanical component with a blue circular badge labeled '36' (no text or symbols on the object itself)
natural_image
Line drawing of a broadband cable with two connectors and a blue circular icon at the top left (no text or symbols)
1.3 Physical Appearance
Right View
- External ear set jack
- External microphone jack
- USB port type A
- USB port type A
- USB mini type B
- COM port
- Mini VGA
- & 9. Nut screw holes

Left View
- Infrared port
- Stylus pen
- PCMCIA type II
- Power On/Off switch
- DC-in jack
- & 7. Nut screw holes

Bottom
- Docking connector to the base station

natural_image
Line drawing of a device rear panel with ports and a labeled connector (no text or symbols beyond label)Back
- Modular connector (supports COM, PCI, USB1.1 host)
- Cover for Flash memory and coin battery
- Battery Latch 1
- Battery Latch 2
- Speaker
- Battery
- Software/hardware preset
- Wireless power switch

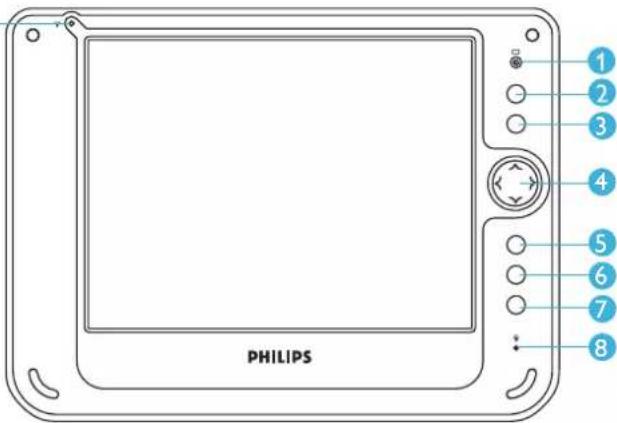
Front View
- Power LED indicator
2, 3, 5, and 6 Customized hot key - Four-way directional key with enter
- Input panel button
- Internal microphone
9.WLAN LED Indicator
9
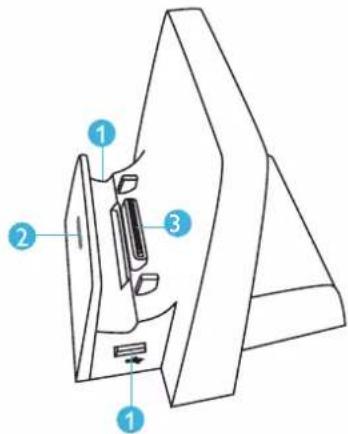
Base Station
- 2x USB port (type A)
- Power LED Indicator
- Docking site
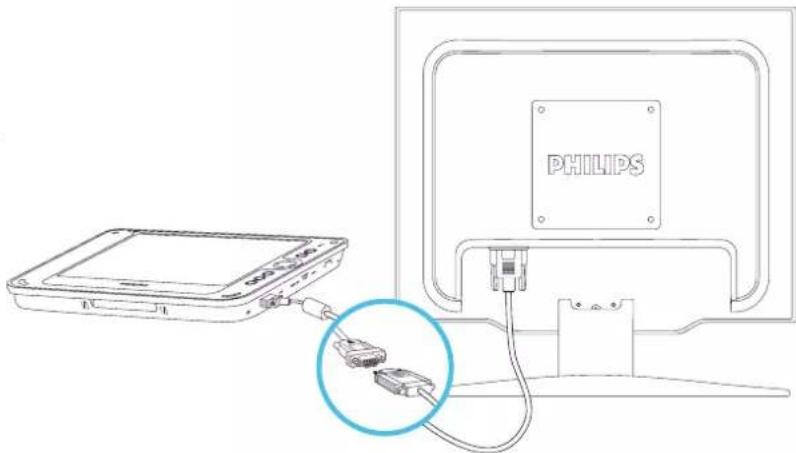
Mini-VGA to VGA Cable
The Mini-VGA cable allows you to connect to a standard VGA cable for connection to a monitor display terminal or projector.
natural_image
Line drawing of a Philips monitor connected to an electronic device via cable, with a magnified inset showing the cable connector (no text or symbols on the device itself)Ruggedized Design
Your 100WT 10P is specially designed to withstand such as a physical impact or a liquid spill.
- Drop resistant.
It has the anti-shock design to resistant to 3 feet drop test - Liquid spill.
100WT10P meets the IP53 requirement for water and dust resistance.
2.1 Base station setup
2.1.1. Connect power cord to the AC power adaptor.
2.1.2. Plug the cord into the base station first and then plug the other end into a power outlet.
2.2 Load battery
2.2.1. Make sure the power switch at lower-left corner of your 100WT10P is in the OFF position.
2.2.2. Install the battery.
- Place 100WT10P on your desk with its face down.
- Place the battery in the battery slot then press it down to fit in.
- Push battery latch 1 into the locked position.
- For first time use, the battery requires five hours to become fully charged.
2.3 Stylus recalibration
When the pad is powered on for the first time, the recalibration protocol will automatically launch. Follow the instructions to walk through the process.
2.4 WLAN setup
- Tap START
2.Tap SETTINGS - Tap Network and Dial-up Connections
- Tap 'Internal Wireless LAN' Settings icon
- A dialog box pops up. Choose the Wireless Networks tab. Tap the Refresh button in the Available Networks panel. In a few seconds, a list of available networks is displayed
- Select the network to which you wish to connect
7.Tap CONFIGURE
8.Tap OK
There are two sources of power for 100WT10P operation: the battery and the AC adapter.
3.1 AC
You may operate your 100WT10P with AC power in two different ways. Mounted in the base station, or connected directly to the AC adapter. To run your 100WT10P on the base station, place the pad into and connect the AC adapter to the jack at the rear of the base station. To plug the product directly to the AC adapter, locate and plug into the DC-in jack at the lower left corner of the product, under the orange rubber protector.
3.2 Battery
3.2.1. When using the 100WT10P for the first time, it is advisable to charge the battery for at least 5 hours.
3.2.2. After the initial charging, when not in use, the 100WT10P takes approximately two hours to fully charged; it takes 3 hours to fully charged while in use. A fully charged battery lasts up to 4 hours.
3.2.3. The power light on the top right indicates the level of battery charge.
Turn on the power to see the power light.
• Full charge The power light is solid green.
- Low charge The power light is blinking green when the battery's remaining charged falls to less than 6 percent.
• Critical low charge The power light blinks amber when the charge falls under 3 percent.
- If your 100WT10P is powered up and immediately enters the suspend mode, it means the battery is uncharged. To avoid loss of data in memory, fully charge the unit within 24 hours.
CAUTION: Recharge the 100WT10P any time a low charge warning appears.
Failure to recharge the battery will result in loss of data contained in internal memory (RAM).
3.2.4. In order to optimize battery operation, open only the applications you are actually using.
To conserve battery power, disable WLAN when it's not in use.
3.2.5. To change battery
- Suspend your 100WT10P by turning the power switch to the OFF position.
- Unlock the battery latch 1
- While one hand holds the battery latch two in the unlocked position, use the other hand to pull the battery out of the slot.
- Replace with another battery
NOTE: When fully charged and not in use, your 100WT10P has a life of one week.
CAUTION:
- Suspend your 100WT10P before removing or changing the battery pack.
- To avoid loss of data in memory, insert a charged battery in 24 hours.
3.2.6. Power saving
Power saving is available when your 100WT10P is idle. There are three levels of power saving.
• Level 1. User idle: lower screen light
• Level 2. System idle: off screen light
• Level 3. Suspend: power off to suspend
To make changes to power saving setup,
- Tap START
- Tap SETTINGS
- Tap CONTROL PANEL
- Tap POWER
- Choose SCHEMES and select the scheme that best meets your needs.

You can use the stylus or the internal keyboard to select menu options and write messages.
4.1 Stylus
The stylus is used to tap or for handwriting input. When the system turns on for the first time, it defaults to tap input.
NOTE: The two styli that are supplied with 100WT10P are designed for your screen. Use of fingertip or other pointers could damage your screen.
4.1.1 Handwriting
Transcriber is the software application for handwriting input.
To start this application, double-tap on the TRANSCRIBER icon or,
-
Tap SETTINGS
-
Tap PROGRAMS
-
Tap TRANSCRIBER
-
When operating, the Transcriber icons will reside in the system tray located at the bottom of the screen.
To close Transcriber,
-
Go to the system tray at the bottom of screen
-
Double tap on the Transcriber icon for menu options
-
Choose CLOSE TRANSCRIBER

4.1.2 Tap settings
You can use the stylus to tap or double-tap.
Each user's tapping pattern is different. The 100WT10P system
setup process 'learns' each new user's tapping pattern 'signature'.
To test your double-tap pattern:
- Tap START
2.Tap SETTINGS
* Tap CONTROL PANEL - Double tap STYLUS
- Choose the DOUBLE-TAP
- Follow the onscreen instructions
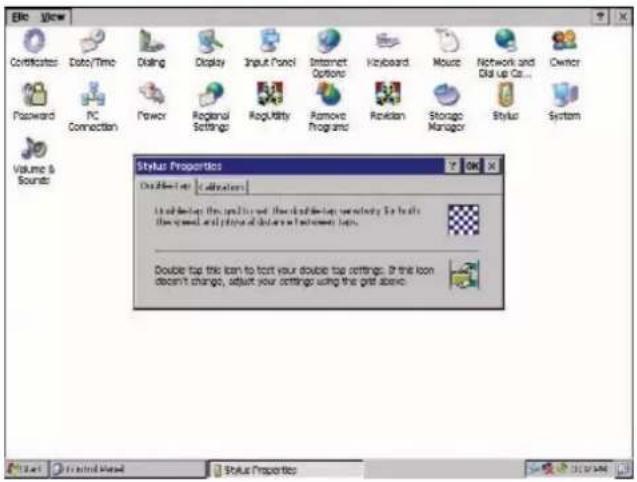
To recalibrate the stylus tapping pattern:
1.Tap START
2. Tap SETTINGS
3. Tap CONTROL PANEL
4. Double tap STYLUS
5. Choose the CALIBRATION
6.Tap RECALIBRATION
7. Follow the onscreen instructions

4.1.3 Right Click
Users accustomed to a mouse device often right click for quick access to command options for an icon. The stylus pen offers a similar command function.
Here's how:
- Go to the center of the icon
- Hit and hold the icon
- Available command options are displayed
4.2 On-Screen Keyboard
Users can 'type' message with the onscreen keyboard. To display, press the Input Panel hardware button on your 100WT10P. To hide it, press the button again. You can choose between large or small input panel. Here's how:
- Tap START
- Tap SETTING
3.Tap CONTROL PANEL - Double tap INPUT PANEL
- Select the preferred input panel version in the drop down menu.
You can setup a connection to a wireless network (WLAN) or a wired network (LAN).
5.1 WLAN
Your 100WT10P includes a wireless LAN module.
5.1.1 Start a connection
- Method One
Tap on the network icon that resides in the system tray at the bottom of your screen. The system will automatically find the networks that are available within the area. In the pop-up window choose the Wireless Information tab. Highlight the network with which you wish to connect. Then tap Connect.
• Method Two
You can also start a connection from Programs menu. Here's how:
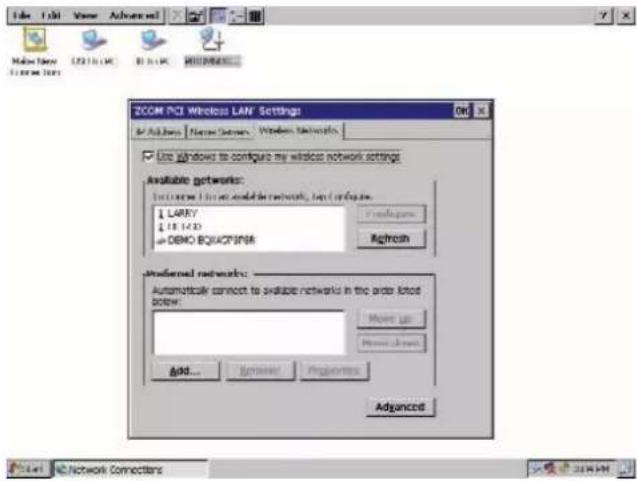
- Tap START
- Tap SETTINGS
- Tap Network and Dial-up Connections
- Tap 'Internal Wireless LAN' Settings icon
5.A dialog box pops up. Choose the WIRELESS NETWORKS.Tap the Refresh button in the Available Networks panel. In a few seconds, a list of available networks is displayed - Select the network to which you wish to connect
7.Tap CONFIGURE
8.Tap OK
5.1.2
When the connection is ready, you may be required to launch a remote control application to communicate between your 100WT10P and the host computer. The 100WT10P ships with two applications to do this:
- Remote Desktop Connection connects to a Window server
- Critrix ICA Manager connects to a Citrix server.
5 CONNECTING TO A NETWORK
11
To complete the connections with Remote Desktop Connection or ICA Manager, you will need information including username, password and network IP .Ask your network administrator to provide the required setup information.
5.2 LAN
You can use the PCMCIA slot or USB port to connect your 100WT10P to a LAN Windows CE.net provides universal interfaces for many different hardware peripherals. (For a list of products supported by CE.NET, see the Microsoft Website.)
natural_image
Line drawing of a device rear panel with a blue screen and control buttons (no text or symbols)To share information between your 100WT10P and your PC/Laptop, you need to establish a direct PC connection.
There are two ways to make direct connection. One way is through USB interface; the other is IR transmission.
To start a connection to a host PC, you need to start the ActiveSync application.ActiveSync is installed in your 100WT10P when shipped. Before set up a connection to your host PC, you also need install ActiveSync 3.7 (or higher) on the host PC.To download this freeware, go to http://www.microsoft.com and search for ActiveSync download.
6.1 USB
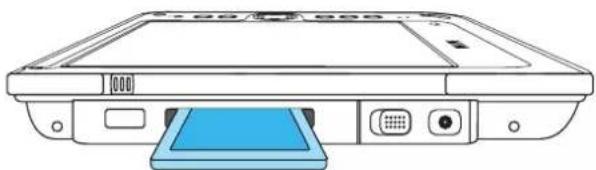
You can use USB cable to connect to a host PC.A Mini USB B to A cable is used as the synchronization cable.
Figure A illustrates use of the Mini USB B to A cable. It connects the 100WT10P to a host PC. When the cable connection is ready, setup for PC connection:
- Tap on START
- Tap on SETTINGS
- Tap on CONTROL PANEL
- Tap on the PC CONNECTION
- Check the box: Allow connection with desktop or laptop computer when device is attached. (When you first start the system, the default connection is USB to PC). Then start the ActiveSync application
- Tap on START
2.Tap on PROGRAM
3.Tap on ACTIVESYNC

NOTE: To restart ActiveSync after it has been stopped, unplug the USB cable from the host PC and then plug it in again. see Figure A
6.2 IR
You can connect to host PC with IR (Infrared) transmission. Place your 100WT10P and the target device in line of sight of each other and at a distance of no more than one meter.
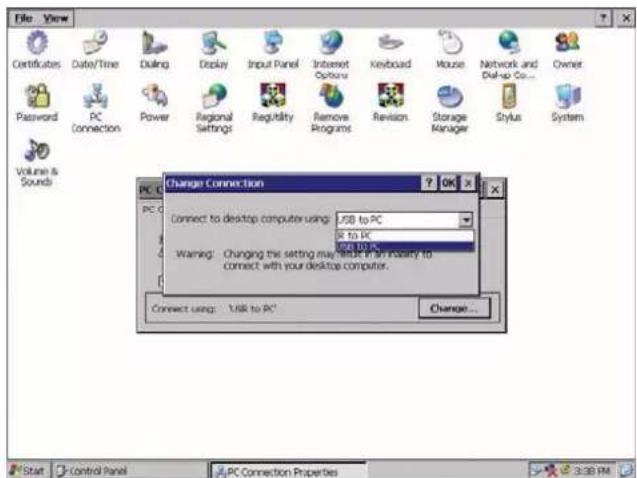
On your 100WT10P to setup for IR
- Tap START
2.Tap SETTINGS - Tap CONTROL PANEL
- Tap the PC CONNECTION
- Check the box: Allow connection with desktop computer when device is attached.
6.Tap CHANGE - In the pull-down menu, choose IR to PC
8.Tap OK
Then start the ActiveSync application
- Tap on START
- Tap on PROGRAM
- Tap on ACTIVESYNC
The host PC will detect the 100WT10P and initiate a connection.
Your 100WT10P has a suite of applications designed to create, share, and manage your information.
7.1 Control Panel
The Control Panel provides access to system settings allowing you to manage the properties of your 100WT10P.
7.1.1 Stylus
Configures and calibrates your touch screen.
7.1.2 Display
Sets your Background, Appearance, and Backlight Time Out preferences.
7.1.3 Input Panel
Changes the size of your on-screen keys and creates character shortcuts.
7.1.4 Network
Selects and sets network properties.
7.1.5 System
Displays your 100WT10P system information and adjusts memory allocation settings.
7.2 Microsoft Internet Explorer
Microsoft Internet Explorer is designed to provide a rich Internet experience while using a Windows CE powered device. To launch:
- Tap on START
- Tap on PROGRAMS
3.Tap on INTERNET EXPLORER
7.3 ActiveSync
The Microsoft ActiveSync application enables you to transfer files between your 100WT10P and a host PC running Windows 98,Windows Me, or Windows 2000 Professional.
- Tap on START
- Tap on PROGRAMS
3.Tap on ACTIVESYNC
7.4 Citrix ICA Client
The Citrix ICAR (Independent Computing Architecture) permits server-based computing. The ICA protocol enables your 100WT10P to function as a terminal when connected to a server running Citrix MetaFrame Software.
The Citrix ICA Client for Windows CE lets you make an ICA connection to a Citrix server. When the ICA connection is established, you can access applications and work with files as if you were working at the Citrix server itself.
- Tap on START
- Tap on PROGRAM
- Tap on COMMUNICATION
- Tap on CITRIX ICA MANAGER
7.5 Microsoft RDP5.1
This is a terminal services client that allows you to connect your 100WT10P to a Microsoft Windows NT or Windows 2000 terminal server.
- Tap on START
- Tap on PROGRAMS
- Tap on MICROSOFT REMOTE DESKTOP CONNECTION
7.6 Windows Media Player
This is a multimedia application that plays audio and video files. For example, you can enjoy MP3 format music in or play a MPEG-4 format video clip from a file located on the pad or from the network.
- Tap on START
- Tap on PROGRAMS
- Tap on MEDIA PLAYER
7.7 Transcriber
Transcriber provides a handwriting recognition application. It makes data input easy when you are on the go. Handwrite a message on the panel screen and that message is automatically entered into the system.
To launch:
- Tap on START
- Tap on PROGRAMS
- Tap on TRANSCRIBER
7.8 Hot Key Utility
There are 4 hot keys buttons to quick launch software applications. You will customize these hot keys functions with the Hot Key Utility application.
- Tap on PROGRAMS
- Tap on HOT KEY
- Choose BROWSE to find the available software applications
- Tap on the application to select it
- Tap OK to complete
7.9. VGA Utility
The VGA Utility has 2 control functions. It is used to select the video output to LCD only or to both LCD and miniVGA port. The other function is to adjust the back light of the screen for your working environment.
To launch VGA utility,
- Go to the system tray at the bottom of your screen
- Double tap the VGA Utility icon
7.10 Registry Utility
User can save the OS registry information to avoid being deleted in the case of un-resolved system freeze or in the case of hardware reset.
To launch Registry Utility
-
Tap on CONTROL PANEL
-
Tap on RegUtility
7.11 Wordpad
Create, open and update WordPad files
8.1 The 100WT10P will not turn on...
8.1.1
Make sure that both the battery latches on the back of the unit are set to the lock position.
8.1.2
Make sure the power switch is in the "on" position.
a. Turn on the power switch located on the left-hand side of the base station, under the orange protective cover, by moving the switch to the "up" position.
b. Sometimes after the unit enters suspend mode, the switch will be in the on/up position, but the unit will be in suspend mode. In this case the switch must be toggled first down and then up again to resume operation.
8.1.3
When power is on, you will see:
a. On the pad: Power indicator light above the screen on the right will turn green
b. On base station: Power indicator located in the center of the base station will turn green
8.1.4
If power is on, but you still don't see anything on the screen, wake up the pad by tapping on the screen or by pressing control buttons located on the right hand side of the screen.
8.1.5
If pad does not power on attach the AC adapter to the unit by either ;
a. Placing the pad on its base station, making certain the docking connector is seated properly & plugging the AC Adapter to plug into the wall, or
b. Plugging the AC adapter into the DC in jack located under the orange protective flap on the left hand side of the unit, making sure that the Adapter is also plugged into the wall socket.
8.1.6
If the preceding steps do not turn the pad on, try restarting the machine:
a. Slide the Reset button located on the back of the pad underneath the Modular Connector to expose the hole labeled "Software Reset"Press the Software Reset by placing the stylus tip into the exposed hole and wait for the pad to reset.
b. As a last resort, use the Hardware Reset. Hardware Reset can be activated sliding the reset button on the back of the unit, and exposing the hole marked "Hardware Reset". By pushing a slim object (such as a paper clip) into the hole marked Hardware Reset, the pad will execute a cold reboot. The stylus will not fit into the HW reset hole.
CAUTION: A Hardware reset erases all data from your 100WT10P's memory.
8.2 My system does not run smoothly...
Poor wireless signal quality or the simultaneous opening of too many applications will cause deterioration in application performance.
To free up memory, close applications that are not in use.
Check wireless signal quality:
8.2.1
WLAN LED indicator. When the WLAN LED indicator is green, a wireless signal is available. A blinking LED indicates a weak or unstable signal. When no signal is available, the LED is amber. If signal is weak, try moving closer to your Access Point, or try repositioning the antenna of the access point.
8.2.2
Network icon. Double tap the Network icon on the bar at the bottom of the screen. Choose the Wireless Information tab to show the current connection.
8.3 How do I turn off my 100WT10P?
To end operation: Go to the power switch under the orange protective cover on the lower left side. Or tap on the Start Menu and then choose "Suspend" to turn off the pad.
NOTE: This places the pad in standby mode. Unlike a PC, your 100WT10P is actually in "suspend" mode rather than "power off" when it's turned off. It's the feature to allow user to quick resume operation. Your data and files remain in the memory as long as the battery is charged.
8.4 How do I reset the unit when the system freezes or hangs up...
8.4.1
Software reset.
a. Push the Reset latch located in the rear of the pad underneath the Modular Connector so you can see the Software Reset button.
b. Press the Software Reset with the tip of the stylus.
8.4.2
Hardware reset. Backup your data first then press Hardware Reset button.
CAUTION: A Hardware reset erases all data in 100WT10P. (Only data in IPSM remains after a hardware reset)
NOTE: 1. If you would like to back up the registry data to avoid the data loss when battery is out of charge by accident, go to Control panel, tap on RegUtility, then choose BackUp Registry. A backup copy of your registry data will be stored in the reserved partition. When the unit is rebooted after a hardware reset, the system will retrieve the registry data being saved in the IPSM.
- It is also possible to keep a backup copy of other critical data in the IPSM to avoid unexpected data loss. Up to 28 MB memory storage is available in IPSM.
8.5 When I use the stylus pen...
8.5.1
The stylus pen does not respond to my handwriting.
By default, the stylus operates in the tap mode. In order to use the handwriting input, you need to launch the handwriting recognition application. Microsoft Transcriber is used for 100WT10P.
- Tap START
- Tap PROGRAMS
- Tap TRANSCRIBER
- Transcriber launches and an dialogue box pops-up
- The icon is displayed on the system tray at the bottom of screen
- Read Help to learn how to use the handwriting input; tap OK when finished
8.5.2
To return to the tap mode:
- Double tap on the Transcriber icon
- Choose Close Transcriber
8.5.3
System does not respond to taps...
- Try a single solid tap.
- Try a double tap instead of single tap.
- Try tapping the center of an icon.
- Recalibrate the tapping pattern.
NOTE: You might need to practice a couple of time in to operate your screen with taps.
8.5.4
The mouse arrow is out of alignment...
The mouse arrow does not point to the center of icon as you intend. It might be due to the viewing angle or the stylus may require calibration.
8.5.5
Users accustomed to a mouse device use a right click for quick access to command options of an object.
The stylus pen offers a similar command function. Here's how:
- Move the mouse arrow to the center of the object.
- Hit and hold the object.
- Available command options are displayed.
8.6 Is MS Transcriber supported by RDP?
RDP service does not support handwriting input using MS Transcriber. You can use the on-screen keyboard for input.
8.7 How do I use the on-screen keyboard?
8.7.1
Open the on-screen keyboard. You can use the Input Panel button to open up / turn off the on-screen keyboard. This button is located at the lower right side of the pad.
8.7.2
Change to the larger keyboard. You can choose between the regular or an enlarged keyboard. Go to Control Panel then tap on Input Panel to choose Keyboard or LargeKB.
8.8 How do I use a password to protect my data on 100WT10P?
You can use a password to protect your data. Here's how:
- To setup, tap the PASSWORD icon on the Control Panel
- Enter the password you have selected
- Enter the password again to confirm your password.
You can enable password protection at Power On or Screen Saver.
CAUTION: If you forget your password, you must perform a full reset or a Hardware reset according to the manufacturer's instructions. Performing a full reset or a Hardware reset erases all files and data that you have created, and programs you have installed (Hardware reset will NOT delete files or data in IPSM directory).
8.9 Is Cisco LEAP supported?
Philips supplies a third-party proprietary solution for LEAP authentication and web encryption which will work natively with our internal 802.11b solution. Alternatively, an external Cisco wireless network adapter (e.g.Aironet 340 or 350 series adapter) can be added to the system to achieve LEAP support.
To clean the screen:
- To remove dust and other particles, wipe the screen with a clean, soft, lint-free cloth.
- For heavy duty cleaning, wipe the screen with a soft, clean cloth lightly sprayed with a commercial window cleaner that does not contain wax or abrasives. Always apply the cleaner to the cloth, not the screen.
If the display contains has become greasy, substitute use isopropyl alcohol.
Note: Paper towels and other paper products are abrasive. Be sure to use a clean cloth when wiping the screen.
To clean the case:
- For normal cleaning, use a soft, dry cloth.
- For heavy duty cleaning, apply a small amount of a mild non-abrasive, ammonia-free, alcohol-free detergent onto a clean, soft, lint-free cloth and wipe the case surface.
Processor
Intel Xscale Processor 400MHz
Operating System
Microsoft Windows CE.NET 4.1
Networking
Built-in 802.11b mini-PCI WLAN module with integral antenna
Remote Protocol
- Microsoft RDP
- Citrix ICA
Memory
128 MB SDRAM on board
Flash ROM
32 or 64 MB flash memory module options
LCD Panel Characteristic
10.4 inch Transmissive TFT LCD
Resolution: SVGA, 800 x 600 pixels
Audio System
AC97 internal microphone and speaker; stereo
supported via earphone jack
Durability
- Rugged anti-shock design withstanding 3 feet drop
test
• IP53 water and dust resistant construction
Pad I/O
- 1 x mini VGA out
- 1 x COM port
- 2 × USB
- 1 x USB mini
• 1 x Audio jack for external earphone
- 1 x Audio jack for external microphone
- 1 x DC-in jack
- 1 x PCMCIA
- 1 x IrDA
- 1 x Docking connector
- 1 x Speaker
- 1 x Modular connector
- 1 x Internal microphone
• 1 x Power LED indicator
• 1 x WLAN LED indicator
Base Station I/O
- 1 x DC-in jack
- 2 × USB
LED indicator
- 1 x WLAN LED on Pad
- 1 x Power LED on Pad
• 1 x Power LED on Base Station
Button and Controls on Pad
- 4 x Customized hot key
- 1 x Input panel
• 1 x Four-way direction key with Enter
- 1 x Power switch
- 1 x Stylus release
- 1 x Wireless latch
- 2 x Battery latch
- 1 x Hardware reset
- 1 x Software reset
Power Supply
Battery:
Swappable smart Li-ion battery pack
AC Adapter Input:
Universal 100V to 240V AC, 50/60 Hz
Output:
60 Watts DC
Dimensions
Pad weight/dimension:
1.6 Kg / 313.5 W × 235.5 H × 29.0 D mm
Base station weight/dimension:
1.0 Kg / 167.0 W × 110.5 H × 122.5 D mm
Included Accessories
- Battery
• AC adapter and power cord
- 2 x Stylus
- Base station
- Mini USB B to A synchronization cable
- Mini VGA cable
Optional accessories
• Battery charger (for charging 3 batteries)
• Extra AC adapter and power cord
- Extra battery
- Stylus 3-pack
• Body glove (planned)
- Carrying bag
100WT10P supports the following I/O modular connectors
| HARDWARE DRIVER COMPATIBILITY | ||
| Storage IBM Microdrive IBM Microdrive 340MBPCMCIA ATA Disk Sandisk Compact Flash64MBGeneric Compact Flash 32MBGeneric Compact Flash 64MBGeneric Compact Flash 128MBGeneric Compact Flash 256MBGeneric Compact Flash 512MBTranscend Compact Flash 128MB(64MB)Generic A Disk (32MB)Generic USB Disk (128 MB)Transcend USB Disk (128MB) | ||
| USB Storage Class Driver Generic A Disk | ||
| Fax/Modem PCMCIA Fax/Modem PC Card Driver FM560 v.90 56K Fax/ModemCom Port Modem SYNNEX MD-56KVC (External Modem) | ||
| Network PCMCIA Wireless LAN PC Card Driver Cisco Aironet 340 SeriesPCMICIA 10/100M Fast Ethernet PC Card 340 SeriesAbocom WB1K5 (Wireless LAN)Generic MQ4CE10T 10M (CF Adapter)Socket LP-E 10M (CF Adapter)USB 10/100M Fast Ethernet Driver USB 10/100M Fast Ethernet Adapter(MQ4UFE1KB) | ||
| Multimedia Display | VGA Driver | CTX 705F (CRT Monitor)Sony Multiscan G500 (CRT Monitor)Infocus LP335 (CRT Monitor)ViewSonic E35 (LCD Monitor)ViewSonic VG150 (LCD Monitor) |
| Mouse | USB HID Class Driver for mouse | Logitech First / Pilot Wheel Mouse(M-BD58) |
| Keyboard USB HID | Class Driver for keyboard Microsoft RT9401 | ACK_600H8113WLogitech Y-BF37 |
| Barcode Reader | Com Port Bar Code Reader EZ One Shot | Bar Cord Reader(MT-7123CG) |
| PC connection | USB Function DriverIrDA Driver (SIR) | Microsoft ActiveSync FunctionMicrosoft ActiveSync Function |
| Earphone | Audio Output Driver | Generic earphone |
| Microphone | Audio Input Driver | Generic Microphone |
The information disclosed in this document, including all designs and related materials, is the valuable property of Philips and/or its licensors.
Philips and/or its licensors, as appropriate, reserve all patent, copyright and other proprietary rights to this document, including all design, manufacturing, reproduction, use, and sales rights thereto, except to the extent said rights are expressly granted to others.
The Philips product(s) discussed in this document are warranted in accordance with the terms of the Warranty Statement accompanying each product. However, actual performance of each such product is dependent upon factors such as system configuration, customer data, and operator control. Since implementation by customers of each product may vary, the suitability of specific product configurations and applications must be determined by the customer and is not warranted by Philips.
To allow for design and specification improvements, the information in this document is subject to change at any time, without notice. Reproduction of this document or portions thereof without prior written approval of Philips is prohibited.
Removable Battery • CE Declaration of Conformity Federal Communications Commission (FCC) Notice (U.S. Only) • ESD Warning Information for UK only Philips End-of-Life Disposal
Removable Battery
CAUTION
RISK OF EXPLOSION IF BATTERY IS REPLACED BY AN INCORRECT TYPE. DISPOSE OF USED BATTERIES ACCORDING TO THE INSTRUCTIONS.
CE Declaration of Conformity
Philips Consumer Electronics declare under our responsibility that the product is in conformity with the following standards
- EN60950:1992+A1+A2+A3+A4+A11 (Safety requirement of Information Technology Equipment)
- EN55011:1998 (Radio Disturbance requirement of Information Technology Equipment)
- EN55024:1998 (Immunity requirement of Information Technology Equipment)
- EN61000-3-2:1995 (Limits for Harmonic Current Emission)
- EN61000-3-3:1995 (Limitation of Voltage Fluctuation and Flicker)
- EN300328-2/EN301489-1/EN301489-17
following provisions of directives applicable
- 73/23/EEC (Low Voltage Directive)
- 89/336/EEC (EMC Directive)
- 93/68/EEC (Amendment of EMC and Low Voltage Directive)
and is produced by a manufacturing organization on ISO9000 level.
Federal Communications Commission (FCC) Notice
This equipment has been tested and found to comply with the limits for a Class B digital device, pursuant to Part 15 of the FCC Rules. These limits are designed to provide reasonable protection against harmful interference in a residential installation. This equipment generates, uses, and radiates ratio frequency energy and, if
not installed and used in accordance with the instructions, may cause harmful interference to radio communications.
However, there is no guarantee that interference will not occur in a particular installation. If this equipment does cause harmful interference to radio or television reception, which can be determined by turning the equipment off and on, the user is encouraged to try to correct the interference by one or more of the following measures:
• Reorient or relocate the receiving antenna.
• Increase the separation between the equipment and receiver.
- Connect the equipment into an outlet on a circuit different from that to which the receiver is connected.
- Consult the dealer or an experienced radio/TV technician for help.
FCC Warning!
To assure continued FCC compliance, the user must use grounded power supply cord and the provided shielded video interface cable with bonded ferrite cores. If a BNC cable is going to be used, use only a shielded BNC (5) cable. Also, any unauthorized changes or modifications not expressly approved by the party responsible for compliance could void the user's authority to operate this device.
FCC Radiation Exposure Statement
This equipment complies with FCC RF radiation exposure limits set forth for an uncontrolled environment. This equipment should be installed and operated with a minimum distance of 20 centimeters between the radiator and your body.
This device complies with Part 15 of the FCC Rules. Operation is subject to the following two conditions:
(1) This device may not cause harmful interference, and
(2) this device must accept any interference received, including interference that may cause undesired operation.
This transmitter must not be co-located or operating in conjunction with any other antenna or transmitter.
Dimensions: 6cm*4.5cm*0.5cm
Operating Temperature: 0 \~ 55 degree
Storage Temperature: -20 \~ 80 degree
Network Protocol: 802.11b
Network Interface: Mini-PCI adaptor Type III B (host)
Wireless interface: 802.11b
Relative humidity: 5 \~ 80 %
Standards IEEE802.11b WLAN, PCMCIA 2.1, JEIDA 4.2, roaming support
Frequency 2.4 to 2.4835GHz (Industrial Scientific Medical Band)
Channels Maximum: Channels, depending on regulatory authorities
Data Rate: 11, 5.5, 2 and 1 Mbps per channel, Auto Fall-Back
WEP: 40/128 bit WEP function
Output Power: 15 dBm (max.)
Receiver Sensitivity -80dBm Min.
ESD Warning!
The USB function may break down during electrostatic discharge interference. Please suspend or reset the system to enable the USB function.
To prevent damage that may result in fire or shock hazard, do not expose this appliance to rain or excessive moisture.
THIS CLASS B DIGITAL APPARATUS MEETS ALL REQUIREMENTS OF THE CANADIAN INTERFERENCE-CAUSING EQUIPMENT REGULATIONS.
Information for UK only
WARNING! THIS APPLIANCE MUST BE EARTHED.
Important:
This apparatus is supplied with an approved moulded 13A plug.
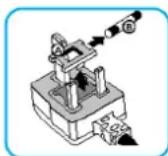
To change a fuse in this type of plug proceed as follows:
1 Remove fuse cover and fuse.
2 Fit new fuse which should be a BS 1362 5A,A.S.T.A. or BSI approved type.
3 Refit the fuse cover.
If the fitted plug is not suitable for your socket outlets, it should be cut off and an appropriate 3-pin plug fitted in its place.
If the mains plug contains a fuse, this should have a value of 5A. If a plug without a fuse is used, the fuse at the distribution board should not be greater than 5A.
Note: The severed plug must be destroyed to avoid a possible shock hazard should it be inserted into a 13A socket elsewhere.
How to connect a plug
The wires in the mains lead are coloured in accordance with the following code:
BLUE - "NEUTRAL" ("N")
BROWN - "LIVE"("L")
GREEN & YELLOW - "EARTH" ("E")

1 The GREEN AND YELLOW wire must be connected to the terminal in the plug which is marked with the letter "E" or by the Earth symbol or coloured GREEN or GREEN AND YELLOW.
2 The BLUE wire must be connected to the terminal which is marked with the letter "N" or coloured BLACK.
3 The BROWN wire must be connected to the terminal which marked with the letter "L" or coloured RED.
Before replacing the plug cover, make certain that the cord grip is clamped over the sheath of the lead - not simply over the three wires.
End-of-Life Disposal
Your new monitor contains materials that can be recycled and reused. Specialized companies can recycle your product to increase the amount of reusable materials and to minimize the amount to be disposed of.
Information for US and Canada
This product may contain lead and/or mercury. Dispose of in accordance to local-state and federal regulations.
For additional information on recycling contact www.eia.org (Consumer Education Initiative)
Please find out about the local regulations on how to dispose of your old monitor from your local Philips dealer.
Specifications subject to change without notice.
All dimensions shown are approximate.
All rights reserved. Reproduction, copying, usage, modifying, hiring, renting public performance, transmission and/or broadcasting in whole or part is prohibited without the written consent of Philips Electronics N.V.
3138 105 40793
M73-PLPOA-130
- TABLE OF CONTENTS
- Before You Begin
- Getting Started
- Power Supply
- Data input to the touch screen
- Connecting to network
- Data Synchronization
- Featured Software Application
- Troubleshooting
- Safety and product care instructions
- Appendix
- Introduction
- Packing list
- Physical Appearance
- Right View
- Left View
- Bottom
- Back
- Front View
- Base Station
- Mini-VGA to VGA Cable
- Ruggedized Design
- Base station setup
- Load battery
- Stylus recalibration
- WLAN setup
- AC
- Battery
- CAUTION:
- Power saving
- To make changes to power saving setup,
- Stylus
- Handwriting
- To close Transcriber,
- Tap settings
- To test your double-tap pattern:
- To recalibrate the stylus tapping pattern:
- Right Click
- On-Screen Keyboard
- WLAN
- Start a connection
- - Method One
- • Method Two
- 5.1.2
- CONNECTING TO A NETWORK
- LAN
- USB
- IR
- On your 100WT10P to setup for IR
- Control Panel
- Stylus
- Display
- Input Panel
- Network
- System
- Microsoft Internet Explorer
- ActiveSync
- Citrix ICA Client
- Microsoft RDP5.1
- Windows Media Player
- Transcriber
- Hot Key Utility
- VGA Utility
- To launch VGA utility,
- Registry Utility
- Wordpad
- The 100WT10P will not turn on...
- My system does not run smoothly...
- How do I turn off my 100WT10P?
- How do I reset the unit when the system freezes or hangs up...
- When I use the stylus pen...
- 8.5.4
- 8.5.5
- Is MS Transcriber supported by RDP?
- How do I use the on-screen keyboard?
- 8.7.1
- 8.7.2
- How do I use a password to protect my data on 100WT10P?
- Is Cisco LEAP supported?
- To clean the screen:
- To clean the case:
- Processor
- Operating System
- Networking
- Remote Protocol
- Memory
- Flash ROM
- LCD Panel Characteristic
- Audio System
- Durability
- Pad I/O
- Base Station I/O
- LED indicator
- Button and Controls on Pad
- Power Supply
- Dimensions
- Included Accessories
- Optional accessories
- Removable Battery
- CAUTION
- CE Declaration of Conformity
- Federal Communications Commission (FCC) Notice
- FCC Warning!
- FCC Radiation Exposure Statement
- ESD Warning!
- To change a fuse in this type of plug proceed as follows:
- How to connect a plug
- End-of-Life Disposal
- Information for US and Canada
Brand : PHILIPS
Model : 100WT10P
Category : Loudspeaker