MA593 - Mp3 player Nextar - Free user manual and instructions
Find the device manual for free MA593 Nextar in PDF.

| Product Type | MP3 Player |
| Brand | Nextar |
| Model | MA593 |
| Dimensions | Approx. 80 x 40 x 10 mm |
| Weight | Approx. 30 g |
| Power Source | Internal rechargeable Li-ion battery, 3.7V 200mAh |
| Charging Interface | USB 2.0 (mini or micro-USB) |
| Battery Life | Up to 8 hours of continuous playback |
| Storage Capacity | Internal memory (varies, e.g., 4GB) with microSD card slot |
| Audio Formats Supported | MP3, WMA, WAV, FLAC |
| Display | Monochrome or color LCD screen (approx. 1.8 inch) |
| FM Radio | Yes, with presets and recording |
| Voice Recording | Built-in microphone, WAV or MP3 format |
| Playback Modes | Repeat, shuffle, folder play, equalizer presets |
| Connectivity | USB 2.0 for data transfer and charging, headphone jack (3.5mm) |
| Operating System Compatibility | Windows, Mac, Linux (mass storage class) |
| Safety Precautions | Do not expose to moisture or extreme temperatures; use specified charger |
| Cleaning Instructions | Wipe with a soft, dry cloth; do not use liquid cleaners |
| Repairability | Battery replacement by qualified technician; limited user-serviceable parts |
| Included Accessories | USB cable, earphones, user manual |
Frequently Asked Questions - MA593 Nextar
User questions about MA593 Nextar
0 question about this device. Answer the ones you know or ask your own.
Ask a new question about this device
Download the instructions for your Mp3 player in PDF format for free! Find your manual MA593 - Nextar and take your electronic device back in hand. On this page are published all the documents necessary for the use of your device. MA593 by Nextar.
USER MANUAL MA593 Nextar
nextar™

MA593 Digital MP3 Player
Instruction Manual
Table of Contents
Precautions....1
Product Features....3
System Requirement 5
Basic Operation....6
Controls and Functions 6
Key instruction:....7
Connecting to PC 8
Install Device Driver for Windows 98SE....8
Operation Procedure 8
Removing Hardware 9
Battery Charging....9
Battery Charging 10
WMA (Support WMA-DRM)....12
Download operation of WMA music with DRM9 (PD-DRM) 12
Operation Instruction 12
Copy Music Files to the Player....15
Start-up/down Procedure 16
Main Menu....16
Activate and Deactivate Key Lock 17
Activate Key Lock 17
Deactivate Key Lock....17
Music....17
Music....18
LCD Display 18
Operation procedure....19
Sub Menu of Music....20
Recordings ......21
LCD Display 21
Operation Procedure 22
Function of the Recordings....22
Sub Menu of Recordings....22
MIC. Record....23
LCD Display 23
Operation Procedure 23
FM radio....25
LCD Display 25
Operation Procedure 25
FM Submenu....27
Exit Player will be back to the main menu.FM Record....27
FM Record 28
LCD Display 28
Operation Procedure 28
Utility 30
Pedometer 30
Stopwatch 30
Delete 31
Delete One....31
Delete All 31
Settings....32
Language....32
Contrast 32
Timer settings....32
Music resume 33
Load defaults....33
Memory/FW 33
Exit 33
References....34
Lyric Synchronization....34
Reset Function....34
Rechargeable Mode 34
Technical Specifications 35
Trouble Shooting....36
Precautions
In order to safely use this player, please follow the precautions depicted in this manual. Before using this player, please thoroughly read and keep it for future reference.
■ Never use the player during driving or operating other vehicles to avoid traffic accident, which also be written in the law in some districts. Even in walking especially crossing the street.
■ Please also do not listen in extremely high volume to avoid any dangerous. Wherever with potential risks, please stop using the player for safety purpose.
■ Please insert the earphone prior to turn on the player, which can not only avoid damaging the earphone but keep the player in good condition.
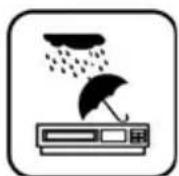
- Keep the player clean and never store the player close to the heat source or dirty, humid or rainy places and avoid direct sunlight.
If the surface is dirty, please clean with soft cloth wet with clean water or soft abluent and never clean the case with alcohol or diluents.
■ Don't press the screen or the keys too hard, as it will be hurtful to the player
■ Never use the player in extremely dry environment to avoid static.
■ Never disconnect the player from PC abruptly during downloading, uploading and formatting to avoid program failure.

In order to provide the best access performance, it will be unable to format in FAT-32 in PC if your mp3 flash memory capacity is 128MB.
■ Attention: Because of the different memory calculating method and the player software (firmware) is stored in the device flash memory and, it will cause the difference between flash memory marked capacity and real capacity. The real flash memory capacity is lesser than the marked memory capacity of this device is normal. Due to different firmware size, it will have the different free flash memory capacity. Please refer the table as below for more details.
| Marked capacity | Real capacity range | Free capacity range after stored firmware |
| 128MB | 122MB~128MB | 73MB~127MB |
| 256MB | 244MB~256MB | 191MB~255MB |
| 512MB | 488MB~512MB | 428MB~511MB |
| 1GB | 953MB~1000MB | 879MB~999MB |
| 2GB | 1907MB~2000MB | 1804MB~1999MB |
We make no representation for the errors, omissions or updates of this document. We also make no representation for the data or music files lost of the player.
Microsoft Windows Media and Windows are trademarks of Microsoft Corporation.
Trademarks of other products mentioned in this user's manual are owned by their respective companies or organizations.
Product Features
Support formats MP3 WMA WAV
This player supports playback of music files which type is MP3, WMA or WAV.
DRM 9 playback
This player supports WMA DRM 9 digital authorized music playback.
Voice recording function
A built-in microphone inside the player enables easy voice recording.
FM Tuner
This player provides a high-performance FM Tuner that allows users to perform automatic channel search, set “favorite” channels and record “favorite” programs.
Pedometer/Stopwatch
This player provides pedometer and stopwatch functions.
Built-in 128\*64 FSTN screen
There is a build-in 128*64 FSTN screen.
Supports multilingual display
This player supports multiple languages user interface.
Lyrics synchronization
This player supports lyrics synchronization.
High Playback quality
Sound quality is higher than 90dB SNR.
Plug and play portable storage
Allows data transfer to and from a PC with USB 1.1 / 2.0 full-speed interface. The player is also a portable storage device that supports Mass Storage Class without the need to install additional driver, except for Win98SE.
Easy and quick battery charging
The player's battery can be charged via USB port from a computer or an USB interface adapter. It can be fully charged in 4 hours approximately and 80% charged in 2 hours.
System Requirement
System requirement of this player:
- Microsoft ^® Windows 98SE/2000/Me/XP
- Pentium 200MHz CPU or higher level CPU
- USB port
- 120MB hard disk free space
- CD-ROM drive
Basic Operation
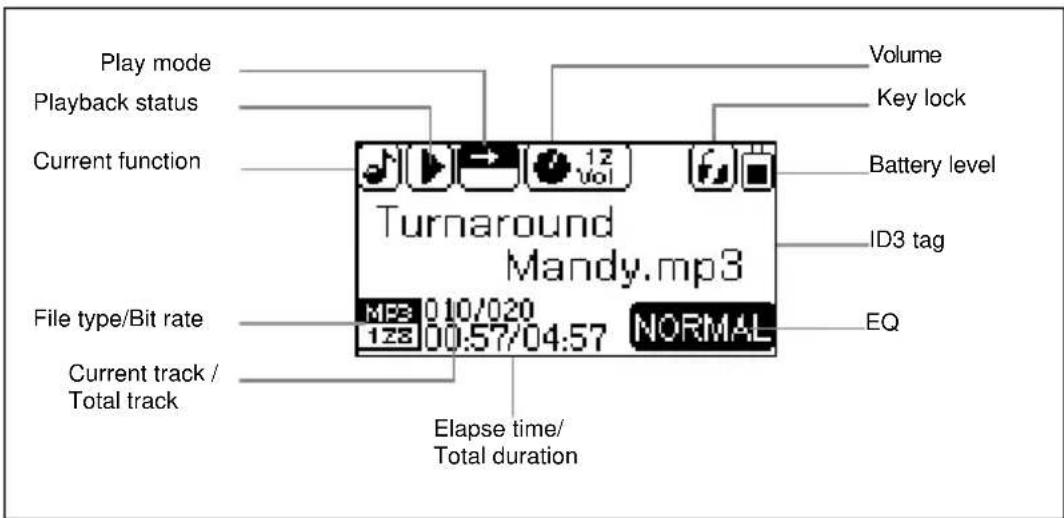
Controls and Functions

(1) Play/Pause Button (▶ II)
(2) Forward Button (▶▶)
(3) Display Area
(4) Reset Button
(5) Rewind Button (◀)
(6) Menu Button (M)
(7) Earphone Jack
(8) Volume Up Button (+)
(9) Microphone
(10) USB Port
(11) Volume Down Button (-)
(12) REC Button
Reset: Reset the player (accessed by a pointed object, such as an unbent paperclip).
Key instruction:
| Function Action | |
| Power On/Off | Long press the Play/Pause/Power [▶ II] button |
| A-B Replay Function Press [REC] button 1 | ^st : Select starting point APress [REC] button 2^nd : Select ending point B and replay AB section.Press [REC] button 3^rd : Exit replaying |
| Play or pause or resume playback Press the [▶ II] button | |
| Open the main menu Long press the menu button [M] | |
| Open the submenu press the menu button [M] | |
| Navigation within the menu | Press the Rewind button [◀] or Forward button [▶] |
| Confirm selecting Press the [▶ II] button | |
| Return to the previous menu or exit the menu | Press [M] button |
| Switch to previous track/file or next track/file | Press the Rewind button [◀] or Forward button [▶] |
| Forward or Rewind | Long press the Rewind button [◀] or Forward button [▶] |
| Volume up Press the [+] button | |
| Volume down | Press the [- ] button |
Connecting to PC
Install Device Driver for Windows 98SE
- Execute setup.exe in driver CD and complete the driver installation.
- Reboot the PC.
- Connect the MP3 player to the USB port of PC
Operation Procedure
To upgrade firmware or copy music to the player, please first to power the player off and connect the player to the PC by using a USB cable.
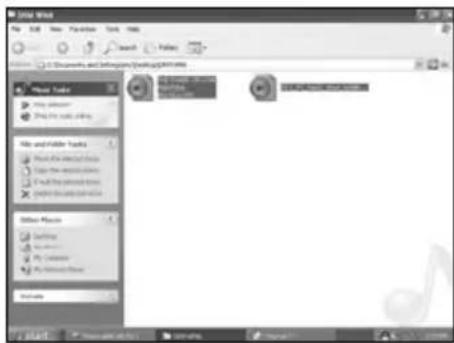
After connecting to a PC, the system will create a removable drive in "My Computer" and from which the data stored on the player becomes accessible. The screen below will be shown on the player if successfully connected. Note that please do not use USB hub or USB extended line when connection.
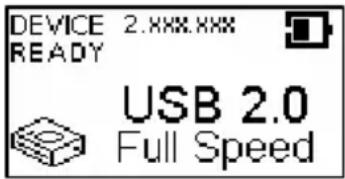
The files stored on the player can be managed through Windows File Explorer or "My Computer" to copy favorite music files or data to the player; or deleting files stored in the player.
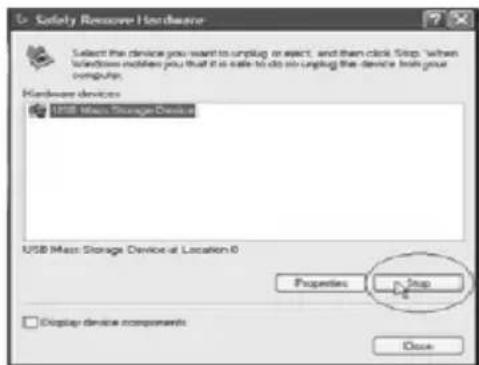
After file access is completed, please follow the steps below to remove the player to prevent file damages.
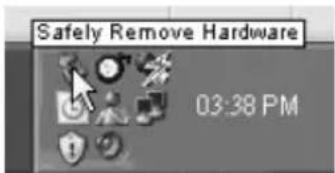
Removing Hardware
Use the left button on the mouse to double-click on the icon for removing hardware that is located on the lower right corner of the screen. Please refer to the right picture:
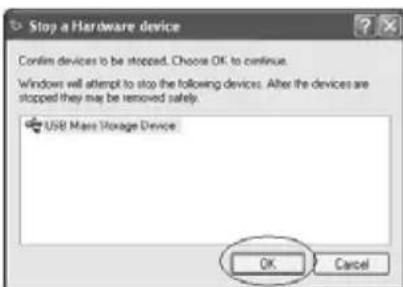
When the following screen appears, click "Stop" and then "OK" button to remove the hardware safely. The USB cable can then be removed from the player, please refer to the picture below:
Battery Charging
Be sure to charge the player before initial use for at least 2 hours. This product adopts build-in rechargeable Li-Ion battery.
Connect this player to a PC. Please refer to "Connecting to a PC" on previous section for instructions.
The battery indicator on the right top of the display shows the battery level.
When the battery is charging, the icon will be changing from an empty battery to a full one to indicate the process.

The right icon will replace the charging one when the battery is full.

Although it contains a hardware protection circuit, please do not charge the battery for more than 12 hours at a time. During charging, it's normal that the player will have a little heat.
The battery should be charged and discharged for several times to optimize power performance. The usable time of battery electricity may be various according to different volume, type of playing file and pressing operation.

Note:
- The mp3 player only accepts the standard USB 2.0 output voltage and current to charge the built-in Li-Ion battery. If the charging voltage and current are out of the compass, it will damage the battery and the mp3 player. It will be no warranty in this case. Please make sure to check the output voltage and current of the USB port on your PC or USB adapter before charging this player.
- The battery could be over discharged if the player is not used for a long time (over three months). To avoid over discharge, fully charge the player every two or three months.
- Do not touch the player with bare hands if the built-in battery is leaking. In this case, contact service center for help since the liquid may remain in the player. If your body or clothes has contacted with the battery liquid, wash it off thoroughly with water. Also, if some of liquid gets into your eyes, do not rub your eyes but immediately wash them with clean water, and consult a doctor.
WMA (Support WMA-DRM)
Download operation of WMA music with DRM9 (PD-DRM)
On Windows 98SE / Windows ME / Windows 2000 / Windows XP, music with DRM should be transferred by Windows Media Player version 9.0 or 10.0 (version 10.0 is for Windows XP only) to MP3 player.
Other download operation probably will cause the MP3 player can not read the music files with DRM protection.
Operation Instruction
On Windows 98SE / Windows ME / Windows 2000 / Windows XP, the user should upgrade Windows Media Player to version 9.0 or 10.0 (version 10.0 is only for Windows XP).
System might request to download the license in case if the user does not download the music with DRM properly from the web site. In this case, the user needs to download the license from music publisher as instruction of Microsoft showing in the operating window.
On Windows Media Player version 10.0 (Windows XP only)
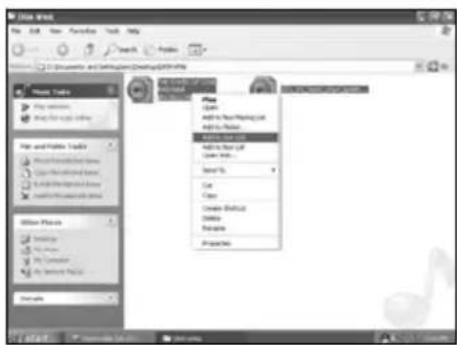
A. Connect player to PC.
B. Choose the desired WMA music with DRM.
C. Click right button of the mouse and choose "Add to Sync list".
D. On the open window, choose "Sync" option.
 | E. On “Sync” window, choose the desired WMA music with DRM as step B and choose “Removable Disk”. |
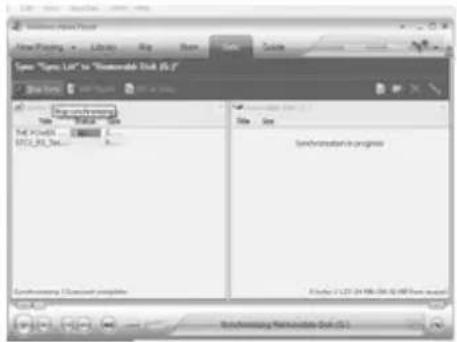 | F. Click “Start Sync” to transfer the WMA music with DRM to the player. |
Copy Music Files to the Player
If the connection is successful, a removable drive icon will appear in "My Computer".
First, find out your favorite MP3 or WMA audio files in "My Computer".
Second, use the mouse to select those audio files and click those files with the right button of the mouse to select "Copy".
Third, find Removable Drive in "My Computer" and enter it, then right click on the mouse to paste those files to the Removable Drive.
After the file copy is completed, remove the player safely from the PC.

Start-up/down Procedure
To power on the player, press the ▶ II button while the player is off.
Press and hold the ▶ II button to power off the player while the player is on to ensure the settings are saved. (The setting will only be saved if the player is power off properly by the user or time up regarding to timer setting).

Main Menu
When press and hold Menu button, the main menu will be shown on the LCD display. To select the main function, pressing ◀ or ▶ button then press ▶ II button to confirm the selection. Pressing Menu button will exit main menu and back to the main function. The main menu is as below:
(1) Music
(2) Recordings
(3) FM radio
(4) Utility
(5) Delete
(6) Settings
Activate and Deactivate Key Lock
Activate Key Lock
In Music, Recordings and FM Radio functions, activate key lock under sub menu of Music, Recordings and FM Radio. Key lock is immediately activated by pressing ▶ II button to confirm the selection.
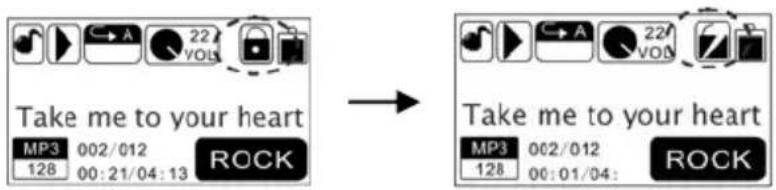
Deactivate Key Lock
To deactivate the key lock, hold down the ▶ II button until the displayed lock opens and is then hidden from the display as the pictures below (approx. 3 seconds).

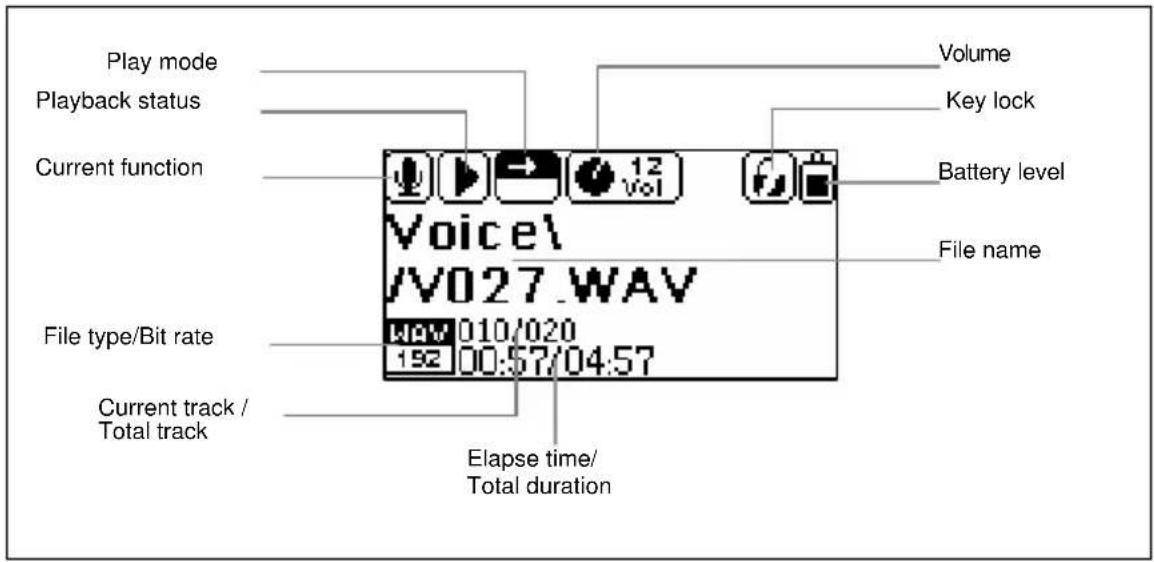
Music
LCD Display
Operation procedure
1. Select "Music"
Music function is a default function when power on the player. You also can open the music function by select the Music in the main menu.
2. Play and Pause
Music playback stops first when power on or switching to Music playback function from other function.
While the music is stop or paused, press ▶ II button to play the music. Press the ▶ II button to pause while the music is playing and press it again to resume playback.
3. Go to previous
Press the ◀ button to replay the current track. If the current track has been played less than five seconds, press the Previous button will skip to the previous track in the current play list.
4. Go to next
Press the ▶ button to skip to the next track, if the current track is the final track it will wrap around to the first track in the current play list.
5. Fast rewind
Press and hold ◀ button will cause the time code to seek backward quickly
6. Fast forward
Press and hold ▶ button will cause the time code to seek forward quickly.
7. Set AB Mode
Pressing REC button while in the music playback function means select the starting point A, pressing REC button
again to select the ending point B. Press REC button the third time to stop the playback of AB section.
8. Back to Main Menu
Press and hold Menu button will leave music function and open the Main Menu.
Sub Menu of Music
During music mode, you can press the Menu button to enter the sub menu of "Music". Press the ◄ or ▶ button to navigate the sub menu. They are Key lock, Play mode, Equalizer, Navigation, Record settings, Music, Exit. Press the ▶ II button to enter the appointed mode.
Recordings
LCD Display
Operation Procedure
Select "Recordings" Function
Select Recordings in main menu to enter Recordings playback function and press ▶ II button to start playing. Please refer to the Music function for the recordings playback and operation. Please note that there is no Shuffle and Shuffle repeat play mode in the Recordings playback function.
Function of the Recordings
-
Play recorded files from FM Record.
-
Play recorded files from Mic. Record.
Support recorded files in WAV (ADPCM) format that stored in Recordings directory of the player.
Sub Menu of Recordings
During Recordings mode, you can press the Menu button to enter the sub menu of "Recordings". Press the ◀ or ▶ button to navigate the sub menu. They are Key lock, Play mode, Navigation, Record settings, Recordings, Exit. Press the ▶ II button to enter the appointed mode.
MIC. Record
LCD Display

Operation Procedure
1. Start MIC. Record
Press and hold REC button to start MIC. Record from the microphone from whatever function except FM Radio function. When the recording icon is flashing, the recording begins.
2. Pause Recording
Press the REC button to pause recording and press it again to resume recording.
3. Stop Recording
Press Menu button to stop recording and the player turn to the Recordings function. Press ▶ II button to play the recorded file V###.WAV.
4. Recorded Files
The recorded file is defined automatically as V###.WAV in Recordings directory of the player, ### is a figure composed of three numbers starting with 001 for the first file and 002 for the second one. The format of recorded file is WAV (ADPCM).
5. Sampling rate (Record settings)
Sampling rate of recorded file can be set under the sub menu of "Recordings". The higher the sampling rate, the better recording quality will gain but will produce larger recorded file size. The lower the sampling rate, the more common quality will gain with longer recording duration and smaller recorded file size.
Cautions: During recording, the display will show "Device Full!" if the flash memory is full. The recording will be stopped and the recorded file will be automatically saved. No further recording and file saving are possible.
During recording, the display will show “Low Battery!” warning to warn the user the battery is low. The recording will be stopped and the voice file will be automatically saved. No further recording and file saving are possible unless the battery is been charged.
Since the recording function consumes more battery power, therefore, if the battery is low, no further recording is possible, even though other functions may still be played.
FM radio
LCD Display
Operation Procedure
1. Select "FM radio"
Select FM radio in main menu to listen to the FM radio programs. The device will search for frequencies automatically when first time entering or no saved stations.
2. Switch FM radio Function
Press ▶ II button to switch between the Station memory mode and Manual scan mode.

Station memory mode


Manual scan mode
3. Switch radio station
Press ◀ button or ▶ button to switch between the saved radio stations under Station memory Mode.
4. Fine-tune the frequency
Press ◀ or ▶ button to fine-tune the frequency backward or forward by 0.1MHz under Manual scan Mode.
It will quickly adjust the frequency backward or forward by press and hold the ◀ or ▶ button in the Manual Scan Mode.
5. Back to Main Menu
Press Menu button to open FM Submenu and select "Exit" will leave FM radio function, back to the main menu. You can also long press the M button to return to the main menu.
Cautions: Always connect your earphones to the earphone jack of the player, since the earphone cable serves as antenna for the internal radio.
FM Submenu
Select and enter the FM mode, press the ▶ II button to enter the appointed submenu. Here includes five options: Key lock, FM band, Auto scan, FM radio and Exit.
FM band
There are three options of FM band: Europe band, USA band, Japan band. Select Exit to return to the upper menu.
Auto scan
In the pop-up dialog box, choose "Yes" to search for frequencies automatically or "No" to return to the submenu. The player will search for the 30(maximum, it may be less than 30) strongest signal channels and memorize it. The player will return to FM Radio function after scanning for the station.
FM radio Player will be back to FM Radio function.
Exit Player will be back to the main menu.
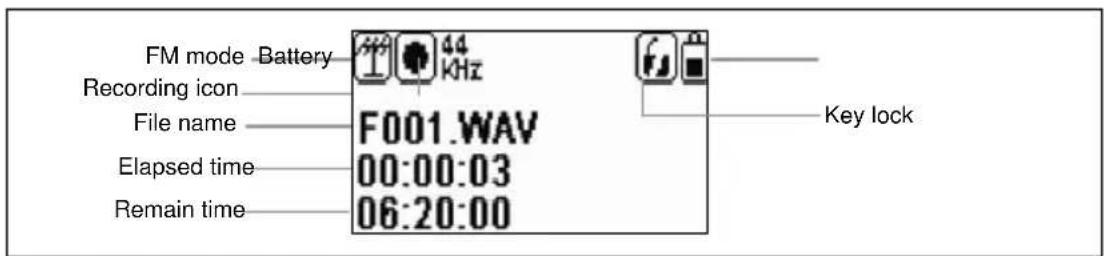
FM Record
LCD Display
Operation Procedure
1. Open "FM Record"
During FM listening, press and hold REC button to start FM Recording. When the recording icon is flashing, the recording begins.
2. Pause Recording
Press the REC button to pause and repress to resume recording at the same recorded file.
3. Stop Recording
Press Menu button to stop recording and the player will remain in FM Radio function. If you want to listen to the recorded FM program, you can go to the Recordings mode and select the recorded file.
4. Recorded Files
The recorded file is defined automatically as F###.WAV in FM directory of the player, ### is a figure composed of three numbers starting with 001 for the first file and 002 for the second one. The format of recorded file is WAV (ADPCM).
Cautions:
During recording, the display will show "Device Full!" if the flash memory is full. The recording will be stopped and the recorded file will be automatically saved. No further recording and file saving are possible.
During recording, the display will show "Low Battery!" warning to warn the user the battery is low. The recording will be stopped and the voice file will be automatically saved. No further recording and file saving are possible unless the battery is been charged.
Since the recording function consumes more battery power than other functions, therefore, if the battery is low, no further recording is possible, even though other functions may still be played.
Utility
Select and enter the Utility mode. It includes Pedometer, Stopwatch and exit. Press ▶ II button to enter. Select Exit to return to the upper menu.
Pedometer
Select and enter the Pedometer option, a dialog box of pedometer settings appears, you can press the ◀ or ▶ button to switch between the "stride" and "sex" option and press the + or - button to adjust. After setting is set up, press the ▶ II button to begin counting. The pedometer will record the steps one by one after the player shaken once time. To reset the counter to zero, press the REC button. Press M button or long press the ▶ II button to return to the utility submenu.
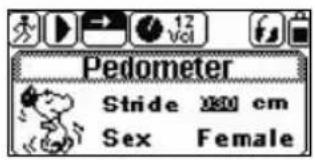
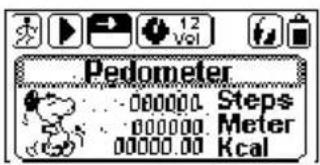
You can listen to the music while using this function.
Stopwatch
Select and enter the Stopwatch option, press the REC button to begin counting and repress to pause. Long press
this button to reset to zero and press the MENU button to return the utility submenu.
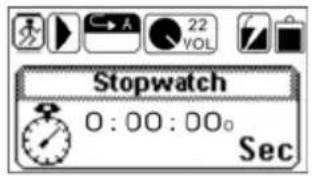
You can listen to the music while using this function.
Delete
From the main menu, press the ◀ or ▶ button to select the Delete mode. It includes Delete one, Delete all and Exit. Press ▶ II button to enter. The music will be stop after you enter this mode. Select the Exit or press the M button to return to the upper setting.
Delete One
Under the Delete mode, select and enter the Delete one function from the submenu, select the file you want to delete and press the ▶ II button to eject out a dialog box, choose "yes" to confirm deleting or "No" to exit.
Delete All
Under the Delete mode, select and enter the Delete all function from the submenu, in the dialog box, choose "yes" to confirm deleting or "No" to exit.
Settings
Select and enter the Settings mode. It includes Language, Contrast, Timer settings, Music resume, Load defaults, Memory/FW, and Exit. Press the ▶ II button to enter the appointed submenu.
Language
Here includes English, French, Spanish, Italian, German and Hungary. After selecting your desired language, press the ▶ II button to save. Select the Exit to return to the upper setting.
Contrast
Press the ◀ or ▶ button to adjust the brightness, and then press the ▶ II button to save.
Timer settings
The Timer settings include: Shutdown, Sleep timer, Backlight, and Exit. Press the ▶ II button to enter the relative setting. Select the Exit to return to the upper setting.
1. Shutdown
Press the ◀ or ▶ button to select the shutdown time and press the ▶ II button to save. Player will power off after be idle for such a period.
2. Sleep timer
Press the ◀ or ▶ button to select the sleep time after which the player will power off and press the ▶ II button to
save.
3. Backlight
Press the ◀ or ▶ button to select the backlight time after which the player will shut down the backlight and press the ▶ II button to save.
Music resume
Select YES to use this function. Select NO to exit. If you select YES, The player will play the track from the point stopped at last time. Or select NO to start playing from the beginning of the track.
Load defaults
Select YES return to the default setting. Select NO to exit.
Memory/FW
You can check the software version, the total memory of the unit and available memory capacity.
Exit
Return to the Settings mode.
References
Lyric Synchronization
The player only supports the Lyric Synchronous Display that the file shares the same name as LRC file of MP3 format, e.g., music file is named as “Angel.mp3”, the LRC file must be named as “Angel.lrc”, what's more, they have to be in the same directory
Reset Function
If the player can't use normally as some reasons (It seldom likes this at normal operation), please use the small plastic stick or dielectric to reset the player.
Rechargeable Mode
We built in environmental protection chargeable battery in the player. Turn on computer, Connect your player to your computer via the supplied USB cable.
Connect the small end of the supplied USB cable to the mini USB port on your player.
Connect the other end of the cable to one of your computer's USB ports.
To see if the battery is charging, check the battery indicator on the screen. The movement of the battery indicator shows you that the battery is charging. When fully charged the indicator will cease to move and rest on the full position.
Technical Specifications
| MP3 bit rate | 32~320Kbps (Mp3)32~192Kbps (WMA) | Music format MP3, WMA | |
| Sampling rate | 8/11/16/22/32/44/48kHz(optional) | Frequency response | 20Hz~20KHz |
| Record format WAV (ADPCM) SNR >90db | |||
| Dynamic range >80db (1KHZ) Distortion: <0.05% | |||
| (REFERENCE LEVEL:0dB (MP3) 1 mW, 4mW -52dB/-62dB (VOICE, REFERENCE REQUENCY:1KHZ) | |||
| Dimension | 77.5*36.5*17.5 mm | Weight < 52g | |
| Screen | 128*64 FSTN | Output power 5mV | |
| Battery Rechargeable Li-Ion battery | Playback duration | >10h (display on) | |
| Storage condition | Humidity <90%, normal temperature | Working environment | Humidity <85%, -10~40°C |
| USB interface: | USB 2.0 full speed | ||
| Capacity | ☐256MB ☐512MB ☐1GB ☐2GB ☐4GB | ||
Note: The options may vary upon the firmware version.
Trouble Shooting
If you have problems in operating your player, please check the trouble shooting guide below before sending it to service.
Problem: If there is no picture displayed after the player is connected to PC and can not serve as a storage device or can not be powered on after the battery is fully charged, please refer to the following steps to update the software in the player.
Check Items:
- Download the latest software from the website or copy it from the attached CD (if any) and execute the setup.exe in the folder to complete the installation.
- Press and hold Power button of the player for five seconds and plug in the USB cable.
- Execute the updated software installed by step (1) to start firmware download program and release the Power button.
-
If the software upgrade program can not detect the player, press and hold the Power button and do not release it. Keep the USB connection with the PC and use a tack or pin to press the RESET at the side of the player. Check the firmware update program can delete out the player or not. If the program still can not delete the player, unplug the USB cable and repeat step (2) and (3) until the player is detected and the software upgrade is completed.
-
The upgrade of software may format the player, so please copy the music or files in the player to PC first.
Problem: If you find there is weak signals for FM channels.
Check Items:
- Remove or turn off interference sources from the player. Interference sources may include a PC and other electronic devices.
- Adjust the angle of earphone cord and the player, for the earphone cord is the antenna of the player.
Problem: No sound from the earphone
Check Items:
- Check if the earphone is completely inserted into the jack.
- Check if the music file format is supported by the player.
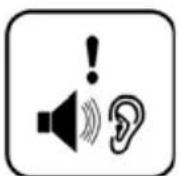
Listening caution
Do not play your headphones or earphones at a high volume.
Hearing experts advise against continuous extended play.
If you experience a ringing in your ears, reduce volume or discontinue use.
Do not use while operating a motorized vehicle. It may create a traffic hazard and is illegal in many areas.
You should use extreme caution or temporarily discontinue use in potentially hazardous situations.
Even if your headphones or earphones are the open-air type designed to let you hear outside sounds, don't turn up the volume so high that you can't hear what's around you.
Sound can be deceiving. Over time your hearing “comfort level” adapts to higher volumes of sound. So what sounds “normal” can actually be loud and harmful to your hearing.
Guard against this by setting your equipment at a safe level BEFORE your hearing adapts.
To establish a safe level:
Start your volume control at a low setting.
Slowly increase the sound until you can hear it comfortably and clearly, and without distortion.
Once you have established a comfortable sound level:
Leave it there.
Precautions:
1). When not using the player for an extended period of time, remove the batteries to avoid damage due to leakage. (Apply to Models that come with AAA or AA battery)
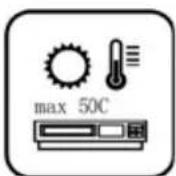
2). Do not use the player in extremely hot, cold, dusty or damp environments.
3). Make sure the HOLD key is in the unlock position before using the player (otherwise controls will not function).
4). Avoid dropping or striking the unit. This may cause external and internal physical damage to the player.
5). Replace battery with new one if: (Apply to Models that come with AAA or AA battery) a) The battery level icon displays
(An empty battery)
b) The players powers off automatically and off again when restarted.
c) No response when pressing keys with HOLD off and battery installed
6). To prevent damage from static shock, never use the player in very dry conditions.
7). When player is being formatted or transferring a file, do not interrupt the connection. Otherwise, data may be corrupt of lost.
8). When the player is used as a portable HD, please use only per instructions. Otherwise, permanent data loss could occur.
CAUTION:
This equipment has been tested and found to comply with the limits for a Class B digital device, pursuant to Part 15 of the FCC Rules.
These limits are designed to provide reasonable protection against harmful interference in a residential installation. This equipment generates uses and can radiate radio frequency energy and, if not installed and used in accordance with the instructions, may cause harmful interference to radio communications. However, there is no guarantee that interference will not occur in a particular installation. If this equipment does cause harmful interference to radio or television reception, which can be determined by turning the equipment off and on, the user is encouraged to try to correct the interference by one or more of the following measures:
◆ Reorient or relocate the receiving antenna.
◆ Increase the separation between the equipment and receiver.
◆ Consult the dealer or an experienced radio/TV technician for help.
◆ Connect the equipment into an outlet on a circuit different from that to which the receiver is connected.
FCC Caution:
◆ To assure continued compliance, following the attached installation instructions.
◆ Use only the provided shielded the interface cables when connecting to computer.
Any unauthorized changes or modifications to this equipment would void the user's authority to operate this device.
This device complies with Part 15 of the FCC Rules. Operation is subjected to the following two conditions: (1) This device may not cause harmful interference, and (2) this device must accept any interference received, including interference that may cause undesired operation.
This product may receive radio interference caused by mobile telephones or other products during operation. If such interference is apparent, please increase separation between the product and the mobile telephone or other product.
This product may receive radio interference caused by mobile telephones or other products during operation. If such interference is apparent, please increase separation between the product and the mobile telephone or other product.
Industry Canada Requirement:
This Class B digital apparatus complies with Canadian ICES-003.
- Other names of system and products mentioned in these instructions are usually the registered trademarks or trademarks of the manufacturers who developed the system or product concerned.
The ^TM and ^ are not used to identify registered trademarks and trademarks in these instructions.
This manual was correct and complete at the time of printing. However, specifications and updates can occur at any time without prior notice.
No part of this manual may be copied, republished, reproduced, transmitted or distributed in any way without prior written consent of Nextar, Inc. Any unauthorized distribution of this manual is expressly forbidden.
© 2008 Nextar (Hong Kong) Limited. Nextar is a trademark and service mark of Nextar (Hong Kong) Limited. All other brand names, trademarks and service marks are property of their owners.
Nextar may find it necessary to modify, amend or otherwise change or update this manual. We reserve the right to do this at any time, without any prior notice. All specifications and features are subject to change without notice. All screen shots shown are simulated and may not represent the actual screen on production units sold to consumers.
For instruction manuals, updated drivers or other information, be sure to visit our website at:
www.Nextar.com
Or write us at:
Nextar
1661 Fairplex Dr.
LaVerne, CA USA 91750
Copyright © 2008