
4-Port Broadband Router 524957 - Router Intellinet - Free user manual and instructions
Find the device manual for free 4-Port Broadband Router 524957 Intellinet in PDF.


| Product Type | 4-Port Broadband Router |
| Model | 524957 |
| Brand | Intellinet |
| Dimensions (W x L x H) | 155 x 85 x 35 mm (6.1 x 3.3 x 1.4 in) |
| Weight | 0.41 kg (0.9 lbs) |
| Power Supply | External adapter, 9 V DC, 500 mA |
| LAN Ports | 4 x RJ45 10/100 Mbps with Auto MDI/MDI-X |
| WAN Port | 1 x RJ45 10/100 Mbps |
| Standards | IEEE 802.3 (10Base-T), IEEE 802.3u (100Base-TX) |
| Firewall Features | NAT, URL filtering, MAC filtering, client filtering, DMZ |
| Supported WAN Types | Dynamic IP, Static IP, PPPoE, BigPond |
| VPN Pass-Through | PPTP, IPSec, L2TP |
| QoS | Port-based and DSCP bandwidth management |
| DHCP Server | Yes, with static lease management |
| DDNS Support | Yes, compatible with DynDNS |
| UPnP | Yes |
| Default IP Address | 192.168.2.1 |
| Default Login | Username: admin, Password: 1234 |
| Certifications | FCC Class B, CE |
| Operating Temperature | 0 – 40°C (32 – 104°F) |
| Operating Humidity | 10 – 95% RH, non-condensing |
| Package Contents | Router, Ethernet cable 1 m, power adapter, quick install guide, user manual on CD |
Frequently Asked Questions - 4-Port Broadband Router 524957 Intellinet
User questions about 4-Port Broadband Router 524957 Intellinet
0 question about this device. Answer the ones you know or ask your own.
Ask a new question about this device
Download the instructions for your Router in PDF format for free! Find your manual 4-Port Broadband Router 524957 - Intellinet and take your electronic device back in hand. On this page are published all the documents necessary for the use of your device. 4-Port Broadband Router 524957 by Intellinet.
USER MANUAL 4-Port Broadband Router 524957 Intellinet
4-PORT BROADBAND ROUTER USER MANUAL MODEL 524957


INT-524957-UM-1210-01
INTRODUCTION
Thank you for purchasing the INTELLINET NETWORK SOLUTIONS™ 4-Port Broadband Router, Model 524957.
Combining a router, firewall and four-port Fast Ethernet switch, this handy device lets you experience fast speeds as you surf the Web, download music or photos, and play online games. A DHCP server that automatically assigns IP addresses to users on the LAN — plus UPnP that supports gaming — makes this the perfect router for the home network.
Keeping intruders out of your network can be a challenge, but this feature-rich router is designed to make that task easier. It includes a true firewall that secures your network against hackers. With Network Address Translation (NAT) to shield your networked devices from intruders plus content control using URL and MAC filtering, you can rest assured that you have taken the necessary precautions to protect the data on your network.
The easy-to-follow instructions in this user manual help make setup and operation quick and simple, so you'll also soon be enjoying the benefits of these additional features:
- Integrated 10/100 Mbps LAN switch with Auto MDI/MDI-X support
• Supports virtual server and DMZ (demilitarized zone)
• Supports DDNS (dynamic DNS)
• Supports VPN pass-through (PPTP, L2TP)
• QoS (Quality of Service) bandwidth management
• VPN Pass Through (PPTP, IPSec, L2TP)
• DHCP server supports static lease management
• Supports remote management
• Supports static routing - Firmware updates via Web-based user interface
• Three-Year Warranty
Package Contents
• 4-Port Broadband Router
- User manual on CD, plus quick installation guide
• RJ45 Ethernet cable: 1.0 m (3 ft.)
- Power adapter
TABLE OF CONTENTS
1 Hardware Installation.... 4
1.1 Rear Panel Ports & Jacks.... 4
1.2 Front Panel LEDs 5
2 Network Settings....5
2.1 IP Address Setup 5
2.2 Confirming the Connection 14
2.3 Logging In to the Web Browser 16
3 Router Setup 18
3.1 Quick Setup.... 18
3.2 Admin 23
3.3 WAN 27
3.4 LAN 33
3.5 NAT 35
3.6 Firewall 40
3.7 Routing 43
3.8 QoS 45
3.9 Miscellaneous....47
3.10 High Level 49
3.11 Status 49
4 Troubleshooting....51
5 Specifications....52
1 HARDWARE INSTALLATION
Using the included RJ45 Ethernet cable (and more, as needed), make your 4-Port Broadband Router network connections by following the steps below and referring to the Port and LED descriptions (presented from left to right).
- Turn off all devices to be incorporated into the network, including any PCs, switches/hubs, the modem and the router.
- Connect the LAN or Ethernet network port of the cable/DSL modem to the router's WAN port.
- Connect PCs (and any switch/hub used to expand the network) to the router's LAN ports.
- Turn on the cable/DSL modem.
- Use the included power adapter to connect the router to an AC outlet.
- Turn on the PC you'll be using to configure the router.
1.1 Rear Panel Ports & Jacks

WAN — This 10/100Mbps port connects the cable/DSL modem.
PC1-4 — These four LAN ports connect networked devices, such as PCs, print servers and remote hard drives. If you connect a LAN port to a switch or hub, check that both the device's Power LED and the router's corresponding PC/LAN LED (see below) light to confirm the connection.
Reset — Push this recessed button to clear all established router configuration settings and reset to the factory default settings. See Section 3: Restore Defaults.
PWR — This jack is for the included external 9 V DC, 500 mA power adapter.
1.2 Front Panel LEDs
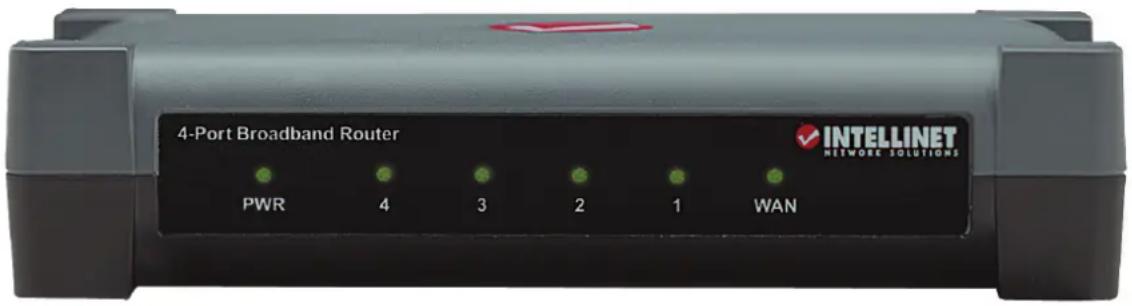
PWR — This lights when the router is turned on.
4-1 — These correspond to the four LAN ports on the router's rear panel. Lighted indicates a successful connection; blinking means data is being transmitted or received through that port.
WAN — Lighted indicates a successful Internet connection; blinking indicates data is being transmitted or received through that port.
2 NETWORK SETTINGS
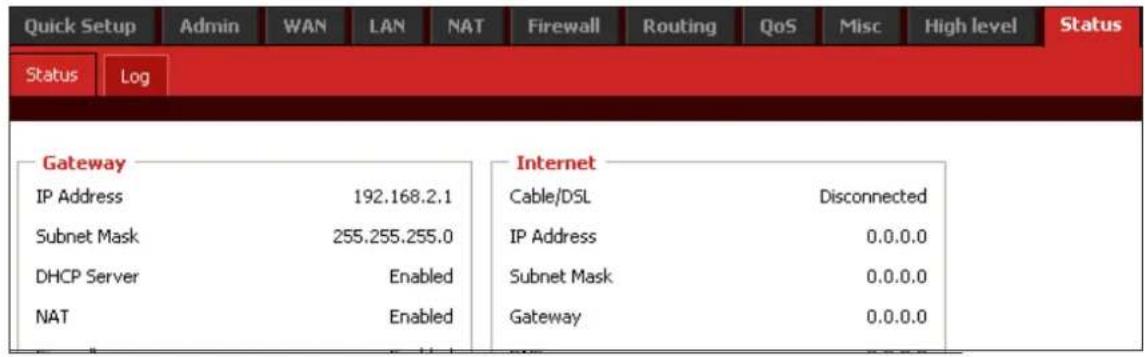
To configure the router using a Web browser-based configuration utility, at least one properly configured computer needs to be connected to the router via the Ethernet. This 4-Port Broadband Router is configured with the default IP address of 192.168.2.1 and subnet mask of 255.255.255.0, and its DHCP server is enabled by default.
At this point, you can proceed to Section 2.3: Logging In to the Web Browser. If you encounter problems from there, return here and follow the steps in Sections 2.1: IP Address Setup and 2.2: Confirming the Connection.
2.1 IP Address Setup
2.1.1 Windows 98SE / Me
- On your PC's desktop, click "Start" and go to the Control Panel.
- Double-click the "Network" icon to display the Network dialog box.
- Click the Configuration tab and ensure that you have the appropriate network card installed.
- Select "TCP/IP." NOTE: If "TCP/IP" is listed more than once, select
the item that has an arrow ( → ) pointing to the network card installed on your computer. Do not choose the TCP/IP listing that has the words “Dial Up Adapter” beside it.
- Click "Properties" to display the TCP/IP Properties dialog box.
- Ensure "Obtain IP Address Automatically" is selected/checked.
- In the WINS Configuration dialog box, ensure that "Disable WINS Resolution" is checked.
- In the Gateway dialog box, remove all entries from the "Installed gateways" section by selecting them and clicking "Remove."
- In the DNS Configuration dialog box, remove all entries from the DNS Server Search Order box by selecting them and clicking "Remove." Remove all entries from the Domain Suffix Search Order box by selecting them and clicking "Remove." Click "Disable DNS."
- Click "OK" to return to the Network Configuration dialog box.
- Click "OK." If prompted to restart, click "Yes."
2.1.2 Windows 2000
- On your PC's desktop, click "Start" and "Settings," then go to the Control Panel.
- Double-click the "Network and Dial-up Connections" icon.
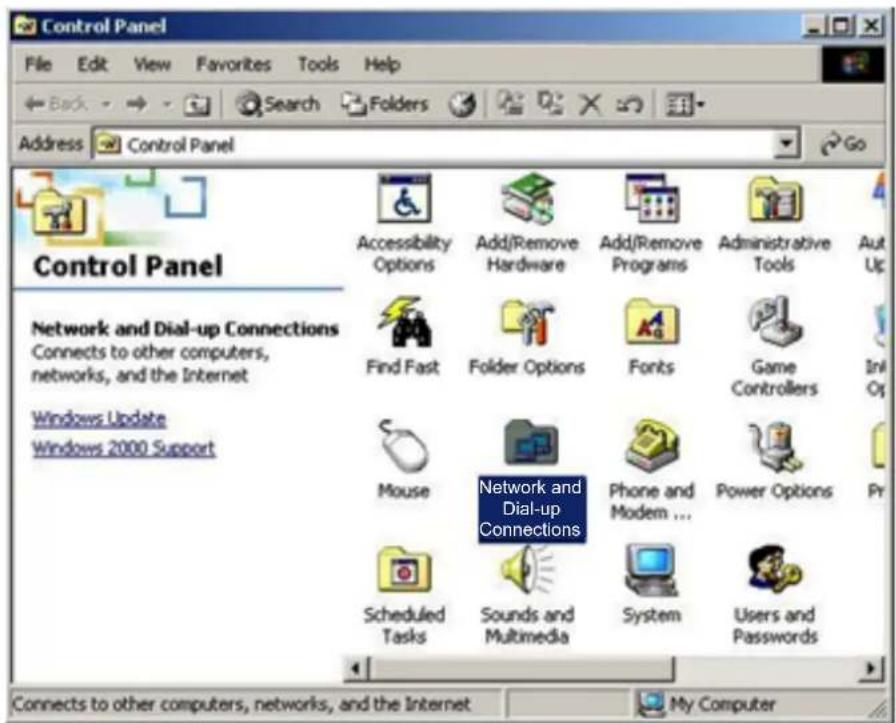
- Right-click on the "Local Area Connections" icon to display the pop-up menu, then click "Properties."

- Highlight "Internet Protocol (TCP/P)" and click "Properties."

- Select "Obtain an IP address automatically" and "Obtain DNS server address automatically"; click "OK" to return to the previous screen.

- When the Local Area Connection Properties screen displays again, click "OK."

2.1.3 Windows XP
- On your PC's desktop, click "Start" and go to the Control Panel.
- Select "Network and Internet Connections."

- Click "Network Connections."
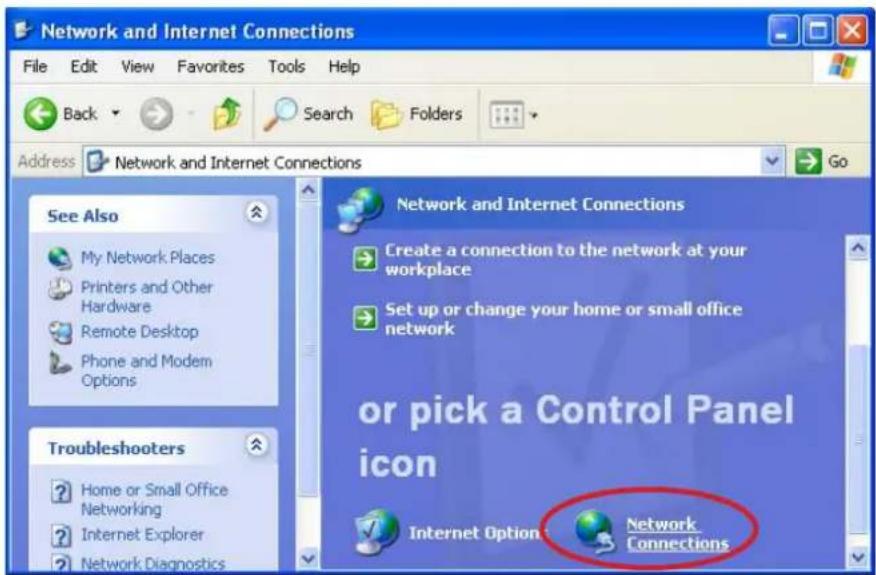
- Right-click on the "Local Area Connections" icon to display the pop-up menu, then click "Properties."

- On the subsequent Local Area Connection Properties screen, select "Internet Protocol (TCP/IP)" and click "Properties."

- Select both "Obtain an IP address automatically" and "Obtain DNS server address automatically"; then click "OK."

- When Local Area Connection Properties displays again, click "Close."

2.1.4 Windows Vista/7
- On your PC's desktop, click "Start" and go to the Control Panel.
- Click "Network and Sharing Center."

- With the Network and Sharing Center screen displayed, select "Manage network connections."

- Right-click on the "Local Area Connection" icon to display the pop-up menu, then click "Properties."

- Highlight "Internet Protocol Version 4 (TCP/IPv4)" and click "Properties."

- Select both "Obtain an IP address automatically" and "Obtain DNS server address automatically"; then click "OK."

- When Local Area Connection Properties displays again, click "OK" to close the screen.
2.2 Confirming the Connection
Once the configuration for obtaining an IP address is complete, you can use the ping command to verify that the computer is able to communicate with the router. Open the DOS window (as detailed below) and ping the IP address of the router at the DOS prompt.
- For Windows 98SE / Me: Click "Start," then "Run"; enter "command" and click "OK."
- For Windows 2000 / XP / Vista / 7: Click "Start," then "Run"; enter "cmd" and click "OK."
If the Command window returns something similar to the lines below, the connection between the router and your computer has been successfully established.
C:\Documents and Settings\admin>ping 192.168.2.1
Pinging 192.168.2.1 with 32 bytes of data:
Reply from 192.168.2.1: bytes=32 time=1ms TTL=64
Reply from 192.168.2.1: bytes=32 time=1ms TTL=64
Reply from 192.168.2.1: bytes=32 time=1ms TTL=64
Reply from 192.168.2.1: bytes=32 time=1ms TTL=64
Ping statistics for 192.168.2.1:
Packets: Sent = 4, Received = 4, Lost = 0 (0% loss),
Approximate round trip times in milli-seconds:
Minimum = 1ms, Maximum = 1ms, Average = 1ms
If the computer fails to connect to the router, the Command window will return the following (which indicates that the computer network settings and cable connections between the router and the computer should be checked):
C:\Documents and Settings\admin>ping 192.168.2.1
Pinging 192.168.2.1 with 32 bytes of data:
Request timed out.
Request timed out.
Request timed out.
Request timed out.
Ping statistics for 192.168.2.1:
Packets: Sent = 4, Received = 0, Lost = 4 (100% loss),
Remember, in order for your network to operate properly, the router needs to be configured through your Web browser, as explained in the following section.
2.3 Logging In to the Web Browser
- Open a Web browser (Microsoft Internet Explorer, Firefox, Safari, etc.) on the computer you've just connected to the router and enter the IP address (192.168.2.1) in the address bar.

Press

Once you've logged in, the router's user interface will display.

3 ROUTER SETUP
With the user interface displayed, you have the option of proceeding with the Quick Setup procedure (Section 3.1 below) or selecting any of the 10 additional menu options (Admin, WAN, etc. — Sections 3.2–3.11), which allow you to modify the default settings to customize your router and network configuration.
3.1 Quick Setup
The Quick Setup Wizard will guide you through the initial configuration of the router. It's best that you follow the Quick Setup Wizard step by step.
- Enter an easily recognized/remembered name for the router in the Host Name field, then select a time zone from the drop-down menu. (Enabling and configuring the Daylight Saving settings is optional.) Click "Next."

- Specify the WAN (wide area network) connection type required by your Internet service provider. You can select "Auto Detect," which will display the connection type in the Result field when you click "Detect":
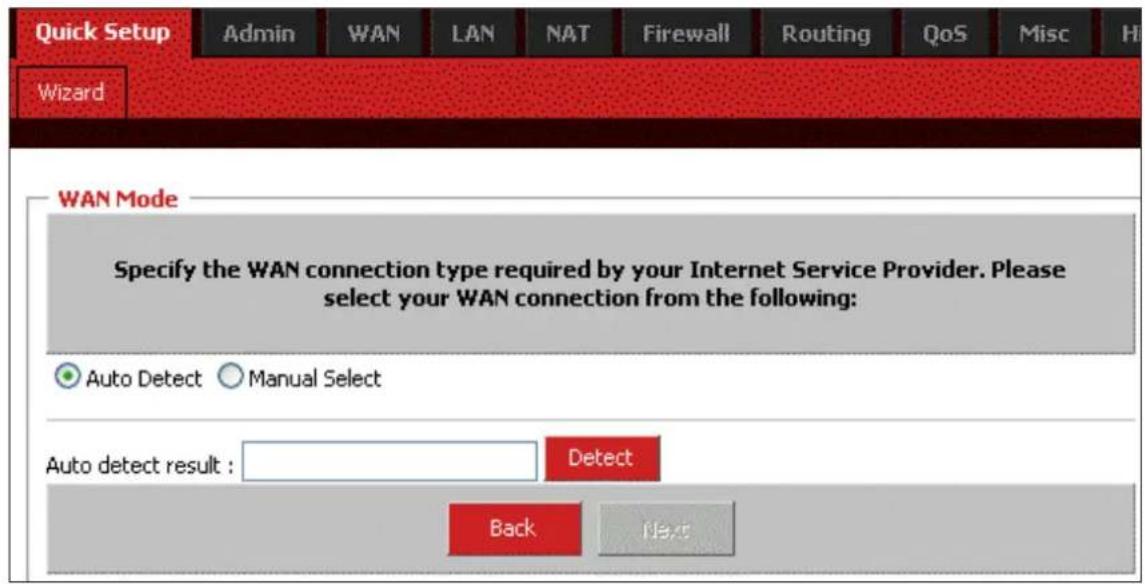
or you can select "Manual Select," which presents you with four options. Select one and click "Next" or click "Back" to return to the previous screen. NOTE: Additional configuration options for each of these four connection types are explained in detail in Section 3.3: WAN.

Dynamic IP Address — This connection type means you obtain an IP address from your Internet service provider (ISP) automatically. (ISPs that supply a cable modem always use this.) Click “Next” to advance to the next screen.

Clone MAC: The WAN port of the router has a unique Media Access Control (MAC) address assigned to it referred to as "Default MAC." The "Clone MAC" option is available for special situations; for example, since an ISP allows only certain MAC addresses access to the Internet, selecting "MAC Address" and clicking "Clone MAC" modifies your WAN port's MAC address in order to avoid detection of the router, which can lead to a service disconnect.
Static IP — This connection type allows you to maintain the same IP address over time (unlike “temporary” dynamic IP addresses that are assigned with each Internet connection). Click “Next” to

advance to the next screen.
IP Address: Enter the address provided by your ISP. Subnet Mask: Enter the address provided by your ISP. Gateway IP: This is provided by your ISP.
PPPoE — This connection type (Point-to-Point Protocol over Ethernet) is typically used with DSL and ADSL service. Click “Next” to advance to the next screen.

User Name: Enter the PPPoE user name provided by your ISP. Password: Enter the PPPoE password provided by your ISP. Retype Password: For confirmation.
Service Name: For reference. MTU: Enter a value for the largest packet size to be permitted for network transmission. The default value of 1496 is recommended.
Maximum Idle Time: Enter a figure within the range in order to cut your connection with your ISP after that period of time. BigPond — Select if this service (Australia’s largest ISP) is used. Click “Next” to advance to the next screen.
BigPond Account: Enter the user name provided by the ISP. BigPond Password: Enter the password provided by the ISP. Retype Password: For confirmation.
Authentication Server: This is provided by the ISP.

- When the appropriate fields have been filled in for the selected connection type, click "Next" to advance to the DNS Server screen.
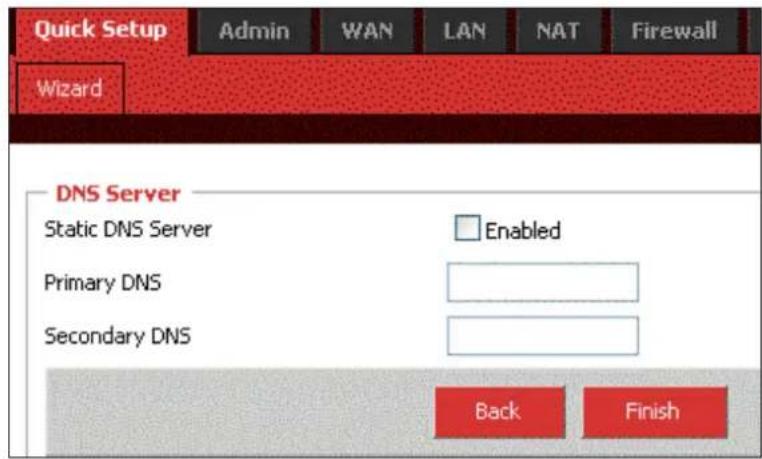
- Static DNS Server: Select to enable/disable the server.
-
Primary DNS: Your ISP will provide at least one Domain Name System (DNS) IP address. (DNS translates readable/recognizable domain names into numerical IP addresses.) Enter the IP address of your DNS server here.
• Secondary DNS: As an option, you can enter the IP address of a backup DNS server here. -
Once all the necessary or preferred settings have been established, click "Finish" to exit the Quick Setup wizard. At this point, your router is operational: To take advantage of the numerous added features, continue through the following sections of the manual.
3.2 Admin
This submenu presents numerous basic, yet popular, configuration options and features, including modifying your network password. NOTE: As you finish making changes to the settings on any of the menu screens, click "OK" to implement the changes or click "Cancel" to clear the fields and revert to previous selections.
3.2.1 Management
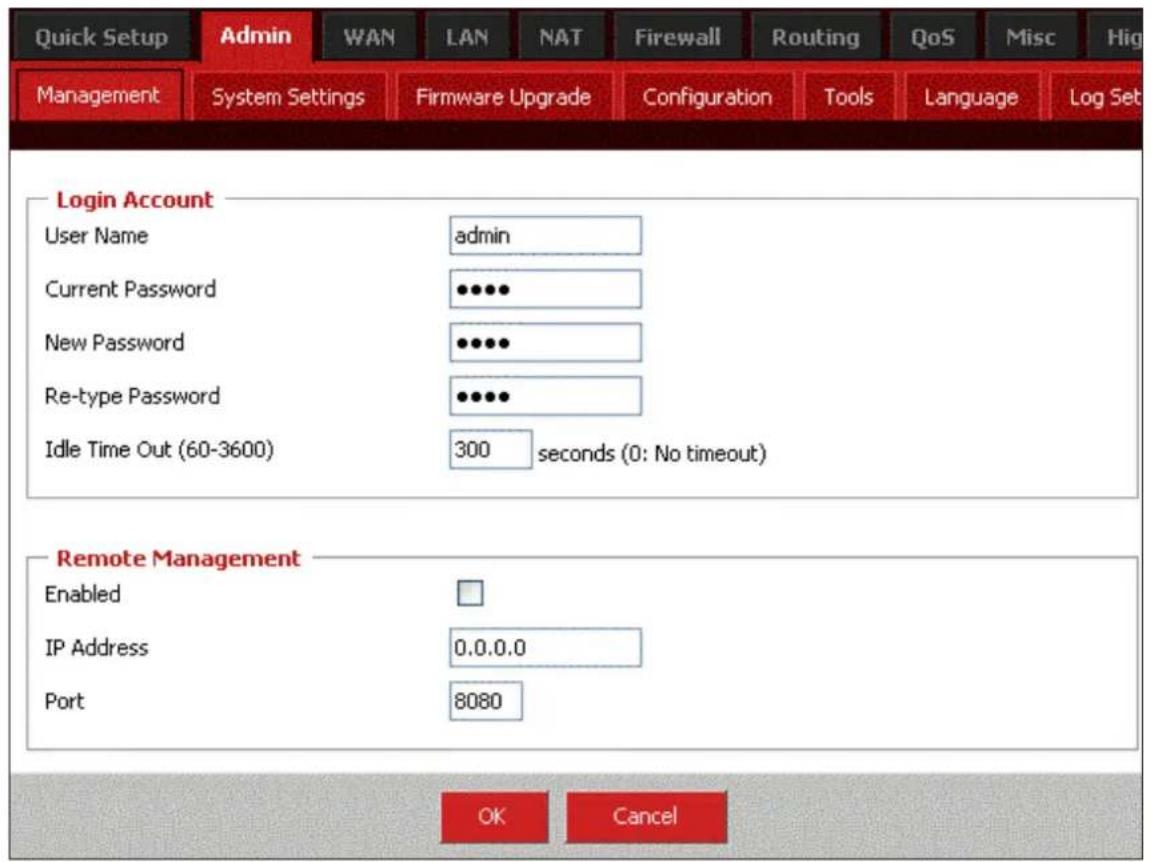
User Name: This is the one field that cannot be altered.
Current / New / Re-type Password: Enter as indicated.
Idle Time Out: Enter a figure within the range in order to cut your connection with your ISP after that period of time.
Remote Management: Select to enable/disable the function, and enter the number of the port you want to manage.
3.2.2 System Settings

NTS Server: For reference.
Time Zone: Select from the drop-down menu.
Daylight Saving: Select to enable/disable, then set the date range using the drop-down menus.
Host Name: For reference.
NAPT: Select to enable/disable Network Address Port Translation.
3.2.3 Firmware Upgrade
This important function allows you to upgrade the router's firmware. To do so, you need to download the firmware file to your local hard disk, then enter that file name and path in the appropriate field on this screen. You can also use the "Browse" button to find the firmware file on your PC. Once you've selected the new firmware file, click "OK" to start the upgrade process. (You may need to wait a few minutes for the upgrade to complete.) Once the upgrade is complete, you can start using the router. NOTE: It is always important that you take every precaution against a loss of power or network disconnect during any

firmware upload procedure, as such an occurrence can cause damage both to the file and the router itself.
3.2.4 Configuration

Restore Factory Default: Select to put everything into factory configuration. Make sure you have made a copy of what you've configured. The default settings are "admin" for Username; "1234" for Password; "192.168.2.1" for IP Address; and "255.255.255.0" for Subnet Mask.
Backup Settings: Select to back up the current settings in your computer.
Restore Settings: Select to restore the settings that are stored in your computer. Click "Browse" to select the proper files, then click "OK."
3.2.5 Tools
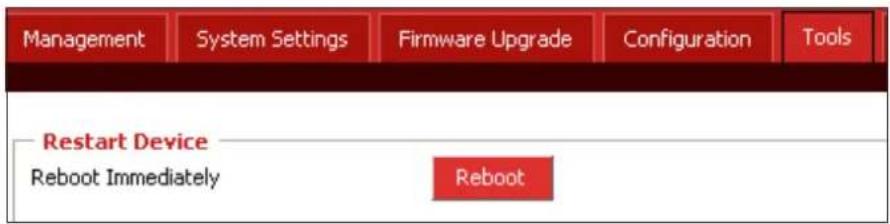
Reboot: Click to restart the router.
3.2.6 Language

Language: Make a selection from the drop-down menu.
3.2.7 Log Settings

Settings: This section displays the logs of various activities and events, and also allows you to send these records to another location via e-mail.
SMTP Server: Enter the address of the Simple Mail Transfer Protocol server that will be used to send the log information.
Sender/Receiver Email Address: Enter the addresses that logs will be sent from/to, then select "Email Log" and click "Send."
3.2.8 Logout
Click "OK" to log out from the Web.
3.3 WAN
As mentioned in Section 3.1: Quick Setup, this menu presents details about the numerous options available in the four connection types you can choose from: Dynamic IP Address, Static IP, PPPoE and BigPond.

3.3.1 Dynamic IP Address
Make this selection in the WAN Connection Mode panel to obtain an IP address from your Internet service provider (ISP) automatically. (ISPs that supply a cable modem always use this.)
Request IP Address: If your ISP supports this function, you can enter an IP address you would prefer.
MTU: Maximum Transmission Unit specifies the largest packet size permitted for network transmission. Most DSL users should use the value 1492. You can set MTU manually, but it should be left in the 576 to 1500 range. NOTE: If the value entered isn't in accord with the value the ISP provides, it can cause problems, such as failure to send e-mail or to browse. (If a problem occurs, contact your ISP.)
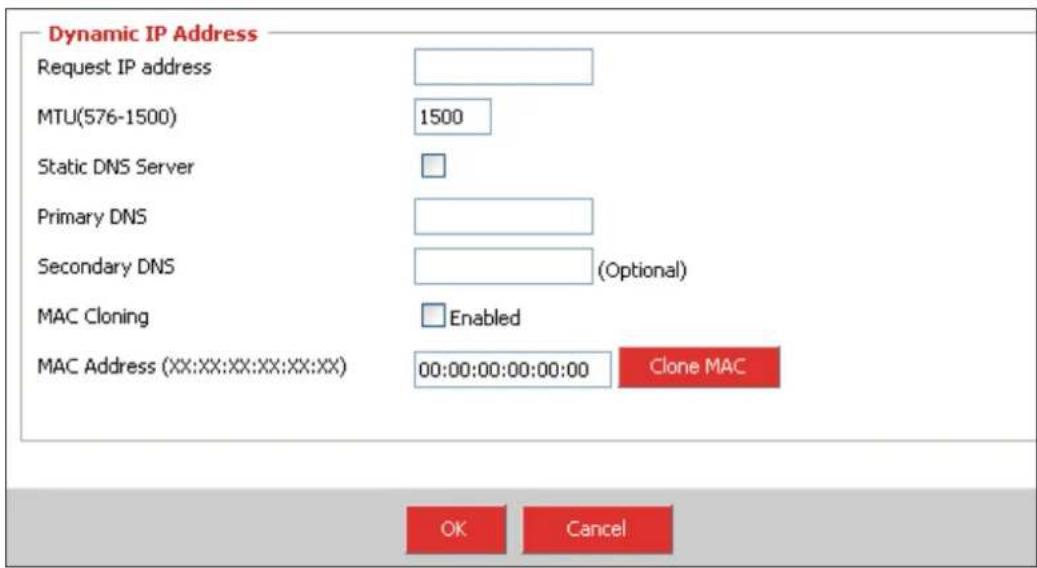
Primary DNS: Your ISP will provide at least one Domain Name System (DNS) IP address. (DNS translates readable/recognizable domain names into numerical IP addresses.) Enter the IP address of your DNS server here.
Secondary DNS: As an option, you can enter the IP address of a backup DNS server here.
MAC Address: The WAN port of the router has a unique Media Access Control (MAC) address assigned to it referred to as "Default MAC." The "Clone MAC" option is available for special situations; for example, since an ISP allows only certain MAC addresses access to the Internet, selecting "MAC Address" and clicking "Clone MAC" modifies your WAN port's MAC address in order to avoid detection of the router, which can lead to a service disconnect.
3.3.2 Static IP
This connection type allows you to maintain the same IP address over time (unlike “temporary” dynamic IP addresses that are assigned with each Internet connection).
IP Address: Enter the address provided by your ISP.
Subnet Mask: Specify a subnet mask for your WAN segment.
Gateway IP: This is provided by your ISP.
MTU: The MTU (Maximum Transmission Unit) setting specifies the largest packet size permitted for network transmission. Most DSL


users should use the value 1492. You can set MTU manually, and you should leave this value in the 576 to 1500 range. NOTE: If the value entered isn't in accord with the value the ISP provides, it can cause problems, such as failure to send e-mail or to browse. (If such a problem occurs, contact your ISP for information about correcting the MTU value.)
Primary DNS: Your ISP will provide at least one Domain Name System (DNS) IP address. (DNS translates readable/recognizable domain names into numerical IP addresses.) Enter the IP address of your DNS server here.
Secondary DNS: Enter the IP address of a backup DNS server here. MAC Address: The WAN port of the router has a unique Media Access Control (MAC) address assigned to it referred to as "Default MAC." The "Clone MAC" option is available for special situations; for example, since an ISP allows only certain MAC addresses access to the Internet, selecting "MAC Address" and clicking "Clone MAC" modifies your WAN port's MAC address in order to avoid detection of the router, which can lead to a service disconnect.
3.3.3 PPPoE
This connection type (Point-to-Point Protocol over Ethernet) is typically used with DSL and ADSL service.

Address Mode: Select whichever service you're provided.
IP Address: If you select Static PPPoE, you must enter an IP address here.
PPPoE Account: Enter the PPPoE username provided by your ISP. PPPoE Password: Enter the PPPoE password provided by your ISP. Please retype your password: For confirmation.
MTU: The MTU (Maximum Transmission Unit) setting specifies the largest packet size permitted for network transmission. Most DSL users should use the value 1492. You can set MTU manually, and you should leave this value in the 576 to 1500 range. NOTE: If the value entered isn't in accord with the value the ISP provides, it can cause problems, such as failure to send e-mail or to browse. (If such
a problem occurs, contact your ISP for information about correcting the MTU value.)
Primary DNS: Your ISP will provide at least one Domain Name System (DNS) IP address. (DNS translates readable/recognizable domain names into numerical IP addresses.) Enter the IP address of your DNS server here.
Secondary DNS: Enter the IP address of a backup DNS server here.
MAC Address: The WAN port of the router has a unique Media Access Control (MAC) address assigned to it referred to as “Default MAC.” The “Clone MAC” option is available for special situations; for example, since an ISP allows only certain MAC addresses access to the Internet, selecting “MAC Address” and clicking “Clone MAC” modifies your WAN port’s MAC address in order to avoid detection of the router, which can lead to a service disconnect.
Connection Mode: There are three options in the drop-down menu:
- Keep-Alive keeps you connected to the Internet indefinitely, even when your connection sits idle.
- Auto-Connect is suitable for Internet connections that need to record the online time. It doesn't connect to the Internet when the power is on, only when an access request is made (it will connect automatically.) When there is no access request within a set timeframe (60-3600 seconds), it will disconnect
- Manual On is suitable when the access method is controlled by an administrator using a password. It doesn't connect to the Internet when the power is on, only when you connect or disconnect manually.
3.3.4 BigPond
This connection option is used in conjunction with Telstra, Australia's largest ISP.
BigPond Account: Enter the user name provided by the ISP.
BigPond Password: Enter the password provided by the ISP.
Please Retype Your Password: For confirmation.
MTU: The MTU (Maximum Transmission Unit) setting specifies the largest packet size permitted for network transmission. Most DSL users should use the value 1492. You can set MTU manually, and you should leave this value in the 576 to 1500 range. NOTE: If the

MTU: Maximum Transmission Unit specifies the largest packet size permitted for network transmission. Most DSL users should use the value 1492. You can set MTU manually, but it should be left in the
576 to 1500 range. NOTE: If the value entered isn't in accord with the value the ISP provides, it can cause problems, such as failure to send e-mail or to browse. (If a problem occurs, contact your ISP.)
Primary DNS: Your ISP will provide at least one Domain Name System (DNS) IP address. (DNS translates readable/recognizable domain names into numerical IP addresses.) Enter the IP address of your DNS server here.
Secondary DNS: Enter the IP address of a backup DNS server here.
MAC Address: The WAN port of the router has a unique Media Access Control (MAC) address assigned to it referred to as "Default MAC." The "Clone MAC" option is available for special situations; for example, since an ISP allows only certain MAC addresses access to the Internet, selecting "MAC Address" and clicking "Clone MAC" modifies your WAN port's MAC address in order to avoid detection of the router, which can lead to a service disconnect.
3.4 LAN
This menu — with its two submenu screens: LAN Settings and DHCP Client List — presents options for configuring your local area network.
3.4.1 LAN Settings

IP Address: This is the router's LAN port IP address (your LAN clients' default gateway IP address), shown with the default value.
Subnet Mask: Specify a subnet mask for your LAN segment.
DHCP Server: Select to enable/disable the DHCP server. By enabling, the router will automatically give your LAN clients an IP address.
IP Pool Starting/Ending Address: If desired, define a specific range for your DHCP server to issue IP addresses to your LAN clients.
Lease Time: From the drop-down menu, select the time interval after
which the connected client computers are instructed to request a new IP address from the router.
DNS Proxy: When activated, the router acts as a DNS server in your network, which means that the computer sends the DNS request to the router, which in turn queries the ISP's DNS server. Since the router is caching the results, subsequent requests to the same domain name benefit from a performance gain. NOTE: These gains are negligible in smaller networks, so leaving this option disabled — thus having the client doing the DNS look-up itself — is more often than not the best option.
DHCP Client List: This table displays information relevant to clients connected to the router.
Host Name: Enter the name of a static client allowed access to the router.
IP Address: Enter the IP address of a static client allowed access to the router.
MAC Address: Enter the MAC address of a static client allowed access to the router.
3.5 NAT
The network address translation (NAT) menu presents options that make it possible to open ports, create a DMZ and perform other functions.
3.5.1 Virtual Server
Some games, servers and applications don't work in conjunction with NAT unless a virtual server is established to provide WAN-to-LAN port mapping.
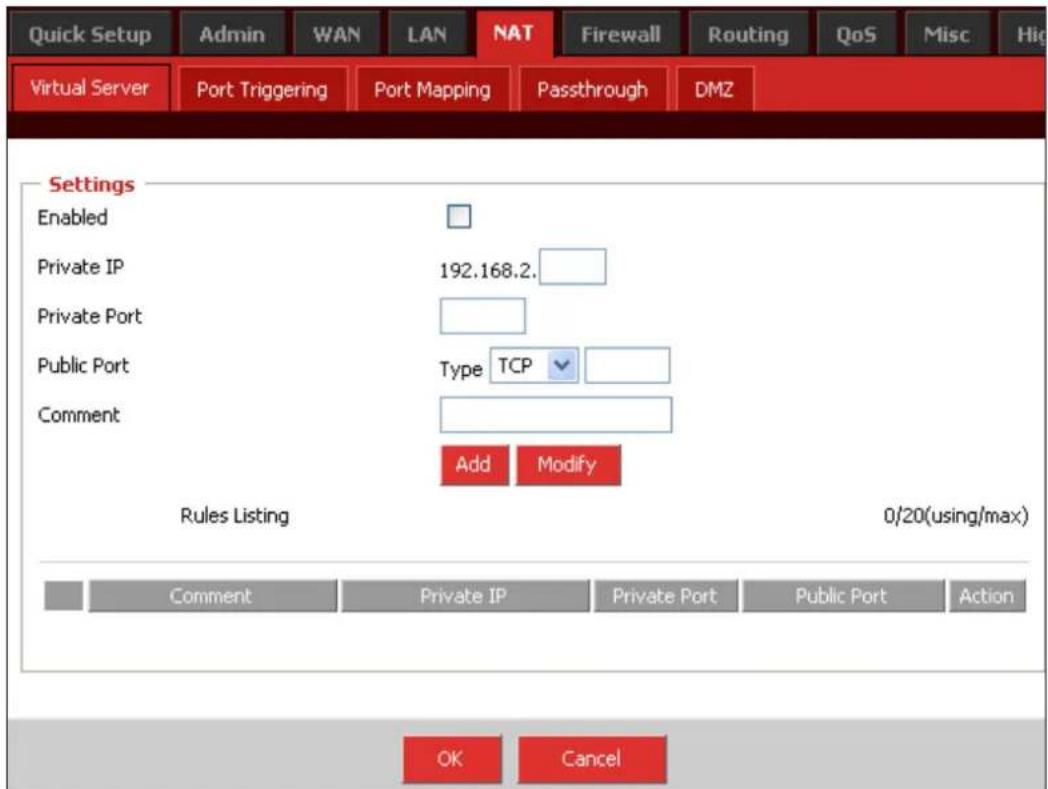
Enabled: Select to enable/disable the function.
Private IP: This is the address of the internal host for which you want to open a port.
Private Port: Enter an internal port number.
Public Port: Enter an external port number.
Type: Select the protocol that's required for the service you're setting up (TCP or UDP).
Comment: Enter any description of the current virtual server item.
Add/Modify: Click to add/edit rules you've configured.
3.5.2 Port Triggering
The port trigger module dynamically registers virtual server rules when any IP host generates the packet from the specified trigger protocol and port. The port trigger module uses a forward protocol type and port number, and uses the IP address of the host that generates the trigger packet when it registers a rule.

Enabled: Select to enable/disable the function.
Trigger Port: Enter a range of ports.
Trigger Type: Select either "TCP" or "UDP" from the drop-down menu.
Public Port: Enter a range of ports.
Public Type: Select either "TCP" or "UDP" from the drop-down menu.
Comment: Enter any description of the configured trigger.
Add/Modify: Click to add/edit rules you've configured.
3.5.3 Port Mapping
This submenu/function allows you to set up public services on your
network, such as Web servers, FTP servers, e-mail servers and other specialized Internet applications (for example, videoconferencing or online gaming). When users send this type of request to your network via the Internet, the router will forward the request to the appropriate PC.

Enabled: Select to enable/disable the function.
Comment: Enter any description of the current mapping rules.
Server IP: Enter the server IP address.
Mapping Ports: Select either a protocol from the drop-down menu and enter the mapping ports.
Add/Modify: Click to add/edit rules you've configured.
3.5.4 Passthrough
VPN: Some applications require an application-level gateway through the router. You can select any of the three “passthroughs” here: “Point-to-Point Tunneling Protocol”; “IPSec,” or Internet Protocol Security, which is a suite of protocols used to implement secure exchanges; and “Layer 2 Tunneling Protocol.”
FTP / Non-Standard FTP Port: If the FTP server is using a non-standard FTP port number, this can prevent FTP data connections
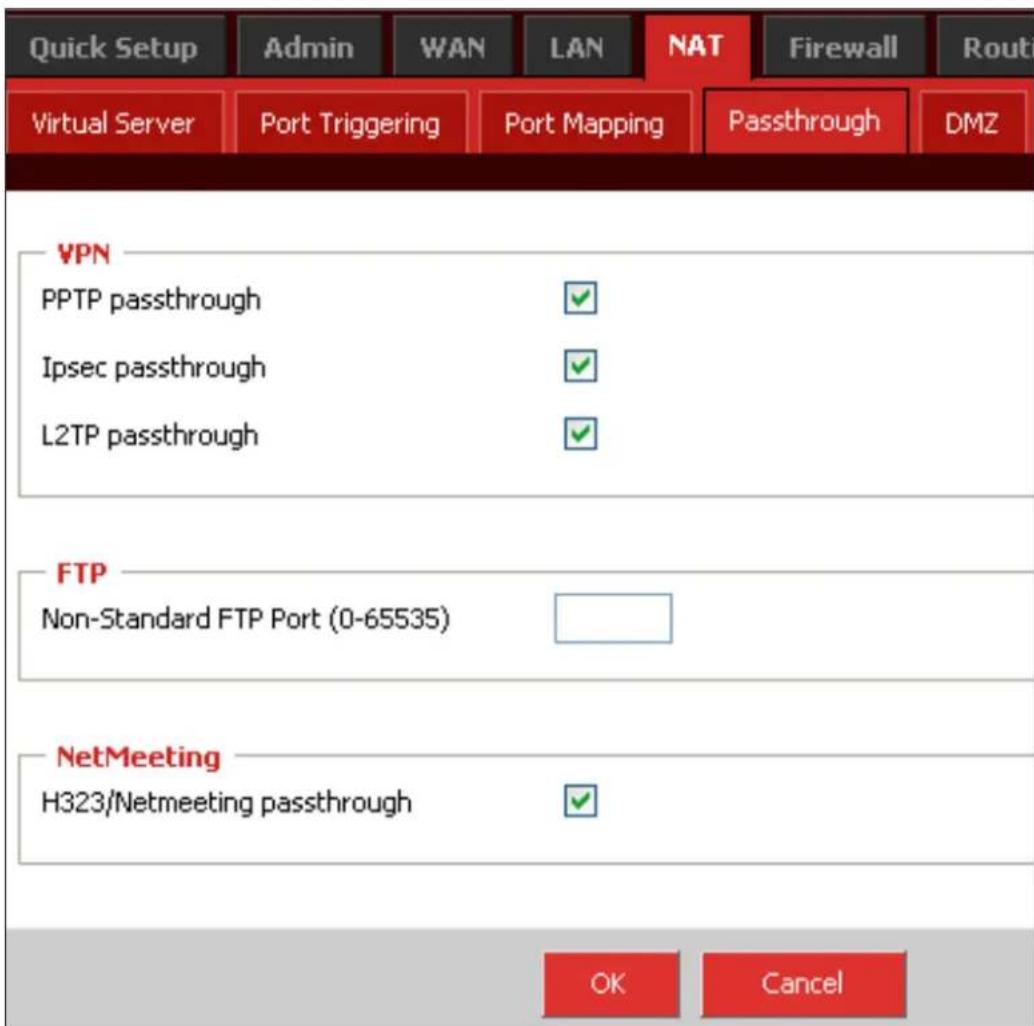
from being established. You should leave this in the 0-65535 range. NetMeeting / H323/Netmeeting Passthrough: To accept the connection request from any outside NetMeeting client, the virtual server for H323/Netmeeting (Port 1720) must be enabled.
3.5.5 DMZ
Enabled: Select to enable/disable the function.
Public IP Address: Make a selection from the drop-down menu.
Virtual Host Option: Choose either "DMZ" or "SDMZ":
- Demilitarized Zone, or DMZ, allows one local user to be exposed to the Internet for use of a special-purpose service, such as Internet gaming or videoconferencing. It forwards all the ports at the same

time to one PC. The Port Forwarding feature is more secure because it only opens the ports you want to be opened, while DMZ hosting opens all the ports of a computer, exposing the computer so the Internet can see it.
- Super Demilitarized Zone, or SDMZ, is similar to DMZ except that the local user (DMZ host) uses the public IP address of your Internet service instead of a private IP address.
IP Address of Virtual DMZ (if “DMZ” is selected): Enter the local IP address of the client PC that you want to place in the DMZ.
MAC Address of Virtual SDMZ (if "SDMZ" is selected): When SDMZ is activated, enter the MAC address of the local computer designated as the SDMZ host.
Get Current LAN IP automatically: If the computer you're currently using is supposed to be the DMZ host, you can select this option and the IP address will be entered automatically.
Add/Modify: Click to add/edit rules you've configured.
3.6 Firewall
This series of submenu options lets you establish a variety of network usage and access limits for better control and security.
3.6.1 Firewall Options

Enabled: Select to enable/disable the items selected or the limits established in the Options table.
3.6.2 Client Filtering
This screen allows you to block Internet access for local clients based on IP addresses, application types and time of day.
Enable Client Filter: Select to enable/disable the function.

Enable: Select to establish rules based on the configuration options that follow.
IP Address: Enter the address (or the range of addresses) you want to control.
Port/Type: You can manually enter your preferences and click "Add," which will then display your new filter configuration in the Rules Listing.
Block Time / Day / Time: Make selections as desired to define rules so they are applied only to specific days and/or times of day.
Comment: Enter a description to differentiate among the various client filters you configure.
Add/Modify: Click to add/edit rules you've configured.
3.6.3 URL Filtering
This screen allows you to prevent users from accessing specific Web sites using broad or narrowly defined filters.

URL Filter Control: Select one of three options: "Disable URL Filter function"; "Deny Internet Access for the following URL addresses"; and "Allow Internet Access for the following URL addresses."
IP Address: Enter the address (or range) you want to filter.
URL Filter String: Enter a specific Web site name or domain name or any defining keywords (for example: games, youtube, nude) that could help focus the filter.
3.6.4 MAC Filtering
This screen allows you to allow or restrict communication between specified nodes.
MAC Access Control: Select one of three options: "Disable MAC Address Control function"; "Deny Internet Access for the following MAC addresses"; and "Allow Internet Access for the following MAC addresses."
MAC Address: Enter the MAC address (using the format shown) you
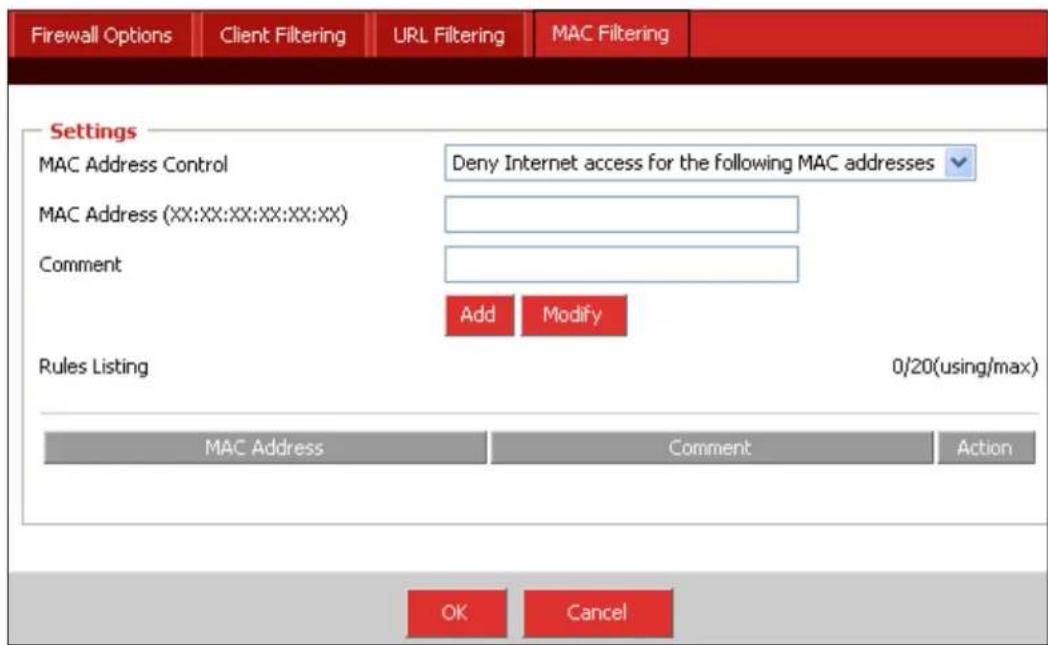
want to control. The format is 00:00:00:00:00:00, using the characters 0-9 and a-f.
Comment: Enter a description to differentiate among the various filters you configure.
3.7 Routing
This menu presents options for optimizing pathways for information packets, thus maximizing the efficiency and speed of the router.
3.7.1 Routing Table

The Routing Table List displays the current routing information as it pertains to the network. Click "Refresh" to update.
3.7.2 Static Routing
A static route is a pre-determined pathway that network information must travel in order to reach a specific host or network.

Destination Network IP: Specify an address you want information packets forwarded to.
Subnet Mask: Specify a subnet mask to distinguish the network and host portions of the IP address.
Gateway IP: Enter the gateway IP address.
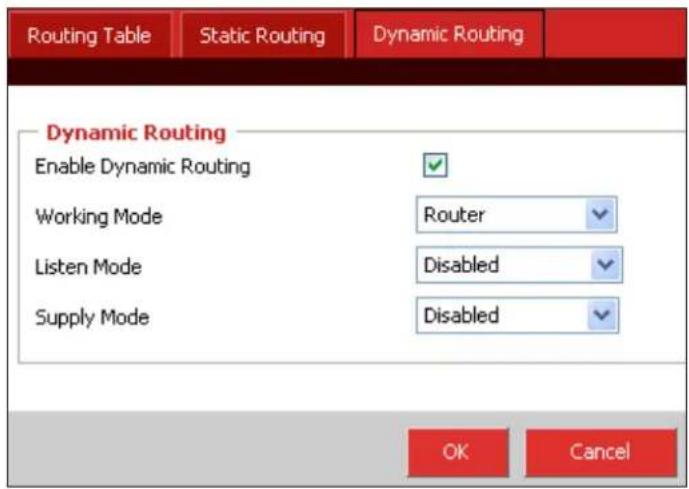
3.7.3 Dynamic Routing
Dynamic routing can be used to cache routes learned by routing protocols, thus allowing the automation of static routing maintenance. The router, using RIP (Routing Information Protocol), determines a network packet's route based on the fewest number of hops between the source and the destination. NOTE: The RIP function is available only when the WAN connection mode is designated as either Static IP or Dynamic IP Address (see Section 3.3: WAN).
Enable Dynamic Routing:
Select to enable/disable the function.
Working Mode: Select "Router" or "Default Gateway."
Listen Mode: Select "Disabled," "RIP1," "RIP2" or "Both" (RIP1 & 2).
Supply Mode: Select "Disabled," "RIP1," "RIP2 (Broadcast)" or "RIP2 (Multicast)."
3.8 QoS
This menu presents Quality of Service options so you can provide different priorities to different applications, users or data flows — or to guarantee a certain level of performance to a data flow — based on your specific network needs.
3.8.1 Port Based

Enable Port Rate Control: Select to enable/disable the function. LAN 1--4 / WAN: For each network connection, enter a maximum uplink/downlink bandwidth.
3.8.2 DSCP

Enable DSCP: Select to enable/disable the function.
High / Medium / Low Queue Weight: Enter your preferred values.
Enable Rule: Select to enable/disable the function.
DSCP Value: Enter your preferred value.
Queue Map: Select a priority level from the drop-down menu.
Description: Enter a description to differentiate among any number of rules that are established.
3.9 Miscellaneous
This menu presents a couple of popular functions that can be configured and put to use: Universal Plug and Play (UPnP) and Dynamic Domain Name Service (DDNS).
3.9.1 UPnP
UPnP (Universal Plug and Play) allows the automatic discovery and configuration of equipment attached to your LAN, providing compatibility with networking equipment, software and peripherals of the 400-plus vendors that participate in the Universal Plug and Play forum.
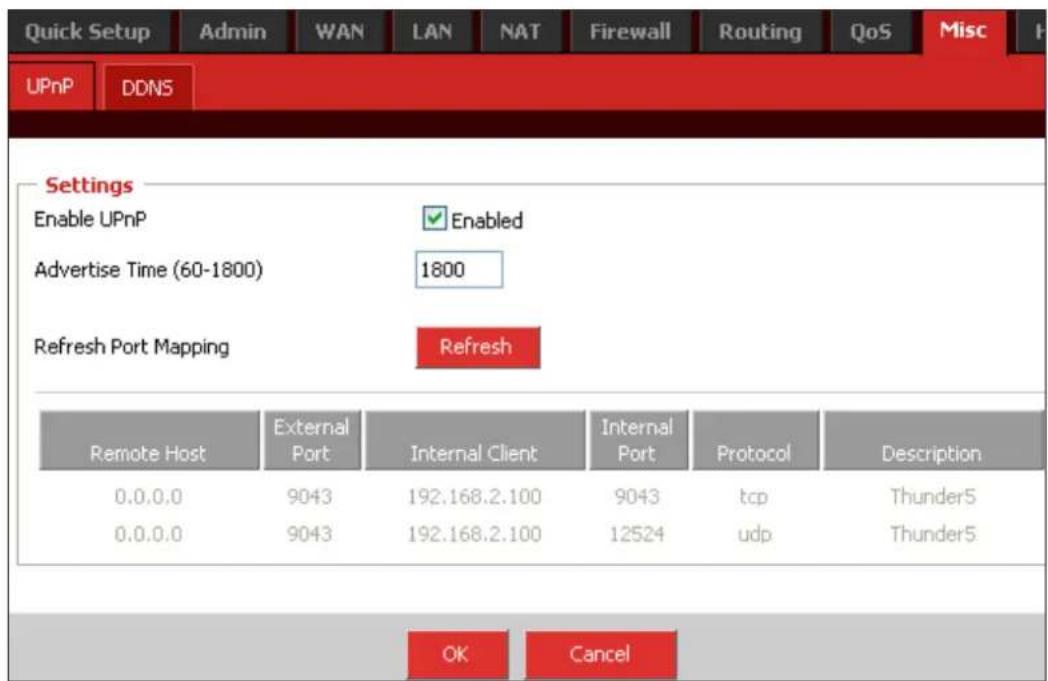
Enable UPnP: Select to enable/disable the function.
Advertise Time: Enter the preferred value.
Refresh Port Mapping: Click to update the list.
3.9.2 DDNS
The DDNS (Dynamic Domain Name Service) feature allows you to use a domain name instead of an IP address) to access Internet sites. Before you can use this feature, however, you need to register an account for DDNS service at a DDNS service provider such as DynDNS.

Enable DDNS: Select to enable/disable the DDNS server.
Host Name / User Name / Password: After you register a DDNS account with a DDNS service, you'll receive the information to enter in each of these fields.
DDNS Server: Select the service you've registered with from the drop-down menu.
DDNS Update Interval: Specify the update interval.
DDNS Ping Test: Click to check the connectivity to the DDNS provider.
3.10 High Level
This menu offers activation of an extra security measure to protect the network.

Enabled: Select to enable/disable ARP (Address Resolution Protocol) spoofing correspondence. When enabled, this function will perform IP/MAC binding on the WAN side at the first ARP reply in order to prevent ARP spoofing, which is a type of Ethernet attack on a network.
3.11 Status
This menu presents two informative submenus: Status and Log.
3.11.1 Status
This screen displays the router's current status and configuration.
3.11.2 Log
The router keeps a running log of events and activities, which are displayed on the screens accessed here. NOTE: When the router is rebooted, the logs are automatically cleared.
![Quick Setup Admin WAN LAN NAT Firewall Routing QoS Misc High level Status Status Log System Log First Page Prev Page Next Page Last Page No. Time Record 1 Thu Jan 01 00:00:00 1970 [System]System start 2 Thu Jan 01 00:00:00 1970 [System]Ver RT_KR2.3 p11 #17 Wed Nov 10 14:43:57 2010 3 Thu Jan 01 00:00…](/content/2026/05/1066751/images/0fbdf2e9e2363775a1a399337822906f2ebe4c53dbc1529c6ec45ce36996604f.jpg)
4 TROUBLESHOOTING
If you forget your password....
Press the Reset button for 5 seconds or more (with the router on) to restore factory settings. The default username is “admin” and the password is “1234.”
If problems arise with the cable modem connection....
Confirm that the cable modem is working properly and the signal is stable. Normally, there will be LEDs on the modem that indicate its operational status. If any LED indicates improper operation, contact your ISP.
Check the LEDs on the front panel of the router. When the cable connections are good, the PWR LED should be on and the WAN LED should be blinking. If you use your computer, the corresponding LAN port LED should also be blinking. If not, confirm that the cables are good. If they check out okay, re-visit Section 3.2.4: Configuration to make sure your configuration is correct. If you can't access the Internet, go to the next step
Open Internet Explorer (or another Web browser) and enter "192.168.2.1" in the address bar, then press
5 SPECIFICATIONS
Standards
• IEEE 802.3 (10Base-T Ethernet)
- IEEE 802.3u (100Base-TX Fast Ethernet)
General
• LAN ports: 4 RJ45 10/100 Mbps data ports
• LAN ports with Auto MDI/MDI-X
• WAN port: 10/100 Mbps RJ45 connector
• Certifications: FCC Class B, CE
Router
• Supported WAN connection types:
- Dynamic IP (DHCP for cable service or DSL)
- Static IP
- PPPoE/PPTP (for DSL)
- Protocols:
- CSMA/CD
- TCP/IP
- UDP
- ICMP
- PPPoE
- NTP
- NAT
- DHCP
- DNS
- DDNS
- ARP
• NAT:
- Virtual server
- Special applications (port trigger)
- DMZ (demilitarized zone)
- Firewall:
- URL filter
- MAC address filter
- Connection Filtering: Limit access to the Internet to PCs in the LAN based on a time schedule
• Supports UPnP (Universal Plug and Play)
• Supports DHCP (client/server)
• Supports PPPoE (DSL), DHCP (cable/DSL) and static IP
• Supports VPN PPTP L2TP pass-through
LEDs
- Power
- WAN Link/Act
• LAN 1-4 Link/Act
Environmental
- Dimensions: 155 (W) x 85 (L) x 35 (H) mm (6.1 x 3.3 x 1.4 in.)
• Weight: 0.41 kg (0.9 lbs.) - Operating temperature: 0 – 40°C (32 – 104°F)
- Operating humidity: 10 – 95% RH, non-condensing
- Storage temperature: -40 – 70°C (-40 – 158°F)
Power
• External power adapter: 9 V DC, 500 mA
Package Contents
• 4-Port Broadband Router
• RJ45 Ethernet cable: 1.0 m (3 ft.)
- Power adapter
- Quick install guide, plus user manual on CD
WASTE ELECTRICAL & ELECTRONIC EQUIPMENT
Disposal of Electric and Electronic Equipment
(applicable in the European Union and other European countries with separate collection systems)

This symbol on the product or its packaging indicates that this product shall not be treated as household waste. Instead, it should be taken to an applicable collection point for the recycling of electrical and electronic equipment. By ensuring this product is disposed of correctly, you will help prevent potential negative consequences to the environment and human health, which could otherwise be caused by inappropriate waste handling of this product. If your equipment contains easily removable batteries or accumulators, dispose of these separately according to your local requirements. The recycling of materials will help to conserve natural resources. For more detailed information about recycling of this product, contact your local city office, your household waste disposal service or the shop where you purchased this product. In countries outside of the EU: If you wish to discard this product, contact your local authorities and ask for the correct manner of disposal.
FEDERAL COMMUNICATIONS COMMISSION REGULATORY STATEMENT
FCC Class B
This equipment has been tested and found to comply with the limits for a Class B digital device, pursuant to Part 15 of Federal Communications Commission (FCC) Rules. These limits are designed to provide reasonable protection against harmful interference in a residential installation. This equipment generates, uses and can radiate radio frequency energy and, if not installed and used in accordance with the instructions, may cause harmful interference to radio communications. However, there is no guarantee that interference will not occur in a particular installation. If this equipment does cause harmful interference to radio or television reception, which can be determined by turning the equipment off and on, the user is encouraged to try to correct the interference by one or more of the following measures:
- Reorient or relocate the receiving antenna.
- Increase the separation between the equipment and the receiver.
- Connect the equipment to an outlet on a circuit different from the receiver.
- Consult the dealer or an experienced radio/TV technician for help.
CE FC

INTELLINET™
NETWORK SOLUTIONS
INTELLINET NETWORK SOLUTIONS ® offers a complete line of active and passive networking products.
Ask your local computer dealer for more information or visit
www.intellinet-network.com.

- 4-PORT BROADBAND ROUTER USER MANUAL MODEL 524957
- INTRODUCTION
- PACKAGE CONTENTS
- TABLE OF CONTENTS
- 1 HARDWARE INSTALLATION.... 4
- 2 NETWORK SETTINGS....5
- 3 ROUTER SETUP 18
- 4 TROUBLESHOOTING....51
- 5 SPECIFICATIONS....52
- 1 HARDWARE INSTALLATION
- 1.1 REAR PANEL PORTS & JACKS
- 1.2 FRONT PANEL LEDS
- 2 NETWORK SETTINGS
- 2.1 IP ADDRESS SETUP
- 2.1.1 WINDOWS 98SE / ME
- 2.1.2 WINDOWS 2000
- 2.1.3 WINDOWS XP
- 2.1.4 WINDOWS VISTA/7
- 2.2 CONFIRMING THE CONNECTION
- 2.3 LOGGING IN TO THE WEB BROWSER
- 3 ROUTER SETUP
- 3.1 QUICK SETUP
- 3.2 ADMIN
- 3.2.1 MANAGEMENT
- 3.2.2 SYSTEM SETTINGS
- 3.2.3 FIRMWARE UPGRADE
- 3.2.4 CONFIGURATION
- 3.2.5 TOOLS
- 3.2.6 LANGUAGE
- 3.2.7 LOG SETTINGS
- 3.2.8 LOGOUT
- 3.3 WAN
- 3.3.1 DYNAMIC IP ADDRESS
- 3.3.2 STATIC IP
- 3.3.3 PPPOE
- 3.3.4 BIGPOND
- 3.4 LAN
- 3.4.1 LAN SETTINGS
- 3.5 NAT
- 3.5.1 VIRTUAL SERVER
- 3.5.2 PORT TRIGGERING
- 3.5.3 PORT MAPPING
- 3.5.4 PASSTHROUGH
- 3.5.5 DMZ
- 3.6 FIREWALL
- 3.6.1 FIREWALL OPTIONS
- 3.6.2 CLIENT FILTERING
- 3.6.3 URL FILTERING
- 3.6.4 MAC FILTERING
- 3.7 ROUTING
- 3.7.1 ROUTING TABLE
- 3.7.2 STATIC ROUTING
- 3.7.3 DYNAMIC ROUTING
- ENABLE DYNAMIC ROUTING
- 3.8 QOS
- 3.8.1 PORT BASED
- 3.8.2 DSCP
- 3.9 MISCELLANEOUS
- 3.9.1 UPNP
- 3.9.2 DDNS
- 3.10 HIGH LEVEL
- 3.11 STATUS
- 3.11.1 STATUS
- 3.11.2 LOG
- 4 TROUBLESHOOTING
- IF YOU FORGET YOUR PASSWORD
- IF PROBLEMS ARISE WITH THE CABLE MODEM CONNECTION
- 5 SPECIFICATIONS
- STANDARDS
- GENERAL
- ROUTER
- LEDS
- ENVIRONMENTAL
- POWER
- WASTE ELECTRICAL & ELECTRONIC EQUIPMENT
- FEDERAL COMMUNICATIONS COMMISSION REGULATORY STATEMENT
- FCC CLASS B
- INTELLINET™
Brand : Intellinet
Model : 4-Port Broadband Router 524957
Category : Router