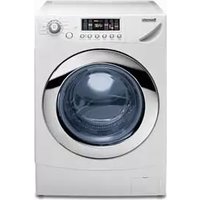
MEGA10W - Washing machine BAUMATIC - Free user manual and instructions
Find the device manual for free MEGA10W BAUMATIC in PDF.


| Product Type | Freestanding Washing Machine |
| Brand | Baumatic |
| Model | MEGA10W |
| Installation Type | Freestanding |
| Capacity | 10 kg |
| Spin Speed | 1400 rpm |
| Energy Class | A+++ |
| Dimensions (H x W x D) | 85 cm x 60 cm x 55 cm |
| Weight | 70 kg |
| Power Supply | 220-240 V, 50 Hz |
| Wash Programs | Cotton, Synthetics, Delicates, Wool, Quick 30, Eczema, Mix, Spin, Rinse |
| Temperature Settings | Cold, 20°C, 30°C, 40°C, 60°C, 90°C |
| Display | LED Digital |
| Delay Start | Up to 24 hours |
| Child Lock | Yes |
| Self-Cleaning | Drum Clean Program |
| Noise Level (Wash/Spin) | 52 dB / 74 dB |
| Water Consumption | 50 L per cycle |
| Energy Consumption | 0.9 kWh per cycle |
| Door Opening | Left hinge |
| Drum Type | Stainless Steel |
| Spare Parts | Available from authorized service centers |
Frequently Asked Questions - MEGA10W BAUMATIC
User questions about MEGA10W BAUMATIC
0 question about this device. Answer the ones you know or ask your own.
Ask a new question about this device
Download the instructions for your Washing machine in PDF format for free! Find your manual MEGA10W - BAUMATIC and take your electronic device back in hand. On this page are published all the documents necessary for the use of your device. MEGA10W by BAUMATIC.
USER MANUAL MEGA10W BAUMATIC
MEGA10W Extra large 10 kg capacity washing machine MEGA10WD Extra large 10 kg capacity washer dryer
Instruction manual
Washing Machine Instruction Manual
MEGA10WD/MEGA10W
INSTRUCTION MANUAL
■ Economic wash system
Using artificial intelligence, the washer uses minimum energy and water by selecting optimal water level and washing time.
■ Low noise system
The washer minimises the washing and spinning noises by sensing the amount of laundry.
■ Child-Lock
The Child-Lock system has been used to prevent children from pressing any buttons to change the programme during operation.
■ Nano-silver sterilization washing
By applying very fine silver particles on essential parts inside, the washer sterilizes up to 99.9% as is done by boiling wash.
■ Air bubble washing
This is an advanced technology that generates millions of air bubbles inside the drum during a washing sequence. The bubbles dissolve the detergent particles completely and cleanse all the soil in clothes gently and neatly.
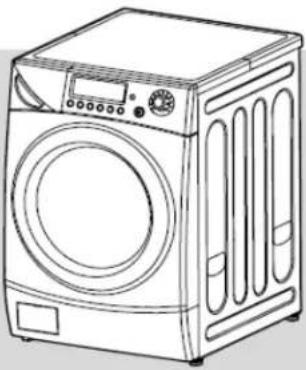
natural_image
Line drawing of a washing machine with front panel and side vent (no text or symbols)| CONTENTS Page | ||||||||||||
| PARTS AND FEATURES | 2 | |||||||||||
| WASHING MACHINE SAFETY | 3 | |||||||||||
| INSTALLATION INSTRUCTIONS | 4 | |||||||||||
| INLET HOSE CONNECTION | 5 | |||||||||||
| ELECTRICAL REQUIREMENTS | 7 | |||||||||||
| OPERATING YOUR WASHING MACHINE | 8 | |||||||||||
| THE FUNCTIONS OF THE WASHING MACHINE CONTROL PANEL 10 | ||||||||||||
| WASHING PROGRAMMES | 12 | |||||||||||
| WASHING PROCEDURE AND SELECTION 13 | ||||||||||||
| GUIDE FOR OTHER USEFUL PROGRAMS | ||||||||||||
| M A I N T E N A N C E | ||||||||||||
| HOW TO CLEAN THE FILTER | ||||||||||||
| REMOVING STAINS | 30 | |||||||||||
| T R O U B L E S H O O T I | ||||||||||||
| CONDITIONS OF GUARANTEE | 32 | |||||||||||
| SERVICE CONTACTS | 33 | |||||||||||
A NOTE TO YOU
Thank you for buying a Baumatic appliance.
Baumatic washing machines are easy to use, save time, and help you manage your home better.
This manual contains valuable information about how to operate and maintain your machine properly and safely.
Please read it carefully.
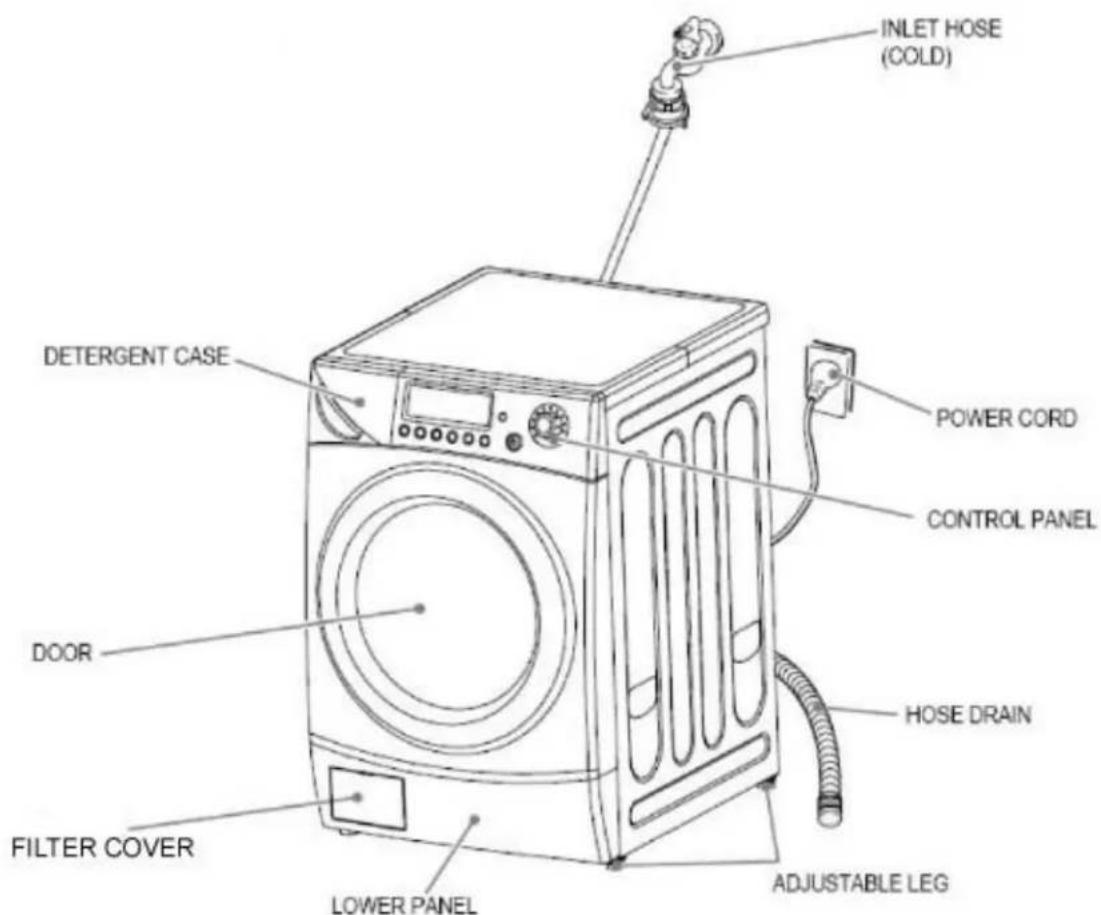
PARTS AND FEATURES
The parts and features of your machine are illustrated on this page. Do familiarise yourself with all parts and features before using it.
NOTE
The drawings in the book may vary from your particular model. They are designed to show the different features of all models covered by this book, therefore, your model may not include all features.
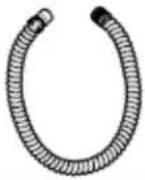
ACCESSORIES
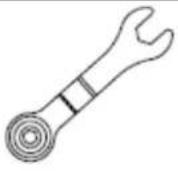
| Hose drain | Inlet hose Spanner | Manual | Blanking Cap (x4) | |
 |  |  |  |  |
WASHING MACHINE SAFETY
Save these instructions
Your safety is important to us.
To reduce the risk of fire, electrical shock, or injury when using your washing machine adhere to the following basic precautions.
| Read all instructions before using your washing machine | |
| Flammable fluids (dry-cleaning solvents, etc) should not be used or stored in or near your machine.Do not add flammable fluids to your wash. These substances give off vapours that can create a fire hazard or explosion.Do not attempt to open the door after a cycle has started.Do not tamper with the controls.The appliance is not intended for use by young children without supervision.If the supply cord is damaged, it must be replaced by the manufacturer, or its service agent or a similarly qualified person in order to avoid a hazard.If the appliance is connected to the power supply via an extension lead, it should not be positioned where it could be splashed by, or become susceptible to, water. | Please ...Have only a qualified person install, repair, or replace parts on washer.Ensure your washing machine is regularly maintained and serviced.Position your washing machine where it will be protected from the weather and keep it where the temperature will not fall below freezing.Do not install your machine at a place of extremely high humidity. It could cause an electric shock or a short circuit.Your washing machine muse be connected to the correct outlet, electrical supply, water supply, and drain supply. |
Understanding your responsibilities
- Do not use chlorine bleach and ammonia or acid(such as vinegar or rust remover) in the same wash. Hazardous fumes can form.
- Unplug power supply cord before attempting to service your machine.
- Do not wash fibreglass material.
Small particles can stick to fabrics washed in following loads and cause skin irritation.
- Do not spray water on the control panel of the washer.
It could cause fire or an electric shock.
- In case of the dual valve model, with only the cold water inlet valve connected and the water temperature is selected as hot or warm, there may be water leakage from unconnected water inlet valve.
• This appliance must be earthed.
INSTALLATION INSTRUCTIONS
Removing transit bolts
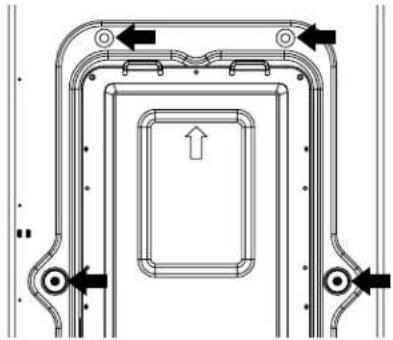
- Before operating the washer, remove the transit bolts (4 each) along with the rubber.
- If the bolts are not removed, it may cause heavy vibration, noise and malfunction.
- Unscrew the 4 bolts with the spanner supplied. Keep the 4 bolts and spanner for future use.
- Whenever the appliance is transported, the transit bolts must be refitted.
natural_image
Technical line drawing of a mechanical component with arrows indicating direction (no text or symbols)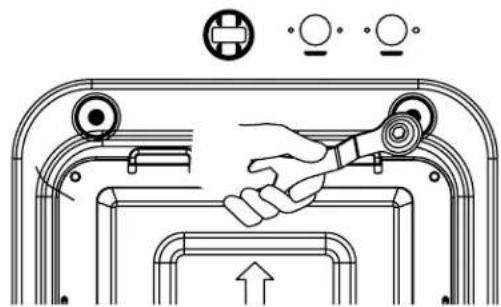
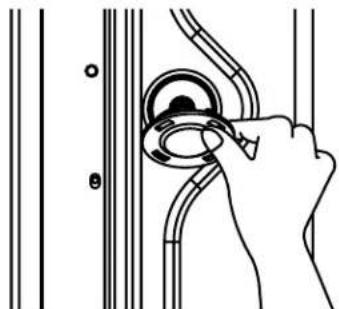
- Close the holes with the Blanking Caps supplied.
natural_image
Illustration of a hand adjusting a circular component between two vertical lines (no text or symbols)Location of washer
- Check the location where the machine will be installed. Make sure you have everything necessary for correct installation.
- Do not place or store your washing machine below 0°C (32°F) to avoid any damage from freezing.
- Never place/store laundry products on top of the machine.
- Install the washer on the horizontal solid floor. If the washer is installed on an uneven floor, it could make considerable noise, vibrate severely and cause a malfunction. If the machine is not level, adjust the legs up or down for horizontal installation.
- Ventilation openings must not be obstructed by carpeting when the machine is installed on a carpeted floor.
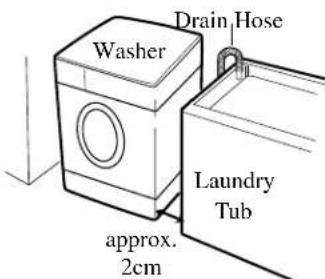
- Leave some space (right & left : 2cm, rear : 10cm).
• In case of built-in installation, the distance between top of the washer and bottom of upper plate
INLET HOSE CONNECTION
The machine should be connected to the water mains using the new hose sets supplied. NEVER reuse old hoses. Be sure that the water inlet hoses are not folded, broken or crushed. The washer should be connected to the cold water supply as this gives the most efficient wash results. Cold fill washing machines increase washing efficiency when using biological detergents because the enzymes work best at low temperatures

PLEASE- have only a qualified person install, repair or replace parts on your machine.
CONNECTION TO THE COLD WATER MAINS:
- Connect the water inlet hose to the water supply-only tighten the screw connection by hand.
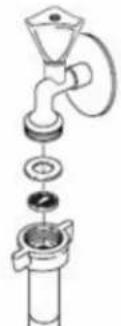
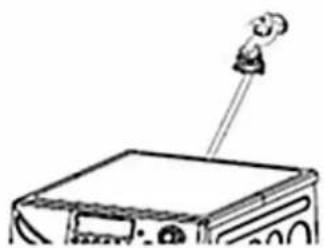
- Connect the inlet hose to the drain outlet of the washing machine (located on the upper right hand corner of the machine) by turning it clockwise until it is tight.
natural_image
Simple line drawing of a device with a stick and a small object above it (no text or symbols)Please check the rubber washer is present inside the inlet hose.
- By slowly opening the water tap before putting the machine into operation, check that the connection is free of leaks.
WATER DRAIN CONNECTION
- Be sure that the drain hoses are not folded, twisted, crushed or elongated by stretching.
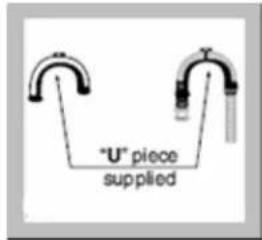
- Water drain hose should be mounted at a height of a minimum of 60 cm to a maximum of 100 cm from the ground.
- The end of the water drain hose may be directly fitted to the waste water outlet connection or to a standalone pipe. The standpipe should have a diameter of approximately 38 mm (see diagram) ensuring there is an air break between the drain hose and standpipe.

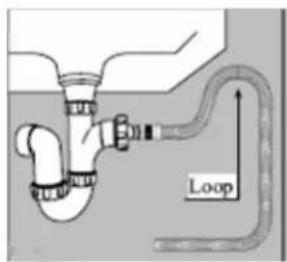
- NEVER attempt to extend the water drain hose by adding additional hosing.
ELECTRICAL REQUIREMENTS

WARNING - Electrical shock hazard: Failure to follow these instructions could result in death or serious injury.
- An electrical earth is required on this machine- If it does not fit the outlet; have a proper outlet installed by a qualified electrician.
- Don't earth to a gas pipe.
- Don't change the power supply cord plug.
- Check with a qualified electrician if you are not sure the machine is properly earthed.
RECOMMENDED EARTHING METHOD
- For your personal safety, this machine must be earthed. It is fitted with a supply lead attached to an earthed plug.
- To prevent electric shock occurring, this machine must be plugged into the relevant earthed power socket. It is the personal responsibility and obligation of the customer to ensure that this is in place before the washing machine is installed.
PLEASE- have only a qualified person install, repair or replace parts on your machine.
Level adjustment
① If the washer is installed on an uneven floor, it could make considerable noise, vibrate and cause a malfunction.

natural_image
Three cartoon illustrations of a washing machine with different expressions and gestures (no text or symbols)②Adjust the level of the washing machine using the adjustable legs.
- Please check if there is any gap between the four adjustable legs and the floor.
- Turn the adjustable legs using the enclosed spanner, adjust the level of the machine and make sure that it is stable.
- Adjust the fixing nuts up tightly so that the machine maintains the adjustment.
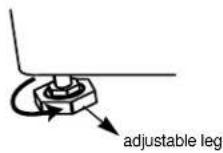
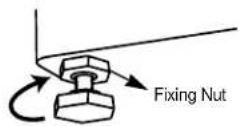
③Make sure that the washing machine does not move when you press down the four corners of the washer's top plate.
NOTE:
There should be no instability of the machine when all the adjustable legs are stuck to the floor closely.

natural_image
Line drawing of a hand operating the front panel of a washing machine (no text or symbols present)To obtain the best washing results, you must operate your machine properly. This section gives you this important information.
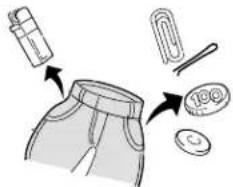
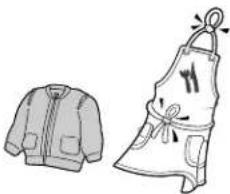
| Preparing clothes for washing | |
| Close zippers, snaps, and hooks to avoid snagging other items.Remove pins, buckles, and other hard objects to avoid scratching the washer interior.Empty pockets and pull them inside out. | Turn down cuffs and turn synthetic garments inside out to avoid damage the tibres.Tie strings and sashes to avoid tangling.Treat spots and stains.(See “Removing stains” on page 30) |
 |  |  |  |
Sorting
- Separate heavily soiled items from lightly soiled ones, even if they would normally be washed together.
- Separate dark colours from light colours, colourfast items from non-colourfast items.
Soil (Heavy, Normal, Light): Separate clothes according to amount of soil.
Colour (White, Lights, Darks): Separate white clothes from coloured clothes.
Lint (Lint producers, Collectors): Wash lint producers and lint collectors separately.
Loading
- For best cleaning and wrinkle-free results, put clothes into the machine loosely so that they move easily in the water.
- Load machine properly and select correct load size setting.
Overloading and selecting a setting too small for the wash load can : - Cause poor cleaning
- Increase wrinkling
- Create excessive lint
-
Wear out items faster (because of damage to fibres)
-
Mix large and small items in each load. Load evenly to maintain washer balance.
An unbalanced load can make the washer vibrate during spin. - Reduce wash time when using a small load size setting. Loads with only a few small items needs less wash time.
- Use a large load size setting to reduce wrinkling with permanent press clothes and some synthetic garments. These items should have more room to move in the water than heavy items. (towels, jeans)
Adding detergent
①Detergent compartment ②Adding fabric softener
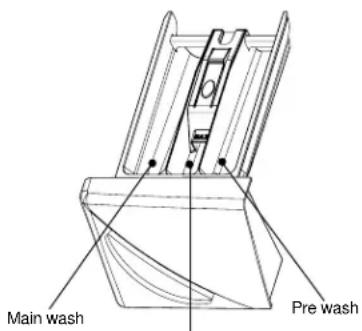
Fabric softener
- If desired, pour liquid fabric softener into the dispenser using the amount recommended by the manufacturers.
- Do not exceed the maximum fill line.
Overfilling can cause early dispensing of the fabric softener which could stain clothes. - Do not open the detergent case when water is supplied.
- Avoid pouring fabric softener directly on the clothes.
THE FUNCTION OF CONTROL PANEL(MEGA10WD)

| [2TK6] | Press this button to turn the power 'ON' or 'OFF'. |
 | Operation and temporary stop is repeated as it is pressed. When you want to change a programme while operating; Press the 'Start/Pause' button → Select the programme that you want to change → Press the 'Start/Pause' button again. |
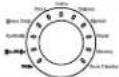 | You can select the programme you want and each lamp is turned on when that course is selected. |
 | As this button is pressed, the wash cycle is selected by 'Quick Wash'(proper load amount :1~2kg) → 'Small'(proper load amount :2~3kg) → 'Main Wash' → 'Pre Wash' → 'Soak' → 'Quick Wash'. |
 | You can select the rinse time(s) you want and each lamp is turned on when that course is selected. As this button is pressed, the rinse time(s) is selected by '1' → 'Rinse Hold' → '2' → 'Rinse Hold' →... ...→ '5' → 'Rinse Hold' → '1'. |
| [0754] | You can select the spin speed you want and each lamp is turned on when that course is selected. |
 | There is a timer control which can delay the start of the wash from one to twelve hours. |
 | This can be used to adjust water temperature according to types of the load to be washed. As this button is pressed, water temperature is selected by Cold → 30°C → 40°C → 60°C → 95°C. |
 | You can select the dry condition you want and each lamp is turned on when that cycle is selected. |
 | Use this function when you want to prevent any accident occurring from the machine. During the operation of the machine, press 'TEMP' and 'DRY' buttons simultaneously within 3 seconds. If this mode is set successfully, CHL and the remaining time will be shown on the display panel alternately In Child Lock mode, no button functions except the Power button. If you want to release this mode, press 'TEMP' and 'DRY' buttons simultaneously again during 3 seconds. If you want to change to the desired program, while this mode is working: 1. Press 'TEMP' and 'DRY' buttons simultaneously again within 3 seconds. 2. Press the 'Start/Pause' button. 3. Select the desired program and press the 'Start/Pause' button again. * The Child Lock mode can be set at any time and it is automatically released when operation errors happen. Also, this mode works when the power is off. * The Child Lock mode can be set at any time and it is automatically released when operation errors happen. Also, this mode works when the power is off. |
 | If you want to open the Door intentionally during operation, press the 'Start/Pause' button and then press the 'Door unlock' button. This signal: & will appear on the display, then you can open the Door after the Tub has cooled inside and the water has drained away. Also, no button functions except the Power button. |
THE FUNCTION OF CONTROL PANEL(MEGA10W)
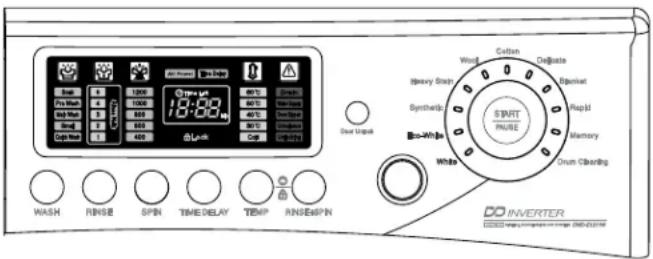
| Press this switch to turn the power 'ON' or 'OFF'. | |
| Operation and temporary stop is repeated as it is pressed. When you want to change the program operating; Press the 'Start/Pause' button → Select the program that you want to change → Press the 'Start/Pause' button again. | |
 | You can select the course you want and each lamp is turned on when that course is selected. |
| You can select the wash course you want and each lamp is turned on when that course is selected. | |
| You can select the rinse time(s) you want and each lamp is turned on when that course is selected. | |
| You can select the spin speed you want and each lamp is turned on when that course is selected. | |
| It can be used to pre-engage time for wash from 1 hr to 12 hrs. | |
| It can be used to adjust water temperature according to the types of load to be washed.As this button is pressed, water temperature is selected by Cold → 30°C → 40°C → 60°C → 95°C. | |
| It is used to perform the Rinse and Spin programs only. | |
| Use this function when you want to prevent any accident occurring from handling of the washer by a child.During operation of the washer, press 'TEMP' and 'RINSE+SPIN' buttons simultaneously.If this mode will be set successfully, CHL and remain time will be shown on PCB board alternately. In Child Lock mode, no button functions except the Power button.If you want to set this mode, press 'TEMP' and 'RINSE+SPIN' buttons simultaneously within 3 seconds.And if you want to release this mode, press 'TEMP' and 'RINSE+SPIN' buttons simultaneously within 3 seconds.If you want to change to the desired program, while this mode is working:1. Press 'TEMP' and 'RINSE+SPIN' buttons simultaneously again during 3 seconds.2. Press the 'Start/Pause' button.3. Select the desired program and press the 'Start/Pause' button again.* The Child Lock mode can be set at any time and it is automatically released when operation errors happen. Also, this mode works when the power is off. | |
| It you want to open the Door intentionally during operation, press the 'Start/Pause' button and then press 'Door unlock' button.This signal: will appear on PCB board, then you can open Door after the Tub has cooled inside and the water has drained away. Also, no button functions except the Power button. |
WASHING PROGRAMS
| Program | Fabric type | Proper Temp. | Default data | Maximum Load |
| Normal | Colourfast garments (shirts, night dresses, pyjamas,...) and lightly soiled white cottons(underwear,...) | 40 °C(cold,30°C, 60°C) | Wash: main washRinse: 3Spin: 800Temp.: 40°C | Refer to rating label |
| White | First check whether laundry is machine washable, (white cotton, linen, towel and sheets...) | 95 °C(fixed) | Wash: main washRinse: 3Spin: 800Temp.: 95°C | Refer to rating label |
| Eco-White | First check whether laundry is machine washable, (white cotton, linen, towel and sheets...) | 60 °C(40°C) | Wash: main washRinse: 3Spin: 800Temp.: 60°C | Refer to rating label |
| Synthetic | Polyamide, Acrylic, Polyester...) | 40 °C(cold, 30°C, 60°C) | Wash: main washRinse: 3Spin: 800Temp.: 40°C | Refer to rating label |
| Heavy Stains | Heavily soiled clothes:(blue jeans,climbing clothes, ruck sacks, sports wear,...) | 40 °C(cold, 30°C, 60°C) | Wash: pre washRinse: 3Spin: 800Temp.: 40°C | Refer to rating label |
| Wool | Machine washable woolens with pure new wool only. | Cold(fixed, in order to prevent textile damage) | Wash: main washRinse: 2Spin: 400Temp.: cold | Refer to rating label |
| Delicate | Delicate laundry- easily damaged.(silk, curtains..) | Cold(fixed, in order to prevent textile damage) | Wash: main washRinse: 2Spin: 400Temp.: cold | Refer to rating label |
| Blanket | Blankets, curtains etc. | Cold(fixed, in order to prevent textile damage) | Wash: main washRinse: 3Spin: 800Temp: cold | Refer to rating |
| Rapid | Lightly soiled clothes, frequently washed items and small amounts of clothing . | 30 °C(cold,40°C) | Wash: main washRinse: 3Spin: 800Temp.: cold(Dry :cupboard) | |
| Memory | Use to memorise program you want. | |||
| Drum Cleaning | Use to clean (and dry) the Tub and Drum. | Cold | Wash: soakRinse: 2Spin: 400Temp.: cold(Dry :cupboard) | label |
WASHING PROCEDURE AND SELECTION
1. NORMAL PROGRAMME
| Step 1 | Put the laundry into the Drum.Then close the Door.In the detergent compartment, put the powder into the main wash and prewash sections (See Diagram - Page 9).Softener should be poured into the middle section of the compartment and be below 'MAX' level.Put the detergent into the pre wash room(I marking) only if you want to add prewash.When you want to use bleach, put it into the main wash room (I I marking) with detergent. |
| Step 2 | Press the Power button.The LED shows this signal: '- --' |
| Step 3 | Select the 'NORMAL' programme using the programme selection dial.(If you press the 'Start/Pause' button after pressing the Power button without selecting a programme, the 'NORMAL' programme is selected as default programme.)Main wash' and '3' times rinse and '800' rpm spin speed and '40°C' water temperature are selected automatically.If you want to change the 'Washing programme', 'Rinse time(s)', 'Spin speed' and 'water temperature', select the programme you want to change by pressing each button. |
| Step 4 | Press the 'Start/Pause' button.The washing machine will start operating by locking the Door and supplying water. |
Note
- If you want to change the programme setting during operation, press the 'Start/Pause' button to hold the operation and then change to the programme you want by pressing each corresponding button.
- Water temperature '95°C' is not selected, in order to prevent clothes from being damaged.
-
If you want to add clothes during operation, press the 'Start/Pause' and 'Door unlock' buttons, then open the Door, put the clothes into the drum, then close the door and press the 'Start/Pause' button again.
-
WHITE PROGRAMME
| Step 1 | Put the laundry into the Drum.Then close the Door.Put the detergent into the main wash and prewash sections (See Diagram - Page 9).Softener should be poured into the middle section of the compartment and be below 'MAX' level.Put the detergent into the pre wash section only if you want to add prewash.When you want to use bleach, put it into the main wash section with detergent. |
| Step 2 | Press the Power button.The LED shows this signal: '- --' |
| Step 3 | Select the 'WHITE' programme using the programme selection dial.(If you press the 'Start/Pause' button after pressing the Power button without selecting a programme, the 'NORMAL' programme is selected as default programme.)'Main wash', '3' times rinse, '800' rpm spin speed and '95°C' water temperature are selected automatically.If you want to change the 'Washing programme', 'Rinse time(s)' and 'Spin speed', select the programme you want by pressing the relevant buttons. |
| Step 4 | Press the 'Start/Pause' button.The washing machine will start operating, by locking the door and supplying water, after sensing the amount of laundry automatically. |
Note
- If you want to change the programme setting during operation, press the 'Start/Pause' button to hold the operation and then change to the programme you want by pressing each corresponding button.
• Water temperature is set only to '95°C'. - If you want to add the clothes during operation, press the 'Start/Pause' and 'Door unlock' buttons, then open the Door and put the clothes into the Drum. Then close the Door and press the 'Start/Pause' button again.
- Sometimes large amounts of suds occur.
The washing machine will clean away the suds automatically.
3. ECO-WHITE PROGRAMME
| Step 1 | Put the laundry into the drum.Then close the Door.In the detergent compartment, put the powder into the main wash and prewash sections (See Diagram - Page 9).Softener should be poured into the middle section of the compartment and be below 'MAX' level.Put the detergent into the pre wash section only if you want to add prewash.When you want to use bleach, put it into the main wash section with detergent. |
| Step 2 | Press the Power button.The LED shows this signal: '- --' |
| Step 3 | Select the 'ECO-WHITE' programme using the programme selection dial.(If you press the 'Start/Pause' button after pressing the Power button without selecting a programme, the 'NORMAL' programme is selected as default programme.)'Main wash', '3' times rinse, '800' rpm spin speed and '60°C' water temperature are selected automatically.If you want to change the 'Washing programme', 'Rinse time(s)', 'Spin speed' and 'water temperature', select the programme you want by pressing the relevant buttons. |
| Step 4 | Press the 'Start/Pause' button.The washing machine will start operating by locking the door and supplying water, after sensing the amount of laundry automatically. |
Note
- If you want to change the programme setting during operation, press the 'Start/Pause' button to hold the operation and then change the programme you want by pressing each corresponding button.
• Water temperature '40°C' and '60°C' are only selected. -
If you want to add the clothes during operation, press 'Start/Pause' and 'Door unlock' buttons, then open the Door and put the clothes into the Drum. Then close the Door and press the 'Start/Pause' button again.
-
SYNTHETIC PROGRAMME
| Step 1 | Put the laundry into the drum.Then close the Door.In the detergent compartment, put the powder into the main wash and prewash sections (See Diagram - Page 9).Softener should be poured into the middle section of the compartment and be below 'MAX' level.Put the detergent into the pre wash section only if you want to add prewash.When you want to use bleach, put it into the main wash section with detergent. |
| Step 2 | Press the Power button.The LED shows this signal: '---' |
| Step 3 | Select the 'SYNTHETIC' programme using the programme selection dial.(If you press the 'Start/Pause' button after pressing the Power button without selecting programme, the 'NORMAL' programme is selected as default programme.)'Main wash', '3' times rinse, '800' rpm spin speed and '40°C' water temperature are selected automatically.If you want to change the 'Washing course', 'Rinse time(s)', 'Spin speed' and 'water temperature', select the programme you want by pressing the relevant buttons. |
| Step 4 | Press the 'Start/Pause' button.The washing machine will start operating by locking the the Door and supplying water. |
Note
- If you want to change the programme setting during operation, press the 'Start/Pause' button to hold the operation and change to the programme you want by pressing each corresponding button.
• Water temperature '95°C' and Spin speed '1200' are not selected. -
If you want to add the clothes during operation, press the 'Start/Pause' and 'Door unlock' buttons, then open the Door and put the clothes into the Drum. Then close the door and press the 'Start/Pause' button again.
-
HEAVY STRAIN PROGRAMME
| Step 1 | Put the laundry into the drum.Then close the Door.In the detergent compartment, put the powder into the main wash and prewash sections (See Diagram - Page 9).Softener should be poured into the middle section of the compartment and be below 'MAX' level.Put the detergent into the pre wash section only if you want to add prewash.When you want to use bleach, put it into the main wash section with detergent. |
| Step 2 | Press the Power button.The LED shows this signal: '- --' |
| Step 3 | Select the 'HEAVY STRAIN' programme using the programme selection dial.(If you press the 'Start/Pause' button after pressing the Power button without selecting a programme, the 'NORMAL' programme is selected as default programme.)'Pre wash', '3' times rinse, '800' rpm spin speed and '40°C' water temperature are selected automatically.If you want to change the 'Washing programme', 'Rinse time(s)', 'Spin speed' and 'water temperature', select the programme you want by pressing the relevant buttons. |
| Step 4 | Press the 'Start/Pause' button.The washing machine will start operating, by locking the the Door and supplying water. |
Note
- If you want to change the programme setting during operation, press the 'Start/Pause' button to hold the operation and change to the programme you want to change by pressing each corresponding button.
- Water temperature '95°C' is not selected in order to prevent clothes from being damaged.
-
If you want to add clothes during operation, press the 'Start/Pause' button and 'Door unlock' buttons, then open the Door and put the clothes into the Drum. Then close the door and press the 'Start/Pause' button again.
-
WOOL PROGRAMME
| Step 1 | Put the laundry into the drum.Then close the Door.In the detergent compartment, put the powder into the main wash section (See Diagram - Page 9).Softener should be poured into the middle section of the compartment and be below 'MAX' level.When you want to use bleach, put it into the main wash section with detergent. |
| Step 2 | Press the Power button.The LED shows only this signal: '- --' |
| Step 3 | Select the 'WOOL' programme using the programme selection dial.(If you press the 'Start/Pause' button after pressing the Power button without selecting a programme, the 'NORMAL' programme is selected as the default programme.)'Main wash', '2' times rinse, '400' rpm spin speed and 'Cold' water temperature are selected automatically.If you want to change the 'Washing programme', 'Rinse time(s)' and 'Spin speed', select the programme you want by pressing the relevant buttons. |
| Step 4 | Press the 'Start/Pause' button.The machine will start operating by locking the door.S |
Note
- If you want to change the programme setting during operation, press the 'Start/Pause' button to hold the operation and change to the programme you want by pressing each corresponding button.
- Water temperature 'Cold' is only selected in order to prevent woolens from being damaged.
- Spin speed '400' and '600' are only selectable.
- DRY function is not selected(optional function).
- DELAY START is not selected.
• SOAK and Pre Wash in wash cycle are not selected. -
If you want to add clothes during operation, press the 'Start/Pause' button and 'Door unlock' buttons, then open the Door and put the clothes into the drum. Then close the Door and press the 'Start/Pause' button again.
-
DELICATE PROGRAMME
| Step 1 | Put the laundry into the drum.Then close the Door.In the detergent compartment, put the powder into the main wash section.(See Diagram - Page 9).Softener should be poured into the middle section of the compartment and be below 'MAX' level.When you want to use bleach, put it into the main wash section with detergent. |
| Step 2 | Press the Power button.The LED shows this signal: '- --' |
| Step 3 | Select the 'DELICATE' programme using the programme selection dial.( If you press the 'Start/Pause' button after pressing the Power button without selecting a programme, the 'NORMAL' programme is selected as default programme.)'Main wash', '2' times rinse, '400' rpm spin speed and 'Cold' water temperature are selected automatically.If you want to change the 'Washing programme', 'Rinse time(s)' and 'Spin speed',select the programme you want by pressing the relevant buttons. |
| Step 4 | Press the 'Start/Pause' button.The machine will start operating by locking the Door and supplying water. |
Note
- If you want to change the programme setting during operation, press the 'Start/Pause' button to hold the operation and change to the programme you want by pressing each corresponding button.
- Water temperature 'Cold' is only selected in order to prevent delicate clothes from becoming damaged.
- Spin speed '400' and '600' are only selectable.
- DRY function is not selected(optional function).
- DELAY START is not selected.
• SOAK and Pre Wash in wash programme are not selected. -
If you want to add clothes during operation, press the 'Start/Pause' and 'Door unlock' buttons, then open the Door and put the clothes into the drum. Then close the Door and press 'Start/Pause' button again.
-
BLANKET PROGRAMME
| Step 1 | Put the laundry into the drum.Then close the Door.In the detergent compartment put the powder into the main wash section (See Diagram - Page 9).Softener should be below 'MAX' level.When you want to use bleach, put it into the main wash room (I I marking) with detergent. |
| Step 2 | Press the Power button.The LED shows this signal: '---' |
| Step 3 | Select the 'BLANKET' programme using the programme selection dial.(If you press 'Start/Pause' button after pressing the Power button without selecting a programme, the 'NORMAL' programme is selected as default programme.)'Main wash', '3' times rinse, '800' rpm spin speed and 'Cold' water temperature are selected automatically.If you want to change the 'Washing programme', 'Rinse time(s)' and 'Spin speed', select the programme you want by pressing the relevant buttons. |
| Step 4 | Press the 'Start/Pause' button.The machine will start operating by locking the Door and supplying water. |
Note
- If you want to change the programme setting during operation, press the 'Start/Pause' button to hold the operation and change to the programme you want by pressing each corresponding button.
- Water temperature 'Cold' is only selected in order to prevent delicate clothes from being damaged.
- Spin speed '400' and '600' and '800' are the options available.
- DRY function is not selected(optional function).
- DELAY START is not selected.
• SOAK and Pre Wash in wash programme are not selected. -
If you want to add clothes during operation, press the 'Start/Pause' and 'Door unlock' buttons, then open the Door and put the clothes into the drum. Then close the door, and press 'Start/Pause' button again.
-
RAPID PROGRAMME
| Step 1 | Put the laundry into the drum.Then close the Door.In the detergent compartment, put the powder into the main wash section (See Diagram - Page 9).Softener should be poured into the middle section of the compartment and be below 'MAX' level.When you want to use bleach, put it into the main wash section with detergent. |
| Step 2 | Press the Power button.The LED shows this signal: '-' |
| Step 3 | Select the 'RAPID' programme using the programme selection dial.If you press 'Start/Pause' button after pressing the Power button without selecting a programme, the 'NORMAL' programme is selected as default programme.'Main wash', '2' times rinse, '800' rpm spin speed, '30°C' water temperature (and 'Cupboard' dry condition) are selected automatically.If you want to change the 'Washing cycle', 'Rinse time(s)', 'Spin speed' and 'water temperature', select the programme you want by pressing the relevant buttons. |
| Step 4 | Press the 'Start/Pause' button.The machine will start operating by locking the Door and supplying water. |
Note
- The appropriate amount of laundry is below 3 kg.
- If you want to change the programme setting during operation, press the 'Start/Pause' button to hold the operation and change to the programme you want by pressing each corresponding button.
- Water temperature 'Cold', '30°C' and '40°C' are selectable.
- Spin speed '1200' is not selected.
- All wash programmes are not selected except main wash.
- If you want to add the clothes during operation, press the 'Start/Pause' and 'Door unlock' buttons, then open the Door and put the clothes into the drum. Then close the door and press the 'Start/Pause' button again.
10. MEMORY PROGRAMME
| Step 1 | Put the laundry into the drum.Then close the Door.In the detergent compartment put the powder into the main wash and prewash sections (See Diagram - Page 9).Softener should be poured into the middle section of the compartment and be below 'MAX' level.Put the detergent into the pre wash room:(I marking) only if you want to add prewash.When you want to use bleach, put it into the main wash section with detergent. |
| Step 2 | Press the Power button.The LED shows only '-' signal. |
| Step 3 | Select the 'MEMORY' programme using the programme selection dial.(If you press the 'Start/Pause' button after pressing the Power button without selecting a programme, the 'NORMAL' programme is selected.)If you want to memorise the 'Washing programme', 'Washing course', 'Rinse time(s)', 'Spin speed', 'water temperature' (and 'Dry condition'), select the programme you want by pressing the relevant buttons and using the programme selection dial. |
| Step 4 | Press the 'Start/Pause' button.The washer will start operating by locking the Door and supplying water. |
Note
- If you start the memorised programme, this data will be saved automatically.
- If you want to change the programme setting during operation, press the 'Start/Pause' button to hold the operation and change to the programme you want by pressing each corresponding button.
-
If you want to add the clothes during operation, press the 'Start/Pause' and 'Door unlock' buttons, then open the Door and put the clothes into the drum. Then close the door and press the 'Start/Pause' button again.
-
DRUM CLEANING PROGRAMME
| Step 1 | Put the laundry into the drum.Then close the Door.If you want to clean the Drum slightly, use this programme without bleach.If you want to clean the Drum thoroughly, please use detergent only. |
| Step 2 | Press the Power button.The LED shows only this signal: '- --' |
| Step 3 | Select the 'DRUM CLEANING' programme using the programme selection dial.(If you press the 'Start/Pause' button after pressing the Power button without selecting a programme, the 'NORMAL' programme is selected as default programme.'Soak','2' times rinse, '400' rpm spin speed, 'Cold' water temperature (and 'Cupboard' dry condition) are selected automatically. |
| Step 4 | Press the 'Start/Pause' button.The machine will start operating by locking the Door and supplying water. |
Note
- All programmes are not selectable except rinse time(s).
- DELAY START is not selected.
- Use this programme without a load (ie: any clothes in the drum).
- It is recommended that the cleaning cycle should be carried out once a month.
GUIDE FOR OTHER USEFUL PROGRAMMES
* DELAY START (RESERVED WASHING)
| Step 1 | Put the laundry into the drum.Then close the Door.In the detergent compartment, put the powder into the main wash and prewash sections (See Diagram - Page 9).Softener should be poured into the middle section of the compartment and be below 'MAX' level.Put the detergent into the pre wash section only if you want to add prewash.When you want to use bleach, put it into the main wash section with detergent. |
| Step 2 | Press the Power button.The LED shows this signal: '---' |
| Step 3 | Select the programme using the programme selection dial.If you press 'Start/Pause' button after pressing the Power button without selecting a programme, the 'NORMAL' programme is selected as default programme.Select the 'Washing cycle', 'Rinse time(s)', 'Spin speed' and 'water temperature' by pressing by pressing the relevant buttons. |
| Step 4 | Press the 'DELAY START' button.The 'Time Delay' LED will light up.Select the time you wish to delay your programme from one to twelve hours by pressing the appropriate button.The time displayed shows the time the selected programme will finish. |
| Step 5 | Press the 'Start/Pause' button.If you carry out the above instructions correctly, only the 'Time Delay' and 'Lock' LED's will be displayed. |
Note
- If you want to check the selected programme, press the 'Start/Pause' button again.
• Before starting 'Time Delay':
- Load laundry and close Door.
- Put the detergent and fabric softener into the detergent compartment..
- The finishing time may vary from your selected time as it may be dependent upon your water supply and/or selected water temperature.
- 'WOOL' and, 'DELICATE' and 'DRUM CLEANING' programmes cannot be selected with select 'Time Delay'.
- Adding clothes during 'Time Delay' operation is not allowed.
* ONLY WASH
| Step 1 | Put the laundry into the Drum and put the detergent and softener into the detergent compartment.Then close the Door. |
| Step 2 | Press the Power button.• The LED shows this signal: '--' |
| Step 3 | Select the 'WASH CYCLE' you want by pressing the 'WASH' button.• The 'NORMAL' programme is selected automatically. |
| Step 4 | Press the 'Start/Pause' button.• The machine will start operating by locking the Door and supplying water. |
* ONLY RINSE
| Step 1 | Put the laundry into the Drum and put the detergent and softener into the detergent compartment.Then close the Door. |
| Step 2 | Press the Power button.• The LED shows this signal: '- --' |
| Step 3 | Select the 'RINSE' time(s) you want by pressing the 'RINSE' button.• The 'NORMAL' programme is selected automatically. |
| Step 4 | Press the 'Start/Pause' button.• The machine will start operating by locking the Door and supplying water. |
* ONLY SPIN
| Step1 | Put the laundry into the Drum and close the Door. |
| Step 2 | Press the Power button.• The LED shows only '-' signal. |
| Step 3 | Select the 'SPIN CONDITION' you want by pressing the 'SPIN' button.• The 'NORMAL' programme is selected automatically.• The water temperature is selected as 'Cold' automatically. |
| Step 4 | Press the 'Start/Pause' button.• The machine will start operating by locking the Door. |
* DRYER (MEGA10WD)
| Step 1 | Put the laundry into the Drum and close the Door. |
| Step 2 | Press the Power button.• The LED shows this signal: '-' |
| Step 3 | Select the 'DRY CONDITION' you want by pressing the 'DRY' button.As this button is pressed, the dry condition is selected by 'Cupboard' → 'Very'→ 'Time(30, 1:00, 1:30)' → OFF → 'Low Temp' → 'Iron' → 'Cupboard' |
| Step 4 | Press the 'Start/Pause' button.• The machine will start operating by locking the Door. |
Note
- Do not use detergent and softener.
- After finishing this programme, is shown of PCB board alternately and the 'Easy Iron' programme continues for thirty minutes only and automatically stops.
- 'WOOL', 'DELICATE' and 'BLANKET' programmes are not selectable with 'DRY'.
- Be wary of the temperature of the clothes if taking them out of the dryer immediately the drying cycle has finished.
- A little shrinkage and deformation sometimes happens during drying, so check clothes whether dry or not previously
- If you wish to use the dryer feature immediately following washing, after selecting the programme, press the 'DRY' button then press the 'Start/Pause' button. Please note this programme will only function if the wash does not exceed the weight recommended for the dryer.
* RINSE+SPIN (MEGA10W)
| Step 1 | Put the laundry into the Drum and put softener into the detergent compartment. Then close the Door.Softener should be poured into the middle section of the compartment and be below 'MAX' level. |
| Step 2 | Press the Power button.The LED shows this signal: '---' |
| Step 3 | Select the programme you want using the programme selection dial.If you press 'RINSE+SPIN' button without selecting a programme, the 'NORMAL' programme is selected as the default programme. |
| Step 4 | Press the 'RINSE+SPIN' button.'1' time rinse, '800' rpm spin speed and 'Cold' water temperature are selected automatically.'400' rpm spin speed is selected in the 'WOOL' and 'DELICATE' programme.If you want to change the Rinse time(s) and Spin condition, press each corresponding button. |
| Step 5 | Press the 'Start/Pause' button.The machine will start operating by locking the door and supplying water. |
Note
- It is possible during this cycle to select the temperature of the water.
- You can incorporate the washing cycle during this procedure by pressing the 'WASH' button.
MAINTENANCE
Proper care of your washer can extend its life. This section explains how to care for your washer properly and safely.
Cleaning your washer
| Exterior Interior | |
Wipe up detergent, bleach, and other spills with a soft, damp cloth or sponge as they occur. Occasionally wipe the outside of the washer to keep it looking like new.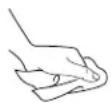 | Clean interior with 250ml of chlorine bleach mixed with 500ml of detergent.Run washer through a complete cycle.Repeat this process if necessary. |
Check all pockets for sharp or metal objects eg.keys,pins, clips, money, etc.They may damage the interior of your machine.If any such items are found please do not rest or leave them on top of the machine. 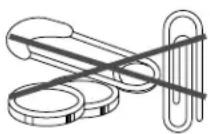 | |
Winter storage or moving care
Install and store your machine where it will not be subject to freezing temperatures as any water left in hoses, etc. may damage it.
If you wish to store/move your machine during freezing weather please take note of the following:
| To store/move the machine To use washer again | |
| Disconnect from mains.Disconnect and drain water inlet hoses.Run the washing machine on a drain and spin setting (see pages 10-11) for 1 minute.Unplug the power supply cord. | Flush water pipes and hoses.Reconnect water inlet hoses.Reconnect to water supply.Reconnect power supply cord. |
Non-use or vacation care
Operate your washing machine only when you are at home.
If you are on holiday or your machine is not being used for an extended period of time, you should:
- Unplug the power supply cord or turn off electrical power to the washer.
- Disconnect the water supply.
This helps avoid accidental flooding (due to a water pressure surge) while you are away.
HOW TO CLEAN THE FILTER
Cleaning the water inlet filter
Clean the filter when water leaks from the water inlet

Pull the power plug out before cleaning the filter.

Turn off the water supply to the washer and separate the inlet hose. Pull the inlet filter out. Remove the dirt form the inlet filter with a brush.
Cleaning the drain filter
- This drain filter is used to screen the foreign bodies such as threads, coins, pins, buttons etc..
-
If the drain filter is not cleaned regularly (after every ten washes), drainage problems could arise.
CAUTION : Be careful when draining if the water is hot. -
Open the lower cover(①) by using a coin. Remove the cap hose(②) to pull out the hose.

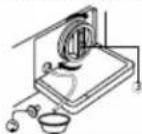
- Unplug the cap hose(2), allowing the water to flow out. At this time use a vessel to prevent water flowing on to the floor. When water does not flow any more, turn the pump filter(3) open to the left.
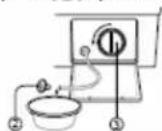
- Remove any foreign material from the pump filter(③). After cleaning, turn the pump filter clockwise and insert the cap hose(②) to the original place. Close the lower cover.
Cleaning the detergent case
*After a while, detergent and fabric softeners leave a deposit in the drawer;
- It should be cleaned from time to time with a jet of running water.
- If necessary, it can be removed completely from the machine by pressing the catch downwards and by pulling it out.
- To facilitate cleaning, the upper part of the fabric softener compartment can be removed.


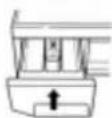
*Detergent can also accumulate inside the recess which should be cleaned occasionally with a brush.
*Once you have finished cleaning, replace the case and run a rinse cycle without laundry.

REMOVING STAINS
Stained, heavily-soiled, or greasy items may need to be prewashed or soaked for best results. Soaking helps remove protein-type stains like blood, milk or grass. Prewashing helps loosen soil before washing. PLEASE REFER TO CLOTHING CARE ADVICE ON MANFACTURERS LABEL.
Stain removal rules
- Use warm water for soaking or prewashing stained laundry. Hot water can set stains.
- Most stains are easier to remove when they are fresh.
- Before treating any stain, find out what kind of stain it is, how old the stain is, what kind of fabric it is, and whether the fabric is colorfast. (Check the care label)
- Washing and drying can set some stains.
- Start with cold or warm water. Hot water can set some stains.
- When bleach is recommended, use a bleach that is safe for the fabric.
- Put the stained area face down on a paper towel or white cloth. Apply the stain remover to the back of the stain. This forces the stain off the fabric instead of through it.
Stain removal guide
| STAIN TO REMOVE | |
| Blood | Rinse immediately in COLD water.If stain remains, soak in cold water with an enzyme prewash. |
| Chewing gum | Use ice in a plastic bag to harden the gum.Scrape off what you can and then sponge with white spirits. |
| Cocoa, Chocolate | Sponge with COLD water and soak in an enzyme prewash.If stains persist, rub in a little detergent and rinse in cold water. |
| Coffee | Blot up quickly and rinse out in COLD water.Rub in a little detergent and wash in the maximum temperature allowed for the fabric type. |
| Cream/MilkIce cream | Rinse in COLD water and wash normally.If stain is still apparent, sponge with white spirits. |
| Deodorant | Rub affected area with white vinegar and then rinse out in COLD water.Sponge with white spirits.Treat stiffened areas with enzyme prewash. |
| Egg | Soak in a COLD enzyme prewash, rinse and wash normally. |
| Fabric/Softener | Rub affected area with a bar of soap and wash normally. |
| Fruit stains | Treat as soon as possible by sponging with COLD water.Rub a little detergent on the stain and wash normally. |
| Grass | Sponge with white spirits.Rub in an enzyme prewash and wash as normal. |
| Grease and oil | Lay the affected area face down on an absorbent cloth and work from the back.Sponge with white spirits or dry cleaning fluid. Wash normally. |
| Iron or rust | Apply lemon juice and salt and place in the sun. Wash normally. |
| Lipstick | Sponge with white methylated spirits and wash normally. |
| Mildew | Wash in WARM water and detergent.Moisten area with lemon juice, dry in the sun and wash normally.If stain persists and the fabric allows, use bleach. |
| Mud | Brush off any dry mud. Rinse in cold water.If stain persists rub in a little detergent and wash normally. |
| Paint: oil-based | Scrape off any fresh paint and sponge with a non flammable dry cleaning fluid and wash normally. |
| Paint: water-based | Treat while still wet, rinse in WARM water and wash normally. |
| Scorch marks | Dampen a cloth with hydrogen peroxide, lay it over the affected area and press with a fairly hot iron. |
TROUBLE SHOOTING
Most problems are easily solved if you understand the cause.
Check the following list for problems before calling for service.
If error mode such as IE, OE, UE are displayed on the control panel-first open and close the door, and then press START/PAUSE button.
| PROBLEM CHECK | POINT |
| The machine will not operate at all. | Is there a power failure?Is the power cord correctly connected to an electric outlet?Did you turn on the power?Did you press Start/Hold button?Is there the correct amount of laundry in the washer? |
| Water is not suppliedError displayIE | Did you connect the inlet hose and open the water tap?Is the inlet hose or the water tap frozen?Is the water supply shut off?Is there any foreign matter blocking up the inlet hose filter? |
| The machine will not drainError displayOE | Is the drain hose frozen or blocked up by dirt?Is the drain hose kinked or deformed?Is the end of the drain hose immersed in water?Is there excessive dirt inside the drain filter? |
| The machine will not spinError displayUE | Are the clothes in the drum collected on one side?Is the washer installed on an uneven floor or is the vibration serious?Is the door open? (The lamp “LE vill light up in this case.) |
| Vibrating and too noisy | Is the washer installed on an uneven floor?Have all the transit bolts been removed? |
Note
- If E8 and E9 error mode are shown on PCB board, please contact service centre: SEE PAGE 34-35
Baumatic Ltd. Conditions of guarantee
Dear Customer,
Your new Baumatic appliance comes complete with a free 12 month guarantee covering both parts and labour costs resulting from defective materials or workmanship.
Baumatic also gives you the opportunity to automatically extend the guarantee period for a further 12 months at no extra cost, giving an initial guarantee period of 24 months. The extended guarantee period applies to England, Scotland, Wales and Northern Ireland only.
To qualify for your full 24 months guarantee you must register your appliance within 28 days of purchase to be covered under this guarantee. This can be done online via: www.baumatic.co.uk or through returning the guarantee card which can be found in each new Baumatic appliance.
* In addition, your appliance is covered by a 5 year parts warranty. Baumatic Ltd will provide free of charge the parts required to repair the appliance, only if they are fitted by a Baumatic engineer, for any defect that arises due to faulty materials or workmanship within a period of 5 years from the original purchase date.
* An additional 1 to 3 year insurance scheme for labour is available should you wish to extend the warranty period.
Should any person other than an authorised representative of Baumatic Ltd interfere with the appliance, the policy is negated and Baumatic Ltd will be under no further liability.
The guarantee covers the appliance for normal domestic use only, unless otherwise stated.
Any claims made under the terms of the guarantee must be supported by the original invoice/bill of sale issued at the time of purchase.
This guarantee is transferable only with the written consent of Baumatic Ltd.
If the appliance fails and is considered either not repairable or uneconomical to repair between 12 months (2 years if registered) and five years, a free of charge replacement will not be offered.
The guarantee for any replacement will only be for the remainder of the guarantee on the original product purchased.
The guarantee does not cover:
- Sinks and taps
- Failure to comply with the manufacturers instructions for use.
- The replacement of cosmetic components of accessories
- Accidental damage or wilful abuse.
- Subsequent loss or damage owing to the failure of the appliance or electrical supply
- Incorrect installation
- Losses caused by Acts of God, civil war, failure to obtain spare parts, strikes or lockouts
- Filters, fuses, light bulbs, external hoses, damage to bodywork, paintwork, plastic items, covers, baskets, trays, shelves, burner bases, burner caps, decals, corrosion, rubber seals.
In the course of the work carried out it may be necessary to remove the appliance from it operating position. Whilst all reasonable care will be taken, Baumatic Ltd cannot accept responsibility for damage sustained to any property whatsoever in this process.
This guarantee is in addition to and does not diminish your statutory or legal rights.
Contacting Baumatic Ltd
| Sales | Service | Spares | Technical/Advice | |
| TEL: 0118 933 6900 | TEL: 0118 933 6911 | TEL: 0118 933 6922 | 0118 933 6933 | |
| FAX: 0118 931 0035 | FAX: 0118 986 9124 | FAX: 0118 933 6942 | 0118 933 6942 | |
For ROI (Republic of Ireland), please contact one of the numbers below:
TEL: 01-6266798 FAX: 01-6266634
Thanks you for buying Baumatic.
* Applies to UK, Scotland, Wales & Northern Ireland only (Republic of Ireland has 1 year labour & 1 year parts warranty only)
Baumatic®
You will be mine ...
Headquarters
Baumatic Ltd.
Baumatic Buildings,
6 Bennet Road,
Reading,
Berkshire
RG2 0QX, United Kingdom
Sales Telephone
+44 118 933 6900
Sales Fax
+44 118 931 0035
Service Telephone
+44 118 933 6911
Service Fax
+44 118 986 9124
Spares Telephone
+44 118 933 6922
Technical / Advice Telephone
+44 118 933 6933
E-mail:
sales@baumatic.co.uk
technical@baumatic.co.uk
Http (Internet site):
www.baumatic.com
Environmental note
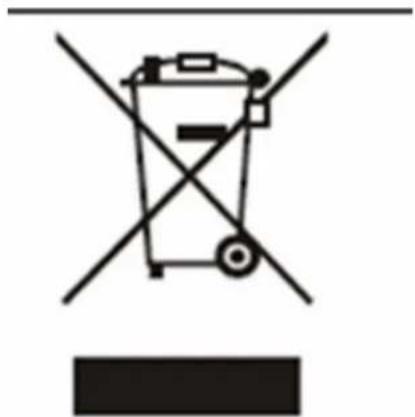
This appliance is marked according to the European directive 2002/96/EC on Waste electrical and Electronic Equipment (WEEE). By ensuring this product is disposed of correctly, you will help prevent potential negative consequences for the environment and human health, which could otherwise be caused by inappropriate waste handling of this product.
The symbol

on the product, or on the documents accompanying the product, indicates that this appliance may not be treated as household waste. Instead it shall be handed over to the applicable collection point for the recycling of electrical and electronic equipment.
Disposal must be carried out in accordance with local environmental regulations for waste disposal.
For more detailed information about treatment, recovery and recycling of this product, please contact your local city office, your household waste disposal service or the shop where you purchased the product.
natural_image
Symbol of a trash bin crossed with a diagonal line, no text or numbers present- The packaging materials that Baumatic uses are environmentally friendly and can be recycled.
- Please discard all packaging material with due regard for the environment.

www.baumatic.com

- Washing Machine Instruction Manual
- MEGA10WD/MEGA10W
- INSTRUCTION MANUAL
- ■ Economic wash system
- ■ Low noise system
- ■ Child-Lock
- ■ Nano-silver sterilization washing
- ■ Air bubble washing
- A NOTE TO YOU
- PARTS AND FEATURES
- NOTE
- WASHING MACHINE SAFETY
- Save these instructions
- Understanding your responsibilities
- INSTALLATION INSTRUCTIONS
- Removing transit bolts
- Location of washer
- INLET HOSE CONNECTION
- CONNECTION TO THE COLD WATER MAINS:
- WATER DRAIN CONNECTION
- ELECTRICAL REQUIREMENTS
- RECOMMENDED EARTHING METHOD
- Level adjustment
- NOTE:
- Sorting
- Loading
- Adding detergent
- THE FUNCTION OF CONTROL PANEL(MEGA10WD)
- THE FUNCTION OF CONTROL PANEL(MEGA10W)
- WASHING PROCEDURE AND SELECTION
- NORMAL PROGRAMME
- ECO-WHITE PROGRAMME
- MEMORY PROGRAMME
- GUIDE FOR OTHER USEFUL PROGRAMMES
- MAINTENANCE
- Cleaning your washer
- Winter storage or moving care
- Non-use or vacation care
- HOW TO CLEAN THE FILTER
- Cleaning the water inlet filter
- Cleaning the drain filter
- Cleaning the detergent case
- REMOVING STAINS
- Stain removal rules
- TROUBLE SHOOTING
- Baumatic Ltd. Conditions of guarantee
- Contacting Baumatic Ltd
- Baumatic®
- Headquarters
- E-mail:
- Environmental note
Brand : BAUMATIC
Model : MEGA10W
Category : Washing machine