BM150 - Baby monitor HAMA - Free user manual and instructions
Find the device manual for free BM150 HAMA in PDF.

| Product Type | Baby Monitor |
| Brand | Hama |
| Model | BM150 |
| Technology | DECT |
| Range (outdoor) | Up to 300 m |
| Range (indoor) | Up to 50 m |
| Power Supply (parent unit) | AC adapter (230V, 50Hz) |
| Power Supply (baby unit) | AC adapter or 3 rechargeable AA batteries |
| Audio Transmission | Two-way, full duplex |
| Voice Activation | Yes, with adjustable sensitivity |
| Sound Level Indicator | LED bar on parent unit |
| Night Light | Yes, on baby unit (adjustable) |
| Lullabies | 5 pre-installed |
| Temperature Sensor | Yes, on baby unit |
| Pairing | Automatic, up to 2 parent units |
| Dimensions (parent unit) | 80 x 60 x 30 mm |
| Dimensions (baby unit) | 100 x 80 x 50 mm |
| Weight (parent unit) | 100 g |
| Weight (baby unit) | 150 g |
| Cleaning | Wipe with a soft, dry cloth |
| Security | Encrypted transmission, anti-interference |
| Spare Parts Availability | Batteries and chargers available from Hama |
Frequently Asked Questions - BM150 HAMA
User questions about BM150 HAMA
0 question about this device. Answer the ones you know or ask your own.
Ask a new question about this device
Download the instructions for your Baby monitor in PDF format for free! Find your manual BM150 - HAMA and take your electronic device back in hand. On this page are published all the documents necessary for the use of your device. BM150 by HAMA.
USER MANUAL BM150 HAMA
All listed brands are trademarks of the corresponding companies. Errors and emissions except, and subject to technical changes. Our general terms of delivery and payment are applied.
00113997man_cs_de_en_es_ru.indd 4
50113997/10.11

hama®
THE SMART SOLUTION
00 113997
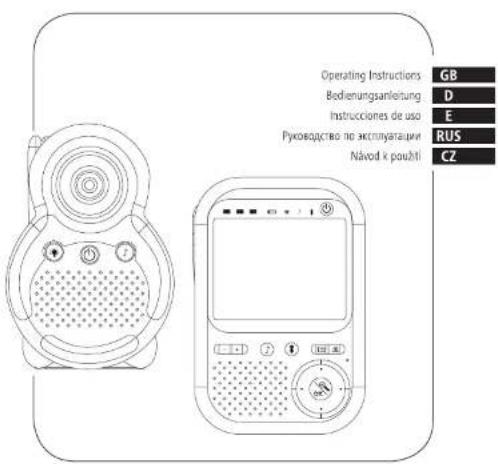
Baby Control
"BM150"

21.11.13 10:13
GB Operating instruction
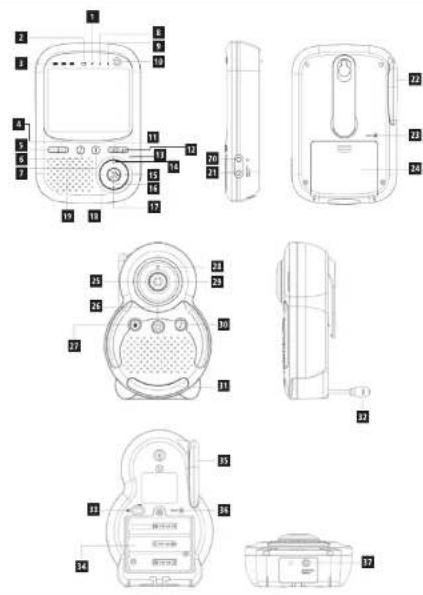
Controls and Displays
Parent unit
-
Linking light
-
Low battery indicator
-
User's right
-
Volume -
-
Lullaby
-
Talic bar
-
Lullaby lig
-
talk back light
-
Power / Power
-
Men
-
Carrer
-
Microphone
-
Up
-
Right
-
Zoom
-
Down 18. Left
-
Speakerphone
-
Headphone socket
-
DC socket
-
Antenna
-
Reset
-
Battery door
Baby unit
-
Camera
-
Power button [Power indicator]
-
Night light button
-
Linding Indicator
-
Infrared light
-
Lumber outlet
-
Night label
-
Temperature sensor
-
Volume slide switch
-
Battery compartment
-
Antenna
-
Reset button
-
DC jack
Thank you for choosing a Hama product. Take your time and read the following instructions and information completely. Please keep these instructions in a sale place for future reference, if you sell the device, please pass these operating instructions on to the new paper.
1. Explanation of Warning Symbols and Notes

Warning
This symbol is used to indicate safety instructions or to draw your attention to specific hazards and risks.

Notes
This symbol is used to indicate additional information or important notes.
2. Everything included?
Tx parent uni
1x baby unit 2x Republicanable NMM battery for the parent unit
3x AA alkaline batteries for the baby unit
1x mains adapter for the parent unit
1x mains adapter for the baby unit
3. Safety Notes
- The product is intended for private, non-
commercial use only.
- Protect the product from dirt, moisture and
overheating and use it in dry rooms only.
• DO NOT USE THE PRODUCT IN AREAS WHERE THE USE OF electronic devices is not permitted.
• Do not drop the product and do not expose it to
do not drop the product, and do not expose it to any major shocks.
- Keep this product, as all electrical products, out of
the reach of children
• Do not operate the product outside the power
times given in the specifications.
- Keep the packaging material out of the reach of
children due to the risk of surlocation.
- propose of packaging material immediately according to locally applicable regulations.
- Do not modify the product in any way. Doing so voids the warranty.

use batteries (or rechargeable batteries)
that match the specified type.
• Do not attempt to charge non-rechargeable
Batteries, as they may explode
- When inserting bacteria, note the correct
potality (+ and - the high) and much the peltorism, accordingly. Failure to do so could
result in the batteries leaking or exploding
- Remove the batteries from products that are
not being used for an extended period
- Remove dead batteries immediately
- Do not mix old and new batteries or batteries
of a different type or make.

Warning
Risk of suffocation/ strangulation
- Ensure that the mains adapter and the
confection cable are always used out of reach
of children
• Do not use any extension cables for the
connection table
4. GETTING STARTED
Baby unit

Note
- You can operate the baby unit with mains.
current or alkaline batteries
• Even if you operate the baby unit with mains.
current, we recommend inserting alkaline
pactenes. This ensures that the unit will work
4.1. Operating the baby unit with a power
supply unit
- Insert the power cable into the socket on the
bottom of the baby unit.
- Connect the other end of the power cable to the
electrical socket.
• To switch on the baby unit, hold down the |ON|
OFF: button until the operation indicator light
up. The baby unit a now switched off and the connection indicator will flash.

Warning
- Dals use the included mains advances
- Connect the product only to a socket that has
been approved for the device. The
electrical socket must always be easily
accessible
- Do not use the product if the AC adapter
adapter cable of power cable is damaged
4.2 Operating the baby unit using alkaline
batteries
- Remove the battery compartment cover
• Inden 3 AA alkaline batteries
- Put the battery compartment cover back on and
tighten the screw in a clockwise direction using a
To switch on the baby and hold down the ION
OFF button until the expiration indicator lights
up. The baby unit is now switched on and the
connection indicator will flash
Parent unit

Note
- The parent unit comes with a rechargeable
battery
- Charge the parent unit before you start using it
and if the battery level is low


Warning
- Only use suitable charging devices or USB connections for charging.
- As a rule, do not charging devices or USB connections that are defective and do not try to repair them yourself.
- Do not overcharge the product or allow the battery to completely discharge.
- Avoid storing, charging or using batteries in extreme temperatures.
-
When stored over a long period of time, batteries should be charged regularly (at least every three months).
-
Remove the battery compartment cover.
- Insert the included rechargeable battery.
- Close the battery compartment.
- Insert the power cable into the socket on the side of the parent unit.
- Connect the other end of the power cable to the electrical socket.
- To switch on the parent unit, hold down the [ON/OFF] button until the operation indicator lights up. The parent unit is now switched on.
• The parent unit charges the battery.

Note
- Once the rechargeable battery pack is fully charged, you can only use the battery to power the parent unit.
- If no battery pack is inserted in the parent unit, it can still be powered on when connecting to the mains power.
5. Registration (Pairing)

Note - Pairing
- The units are wirelessly paired in the original factory settings.
- It is not necessary to pair the units, except when this connection is lost due to inappropriate use or anomalous external circumstances.
-
Only perform the following steps in this case.
-
Hold down the ON/OFF button to switch on the parent unit. The parent unit is now switched on. It searches for the baby unit and establishes a connection.
- Hold down the ON/OFF button to switch on the baby unit. The connection indicator will flash. Then press the ON/OFF and nightlight buttons at once until the connection indicator flashes rapidly to access the appropriate code setting.
- Hold down the camera button on the parent unit for 2 seconds. The parent unit automatically searches for the camera (baby unit), beeps and shows the camera image.

Note - Pairing
If a certain baby unit was registered previously, registering the current baby unit will overwrite the previous registration.
6. Parent unit status display
| Icons | Behaviors description |
| Indicates the signal strength between the baby unit and parent unit. The more blocks, the stronger connection signal. | |
| Indicates no connection between the baby unit and parent unit: | |
| Current camera No.1 linking to parent unit | |
| Current camera No.2 linking to parent unit | |
| Current camera No.3 linking to parent unit | |
| Current camera No.4 linking to parent unit | |
| Full battery level | |
| 3/4 battery level | |
| 1/2 battery level | |
| 1/4 battery level | |
| Low battery, needs charging | |
| Indicates that the Night Light of the baby unit is on. | |
| Indicates the speaker volume level of parent unit. The more blocks, the louder the parent unit speaker volume. | |
| Zoom image two times | |
| 27°C | Temperature reading from baby unit |
6.1 Menu structure of Parent unit
| Brightness | Level 1 – Level 8 | |
| Add Baby Unit | Up to 4 Units | |
| Sleep Mode | Off/On | |
| Night Light | Off/On | |
| Default setting? | OK/Cancel |
7. Setting up
- Place the baby unit in a convenient location (e.g. on a table) and point the camera lens towards the area you want to monitor.
- Adjust the baby unit's head angle by rotating the camera up, down, left and right until you are satisfied with the image in parent unit.
- Place the parent unit in a convenient location (eg. on a table or bedstand), and adjust the display to your view at least 30cm away.

Note - Pairing
- Do not place the baby unit within baby's reach! If there is interference with the picture or sound, try moving the units to different locations, and ensure they are not close to other electrical equipment.
- If you place the parent and baby units too close together, you may hear a high pitched noise, this is normal. The units are designed to be located at a distance(at least 3 metre or more) from one another, e.g. in separate room.
- For the first time usage, turn on both units, they can automatically scan the corresponding code at once without press any button.
7.1 Night Vision mode
The baby unit has 8 high-intensity infrared lens for picking up clear images in the dark. When the built-in photo sensor detects a low level of ambient light, the LEDs will automatically activate and the screen on the parent unit will display in black and white.
7.2 Adjust speaker volume of parent unit and baby unit
- There are 3 volume levels on baby unit from level 1 to level 3, the user can slide the switch to select the volume level.
- And 8 volume levels on parent unit, including volume off and level 2 to level 8. The volume level of parent unit will be shown on the status bar when you adjust the volume. Press [Vol-] to decrease or [Vol+] to increase the volume of parent unit.
- Changing the volume setting on the baby unit affects the volume when you use the Talk Back feature and when playing lullaby.
7.3 Talk Back
You can use the Talk Back feature to comfort and reassure your baby. Whilst using Talk Back you will not be able to hear your baby until you release the button.
- In monitor mode, press and hold [Talk Back] button on the parent unit to speak to baby. Icon will be turned on.
- Release to hear your baby again.
7.4 Zoom
Through this zoom feature, you can view your baby in zoom mode ⑨.2
- In monitoring mode, press [ZOOM] button to zoom image two time.
- Press [ZOOM] button to zoom out the return to the normal monitoring mode.
ZOOM icon Ⓜ will be displayed in the right side of bottom of display screen.
7.5 Temperature Display (°C)
The temperature reading from the temperature sensor at the back of the baby unit will be displayed at the top of the LCD screen.
7.6 Lullaby
Lullaby play and stop
The baby unit plays lullabies to gently soothe your baby back to sleep. Each lullaby is played repeatedly about 45 seconds. Select one of the 5 melodies you like and play it.
- Press and hold [Lullaby] button for 2 second to play the lullaby.
- Press to skip to the next lullaby when playing the lullaby.
- Slide the volume switch to select the FULL-Middle-LOW volume setting.
- Press and hold [Lullaby] button for 2 seconds again to stop the lullaby.
Lullaby remote control
- Press and hold the [Lullaby] button in parent unit by 2 seconds until the LULLABY INDICATOR is on .The lullaby is playing in baby unit.
- Press to skip to the next lullaby when playing the lullaby.
- Press and hold the [Lullaby] button in parent unit by 2 seconds until the LULLABY INDICATOR is off. The lullaby is stopped in baby unit.
7.7 OFF-Linking
If there is no connection or the parent unit is out of range, the video display will go to display 7 color in the LCD screen and the beep sound will be sounded from the speaker. Simultaneity LINK INDICATOR will be flashed in baby and parent unit.
8. PARENT UNIT SETTINGS
Press [MENU] to access the main menu.
Set the brightness
- Press [UP] or [DOWN] to select BRIGHTNESS.
- Press [OK] to enter the sub-menu.
- Press [LEFT] or [RIGHT] to select the desired level of the brightness.
- Press [OK] to confirm, then return to the main menu.
Add baby unit
- Press [UP] or [DOWN] to select ADD baby unit sub-menu.
- Press [OK] to confirm, then word "Search...." appear in the LCD screen.
- Press both [Power] and [Light] button of New baby unit, the LINKING INDICATOR is flashing quickly. When the parent unit finds the camera, beeps and the picture from the camera appears.

Note
- Except the original registration camera1, up to 3 cameras can be added to one parent unit at any time.
- In monitor mode, you may press the [camera] button to switch the camera from No.1 to No.4 to monitor the different area you want.
Sleep mode
- Press [UP] or [DOWN] to select Sleep mode sub-menu.
- Press [OK] to turn on/off the sleep mode with the sleep icon 😊 appearing/disappearing on the top of the LCD.

Note
If the area around the baby is so quiet the LCD screen will go to off until it is noisy.
Night light (Remote)
- Press [UP] or [DOWN] to select Night light sub-menu.
- Press [OK] to remote the night light to be turned on/off in baby unit.

Note
When the night light is on, the icon 🔔 appears on the top of the LCD screen.
Default Setting
- Press [UP] or [DOWN] to select Default setting sub-menu.
- Press [OK] to enter the setting
- Press [LEFT] or [RIGHT] to select "OK" or "Cancel".
- Press [OK] button to confirm, the all setting will returned to default setting as follow:
| Volume | Level 4 |
| Brightness | Level 4 |
| Zoom | 1x |
| Sleep Mode | Off |
RESET THE PARANT AND BABY UNITS
In some cases of mal-function, you may press by using a metal pin to reset the unit. The parent unit and baby unit are reset individually.
- Press [RESET] button at the back of the parent/baby unit to power off and recover the unit.
- Press and hold [POWER] button to restart the unit.
BATTERY REPLACEMENT
When the low battery indicator □ displays on the LCD, it indicates that the battery is low. So the battery needs to be recharged. (The battery pack takes about 12 hours to charge fully.) Or if the power indicator of the baby unit is flashing, it indicate that the battery of the unit is not enough, please replace with 3 new AA size batteries for the baby unit immediately.

Note
Attention! Please dispose of used unit or batteries in an ecologically safe manner.
9. Troubleshooting
No display (Linking light on parent unit does not come on)
- Check whether the parent unit is powered on.
- Check whether the supplied rechargeable battery pack is correctly installed and that they are not drained.
- Recharge the parent unit by connecting it to the power supply.
Link indicator on the parent unit flashes
• The parent unit and the baby unit may be out of range with each other. Reduce the distance between the units, but not closer than 3 metre
- The baby unit may be switched off. Press [POWER] key to switch on the baby unit.
The parent unit or baby unit beep
- Lost connection, Reduce the distance between the parent unit and baby unit, but not closer than 3 metre.
- Any one of both units may be switched off. Switch on it.
Cannot hear sound or baby cry from the parent unit
• The volume level in the parent unit may be set too low, increase the volume level of the parent unit.
• The baby unit is far away your baby, place the baby unit in a convenient location which can hear if baby disturbs Or becomes uncomfortable.
The baby monitor system produces a high pitched noise
- The parent unit and the baby unit are too close to each other. Make sure the parent unit and baby unit are at least 3 metres away from each other.
- The speaker volume of the parent unit maybe set too high. Decrease the volume of the parent unit.
- Technical Specifications
| Frequency range/Operating range: | 2407.5 ~2475.0 GHZ |
| Transmitting power: | 100mW |
| Temperature range | |
| Operating: | 0°C to 40°C |
| Storage: | -20°C to 60°C |
| Display / TFT Panel | |
| Panel Size: | 3.5inches |
| Resolution: | 320X240pixels |
| Electrical power | |
| Baby unit Input: | 100-240VAC 50/60HZ0.1A |
| Baby unit Output: | 6V DC 500mA |
| Parent unit Input: | 100-240VAC 50/60HZ0.1A |
| Parent unit Output: | 6V DC 500mA |
| Battery information | |
| Baby unit: | AA size1.5V x 3 Alkaline battery |
| Parent unit: | 3.6V / 1400mANi-MHbattery rechargeablebattery pack |
11. Note on environmental protection:

After the implementation of the European Directive 2002/96/EU and 2006/66/EU in the national legal system, the following applies: Electric and electronic devices as well as batteries must not be disposed of
with household waste. Consumers are obliged by law to return electrical and electronic devices as well as batteries at the end of their service lives to the public collecting points set up for this purpose or point of sale. Details to this are defined by the national law of the respective country. This symbol on the product, the instruction manual or the package indicates that a product is subject to these regulations. By recycling, reusing the materials or other forms of utilising old devices/Batteries, you are making an important contribution to protecting our environment.
12. Declaration of Conformity
CE Hereby, Hama GmbH & Co. KG, declares that this device is in compliance with the essential requirements and other relevant provisions of Directive 1999/5/EC. See www.hama.com for declaration of conformity according to R&TTE Directive 99/5/EC guidelines.

Indicates that the Night Light of the baby unit is on.
