Colorado (2012) - Car CHEVROLET - Free user manual and instructions
Find the device manual for free Colorado (2012) CHEVROLET in PDF.

| Product Type | Mid-size Pickup Truck |
| Model Year | 2012 |
| Engine Options | 2.9L I4 (185 hp) or 3.7L I5 (242 hp) |
| Transmission | 5-speed manual or 4-speed automatic |
| Drivetrain | Rear-wheel drive or 4-wheel drive |
| Dimensions (L x W x H) | 207.1 in x 70.4 in x 64.8 in |
| Wheelbase | 126.0 in |
| Curb Weight | 4,200 lb (approx.) |
| Fuel Capacity | 21 gallons |
| Fuel Economy (city/hwy) | 17/23 mpg (I5 engine, RWD) |
| Maximum Towing Capacity | 3,500 lb (properly equipped) |
| Payload Capacity | 1,500 lb (approx.) |
| Key Features | StabiliTrak stability control, OnStar, cruise control, power windows/locks |
| Safety Systems | Front airbags, side curtain airbags, ABS, traction control |
| Maintenance Interval (Oil) | Every 7,500 miles or 12 months |
| Bed Length | 6.0 ft or 7.5 ft (depending on cab configuration) |
| Seating Capacity | 2-5 passengers (regular or crew cab) |
| Steering | Power rack-and-pinion |
| Brakes | Front disc, rear drum with ABS |
| Tire Size | P235/75R16 or P265/70R16 |
Frequently Asked Questions - Colorado (2012) CHEVROLET
User questions about Colorado (2012) CHEVROLET
0 question about this device. Answer the ones you know or ask your own.
Ask a new question about this device
Download the instructions for your Car in PDF format for free! Find your manual Colorado (2012) - CHEVROLET and take your electronic device back in hand. On this page are published all the documents necessary for the use of your device. Colorado (2012) by CHEVROLET.
USER MANUAL Colorado (2012) CHEVROLET
2012ChevroletColoradoOwnerManual
InBrief....1-1
InstrumentPanel......1-2
InitialDriveInformation......1-3
VehicleFeatures......1-15
Performance and
Maintenance....1-17
Keys, Doors, and
Windows......2-1
KeysandLocks......2-2
Doors....2-7
VehicleSecurity......2-10
ExteriorMirrors......2-13
InteriorMirrors......2-15
Windows....2-16
SeatsandRestraints......3-1
HeadRestraints....3-2
FrontSeats......3-3
RearSeats......3-8
SafetyBelts....3-11
AirbagSystem......3-20
ChildRestraints......3-35
Storage....4-1
StorageCompartments......4-1
InstrumentsandControls....5-1
Controls....5-2
WarningLights, Gauges, and
Indicators......5-6
InformationDisplays......5-20
VehicleMessages......5-23
Lighting....6-1
ExteriorLighting......6-1
InteriorLighting......6-6
LightingFeatures......6-7
InfotainmentSystem......7-1
Introduction......7-1
Radio....7-7
AudioPlayers......7-15
Phone....7-21
ClimateControls......8-1
ClimateControlSystems.....8-1
AirVents....8-3
DrivingandOperating......9-1
DrivingInformation......9-2
StartingandOperating......9-26
EngineExhaust......9-34
AutomaticTransmission.....9-36
ManualTransmission......9-38
DriveSystems....9-40
Brakes....9-44
RideControlSystems......9-47
CruiseControl....9-50
Fuel....9-53
Towing....9-57
ConversionsandAdd-Ons...9-67
VehicleCare....10-1
GeneralInformation......10-2
VehicleChecks......10-4
HeadlampAiming......10-36
BulbReplacement......10-36
ElectricalSystem......10-40
WheelsandTires......10-47
JumpStarting.....10-87
Towing....10-91
AppearanceCare......10-96
ServiceandMaintenance...11-1
GeneralInformation......11-1
MaintenanceSchedule......11-3
SpecialApplication
Services....11-8
2012ChevroletColoradoOwnerManual
AdditionalMaintenance
andCare....11-8
RecommendedFluids,
Lubricants, and Parts.....11-12
MaintenanceRecords.....11-16
TechnicalData....12-1
VehicleIdentification......12-1
VehicleData....12-2
CustomerInformation......13-1
CustomerInformation......13-1
ReportingSafetyDefects....13-19
VehicleDataRecordingand
Privacy....13-20
Index......i-1


Thenames, logos, emblems, slogans, vehiclemodelnames, and vehiclebodydesignsappearingin thismanualincluding, but not limited to, GM, the GM logo, CHEVROLET, the CHEVROLETEmblem, and COLORADO are trademarks and/or servicemarksof General Motors LLC, itssubsidiaries, affiliates, or licensors.
Thismanualdescribesfeaturesthat mayormaynotbeonyourspecific vehicleeitherbecausetheyare optionsthatyoudidnotpurchaseor duetochangessubsequenttothe printingofthisownermanual. Pleaserefertothepurchase documentationrelatingtoyour specificvehicletoc confirmeeachof thefeaturesfoundonyourvehicle. ForvehiclesfirstsoldinCanada, substitutethename"General MotorsofCanadaLimited"for ChevroletMotorDivisionwhereverit appearsinthismanual.
Keepthismanualinthevehiclefor quickreference.
CanadianVehicleOwners
AFrenchlanguagecopyofthis manualcanbeobtainedfromyour dealerorfrom:
PartNo.20901233BSecondPrinting
©2011GeneralMotorsLLC.AllRightsReserved.
UsingthisManual
Toquicklylocateinformationabout thevehicle,usethelndexinthe backofthemanual.Itisan alphabeticalallistofwhatisinthe manualandthepagenumberwhere itcanbefound.
Danger,Warnings, and Cautions
Warning messages found on vehicle labels and this manual describe hazards and what to avoid or reduce them.
Dangerindicatesahazardwitha highlevelofriskwhichwillresultin seriousinjuryordeath.
Warningor Caution indicates a hazard that could result in injury or death.
WARNING
These mean there is something that could hurt you or other people.
Notice: This mean there is something that could result in property or vehicle damage. This would not be recovered by the vehicle's warranty.

Acirclewithaslashthroughitisa safetysymbolwhichmeans"Do Not,""Donotdothis,"or"Donotlet thishappen."
Symbols
Thevehiclehascomponentsand labelsthatusesymbolsinsteadof text.Symbolsareshownalongwith thetextdescribingtheoperationor informationrelatingtoaspecific component,control,message, gauge,orindicator.
(i): This symbol is shown when you need to see your own manual for additional instructions or information.
☐: This symbol is shown when you need to see a service manual for additional instructions or information.
VehicleSymbolChart
Herearesomeadditionalsymbols that may be found on the vehicle and what they mean. Form more information on the symbol, refer to the Index.
AirbagReadinessLight
AirConditioning
(ABS):AntilockBrakeSystem(ABS)
OnStar® Hands-FreePhone
(1) (P): BrakeSystemWarning Light
- + :ChargingSystem
:CruiseControl
EngineCoolantTemperature
-ExteriorLamps
D:FogLamps
:FuelGauge
Fuses
ED:HeadlampHigh/Low-Beam Changer
LATCHSystemChild
Restraints
:MalfunctionIndicatorLamp
OilPressure
①:Power
SafetyBeltReminders
(!):TirePressureMonitor
: TractionControl/StabiliTrak ®
:WindshieldWasherFluid
vilntroduction
NOTES
InBrief
InstrumentPanel
InstrumentPanel......1-2
InitialDriveInformation
InitialDriveInformation......1-3
RemoteKeylessEntry(RKE)
System......1-4
DoorLocks....1-4
Tailgate....1-5
Windows....1-6
SeatAdjustment......1-7
HeatedSeats......1-8
HeadRestraintAdjustment....1-8
SafetyBelts....1-8
PassengerSensingSystem...1-9
MirrorAdjustment......1-9
SteeringWheel
Adjustment......1-11
InteriorLighting......1-11
ExteriorLighting......1-12
WindshieldWiper/Washer....1-12
ClimateControls....1-13
Four-WheelDrive......1-14
VehicleFeatures
Radio(s)....1-15
SatelliteRadio....1-16
CruiseControl....1-16
DriverInformation
Center(DIC)....1-17
PowerOutlets......1-17
PerformanceandMaintenance
TractionControl
System(TCS)......1-17
StabiliTrak® System......1-18
TirePressureMonitor......1-18
EngineOilLifeSystem.....1-18
DrivingforBetterFuel
Economy....1-19
RoadsideAssistance
Program....1-19
OnStar ^® 1-20
InstrumentPanel

text_image
Diagram of car interior with labeled dashboard and steering wheel, showing various directional controls and components.ManualTransmissionsshown, Automatic Transmissionsimilar
A. AirVentsonpage8-3.
B. TurnandLane-ChangeLever.
See TurnandLane-Change
Signalsonpage6-4.
WindshieldWiper/Washeron
page5-2.
C. InstrumentClusteronpage5-7.
D. HazardWarningFlasherson page6-4.
E.PassengerSideAirbag.See AirbagSystemonpage3-20.
F.ExteriorLampControlson page6-1.
FogLampsonpage6-5 (IfEquipped).
ExteriorCargoLampson page6-5.
G. Parking Brakeonpage9-45.
H. DataLinkConnector(DLC) (OutofView). See Malfunction IndicatorLamponpage5-13.
I. Hornonpage5-2.
J.StabiliTrak ^® Systemon page9-48.
Four-WheelDriveon page10-30.
K. Infotainmentpage 7-1.
L. ClimateControlSystemson page8-1.
M.PowerOutletsonpage5-5.
N.PassengerAirbagStatus Indicatoronpage5-11.
InitialDrive Information
Thissectionprovidesabrief overviewaboutsomeofthe importantfeaturesthatmayormay notbeonyourspecificvehicle.
Formoredetailedinformation, refer toeachofthefeatureswhichcanbe foundlaterinthisownermanual.
1-4InBrief
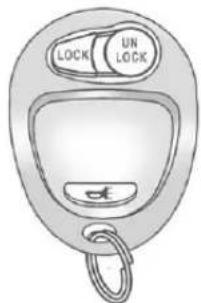
RemoteKeylessEntry (RKE)System
TheRKEtransmitterisusedtolock andunlockthedoorsfromupto9m (30ft)awayfromthevehicle.
text_image
LOCK UN LOCKPressUNLOCKtounlockthedoors andpressLOCKtolockthem.
Press 🔍 to sound the horn and to flash the exterior lamps for 30 seconds.
Lockandunlockfeedbackcanbe personalized.SeeDriver InformationCenter(DIC)on page5-20.
SeeKeysonpage2-2andRemote KeylessEntry(RKE)System Operationonpage2-3.
DoorLocks
ManualDoorLocks
Lockorunlockthedoorsfromthe outsidewiththekeyinthedriveror frontpassengerdoororpressthe LOCKorUNLOCKbuttononthe RemoteKeylessEntry (RKE)transmitter.
natural_image
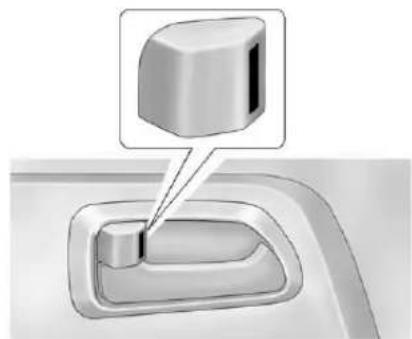
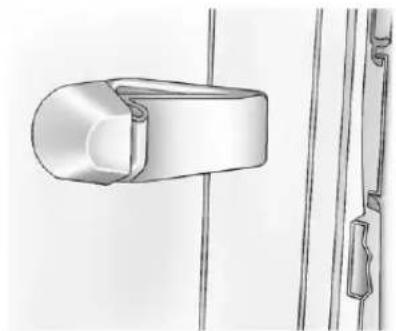
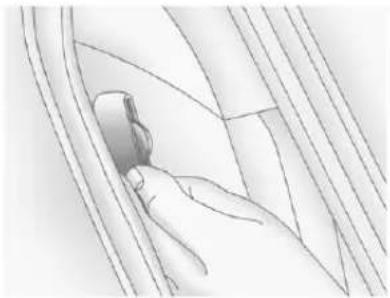
Close-up of a mechanical switch component with a highlighted section (no text or symbols visible)Frominsidethevehicle,movethe leveronthedoorforwardor rearwardtolockorunlockthedoor.
Seeingtheredlineonthelever indicatesthedoorisunlock.
PowerDoorLocks

text_image
U L U UVehicleswithpowerdoorlocks,the switchesarelocatedonthefront doorarmrests.
PressLtolockthedoors.
PressUtounlockthedoors.
Formoreinformationsee:
• DoorLocksonpage2-5.
• PowerDoorLocksonpage2-6.
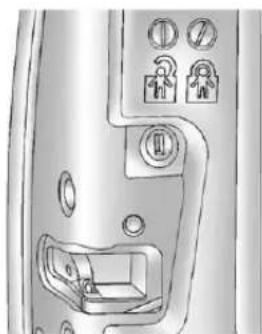
SafetyLocks(CrewCab)
Ifthevehicleisacrewcabmodel,it mayhavereardoorsafetylockson thereardoors.Withthisfeature,the reardoorsarelockedsothey cannotbeopenedfromtheinside.
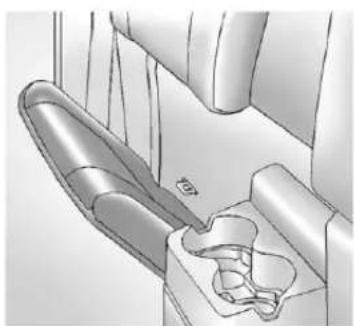
natural_image
Technical diagram of a door handle with lock symbols and mounting holes (no text or labels)Thereardoorsafetylocksare locatedontheinsideedgeofeach reardoorbelowthesafetylock label.
Formoreinformation,seeSafety Locks(CrewCab)onpage2-6.
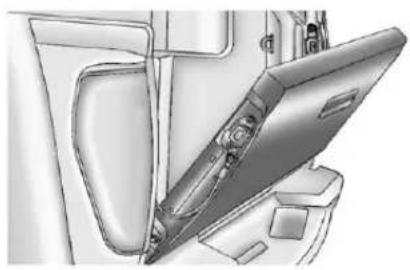
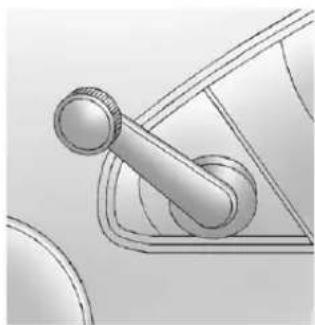
Tailgate
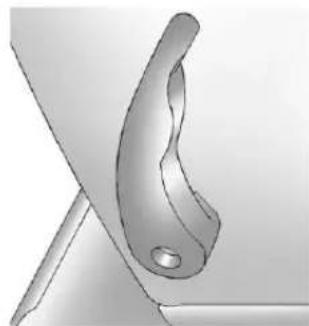
natural_image
Technical illustration of a mechanical component with a tool inserted, showing no visible text or symbols.Openthetailgatebypullingupon theoutsidehandlewhilepullingthe tailgatedown.
Onvehicleswithalockingtailgate, usetheignitionkeytounlockit.
Formoreinformationsee Tailgate onpage2-8.
1-6InBrief
Windows
ManualWindows
natural_image
Mechanical lever mechanism diagram showing pivot and pivot components (no text or labels)Usethewindowcranktoopenand closeeachwindow.
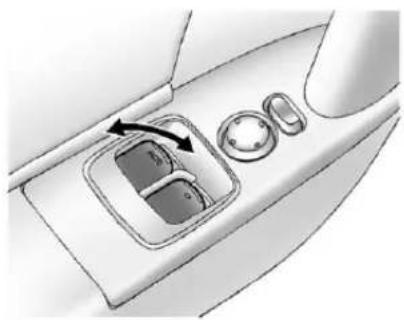
PowerWindows
natural_image
Close-up of a computer keyboard key with two buttons (U and L) on a white surface, no text or symbols visible.RegularCabShown, CrewCab Similar
Pushtheswitchdowntoopenthe window. Pullthefrontoftheswitch uptocloseit.
See Manual Windowsonpage2-17 or Power Windowsonpage2-17.
Express-DownWindow
Windowswithanexpress-down featureallowthewindowtobe loweredfullywithoutpressingand holdingtheswitch.Pressthefrontof theswitchtothefirstposition,and thewindowopensasmallamount.Presstheswitchdownfullyandthe windowgoesallthewaydown.
Tostopthewindowwhileitis lowering,pullupthefrontofthe switch.
SeatAdjustment ManualSeats
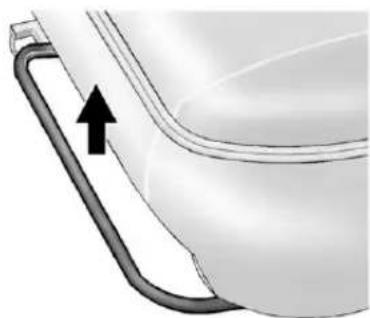
natural_image
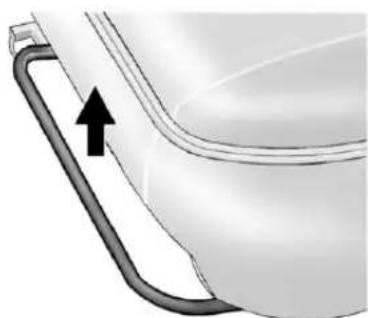
Close-up of a toilet handle with a black arrow pointing to the side panel (no text or symbols visible)Toadjustamanualseat:
- Liftthebarunderthefrontofthe seatcushiontounlocktheseat.
2.Slidetheseattothedesired positionandreleasethebar. - Trytomovetheseatback and forthtomakesureitislocked in place.
See Seat Adjustment page 3-3 formoreinformation.
PowerSeats
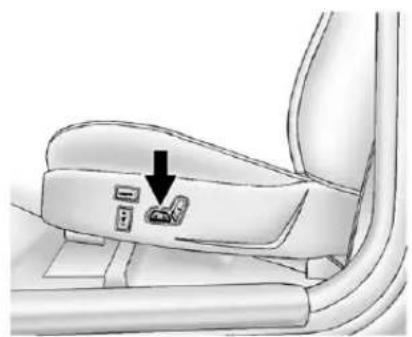
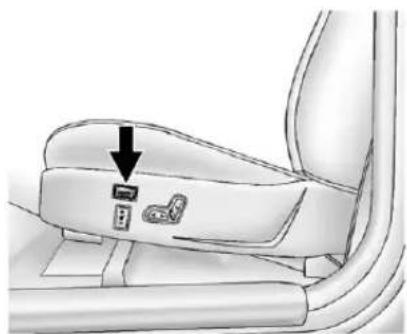
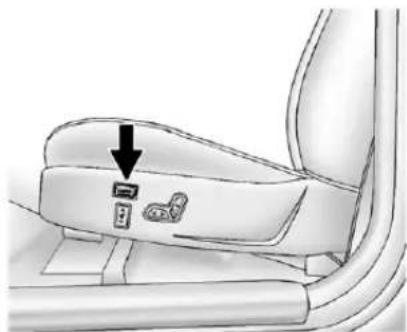
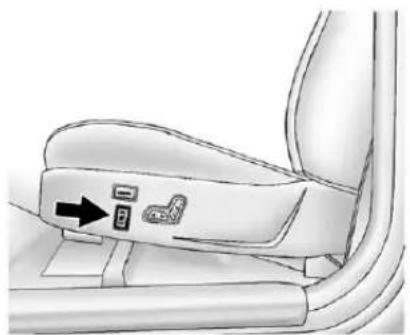
natural_image
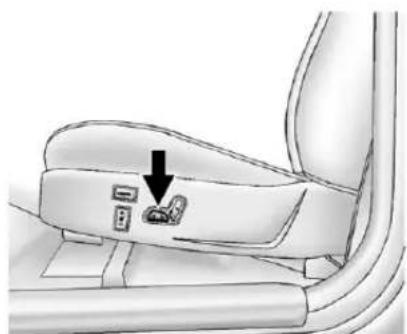
Diagram of a car seatbelt with a downward arrow pointing to a small car component (no text or symbols present)Toadjustapowerseat,ifavailable:
- Movetheseatforwardor rearwardbyslidingthecontrol forwardorrearward.
- Raiseorlowerthefrontorrear partoftheseatcushionby movingthefrontorrearofthe controlupordown.
- Raiseorlowertheentireseatby movingtheentirecontrolup ordown.
Usetheverticalcontroltoadjustthe seatback.
SeePowerSeatAdjustmenton page3-3andRecliningSeatbacks onpage3-4formoreinformation.
PowerLumbar
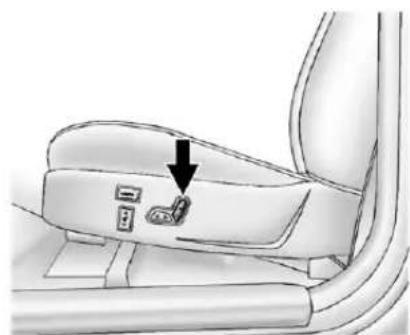
natural_image
Diagram of a car seatbelt with a black arrow pointing to a button (no text or symbols present)Ifavailable, pressandholdthefront orrearofthecontroltoincreaseor decreaselumbarsupport. Release thecontrolwhenthelevelofsupport isreached.
SeeLumbarAdjustmenton page3-4formoreinformation.
HeatedSeats

natural_image
Line drawing of a car seatbelt with a directional arrow pointing to the seat (no text or symbols present)Ifavailable,theswitchesareonthe outboardsidesofthefrontseats.To operate,theignitionmustbeon.
- Pressthetopoftheswitchfor thehighsetting.
- Pressthebottomoftheswitch forthelowsetting.
- Puttheswitchinthecenter positiontoturnthisfeatureoff.
SeeHeatedFrontSeatson page3-7formoreinformation.
HeadRestraint Adjustment
Donotdriveuntiltheheadrestraints foralloccupantsareinstalled and adjusted properly.
Toachieveacomfortableseating position,changetheseatback reclineangleaslittleasnecessary whilekeepingtheseatandthehead restraintheightintheproper position.
FormoreinformationseeHead Restraintsonpage3-2andSeat Adjustmentonpage3-3.
SafetyBelts
natural_image
Illustration of a person wearing a seatbelt and belt, no text or symbols presentRefertothefollowingsectionsfor importantinformationonhowtouse safetybeltsproperly.
• SafetyBeltsonpage3-11.
• HowtoWearSafetyBelts Properlyonpage3-12.
• Lap-ShoulderBeltonpage3-13.
• LowerAnchorsandTethersfor Children(LATCHSystem)on page3-43.
PassengerSensing System
Thepassengersensingsystem, ifequipped, willturnofftheright frontpassengerfrontalairbagunder certainconditions. Thedriver airbagsarenotaffectedbythis.
If the vehicle has one of the passenger air bag status indicators pictured in the following illustrations, then the vehicle has a passenger sensing system.
Thepassengerairbagstatus indicatorwillbevisibleonthe instrumentpanelwhenthevehicleis started.
PASSENGER AIR BAG


UnitedStates
CanadaandMexico
See Passenger Sensing System on page 3-27 for important information.
MirrorAdjustment ExteriorMirrors
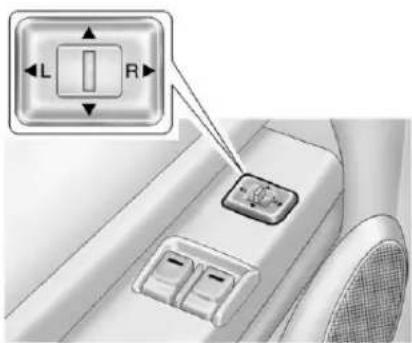
text_image
L RVehicleswithoutsidepowermirrors havecontrolsonthedriverdoor armrest.
1-10InBrief
Toadjustthepowermirrors:
-
Movetheselectorswitchtothe L(left)orR(right)tochoose the driverorpassengermirror.
-
Pressoneofthefourarrows locatedonthecontrolpadto movethemirrortothedesired direction.
-
Return these selectors switch to the center position on cethemirrors are adjusted.
SeePowerMirrorsonpage2-14.
Vehicleswithmanualoutside mirrorscanbeadjustedbypassing themirrorupanddownnandleftand rightsothatyoucanseeaclear viewbehindyou.
Manuallyfoldthemirrorsinwardto preventdamagewhengoing throughanautomaticcarwash. To fold, pushthemirrortowardthe vehicle. Pushthemirroroutward, to returntoitsoriginalposition.
SeeManualMirrorsonpage2-14.
InteriorMirror
Onvehicleswithamanualinside rearviewmirror,themirrorcanbe adjustedbyholdingitinthecenter tomoveitforaclearviewbehind you.Toavoidglarefromthe headlampsbehindyou,pushthetab forwardfordaytimeuseandpullit fornighttimeuse.
See Manual Rearview Mirror on page 2-15.
The automatic dimming inside rearview mirror will automatically reduce the glare of flights from behind the vehicle.
SeeAutomaticDimmingRearview Mirroronpage2-15.
SteeringWheel Adjustment
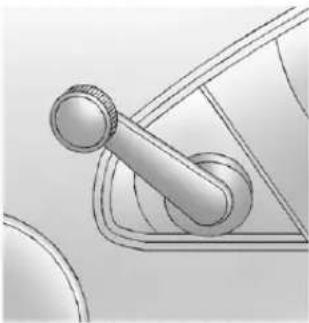
natural_image
Illustration of a mechanical device with a drum and surrounding circular components (no text or symbols)Thesteeringwheeladjustmentlever islocatedontheleftsideofthe steeringwheel.
Toadjust:
- Hold thesteeringwheelandpull thelevertowardyou.
- Movethesteeringwheelup ordown.
- Releasethevertolockthe wheelinplace.
Donotadjustthesteeringwheel whiledriving.
InteriorLighting
DomeLamps
Thedomelampscomeonwhenany doorisopened.
Tomanuallyturnonthedome lamps, turnthethumbwheel, located nexttotheexteriorlampscontrol, all thewayup. Thecargolampsmay comeon, ifthevehicleisequipped withBluetooth. In thisposition, the lampsremainonwhetheradooris openedorclosed.
ReadingLamps
Pressthelensonthelampstoturn eachreadinglamponoroff.
Theselampswillnotcomeonwith thedomelamps.
Formoreinformationsee:
- "DomeLampOverride" under DomeLampsonpage6-6.
• InstrumentPanelIllumination Controlonpage6-6. - ExitLightingonpage6-7.
ExteriorLighting

text_image
AUTO 300℃:Turnsoffallexteriorlamps includingtheDaytimeRunning Lamps(DRL).
AUTO: Automatic operation of the headlamps and other exterior lamps at normal brightness.
300: Manualoperationofthe parkinglampsandotherexterior lamps.
D: Manualoperationofthe headlampsandotherexterior lamps.
Formoreinformation,see:
- ExteriorLampControlson page6-1.
• DaytimeRunningLamps(DRL) onpage6-3.
• AutomaticHeadlampSystemon page6-3. - FogLampsonpage6-5.
- ExteriorCargoLampson page6-5.
WindshieldWiper/Washer
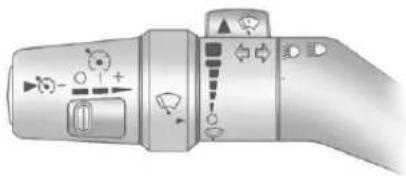
natural_image
Illustration of a camera control panel with adjustment knobs and buttons (no text or symbols):Forasinglewipe, movethe bandto and thenreleaseit. For severalwipes, holdthebandon longer.

:Foradjustableintervalwipes, turnthebandupformorefrequent wipesordownforlessfrequent wipes.
: Forslowwipes, turn the band to the first solid position past the delay settings.
■:Forfastwipes,turnthebandto thesecondsolidpositionpastthe delaysettings.
○:Usetoturnthewipersoff.
WindshieldWasher: Push the paddleontopoftheturnsignal/lane changelevertospraywasherfluid onthewindshield.
SeeWindshieldWiper/Washeron page5-2.
ClimateControls
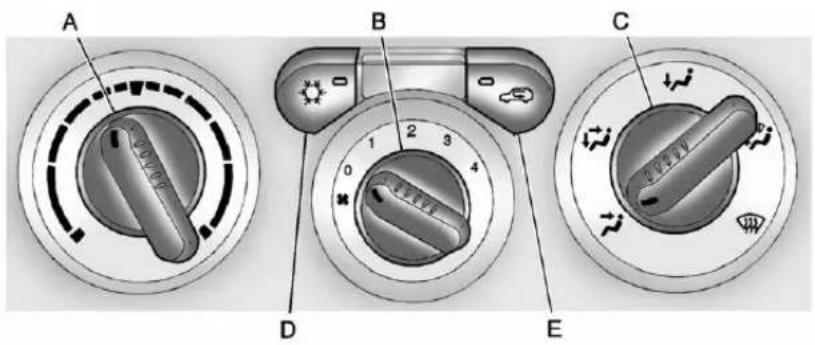
A. TemperatureControl
B.FanControl
C.AirDeliveryModeControl
D. AirConditioning
E.AirRecirculation
See ClimateControlSystemson page8-1.
1-14InBrief
Four-WheelDrive
Four-wheeldrivesendsengine powertoallfourwheelsforextra traction.
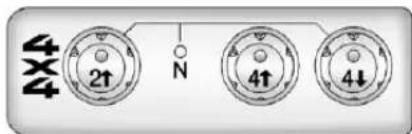
text_image
4×4 2↑ N 4↑ 4↓Thetransfercasebuttonsare locatedtotherightofthesteering wheelontheinstrumentpanel.
Usethesebuttonstoshiftintoand outoffour-wheeldrive.
2↑(Two-WheelHigh):Usefor drivinginmoststreetandhighway situations.
WARNING
Shiftingthetransfercaseto N(Neutral)cancausethevehicle torollevenifthetransmissionis inP(Park).Youorsomeoneelse couldbeseriouslyinjured. Be suretosettheparkingbrake beforeplacingthetransfercasein N(Neutral).SeeParkingBrakeon page9-45.
N(Neutral):UsetheN(Neutral) positiononlywhentowingthe vehicle.SeeRecreationalVehicle Towingonpage10-91.
4↑(Four-WheelHigh): Use when extratraction is needed in most off-roadsituations.
4 ↓(Four-WheelLow):Usethis positiontodeliverextratorquetoall fourwheels.Usedforextremeoff-roadconditions.SeeFour-Wheel Driveonpage9-40.
VehicleFeatures
Radio(s)

text_image
MP3/WMA VOL PWR SEEK SCAN 1 FLDV 2 FLDΔ 3 REV 4 FWD 5 RDM TUNE DISPL AUDIO PUSH P-TYPE TURN BAND CD AUX INFO SEEK TYPE TRAF AUTO EQ AUTO VOL HR AUTO MNRadiowithCD(MP3/WMA)
PWR: Presstoturnthesystemon andoff.
◄VOL►:Turntoincreaseor decreasethevolume.
BAND: Presstoswitchbetween FM1, FM2, AM, or XM1, or XM2 (ifequipped). Theselection displays.
◀ TUNE ▶ : Turn to select radio stations.
◀SEEK▶:Presstogotothe previoussortothenextstationand staythere.
Formoreinformationaboutthese andotherradiofeatures,see Infotainmentpage7-1.
SettingPresetStations
Radiostationsarestoredas presets.
ForvehicleswithanXMradio,a maximumof30stationscanbe storedaspresetsusingthesix numberedpushbuttons.
IftheradiodoesnothaveXM, upto 18stations(sixFM1,sixFM2,and sixAM),canbeprogrammedonthe sixnumberedbuttons.
See "SettingPresetStations" under Operationonpage7-3.
SettingtheClock
Tosetthetimeanddateforthe radiowithCD(MP3/WMA):
PressandholdtheHRbuttonuntil thecorrecthourdisplays.Pressand holdtheMNbuttonuntilthecorrect minutedisplays.Thetimecanbe setwiththeignitiononoroff.
Tosynchronizethetimewithan FMstationbroadcastingRadioData System(RDS)information,press andholdtheHRandMNbuttonsat thesametimeuntilRDSTIME displays.Toacceptthistime,press andholdtheHRandMNbuttons,at thesametime,foranother twoseconds.Ifthetimeisnot availablefromthestation,NO UPDAT(update)displays.
RDStimeisbroadcastoncea minute. After tuning to an RDS broadcast station, it could take a few minutes forth the time to update.
Fordetailedinstructionsonsetting theclockforyourspecificaudio system,seeClockonpage5-4.
SatelliteRadio
XMisasatelliteradioservicebased inthe48contiguousUnitedStates and10Canadianprovinces. XMsatelliteradiohasawidevariety ofprogrammingand commercial-freemusic,coastto coast,andindigital-qualitysound.
Afeeisrequiredtoreceivethe XMservice.
Formoreinformation, referto:
• www.xmradio.comorcall 1-800-929-2100(U.S.)
• www.xmradio.caorcall 1-877-438-9677(Canada)
See Satellite Radioonpage 7-11.
CruiseControl

Thecruisecontrolsarelocatedat theendofthemultifunctionlever.
○:Turnsthesystemoff.
|:Turnsthesystemon.
+(Resume/Accelerate):Useto makethevehicleaccelerateor resumeapreviouslysetspeed.
▶-(Set):Pressthebuttonat theendofthelevertosetthe speed.
Formoreinformation, see Cruise Controlonpage9-50.
DriverInformation Center(DIC)
The DICislocated on the instrumentpanelcluster.ltdisplays thestatusofmanyvehiclesystems andenablessomefeaturestobe personalized.
Usethetripresetstemlocated on the instrumentpanelclustertoscroll throughtheavailablefunctions. For moreinformation, seeDriver InformationCenter(DIC)on page5-20.
VehiclePersonalization
Somevehiclefeaturescanbe personalizedthroughtheDIC. Thesefeaturesinclude:
• Language: English, Spanish, or French
• AutomaticDoorLocks
- RKEFeedback
Formoreinformation, seeDriver InformationCenter(DIC) on page5-20.
PowerOutlets
Theaccessorypoweroutletscanbe usedtopluginelectricalequipment, suchasacellphoneorMP3player.
The vehicle may have an accessory power outlet located below the climate control system and on the rear of the center console.
SeePowerOutletsonpage5-5.
Performance and Maintenance
TractionControl System(TCS)
Thetractioncontrolsystemlimits wheelspin. Thesystemturnson automatically every time the vehicle is started.
- Toturnofftractioncontrol, press andreleasetheTCS/StabiliTrak button 📁ontheinstrument panel. 🌐illuminatesandthe appropriateDICmessageis displayed.SeeRideControl SystemMessagesonpage5-26.
- PressandreleasetheTCS/StabiliTrakbuttonagaintoturnontractioncontrol.
Formoreinformation,see Traction ControlSystem(TCS)on page9-47.
StabiliTrak® System
TheStabiliTraksystemassistswith directionalcontrolofthevehiclein difficultdrivingconditions. The systemturnsonautomaticallyevery timethevehicleisstarted.
- Toturnoffbothtractioncontrol andStabiliTrak,pressandhold theTCS/StabiliTrakbutton untililluminatesandthe appropriateDICmessageis displayed.SeeRideControl SystemMessagesonpage5-26.
- PressandreleasetheTCS/StabiliTrakbuttonagaintoturn onbothsystems.
Formoreinformation,see StabiliTrak® Systemonpage9-48.
TirePressureMonitor
This vehicle may have a Tire Pressure Monitor System (TPMS).

The TPMS warninglightalertsyou toasignificantlossinpressureof oneofthevehicle'stires.Ifthe warninglightcomeson,stopas soonaspossibleandinflatethe tirestotherecommendedpressure shownontheTireandLoading Informationlabel.See VehicleLoad Limitsonpage9-19.Thewarning lightwillremainonuntilthetire pressureiscorrected.
During cooler conditions, the low tire pressure warning light may appear when the vehicle is first started and then turn off. This maybe nearly indicator that the tire pressures are getting low and the tires need to be inflated to the proper pressure.
The TPMS does not replacen normal monthly tire maintenance. It is the driver's responsibility to maintain correct tire pressures.
See TirePressureMonitorSystem onpage 10-56.
EngineOilLifeSystem
Theengineoillifesystemcalculates engineoillifebasedonvehicleuse anddisplaysaDICmessagewhen itisnecessarytochangetheengine oilandfilter.
ResettingtheOilLifeSystem
- TurntheignitiontoON/RUN, withtheengineoff.
- Pressandreleasethestemin thelowercenterofthe instrumentclusteruntiltheOIL LIFEmessageisdisplayed.
-
Oncethealternating OILLIFE and RESET messages appear, press and hold the stem until several beep sound. This confirms that the oil ifesystem has been reset.
-
TurnthekeytoLOCK/OFF. SeeEngineOilLifeSystemon page10-12.
DrivingforBetterFuel Economy
Drivinghabitscanaffectfuel mileage. Herearesomedrivingtips togetthebestfueleconomy possible.
- Avoidfaststartsandaccelerate smoothly.
- Brakegraduallyandavoid abruptstops.
- Avoididlingtheengineforlong periodsoftime.
- When road and weather conditions are appropriate, use cruise control.
• Alwaysfollowpostedspeed limitsordrivemoreslowlywhen conditionsrequire. -
Keepvehicletiresproperly inflated.
• Combineseveraltripsintoa singletrip. -
Replacethevehicle'stireswith thesameTPCSpecnumber moldedintothetire'ssidewall nearthesize.
- Followrecommended scheduled maintenance.
Roadside Assistance Program
U.S.:1-800-243-8872
TTYUsers(U.S.):1-888-889-2438
Canada:1-800-268-6800
Mexico:01-800-466-0800
AstheownerofanewChevrolet, you are automaticallyenrolled in the Roadside Assistance program.
SeeRoadsideAssistanceProgram (U.S. and Canada) on page 13-8 or RoadsideAssistanceProgram (Mexico) on page 13-10 form more information.
Roadside Assistance and On Star (U.S. and Canada)
If you have an active On Star subscription, press the button and the current GPS location will be sent to an Star advisor who will assess your problem, contact Roadside Assistance, and relay you exact location to get the help you need.
OnlineOwnerCenter(U.S.and Canada)
TheOnlineOwnerCenterisa complimentaryservicethatincludes onlineservicereminders,vehicle maintenancetips,onlineowner manual,specialprivileges, andmore.
Signuptodayat:
U.S.: chevrolet.com (clickon "Owners," then "ManageMy Chevrolet/OwnersLogin")
Canada:chevroletowner.ca
OnStar®

For vehicles with an active On Star subscription, On Star uses several innovativetechnologies and live Advisor to provide a wider range of safety, security, navigation, diagnostics, and callingservices.
AutomaticCrashResponse
Inacrash,built-insensors automaticallyalertanOnStar Advisorwhoisimmediately connectedtothevehicletoseeif youneedhelp.
HowOnStarServiceWorks
:Pushthisbluebutton to connecttoaspeciallytrained OnStarAdvisortoverify your accountinformationandtoanswer questions.
:Pushthisredemergency buttontogetpriorityhelpfrom speciallytrainedOnStarEmergency Advisors.
:Pushthisbuttonforhands-free, voice-activatedcallingandtogive voicecommandsforHands-Free CallingandTurn-by-Turn Navigation.
AutomaticCrashResponse, EmergencyServices, CrisisAssist, StolenVehicleAssistance, Vehicle Diagnostics, RemoteDoorUnlock, RoadsideAssistance, Turn-by-Turn Navigation, and Hands-FreeCalling are available on most vehicles. Not all On Starservices are available on all vehicles. Formoreinformation,
seetheOnStarOwner'sGuide;visit www.onstar.com(U.S.)or www.onstar.ca(Canada);contact OnStarat1-888-4-ONSTAR (1-888-466-7827)or TTY1-877-248-2080;orpush https tospeakwithanOnStarAdvisor 24hoursaday,sevendaysaweek.
ForafulldescriptionofOnStar servicesandsystemlimitations,see theOnStarOwner'sGuideinthe glovebox.
OnStarserviceissubjecttothe OnStarTermsandConditions includedintheOnStarGlove BoxKit.
OnStarservicerequireswireless communicationnetworksandthe GlobalPositioningSystem(GPS) satellitenetwork.NotallOnStar servicesareavailableeverywhere oronallvehiclesatalltimes.
OnStarservicecannotworkunless yourvehicleisinaplacewhere OnStarhasanagreementwitha wirelessserviceproviderforservice inthatarea,andthewireless
serviceproviderhascoverage, networkcapacity,reception,and technologycompatiblewithOnStar's service.Serviceinvolvinglocation informationaboutyourvehicle cannotworkunlessGPSsignalsare available,unobstructed,and compatiblewiththeOnStar hardware.Thevehiclemusthavea workingelectricalsystemand adequatebatterypowerforthe OnStarequipmenttooperate. OnStarservicemaynotworkifthe OnStarequipmentisnotproperly installedoryouhavenotmaintained itevenifyourvehicleisingood workingorderandincompliance withallgovernmentregulations. Ifyoutrytoadd,connect,ormodify anyequipmentorsoftwareinyour vehicle,OnStarservicemaynot work.Otherproblemsbeyond OnStar'scontrolmayprevent servicetoyou,suchashills,tall buildings,tunnels,weather, electricalsystemdesignand architectureofyourvehicle,damage
toimportantpartsofyourvehiclein acrash,orwirelessphonenetwork congestionorjamming.
SeeRadioFrequencyStatementon page 13-22forinformation regardingPart15oftheFederal CommunicationsCommission(FCC) rulesandIndustryCanada StandardsRSS-GEN/210/220/310.
YourResponsibility
Increase the volume of the radio if the OnStar Advisor cannot be heard.
IfthelightnexttotheOnStar buttonisred,thesystemmaynot befunctioningproperly.Push andrequestvehiclediagnostic. Ifthelightappearsclear(nolight appears),yourOnStarsubscription hasexpiredandallserviceshave beendeactivated.Push to confirmthattheOnStarequipment isactive.
1-22InBrief
NOTES
Keys, Doors, and Windows
KeysandLocks
Keys....2-2
RemoteKeylessEntry(RKE)
System......2-2
RemoteKeylessEntry(RKE)
SystemOperation......2-3
DoorLocks......2-5
PowerDoorLocks......2-6
AutomaticDoorLocks.....2-6
LockoutProtection......2-6
SafetyLocks(CrewCab).....2-6
Doors
RearDoors....2-7
Tailgate....2-8
VehicleSecurity
VehicleSecurity......2-10
Anti-theftAlarmSystem.....2-10
Immobilizer.....2-11
ImmobilizerOperation
(PASS-KeyIII+
CanadaOnly)......2-11
ImmobilizerOperation
(PasslockU.S.Only)......2-13
ExteriorMirrors
ConvexMirrors......2-13
ManualMirrors......2-14
PowerMirrors......2-14
InteriorMirrors
ManualRearviewMirror.....2-15
AutomaticDimmingRearview
Mirror....2-15
Windows
Windows....2-16
ManualWindows......2-17
PowerWindows......2-17
RearWindows......2-19
SunVisors......2-19
KeysandLocks
Keys

WARNING
Leavingchildreninavehiclewith theignitionkeyisdangerousfor manyreasons. Childrenorothers couldbebadlyinjuredoreven killed. Theycouldoperatethe powerwindowsorothercontrols orevenmakethevehiclemove. Thewindowswillfunctionwiththe keysintheignitionandchildren couldbeseriouslyinjuredorkilled ifcaughtinthepathofaclosing window. Donotleavethekeysin avehiclewithchildren.
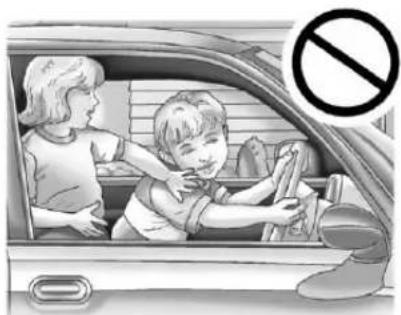
natural_image
Illustration of a child cleaning a car window with an adult nearby, no text or symbols presentThekeycanbeusedfortheignition, alldoorlocks,andthetailgate.
Thekeyhasabar-codedkeytag thatthedealerorqualifiedlocksmith canusetomakenewkeys.Store thisinformationinasafeplace,not inyourvehicle.
Iflockedoutofyourvehicle, callthe RoadsideAssistanceCenter.See RoadsideAssistanceProgram(U.S. andCanada)onpage 13-8or RoadsideAssistanceProgram (Mexico)onpage 13-10.
With an active On Stars subscription, an On Star Advisorm may remotely unlock the vehicle. See On Star ^® on page 1-20.
RemoteKeylessEntry (RKE)System
SeeRadioFrequencyStatementon page 13-22forinformation regardingPart15oftheFederal CommunicationsCommission(FCC) rulesandIndustryCanada StandardsRSS-GEN/210/220/310.
If thereisadecreaseintheRKE operatingrange:
- Checkthedistance. The transmitter may be too far from the vehicle.
- Checkthelocation. Other vehiclesorobjectsmaybe blockingthesignal.
- Checkthetransmitter's battery. See "BatteryReplacement" later in this section.
- Ifthetransmitterisstillnot workingcorrectly,seeyour dealeroraqualifiedtechnician forservice.
RemoteKeylessEntry (RKE)SystemOperation
VehicleswithRemoteKeyless Entry(RKE),transmitterfunctions workupto9m(30ft)awayfromthe vehicle.
There are other conditions which can affect the performance of the transmitter. See Remote Keyless Entry(RKE) System on page 2-2.
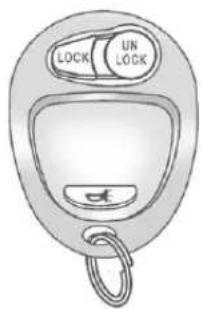
text_image
LOCK UN LOCKUNLOCK: Presstounlock the driverdoorandturnontheinterior lamps. Theparkinglampsmayflash andthehornmaysound.
PressUNLOCKagainwithin threesecondsandallofthedoors unlock.
LOCK: Presstolockallthedoors. Theparkinglampsmayflashand thehornmaysound.
If a door is open or a jar when LOCK is pressed, the horns sounds several times to let you know the doors did not lock and the content theft-deterrent system is not armed. Pressing LOCK again while the horn is sounding or within three seconds after the horn stop sounding, the doors lock but the content theft-deterrent system does not arm until the opened door is closed.
Differentfeedbackmodescanbe programmedthroughtheDriver InformationCenter(DIC).See "RemoteKeylessEntryFeedback" underDriverInformationCenter(DIC)onpage5-20.
(Panic): Presstomakethe hornsoundandtheheadlampsand taillampsflashforupto30seconds. Toturnthemoffwaitfor30seconds, orpress again, orstartthe vehicle.
ProgrammingTransmittersto theVehicle
OnlyRKEtransmittersprogrammed tothevehiclewillwork.lfa transmitterislostorstolen,a replacementcanbepurchased and programmedthroughyourdealer. Whenthereplacementtransmitteris programmedtothevehicle,all remainingtransmittersmustalsobe programmed.Anylostorstolen transmittersnolongerworkoncethe newtransmitterisprogrammed. Eachvehiclecanhaveuptofour transmittersprogrammedtoit.
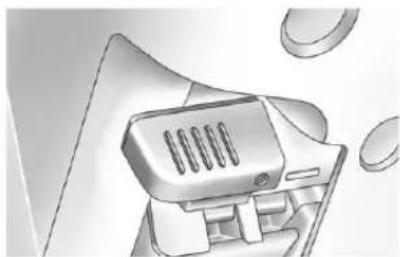
BatteryReplacement
Notice: When replacing the battery, donottouchany of the circuitry on the transmitter. Static from your body could damage the transmitter.
Toreplacethebattery:
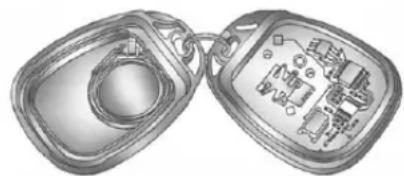
natural_image
Illustration of two open decorative objects with internal cutouts and geometric patterns (no text or symbols)- Separatethetransmitterwitha flat,thinobjectinsertedinthe slotbetweenthecoversofthe transmitterhousing.
- Removetheoldbattery.Donot useametalobject.
- Insertthenewbattery. Replace with a CR2032 equivalent battery.
- Putthetransmitterback together.
DoorLocks

WARNING
Unlockeddoorscanbe dangerous.
- Passengers,especially children,caneasilyopenthe doorsandfalloutofamoving vehicle.Whenadooris locked,thehandlewillnot openit.Thechanceofbeing thrownoutofthevehicleina crashisincreasedifthe doorsarenotlocked.So,all passengersshouldwear safetybeltsproperlyandthe doorsshouldbelocked wheneverthevehicleis driven.
(Continued)
WARNING(Continued)
- Youngchildrenwhogetinto unlockedvehiclesmaybe unabletogetout.Achildcan beovercomebyextremeheat andcansufferpermanent injuriesorevendeathfrom heatstroke.Alwayslockthe vehiclewheneverleavingit.
- Outsiderscaneasilyenter throughanunlockeddoor whenyouslowdownorstop thevehicle.Lockingthedoors canhelppreventthisfrom happening.
Tolockorunlockthedoorfromthe outside, usethekeyinthedriveror frontpassengerdoororpressthe LOCKorUNLOCKbuttononthe RemoteKeylessEntry(RKE) transmitter.
Tolockadoorfromtheinside,move themanualleveronthedoor forward.Tounlockadoorfromthe inside,movetheleveronthedoor rearward.
Youwillseeacoloredareaonthe leverwhenthedoorisunlocked.
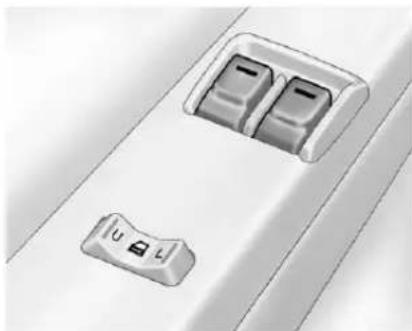
PowerDoorLocks

text_image
U L UVehicleswithpowerdoorlocks,the switchesarelocatedonthefront doorarmrests.
PressLtolockthedoors.
PressUtounlockthedoors.
AutomaticDoorLocks
If the vehicle has power door locks and theremote key less entry system, ith as an automatic clock/ unlock feature.
If the vehicle has an automatic transmission, it is programmed from the factory to lock all doors automatically when the shift lever is moved out of P (Park). All the doors will unlock when the shift lever is moved back into P (Park).
If the vehicle has a manual transmission, it is programmed from the factory to lock all the doors when the vehicles speed is greater than 24 km/h (15 mph). The doors will unlock when the key is removed from the ignition.
Tochangetheautomaticdoorlock and unlocksettings, see "Automatic DoorLocks" underDriver InformationCenter(DIC) on page 5-20.
LockoutProtection
Ifthevehiclehaspowerdoorlocks, thisfeatureprotectsyoufrom lockingthekeyinthevehiclewhen thekeyisintheignitionandadoor isopen.
Ifthepowerdoorlockswitchis pressedwhenadoorisopenand thekeyisintheignition,allofthe doorswilllockandthenthedriver doorwillunlock.
SafetyLocks(CrewCab)
Ifthevehicleisacrewcabmodel,it mayhavereardoorsafetylocks. Withthisfeature,thereardoorsare lockedsotheycannotbeopened fromtheinside.
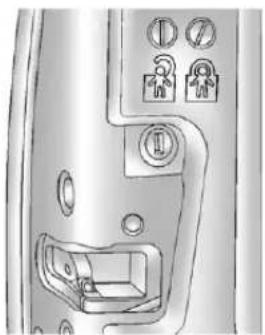
natural_image
Close-up of a metallic door panel with lock symbols and a handle mechanism (no text or labels visible)Thereardoorsafetylockislocated ontheinsideedgeofeachreardoor belowthesafetylocklabel.
Toengagethesafetylocks:
- Openoneofthereardoors.
- Using the ignition key, turn the safety lock to the horizontal position.
- Closethedoor.
- Repeathesestepsontheother reardoor.
Toopenareardoorwhenthesafety lockison, unlockthedoorandopen thedoorfromtheoutside.
Todisengagethesafetylocks:
- Openoneofthereardoors.
- Using the ignition key, turn the safety lock to the vertical position.
3.Closethedoor. - Repeathesestepsontheother reardoor.
Doors
RearDoors
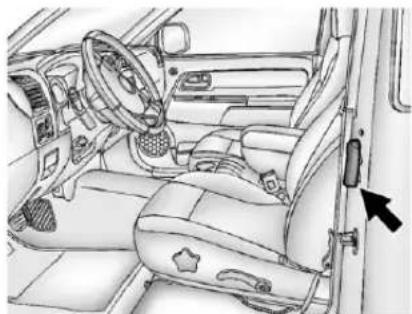
natural_image
Interior view of a car dashboard and steering wheel (no text or symbols visible)Toopenthedoor, openthefront door. Then, usethehandletoopen thereardoor. Thereardoormustbe closedbeforeclosingthefrontdoor.
Tailgate

WARNING
Itisextremelydangeroustoride onthetailgate,evenwhenthe vehicleisoperatedatlowspeeds. Peopleridingonthetailgate caneasilylosetheirbalance andfallinresponsetovehicle maneuvers.Fallingfromamoving vehiclemayresultinserious injuriesordeath.Donotallow peopletorideonthetailgate.Be sureeveryoneinyourvehicleisin aseatandusingasafetybelt properly.
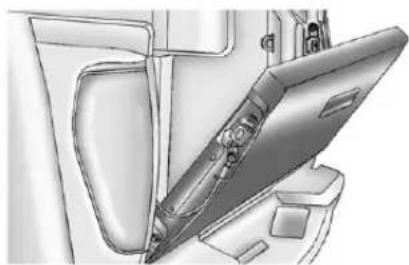
natural_image
Technical illustration of a mechanical component with a lid and handle (no text or symbols visible)Openthetailgatebypullingupon theoutsidehandlewhilepullingthe tailgatedown.
Whenthetailgateisshut,besureit islatchedsecurely.
Onvehicleswithalockingtailgate, usetheignitionkey.Turnthekey counterclockwisetolockthe tailgate.Turnthekeyclockwiseto unlockthetailgate.
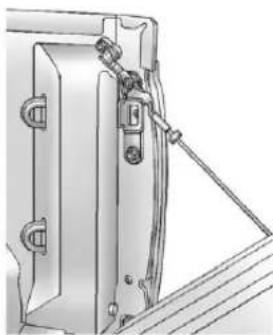
TailgateRemoval
Toremovethetailgate:
- With the tail gate fully open, lift slightly on the entire retail gate assembly.
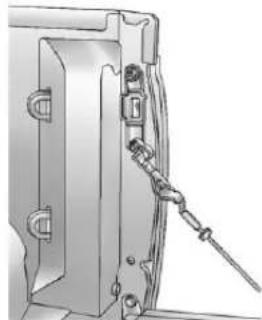
natural_image
Technical line drawing of a mechanical assembly with no visible text or symbols- Removetheretainingcables from both sides of the detail gate by pulling the clips away from the boltheads while pushing the cable bracket forward.
Whenthelargerpartofthehole onthebracketisoverthebolt, slidethebracketoffofthebolt.
- With the tailgate partially down, lift upon the passengers side and pull the tail gatetoward you, then movethetailgatet other right to releasethedriverside. You can then removetheentiretailgate assembly.
Reversetheprocedureoreinstall thetailgate.Makesureitissecure.
Topartiallylowerthetailgate:
- With the tail gate fully open, lift up slightly on the entire retail gate assembly.
natural_image
Technical line drawing of a mechanical device with attached components (no text or symbols)TailgatePartiallyDown
- Removetheretainingcablefrom thepassengersideofthe tailgatebypullingtheclipaway fromtheboltheadwhilepushing thecablebracketforward.
Whenthelargerpartofthehole onthebracketisoverthebolt, slidethebracketoffthebolt.
3.Slidethelowerendfittingonto thetopbolt. Thetailgatewillnow stayinthepartiallyopened position.
- RepeatSteps2 and 3 for the driverside.
If you would like to close the tailgate, the bracket cannot be in the partially opened position. Use the top position on the bracket to anchor it on the bottom bolt.
VehicleSecurity
This vehicle has the theft-deterrent features; however, they donot make it impossible to steal.
Anti-theftAlarmSystem
If your vehicle has the Remote KeylessEntry(RKE) system, the vehicle has a content theft-deterrent alarmsystem.
Toactivatethecontent theft-deterrentsystem:
- Closeallthedoors.
- LockthedoorswiththeRKE transmitter. Thesecuritylight, locatedontheinstrumentpanel cluster, willflash.
IftheLOCKbuttonontheRKE transmitterispressed, butadooris open, thehornwillchirpsixtimes. PresstheLOCKbuttonagain, within threesecends, andthedoorswill lock. Closetheopendoorandthe systemwillbeactivated.
Ifalockeddoorisnotopened using theRKEtransmitter,orbyOnStar thepre-alarmwillgooff.Ifthe engineisnotstartedorUNLOCK notpressedwithin10seconds,the frontturnsignallampswillflashfor twominutes,andthehornwillsound fortwominutes,thenwillturnoffto savethebatterypower.
Remember, thetheft-deterrent systemwillnotactivateifyoulock thedoorswithakey, themanual doorlock, orpowerdoorlock switch. Thesystemcanonlybe activatedusingtheRKEtransmitter, orbyOnStar ^® . SeetheOnStar Owner's Guideforadditional information. You should also
rememberthatyoucanstartyour vehiclewiththecorrectignitionkey ifthealarmhasbeensetoff.
Hereishowtoavoidsettingoffthe alarmbyaccident:
- If you donot want to activate the theft-deterrent system, the vehicles should be locked with the door key after the doors are closed.
• Alwaysunlockadoorwiththe RKEtransmitter.Unlocka dooranyotherwaywillsetoff thealarm.
Ifyousetoffthealarmbyaccident, youcanturnoffthealarmby pressingUNLOCKontheRKE transmitter. Thealarmwillnotstopif youtrytounlockadoorany otherway.
TestingtheAlarm
Totestthealarm:
- Frominsidethevehicle, activate thesystembylockingthedoors withtheRKEtransmitter.
- Unlockthedoorwiththemanual doorlockandopenthedoor. This should set off the alarm.
- Toturnthealarmoff, press the UNLOCKbuttonontheRKE transmitterorstarttheengine.
Ifthealarmdoesnotsoundwhenit shouldbutthelightsflash,checkto seeifthehornworks. Thehornfuse maybeblown. Toreplacethefuse, seeFusesandCircuitBreakerson page 10-40.
If the alarm does not sound or the front turnsign allamps donot flash, see your dealer for service.
Immobilizer
SeeRadioFrequencyStatementon page 13-22forinformation regardingPart15oftheFederal CommunicationsCommission(FCC) rulesandIndustryCanada StandardsRSS-GEN/210/220/310.
ImmobilizerOperation (PASS-KeyIII+CanadaOnly)
This vehicle has a passive theft-deterrent system.
Thesystemisautomaticallyarmed whenthekeyisremovedfromthe ignition.
Thesystemisautomatically disarmedwhenthekeyisturnedto ON/RUN.
Youdonothavetomanuallyarmor disarmthesystem.
Thesecuritylightcomesonifthere isaproblemwitharmingor disarmingthetheft-deterrent system.
Thekeyusesatransponderthat matchesanimmobilizercontrolunit inthevehicle.Onlythecorrectkey startsthevehicle.Ifthekeyisever damaged,thevehiclemaynotstart.
Whentryingtostartthevehicle, iftheenginedoesnotstartandthe securitylightcomeson,theremay beaproblemwiththetheft-deterrent system.Turntheignitionoffandtry again.
Iftheenginestilldoesnotstart,and thekeyappearstobeundamaged, tryanotherignitionkey.Checkthe fuse.SeeFusesandCircuit Breakersonpage10-40.Ifthe enginestilldoesnotstartwiththe otherkey,thevehicleneedsservice. Ifthevehicledoesstart,thefirstkey maybefaulty.Seeyourdealerwho canservicethetheft-deterrent systemandhaveanewkeymade.
2-12Keys, Doors, and Windows
Itispossibleforthetheft-deterrent systemdecodertolearnthe transpondervalueofanewor replacementkey.Upto10keyscan beprogrammedforthevehicle.The followingprocedureisfor programmingadditionalkeysonly.
CanadianOwners: If the keys are lostordamaged, only a dealer can serviceth theft-deterrent system to havenewones made. Twocurrent driver's keysarerequired to program additional keys.
Toprogramanewkey:
-
Verify that thenewkey has PK3+ stampedonit.
-
Insert the current driver's key in the ignition and start the engine. If the engine does not start see your dealer for service.
-
After the engine has started, turn the key to LOCK/OFF, and movethekey.
-
Insert these second current driver's key in the ignition and start the engine with int e n t e c o n d s o f removing the previous key. If the engine does not start see your dealer for service.
-
After the engine has started, turn the key to LOCK/OFF, and removethe key. Insert the key to be programmed and turn it to ON/RUN with intensecond sof removing the previous key. These security light turn soffonce the key has been programmed.
-
RepeatSteps1 through 5 if additionalkeysaretobe programmed.
If these security light comes on and stay on while driving, the engine will restartify outurnit off. However, the theft-deterrent system is not working properly and must be serviced by your dealer. The vehicle is not protected by the theft-deterrent system at thistime.
Inanemergency, contactRoadside Assistance. See Roadside Assistance Program(U.S. and Canada) on page 13-8 or Roadside Assistance Program(Mexico) on page 13-10.
Donotleavethekeyordevicethat disarmsordeactivatesthetheft deterrentsysteminthevehicle.
ImmobilizerOperation (PasslockU.S.Only)
Passlock® isapassive theft-deterrentsystemthatenables fuelifthevehicleisstartedwitha validkey. Ifanincorrectkeyisused ortheignitionlockcylinderis tamperedwith, thefuelsystemis disabledandthevehicledoesnot start.
Thesecuritylightturnsoff approximatelyfivesegonsafter theengineisstarted.SeeSecurity Lightonpage5-19.
If the engine installs and these security lightflashes, wait about 10 minutes until the light stops flashing before trying to start the engine. Release the key from START as soon as the engine starts.
If theenginedoesnotstartafter threetries, thevehicleneeds service.
If the engine is running and the security light comes on, the engine restartsify outurn the engine off. However, the Passlock ^ system is not working properly and must be serviced by your dealer. The vehicle is not protected by Passlock ^ at this time. See your dealer for service.
Inanemergency, call the Roadside Assistance Center. See Roadside Assistance Program (U.S. and Canada) on page 13-8 or Roadside Assistance Program (Mexico) on page 13-10.
Donotleavethekeyordevicethat disarmsordeactivatesthetheft deterrentsysteminthevehicle.
ExteriorMirrors
ConvexMirrors

WARNING
Aconvexmirrorcanmakethings, likeothervehicles, lookfarther awaythantheyreallyare. If you cuttoosharplyintotherightlane, youcouldhitavehicleonthe right. Checktheinsidemirroror glanceoveryourshoulderbefore changinglanes.
Thepassengersidemirrorisconvex shaped. Aconvexmirror's surface is curvesomorecanbeseen from thedriverseat.
ManualMirrors
Adjustthemirrorsbypassingthe mirrorupanddownnandleftand rightsoyoucanseeaclearview behindyou.
Manuallyfoldthemirrorsinwardto preventdamagewhengoing throughanautomaticcarwash.To fold,pushthemirrorstowardthe vehicle.Pushoutward,toreturnthe mirrorstotheiroriginalposition.
PowerMirrors

text_image
L RVehicleswithoutsidepowermirrors havecontrolsonthedriverdoor armrest.
Toadjustthepowermirrors:
-
Movetheselectorswitchtothe L(left)orR(right)tochoose the driverorpassengermirror.
-
Pressoneofthefourbuttons locatedonthecontrolpadto movethemirrortothedesired direction.
-
Return these selectors switch to the center position on cethemirrors are adjusted.
Ifthemirrorbeginsmakinga ratchetingsound,themirrorhas reachedtheendofitstraveland cangonofartherinthatdirection. Tostopthesound,reversethe mirrordirectionusingthe controlpad.
Manuallyfoldthemirrorsinwardto preventdamagewhengoing throughanautomaticcarwash.To fold,pushthemirrortowardthe vehicle.Pushoutward,toreturnthe mirrortoitsoriginalposition.
InteriorMirrors
ManualRearviewMirror
Adjustthismirrorforaclearviewof theareabehindthevehicle.Hold themirrorinthecentertomoveit up,down,orside-to-side.Toreduce headlampglare,pushthetab forwardfordaytimeuseandpullit fornighttimeuse.
VehicleswithOnStar ^® havethree additionalcontrolbuttonslocatedat thebottomofthemirror.Seeyour dealerformoreinformationonthe systemandhowtosubscribeto OnStar.SeetheOnStarOwner's Guideformoreinformationabout theservicesOnStarprovides.
AutomaticDimming RearviewMirror
The vehicle may have an automatic dimming inside rear view mirror. Automatic dimming reduces the glare of lights from behind the vehicle.
ThemirrormayalsohaveOnStar® and/oracompassandoutside temperaturedisplay.
ControlbuttonsfortheOnStar systemareatthebottomofthe mirror.SeetheOnStarOwners Guideformoreinformationabout theservicesOnStarprovides.See Compassonpage5-3formore informationaboutthecompass display.See“TemperatureDisplay” after,formoreinformationaboutthe outsidetemperaturedisplay.
AUTO/ ○ / ⏻ (On/Off): Press andholdAUTO/ ○ forabout threesecondsordependingonthe mirror, press ⏻ toturnautomatic dimmingonoroff. The automatic dimmingfeaturecomesonandthe indicatorlightilluminateseachtime the vehicleisstarted.
TemperatureDisplay
Ⓐ F / ⏻ (On/Off): Press ⚠ for dependingonthemirror, press ⏻ to turnthedisplayonoroff.
ToadjustbetweenFahrenheit and Celsius:
-
Pressandhold ⚠️ F / ⏻ for a fewseconds. The current unit of measure (CorF) flashes.
-
Press ⚠️/↓ again and releasetochangetheunitof measure.Waitseveralseconds and the compass/temperature display return with these selected unit of measure.
Itisnormalundercertainconditions forthetemperatureupdatetobe delayed. Ifanincorrecttemperature displaysforanextendedperiod,see yourdealer.
CleaningtheMirror
Donotsprayglasscleanerdirectly onthemirror. Useasofttowel dampenedwithwater.
Windows
WARNING
Leavingchildren, helplessadults, orpetsinavehiclewiththe windowsclosedisdangerous. Theycanbeovercomebythe extremeheatandsuffer permanentinjuriesorevendeath fromheatstroke.Neverleavea child,ahelplessadult,orapet aloneinavehicle,especiallywith thewindowsclosedinwarmor hotweather.

natural_image
Illustration of a child in a car seat with a no-smoking symbol above, under a night sky (no text or symbols on the diagram itself)The vehicle aerodynamics are designed to improve fueleconomy performance. This may result in a pulsingsound when awindow is partially open. Toreducethesound, open another window worths sunroof (ifequipped).
ManualWindows
natural_image
Mechanical lever mechanism diagram showing pivot and pivot components (no text or labels)Onvehicleswithmanualwindows, usethewindowcranktoopenand closeeachwindow.
PowerWindows
WARNING
Leavingchildreninavehiclewith thekeysisdangerousformany reasons. Childrenorotherscould bebadlyinjuredorevenkilled. Theycouldoperatethepower windowsorothercontrolsoreven makethevehiclemove. The windowswillfunctionandthey couldbeseriouslyinjuredorkilled ifcaughtinthepathofaclosing window.Donotleavekeysina vehiclewithchildren.
When there are children in the rearseatusethewindowlockout button to prevent unintentional operation of the windows.
natural_image
Diagram of a car intake canal with directional arrows indicating flow or movement (no text or symbols)RegularCabShown, CrewCab Similar
Pushtheswitchdowntoopenthe window.Pullthefrontoftheswitch uptocloseit.
Theswitchesworkwhentheignition isinON/RUN,ACC/ACCESSORY, orinRetainedAccessoryPower (RAP).SeeRetainedAccessory Power(RAP)onpage9-31.
2-18Keys, Doors, and Windows
Express-DownWindow
Windowswithanexpress-down featureallowthewindowtobe loweredfullywithoutpressingand holdingtheswitch.Pressthefrontof theswitchtothefirstposition,and thewindowopensasmallamount. Presstheswitchdownfullyandthe windowgoesallthewaydown.
Tostopthewindowwhileitis lowering,pullupthefrontofthe switch.
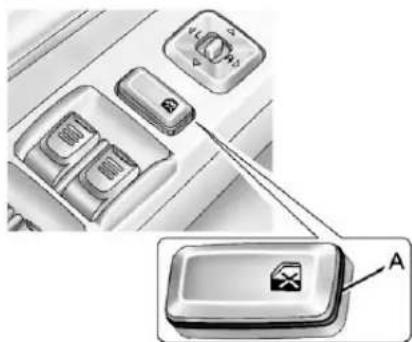
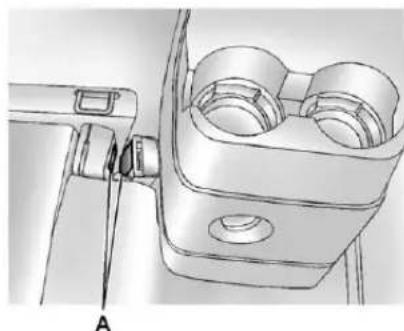
WindowLockout(CrewCab)
natural_image
Diagram of a car interior control panel with a labeled component 'A' pointing to a device (no text or symbols on the panel itself)Thisfeaturepreventstherear passengerwindowsfromoperating, exceptfromthedriverposition.
Press 📄toactivatetherear windowlockoutswitch. Thered line(A)willnotbevisiblewhen activated.
Press 📄antodeactivatethe lockoutswitch. Theredline(A)is visiblewhendeactivated.
RearWindows
SlidingRearWindow
natural_image
Technical line drawing of a mechanical clamp or bracket component (no text or symbols)Ifthevehiclehasthisfeature, squeezethelatchinthecenterof thewindowandslidetheglassto openit.
Besurethelatchisengagedwhen thewindowisclosed.
SunVisors
natural_image
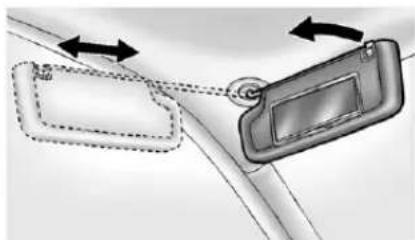
Diagram showing two car door lockers connected by a rope, with arrows indicating motion direction (no text or symbols)Pullthesunvisordowntoblock glare.Detachthesunvisorfromthe centermounttopivottotheside window,ortoextendalongtherod, ifavailable.
2-20Keys, Doors, and Windows
NOTES
Seatsand Restraints
HeadRestraints
HeadRestraints....3-2
FrontSeats
SeatAdjustment......3-3
PowerSeatAdjustment......3-3
LumbarAdjustment......3-4
RecliningSeatbacks......3-4
SeatbackLatches....3-6
HeatedFrontSeats......3-7
RearSeats
RearSeats(ExtendedCab)...3-8
RearSeats(CrewCab)......3-9
SafetyBelts
SafetyBelts....3-11
HowtoWearSafetyBelts Properly....3-12
Lap-ShoulderBelt......3-13
SafetyBeltUseDuring Pregnancy....3-18
LapBelt....3-18
SafetyBeltExtender......3-19
SafetySystemCheck......3-19
SafetyBeltCare......3-19
ReplacingSafetyBeltSystem PartsafteraCrash......3-20
AirbagSystem
AirbagSystem......3-20
WhereAretheAirbags?.....3-22
WhenShouldanAirbag Inflate?......3-24
WhatMakesanAirbag Inflate?......3-25
HowDoesanAirbag Restrain?......3-25
WhatWillYouSeeafteran AirbagInflates?......3-26
PassengerSensing System....3-27
ServicingtheAirbag-Equipped Vehicle....3-32
AddingEquipmenttothe Airbag-EquippedVehicle...3-33
AirbagSystemCheck......3-34
ReplacingAirbagSystem PartsafteraCrash......3-34
ChildRestraints
OlderChildren....3-35
InfantsandYoung Children......3-37
ChildRestraintSystems.....3-39
WheretoPuttheRestraint...3-41
LowerAnchorsandTethers forChildren(LATCH System)....3-43
ReplacingLATCHSystem PartsAfteraCrash......3-54
SecuringChildRestraints (RearSeatPosition)......3-54
SecuringChildRestraints (CenterFrontSeat Position)....3-57
SecuringChildRestraints (RightFrontSeat Position)....3-59
3-2 Seats and Restraints
HeadRestraints
Onsomecrewcabmodels,the vehicle'sfrontseatshaveadjustable headrestraintsintheoutboard seatingpositions.

WARNING
Withheadrestraintsthatarenot installedandadjustedproperly, thereisagreaterchancethat occupantswillsufferaneck/spinalinjuryinacrash.Donot driveuntiltheheadrestraintsfor allooccupantsareinstalledand adjustedproperly.
natural_image
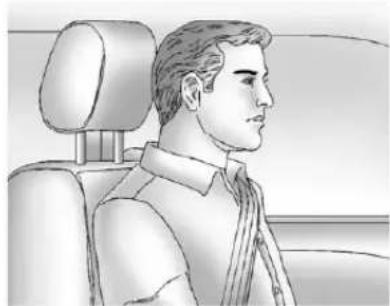
Side profile illustration of a person in a car seat, showing head, neck, and torso (no text or symbols)Adjusttheheadrestraintsothatthe topoftherestraintisatthesame heightasthetopoftheoccupant's head. Thispositionreducesthe chanceofaneckinjuryinacrash.
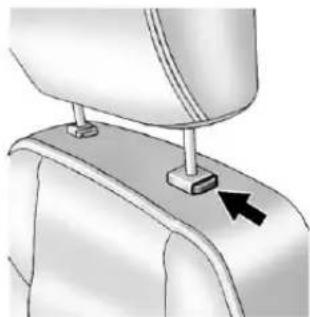
natural_image
Mechanical component diagram showing a bracket with a bolt and arrow indicator (no text or symbols)Theheightoftheheadrestraintcan beadjusted.Pulltheheadrestraint uptoraiseit.Trytomovethehead restrainttomakesurethatitis lockedinplace.
Tolowertheheadrestraint,press thebutton,locatedonthetopofthe seatback,andpushtherestraint down.Trytomovethehead restraintafterthebuttonisreleased tomakesurethatitislockedin place.
Thefrontseatoutboardhead restraintsarenotdesignedtobe removed.
FrontSeats
SeatAdjustment

WARNING
Youcanlosecontrolofthe vehicleifyoutrytoadjusta manualdriverseatwhilethe vehicleismoving. Thesudden movementcouldstartleand confuseyou,ormakeyoupusha pedalwhenyoudonotwantto. Adjustthedriverseatonlywhen thevehicleisnotmoving.
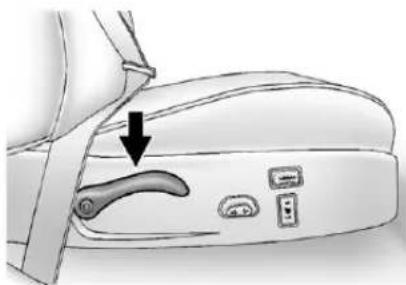
natural_image
Close-up of a toilet handle with an arrow indicating direction (no text or symbols)Toadjusttheseat:
- Liftthebarunderthefrontedge oftheseatcushiontounlock theseat.
2.Slidetheseattothedesired positionandreleasethebar. - Trytomovetheseatback and forthobesuretheseatis lockedinplace.
PowerSeatAdjustment
natural_image
Diagram of a car seatbelt with a black arrow pointing to the seatbelt (no text or symbols present)Toadjusttheseat,ifavailable:
- Movetheseatforwardor rearwardbyslidingthecontrol forwardorrearward.
- Raiseorlowerthefrontorrear partoftheseatcushionby movingthefrontorrearofthe controlupordown.
- Raiseorlowertheentireseatby movingtheentirecontrolup ordown.
3-4 Seats and Restraints
Toadjusttheseatback,see"Power RecliningSeatbacks" under RecliningSeatbacksonpage3-4.
LumbarAdjustment
ManualLumbar
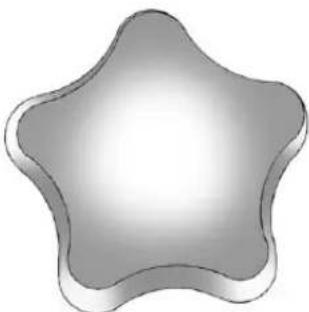
natural_image
Gray five-pointed star shape with gradient shading (no text or symbols)Ifavailable, themanuallumbarknob isontheoutboardsideofthe driverseat.
Turntheknobtoincreaseor decreaselumbarsupport.
PowerLumbar
natural_image
Diagram of a car seatbelt with two buttons and a downward arrow indicating a location (no text or symbols present)Ifavailable, pressandholdthefront orrearofthecontroltoincreaseor decreaselumbarsupport. Release thecontrolwhentheseatback reachesthedesiredleveloflumbar support.
RecliningSeatbacks

WARNING
Sittinginareclinedpositionwhen thevehicleisinmotioncanbe dangerous.Evenwhenbuckled up,thesafetybeltscannotdo theirjobwhenreclinedlikethis.
Thesafetybeltcannotproperly restrainyou, and you could be injuredorkilled.
Forproperprotectionwhenthe vehicleisinmotion,havethe seatbackupright.Thensitwell backintheseatandwearthe safetybeltproperly.
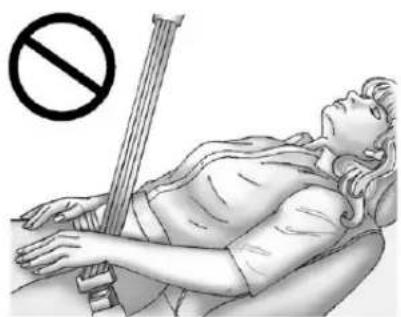
natural_image
Illustration of a person lying in bed with a string and a no-smoking symbol above (no text or labels)Donothaveaseatbackreclinedif thevehicleismoving.
ManualRecliningSeatbacks

WARNING
Youcanlosecontrolofthe vehicleifyoutrytoadjusta manualdriverseatwhilethe vehicleismoving. Thesudden movementcouldstartleand confuseyou,ormakeyoupusha pedalwhenyoudonotwantto.
Adjustthedriverseatonlywhen thevehicleisnotmoving.

WARNING
Ifeitherseatbackisnotlocked, it couldmoveforwardinasudden stoporcrash. Thatcouldcause injurytothepersonsittingthere.
Alwayspushandpullonthe seatbackstobesuretheyare locked.
natural_image
Illustration of a device's internal components with an arrow pointing to a handle (no text or symbols present)Toreclineamanualseatback:
- Liftthelever.
- Movetheseatbacktothe desiredposition, and then releasethelevertolockthe seatbackinplace.
- Pushandpullontheseatbackto makesureitislocked.
3-6SeatsandRestraints
Toreturntheseatbacktotheupright position:
-
Lift the lever fully without applying pressure to the seatback, and these seatback will return to the upright position.
-
Pushandpullontheseatback to make sureitislocked.
PowerRecliningSeatbacks
natural_image
Diagram of a car seatbelt with a directional arrow pointing to the seat (no text or symbols present)Toreclineapowerseatback, ifavailable:
- Tiltthetopofthecontrol rearwardtorecline.
• Tiltthetopofthecontrolforward toraise.
SeatbackLatches
The vehicle may have front seat back that fold forward for easy access to the rear seats or the storage are behind these seats.
natural_image
3D rendered mechanical part with curved handle and circular hole (no text or symbols)Tofoldtheseatbackforward, push theleveronthesideoftheseat rearwardandpulltheseatback forward.
WARNING
Ifeitherseatbackisnotlocked, it couldmoveforwardinasudden stoporcrash. That could cause injury to the person sitting there. Always push and pull on the seat back stobesure they are locked.
Toreturntheseatbacktotheupright position, pushtheseatbackallthe waybackuntillatches.
If theseatback was reclined before being folded forward, it will return to thereclined position.
HeatedFrontSeats
WARNING
If you cannot feel temperature change or paint to the skin, the seat theater may cause burns even at low temperatures. To reduce risk of burns, people with such a conditions should use care when using these seat theater, especially for long periods of time. Don't place anything on these at that insulates against heat, such as a blanket, cushion, cover, or similar item. This may cause these seat theater to overheat. An overheated seat theater may cause a burn or may damage these seat.
natural_image
Diagram of a car seatbelt with two buttons and an arrow pointing to the seat (no text or symbols present)Ifavailable,theswitchesareonthe outboardsidesofthefrontseats.To operate,theignitionmustbeon.
3-8 Seats and Restraints
Thisfeaturewillheatthecushion andbackoftheseats.
- Pressthetopoftheswitchfor thehighsetting.
- Pressthebottomoftheswitch forthelowsetting.
• Puttheswitchinthecenter positiontoturnthisfeatureoff.
The heated seat will turn on at the last setting if the ignition is turned off and then back on.
Thepassengersafetybeltmustbe fastenedfortheheatedseatfeature toworkonthepassengerseat.
RearSeats
RearSeats (ExtendedCab)
natural_image
3D technical illustration of a mechanical assembly with no visible text or symbolsOnextendedcabmodels,theremay beforwardfoldingseatsinthe reararea.
Tofoldarearseatcushionfromthe storedpositiontothesitting position,pullthefrontoftheseat cushiondowncompletely.
Therearseatstoragecompartments mustbeclosedbeforefoldingthe seatdown.SeeRearStorageon page4-2.
Notice: Folding arearseat with the safety belts still fastened may caused a gametotheseator the safety belts. Always sunbuckle the safety belts and return them to their normal stowed position before folding arearseat.
natural_image
Technical line drawing of a mechanical component with labeled point A (no text or symbols present)A. HookandLoopFastener
Tostoretheseat:
- Securethesafetybeltbuckle to theirboardsideoftheseatwith thehookandloopfastener(A), sothatitdoesnotmovewhen notinuse.
- Push the entire seat up untilitis flush with the trim panel.
RearSeats(CrewCab)
Oncrewcabmodels, therear seatbackscanbefoldedforward.
Notice: Folding arearseat with the safety belts still fastened may caused damage to theseator the safety belts. Always sunbuckle the safety belts and return them to their normal stowed position before folding arearseat.
Tofoldarearseatback:
natural_image
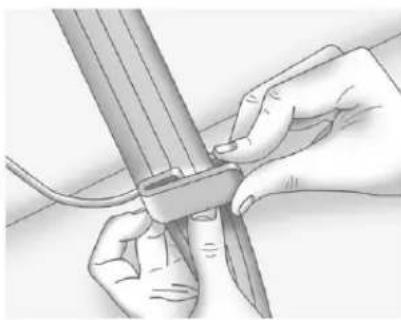
Illustration of a hand adjusting a seatbelt with a black arrow indicating the joint detail (no text or symbols present)- Disconnect therearcenter safetybeltlatch from the mini-buckle by inserting the tip of the safety belt tongue into the slot on the buckle. Let the belt retract.
natural_image
Interior view of a car seat with a person adjusting a seatbelt, showing no text or symbols.- Pulltheloopontheoutboard sideoftheseatbackforward untilyouhearaclick.
- Foldtheseatbackforward.
3-10 Seats and Restraints
Toreturnaseatbacktotheupright position:
- Lifttheseatbackupandpushit rearward.

WARNING
Ifeitherseatbackisnotlocked, it couldmoveforwardinasudden stoporcrash. That could cause injury to the person sitting there. Always push and pull on the seatbackstobesure they are locked.
- Pushandpullontheseatbackto makesureitislockedinplace.

WARNING
Asafetybeltthatisimproperly routed, not properly attached, ortwisted will not provide the protection needed in acrash. The person wearing the belt could be seriously injured. After raising the reseatback, always check to be sure that the safety belts are properly routed and attached, and arenottwisted.
- Reconnect the centers safety belt latch platetothemini-buckle. Makesurethesafety belt is not twisted.
- Pushandpullonthelatchplate tobesureitissecure.
When theseatback is not in use, it should be kept in the upright, locked position.
SafetyBelts
Thissectionofthemanual describeshowtousesafetybelts properly.Italsodescribessome thingsnottodowithsafetybelts.

WARNING
Donotletanyoneridewherea safetybeltcannotbeworn properly.Inacrash,ifyouoryour passenger(s)arenotwearing safetybelts,injuriescanbemuch worsethanifyouarewearing safetybelts.Youcanbeseriously injuredorkilledbyhittingthings insidethevehicleharderorby beingejectedfromthevehicle.In addition,anyonewhoisnot buckledupcanstrikeother passengersinthevehicle.
(Continued)
WARNING(Continued)
Itisextremelydangeroustoride inacargoarea,insideoroutside ofvehicle.Inacollision, passengersridingintheseareas aremorelikelytobeseriously injuredorkilled.Donotallow passengerstorideinanyareaof thevehiclethatisnotequipped withseatsandsafetybelts.
Alwayswearasafetybelt, and checkthatallpassenger(s) are restrainedproperlytoo.
Thisvehiclehasindicatorsasa remindertobucklethesafetybelts. See SafetyBeltReminderson page5-9foradditionalinformation.
WhySafetyBeltsWork
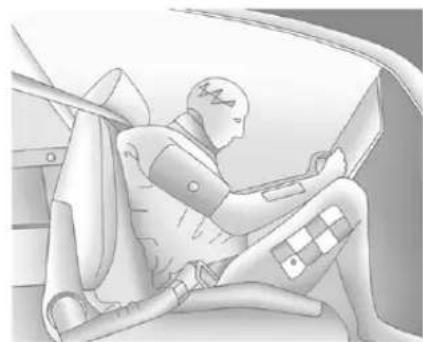
natural_image
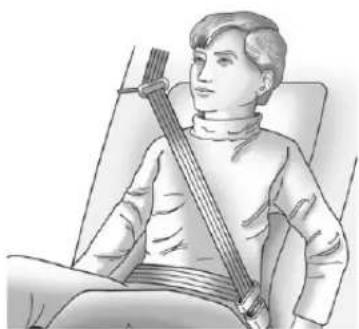
Illustration of a person seated in a car, wearing a seatbelt and holding an object (no text or symbols visible)Whenridinginavehicle,youtravel asfastasthevehicledoes.Ifthe vehiclestopssuddenly,youkeep goinguntilsomethingstopsyou. Itcouldbethewindshield,the instrumentpanel,orthesafetybelts!
3-12 Seats and Restraints
Whenyouwearasafetybelt,you andthevehicleslowdowntogether. Thereismoretimetostopbecause youstopoveralongerdistanceand, whenwornproperly,yourstrongest bonestaketheforcesfromthe safetybelts.Thatiswhywearing safetybeltsmakessuchgood sense.
QuestionsandAnswersAbout SafetyBelts
Q: Willlbetrappedinthevehicle afteracrashiflamwearinga safetybelt?
A: You could be—whether you are wearing as safety belt or not. Your chance of being conscious during and after a crash, so you can unbuckle and get out, is much greater if you are belted.
Q: If my vehicle has air bags, why should have to wear safety belts?
A: Airbagsaresupplemental systemsonly; sotheyworkwith safetybelts—notinsteadof them. Whetherornotanairbag isprovided, allooccupantsstill havetobuckleuptogetthe mostprotection.
Also, innearly all states and in all Canadian provinces, the law requires wearingsafety belts.
HowtoWearSafetyBelts Properly
Thissectionisonlyforpeopleof adultsize.
Therearespecialthingstoknow aboutsafetybeltsandchildren.And therearedifferentrulesforsmaller childrenandinfants.Ifachildwillbe ridinginthevehicle,seeOlder Childrenonpage3-35orInfants andYoungChildrenonpage3-37. Followthoserulesforeveryone's protection.
It is very important for all occupants to buckle up. Statistic show that unbelted people are hurt more often incrashesthan those who are wearing safety belts.
Thereareimportantthingstoknow aboutwearingasafetybeltproperly.
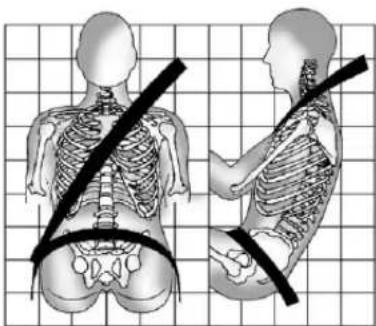
natural_image
Side-by-side anatomical illustrations of human torso and pelvis with a black belt, displayed on grid background (no text or labels)- Situpstraightandalwayskeep yourfeetonthefloorinfront ofyou.
• Alwaysusethecorrectbuckle foryourseatingposition.
- Wearthelappartofthebeltlow andsnugonthehips,just touchingthethighs.Inacrash, thisappliesforcetothestrong pelvicbonesandyouwouldbe lesslikelytoslideunderthelap belt.Ifyouslidunderit,thebelt wouldapplyforceonyour abdomen.Thiscouldcause seriousorevenfatalinjuries. - Weartheshoulderbeltoverthe shoulderandacrossthechest. Thesepartsofthebodyarebest abletotakebeltrestraining forces.Theshoulderbeltlocksif thereisasuddenstoporcrash.

WARNING
Youcanbeseriouslyinjured, orevenkilled, bynotwearing yoursafetybeltproperly.
- Neverallowthelapor shoulderbelttobecome looseortwisted.
(Continued)
WARNING(Continued)
- Neverweartheshoulderbelt underbotharmsorbehind yourback.
- Neverroutethelapor shoulderbeltoveran armrest.
Lap-ShoulderBelt
Allseatingpositionsinthevehicle havealap-shoulderbeltexceptfor thecenterfrontpassengerposition, ifequipped,whichhasalapbelt. SeeLapBeltonpage3-18formore information.
The following instructionsexplain howtowearalap-shoulderbelt properly.
- Adjusttheseat, if theseatis adjustable, so you cansit up straight. Toseehow, see "Seats" in the Index.
3-14 Seats and Restraints
- Pickupthelatchplateandpull thebeltacrossyou.Donotletit gettwisted.
Thelap-shoulderbeltmaylockif youpullthebeltacrossyouvery quickly. If this happens, let the beltgobackslightlytounlockit. Then pullthebeltacrossyou moreslowly.
If you ever pull the shoulder portion of a passenger belt out all the way, the child restraint locking feature may be engaged. If this happens, just let the belt goback all the way and start again.
Engagingthechildrestraint lockingfeatureintherightfront seatingpositionmayaffectthe passengersensingsystem, ifequipped.SeePassenger SensingSystemonpage3-27 formoreinformation.
natural_image
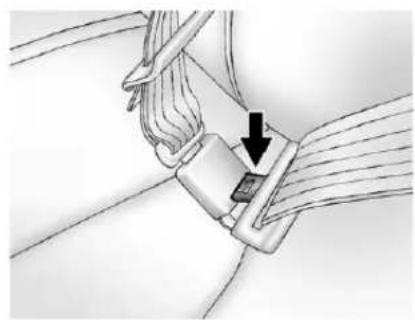
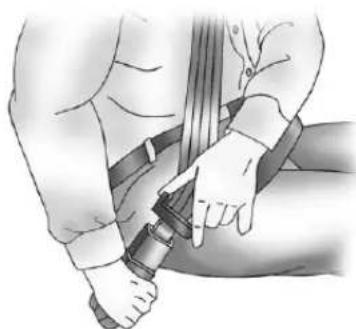
Illustration of a person adjusting a seatbelt (no text or symbols present)- Pushthelatchplate into the buckle until it clicks.
Pulluponthelatchplateto makesureitissecure.Ifthebelt isnotlongenough,see Safety BeltExtenderonpage3-19.
Positionthereleasebuttonon thebucklesothatthesafetybelt couldbequicklyunbuckledif necessary.
- If equipped with a shoulder belt height adjuster, move it to the height that is right for you. See "Shoulder Belt Height Adjuster" later in this section for instruction on use and important safety information.
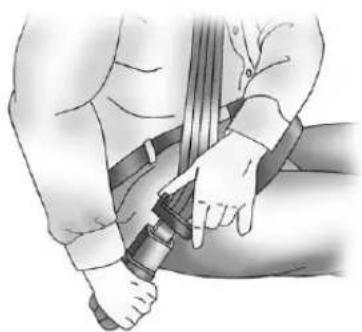
natural_image
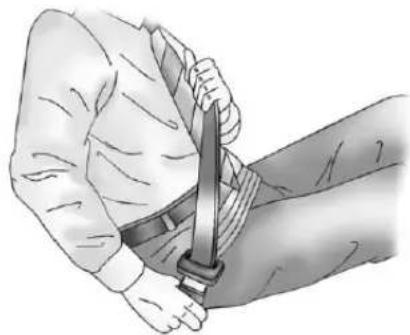
Illustration of a person's arm being lifted by a bandage, showing the band and wrist (no text or symbols present)- Tomakethelapparttight, pull upontheshoulderbelt.
It may be necessary to pull stitching on the safety belt through the latch plate to fully tight enthelap beltons smaller occupants.
natural_image
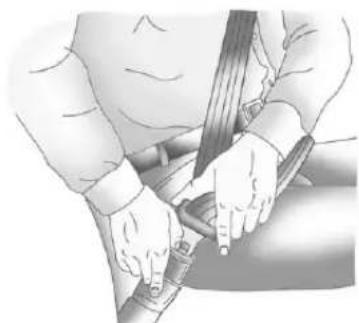
Illustration of a person using a bandage to lift a weight (no text or symbols present)Tounlatchthebelt, pushthebutton onthebuckle. Thebelt should return to its stowed position. Slide thelatchplate up the safety belt webbing when the safety belt is not in use. Thelatch plates should rest on the stitching on the safety belt, near the guideloop on the sidewall.
Beforeadoorisclosed,besurethe beltisoutoftheway.Ifadooris slammedagainstasafetybelt, damagecanoccurtoboththebelt andthevehicle.
ShoulderBeltHeightAdjuster
The vehicle has a shoulder belt height adjuster forth driver and right front passenger seating position.
Adjusttheheightsotheshoulder portionofthebeltisontheshoulder andnotfallingoffofit. Thebelt shouldbecloseto, but not contacting, theneck. Improper shoulderbeltheightadjustment could reduce the effectiveness of the safety belt in acrash. See How to Wear Safety Belts Properly on page 3-12.
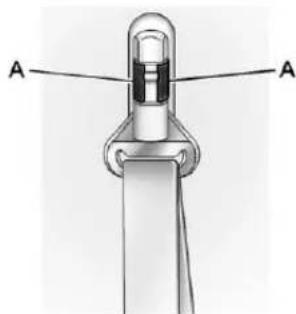
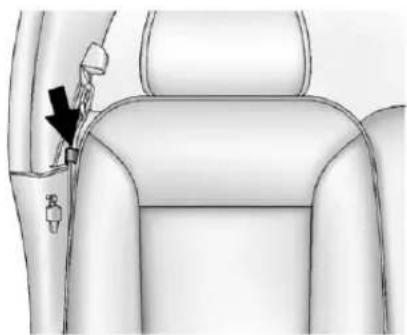
natural_image
Technical line drawing of a mechanical component with labeled points A (no text or symbols beyond labels)Tomoveitupordown, squeezethe releasebuttons(A)togetherand movetheheightadjustertothe desiredposition.
Aftertheadjusterissettothe desiredposition,trytomoveitdown withoutsqueezingtherelease buttonstomakesureithaslocked intoposition.
3-16SeatsandRestraints
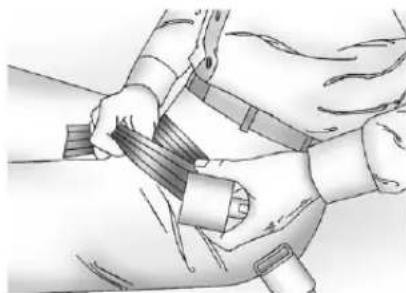
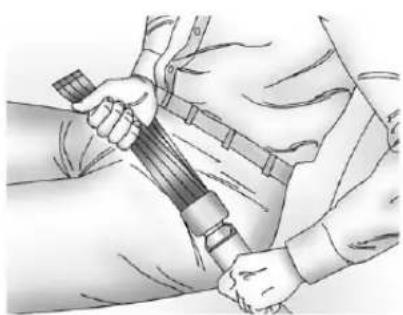
SafetyBeltPretensioners
Thisvehiclehassafetybelt pretensionersforfrontoutboard occupants. Althoughesafetybelt pretensionerscannotbeseen,they arepartofthesafetybeltassembly. Theycanhelptightenthesafety beltsduringtheearlystagesofa moderatetoseverefrontalornear frontalcrashifthethreshold conditionsforpretensioner activationaremet.
Pretensionersworkonlyonce.Ifthe pretensionersactivateinacrash, theywillneedtobereplaced,and probablyothernewpartsforthe vehicle'ssafetybeltsystem.See ReplacingSafetyBeltSystemParts afteraCrashonpage3-20.
RearSafetyBeltComfort Guides
This vehicle may haverear shoulder belt comfort guides for therear outside positions. If not, they are available through your dealer.
Rearshoulderbeltcomfortguides mayprovideaddedsafetybelt comfortforolderchildrenwhohave outgrownboosterseatsandfor someadults.Wheninstalledand properlyadjusted,thecomfortguide positionsthebeltawayfromthe neckandhead.
natural_image
Line drawing of a hand holding a device against a striped background (no text or symbols)Hereishowtoinstallacomfort guidetotheshoulderbelt:
- Slidetheguideoffofitsstorage cliplocatedbetweentheinterior bodyandtheseatback.
natural_image
Illustration of hands using a tool to cut or adjust a cylindrical object (no text or symbols visible)- Placetheguideoverthebelt andinsertthetwoedgesofthe beltintotheslotsoftheguide.

natural_image
Close-up of a metallic cable or wire with a strap, showing internal strands and a small inset view (no text or symbols)- Besurethatthebeltisnot twistedanditiesflat. The elasticcordmustbeunderthe beltandtheguideontop.
WARNING
Asafetybeltthatisnotproperly wornmaynotprovidethe protectionneededinacrash. The personwearingthebeltcouldbe seriouslyinjured. Theshoulder beltshouldgooverthesthoulder andacrossthechest. Theseparts ofthebodyarebestabletotake beltrestrainingforces.
natural_image
Illustration of a person seated in a chair holding a stringed instrument (no text or symbols visible)- Buckle, position, and releasethe safetybeltasdescribed previously in this section. Make suretheshoulder portion of the belt is on the shoulder and not falling off of it. The belt should be closeto, but not contacting, theneck.
Toremoveandstorethecomfort guide, squeezethebeltedges togethersothatthesafetybeltcan beremovedfromtheguide.Slide theguidebackonitsstorageclip locatedbetweentheinteriorbody andtheseatback.
3-18 Seats and Restraints
SafetyBeltUseDuring Pregnancy
Safetybeltsworkforeveryone, includingpregnantwomen.Likeall occupants,theyaremorelikelyto beseriouslyinjurediftheydonot wearsafetybelts.
natural_image
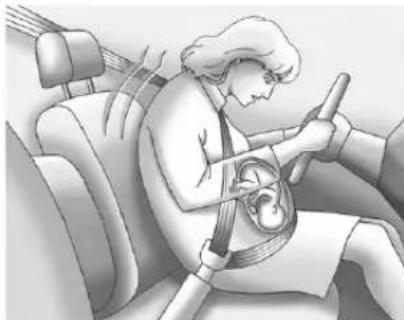
Illustration of a person wearing a seatbelt inside a car, with no visible text or symbolsApregnantwomanshouldweara lap-shoulderbelt, and the lap portions should bewornaslowas possible, belowtherounding, throughout the pregnancy.
The best way to protect the fetus is to protect them other. When as safety belt is worn properly, it is more likely that the fetus will not be hurt in a crash. For pregnant women, as for anyone, the key to makings safety belt is effective is wearing them properly.
LapBelt
Thissectionisonlyforthelapbelt. Tolearnhowtowearalap-shoulder belt, seeLap-ShoulderBelton page3-13.
The vehicle may have a center seating position. When you sit in the center front seating position, you have all safety belt, which has no retractor.
natural_image
Illustration of a person's arm holding a belt or buckle, with no visible text or symbolsTomakethebeltlonger, tiltthelatch plateandpullitalongthebelt.
Buckle, position, and release it the same way asthelappartofa lap-shoulderbelt.
natural_image
Illustration of two hands holding a rope or cable, no text or symbols presentTomakethebeltshorter, pullitsfree endasshownuntilthebeltissnug.
Ifthebeltisnotlongenough,see SafetyBeltExtenderonpage3-19.
Makesurethereleasebuttononthe buckleispositionedsoyouwould beabletounbucklethesafetybelt quicklyifnecessary.
SafetyBeltExtender
If the vehicle's safety belt will fasten around you, you should use it.
Butifasafetybeltisnotlong enough,yourdealerwillorderyou anextender.Whenyougointo orderit,taketheheaviestcoatyou willwear,sotheextenderwillbe longenoughforyou.Tohelpavoid personalinjury,donotletsomeone elseuseit,anduseitonlyforthe seatismadetofit.Theextender hasbeendesignedforadults.Never useitforsecuringchildseats.To wearit,attachittotheregularsafety belt.Formoreinformation,seethe instructionsheetthatcomeswith theextender.
SafetySystemCheck
Nowandthen, check that the safety belt reminder light, safety belts, buckles, latch plates, retractors, and anchorages are all working properly. Look for any other loose or damaged safety belts system parts that might keep safety belts system
fromdoingitsjob.Seeyourdealer tohaveitrepaired.Tornorfrayed safetybeltsmaynotprotectyouina crash.Theycanripapartunder impactforces.Ifabeltistornor frayed,getanewonerightaway.
Makesurethesafetybeltreminder lightisworking.SeeSafetyBelt Remindersonpage5-9formore information.
Keepsafetybeltscleananddry. See SafetyBeltCareonpage3-19.
SafetyBeltCare
Keepbeltscleananddry.

WARNING
Donotbleachordyesafetybelts. Itmayseverelyweakenthem. In acrash, they might not be able to provide adequate protection. Cleansafetybelts only with mild soap and lukewarmwater.
ReplacingSafetyBelt SystemPartsaftera Crash

WARNING
Acrashcandamagethesafety beltsysteminthevehicle. Adamagedsafetybeltsystem maynotproperlyprotectthe personusingit,resulting in serious injuryorevendeathina crash. To help makesure the safetybeltsystemsareworking properly after acrash, havethem inspected and any necessary replacements made as soon as possible.
Afteraminorcrash, replacement of safetybeltsmaynotbenecessary. Butthesafetybeltasembliesthat were used during any crash may have been stressed or damaged. Seeyourdealertohavethesafety beltassemblies inspected or replaced.
Newpartsandrepairsmaybe necessaryevenifthesafetybelt systemwasnotbeingusedatthe timeofthecrash.
Havethesafetybeltpretensioners checkedifthevehiclehasbeenina crash,oriftheairbagreadinesslight staysonafteryoustartthevehicle orwhileyouaredriving.SeeAirbag ReadinessLightonpage5-10.
AirbagSystem
The vehicle hasthe following airbags:
• Afrontalairbagforthedriver.
- Afrontalairbagfortherightfront passenger.
Yourvehiclemayalso havethe following airbags:
• Aroof-railairbagforthedriver and the passenger seated directly behind the driver.
- Aroof-railairbagfortheright frontpassengerandthe passengerseateddirectly behindtherightfrontpassenger.
Alloftheairbagsinyourvehiclewill havethewordAIRBAGembossed inthetrimoronanattachedlabel nearthedeploymentopening.
Forfrontalairbags, theword AIRBAG will appear on the middle part of the steering wheel for the driver and the instrument panel for the right front passenger.
Withroof-railairbags, theword AIRBAG will appear along the headlinerortrim.
Airbagsaredesignedtosupplement theprotectionprovidedbysafety belts. Eventhoughtoday'sairbags arealsodesignedtohelpreduce theriskofinjuryfromtheforceofan inflatingbag,allairbagsmustinflate veryquicklytodotheirjob.
Herearethemostimportantthings toknowabouttheairbagsystem:
WARNING
Youcanbeseverelyinjuredor killedinacrashifyouarenot wearingyoursafetybelt—evenif youhaveairbags.Airbagsare designedtoworkwithsafety belts,butdonotreplacethem. Also,airbagsarenotdesignedto deployineverycrash.Insome
(Continued)
WARNING(Continued)
crashessafetybeltsareyouronly restraint.See When Shouldan Airbag Inflate?onpage3-24.
Wearingyoursafetybeltduringa crashhelpsreduceyourchance ofhittingthingsinsidethevehicle orbeingejectedfromit.Airbags are“supplementalrestraints”to thesafetybelts.Everyoneinyour vehicleshouldwearasafetybelt properly—whetherornotthereis anairbagforthatperson.
WARNING
Airbagsinflatewithgreatforce, fasterthantheblinkofaney. Anyonewhoisupagainst,orvery closeto,anyairbagwhenit inflatescanbeseriouslyinjured orkilled.Donotsitunnecessarily closetotheairbag,asyouwould beifyouweresittingontheedge ofyourseatorleaningforward. Safetybeltshelpkeepyouin positionbeforeandduringa crash.Alwayswearyoursafety belt,evenwithairbags. Thedriver shouldsitasfarbackaspossible whilestillmaintainingcontrol of thevehicle.
Occupantsshouldnotleanonor sleepagainstthedoororside windowsinseatingpositionswith roof-railairbags.
3-22SeatsandRestraints

WARNING
Childrenwhoareupagainst, orverycloseto,anyairbag whenitinflatescanbeseriously injuredorkilled.Airbagsplus lap-shoulderbeltsofferprotection foradultsandolderchildren,but notforyoungchildrenandinfants. Neitherthevehiclesafetybelt systemnoritsairbagsystemis designedforthem.Young childrenandinfantsneedthe protectionthatachildrestraint systemcanprovide.Always securechildrenproperlyinthe vehicle.Toreadhow,seeOlder Childrenonpage3-35orInfants andYoungChildrenon page3-37.

Thereisanairbagreadinesslight ontheinstrumentpanel,which showstheairbagsymbol.
Thesystemcheckstheairbag electricalsystemformalfunctions. Thelighttellsyouifthereisan electricalproblem.SeeAirbag ReadinessLightonpage5-10for moreinformation.
WhereAretheAirbags?
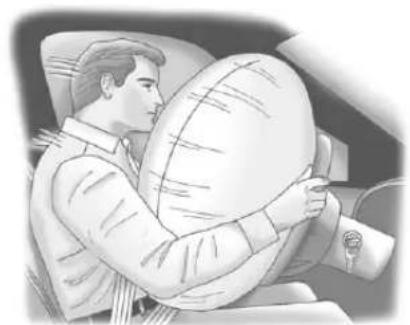
natural_image
Illustration of a person inside a car holding a large cushion (no text or symbols visible)Thedriver'sairbagisinthemiddle ofthesteeringwheel.
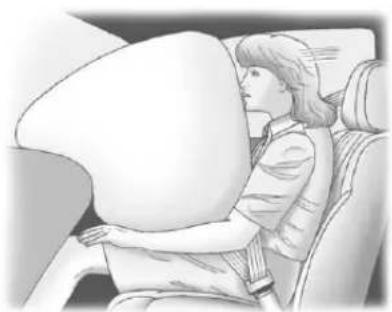
natural_image
Illustration of a person seated in a car, viewed from the side (no text or symbols visible)Therightfrontpassenger'sairbagis intheinstrumentpanelonthe passenger'sside.
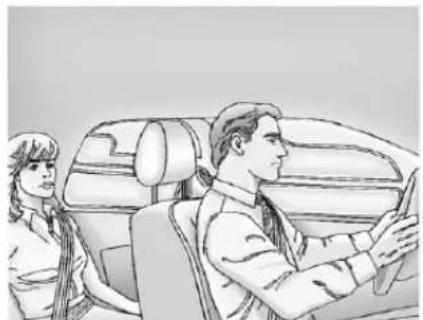
natural_image
Illustration of a car driver and passenger in a car, no text or symbols presentDriverSideShown, Passenger SideSimilar
If your vehicle has roof-rail air bags
forth driver, right front passenger,
and second row out board
passengers, they are in the ceiling
abovethesidewindows.
WARNING
If something is between an occupant and an airbag, the airbag might not inflate properly or might force the object into that person causing severe injury overvendence. The pathofan inflating airbag must be kept clear. Donotput anything between an occupant and an airbag, and donot attach or put anything on the steering wheel huboronor near any other airbag covering.
Neversecureanythingtotheroof ofvehiclewithroof-railairbags byroutingaropeortiedown throughanydoororwindow opening. If youdo, the pathofan inflatingroof-railairbagwillbe blocked.
WhenShouldanAirbag Inflate?
Frontalairbagsaredesignedto inflateinmoderatetoseverefrontal ornear-frontalcrashestohelp reducethepotentialforsevere injuriesmainlytothedriver'sorright frontpassenger'sheadandchest. However,theyareonlydesignedto inflateiftheimpactexceedsa predetermineddeployment threshold.Deploymentthresholds areusedtopredicthowseverea crashislikelytobeintimeforthe airbagstoinflateandhelpprestrain theoccupants.
Whether your frontal air bags willor should deploy is not based on how fast your vehicle is traveling. It depends largely on what you hit, the direction of the impact, and how quickly your vehicles slows down.
Frontalairbagsmayinflateat differentcrashspeeds. For example:
- If the vehicle hits stationary object, the air bags could inflate at different crash speed than if the vehicle hits moving object.
- Ifthevehiclehitsanobjectthat deforms,theairbagscould inflateatadifferentcrashspeed thanifthevehiclehitsanobject thatdoesnotdeform.
- Ifthevehiclehitsanarrowobject (likeapole), theairbags could inflate at different crash speed than if the vehicle hits a wide object (likeawall).
- Ifthevehiclegoesintoanobject atanangle, theairbags could inflate at different crash speed than if the vehiclegoes straight into the object.
Thresholdscanalsovarywith specificvehicledesign.
Frontalairbagsarenotintendedto inflateduringvehiclerollovers, rear impacts, orinmanysideimpacts.
Yourvehiclehasseatposition sensorswhichenablesthesensing systemtomonitorthepositionofthe driver'sseatandtherightfront passenger'sseat.Seatposition sensorsprovideinformationthatis usedtodetermineiftheairbags shoulddeployatareducedlevelor atfulldeployment.
Inaddition, your vehicle has dual-stage frontal airbags. Dual-stage airbags adjust the restraint according to crash severity. Your vehicle has electronic frontal sensors, which help the sensing system distinguish between a moderate frontal impact and more severe frontal impact. For moderate frontal impacts, dual-stage airbags inflate at level less than full deployment. Form more severe frontal impacts, full deployment occurs.
Yourvehiclemayormaynothave roof-railairbags.SeeAirbagSystem onpage3-20.Roof-railairbagsare intendedtoinflateinmoderateto severesidecrashes.Roof-rail airbagswillinflateifthecrash severityisabovethesystem's designedthresholdlevel.The thresholdlevelcanvarywith specificvehicledesign.
Roof-railairbagsarenotintendedto inflateinfrontalimpacts, near-frontal impacts, rollovers, orrearimpacts. Bothroof-railairbagswilldeploy wheneithersideofthevehicleis struck.
Inanyparticularcrash, noonecan saywhetheranairbagshouldhave inflated simply because of the damagetoavehicleorbecause of whattherepaircosts were. For frontal airbags, inflation is determined by what the vehicle hits, the angle of the impact, and how quickly the vehicles slows down. For roof-rail airbags, deployment is determined by the location and severity of the side impact.
WhatMakesanAirbag Inflate?
Inadeploymentevent,thesensing systemsendsanelectricalsignal triggeringareleaseofgasfromthe inflator.Gasfromtheinflatorfillsthe airbagcausingthebagtobreakout ofthecoveranddeploy.Theinflator, theairbag,andrelatedhardwareare allpartoftheairbagmodule.
Frontalairbagmodulesarelocated insidethesteeringwheel and instrumentpanel. For vehicles with seat-mounted side impact airbags, there are air bags modules in the side of the front seat back closest to the door. For vehicles with roof-rail air bags, there are air bag modules in the ceiling of the vehicle, near the sidewindow sthathave occupant seating positions.
HowDoesanAirbag Restrain?
Inmoderatetoseverefrontalor nearfrontalcollisions, evenbelted occupantscancontactthesteering wheelortheinstrumentpanel. In moderatetoseveresidecollisions, evenbeltedoccupantscancontact theinsideofthevehicle.
Airbagssupplementtheprotection providedbysafetybelts.Frontal airbagsdistributetheforceofthe impactmoreevenlyoverthe occupant'supperbody,stoppingthe occupantmoregradually.Roof-rail airbagsdistributetheforceofthe impactmoreevenlyoverthe occupant'supperbody.
Butairbagswouldnothelpinmany typesofcollisions,primarily because the occupant'smotionis nottoward those airbags.See When ShouldanAirbagInflate?on page3-24formoreinformation.
Airbagsshouldneverberegarded asanythingmorethanasupplement tosafetybelts.
WhatWillYouSeeafter anAirbagInflates?
Afterthefrontalairbagsinflate,they quicklydeflate,soquicklythatsome peoplemaynotevenrealizethe airbagsinflated.Roof-railairbags maystillbeatleastpartiallyinflated for sometimeaftertheydeploy. Somecomponentsoftheairbag modulemaybehotforseveral minutes.Forlocationoftheairbag modules,seeWhatMakesan AirbagInflate?onpage3-25.
Thepartsoftheairbagthatcome intocontactwithyoumaybewarm, butnottoohottotouch. Theremay besomesmokeanddustcoming fromtheventsinthedeflated airbags. Airbaginflationdoesnot preventthedriverfromseeingoutof thewindshieldorbeingabletosteer thevehicle, nordoesitprevent peoplefromleavingthevehicle.
WARNING
Whenanairbaginflates, there maybedustintheair. This dust could cause breathing problems for people with a history of asthma or other breathing trouble. To avoid this, everyone in the vehicles should get out as soon as it is safetodoso. If you have breathing problems but cannot get out of the vehicle after an air bag inflates, then get fresh hair by opening a window or a door. If you experience breathing problems following an air bag deployment, you should seek medical attention.
The vehicle has a safe feature that may automatically unlock the doors (ifequipped with power door locks), turn the interior lampson, flash the hazard warning flashers, turn off the radio, and shutoff the fuel system after the air bag inflates. You can lock the doors again by using the
doorlock. The interiorlamps and hazard warning flashers will deactivate after approximately 15 minutes.
WARNING
Acrashsevereenoughtoinflate theairbagsmayhavealso damagedimportantfunctionsin thevehicle,suchasthefuel system,brakeandsteering systems,etc.Evenifthevehicle appearstobedrivableaftera moderatecrash,theremaybe concealeddamagethatcould makeitdifficulttosafelyoperate thevehicle.
Usecautionifyoushouldattempt torestarttheengineafteracrash hasoccurred.
Inmanycrashessevereenoughto inflatetheairbag, windshieldsare brokenbyvehicledeformation.
Additionalwindshieldbreakagemay alsooccurfromtherightfront passengerairbag.
- Airbagsaredesignedtoinflate onlyonce.Afteranairbag inflates,youwillneedsomenew partsfortheairbagsystem. Ifyoudonotgetthem,the airbagsystemwillnotbethere tohelpprotectyouinanother crash.Anewsystemwillinclude airbagmodulesandpossibly otherparts.Theservicemanual foryourvehiclecoverstheneed toreplaceotherparts.
- Yourvehiclehasacrash sensinganddiagnosticmodule whichrecordsinformationaftera crash.SeeVehicleData RecordingandPrivacyon page 13-20andEventData Recordersonpage 13-20.
- Letonlyqualifiedtechnicians workontheairbagsystem. Improperservicecanmeanthat theairbagsystemwillnotwork properly.Seeyourdealerfor service.
PassengerSensing System
If the vehicle has one of the passenger air bag status indicators pictured in the following illustrations, then the vehicle has a passenger sensing system for the right front passenger position. The passenger air bag status indicator, if equipped, is visible on the instrument panel when the vehicle is started.
Inaddition, if the vehicle has a passengersensingsystem for the right front passenger position, the label on the vehicle's sunvisors refer to "ADVANCED AIRBAGS".
PASSENGER AIR BAG

UnitedStates

CanadaandMexico
ThewordsONandOFF,orthe symbolforonandoff,willbevisible duringthesystemcheck.Whenthe systemcheckiscomplete,eitherthe wordONorOFF,orthesymbolfor onoroffwillbevisible.See PassengerAirbagStatusIndicator onpage5-11.
3-28SeatsandRestraints
Thepassengersensingsystemwill turnofftherightfrontpassenger frontalairbagundercertain conditions. Thedriverairbagisnot affectedbythepassengersensing system.
Thepassengersensingsystem workswithsensorsthatarepartof therightfrontpassengerseat. The sensorsaredesignedtodetectthe presenceofaproperly-seated occupantanddetermineiftheright frontpassengerfrontalairbag shouldbeenabled(mayinflate) ornot.
According to accident statistics, children and infants are safer when properly restrained in a child restraintsystemor infant restraint system secured in a rearseating position.
Werecommendthatchildrenbe securedinarearseat,including:an infantorachildridingina rear-facingchildrestraint;achild ridinginaforward-facingchildseat;
anolderchildridinginabooster seat; andchildren, who are large enough, usingsafetybelts.
Werecommendthatrear-facing childrestraintsnotbetransported in the vehicle, eveniftheairbagisoff.
Alabelonyoursunvisorsays, "Neverputarear-facingchildseatin thefront." Thisisbecausetheriskto therear-facingchildissogreat, iftheairbagdeploys.

WARNING
Achildinarear-facingchild restraintcanbeseriously injuredorkillediftherightfront passengerairbaginflates. Thisisbecausethebackofthe rear-facingchildrestraintwould beveryclosetotheinflating airbag.Achildinaforward-facing childrestraintcanbeseriously injuredorkillediftherightfront (Continued)
WARNING(Continued)
passengerairbaginflatesandthe passengerseatisinaforward position.
Evenifthepassengersensing systemhasturnedofftheright frontpassengerfrontalairbag,no systemisfail-safe.Noonecan guaranteeethatanairbagwillnot deployundersomeunusual circumstance,eventhoughthe airbagisturnedoff.
Securerear-facingchild restraintsinarearseat,evenif theairbagisoff.Ifyousecurea forward-facingchildrestraintin therightfrontseat,alwaysmove thefrontpassengerseatasfar backasitwillgo.Itisbetterto securethechildrestraintina rearseat.
If your vehicle does not have a rear seat that will accommodate a rear-facing child restraint, a rear-facing child restraint should not be installed in the vehicle, even if the air bag is off.
Thepassengersensingsystemis designedtoturnofftherightfront passengerairbagif:
• Therightfrontpassengerseatis unoccupied.
- Thesystemdeterminesthatan infantispresentinarear-facing infantseat.
- Thesystemdeterminesthata smallchilddispresentinachild restraint.
- Thesystemdeterminesthata smallchilddispresentina boosterseat.
- Arightfrontpassengertakes his/herweightoffoftheseatfor aperiodoftime.
- Therightfrontpassengerseatis occupied byasmallerperson, suchasachildwhohas outgrownchildrestraints.
- Or,ifthereisacriticalproblem withtheairbagsystemorthe passengersensingsystem.
Whenthepassengersensing systemhasturnedofftherightfront passengerfrontalairbag,theoff indicatorwilllightandstaylitto remindyouthattheairbagisoff. SeePassengerAirbagStatus Indicatoronpage5-11.
Thepassengersensingsystemis designedtoturnon(mayinflate)the rightfrontpassengerfrontalairbag anytimethesystemsensesthata personofadultsizeissitting properlyintherightfrontpassenger seat. Whenthepassengersensing systemhasallowedtheairbagtobe enabled, theonindicatorwilllight andstaylittoremindyouthatthe airbagisactive.
Forsomechildrenwhohave outgrownchildrestraintsandfor verysmalladults,thepassenger sensingsystemmayormaynot turnofftherightfrontpassenger's frontalairbag,dependinguponthe person'sseatingpostureandbody build.Everyoneinyourvehicle whohasoutgrownchildrestraints shouldwearasafetybelt properly—whetherornotthereis anairbagforthatperson.

WARNING
If the airbagreadiness light ever comes on and stay on, it means that something may be wrong with the air bags system. To help avoid injury to your self for others, have the vehicles serviced right away. See Airbag Readiness Lighton page 5-10 form more information, including important safety information.
3-30 Seats and Restraints
IftheOnIndicatorisLitfora ChildRestraint
Ifachildrestrainhasbeeninstalled andtheonindicatorislit:
- Turnthevehicleoff.
- Removethechildrestraint from the vehicle.
- Remove any additional items from these seats such as blankets, cushions, seat covers, seat heaters, or seat massagers.
-
Reinstall the child restraint following the directions provided by the child restraint manufacturer and referto Securing Child Restraints (Right Front Seat Position) on page 3-59 or Securing Child Restraints (Center Front Seat Position) on page 3-57 or Securing Child Restraints (Rear Seat Position) on page 3-54.
-
If, afterreinstalling the child restraint and restarting the vehicle, the on indicator is still lit, turn the vehicle off. Then slightly reclin the vehicle seat back and adjust these at cushion, if adjustable, to make sure that the vehicle seat back is not pushing the child restraint into these at cushion.
Alsomakesurethechild restraintisnottrappedunderthe vehicleheadrestraint.Ifthis happens,adjustthehead restraint.SeeHeadRestraints onpage3-2.
6.Restartthevehicle.
Iftheonindicatorisstilllit, securethechildinthechild restraintinarearseatpositionin thevehicleandcheckwithyour dealer.
Ifnorearseatisavailable,do notinstallachildrestraintinthis vehicleandcheckwithyour dealer.
IftheOffIndicatorisLitforan Adult-SizeOccupant
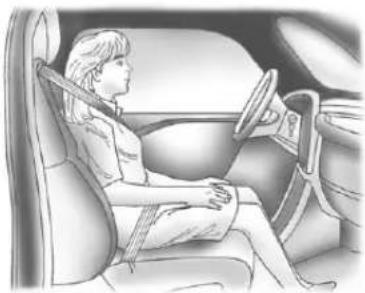
natural_image
Interior view of a car showing a person seated in the driver's seat, with steering wheel and dashboard visible (no text or symbols)Ifapersonofadult-sizeissittingin therightfrontpassengerseat,but theoffindicatorislit,itcouldbe becausethatpersonisnotsitting properlyintheseat.Ifthishappens, usethefollowingstepstoallowthe
systemtodetectthatpersonand enabletherightfrontpassenger frontalairbag:
- Turnthevehicleoff.
- Remove any additional material from these seat, such as blankets, cushions, seat covers, seat heaters, or seat massagers.
- Placetheseatbackinthefully uprightposition.
- Havethepersonsituprightin theseat, centeredontheseat cushion, with legscomfortably extended.
- Restartthevehicleandhavethe personremaininthispositionfor twotothreeminutesaftertheon indicatorislit.
AdditionalFactorsAffecting SystemOperation
Safetybeltshelpkeepthe passengerinpositionontheseat duringvehiclemaneuversand braking,whichhelpsthepassenger sensingsystemmaintainthe passengerairbagstatus.See "SafetyBelts" and "ChildRestraints" intheIndexforadditional informationabouttheimportanceof properrestraintuse.
If the shoulder portion of the belt is pulled out all the way, the child restraint locking feature will be engaged. This may unintentionally causethe passengers sensing system to turn the air bag off for some adult size occupants. If this happens, let the belt go back all the way and start again.
3-32SeatsandRestraints
Athicklayerofadditionalmaterial, suchasablanketorcushion, oraftermarketequipmentsuchas seatcovers,seatheaters,andseat massagerscanaffecthowwell thepassengersensingsystem operates.Werecommendthatyou notuseseatcoversorother aftermarketequipmentexceptwhen approvedbyGMforyourspecific vehicle.SeeAddingEquipmentto theAirbag-EquippedVehicleon page3-33formoreinformation aboutmodificationsthatcanaffect howthesystemoperates.

WARNING
Stowingofarticlesunderthe passengerseatorbetweenthe passengerseatcushionand seatbackmayinterferewiththe properoperationofthepassenger sensingsystem.
Servicingthe Airbag-EquippedVehicle
Airbagsaffecthowthevehicle shouldbeserviced.Thereareparts oftheairbagsysteminseveral placesaroundthevehicle.Your dealerandtheservicemanualhave informationaboutservicingthe vehicleandtheairbagsystem.To purchaseaservicemanual,see ServicePublicationsOrdering Informationonpage13-18.

WARNING
Forupto10secondsafterthe vehicleisturnedoffandthe batteryisdisconnected,anairbag canstillinflateduringimproper service.Youcanbeinjuredifyou areclosetoanairbagwhenit inflates.Avoidyellowconnectors. Theyareprobablypartofthe airbagsystem.Besuretofollow properserviceprocedures,and makesurethepersonperforming workforyouisqualifiedtodoso.
AddingEquipmenttothe Airbag-EquippedVehicle
Q: Isthereanythinglmightadd toorchangeaboutthevehicle thatcouldkeeptheairbags fromworkingproperly?
A: Yes. If you add things that changethe vehicle's frame, bumpersystem, height, frontend or sidesheet metal, they may keep the air bags system from working properly. Changing or moving any part of the front seats, safety belts, the airbag sensing and diagnostic module, steering wheel, instrument panel, roof-rail air bag modules, ceiling headliner or pillargarnish trim, frontsensors, or airbag wiring can affect the operation of the air bags system.
Inaddition, the vehicle may have passengers sensing system for the right front passenger position, which includes sensors that are part of the passenger seat. The passengers sensing
systemmaynotoperateproperly iftheoriginalseattrimis replacedwithnon-GMcovers, upholsteryortrim,orwith GMcovers,upholsteryortrim designedforadifferentvehicle. Anyobject,suchasan aftermarketseatheaterora comfortenhancingpador device,installedunderorontop oftheseatfabric,couldalso interferewiththeoperationof thepassengersensingsystem. Thiscouldeitherpreventproper deploymentofthepassenger airbag(s)orpreventthe passengersensingsystemfrom properlyturningoffthe passengerairbag(s).See PassengerSensingSystemon page3-27.
If you have any questions, call Customer Assistance. The phonenumbers and addresses for Customer Assistance are in Step Two of the Customer Satisfaction Procedure in this manual. See Customer
SatisfactionProcedure(U.S.and Canada)onpage 13-4 or CustomerSatisfaction Procedure(Mexico)on page 13-4.
Q: Because I have adisability, I haveto get my vehicle modified. How can I find out whether this will affect my air bagsystem?
A: If you have questions, call Customer Assistance. The phonenumbers and addresses for Customer Assistance are in Step Two of the Customer Satisfaction Procedure in this manual. See Customer Satisfaction Procedure (U.S. and Canada) on page 13-1 or Customer Satisfaction Procedure (Mexico) on page 13-4.
Inaddition, your dealer and the servicemanual have information about the location of the airbag sensors, sensing and diagnostic module and airbag wiring.
AirbagSystemCheck
Theairbagsystemdoesnotneed regularly scheduled maintenance or replacement. Makesuretheairbag readinesslightisworking. See AirbagReadinessLighton page5-10formoreinformation.
Notice:Ifanairbagcoveringis damaged, opened, or broken, the airbag may not work properly. Do not open or break the airbag coverings. If there are any opened or broken airbag covers, havethe airbag covering and/or airbag modulere placed. For the location of the airbags, see Where Are the Airbags? on page 3-22. See your dealer for service.
ReplacingAirbagSystem PartsafteraCrash

WARNING
Acrashcandamagethe airbagsystemsinthevehicle. Adamagedairbagsystem maynotworkproperly and maynotprotectyouandyour passenger(s)inacrash,resulting inseriousinjuryorevendeath.To helpmakesuretheairbag systemsareworkingproperly afteracrash,havethem inspectedandanynecessary replacementsmadeassoonas possible.
Ifanairbaginflates, you will need to replace airbagsystemparts. See your dealer for service.
If the airbagreadinesslightstayson after the vehicle is started or comes on when you are driving, the airbag system may not work properly. Have the vehicles serviced right away. See Airbag Readiness Lighton page 5-10 form more information.
ChildRestraints OlderChildren
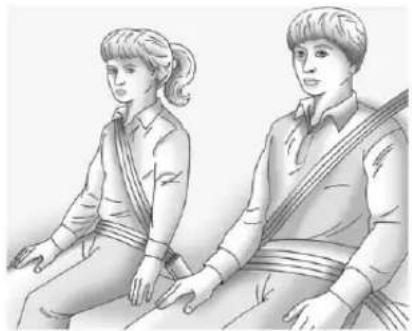
natural_image
Illustration of two people sitting side by side, wearing traditional-style clothing (no text or symbols visible)Olderchildrenwhohaveoutgrown boosterseatsshouldwearthe vehiclesafetybelts.
Themanufacturer'sinstructionsthat comewiththeboosterseatstatethe weightandheightlimitationsforthat booster.Useaboosterseatwitha lap-shoulderbeltuntilthechild passesthefittestbelow:
- Sitallthewaybackontheseat. Dothekneesbendattheseat edge?Ifyes,continue.Ifno, returntotheboosterseat.
- Bucklethelap-shoulderbelt. Doestheshoulderbeltreston theshoulder?Ifyes,continue. Ifno,tryusingtherearsafety beltcomfortguide.See"Rear SafetyBeltComfortGuides" underLap-ShoulderBelton page3-13formoreinformation. Iftheshoulderbeltstilldoesnot restontheshoulder,thenreturn totheboosterseat.
- Doesthelapbeltfitlowand snugonthehips,touchingthe thighs?Ifyes,continue.Ifno, returntotheboosterseat.
- Canpropersafetybeltfitbe maintainedforthelengthofthe trip?Ifyes,continue.Ifno, returntotheboosterseat.
Q:Whatistheproperwayto wearsafetybelts?
A: Anolderchildshouldwearalap-shoulderbeltandgettheadditionalrestraintashoulderbeltcanprovide. Theshoulderbeltshouldnotcrossthefaceorneck. Thelapbeltshouldfitsnuglybelowthehips, justtouchingthetopofthethighs.Thisappliesbeltforcetothechild'spelvicbonesinacrash.Itshouldneverbewornovertheabdomen,whichcouldcausesevereorevenfatalinternalinjuriesinacrash.
Alsosee"RearSafetyBeltComfort Guides"underLap-ShoulderBelton page3-13.
3-36SeatsandRestraints
According to accident statistics, children and infants are safer when properly restrained in a child restraintsystemor infant restraint system secured in a rearseating position.
Inacrash, children who are not buckled up can strike other people who are buckled up, or can be thrown out of the vehicle. Older children need to use safety belts properly.

WARNING
Neverdothis.
Neverallowtwochildrentowear thesamesafetybelt. Thesafety belt cannot properly spread the impact forces. Inacrash, the two children can be crushed together and seriously injured. As safety belt must be used by only one person at time.
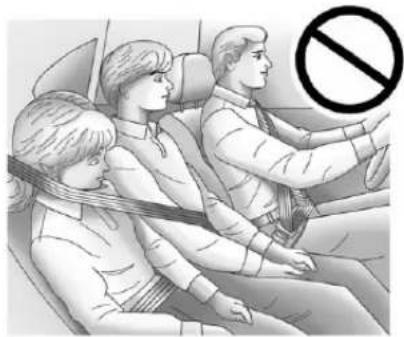
natural_image
Illustration of three people seated in a car, one wearing a seatbelt, with a no-smoking symbol overlaid (no text or symbols present)
WARNING
Neverdothis.
Neverallowachildtowearthe safetybeltwiththeshoulderbelt behindtheirback.Achildcanbe seriouslyinjuredbynotwearing thelap-shoulderbeltproperly.Ina crash,thechildwouldnotbe restrainedbytheshoulderbelt. Thechildcouldmovetoofar forwardincreasingthechanceof headandneckinjury.Thechild
(Continued)
WARNING(Continued)
mightalsoslideunderthelap belt. Thebeltforcewouldthenbe appliedrightontheabdomen. Thatcouldcauseseriousorfatal injuries. Theshoulderbeltshould goovertheshoulderandacross thechest.
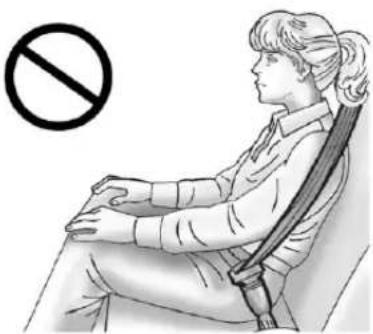
natural_image
Illustration of a person sitting in a chair with a diagonal bar, no text or symbols presentInfantsandYoung Children
Everyoneinavehicleneeds protection! Thisincludesinfantsand allotherchildren. Neither the distancetravelednortheage and sizeofthetravelerchangesthe need,foreveryone,tousesafety restraints. Infact,thelawinevery stateintheUnitedStatesandin everyCanadianprovincesays childrenuptosomeagemustbe restrainedwhileinavehicle.

WARNING
Childrencanbeseriouslyinjured orstrangledifashoulderbeltis wrappedaroundtheirneckand thesafetybeltcontinuesto tighten.Neverleavechildren unattendedinvehicleandnever allowchildrentoplaywiththe safetybelts.
Airbagspluslap-shoulderbeltsoffer protectionforadultsandolder children,butnotforyoungchildren andinfants.Neitherthevehicle's safetybeltsystemnoritsairbag systemisdesignedforthem.Every timeinfantsandyoungchildrenride invehicles,theyshouldhavethe protectionprovidedbyappropriate childrestraints.
Childrenwhoarenotrestrained properly can strike other people, or can be thrown out of the vehicle.

WARNING
Neverdothis.
Neverholdaninfantorachild whileridinginavehicle. Dueto crashforces, aninfantorachild willbecomesoheavyitisnot possibletoholditduringacrash. Forexample, inacrashatonly 40km/h(25mph), a5.5kg(12lb) infantwillsuddenlybecomea
(Continued)
WARNING(Continued)
110kg(240lb)forceonaperson's arms.Aninfantshouldbe securedinanappropriate restraint.

natural_image
Illustration of a woman breastfeeding a baby in a car seat, with no visible text or symbols
WARNING
Neverdothis.
Childrenwhoareupagainst, orverycloseto,anyairbagwhen itinflatescanbeseriouslyinjured orkilled.Neverputarear-facing childrestraintintherightfront seat.Securearear-facingchild restraintinarearseat.Itisalso bettertosecureaforward-facing childrestraintinarearseat.Ifyou mustsecureaforward-facing childrestraintintherightfront seat,alwaysmovethefront passengerseatasfarbackasit willgo.
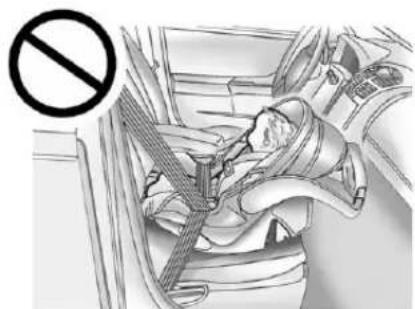
natural_image
Interior view of a car showing a car seatbelt and seatbelt switch, with a no-smoking symbol overlaid (no text or labels present)Q: Whatarethedifferenttypes of add-onchildrestraints?
A: Add-onchildrestraints, which are purchased by the vehicle owner, are available in four basic types. Selection of a particular restraint should take into consideration not only the child's weight, height, and age but also whether or not the restraint will be compatible with themotor vehicle in which it will be used.
Formostbasictypesofchild restraints,therearemany differentmodelsavailable.When purchasingachildrestraint,be sureitisdesignedtobeusedin amotorvehicle.Ifitis,the restraintwillhavealabelsaying thatitmeetsfederalmotor vehiclesafetystandards.
Therestraintmanufacturer's instructionsthatcomewiththe restraintstatetheweightand heightlimitationsforaparticular childrestraint.Inaddition,there aremanykindsofrestraints availableforchildrenwith specialneeds.
WARNING
Toreducetheriskofneck and headinjuryduringacrash,infants needcompletesupport. Thisis becauseaninfant'sneckisnot fullydevelopedanditshead weighssomuchcomparedwith therestofitsbody.Inacrash,an infantinarear-facingchild restraintsettlesintotherestraint, sothecrashforcescanbe distributedacrossthestrongest partofaninfant'sbody,theback andshoulders.Infantsshould alwaysbesecuredinrear-facing childrestraints.
WARNING
Ayoungchild'shipbonesarestill sosmallthatthevehicle'sregular safetybeltmaynotremainlowon thehipbones,asitshould. Instead,itmaysettleuparound thechild'sabdomen.Inacrash, thebeltwouldapplyforceona bodyareathatisunprotectedby anybonystructure.Thisalone couldcauseseriousorfatal injuries.Toreducetheriskof seriousorfatalinjuriesduringa crash,youngchildrenshould alwaysbesecuredinappropriate childrestraints.
ChildRestraintSystems
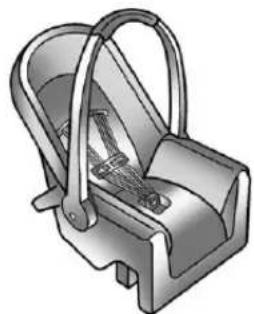
natural_image
3D illustration of a mechanical device with handle and internal components (no text or symbols)(A)Rear-FacingInfantSeat
Arear-facinginfantseat(A) providesrestraintwiththeseating surfaceagainstthebackofthe infant.
The harnesssystemholdstheinfant inplaceand,inacrash,actsto keeptheinfantpositionedinthe restraint.
3-40SeatsandRestraints
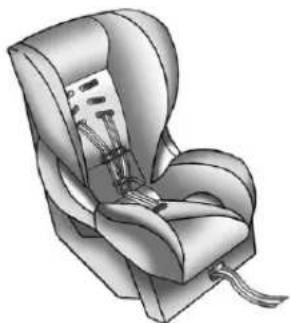
natural_image
Illustration of a car seat with straps and straps (no text or symbols)(B)Forward-FacingChildSeat
Aforward-facingchildseat(B) provides restraint for the child's body with the harness.
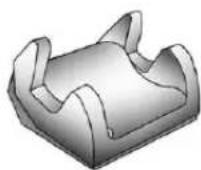
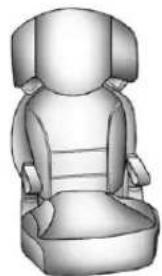
natural_image
3D rendered illustration of a car seat with front and back panels (no text or symbols)(C)BoosterSeats
Aboosterseat(C)isachildrestraint designedtoimprovethefitofthe vehicle'ssafetybeltsystem. Aboosterseatcanalsohelpa childtoseeoutthewindow.
SecuringanAdd-OnChild RestraintintheVehicle

WARNING
Achildcanbeseriouslyinjuredor killedinacrashifthechild restraintisnotproperlysecuredin thevehicle.Securethechild restraintproperlyinthevehicle usingthevehiclesafetybeltor LATCHsystem,followingthe instructionsthatcamewiththat childrestraintandtheinstructions inthismanual.
Tohelpreducethechanceofinjury, thechildrestraintmustbesecured inthevehicle. Childrestraint systemsmustbesecuredinvehicle seatsbylapbeltsorthelapbelt portionofalap-shoulderbelt,orby theLATCHsystem.SeeLower AnchorsandTethersforChildren (LATCHSystem)onpage3-43for moreinformation.
Childrencanbeendangeredina crashifthechildrestraintisnot properlysecuredinthevehicle.
Whensecuringanadd-onchild restraint, refertotheinstructions that comewiththerestraint which maybeontherestraintitselforina booklet, or both, and to this manual. The childrestraint instructions are important, so if they are not available, obtain are replacement copy from the manufacturer.
Keepinmindthatanunsecured childrestraintcanmovearoundina collisionorsuddenstopandinjure peopleinthevehicle.Besureto properlysecureanychildrestraintin thevehicle—evenwhennochildis init.
InsomeareasoftheUnitedStates andCanada,CertifiedChild PassengerSafetyTechnicians (CPSTs)areavailabletoinspect anddemonstratehowtocorrectly useandinstallchildrestraints.In theU.S.,refertotheNational HighwayTrafficSafety Administration(NHTSA)websiteto locatethenearestchildsafetyseat inspectionstation.ForCPST availabilityinCanada,checkwith TransportCanadaortheProvincial MinistryofTransportationoffice.
SecuringtheChildWithinthe ChildRestraint

WARNING
Achildcanbeseriouslyinjuredor killedinacrashifthechildisnot properlysecuredinthechild restraint. Securethechild properlyfollowingtheinstructions thatcamewiththatchildrestraint.
WheretoPutthe Restraint
According to accident statistics, children and infants are safer when properly restrained in a child restraintsystemor infant restraint system secured in a rearseating position.
Werecommendthatchildrenand childrestraintsbesecuredinarear seat,including:aninfantorachild ridinginarear-facingchildrestraint; achildridinginaforward-facing childseat;anolderchildridingina boosterseat;andchildren,whoare largeenough,usingsafetybelts.
3-42SeatsandRestraints
Neverputarear-facingchildseatin thefront. Thisisbecausetheriskto therear-facingchildissogreat, iftheairbagdeploys.

WARNING
Achildinarear-facingchild restraintcanbeseriouslyinjured orkillediftherightfront passengerairbaginflates. This is because the back of the rear-facing child restraint would be very closetotheinflating airbag. Achildinaforward-facing child restraint can beseriously injured or killed iftherightfront passengerairbaginflates and the passenger seat is in a forward position.
The vehicle may have a passengers sensing system which is designed to turn off the right front passenger frontal airbag under certain conditions.
(Continued)
WARNING(Continued)
Evenifthepassengersensing system,ifequipped,hasturned offtherightfrontpassenger frontalairbag,nosystemis fail-safe.Noonecanguarantee thatanairbagwillnotdeploy undersomeunusual circumstance,eventhough itisturnedoff.
Securerear-facingchildrestraints inarearseat, even if the airbagisoff. If you secure a forward-facing child restraint in therightfrontseat, always move thefrontpassenger seat as far backasitwill go. It is better to secure the child restraint in rearseat.
See Passenger Sensing System on page 3-27 for additional information.

WARNING
Achildinachildrestraintinthe centerfrontseatcanbebadly injuredorkilledbythefrontal airbagsiftheyinflate.Never secureachildrestraintinthe centerfrontseat.Itisalways bettertosecureachildrestraintin arearseat.
Donotusechildrestraintsinthe centerfrontseatposition.
If the vehicle does no that a very few seats, rear-facing child restraints should not be installed in the vehicle, even if the passenger air bag is off.
Ifachildinaforward-facingchild restraintmustbetransportedina vehiclethatdoesnothaverear seats,thechildrestraintshouldbe securedintherightfrontseat position.See"SecuringChild Restraints(RightFrontSeat Position)"laterinthissection,for instructionsonhowtoinstallachild restraintintherightfrontseat position.
Whensecuringachildrestraintina rearseatingposition,studythe instructionsthatcamewiththechild restrainttomakesureitis compatiblewiththisvehicle.
Childrestraintsandboosterseats varyconsiderableinsize, and some mayfitin certain seating positions better than others. Always make sure the child restraint is properly secured.
Dependingonwhereyouplacethe childrestraintandthesizeofthe childrestraint,youmaynotbeable toaccessadjacentsafetybelt assembliesorLATCHanchorsfor additionalpassengersorchild restraints.Adjacentseating positionsshouldnotbeusedifthe childrestraintpreventsaccesstoor interfereswiththeroutingofthe safetybelt.
Whereveryouinstallachild restraint,besuretosecurethechild restraintproperly.
Keepinmindthatanunsecured childrestraintcanmovearoundina collisionorsuddenstopandinjure peopleinthevehicle.Besureto properlysecureanychildrestraintin thevehicle,evenwhennochildis init.
LowerAnchorsand TethersforChildren (LATCHSystem)
TheLATCHsystemholdsachild restraintduringdrivingorinacrash. Thissystemisdesignedtomake installationofachildrestrainteasier. TheLATCHsystemusesanchorsin thevehicleandattachmentsonthe childrestraintthataremadeforuse withtheLATCHsystem.
MakesurethataLATCH-compatible childrestraintisproperlyinstalled usingtheanchors,orusethe vehicle'ssafetybeltstosecurethe restraint,followingtheinstructions thatcamewiththatrestraint,and alsotheinstructionsinthismanual. Wheninstallingachildrestraintwith atoptether,youmustalsouse eithertheloweranchorsorthe safetybeltstoproperlysecurethe childrestraint.Achildrestraintmust neverbeinstalledusingonlythetop tetherandanchor.
3-44SeatsandRestraints
InordertousetheLATCHsystemin yourvehicle,youneedachild restraintthathasLATCH attachments.Thechildrestraint manufacturerwillprovideyouwith instructionsonhowtousethechild restraintanditsattachments.The followingexplainshowtoattacha childrestraintwiththese attachmentsinyourvehicle.
Notallvehicleseatingpositionsor childrestraintshaveloweranchors andattachmentsortoptether anchorsandattachments.
LowerAnchors
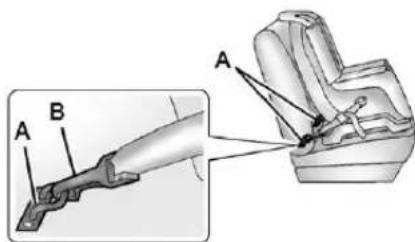
text_image
Technical diagram showing mechanical assembly with labeled parts A and B, including a magnified detail view.Loweranchors(A)aremetalbars builtintothevehicle. There are two loweranchorsforeachLATCH seatingpositionthatwill accommodateachildrestraint withlowerattachments(B).
TopTetherAnchor
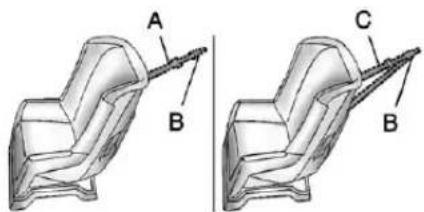
text_image
A B C BAtoptether(A,C)anchorsthetop ofthechildrestrainttothevehicle. Atoptetheranchorisbuilt intothevehicle. Thetoptether attachment(B)onthechildrestraint connectstothetoptetheranchorin thevehicleinordertoreducethe forwardmovementandrotationof thechildrestraintduringdrivingorin acrash.
Yourchildrestraintmayhavea singletether(A)oradual tether(C).Eitherwillhaveasingle attachment(B)tosecurethetop tethertotheanchor.
Somechildrestraintsthathavea toptetheraredesignedforusewith orwithoutthetoptetherbeing attached.Othersrequirethetop tetheralwaystobeattached.In Canada,thelawrequiresthat forward-facingchildrestraintshave atoptether,andthatthetetherbe attached.Besuretoreadandfollow theinstructionsforyourchild restraint.
LowerAnchorandTopTether AnchorLocations
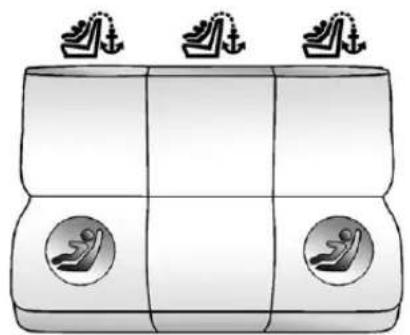
natural_image
Illustration of a baby in a maternity position with three identical arms (no text or symbols)CrewCab—RearSeat
(TopTetherAnchor): Seating positions with toptetheranchors.
(LowerAnchor): Seating positions with twolower anchors.
Forcrewcabmodels, there are exposedmetalloweranchorsfor eachrearoutboardseatingposition, wheretheseatbackmeetstheback oftheseatcushion.
Toassistinlocatingthelower anchors, placeyourhandina palm-uppositionandreachup betweentheseatcushionandthe seatback.
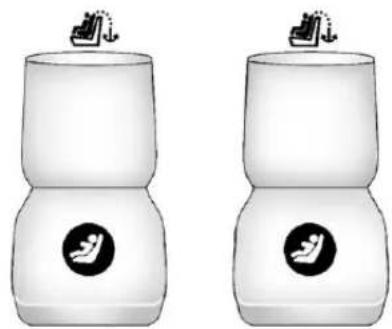
natural_image
Two identical white cylindrical objects with black circular markers containing human silhouettes, each with a small bird icon on top (no text or symbols)ExtendedCab—RearSeat
(TopTetherAnchor): Seating positions with toptetheranchors.
(LowerAnchor): Seating positions with twolower anchors.
Forextendedcabmodelswithrear seats,thereareexposedmetal loweranchorsforeachrearseating position,attachedtothebackwall, neartheseatcushion.
3-46SeatsandRestraints
Toassistinlocatingthelower anchors, placeyourhandina palm-uppositionandreachup betweentheseatcushionandthe seatback.
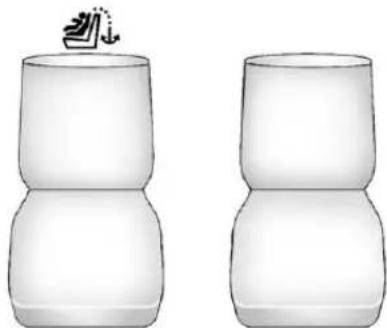
natural_image
Two identical white cylindrical objects with rounded tops, one with a small arrow icon above the top (no text or symbols)FrontBucketSeats—Regular and ExtendedCab without Rear Seats
(TopTetherAnchor): Seating positions with toptetheranchors.
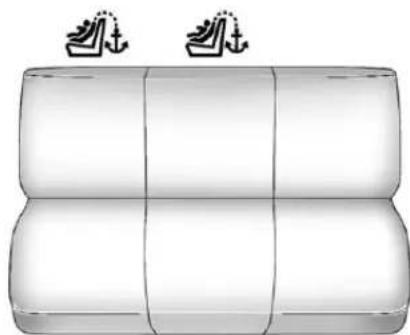
natural_image
3D diagram of a rectangular object with horizontal bands and two small boat icons above (no text or symbols)FrontBenchSeat—Regular and ExtendedCabwithoutRear Seats
(TopTetherAnchor): Seating positions with toptetheranchors.
Sometoptetheranchorshave covers.Toassistinlocatingthe coveredtoptetheranchors,thetop tetheranchorsymbolisonthe cover.
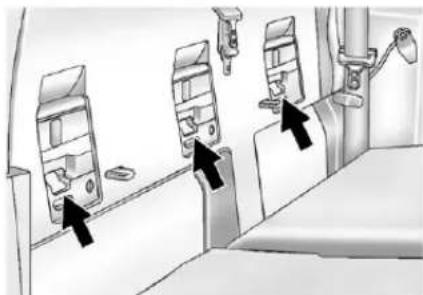
natural_image
Illustration of three wall-mounted devices with arrows pointing to their positions (no text or symbols present)CrewCab
Thetoptetheranchorsinacrew cabmodelareonthebackwall behindeachrearseatingposition.
Besuretouseananchoronthe samesideofthevehicleasthe seatingpositionwherethechild restraintwillbeplaced.
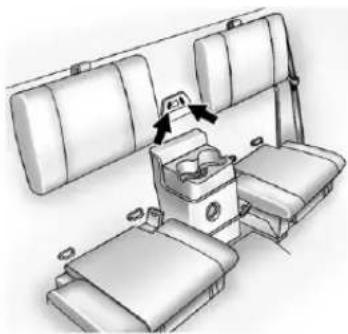
natural_image
Diagram of a vehicle seat assembly with two rear seats and a central seat, showing no text or symbols.ExtendedCab—RearSeat
Thetoptetheranchorsinan extendedcabmodelareonthe centerofthebackwallbehinda removablecoverfortherearseating positions. Besuretouseananchor nearesttotheseatingposition wherethechildrestraintwillbe placed.
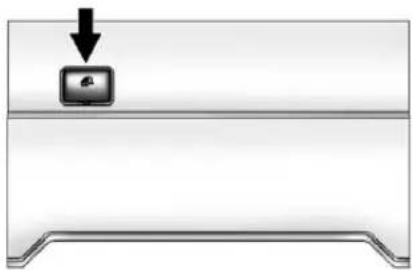
natural_image
Simple diagram showing a monitor icon with an arrow pointing downward, placed on a flat surface (no text or symbols)RegularandExtendedCab withoutRearSeats(FrontBucket Seats)
Forregularandextendedcab modelswithoutrearseatsthathave frontbucketseats,thereisatop tetheranchorbehindaremovable coveronthebackwallbehindthe rightfrontpassengerseat.Youmay havetopulltheseatbackforwardto accesstheanchor.
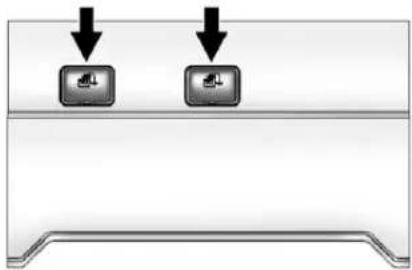
natural_image
Diagram showing two identical square buttons with downward arrows above a horizontal line, no text or symbols present.RegularandExtendedCab withoutRearSeats(Front BenchSeat)
Forregularandextendedcab modelswithoutrearseatsthathave afrontbenchseat,therearetop tetheranchorsbehindremovable coversonthebackwallbehindthe rightfrontpassengerseatandthe centerfrontpassengerseat.The seatbackmayhavetobepulled forwardtoaccesstheanchors.
Donotsecureachildrestraintina positionwithoutatoptetheranchor ifanationalorlocallawrequires thatthetoptetherbeattached,orif theinstructionsthatcomewiththe childrestraintsaythatthetoptether mustbeattached.
According to accident statistics, children and infants are safer when properly restrained in a child restraintsystemor infant restraint system secured in a rearseating position. See Where to Put the Restrainton page 3-41 for additional information.
SecuringaChildRestraint DesignedfortheLATCH System

WARNING
IfaLATCH-typechildrestraintis notattachedtoanchors,thechild restraintwillnotbeabletoprotect thechildcorrectly.Inacrash,the childcouldbeseriouslyinjuredor killed.InstallaLATCH-typechild restraintproperlyusingthe anchors,orusethevehiclesafety beltstosecuretherestraint,followingtheinstructionsthat camewiththechildrestraintand theinstructionsinthismanual.

WARNING
Donotattachmorethanonechild restrainttoasingleanchor. Attachingmorethanonechild restrainttoasingleanchorcould causetheanchororattachment tocomelooseorevenbreak duringacrash.Achildorothers couldbeinjured.Toreducethe riskofseriousorfatalinjuries duringacrash,attachonlyone childrestraintperanchor.
WARNING
Childrencanbeseriouslyinjured orstrangledifashoulderbeltis wrappedaroundtheirneckand thesafetybeltcontinuesto tighten.Buckleanyunusedsafety beltsbehindthechildrestraintso childrencannotreachthem.Pull theshoulderbeltallthewayout oftheretractortosetthelock, ifthevehiclehasone,afterthe childrestrainthasbeeninstalled.
Notice: DonotlettheLATCH attachmentsrubagainstthe vehicle'ssafetybelts. This may damage these parts. If necessary, move buckledsafetybeltsto avoid rubbing the LATCH attachments.
Donotfoldtheemptyrearseat withasafetybeltbuckled. This coulddamagethesafetybeltor theseat. Unbuckleandreturnthe safetybelttoitsstowedposition, beforefoldingtheseat.
CrewCab—RearSeat
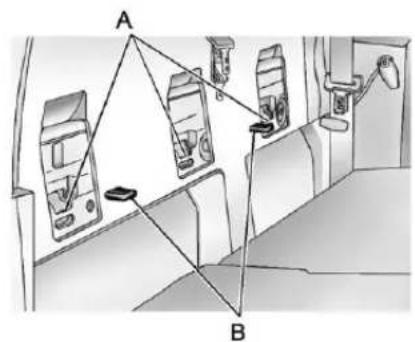
text_image
Diagram showing car safety monitoring setup with labeled components A and B, including vehicle detection and surveillance equipment.-
Putthechildrestraint on theseat.
-
If the child restraint manufacturer's instructions recommend that the toptether be attached, attach the top tether to the toptether anchor (A). Referto the child restraint instructions and the following steps:
2.1.Pulltheseatbackforwardto accessthetoptether anchors(A).SeeRear
Seats(CrewCab)on page3-8orRearSeats (ExtendedCab)on page3-8.
2.2.Routethetoptether accordingtoyourchild restraintinstructions and the followinginstructions:
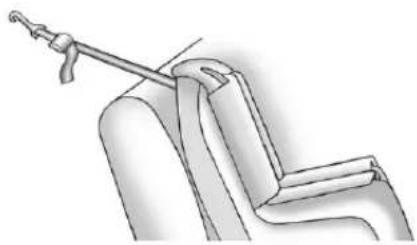
natural_image
Diagram of a mechanical clamp or bracket assembly (no text or symbols visible)If the child restraint has a singlet ether, routethe tether over these at back.
3-50SeatsandRestraints
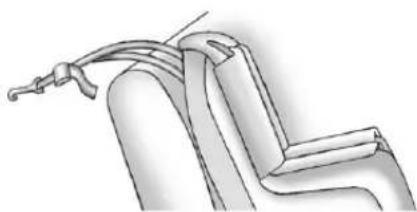
natural_image
Technical line drawing of a mechanical component or assembly (no text or symbols)If the child restraint has a dual tether, routethetether overtheseatback.
2.3. Attachthetoptethertothe anchor(A). Makesurethat you secure the toptetherto the toptetheranchor and nottotheseatback latch(B).
2.4. Pushrearwardonthe seatbackuntilillocksinto itsuprightposition.Push andpullontheseatbackto makesureitissecured properly.
- Attachandtightenthelower attachmentstothelower anchors. If the child restraint does nothavelower attachmentsorthedesired seating positiondoes nothave lower anchors, secure the child restraint with the toptether and the safety belts. Refertoyour child restraint manufacturer instructions and the instructions in this manual.
3.1. Find the lower anchors for the desired seating position.
3.2. Attachandtightenthelower attachmentsonthechild restrainttothelower anchors.
-
Tightenthetoptether.
-
Beforeplacingachildinthe childrestraint, makesureitis securelyheldinplace. To check, graspthechildrestraintatthe LATCHpathandattemptto moveitsidetosideandback andforth. Thereshouldbeno morethan2.5cm(1in)of movementforproperinstallation.
ExtendedCab—RearSeat
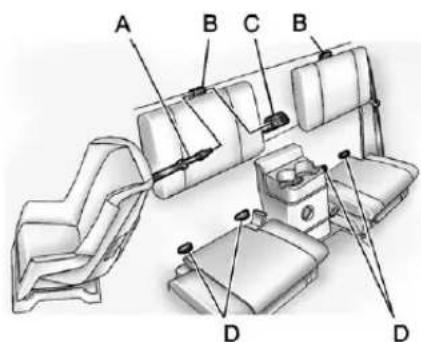
text_image
A B C B D D- Attachandtightenthelower attachmentstothelower anchors. If thechildrestraint does nothavelower attachmentsorthedesired seatingpositiondoesnothave loweranchors, secure thechild restraint with thetoptether and thesafetybelts. Refertoyour childrestraintmanufacturer instructions and theinstructions in this manual.
1.1. Findtheloweranchors(D) forthedesiredseating position.
1.2. Put the child restraint on theseat.
1.3. Attachthelower attachmentsonthechild restrainttothelower anchors(D)inthevehicle. Thechildrestraint instructionswillshow youhow.
- If the child restraint manufacturer recommends that the toptether be attached, attach and tighten the toptethertothetoptether anchor(C). Referto the child restraint instructions and the following steps:
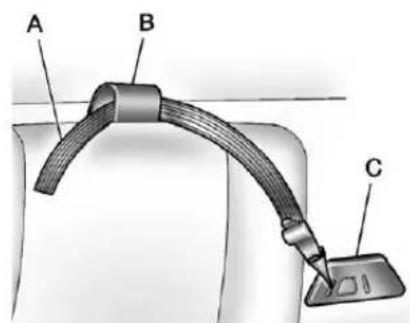
text_image
A B C2.1. Pullonthefingeraccess tabtoremovethecoverto accessthetoptether anchors(C).
3-52SeatsandRestraints
2.2.Routethetoptether(A) throughtheloop(B)atthe topoftheseatbackto attachthetoptethertothe nearesttoptether anchor(C).
- Tightentheloweranchor attachmentsandthetoptether. Thechildrestraintinstructions willshowyouhow.
- Beforeplacingachildinthe childrestraint, makesureitis securelyheldinplace. To check, graspthechildrestraint at the LATCHpath and attempt to move its sidetoside and back and forth. Thereshouldbeno more than 2.5cm(1in) of movement for proper installation.
RightFrontSeat—Regular/ExtendedCabwithoutRear Seats
The vehicle has a right front passenger air bag and may also have passengers sensing system. If the vehicle has a passenger sensing system is designed to turn off the right front passenger frontal air bag when an infantina rear-facing infant seator as small childina forward-facing child restraintor booster seatisdetected. See "Securing Child Restraints (Right Front Seat Position)" later in this section and Passenger Sensing System on page 3-27 for important safety information and additional information on installing a child restraint in the right front seat position.
-
See "SecuringChildRestraints (RightFrontSeatPosition)" later in this section for instruction on installing the child restraint using the safety belts.
-
If the child restraint manufacturer's instructions recommend that the toptether be attached, attach and tighten the toptethertothetoptether anchor. Referto the child restraint instructions and the following steps:
2.1. Pulltheseatbackforwardto accesssthetoptether anchor. See Seatback Latchesonpage3-6.
2.2. Pullonthefingeraccess tabtoremovethecoverto accessthetoptether anchor.
2.3.Routethetoptether according to your child restraint instructions and the following instructions:

natural_image
Line drawing of a seated car seat with a handle and seatbelt (no text or symbols)If the position you are using has a fixed head restor head restraint and you are using a single tether, route the ether over the head rest or head restraint.
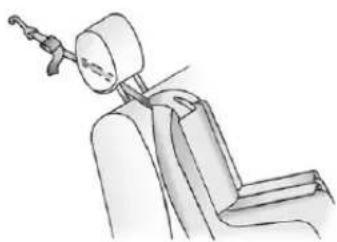
natural_image
Line drawing of a seated human arm with a headpin and wrist strap (no text or symbols)If the position you are using has an adjustable headrest or head restraint and you are using a single tether, raise the head restor head restraint and routethe tether under the head restor head restraint and between the head restor head restraint posts.
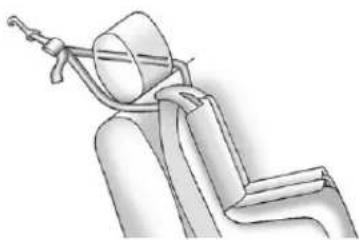
natural_image
Line drawing of a seated car seat with a handle and seatbelt (no text or symbols)If the position you are using has a fixed or adjustable head restor head restraint and you are using adual tether, routethetether around the head restor head restraint.
-
Attachandtightenthetoptether according to your child restraint instructions.
-
Beforeplacingachildinthe childrestraint, makesureitis securelyheldinplace. To check, graspthechildrestraintatthe LATCHpathandattemptto moveitsidetosideandback andforth. Thereshouldbeno morethan2.5cm(1in)of movementforproperinstallation.
CenterFrontSeat—Regular/ExtendedCabwithoutRear Seats
Forvehicleswithoutrearseats, manufacturersarerequired to providetoptetheranchorsforall non-driverseatingpositions and instructionsforusingthoseanchors. Evenifatoptetheranchoris available,youshouldnotinstalla childrestraintinthecenterfront seatposition.SeeWheretoPutthe Restraintonpage3-41forimportant safetyinformationandadditional informationoninstallingachild restraintinthecenterfrontseat position.See"SecuringChild Restraints(CenterFrontSeat Position)"laterinthissectionfor instructionsoninstallingthechild restraintusingthesafetybeltsand toptetheranchor.
ReplacingLATCHSystem PartsAfteraCrash

WARNING
AcrashcandamagetheLATCH systeminthevehicle.Adamaged LATCHsystemmaynotproperly securethechildrestraint, resultinginseriousinjuryoreven deathinacrash.Tohelpmake suretheLATCHsystemis workingproperlyafteracrash, seeyourdealertohavethe systeminspectedandany necessaryreplacementsmadeas soonaspossible.
If the vehicle has the LATCH system and it was being used during a crash, new LATCH system parts may be needed.
Newpartsandrepairsmaybe necessaryeveniftheLATCH systemwasnotbeingusedatthe timeofthecrash.
SecuringChildRestraints (RearSeatPosition)
Whensecuringachildrestraintina rearseatingposition,studythe instructionsthatcamewithyour childrestrainttomakesureitis compatiblewiththisvehicle.
IfyourchildrestrainthastheLATCH system,seeLowerAnchorsand TethersforChildren(LATCH System)onpage3-43forhowto installyourchildrestraintusing LATCH.Ifyousecureachild restraintusingasafetybeltandit usesatoptether,seeLower AnchorsandTethersforChildren (LATCHSystem)onpage3-43for toptetheranchorlocations.
Donotsecureachildrestraintina positionwithoutatoptetheranchor ifanationalorlocallawrequires thatthetoptetherbeanchored,orif theinstructionsthatcomewiththe childrestraintsaythatthetopstrap mustbeanchored.
InCanada, the law requires that forward-facing child restraint have adopted, and that the tether be attached.
If your child restraint does not have the LATCH system, you will be using the safety belt to secure the child restraint in this position. Besure to follow the instructions that camewith the child restraint. Secure the child in the child restraint when and asthe instruction say.
If you need to install more than one child restraint in there are seat, be suretoread Where to Put the Restrainton page 3-41.
- Putthechildrestraint on theseat.
- Pickup the latch plate, and run the lap and shoulder portions of the vehicle's safety belt through or around therestraint. The child restraint instructions will show you how.

natural_image
Illustration of a person's seatbelt being adjusted for a car (no text or symbols visible)- Pushthelatchplate into the buckle until it clicks.
Makesurethereleasebuttonis positionedsoyouwouldbeable tounbucklethesafetybelt quicklyifnecessary.
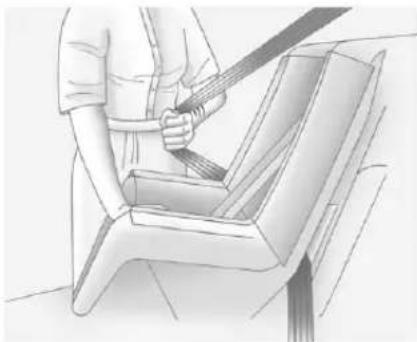
natural_image
Line drawing of a person using a belt to lift a seatbelt (no text or symbols)-
Pulltheshoulderbeltalltheway outoftheretractortosetthe lock. Whentheretractorlockis set, thebeltcanbetightenedbut notpulledoutoftheretractor.
-
If your child restraint has atop tether, attach the toptetherto the toptether anchor. See Lower Anchors and Tethers for Children (LATCHSystem) on page 3-43.

natural_image
Illustration of a hand using a tool to lift or lift a mechanical component (no text or symbols visible)- Totightenthebelt, pushdown onthechildrestraint, pullthe shoulderportionofthebelt to tightenthalapportionofthebelt, andfeedtheshoulderbeltback intotheretractor. Wheninstalling aforward-facingchildrestraint, it maybehelpfultouseyourknee topushdownonthechild restraintasyoutightenthebelt.
Trytopullthebeltoutofthe retractortomakesurethe retractorislocked.Ifthe retractorisnotlocked,repeat Steps4and6.
-
Tightenthetoptether. See LowerAnchorsandTethersfor Children(LATCHSystem) on page 3-43.
-
Before placing a child in the child restraint, makes sure it is securely held in place. To check, grasp the child restraint at the safety belpath and attempt to move its side-to-side and back-and-forth. When the child restraint is properly installed, there should be more than 2.5cm (1in) of movement.
Toremovethechildrestraint, unbucklethevehicle'ssafetybelt andletitgobackalltheway. If the toptetherisattachedtoatoptether anchor, disconnectit.
SecuringChildRestraints (CenterFrontSeat Position)
Forvehicleswithoutrearseats, manufacturersarerequiredto providetoptetheranchorsforall non-driverseatingpositionsand instructionsforusingthoseanchors. Evenifatoptetheranchoris available,youshouldnotinstalla childrestraintinthecenterfront seatingposition.
WARNING
Achildinachildrestraintinthe centerfrontseatcanbebadly injuredorkilledbythefrontal airbagsiftheyinflate.Never secureachildrestraintinthe centerfrontseat.Itisalways bettertosecureachildrestraintin arearseat.
Inaddition, some larger child restraints, if installed in the center front seating position, may interfere with access to the driver and right front passengers safety belt buckles. See Safety Beltson page 3-11 for information, including warnings, about the importance of safety belt use.
If the vehicle does not have rear seats, rear-facing child restraints should not be installed in the vehicle, even if the passenger air bag is off.
Ifachildinaforward-facingchild restraintmustbetransportedina vehiclethatdoesnothaverear seats,thechildrestraintshouldbe securedintherightfrontseat position.See"SecuringChild Restraints(RightFrontSeat Position)"laterinthissection,for instructionsonhowtoinstallachild restraintintherightfrontseat position.
Donotsecureachildseatina positionwithoutatoptetheranchor ifanationalorlocallawrequires thatthetoptetherbeanchored.
InCanada, the law requires that forward-facing child restraint have to optether, and that the tether be attached.
3-58SeatsandRestraints
Thelapbeltwouldbeusedto secureachildrestraintinthis position,followingtheinstructions thatcamewiththechildrestraint.
- Adjustthedriverseattothe desiredposition. Foldthe armrestup, ifequipped.
- Movethepassengerseatsothat theseatandseatbackare alignedwiththedriverseatand seatbackpositions.SeeSeat Adjustmentpage3-3or PowerSeatAdjustmenton page3-3andReclining Seatbacksonpage3-4formore information.
- Makethecenterpositionlapbelt aslongaspossiblebytiltingthe latchplateandpullingitalong thebelt.
-
Placethechildrestraint on theseat.
-
If the child restraint manufacturer recommends using to optether anchor, attach the toptether on the child restraint to the top tether anchor on the vehicle. Routethetoptether according to the child restraint instructions and the following instructions:
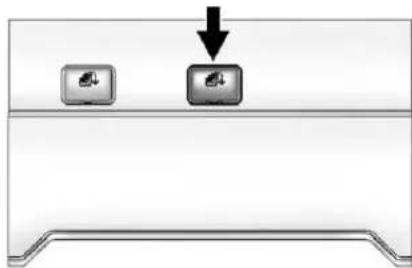
natural_image
Simple diagram showing two computer monitors above a base, with a downward arrow pointing to the monitor (no text or symbols present)5.1.Pullonthefingeraccess tabtoremovethecoverto accesssthetoptether anchor.
5.2.Routethetoptetherover thecenterseatbackor foldingarmrest,ifequipped.
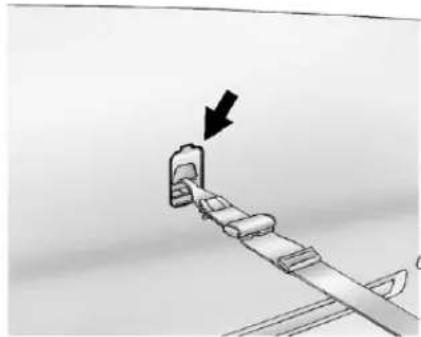
natural_image
Diagram showing a car being lifted by an elevator, with an arrow indicating the direction (no text or symbols present)5.3. Attachthetoptethertothe slotsinthebackpanelas shown. Donottightenthetoptether atthistime.
-
Pickup the latch plate on the center position lapsafety belt, and run the lapsafety belt through therestraint. The child restraint instructions will show you how.
-
Pushthelatchplate into the buckle until it clicks. Position the release button on the buckleso that the safety belt can be unbuckled.
- Tightenthecenterpositionlap beltbypullingonthelooseend ofthebelt.Itmaybehelpfulto useyourkneetopushdownon thechildrestraintasyoutighten thebelt.
-
Tightenthetoptether. Follow the childrestraint manufacturer's instructions.
-
Beforeplacingachildinthe childrestraint,makesureitis securelyheldinplace.To check,graspthechildrestraint atthesafetybeltpathand attempttomoveitsidetoside andbackandforth.Whenthe childrestraintisproperly installed,thereshouldbeno morethan2.5cm(1in)of movement.
Toremovethechildrestraint, unbucklethevehiclesafetybelt. Ifthetoptetherisattachedtothe toptetheranchor, disconnectitand reinstallthetoptetheranchorcover.
SecuringChildRestraints (RightFrontSeat Position)
Thisvehiclehasairbags. Arear seatisasaferplacetosecurea forward-facingchildrestraint. See Where to Put the Restrainton page 3-41.
Inaddition, the vehicle may have a passengersensingsystem which is designed to turn off the right front passenger's frontal air bag under certain conditions. See Passenger Sensing System on page 3-27 and Passenger Airbag Status Indicator on page 5-11 form more information on this, including important safety information.
3-60SeatsandRestraints
Alabelonthesunvisorsays, "Neverputarear-facingchildseatin thefront." Thisisbecausetheriskto therear-facingchildissogreat, iftheairbagdeploys.

WARNING
Achildinarear-facingchild restraintcanbeseriouslyinjured orkillediftherightfront passengerairbaginflates. This is because the back of the rear-facing child restraint would be very closetotheinflating airbag. Achildinaforward-facing child restraint can beseriously injured or killed iftherightfront passengerairbaginflates and the passenger seat in a forward position.
The vehicle may have a passengersensingsystem which is designed to turn off the right front passenger frontal airbag under certain conditions.
(Continued)
WARNING(Continued)
Evenifthepassengersensing system,ifequipped,hasturned offtherightfrontpassenger frontalairbag,nosystemis fail-safe.Noonecanguarantee thatanairbagwillnotdeploy undersomeunusual circumstance,eventhough itisturnedoff.
Securerear-facingchildrestraints inarearseat, even if the airbagisoff. If you secure a forward-facing child restraint in therightfrontseat, always move thefrontpassenger seat as far backasitwill go. It is better to secure the child restraint in rearseat.
See Passenger Sensing System on page 3-27 for additional information.
If the vehicle does not have a rear seat that will accommodate a rear-facing child restraint, a child restraint should not be installed in your vehicle, even if the airbag is off.
If your child restraint has the LATCH system, see Lower Anchors and Tethers for Children (LATCH System) on page 3-43 for how and where to install your child restraint using LATCH. If a child restraint is secured using safety belt and it uses at optether, see Lower Anchors and Tethers for Children (LATCH System) on page 3-43 for toptether anchor locations.
Donotsecureachildseatina positionwithoutatoptetheranchor ifanationalorlocallawrequires thatthetoptetherbeanchored,orif theinstructionsthatcomewiththe childrestraintsaythatthetopstrap mustbeanchored.
InCanada, the law requires that forward-facing child restraints have adopted, and that the tether be attached.
Youwillbeusingthelap-shoulder belttosecurethechildrestraintin thisposition.Followtheinstructions thatcamewiththechildrestraint.
- Movetheseatasfarbackasit willgobeforesecuringthe forward-facingchildrestraint.
- Putthechildrestraint on theseat.
- Pickup the latch plate, and run the lap and shoulder portions of the vehicle's safety belt through or around therestraint. The child restraint instructions will show you how.

natural_image
Illustration of a person's hand using a belt switch to lift a car seatbelt (no text or symbols present)- Pushthelatchplate into the buckle until it clicks.
Positionthereleasebuttonon thebucklesothatthesafetybelt couldbequicklyunbuckled ifnecessary.
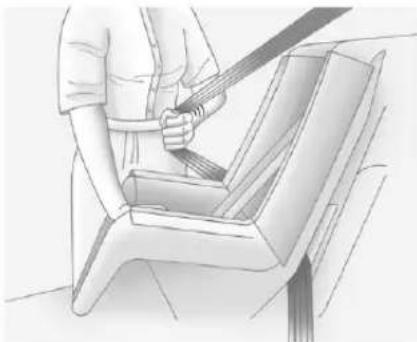
natural_image
Line drawing of a person using a seatbelt to lift a car seat (no text or symbols)- Pulltheshoulderbeltalltheway outoftheretractortosetthe lock. Whentheretractorlockis set, thebeltcanbetightenedbut notpulledoutoftheretractor.
- If the vehicle does not have a reseat and the child restraint manufacturer recommends using atoptether anchor, attach the toptethertothetoptether anchor. Refertothe instructions that camewith the child restraint and to Lower Anchors and Tethers for Children (LATCH System) on page 3-43.
3-62SeatsandRestraints
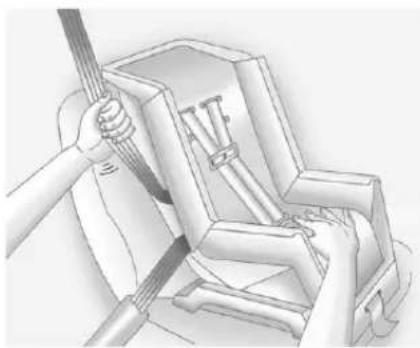
natural_image
Technical illustration of a mechanical assembly with a tool interacting with a component (no text or symbols visible)- Totightenthebelt, pushdown onthechildrestraint, pullthe shoulderportionofthebelt to tightenthelapportionofthebelt, andfeedtheshoulderbeltback intotheretractor. Wheninstalling aforward-facingchildrestraint, it maybehelpfultouseyourknee topushdownonthechild restraintasyoutightenthebelt.
Trytopullthebeltoutofthe retractortomakesurethe retractorislocked.Ifthe retractorisnotlocked,repeat Steps5and7.
- Tightenthetoptether. See LowerAnchorsandTethersfor Children(LATCHSystem) on page3-43.
- Beforeplacingachildinthe childrestraint, makesureitis securelyheldinplace. To check, graspthechildrestraintatthe safetybeltpathandattemptto moveitsidetosideandback andforth. Whenthechild restraintisproperlyinstalled, thereshouldbenomorethan 2.5cm(1in)ofmovement.
Ifthevehicleisequippedwiththe passengersensingsystem,and whenthepassengersensingsystem hasturnedofftherightfront passengerfrontalairbag,theoff indicatoronthepassengerairbag statusindicatorshouldlightandstay litwhenyoustartthevehicle.See PassengerAirbagStatusIndicator onpage5-11.
Ifachildrestrainhasbeeninstalled andonindicatorislit,see"IftheOn IndicatorisLitforaChildRestraint" underPassengerSensingSystem onpage3-27formoreinformation.
Toremovethechildrestraint, unbucklethevehiclesafetybeltand letitreturntothestowedposition.
Storage
StorageCompartments
GloveBox......4-1
Cupholders......4-1
RearStorage......4-2
CenterConsoleStorage.....4-2
Storage Compartments
GloveBox
Liftuponthegloveboxleverto openit.
Cupholders
This vehicle may have twocupholders located on the lower part of the front doors as well as twocupholders located at the front end of the console. Vehicles with bench seats may have cup holders attached to the front of the center seat.
Forvehiclesthatareanextended caborcrewcabmodel,thevehicle alsohastworearcupholders.On crewcabmodels,thecupholders arelocatedatthefrontendofthe rearcenterseatcushion.The cupholdercanberemovedfor cleaningbypassingthetabbelow thecupholderandslidingthe cupholderforward.
Onextendedcabmodels, therear seatcupholdersarelocatedontop oftherearcenterconsole.
Vehicleswithashtrayswilluseone ofthecupholders.
4-2Storage
RearStorage
Extendedcabmodelsmighthave storagecompartmentsunderthe rearseats.
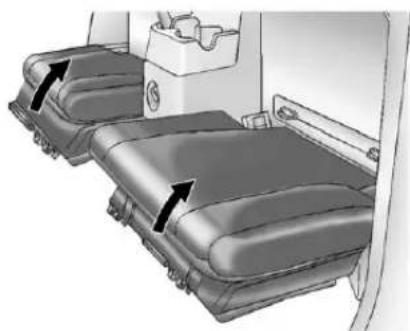
natural_image
Interior view of a vehicle showing two car seats with directional arrows indicating movement or positioning (no text or symbols present)Toaccessthestorage compartments, liftthecushionon thebottomoftherearseats. This exposesthestorageboxesunder theseat.
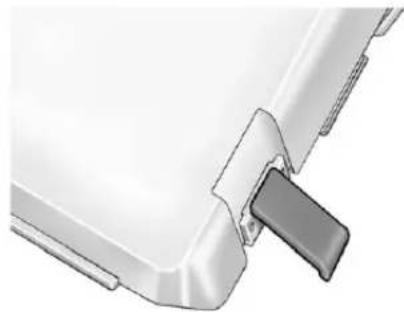
natural_image
Close-up of a white plastic mechanical component with a gray clip attached (no text or symbols visible)Toopenastoragebox, unhook the bottomandliftthelatchesoneach sideofthestoragebox.
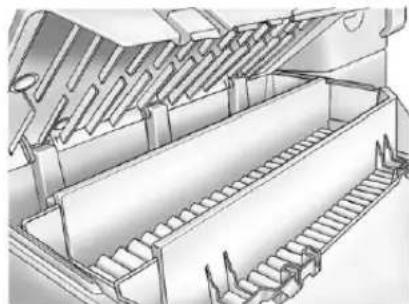
natural_image
Technical line drawing of a mechanical assembly with conveyor belts and internal components (no text or symbols)Liftthelidfromthecenterareato accessthestoragebox.
CenterConsoleStorage
Forvehicleswithbenchseats,there maybeacenterarmreststorage area.Liftupontheuppertab locatedatthefrontofthearmrestto releasethelatchtoopen.
Forvehicleswithbucketseatsor uplevelpackages,thevehiclemay haveatwo-tieredcenterarmrest storagearea.Liftupontheupperor lowertabatthefrontofthearmrest toopentheupperorlower storagearea.
Instruments and Controls
Controls
SteeringWheelAdjustment...5-2
Horn....5-2
WindshieldWiper/Washer.....5-2
Compass....5-3
Clock....5-4
PowerOutlets......5-5
CigaretteLighter....5-5
Ashtrays....5-6
WarningLights, Gauges, and Indicators
WarningLights, Gauges, and
Indicators......5-6
ChimeLevelAdjustment.....5-6
InstrumentCluster......5-7
Speedometer....5-8
Odometer....5-8
TripOdometer....5-8
Tachometer....5-8
FuelGauge....5-8
EngineCoolantTemperature Gauge....5-9
SafetyBeltReminders......5-9
AirbagReadinessLight.....5-10
PassengerAirbagStatus Indicator....5-11
ChargingSystemLight.....5-12
Malfunction IndicatorLamp......5-13
BrakeSystemWarning Light....5-15
AntilockBrakeSystem(ABS) WarningLight....5-16
StabiliTrak® OFFLight......5-17
TractionControlSystem (TCS)/StabiliTrak® Light....5-17
TirePressureLight......5-18
EngineOilPressureLight....5-18
SecurityLight......5-19
High-BeamOnLight......5-19
CruiseControlLight......5-19
InformationDisplays
DriverInformation
Center(DIC)......5-20
VehicleMessages
VehicleMessages......5-23
BatteryVoltageandCharging Messages....5-23
BrakeSystemMessages....5-23
DoorAjarMessages......5-24
EngineCoolingSystem Messages....5-24
EngineOilMessages......5-24
EnginePowerMessages....5-25
FuelSystemMessages.....5-25 LampMessages.....5-25
RideControlSystem Messages......5-26
ServiceVehicleMessages...5-26
TireMessages......5-27
TransmissionMessages.....5-27
5-2 InstrumentsandControls
Controls
SteeringWheel Adjustment
natural_image
Illustration of a computer mouse with ventilation slots, surrounded by floating coins (no text or symbols)Thesteeringwheeladjustmentlever islocatedontheleftsideofthe steeringwheel.
Toadjust:
- Hold thesteeringwheelandpull thelevertowardyou.
- Movethesteeringwheelup ordown.
- Releasethelevertolockthe wheelinplace.
Donotadjustthesteeringwheel whiledriving.
Horn
Tosoundthehorn, pressthehorn symbolonthesteeringwheelpad.
WindshieldWiper/Washer
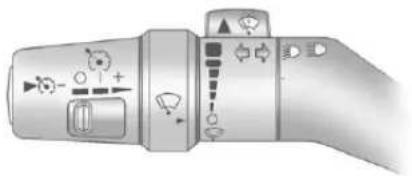
natural_image
Diagram of a camera control panel with adjustment knobs and directional arrows (no text or symbols)Thewindshieldwipercontrolsare locatedontheturnsignal/lane changelever. They are controlled by turningthebandwiththis symbol.
Thewindshieldwipersworkinall ignitionpositions,exceptLOCK/OFF.ThisincludestheRetained AccessPowermode.SeeRetained AccessoryPower(RAP)on page9-31.
Movethebandtooneofthe followingpositions:

(Mist):Forasinglewipe,move
thebandto 🚙 andthenreleaseit. Forseveralwipes, holdthebandon longer.

(AdjustableIntervalWipes):
Foradjustableintervalwipes,turn thebandupformorefrequentwipes ordownforlessfrequentwipes.

(LowSpeed):Forslow
wipes, turnthebandtothefirstsolid positionpastthedelaysettings.

(HighSpeed): Forfastwipes, thebandtothesecondsolid sitionpastthedelaysettings.

(Off):Usetoturnthewipersoff.
Clearsnowandicefromthewiper bladesbeforeusingthem.Iffrozen tothewindshield,carefullyloosenor thawthem.Damagedwiperblades shouldbereplaced.
WindshieldWasher

WARNING
Infreezingweather, donotuse the washer until the windshield is warmed. Otherwise the washer fluid can form mice on the windshield, blocking your vision.

(WasherFluid):Pushthe paddleontopofthemultifunction levertospraywasherfluidonthe windshield. Thewiperswillclearthe windowandtheneitherstopor returntoyourpresetspeed.
Compass
CompassOperation
Press ⚠Fordependingonthe mirror, press ⏻ oncetoturnthe displayonoroff.
CompassCalibration
Thecompassmayneed calibrationif:
• CALisdisplayedwhiledrivingin thevehicle.
- Afterapproximatelyfiveseconds, thedisplaydoesnotshowa compassheading,NforNorth,forexample,theremaybea strongmagneticfieldinterfering withthecompass.Interference canbecausedbyamagnetic antennamount,magneticnote padholder,orasimilar magneticitem.
- Thecompassdoesnotdisplay thecorrectheadingandthe compasszonevarianceisset correctly.
Tocalibrate, CALmustbedisplayed inthemirrorcompasswindows. If CALisnotdisplayed, pressand hold Ⓐ F / ⏻ for several seconds or until CALisdisplayed.
The compass can be calibrated by driving the vehicle circles at 8 km/h (5 mph) or less until the display reads direction.
CompassVariance
Themirrorissettozoneeight. If you donotliveinzoneeightor drive out of the area, the compass varianceneedstobe changed to the appropriate zone.
Toadjustforcompassvariance:
- Find the current location and variance zonenumber on the following zonemap.
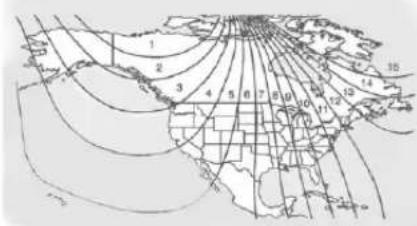
text_image
Map showing numbered regions and latitude/longitude lines across the North America and South America, with labeled points 1–15.-
Press and hold ⏻/ ⏻ until Z and/orazonenumberdisplays.
-
Press ⚙️ / ⏻ repeatedly until thenewzonumberdisplays. Afteryoustoppressingthe button,thedisplayshowsa compassdirectionwithina fewseconds.
Clock
AM-FMRadio
PressandholdHRuntilthecorrect hourdisplays.PressandholdMN untilthecorrectminutedisplays.Thereisaninitialtwo-seconddelay beforetheclockgoesintotime-set mode.Todisplaythetimewiththe ignitionoff,pressRCL,HR,orMN.
RadiowithCD(MP3/WMA)
PressandholdtheHRbuttonuntil thecorrecthourdisplays.Pressand holdtheMNbuttonuntilthecorrect minutedisplays.Thetimecanbe setwiththeignitiononoroff.
Tosynchronizethetimewithan FMstationbroadcastingRadioData System(RDS)information,press andholdtheHRandMNbuttonsat thesametimeuntilRDSTIME displays.Toacceptthistime,press andholdtheHRandMNbuttons,at thesametime,foranother twoseconds.Ifthetimeisnot availablefromthestation,NO UPDAT(update)displays.
RDStimeisbroadcastoncea minute. After tuning to an RDS broadcast station, it could take a few minutes for the time to update.
PowerOutlets
Theaccessorypoweroutletscanbe usedtopluginelectricalequipment, suchasacellphoneorMP3player.
The vehicle may have an accessory power outlet located below the climate control system, and on the rear of the center console. Remove the cover to access and replace when not in use.
WARNING
Powerisalwayssuppliedtothe outlets.Donotleaveelectrical equipmentpluggedinwhenthe vehicleisnotinusebecausethe vehiclecouldcatchfireandcause injuryordeath.
Notice:Leavingelectrical equipmentpluggedinforan extendedperiodoftimewhilethe vehicleisoffwilldrainthe battery.Alwaysunplugelectrical equipmentwhennotinuseand donotpluginequipmentthat exceedsthemaximum20ampere rating.
Certain electrical accessories may not be compatible with the accessory power outlet and could overload vehicle and adapter fuses. If a problem is experienced, see your dealer.
When adding electricalequipment, besuretofollowtheproper installationinstructionsincludedwith theequipment.SeeAdd-On ElectricalEquipmentonpage9-67.
Notice: Hangingheavy equipment from the power outlet can caused damage not covered by the vehicle warranty. The power outlets are designed for accessory power plug only, such as cell phone charge cords.
CigaretteLighter
Tousethelighter, pressitinallthe way, andletgo. Whenitisready, it willpopbackoutbyitself.
Notice: Holding acigarettelighter inwhileitisheating does not let the lighterbackaway from the heating element when it is hot. Damage from overheating can occur to the lighter or heating element, or a fuse could be blown. Donotholdacigarette lighter in whileitisheating.
Ashtrays
The vehicle may have are removable ashtray and cigarette lighter.
Theashtrayislocatedinthecenter consolearea. Theashtraycanbe removedforcleaning. Whenthe ashtrayisremoved, thisareacan alsobeusedasacupholder.
Notice: If papers, pins, or other flammable items are put in the ashtray, hot cigarettes or other smoking materials could ignite them and possibly damage the vehicle. Never put flammable items in the ashtray.
WarningLights, Gauges,and Indicators
Warninglightsandgaugescan signalthatsomethingiswrong beforeitbecomesseriousenough tocauseanexpensiverepairor replacement.Payingattentiontothe warninglightsandgaugescould preventinjury.
Warninglightscomeonwhenthere couldbeaproblemwithvehicle function. Somewarninglightscome onbrieflywhentheengineisstarted toindicatetheyareworking.
Gaugescanindicatewhenthere couldbeaproblemwithvehicle function.Oftengaugesandwarning lightsworktogethertoindicatea problemwiththevehicle.
Whenoneofthewarninglights comesonandstaysonwhile driving,orwhenoneofthegauges showstheremaybeaproblem, checkthesectionthatexplainswhat
todo.Followthismanual'sadvice. Waitingtodorepairscanbecostly andevendangerous.
ChimeLevelAdjustment
Theradioisusedtoadjustthe vehicle'schimelevel. Tochangethe volumelevelofthechime, press andholdpushbutton6withthe ignitiononandtheradiopoweroff. Thevolumelevelwillchangefrom thenormalleveltoloud,andLOUD willappearontheradiodisplay. To changebacktothedefaultor normalsetting,pressandhold pushbutton6again. Thevolume levelwillchangefromtheloudlevel tonormal,andNORMALwillappear ontheradiodisplay.Eachtimethe chimevolumeischanged,three chimeswillsoundtoindicatethe newvolumeselected.Removingthe radioandnotreplacingitwitha factoryradioorchimemodulewill disablevehiclechimes.
InstrumentCluster
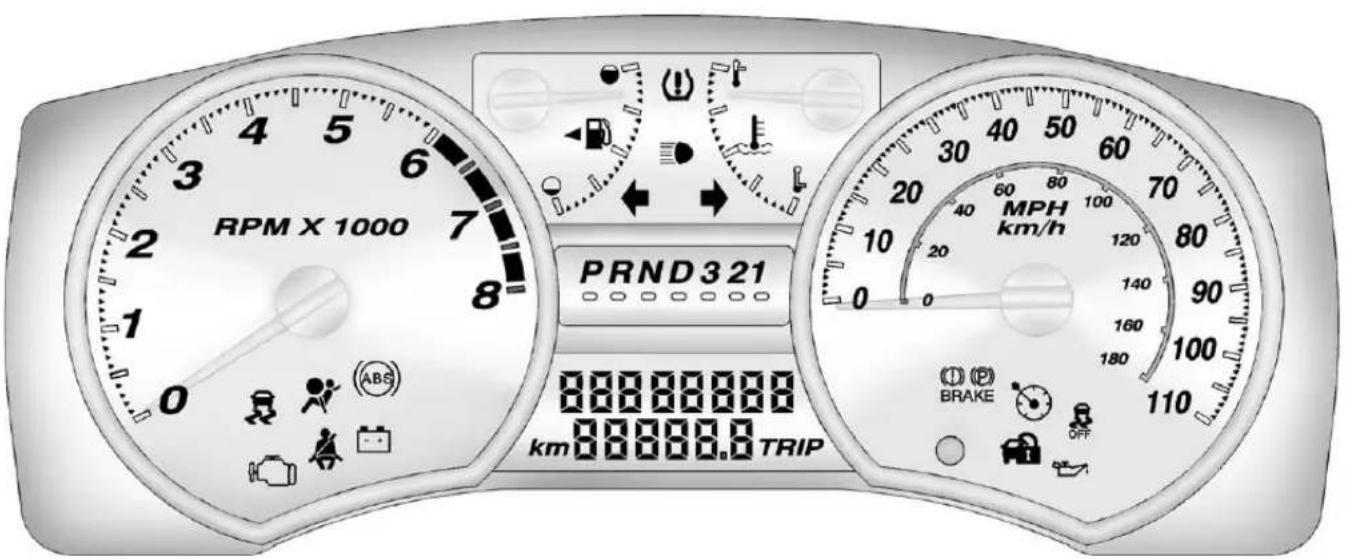
text_image
RPM X 1000 PRND321 0 ABS km 888888888 TRIP MPH km/h 100 120 80 140 90 160 180 100 110 BRAKEEnglishAutomaticTransmission2.9LShown,Metric,ManualTransmission,3.7Land5.3LSimilar
Speedometer
Thespeedometershowsthe vehicle'sspeedineitherkilometers perhour(km/h)ormilesper hour(mph).
Odometer
Theodometershowshowfarthe vehiclehasbeendriven,ineither miles(usedintheUnitedStates)or kilometers(usedinCanada).
Theodometermileagecanbe checkedwithoutthevehiclerunning bypassingthetripinformation stem.See "Odometer" underDriver InformationCenter(DIC) on page5-20formoreinformation.
If the cluster is replaced then new on will automatically detect and update the vehicle's accumulated mileage.
TripOdometer
Thevehiclehasatripodometerthat indicateshowfarthevehiclehas beendrivensincethetripodometer waslastsettozero.
See "TripOdometer" under Driver Information Center(DIC) on page 5-20 form more information.
Tachometer
Thetachometerdisplaytheengine speedinrevolutionsper minute(rpm).
Notice: If the engine is operated with the tachometer in the shaded warning area, the vehicle could be damaged, and the damages would not be covered by the vehicle warranty. Donot operate the engine with the tachometer in the shaded warning area.
FuelGauge
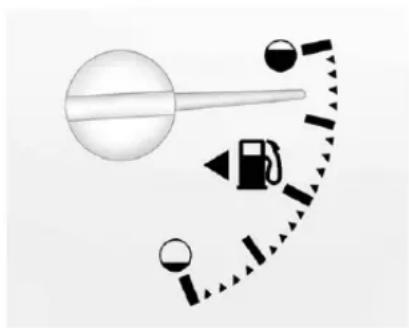
natural_image
Diagram showing a fuel pump connected to a rotating wheel, with no text or symbols present.Whentheignitionison, the fuel gaugeshowshowmuchfuelthe vehiclehasremaininginthe fueltank.
Anarrowonthefuelgauge indicatesthesideofthevehiclethe fueldoorison.
Herearefourthingsthatsome ownersaskabout.Noneofthese indicateaproblemwiththevehicle's fuelgauge:
- Atthegasstation, the gas pump shut so off before the gauge reads full.
- Ittakesalittlemoreorlessfuel tofillupthanthegauge indicated. Forexample, the gaugemayhaveindicatedthe tankwashalffull, butitactually tookalittlemoreorlessthan halfthetank'scapacitytofill thetank.
- Thegaugemovesalittlewhile turningacornerorspeedingup.
- Thegaugedoesnotgobackto emptywhentheignitionis turnedoff.
Whenthefuelinthefueltankislow, aLOWFUELmessagewilldisplay ontheDriverInformation Center(DIC).SeeFuelSystem Messagesonpage5-25formore information.
EngineCoolant
TemperatureGauge
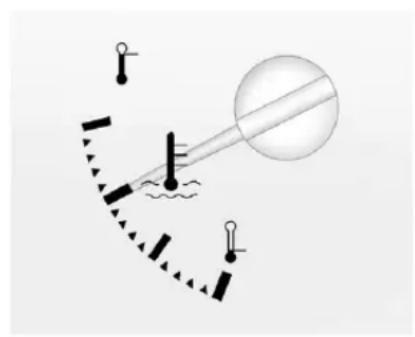
natural_image
Diagram of a scientific instrument with a spherical object and two vertical sensors, no text or symbols presentThisgaugeshowstheengine coolanttemperature.
Ifthegaugepointerisnearthetop ofthegauge,theengineistoohot. Itmeansthattheenginecoolanthas overheated.Ifthevehiclehasbeen operatingundernormaldriving conditions,pullthevehicleoffthe road,stopthevehicleandturnoff theengineassoonaspossible.
SeeEngineOverheatingon page10-23formoreinformation.
SafetyBeltReminders
DriverSafetyBeltReminder Light
Whentheengineisstarted, achime soundsforseveralsecondsto remindadrivertofastenthesafety belt, unlessthedriversafetybeltis alreadybuckled.

Thesafetybeltlightcomesonand staysonforseveralseconds,then flashesforseveralmore.
Thischimeandlightarerepeatedif thedriverremainsunbuckledand thevehicleisinmotion.Ifthedriver safetybeltisalreadybuckled, neitherthechimenorthelight comeson.
PassengerSafetyBelt ReminderLight
Forvehiclesequippedwiththe passengersafetybeltreminderlight, severalsecondsaftertheengineis started,achimesoundsfor severalsecondstoremindthefront passengertobuckletheirsafety belt.Thepassengersafetybeltlight, locatedontheinstrumentpanel, comesonandstaysonfor severalsecondsandthenflashes forseveralmore.
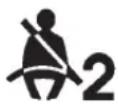
Thischimeandlightarerepeatedif thepassengerremainsunbuckled andthevehicleisinmotion.
If the passengers safety belt is buckled, neither the chimen or the light comes on.
Thefrontpassengersafetybelt warninglightandchimemayturnon ifanobjectisputontheseatsuch asabriefcase,handbag,grocery bag,laptoporotherelectronic device.Toturnoffthewarninglight and/orchime,removetheobject fromtheseatorbucklethe safetybelt.
AirbagReadinessLight
Thesystemcheckstheairbag's electricalsystemforpossible malfunctions. Ifthelightstaysonit indicatesthereisanelectrical problem. Thesystemcheckincludes theairbagsensor(s), passenger sensing system, thepretensioners, theairbagmodules, thewiring, and thecrashsensinganddiagnostic module. Formoreinformationonthe airbagsystem, seeAirbagSystem onpage3-20.

Theairbagreadinesslightflashes forafewsecondswhentheengine isstarted. Ifthelightdoesnotcome onthen, haveitfixedimmediately.
WARNING
If the airbagreadinesslightstays on after the vehicle is started or comes on while driving, it means the air bagsystem might not be working properly. The airbags in the vehicle might not inflate a crash, or they could even inflate without a crash. To help avoid injury, have the vehicles serviced right away.
If there is a problem with the airbag system, an airbag Driver Information Center (DIC) message can also come on. See Vehicle Messages on page 5-23 form more information.
PassengerAirbagStatus Indicator
If the vehicle has one of the passenger air bag status indicators pictured in the following illustrations, then the vehicle has a passenger sensing system for the right front passenger position. The passenger air bag status indicator is on the instrument panel. See Passenger Sensing System page 3-27 for important safety information.
Inaddition, if the vehicle has a passengersensingsystem for the right front passenger position, the label on the vehicle's sunvisors refer to "ADVANCED AIRBAGS".
PASSENGER AIR BAG

UnitedStates
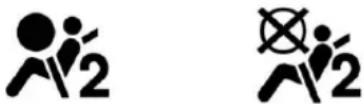
CanadaandMexico
Whenthevehicleisstarted, the passengerairbagstatusindicator willlightONandOFF, orthesymbol foronandoff, forseveralseconds asasystemcheck. Then, after severalmoreseconds, thestatus indicatorwilllighteitherONorOFF, oreithertheonoroffsymboltolet youknowthestatusoftherightfront passengerfrontalairbag.
5-12 InstrumentsandControls
IfthewordONortheonsymbolis litonthepassengerairbagstatus indicator, itmeansthattheright frontpassengerfrontalairbagis enabled (mayinflate).
IfthewordOFFortheoffsymbolis litontheairbagstatusindicator, it meansthatthepassengersensing systemhasturnedofftherightfront passengerfrontalairbag.
If,afterseveralseconds,bothstatus indicatorlightsremainon,orifthere arenolightsatall,theremaybea problemwiththelightsorthe passengersensingsystem.See yourdealerforservice.
WARNING
If the airbagreadiness light ever comes on and stay on, it means that something may be wrong with the air bags system. To help avoid injury to yourself for others, have the vehicles serviced right away. See Airbag Readiness Lighton page 5-10 form more information, including important safety information.
ChargingSystemLight
Thislightcomesonbrieflywhenthe ignitionkeyisturnedtoSTART,but theengineisnotrunning,asa checktoshowitisworking.
Ifitdoesnot,havethevehicle servicedbyyourdealer.
Thelightshouldgooutoncethe enginestarts.lfitstayson, orcomesonwhiledriving,there couldbeaproblemwiththe chargingsystem.Achargingsystem messageintheDriverInformation Center(DIC)canalsoappear.See BatteryVoltageandCharging Messagesonpage5-23formore information.Thislightcouldindicate thatthereareproblemswitha generatordrivebelt,orthatthereis anelectricalproblem.Haveit checkedrightaway.Ifthevehicle mustbedrivenashortdistancewith thelighton,turnoffaccessories, suchastheradioandair conditioner.
Malfunction IndicatorLamp
AcomputersystemcalledOBDII (On-BoardDiagnostics-Second Generation)monitorstheoperation ofthevehicletoensureemissions areatacceptablelevels,toproduce acleanerenvironment. Thislight comesonwhenthevehicleis placedinON/RUN,asacheckto showitisworking.Ifitdoesnot, havethevehicleservicedbyyour dealer.SeeIgnitionPositionson page9-26formoreinformation.
Ifthemalfunctionindicatorlamp comesonandstaysonwhilethe engineisrunning,thisindicatesthat thereisanOBDIIproblemand serviceisrequired.
Malfunctionsoftenareindicated by thesystembeforeanyproblemis apparent. Beingawareofthelight canpreventmoreseriousdamage tothevehicle. Thissystemassists theservicetechnicianincorrectly diagnosinganymalfunction.
Notice: If the vehicle is continually driven with this light on, the emission control might not work as well, the vehicle fuel economy might not be as good, and the engine might not run as smoothly. This could lead to costly repair that might not be covered by the vehicle warranty.
Notice: Modificationsmadetothe engine, transmission, exhaust, intake, orfuelsystemofthe vehicleorthereplacementofthe originaltireswithotherthan thoseofthesameTire PerformanceCriteria(TPC)can affectthevehicle'semission controlsandcancausethislight tocomeon.Modificationsto thesesystemscouldleadto costlyrepairsnotcoveredbythe
vehiclewarranty. This could also result in a failure to pass a required Emission Inspection/ Maintenance Test. See Accessories and Modifications on page 10-4.
Thislightcomesonduringa malfunctioninoneoftwoways:
LightFlashing: Amisfirecondition has been detected. Amisfire increases vehicle emissions and could damage the emission control system on the vehicle. Diagnosis and servicemight berequired.
Topreventmoreseriousdamageto thevehicle:
- Reducevehiclespeed.
- Avoidhardaccelerations.
- Avoidsteepuphillgrades.
- Iftowingatrailer, reduce the amount of cargobeing hauled as soon as it is possible.
5-14 InstrumentsandControls
Ifthelightcontinuestoflash,stop andparkthevehicle.Turnthe vehicleoff,waitatleast10seconds, andrestarttheengine.Ifthelightis stillflashing,followtheprevious stepsandseeyourdealerfor serviceassoonaspossible.
LightOnSteady: Anemission controlsystemmalfunctionhas beendetectedonthevehicle. Diagnosisandservicemightbe required.
The following maycorrectan emissionsystemmalfunction:
- Checkthatthefuelcapisfully installed.SeeFillingtheTankon page9-55.Thediagnostic systemcandetermineifthefuel caphasbeenleftoffor improperlyinstalled.Alooseor missingfuelcapallowsfuelto evaporateintotheatmosphere. Afewdrivingtripswiththecap properlyinstalledshouldturnthe lightoff.
- Checkthatgoodqualityfuelis used.Poorfuelqualitycauses theenginenottorunas efficientlyasdesignedandmay causestallingafterstart-up, stallingwhenthevehicleis changedintogear,misfiring, hesitationonacceleration, orstumblingonacceleration. Theseconditionsmightgoaway oncetheengineiswarmedup.
Ifoneormoreoftheseconditions occurs,changethefuelbrandused. Itwillrequireatleastonestfulltankof theproperfueltoturnthelightoff.
SeeRecommendedFuelon page9-53.
Ifnoneoftheabovehavemadethe lightturnoff,yourdealercancheck thevehicle.Thedealerhashe propertestequipmentand diagnostictoolstofixany mechanicalorelectricalproblems thatmighthavedeveloped.
EmissionsInspection and Maintenance Programs
Somelocalgovernmentsmayhave programstoinspecttheon-vehicle emissioncontrolequipment. For the inspection, the emissionsystemtest equipment is connected to the vehicle's DataLink Connector(DLC).
natural_image
Diagram of a 24-pin connector with slots and connectors (no text or labels)The DLC is under the instrument panel to the left of the steering wheel. See your dealer if assistance is needed.
The vehicle may not pass inspection if:
- Themalfunctionindicatorlampis onwiththeengineerunning,orif thelightdoesnotcomeonwhen theignitionisturnedtoON/RUN whiletheengineisoff.Seeyour dealerforassistanceinverifying properoperationofthe malfunctionindicatorlamp.
- TheOBDII(On-Board Diagnostics)systemdetermines that critical emission control systemshavenotbeen completely diagnosed. The vehicle would be considered not ready for inspection. This can happen if the 12-volt battery has recently been replaced or run down. The diagnostics system is designed to evaluate critical emission control systems during normal driving. This can take several day so froutinedriving.
If this has been done and the vehicle still does not pass the inspection for lack of OBDII system readiness, your dealer can prepare the vehicle for inspection.
BrakeSystemWarning Light
The vehicle brakesystem consists of two hydraulics circuits. If one circuit is not working, there are remaining circuit can still work to stop the vehicle. Fornormal braking performance, both circuits need to be working
If the warning light comes on, there could be a brake problem. Have the brakesystem inspected right away.

EnglishMetric
Thislightcomesonbrieflywhenthe ignitionkeyisturnedtoON/RUN. Ifitdoesnot,haveitfixedsoitwill bereadytowarnifthereisa problem.
Whentheignitionison,thebrake systemwarninglightcomeson whentheparkingbrakeisset.See ParkingBrakeonpage9-45for moreinformation.Thelightstayson iftheparkingbrakedoesnot releasefully.Ifitstaysonafterthe parkingbrakeisfullyreleased,it meansthereisabrakeproblem.
Ifthelightcomesonwhiledriving, pullofftheroadandstop. Thebrake pedalmightbehardertopush, orit mightgoclosertothefloor. Itcan takelongertostop. Ifthelightisstill on, havethevehicletowed for service. See Towingthe Vehicleon page 10-91.

WARNING
Thebrakesystemmightnotbe workingproperlyifthebrake systemwarninglightison. Drivingwiththebrakesystem warninglightoncanleadtoa crash.Ifthelightisstillonafter thevehiclehasbeenpulledoff theroadandcarefullystopped, havethevehicletowedfor service.
AntilockBrakeSystem (ABS)WarningLight
TheAntilockBrakeSystem(ABS) lightcomesonbrieflywhenthe engineisstarted.
Ifthelightdoesnotcomeon,haveit fixedsoitwillbereadytowarnif thereisaproblem.
IftheABSlightstayson,turnthe ignitionoff.Ifthelightcomeson whiledriving,stopassoonasitis safelypossibleandturntheignition off.Achimemayalsosoundwhen thelightcomesonsteady.Then starttheengineagaintoresetthe system.IftheABSlightstayson, orcomesonagainwhiledriving,the vehicleneedsservice.Iftheregular brakesystemwarninglightisnot on,thevehiclestillhasbrakes,but notantilockbrakes.Iftheregular brakesystemwarninglightisalso on,thevehicledoesnothave antilockbrakesandthereisa problemwiththeregularbrakes. SeeBrakeSystemWarningLighton page5-15.
SeeDriverInformationCenter(DIC) onpage5-20forallbrakerelated DICmessages.
StabiliTrak® OFFLight

Thislightcomesonbrieflywhile startingtheengine.lfitdoesnot, havethevehicleservicedbyyour dealer.
Thislightcomesonwhenthe StabiliTraksystemisturnedoff. IfStabiliTrakisoff,theTraction ControlSystem(TCS)isalsooff.
IftheTCSisoff, thesystemdoes not assist in controlling the vehicle. TurnontheTCSandtheStabiliTrak systems and the warning light turnsoff.
See TractionControlSystem(TCS) onpage9-47 and StabiliTrak ^® Systemonpage9-48 formore information.
TractionControlSystem (TCS)/StabiliTrak® Light
TheStabiliTrakandTractionControl System(TCS)indicator/warninglight comesonbrieflywhilestartingthe engine.
If it does not, havethe vehicle serviced by your dealer. If the system is working normally the indicator light thengoes off.
Thelightflasheswhilethe StabiliTraksystemandTCSare workingtoassistthedriverwith directionalcontrolofthevehiclein difficultdrivingconditions.
IftheStabiliTraksystemandTCS lightcomesonandstaysonwhile drivingandaTRACTIONFAULTor SERVICESTABSYSmessage displaysontheDIC,thevehicle needsservice.
SeeStabiliTrak® Systemon page9-48, TractionControlSystem (TCS) on page 9-47 and Ride ControlSystemMessages on page 5-26 form more information.
TirePressureLight

ForvehicleswiththeTirePressure MonitorSystem(TPMS), thislight comesonbrieflywhentheengineis started. Itprovidesinformation abouttirepressuresandtheTPMS.
WhentheLightIsOnSteady
This indicates that one or more of the tires are significantly underinflated.
ADriverInformationCenter(DIC) tirepressuremessagemayalso display.See VehicleMessageson page 5-23 formoreinformation. Stopassoonaspossible, and inflate the tire to the pressure value shown on the Tire and Loading Information label. See Tire Pressure on page 10-54 formoreinformation.
WhentheLightFlashesFirstand ThenIsOnSteady
If the light flashes for about a minute and then stay on, there may be a problem with the TPMS. If the problem is not corrected, the light will come on at every ignition cycle. See Tire Pressure Monitor Operation on page 10-57 form more information.
EngineOilPressureLight
WARNING
Donotkeepdrivingiftheoil pressureislow.Theenginecan becomesohotthatitcatchesfire. Someonecouldbeburned.Check theoilassoonaspossibleand havethevehicleserviced.
Notice:Lackofproperengineoil maintenancecandamagethe engine.Drivingwiththeengine oilowcanalsodamagethe engine.Therepairswouldnotbe coveredbythevehiclewarranty. Checktheoillevelassoonas possible.Addoilifrequired,but iftheoilleveliswithinthe operatingrangeandtheoil pressureisstillow,havethe vehicleserviced.Alwaysfollow themaintenanceschedulefor changingengineoil.
Thislightcomesonbrieflywhile startingtheengine.Ifitdoesnot, havethevehicleservicedbyyour dealer.Ifthesystemisworking normally,theindicatorlightthen goesoff.
Ifthelightcomesonandstayson, it meansthatoilisnotflowingthrough theengineproperly. Thevehicle couldbelowonoilanditmight havesomeothersystemproblem.
SecurityLight
Forinformationregardingthislight andthevehicle'ssecuritysystem, seeAnti-theftAlarmSystemon page2-10.
High-BeamOnLight

Thislightcomesonwhenthe high-beamheadlampsareinuse.
SeeHeadlampHigh/Low-Beam Changeronpage6-2formore information.
CruiseControlLight
Thecruisecontrollightcomeson whenever the cruise control lisset.
Thelightgoesoutwhenthecruise controlisturnedoff.See Cruise Controlonpage9-50formore information.
InformationDisplays
DriverInformation Center(DIC)
TheDriverInformationCenter(DIC) displaysinformationsuchasthetrip odometer,personalizationfeatures, andwarningmessages.TheDIC displayislocatedontheinstrument panelcluster.
OperationandDisplays
TheDriverInformationCenter(DIC) comesonwhentheignitionison.
Ifaproblemisdetected,awarning messageappearsonthedisplay. Pressingandreleasingthetrip odometerresetstemontheDIC acknowledgedgesomecurrent warningsorservicemessages. Somemessagesonlyclearafterthe requiredactionhasbeentaken.
The DIChasdifferentmenuitems which can be accessed by pressing the tripodometer reset stemon the DIC. This include strip information,
suchastheodometerandtrip odometer,engineoillifereset,and personalizationfeaturesthatare explainedinthefollowing information.TheDICtripodometer resetstemislocatedonthe instrumentpanelclusternexttothe DICdisplay.
Triplnformation
Odometer
Theodometerisautomatically displayedontheDICwhenyoustart thevehicle. Theodometershows thetotaldistancethevehiclehas beendrivenineithermilesforthe UnitedStatesorkilometersfor Canada.
TripOdometer
Pressandreleasetheresetstem untilTRIPappearsontheDIC display. Thetripodometers shows thecurrentdistancetraveled since thelastresetofthetripodometerin eithermilesfortheUnitedStatesor kilometersforCanada.
Toresetthetripodometer, press and hold theresetstem until the display return to zero.
EngineOilLifeSystem
Withtheengineoff,turnthekeyto ON/RUNandthenpressthereset stemuntilOILLIFERRESET appears—alternatingbetweenOIL LIFEandRESET—ontheDIC display.TheCHANGEOILmessage alertsyoutochangetheoilona scheduleconsistentwithyour drivingconditions.Alwaysresetthe OILLIFEmessageafteranoil change.Toresetthemessage,see EngineOilLifeSystemon page10-12.
Inadditiontotheengineoillife systemmonitoringtheoillife, additionalmaintenanceis recommendedintheMaintenance Scheduleinthismanual.See EngineOilonpage 10-10and MaintenanceScheduleon page 11-3formoreinformation.
PersonalizationFeatures
Language
Thisfeatureallowsyoutochoose thelanguageinwhichtheDIC displayshowsinformation.
Tosetyourchoiceforthisfeature:
- With the engine off, turn the key to ON/RUN, but donot start the engine.
- ClosealldoorssotheDOORS messagedoesnotdisplayin theDIC.
- Momentarilypressandrelease theresetstemuntilthecurrent languageisdisplayed:English (default), Spanish, or French.
- Toselectadifferentlanguage, pressandholdtheresetstem untilthenextlanguageappears.
-
RepeatStep4untilthedesired languageisdisplayed. Once the desiredlanguageisshownon theDICdisplay, thelanguage isset.
-
Toexitthelanguageselection, momentarilypressandrelease theresetstem.AIIDIC messageswillnowdisplayinthelanguageselected.
AutomaticDoorLocks
Thisfeatureallowsyoutoprogram thedoorlockstoapreferredsetting.
Tosetyourchoiceforthisfeature:
- With the engine off, turn the key to LOCK/OFF. Donot remove the key from the ignition.
- Pressandholdthepowerdoor lockbuttonuntiltheDICdisplay showsthecurrentdoor lockmode.
-
Toviewthenextavailablemode, pressandholdtheresetstem untilthemodeappears. Release theresetstemandpressand holdagaintoviewthe nextmode.
-
Oncethedesiredmodeisshown ontheDICdisplay, brieflypress theresetstemtosetyour choice. TheDICdisplaythen clears.
The following are the available modes:
Lock1(default):Onvehicleswith anautomatictransmission,this modelocksallofthedoorswhen thevehicleisshiftedoutofP(Park) andunlocksallofthedoorswhen thevehicleisshiftedintoP(Park).
Onvehicleswithamanual transmission, thismodelocksallof thedoorswhenthevehiclespeedis greater than 24km/h (15mph) and unlocksallof thedoorswhenthe key is removed from the ignition.
5-22 InstrumentsandControls
Lock2: Onvehicles with an automatic transmission, this mode locksallofthedoor when the vehicle is shifted out of P (Park) and unlock sthedriver's door when the vehicle is shifted into P (Park).
Onvehicleswithamanual transmission, thismodelocksallof thedoorswhenthevehiclespeedis greaterthan24km/h(15mph)and unlocksthedriver'sdoorwhenthe keyisremovedfromtheignition.
Lock3: Onvehicles with an automatic transmission, this mode locks all of the doors when the vehicle is shifted out of Park. Thedors will not automatically unlock.
Onvehicleswithamanual transmission, thismodelocksallof thedoorswhenthevehiclespeedis greaterthan24km/h(15mph). The doorswillnotautomaticallyunlock.
RemoteKeylessEntry(RKE) Feedback
Thisfeatureallowsyoutoprogram theRemoteKeylessEntry(RKE) feedbacktoapreferredsetting.
Tosetyourchoiceforthisfeature:
-
With the engine off, turn the key to LOCK/OFF. Donot remove the key from the ignition.
-
Pressandholdthelockand unlockbuttonsontheRKE transmitteratthesametime. HoldbothbuttonsuntiltheDIC displayshowsthecurrentRKE feedbackmode.
-
Toviewthenextavailablemode, pressandholdtheresetstem untilthemodeappears. Release theresetstemandpressand holdagaintoviewthe nextmode.
-
Oncethedesiredmodeisshown ontheDICdisplay, briefly press theresetstemtosetyour choice. TheDICdisplaythen clears.
The following are the available modes:
RFA1(default): Thismodeflashes theparkinglampswhenyoupress thelockorunlockbuttonsonthe RKEtransmitter.
RFA2: This mode flashesthe parking lamps and soundsthe horn when you press the lock button on the RKE transmitter. This mode also flashesthe parking lamps when you press the unlock button on the RKE transmitter.
RFA3: This mode flashesthe parking lamps and soundsthe horn when you press the lock or unlock button on the RKE transmitter.
RFA4: ThismodedisablesRKE feedback. Therewillbenofeedback whenyoupressthelockorunlock buttonsontheRKEtransmitter.
VehicleMessages
MessagesaredisplayedontheDIC tonotifythedriverthatthestatusof thevehiclehaschangedandthat someactionmaybeneededbythe drivertocorrectthecondition. Multiplemessagesmayappearone afteranother. Themessagesare displayedforseveralsecondseach.
Somemessagesmaynotrequire immediateaction, butyoushould pressandreleasethetripodometer resetstemtoacknowledgethatyou receivedthemessagesandtoclear themfromthedisplay.Each messagemustbeacknowledged individually.
Somemessagescannotbecleared fromtheDICdisplaybecausethey aremoreurgent. These messages requireactionbeforetheycanbe cleared. You should take any message that appear on the display seriously and remember that clearing them messages only makes them messages disappear, not correct the problem.
The following are the possible message that can be displayed and some information about them.
BatteryVoltage and ChargingMessages
SERVICECHARG(Charge) SYS(System)
Thismessagedisplaysifthereisa problemwiththebatterycharging system.Undercertainconditions, thebatterywarninglightmayalso turnonintheinstrumentpanel cluster.SeeChargingSystemLight onpage5-12.Thebatterywillnot bechargingatanoptimalrateand thevehiclewilllosetheabilityto enterthefueleconomymode.The vehicleissafetodrive,however havetheelectricalsystemchecked byyourdealer.Pressandrelease theresetstemtoacknowledgethe messageandclearitfromthe display.
BrakeSystemMessages
ABS(AntilockBrakeSystem) FAULT
Thismessagedisplaysifthereisa problemwiththeAntilockBrake System(ABS).ChecktheABSas soonaspossibleandhaveyour vehicleservicedbyyourdealer.See Brakingonpage9-4andAntilock Brake System(ABS)WarningLight onpage5-16formoreinformation. Pressandreleasetheresetstemto acknowledgethemessageand clearitfromthedisplay.
BRAKES
Thismessagedisplaysifthereisa problemwiththebrakes.Checkthe brakesassoonaspossibleand haveyourvehicleservicedbyyour dealer.SeeBrakingonpage9-4 andAntilockBrakeSystem(ABS) WarningLightonpage5-16for moreinformation.Pressandrelease theresetstemtoacknowledgethe messageandclearitfromthe display.
FLUID
Thismessagedisplaysifthebrake fluidislow.Checkthebrakefluidas soonaspossibleandhaveyour vehicleservicedbyyourdealer.See Brakingonpage9-4formore information.Pressandreleasethe resetstemtoacknowledgethe messageandclearitfromthe display.
PARKBRK(Brake)
Thismessagedisplayswhenthe parkingbrakeisset.SeeParking Brakeonpage9-45andAntilock BrakeSystem(ABS)WarningLight onpage5-16formoreinformation. Themessageclearsfromthe displayaftertheparkingbrakeis releasedorbypassingand releasingtheresetstem.
DoorAjarMessages
DOORS
Thismessagedisplayswhenoneor moreofthedoorsisajar.Checkall thedoorsonyourvehicletomake suretheyareclosed.Themessage clearsfromthedisplayafterallof thedoorsareclosed.
EngineCoolingSystem Messages
AC(AirConditioning)OFF
Thismessagedisplayswhenthe enginecoolanttemperatureistoo highandtheairconditioninginyour vehicleneedstobeturnedoff.See EngineOverheatingonpage10-23 andClimateControlSystemson page8-1formoreinformation.This messagedisplaysalongwiththe ENGHOTmessage.
ENG(Engine)HOT
Thismessagedisplayswhenthe enginecoolanttemperatureishot. Checktheenginecoolant temperaturegauge.SeeEngine CoolantTemperatureGaugeon page5-9.Haveyourvehicle servicedbyyourdealerassoon aspossibleifyoususpectthe engineisoverheating.SeeEngine Overheatingonpage10-23formore information.
EngineOilMessages
CHANGEOIL
Thismessagedisplayswhentheoil needstobechanged.Checktheoil inyourvehicleassoonaspossible andhaveyourvehicleservicedby yourdealer.SeeEngineOilon page 10-10andMaintenance Scheduleonpage 11-3formore information.Pressandreleasethe resetstemtoacknowledgethe messageandclearitfromthe display.
OIL
Thismessagedisplayswhentheoil pressureislow.SeeEngineOil PressureLightonpage5-18and EngineOilonpage10-10formore information.
EnginePowerMessages REDUCEDPOWER
Thismessagedisplayswhenthe vehicle'senginepowerisreduced. Reducedenginepowercanaffect thevehicle'sabilitytoaccelerate. Ifthismessageison,butthere isnoreductioninperformance, proceedtoyourdestination.The performancemaybereducedthe nexttimethevehicleisdriven.The vehiclemaybedrivenatareduced speedwhilethismessageison,but accelerationandspeedmaybe reduced.Anytimethismessage stayson,thevehicleshouldbe takentoyourdealerforserviceas soonaspossible.Pressandrelease
theresetstemtoacknowledgethe messageandclearitfromthe display.
FuelSystemMessages FUELCAP
Thismessagedisplaysifthe vehicle'sfuelcapiseitheroffor loose.Pulloverassoonaspossible andchecktoseeifthefuelcapis secure.Youmayalsoseethecheck enginelightontheinstrumentpanel cluster.Ifthecheckenginelight doescomeonwhenthefuelcap wasloose,itmaytakeafewdriving tripsbeforethelightturnsoff.See MalfunctionIndicatorLampon page5-13formoreinformationifthe lightstillremainson.Pressand releasetheresetstemto acknowledgedethemessageand clearitfromthedisplay.
LOWFUEL
Thismessagedisplaysifthelevelof fuelinthevehicleislow.Alsocheck thefuelgauge.SeeFuelGaugeon page5-8formoreinformation.Refill thefueltankassoonaspossible.
LampMessages
TURNSIGNAL
Thismessagedisplayswhenthe turnsignalisonforabout1.2km (0.75miles)oftravel.Pressand releasetheresetstemto acknowledgedthemessageand clearitfromthedisplay.
RideControlSystem Messages
SERVICESTAB(Stability)SYS (System)
Thismessagedisplaysifthereisa problemwiththeStabiliTraksystem. Haveyourvehicleservicedbyyour dealer.SeeStabiliTrak® Systemon page9-48formoreinformation.
STAB(Stability)SYS (System)OFF
Thismessagedisplayswhenthe StabiliTraksystemisturnedoff.See StabiliTrak® Systemonpage9-48 formoreinformation.
TRAC(Traction)OFF
Thismessagedisplayswhenthe TractionControlSystem(TCS)is turnedoffbypassingthe StabiliTrakbutton.SeeStabiliTrak® Systemonpage9-48formore information.
TRAC(Traction)ON
Thismessagedisplayswhenthe TractionControlSystem(TCS)is turnedonwhenitwaspreviouslyoff duringthesameignitioncycle.
TRAC(Traction)LOW
Thismessagedisplayswhenthe TractionControlSystem(TCS)is active.
TRACTIONFAULT
Thismessagewilldisplayifthereis aproblemwiththeTCS.Haveyour vehicleservicedbyyourdealer.See StabiliTrak® Systemonpage9-48 formoreinformation.Pressand releasetheresetstemto acknowledgedethemessageand clearitfromthedisplay.
ServiceVehicleMessages
SERV(Service)VEH(Vehicle)
Thismessagedisplaysifyour vehicleneedsservice.Haveyour vehicleservicedbyyourdealeras soonaspossible.
TireMessages
LOWTIRE
Thismessagedisplaysifalowtire pressureisdetectedinanyofthe vehicle'stires.Pressandrelease theresetstemtoacknowledgethe messageandclearitfromthe display. Themessageappearsat eachignitioncycleuntilthetiresare inflatedtothecorrectinflation pressure.See Tiresonpage 10-47 and TirePressureonpage 10-54for moreinformationontiresandthe correctinflationpressures.
SERV(Service)TPM(Tire PressureMonitor)
Thismessagedisplaysifaparton theTirePressureMonitorSystem (TPMS)isnotworkingproperly.The tirepressurelightalsoflashesand thenremainsonduringthesame ignitioncycle.See TirePressure Lightonpage5-18.Several conditionsmaycausethismessage toappear.See TirePressure MonitorOperationonpage 10-57for moreinformation.Ifthewarning comesonandstayson,theremay beaproblemwiththeTPMS.See yourdealer.
TransmissionMessages
SERV(Service)4WD (Four-WheelDrive)
Thismessagedisplayswhenthere isaproblemwiththetransfercase controlsystem.Checkthetransfer caseonyourvehicleandhaveit servicedbyyourdealer.See Four-WheelDriveonpage9-40for moreinformationaboutthetransfer case.Pressandreleasethereset stemtoacknowledgethemessage andclearitfromthedisplay.
5-28 InstrumentsandControls
NOTES
Lighting
ExteriorLighting
ExteriorLampControls......6-1
ExteriorLampsOff
Reminder......6-2
HeadlampHigh/Low-Beam
Changer......6-2
Flash-to-Pass......6-2
DaytimeRunning
Lamps(DRL)......6-3
AutomaticHeadlamp
System......6-3
HazardWarningFlashers.....6-4
TurnandLane-Change
Signals......6-4
FogLamps....6-5
ExteriorCargoLamps......6-5
InteriorLighting
InstrumentPanelIllumination
Control......6-6
DomeLamps......6-6
LightingFeatures
ExitLighting......6-7
BatteryLoadManagement....6-7
BatteryPowerProtection.....6-7
ExteriorLighting
ExteriorLampControls
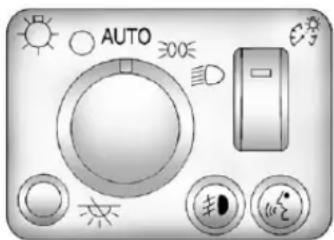
text_image
AUTO 300ΩThe exterior lamp control is located on the instrument panel on the left side of the steering wheel.
(ExteriorLamps): Turnthe knob, located to other right of this symbol, to choose one of the four exterior lamppositions.
(Off): Turnsoffallexteriorlamps includingtheDaytimeRunning Lamps(DRL).
AUTO: Turnstheheadlampson automaticallyatnormalbrightness, togetherwiththefollowing:
- SidemarkerLamps
- Taillamps
- ParkingLamps
• InstrumentPanelLights
SeeAutomaticHeadlampSystem onpage6-3formoreinformation.
00=(ParkingLamps):Turnsonthe parkinglamps,togetherwiththe following:
- SidemarkerLamps
- Taillamps
- LicensePlateLamps
- InstrumentPanelLights
(D(Headlamps):Turnsonthe headlamps,togetherwiththe previouslylistedlampsandlights.
ExteriorLampsOff Reminder
lfadoorisopen,areminderchime soundswhentheheadlampsor parkinglampsaremanuallyturned onandthekeyisoutoftheignition. Toturnoffthechime,turnthe headlampswitchtooffandthen backon.Intheautomaticmode,the headlampsturnoffoncetheignition isinLOCK/OFF.
ForvehiclesfirstsoldinCanada, iftheparkinglampsareturnedon manually,theDaytimeRunning Lamps(DRL)willstayon.
HeadlampHigh/Low-BeamChanger
ID ID HeadlampHigh/LowBeam Changer: Pushtheturnsignal/ multifunctionleverawayfromyouto turnthehighbeamson.
Pullthelevertowardsyoutoreturn tolowbeams.

This indicator light turnson in the instrument panel cluster when the high beam head lamps are on.
Flash-to-Pass
Thisfeatureletsyouusethe high-beamheadlampstosignala driverinfrontofyouthatyouwant topass.Itworksevenifthe headlampsareintheautomatic position.
DaytimeRunningLamps(DRL)can makeiteasierforotherstoseethe frontofyourvehicleduringtheday. Fullyfunctionaldaytimerunning lampsarerequiredonallvehicles firstsoldinCanada.
The DRL system will come on when the following conditions are met:
- Theignitionison.
• The exterior lamps controlis in AUTO.
• Thetransmissionisnotin P(Park)ifyouhavean automatictransmission. - Thelightsensordeterminesitis daytime.
WhentheDRLareon, only the parkinglampsorreducedintensity lowbeamheadlampswillbeon. Thetaillamps, sidemarkers, and otherlampswillnotbeon. The instrumentpanelwillnotbelitup either.
Whenitbeginstogetdark,the headlampswillautomaticallyswitch fromDRLtotheregularheadlamps.
Theregularheadlampsystem should be turned on when needed.
AutomaticHeadlamp System
Whenitisdarkenoughoutside,the automaticheadlampsystemwillturn onafterthetransmissionhasbeen shiftedfromP(Park)toD(Drive). Theheadlamps,taillamps, sidemarker,parkinglamps,roof markerlamps,andtheinstrument panellightsturnonatnormal brightness.Theradiolightswill becomedimmerwhenthe headlightsareoffcomparedtowhen theheadlightsareon.
Thevehiclehasalightsensor locatedonthetopoftheinstrument panel.Donotcoverthesensor, orthesystemwillbeonwhenever theignitionison.
Thesystemcanturnonthe headlampswhendrivingina parkinggarage,throughatunnelor whenthereisovercastweather. Thisisnormal.
Thereisadelayinthetransition between the daytime and nighttime operation of the Daytime Running Lamps (DRL) and the automatic headlampsystem so that driving under bridges or bright overhead streetlights does not affect the system. The DRL and automatic headlampsystem will only be affected when the lights sensor detects a change in lighting lasting longer than the delay.
6-4Lighting
Ifthevehicleisstartedinadark garage,theautomaticheadlamp systemwillcomeonimmediately. Oncethevehicleleavesthegarage, itwilltakeabout1minuteforthe automaticheadlampsystemto changetoDRLifitislightoutside. Duringthatdelay,theinstrument panelclustermaynotbeasbright asusual.Makesuretheinstrument panelbrightnesscontrolisinthefull brightposition.SeeInstrument PanelIlluminationControlon page6-6.
HazardWarningFlashers

text_image
Diagram of car air intake system showing fan, vent, and control knobs with directional arrow and labeled ports△(HazardWarningFlasher): Pressthisbuttonlocatedonthe instrumentpanel,tomakethefront andreaturnsignallampsflashon andoff.Thiswarnsothersthatyou arehavingtrouble.
Press △againtoturnthe flashersoff.
The turnsignalsdonotworkwhile thehazardwarningflashersareon.
TurnandLane-Change Signals
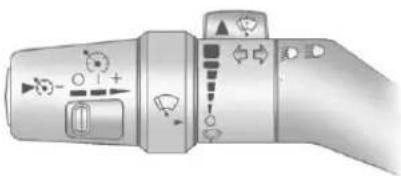
natural_image
Illustration of a rotary control panel with buttons and dials (no text or symbols)Movetheleverallthewayupor downtosignalaturn.
Raiseorlowertheleveruntilthe arrowstartstoflashtosignalalane change.Holditthereuntilthelane changeiscomplete.
Theleverreturnstoitsstarting positionwhenitisreleased.
Ifaftersignalingaturnoralane changethearrowsflashrapidlyor donotcomeon,asignalbulbmay beburnedout.
Replaceanyburnedoutbulbs.lfa bulbisnotburnedout,checkthe fuse.Forbulbreplacement,see Taillamps,TurnSignal,Stoplamps, andBack-UpLampsonpage10-37. Forablownfuseorcircuitbreaker, seeFusesandCircuitBreakerson page10-40.
TurnSignalOnChime
Ifaturnsignalisleftonformore than 1.2km(3/4ofamile),achime willsoundateachflashoftheturn signalandthemessageTURN SIGNALwillalsoappearintheDIC. Toturnthechimeandmessageoff, movetheturnsignallevertotheoff position.
See "TURNSIGNAL" under Lamp Messages on page 5-25 form more information.
FogLamps
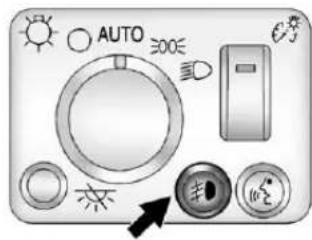
text_image
AUTO 300E +1 +2The foglampbuttonislocatednear the exterior lamps control.
D(Foglamps):Forvehicleswith foglamps,presstoturnthefog lampsonoroff.Anindicatorlight willturnoninthebuttonwhenthe foglampsareon.
Theparkinglampsorlow-beam headlampsmustbeonforthefog lampstowork. Thefoglampswillgo offwheneverthehigh-beam headlampscomeon. Whenthehigh beamsgooff, thefoglampscome onagain.
Somelocalitieshavelawsthat requiretheheadlampstobeon alongwiththefoglamps.
ExteriorCargoLamps
Thecargolamps(ifequipped)can beusedifmorelightisneededin thecargoareaofthevehicleorin thetop-boxstorageunits.
natural_image
Circular icon depicting a truck with motion lines, no text or symbols presentThisbuttonislocatedonthedriver sideoftheinstrumentpanelnear theexteriorlampcontrol.
Presstoturnthecargolampson andoff.
Thedomelampsmustbeonforthe cargolampstocomeon.SeeDome Lampsonpage6-6.
If the vehicle is equipped with Bluetooth ^® , turning the instrument panel illumination control thumbwheel all the way up will turn on the cargolamps.
InteriorLighting
InstrumentPanel IlluminationControl
InstrumentPanelLights): Turnthethumbwheelupordownto brightenordimtheinstrumentpanel lightsandtheradiodisplay. The instrumentpanellights, cluster, and radiodisplaydonotdimtocomplete darkness. Turningthethumbwheel allthewayupwillturnonthedome lampsandmayalsoturnonthe cargolamp, ifthevehicleis equippedwithBluetooth.
The instrument panellight brightness control will only work if the headlamps or parking lamps are on. See Exterior Lamp Controlson page 6-1.
DomeLamps
Thedomelampscomeonwhenany doorisopened.
Tomanuallyturnonthedome lamps, turnthethumbwheel, located nexttotheexteriorlampscontrol, all thewayup. Thecargolampsmay comeon, ifthevehicleisequipped withBluetooth. In thisposition, the lampsremainonwhetheradooris openedorclosed.
ReadingLamps
Pressthelensonthelampstoturn eachreadinglamponoroff.
Theselampswillnotcomeonwith thedomelamps.
DomeLampOverride
Thedomelampoverridebuttonis located below the exterior lamps control.
※(DomeLampOverride):Press thisbuttonintomakethedome lampsremainoffwhenthedoors areopen.Toreturnthelampsto automaticoperation,press ※again andreturnittotheoutposition.
LightingFeatures
ExitLighting
The interior lampswillcomeon when the key is removed from the ignition. The lampswill not come on if the dome override button is pressed in.
BatteryLoad Management
The vehicle has Electric Power Management (EPM) that estimates the battery's temperature and state of charge. It then adjusts the voltage for best performance and extended life of the battery.
Whenthebattery'sstateofcharge islow,thevoltageisraisedslightly toquicklybringthechargebackup. Whenthestateofchargeishigh, thevoltageisloweredslightlyto preventovercharging.Ifthevehicle hasavoltmetergaugeoravoltage displayontheDriverInformation Center(DIC),youmayseethe
voltagemoveupordown. This is normal. If there is a problem, an alert will be displayed.
The battery can be discharged at idle if the electrical loads are very high. This is true for all vehicles. This because the generator (alternator) may not be spinning fast enough that lidetoproduce all of the power needed for very high electrical loads.
Ahighelectricalloadoccurswhen severalofthefollowingareon,such as:headlamps,highbeams,fog lamps,rearwindowdefogger, climatecontrolfanathighspeed, heatedseats,enginecoolingfans, trailerloads,andloadspluggedinto accessorypoweroutlets.
EPMworkstopreventexcessive dischargeofthebattery.ltdoesthis bybalancingthegenerator'soutput andthevehicle'selectricalneeds. Itcanincreaseengineidlespeedto generatemorepowerwhenever
needed. Itcantemporarilyreduce the power demand sof some accessories.
Normally, these actions occur in steps or levels, without being noticeable. In rare cases at the highest level of corrective action, this action may be notice able to the driver. If so, a DIC messagemight be displayed, such as BATTERY SAVERACTIVE, BATTERY VOLTAGELOW, or LOWBATTERY. If one of these messages displays, it is recommended that the driver reduces the electrical loads as much as possible. See Driver Information Center (DIC) on page 5-20.
BatteryPowerProtection
Thisfeatureshutsoffthedome lampifitisleftonformorethan 20minuteswhentheignitionisin LOCK/OFF. Thishelpstoprevent thebatteryfromrunningdown.
6-8Lighting
NOTES
Infotainment System
Introduction
Infotainment......7-1
Theft-DeterrentFeature.....7-2
Operation....7-3
Radio
AM-FMRadio....7-7
SatelliteRadio....7-11
RadioReception......7-13
FixedMastAntenna.....7-14
SatelliteRadioAntenna.....7-14
AudioPlayers
CDPlayer....7-15
Phone
Bluetooth....7-21
Introduction
Infotainment
Determinewhichradiothevehicle hasandreadthefollowingpagesto becomefamiliarwithitsfeatures.

WARNING
Takingyoureyesofftheroadfor extendedperiodscouldcausea crashresultingininjuryordeath toyouorothers.Donotgive extendedattentiontoinfotainment taskswhiledriving.
This system provides access to many audio and nonaudiolistings.
7-2InfotainmentSystem
Tominimizetakingyoureyesoffthe roadwhiledriving,dothefollowing whilethevehicleisparked:
- Becomefamiliarwiththe operationandcontrolsofthe audiosystem.
- Setupthetone, speaker adjustments, and presetradio stations.
Formoreinformation,seeDefensive Drivingonpage9-3.
Notice: Contact your dealer before adding any equipment.
Addingaudioorcommunication equipmentcouldinterferewith theoperationoftheengine,radio, orothersystems,andcould damagethem.Followfederal rulescoveringmobileradioand telephoneequipment.
Notice:Thechimesignalsrelated tosafetybelts,parkingbrake,and otherfunctionsofthevehicle operatethroughtheradio/entertainmentsystem.Ifthat equipmentisreplacedor additionalequipmentisaddedto thevehicle,thechimesmaynot work.Makesurethatreplacement oradditionalequipmentis compatiblewiththevehicle beforeinstallingit.See AccessoriesandModificationson page10-4.
ThevehiclehasRetained AccessoryPower(RAP).WithRAP, theaudiosystemcanbeplayed evenaftertheignitionisturnedoff. SeeRetainedAccessoryPower (RAP)onpage9-31formore information.
Theft-DeterrentFeature
TheftLock ^® is designed to discourage the effective radio. The feature works automatically by learning a portion of the Vehicle Identification Number (VIN). If the radio is moved to different vehicle, it does not operate and either LOC or LOCKED displays.
Whentheradioandvehicleare turnedoff,theremaybeablinking redlighttoindicateTheftLockis armed.
With TheftLockactivated,theradio doesnotoperateifstolen.
Operation

text_image
PWR VOL AM FM 12:14 1 2 3 4 5 6 RCL TUNEAM-FMRadio
7-4InfotainmentSystem
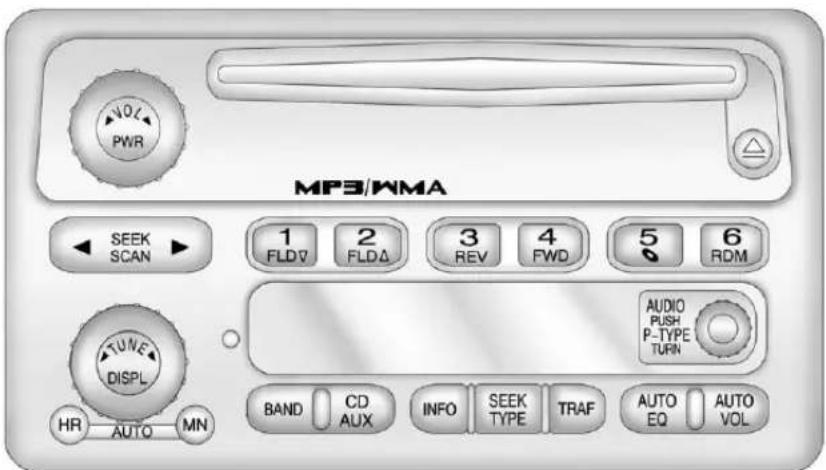
text_image
MP3/WMA VOL/PWR SEEK SCAN ▶ 1 FLDV 2 FLDΔ 3 REV 4 FWD 5 RDM TUNF DISPL AUDIO PUSH P-TYPE TURN BAND CD AUX INFO SEEK TYPE TRAF AUTO EQ AUTO VOL HR AUTO MNRadiowithCD(MP3/WMA)
PlayingtheRadio
AM-FMRadio
PWR(Power): Presstoturnthe systemonandoff.
VOL(Volume): Turntoincreaseor todecreasethevolume.
RCL(Recall):Presstoswitchthe displaybetweentheradiostation frequency,band,andthetime. Whentheignitionisoff,pressto displaythetime.
RadiowithCD(MP3/WMA)
PWR(Power):Presstoturnthe systemonandoff.
◀VOL▶(Volume):Turnto increaseortodecreasethevolume.
DISPL(Display): Whentheignition isturnedoff, presstodisplay thetime.
ForRDS, presstheDISPLknobto changewhatdisplayswhileusing RDS. Thedisplayoptionsare stationname, RDSstation frequency, PTY(programtype), andthenameoftheprogram (ifavailable).
ForXM™ (ifequipped), pressthe DISPLknobwhileinXMmodeto retrievefourdifferentcategoriesof informationrelatedtothecurrent songorchannel:Artist,SongTitle, CategoryorPTY, ChannelNumber/ ChannelName.
Tochangethedefaultonthe display, presstheDISPLknobuntil youseethedesireddisplay, then pressandholdthisknobfor twosecondsandtheradio beepsonce.
AUTOVOL(AutomaticVolume): Automaticvolumeautomatically adjuststheaudiosystemtomake upforroadandwindnoisewhile driving. The volume level should always sound the same while driving.
Setthevolumeatthedesiredlevel. PresstoselectLOW,MEDIUM,and HIGH.AVOLdisplays.Eachhigher settingallowsforhighervolume compensationatfastervehicle speeds.
NONEdisplaysiftheradiocannot determinethevehiclespeed.Toturn automaticvolumeoff,pressuntil OFFdisplays.
SettingtheTone(Bass/Treble)
AM-FMRadio
Toadjustthebassortreble:
-
PressandreleasetheAUDIO buttonuntilBAS(bass)orTRE(treble)displays.
-
Pressandholdthe △or ▽buttontoincreaseorto decreasethetone.
Toadjustthebassortrebletothe centerposition:
-
PressandreleasetheAUDIO buttonuntilBAS(bass)orTRE(treble)displays.
-
PressandholdtheAUDIO buttonformorethan twosecondsuntilabeep sounds.
Toadjustbothtonecontrolsand bothspeakercontrolstothemiddle position:
-
Exitoutofaudiomodeby pressinganotherbutton, causing theradiotoperformthatfunction orwaitfivesecondsforthe displaytoreturntotimeofday.
-
PressandholdAUDIOformore thantwosecondsuntilabeep sounds. CEN(center)displays.
RadiowithCD(MP3/WMA)
Toadjustthebassortreble:
-
PressandreleasetheAUDIO knobuntilBASS(bass)orTREB (treble)displays.
-
TurntheAUDIOknobto increaseortodecrease thetone.
Toadjustthebass/trebletothe middleposition, pressandholdthe AUDIOknob. Theradioproduces onebeepandadjuststhedisplay leveltothemiddleposition.
Toadjustalltoneandspeaker controlstothemiddleposition, push andholdtheAUDIOknobwhenno toneorspeakercontroldisplays. ALLCENTEREDdisplaysanda beepsounds.
7-6InfotainmentSystem
AUTOEQ(Automatic
Equalization): Presstoselect customizedequalizationsettings designedforcountry/western,jazz, talk,pop,rock,andclassical.
Toreturntothemanualmode, press the AUTOEQbuttonuntilCUSTOM displays. Then manually adjust the bass/treble, using the AUDIOknob.
AdjustingtheSpeakers (Balance/Fade)
Fademaynotbeavailableifthe vehicleisaregularcabmodel.
AM-FMRadio
Toadjustbalanceorfade:
-
PressandreleasetheAUDIO buttonuntilBAL(balance)or FAD(fade)displays.
-
Pressandholdthe △or ▽buttontoincreaseorto decreasethelevel.
Toadjustthebalanceorfadetothe centerposition:
-
Pressandreleasethe AUDIObuttonuntilBAL (balance)orFAD(fade)displays.
-
Pressandholdthe AUDIObuttonformorethan twosecondsuntilabeep sounds.
Toadjustbothspeakercontrolsand bothtonecontrolstothemiddle position:
-
Exitoutofaudiomodeby pressinganotherbutton, causing theradiotoperformthatfunction orwaitfivesecondsforthe displaytoreturntotimeofday.
-
PressandholdAUDIOformore thantwosecondsuntilabeep sounds. CEN(center)displays.
RadiowithCD(MP3/WMA)
Toadjustthebalanceorfade:
-
Pressandreleasethe AUDIOknobuntilBAL(balance) orFADE(fade)displays.
-
TurntheAUDIOknobto increaseortodecreasethe level.
Toadjustthebalanceorfadetothe middleposition:
-
Pressandreleasethe AUDIOknobuntilBAL(balance) orFADE(fade)displays.
-
PressandholdtheAUDIOknob untilonebeepsounds.
Toadjustalltoneandspeaker controlstothemiddleposition, push andholdtheAUDIOknobwhenno toneorspeakercontroldisplays. ALLCENTEREDdisplaysanda beepsounds.
RadioMessages
AM-FMRadio
CAL(CalibrationError): The audiosystemhasbeencalibrated forthevehiclefromthefactory. If CAL displaysitmeansthatthe radiohasnotbeenconfigured properlyforthevehicleanditmust bereturnedtoyourdealerfor service.
LOC(Locked): Thismessage displayswhentheTHEFTLOCK® systemhaslockedup. Takethe vehicletoyourdealerforservice.
Ifanyerroroccursrepeatedlyorif anerrorcannotbecorrected, contactyourdealer.
RadiowithCD(MP3/WMA)
CALERR(CalibrationError): The audiosystemhasbeencalibrated forthevehiclefromthefactory. If CALERRdisplaysitmeansthat theradiohasnotbeenconfigured properlyforthevehicleanditmust bereturnedtoyourdealerfor service.
LOCKED: Thismessagedisplays whentheTheftLock ^® systemhas lockedup. Takethevehicletoyour dealerforservice.
Ifanyerroroccursrepeatedlyorif anerrorcannotbecorrected, contactyourdealer.
Radio
AM-FMRadio
FindingaStation
AM-FMRadio
AMFM: Presstoswitch between FM1, FM2, or AM.
TUNE: Turntoselectradio stations.
SEEK: Presstogotothe previousstationandstaythere.
Toscanstations, pressandhold SEEKfortwosecondsuntila beepsounds. Theradiogoestoa station, playsforafewseconds, thengoestothenextstation. Press SEEKagaintostopscanning.
Toscanpresetstations, press and hold ◀SEEKformorethan fourseconds untiltwoeepssound. Theradiogoestothefirstpreset station, playsforafewseconds, thengoestothenextpresetstation. Press ◀SEEKagaintostop scanningpresets.
SEEK ▷: Presstogotothenext stationandstaythere.
Toscanstations, press and hold SEEK ▷fortwoseconds untila beepsounds. Theradiogoestoa station, plays for a few seconds, thengoesthen next station. Press SEEK ▷againtostopscanning.
Toscanpresetstations, press and holdSEEK ▷ formorethan fourseconds until two beep sound. Theradiogoestothefirstpreset station store done on the push buttons, plays for a few seconds, thengoes to then next preset station. Press SEEK ▷ againtostopscanning presets.
RadiowithCD(MP3/WMA)
BAND: Presstoswitchbetween FM1, FM2, AM, or XM1 or XM2 (ifequipped). Theselection displays.
◀ TUNE ▶ : Turn to select radio stations.
◀SEEK▶:Presstogotothe previousornextstationandstay there.
◀SCAN▶:Pressandholdfor morethantwoseconds, SCAN displaysandtheradiobeepsonce. Theradiogoestoastation,plays forafewseconds,thengoestothe nextstation.Press ◀or▶again,to stopscanningpresets.
Toscanpresetstations, press and hold ▶or▶formorethan fourseconds, PSCNdisplaysand theradiobeepsonce. Theradio goestoapresetstation, playsfora fewseconds, thengoestothenext presetstation. Press ▶or▶again, tostopscanningpresets.
RadioDataSystem(RDS)
TheRadiowithCD(MP3/WMA)has anRDSsystem.RDSfeaturesare availableforuseonlyonFM stationsthatbroadcastRDS information.
WithRDS,theradiocandothe following:
- Seektostationsbroadcasting theselectedtypeof programming.
- Receive announcements concerning local and national emergencies.
• Displaymessagesfromradio stations. - Seektostationswithtraffic announcements.
This system relies upon receiving specific information from these stations and only works when the information is available. In rare cases, aradiostation could broadcast incorrect information that cause stheradiofeature to work improperly. If this happens, contact theradiostation.
WhiletheradioistunedtoanRDS station,thestationnameorcall lettersdisplayinsteadofthe frequency.RDSstationscanalso providethetimeofday,aprogram type(PTY)forcurrentprogramming, andthenameoftheprogrambeing broadcast.
RDSMessages
ALERT!: The Alertfeaturewarnsof localornationalemergencies. When analertannouncementcomes on the current radiostation, ALERT! displays. The announcement is heard, even if the volume is slow a CDisplaying. If a CDisplaying, playstops during the
announcement.Alert announcementscannotbe turnedoff.
ALERT!isnotaffectedbytestsof theemergencybroadcastsystem. Thisfeatureisnotsupportedbyall RDSstations.
INFO(Information):Ifthecurrent stationhasamessage,the informationsymbolorINFO displays.Pressthisbuttontosee themessage.Themessagecan displaytheartist,songtitle,callin phonenumberbs,etc.
Iftheentiremessageisnot displayed, partsofthemessage displayeverythreeseconds. To scrollthroughthemessage, press andreleasetheINFObutton.Anew groupofwordsdisplaysafterevery pressofthisbutton.Oncethe completemessagehasdisplayed, theinformationsymbolorINFO disappearsfromthedisplayuntil anothernewmessageisreceived.
Thelastmessagecanbedisplayed bypressingtheINFObutton. The lastmessagestaysonthedisplay untilanewmessageisreceivedor theradioistunedtoadifferent station.
Whenamessageisnotavailable fromastation,NOINFOdisplays.
TRAF(Traffic): TRAFdisplays whenthestationtunedto broadcaststrafficannouncements. Whenatrafficannouncementis broadcastonthisstationyouwill hearit.
Ifthestationdoesnotbroadcast trafficannouncements, press the TRAFbuttonandtheradio seekstoastationthatdoes. When astationthatbroadcasttraffic announcementsisfound, theradio stopsseekingandTRAFdisplays. Ifnostationisfoundthatbroadcasts trafficannouncements, NOTRAF displays.
7-10InfotainmentSystem
IfTRAFdisplays, press the TRAF buttontoturnoffthetraffic announcements.
Theradioplaysthetraffic announcementifthevolumeislow. TheradiointerruptstheplayofaCD ifthelasttunedstationbroadcasts trafficannouncements.
FindingaProgramType(PTY) Station
ToselectandfindaPTYstation:
- TurntheP-TYPEknob.TYPE andaPTYdisplays.
- TurntheP-TYPEknobagain, to selectaPTY.
- OncethedesiredPTYdisplays, presstheSEEK/TYPEbutton toselectPTY'sfirststation.
- Togotoanotherstation withinthatPTY, press the SEEK/TYPEbuttontwiceto displaythePTYandthengoto anotherstation.
Tocanceltheseek, pressthe SEEK/TYPEbutton. This also exits the program type seek mode and return to the last tuned station.
If both PTY and TRAF (traffic) are on, theradiosearches for stations with these selected PTY and traffic announcements.
Iftheradiocannotfindthedesired programtype,NONEdisplaysand theradioreturnstothelasttuned station.
SCAN:ToscanPTYs,pressand holdtheSEEK/SCANuntilabeep sounds. Theradiogoestoastation, playsforafewseconds,thengoes tothenextstation.
BAND(AlternateFrequency): Alternatefrequencyletstheradio switchtoastrongerstationwiththe sameprogramtype.Toturn alternatefrequencyon,pressand holdBANDfortwoseconds.AFON displays.Theradiocouldswitchto stationswithastrongerfrequency.
Toturnalternatefrequencyoff, pressandholdBANDagainfor 2seconds.AFOFFdisplays.The radiodesnotswitchtoother stations.
DISPL(Display): Presstochange whatinformationdisplayswhile usingRDS. Thedisplayoptions arestationname, RDSstation frequency, PTY(programtype), and thenameoftheprogram (ifavailable).
SettingPresetPTYsOnly
Thesixpushbuttonshavefactory PTYpresets.Upto12PTYs (sixFM1andsixFM2),canbe programmedonthenumbered pushbuttons.ToprogramPTYs:
- PressBANDtoselectFM1 orFM2.
-
TurntheP-TYPEknobto activateprogramtypeselect mode.TYPEandthelast selectedPTYdisplays.
-
TurntheP-TYPEknobtoselect aPTY.
- Pressandholdoneofthesix numberedpushbuttonsuntila beepsounds. Whenthat numberedpushbuttonis pressed, the PTY thatwasset, returns.
- Repeat the steps foreach pushbutton.
SettingPresetStations
IftheradiodoesnothaveXM, upto 18stations(sixFM1,sixFM2,and sixAM)canbeprogrammedonthe sixnumberedpushbuttons.
IftheradiohasXM, upto 30stations(sixFM1,sixFM2, sixAM,sixXM1,andsixXM2)can beprogrammedonthesix numberedpushbuttons.
Toprogrameitherradio:
1. Tuneinthedesiredstation.
2. Pressandholdoneofthesix numberedpushbuttonsuntilthe radiobeepsonce.Whenthat numberedpushbuttonispressed again,thestationthatwas stored, returns.
3. Repeat the steps foreach pushbutton.
SatelliteRadio
XM™ SatelliteRadioService
XMisasatelliteradioservicethatis basedinthe48contiguousUnited Statesand10Canadianprovinces. XMSatelliteRadiohasawide varietyofprogrammingand commercial-freemusic, coast-to-coast,andindigital-quality sound.Aservicefeeisrequiredto receivetheXMservice.IfXM Serviceneedstobereactivated,the radiowilldisplay"NoSubscription PleaseRenew"onchannelXM1.
Formoreinformation,contactXMat www.xmradio.comorcall 1-800-929-2100intheU.S.and www.xmradio.caorcall 1-877-438-9677inCanada.
FindingaProgramType(PTY) Channel
ToselectandfindaPTY:
- TurntheP-TYPEknob.TYPE andaPTYdisplays.
- TurntheP-TYPEknobagain, to selectaPTY.
- OncethedesiredPTYdisplays, presstheSEEK/TYPEbutton toselectPTY'sfirststation.
- Togotoanotherstation within that PTY, pesstheSEEK/TYPE buttontwicetodisplaythePTY andthengotoanotherstation.
Tocanceltheseek, pressthe SEEK/TYPEbutton. This also exits the program type seek mode and return to the last tuned station.
7-12InfotainmentSystem
Iftheradiocannotfindthedesired programtype,NONEdisplaysand theradioreturnstothelasttuned station.
FindinganXMChannel
BAND: Presstoswitch between FM1, FM2, AM, or XM1 or XM2 (ifequipped). Theselection displays.
DISPL(Display): Presstoretrieve four different categories of information related to the current song or channel: Artist, Song Title, Category or PTY, Channel Number/ Channel Name.
◀TUNE▶:TurntoselectXM Channels.
◀SEEK▶:Presstogotothe previousornextchannelandstay there.
◀SCAN▶:Pressandholdfor morethantwoseconds, SCAN displaysandtheradiobeepsonce. Theradiogoestoachannel, plays forafewseconds, thengoestothe nextchannel. Press ◀or▶again, tostopscanningpresets.
Toscanpresetchannels, press andhold ◀or▶formorethan fourseconds, PSCNdisplaysand theradiobeepsonce. Theradio goestoapresetchannel, playsfora fewseconds, thengoestothenext presetchannel. Press ◀or▶again, tostopscanningpresets.
SettingPresetChannels
IftheradiohasXM, upto 30stations(6FM1,6FM2,6AM, 6XM1,and6XM2)canbe programmedonthesixnumbered pushbuttons.
Toprogrameitherradio:
-
Tuneinthedesiredchannel.
-
Pressandholdoneofthesix numberedpushbuttonsuntilthe radiobeepsonce.Whenthat numberedpushbuttonispressed again,thechannelthatwas stored, returns.
-
Repeat the steps foreach pushbutton.
XMRadioMessages
XL(ExplicitLanguage
Channels): These channels, or any others, can be blocked data customer's request, by calling 1-800-929-2100 in the U.S. and 1-877-438-9677 in Canada.
Updating: The encryption code in thereceiver is being updated, and no action is required. This process should taken longer than 30 seconds.
NoSignl: Thesystemis functioningcorrectly, butthevehicle isinalocationthatisblockingthe XMsignal. Whenthevehicleis movedintoanopenarea, thesignal shouldreturn.
Loading: Theradiosystemis acquiring and processing audio and text data. No action is needed. This messages should disappear shortly.
OffAir: Thischannelisnot currentlyinservice.Tunetoanother channel.
CHUnavl: Thispreviously assignedchannelisnolonger assigned.Tunetoanotherstation. If thisstationwasoneofthe presets, choose another station for that preset button.
Unauth: Thischannelisblockedor cannotbereceivedwithyourXM Subscriptionpackage.
NoInfo: Noartist, songtitle, category, ortextinformationis available at thistime on this channel. Thesystemis working properly.
NoSubscriptionPleaseRenew: XMsubscriptionneedstobe reactivated.ContactXMat www.xmradio.comorcall 1-800-929-2100intheU.S.and www.xmradio.caorcall 1-877-438-9677inCanada.
NotFound: Noartist, songtitle, category, ortextinformationis available at thistime on this channel. Thesystemisworking properly.
XMLock:TheXMreceiverinyour vehiclecouldhavepreviouslybeen inanothervehicle.Forsecurity purposes,XMreceiverscannotbe swappedbetweenvehicles.Ifthis messageisreceivedafterhaving yourvehicleserviced,checkwith yourdealer.
RadioID: If this message is received when tuned to channel 0, there could be a receiver fault. Consult with your dealer.
Unknown: If this message is received when tuned to channel 0, there could be a receiver fault. Consult with your dealer.
CheckXM: If this messaged does not clear within a short period of time, there receiver could have a fault. Consult with your dealer.
RadioReception
Frequencyinterferenceandstatic canoccurduringnormalradio receptionifitemssuchascellphone chargers,vehicleconvenience accessories,andexternalelectronic devicesarepluggedintothe accessorypoweroutlet.Ifthereis interferenceorstatic,unplugthe itemfromtheaccessorypower outlet.
AM
TherangeformostAMstationsis greaterthanforFM,especiallyat night. Thelongerrangecancause stationfrequenciestointerferewith eachother.Forbetterradio reception,mostAMradiostations boostthepowerlevelsduringthe day,andthenreducetheselevels duringthenight.Staticcanalso occurwhenthingslikestormsand powerlinesinterferewithradio reception.Whenthishappens,try reducingthetrebleontheradio.
FMStereo
FMsignalsonlyreachabout 16to65km(10to40miles). Althoughtheradiohasabuilt-in electroniccircuitthatautomatically workstoreduceinterference,some staticcanoccur,especiallyaround tallbuildingsorhills,causingthe soundtofadeinandout.
XM™SatelliteRadioService
XMSatelliteRadioServicegives digitalradioreceptionfrom coast-to-coastinthe48contiguous UnitedStates, and in Canada. Just as with FM, tall buildings or hills can interferewith satelliteradiosignals, causing the sound to fade in and out. In addition, traveling or standing under heavy foliage, bridges, garages, ortunnels may cause loss of the XM signal for a period of time.
CellularPhoneUsage
Cellularphoneusagemaycause interferencewiththevehicle'sradio. Thisinterferencemayoccurwhen makingorreceivingphonecalls, chargingthephone'sbattery, orsimplyhavingthephoneon.This interferencecausesanincreased levelofstaticwhilelisteningtothe radio.Ifstaticisreceivedwhile listeningtotheradio,unplugthe cellularphoneandturnitoff.
FixedMastAntenna
The fixed mastantennacan withstand most car washes without being damaged as long as it is securely attached to the base. If the mast becomes slightly bent, straighten it out by hand. If the mast is badly bent, replace it.
Occasionallychecktomakesure theantennaistightenedtoitsbase. Iftighteningisrequired,tightenby handuntilfullyseatedplus onequarterturn.
SatelliteRadioAntenna
The XMSatelliteRadioantennais locatedontheroofthevehicle. Keeptheantennaclearof obstructionsforclearradio reception.
AudioPlayers
CDPlayer
CareofTheCDPlayer
DonotaddanylabeltoaCD, it could get caught in the CD player. If a CD is recorded on a personal computer and a description label is needed, try labeling the top of the recorded CD with a marking pen.
TheuseofCDlenscleanersfor CDsisnotadvised,duetotherisk ofcontaminatingthelensoftheCD opticswithlubricantsinternaltothe CDplayermechanism.
Notice:Ifalabelisaddedtoa CD,morethanoneCDisinserted intotheslotatatime,oran attemptismadetoplayscratched ordamagedCDs,theCDplayer couldbedamaged.Whileusing theCDplayer,useonlyCDsin goodconditionwithoutanylabel, loadoneCDatatime,andkeep
theCDplayerandtheloadingslot freeofforeignmaterials, liquids, anddebris.
Ifanerrorddisplays,see"CD Messages"laterinthissection.
CareofCDs
IfplayingaCD-R,thesoundquality canbereducedduetoCD-Rquality, themethodofrecording,thequality ofthemusicthathasbeen recorded,andthewaytheCD-R hasbeenhandled.Handlethem carefully.StoreCD-R(s)intheir originalcasesorotherprotective casesandawayfromdirectsunlight anddust.TheCDplayerscansthe bottomsurfaceofthedisc.Ifthe surfaceofaCDisdamaged,such ascracked,broken,orscratched, theCDdoesnotplayproperlyornot atall.Donottouchthebottomside ofaCDwhilehandlingit;thiscould damagethesurface.PickupCDs bygraspingtheouteredgesorthe edgeoftheholeandtheouteredge.
If the surface of a CD is soiled, take asoft, lint free clothordampena clean, soft clothinamild, neutral detergents solution mixed with water, and clean it. Makes sure the wiping process starts from the center to the edge.
PlayingaCD
InsertaCDpartwayintotheslot, labelsideup. Theplayerpullsitin, andREADINGdisplays. TheCD shouldbeginplaying. ToinsertaCD withtheignitionoff, firstpress the (eject)buttonorthe DISPLknob.
If the ignition or radioisturned off with a CD in the player it stays in the player. When the ignition or radioisturned on, the CD starts to play where it stopped, if it was the last selected audiosource.
WhentheCDisinserted,theCD symboldisplays.Aseachnewtrack startstoplay,thetracknumber displays.
7-16InfotainmentSystem
TheCDplayercanplaythesmaller 8cm(3in)singleCDswithan adapterring.Full-sizeCDsandthe smallerCDsareloadedinthesame manner.
3REV(FastReverse):Pressand holdtoreversequicklywithina track.Pressandholdforlessthan twosecondstoreverseat10times thenormalplayingspeed.Press andholdformorethantwoseconds toreverseat20timesthenormal playingspeed.Releasetoplaythe track.
4FWD(FastForward):Pressand holdtoadvancequicklywithina track.Pressandholdforlessthan twosecondstoadvanceatsixtimes thenormalplayingspeed.Press andholdformorethanttwoseconds toadvanceat17timesthenormal playingspeed.Releasetoplaythe track.
6RDM(Random): Presstohear thetracksinrandom, rather than sequential, order. RDMONdisplays. RDMandthetracknumberdisplays when each track start to play. Pressagaintoturnoffrandomplay. RDMOFFdisplays.
SEEK: Press the left arrow to gotothestartofthecurrentorthe previoustrack.Presstherightarrow togotothestartofthenexttrack. Pressingeitherarrowformorethan twosecondsscansthenexttracks, playingthefirsteightsecondsof eachtrackuntilallofthetracks havebeenpreviewed.Presseither arrowagaintostopscanningandto playthetrack.
◀TUNE▶:Turntogotothe previousornexttrack.
DISPL(Display): Presstoseehow longthecurrenttrackhasbeen playing. ETandtheelapsedtime of thetrackdisplays. Tochangethe defaultonthedisplay(trackor elapsedtime), pressuntilyousee thedesireddisplay, thenpressand holdfortwoseconds. Theradio beepsonce. Theselecteddisplay is nowthedefault.
BAND: Presstolistentotheradio whenaCDisplaying. Theinactive CDremainsinsidetheradiofor futurelistening.
CDAUX(Auxiliary): Presstoplay aCD when listening to other radio. The CDsymbol displays when aCD is loaded.
△(Eject):PresstoejectaCD. Ejectcanbeactivatedwitheither theignitionorradiooff.CDscanbe loadedwiththeignitionandradiooff ifthisbuttonispressedfirst.
PlayinganMP3/WMADisc
MP3/WMACD-RDiscFormat
If you burn your own MP3/WMA disconapersonal computer:
• MakesuretheMP3/WMAfiles arerecordedonaCD-Rdisc.
- Makesureplaylistshavea.m3u or.wplextension,otherfile extensionsmightnotwork.
- Filescanberecordedwitha varietyoffixedorvariablebit rates.Songtitle,artistname, andalbumaredisplayedbythe radiowhenrecordedusingID3 tagsversion1and2.
- Createafolderstructurethat makesiteasytofindsongs whiledriving.Organizesongsby albumsusingonefolderforeach album.Eachfolderoralbum shouldcontain18songsorless.
- Makesuretofinalizethedisc whenburninganMP3/WMA disc,usingmultiplesessions. Itisusuallybettertoburnthe discallatonce.
Theplayerisabletoreadandplay amaximumof253folders, 50playlists,20sessions,and 949files.Longfilenames,folder names,orplaylistnamesmayuse morediscmemoryspacethan necessary.Toconservespaceon thedisc,minimizethelengthofthe file,folder,orplaylistnames.An MP3/WMACD-Rthatwasrecorded usingnofilefolderscanalsobe used.Thesystemcansupportupto 11foldersindepth,though,keepthe depthofthefolderstoaminimumin ordertokeepdownthecomplexity andconfusionintryingtolocatea particularfolderduring playback.Ifa CDcontainsmorethanthe maximumof253folders, 50playlists,20sessions,and 949files,theplayerletsyouaccess
and navigate up to them a maximum, but all item so over them a maximum are played.
RootDirectory
Therootdirectoryistreatedasa folder.Iftherootdirectoryhas compressedaudiofiles,the directorydisplaysasF1ROOT.All filescontaineddirectlyunderthe rootdirectoryareaccessedpriorto anyrootdirectoryfolders.However, playlists(Px)arealwaysaccessed beforerootfoldersorfiles.
EmptyDirectoryorFolder
Ifarootdirectoryorafolderexists somewhereinthefilestructurethat containsonlyfolders/subfoldersand nocompressedfilesdirectly beneaththem,theplayeradvances tothenextfolderinthefilestructure thatcontainscompressedaudio files.Theemptyfolderdoesnot display.
NoFolder
WhentheCDcontainsonly compressedfiles,thefilesare locatedundertherootfolder.The nextandpreviousfolderfunctions havenofunctiononaCDthatwas recordedwithoutfoldersorplaylists. Whendisplayingthenameofthe foldertheradiodisplaysROOT.
WhentheCDcontainsonlyplaylists andcompressedaudiofiles,butno folders,allfilesarelocatedunder therootfolder.Thefolderdownand thefolderupbuttonssearch playlists(Px)firstandthengotothe rootfolder.Whentheradiodisplays thenameofthefolder,theradio displaysROOT.
OrderofPlay
Tracksareplayedinthefollowing order:
- Playbeginsfromthefirsttrackin thefirstplaylistandcontinues sequentiallythroughalltracksin eachplaylist.Whenthelast trackofthelastplaylisthas played,playcontinuesfromthe firsttrackofthefirstplaylist.
- IftheCDdoesnotcontainany playlists, then play begins from the first track under the root directory. When all tracks from the root directory have played, play continues from files according to their numerical listing. After playing the last track from the last folder, play begins again at the first track of the first folder or root directory.
Whenplayentersanewfolder,the displaydoesnotautomaticallyshow thenewfoldernameunlessyou havechosenthefoldermodeasthe defaultdisplay.SeeDISPL(display) laterinthissectionformore information.Thenewtrackname displays.
FileSystemandNaming
Thesongnamethatdisplaysisthe songnamethatiscontainedinthe ID3tag.Ifthesongnameisnot presentinthelID3tag,thenthe radiodisplaysthefilenamewithout theextension(suchas.mp3)asthe trackname.
Tracknameslongerthan 32charactersorfourpagesare shortened.Partsofwordsonthe lastpageoftextandtheextension ofthefilenamedoesnotdisplay.
PreprogrammedPlaylists
Preprogrammedplaylistswhich werecreatedbyWinAmp™, MusicMatch™,orRealJukebox™ softwarecanbeaccessed,however, theycannotbeedited. These playlistsaretreatedasspecial folderscontainingcompressed audiosongfiles.
PlayinganMP3/WMA
InsertaCDpartwayintotheslot, labelsideup.Theplayerpullsitin, andREADINGdisplays.TheCD shouldbeginplayingandtheCD symboldisplays.Ifyouwantto insertaCDwiththeignitionoff,first pressthe △buttonorthe DISPLknob.
If the ignition or radioisturned off with a CD in the player it stays in the player. When the ignition or radioisturned on, the CD starts to play where it stopped, if it was the last selected audio source.
Aseachnewtrackstartstoplay, the tracknumberdisplays.
1FLD ▽(PreviousFolder):Press thisbuttontogotothefirsttrackin thepreviousfolder.Pressingthis buttonwhileinfolderrandommode takesyoutothepreviousfolderand playsthetracksinrandomorderin thatfolder.
2FLD △(NextFolder):Pressthis buttontogotothefirsttrackinthe nextfolder.Pressingthisbutton whileinfolderrandommodetakes theCDtothenextfolderandplays thetracksinrandomorderinthat folder.
3REV(Reverse):Pressandhold thisbuttontoreversequicklywithin atrack.Pressandholdthisbutton forlessthantwosecondstoreverse at10timesthenormalplaying speed.Pressandholditformore thantwosecondstoreverseat 20timesthenormalplayingspeed. Releasethisbuttontoplaythe track.
4FWD(Forward):Pressandhold thisbuttontoadvancequicklywithin atrack.Pressandholdthisbutton forlessthantwosecondsto advanceat10timesthenormal playingspeed.Pressandholditfor morethantwosecondstoadvance at20timesthenormalplaying speed.Releasethisbuttontoplay thetrack.
6RDM(Random): Toplaythe tracksinrandomorderinthecurrent folderorplaylist, pressandrelease thisbutton. FLDRRDM(folder random)displays.Onceallofthe tracksinthecurrentfolderorplaylist haveplayed, thesystemmovesto thenextfolderorplaylistandplays allofthetracksinrandomorder.
Toplayallthetracksinrandom orderontheCD,pressandholdthis buttonfortwoseconds.Abeep soundsandDISCRDM(disc random)displays.Thisfeaturedoes notworkwithplaylists.
7-20InfotainmentSystem
Wheninrandom,pressing and releasing eitherSEEKarrow takes theCDtothepreviousortothenext randomtrack.
Pressandreleasethisbuttonagain toturnoffrandomplay.NORDM (norandom)displays.
◀SEEK▶:Presstheleft SEEKarrowtogotothestartofthe previoustrack.Presstheright SEEKarrowtogotothestartofthe nexttrack.PressingeitherSEEK arrowformorethantwoseconds searchesthepreviousornexttracks attwotrackspersecond.Release thebuttontostopsearchingandto playthetrack.
◀TUNE▶:Turntoreverseor advancethroughthetracksinall foldersorplaylists.Thetrack numberandfilenamedisplaysfor eachtrack.Turningthisknobwhile inrandomreversesoradvancesthe tracksinsequentialorder.
DISPL(Display):Pressthisknob toswitchbetweentrackmode, folder/playlistmode, andtimeofday mode. Thedisplayshowsonly eightcharacters, buttherecanbe uptofourpagesoftext. Ifthereare morethaneightcharactersinthe song, folder, orplaylistname, pressingthisknobwithin twosecondstakesyoutothenext pageoftext. Iftherearenoother pagestobeshown, pressingthis knobwithintwosecondstakesyou tothenextdisplaymode.
- Trackmodedisplaysthecurrent tracknumberandtheID3tag songname.
- Folder/playlistmodedisplaysthe currentfolderorplaylistnumber andthefolder/playlistname.
- Timeofdaymodedisplaysthe timeofdayandtheID3tag songname.
Tochangethedefaultonthe display, presstheDISPLknobuntil youseethedesireddisplay, then pressandholdthisknobfor twoseconds. Theradioproduces onebeepandtheselecteddisplay isnowthedefault.
INFO(Information):INFOdisplays whenacurrenttrackhasID3tag information.Pressthisbutton to displaytheartistnameandalbum containedinthetag.INFO disappearsfromthedisplaywhen theinformationintheID3taghas finishedbeingread.
BAND: Pressthisbuttontolistento theradiowhenaCDisplaying. The inactiveCDremainsinsidetheradio forfuturelistening.
CDAUX(Auxiliary):Pressthis buttontoplayaCDwhenlistening totheradio.TheCDsymbol illuminatesonthedisplaywhena CDisloaded.
△(Eject):Presstthisbuttonto ejectaCD.Ejectcanactivatewhile eithertheignitionorradioisoff. CDscanbeloadedwiththeignition andradiooffifthisbuttonispressed first.
CDMessages
CHECKCD: If this message displays and/or the CD comes out, it could be before one of the following reasons:
- Itisveryhot. When the temperaturereturnstonormal, theCDshouldplay.
- You are driving on a very rough road. When there is become smoother, the CD should play.
• TheCDisdirty, scratched, wet, or upsidedown.
• Theairisveryhumid.Ifso,wait aboutanhourandtryagain.
- TheformatoftheCDmightnot becompatible.See"Usingan MP3"laterinthissection.
• Therecouldhavebeen a problemwhileburningtheCD.
- Thelabelcouldbecaughtinthe CDplayer.
If the CD is not playing correctly, for any other reason, try known good CD.
Ifanyerroroccursrepeatedlyorif anerrorcannotbecorrected, contactyourdealer.Iftheradio displaysanerrormessage, writeit downandprovideittoyourdealer whenreportingtheproblem.
Phone
Bluetooth
Forvehiclesequipped with Bluetoothcapability, the system can interact with many cell phones, allowing:
- Placementandreceiptofcallsin ahands-freemode.
- Sharingofthecellphone's addressbookorcontactlistwith thevehicle.
7-22InfotainmentSystem
Tominimizedriverdistraction, beforedriving, and with the vehicle parked:
- Becomefamiliarwiththe featuresofthecellphone. Organizethephonebook and contactlistsclearlyanddelete duplicateorrarelyusedentries. Ifpossible,programspeeddial orothershortcuts.
- Reviewthecontrolsand operationoftheinfotainment system.
- Paircellphone(s)tothevehicle. Thesystemmaynotworkwith allcellphones.See"Pairinga Phone"inthissectionformore information.
- If the cell phone has voice dialing capability, learntouse that feature to access the address book or contact list. See "VoicePass-Thru" in this section form more information.
- See "StoringandDeletingPhone Numbers" in this section for more information.

WARNING
When using acellphone, it can be distracting to look to long or too often at the screen of the phone or the infotainment (navigation) system. Taking your eyes off the road to long or too oft could cause a crash resulting in injury or death. Focus your attention on driving.
VehicleswithaBluetoothsystem canuseaBluetoothcapablecell phonewithaHands-FreeProfileto makeandreceivephonecalls. The systemcanbeusedwhilethekeyis inON/RUNorACC/ACCESSORY position. TherangeoftheBluetooth systemcanbeupto9.1m(30ft). Notallphonessupportallfunctions, andnotallphonesworkwiththe Bluetoothsystem.See www.gm.com/bluetoothformore informationoncompatiblephones.
VoiceRecognition
The Bluetooth system uses voice recognition to interpret voice command stodial phonenumbers and nametags.
Foradditionalinformationsay"Help" whileyouareinavoice recognitionmenu.
Noise: Keepinteriornoiselevelsto a minimum. Thesystemmaynot recognizevoicecommandsifthere istoomuchbackgroundnoise.
WhentoSpeak: Ashorttone soundsafterthesystemresponds indicatingwhenitiswaitingfora voicecommand.Waituntilthetone andthenspeak.
HowtoSpeak: Speak clearly in a calmandnatural voice.
AudioSystem
When using the in-vehicle Bluetooth system, sound comesthrough the vehicle's front audiosystem speakers and overridest the audio system. Usethea audiosystem volumeknob, during acall, to changethe volume level. The adjusted volume level remains in memory for later calls. Toprevent missed calls, a minimum volume level is used if the volume is turned downtoolow.
BluetoothControls
Use the button, located on the driver side of the instrument panel near the headlamp controls, to operate the Bluetooth system.
(e(PushToTalk):Presstoanswer incomingcalls,toconfirmsystem information,andtostartspeech recognition.
Pairing
ABluetooth-enabledcellphone must be repaired to the Bluetooth system and then connected to the vehicle before it can be used. See your cell phonemanufacturer's user guide for Bluetooth functions before pairing the cellphone. If a Bluetooth phone is not connected, call will be made using OnStar ^® Hands-Free Calling, if available. Referto the OnStar owner's guide form more information.
PairingInformation
- ABluetoothphonewithMP3 capability cannot be paired to the vehicle asaphone and an MP3 player at the same time.
• Uptofivecellphonescanbe pairedtotheBluetoothsystem. - Thepairingprocessisdisabled whenthevehicleismoving.
7-24InfotainmentSystem
- Pairingonlyneedstobe completedonce, unless the pairinginformationonthecell phonechangesorthecellphone isdeletedfromthesystem.
- Onlyonepairedcellphonecan beconnectedtotheBluetooth systematative.
- If multiplepairedcellphones are within range of the system, the system connects to the first available paired cell phone in the order that they were first paired to the system. To link to a different paired phone, see "Linking to a Different Phone" later in this section.
PairingaPhone
- Pressandrelease
- Say "Bluetooth." This command can be skipped.
-
Say "Pair." Thesystemresponds withinstructionsandafour-digit PersonalIdentification Number(PIN).
-
Start the pairing process on the cell phonethat you want top pair. For help with this process, see your cell phonemanufacturer's user guide.
- Locatethedevicenamed "Your Vehicle" inthelistonthecell phone. Followtheinstructions onthecellphonetoenterthe PINthatwasprovidedinStep3. AfterthePINissuccessfully entered, thesystempromptsyou toprovideanameforthepaired cellphone. Thisnamewillbe usedtoindicatewhichphones arepairedandconnectedtothe vehicle. Thesystemresponds with "
hasbeen successfullypaired" afterthe pairingprocessiscomplete. - RepeatSteps1 through 5 topair additional phones.
ListingAllPairedandConnected Phones
Thesystemcanlistallcellphones pairedtoit.lfapairedcellphoneis alsoconnectedtothevehicle,the systemrespondswith"isconnected" afterthatphonename.
- Pressandrelease
- Say "Bluetooth."
- Say "List."
DeletingaPairedPhone
If the phonename you want to delete is unknown, see "Listing All Paired and Connected Phones."
- Pressandrelease
- Say "Bluetooth."
- Say "Delete." Thesystemasks for which phonetodelete.
- Saythenameofthephoneyou wanttodelete.
ConnectingtoaDifferentPhone
Toconnecttoadifferentcellphone, theBluetoothsystemlooksforthe nextavailablecellphoneinthe orderinwhichalltheavailablecell phoneswerepaired.Dependingon whichcellphoneyouwantto connectto,youmayhavetouse thiscommandseveraltimes.
- Pressandrelease
2.Say"Bluetooth."
3.Say"Changephone."
- Ifanothercellphoneis found,theresponsewillbe "
• Ifanothercellphoneisnot found, theoriginalphone remainsconnected.
StoringandDeletingPhone Numbers
Thesystemcanstoreupto 30phonenumbersasnametagsin theHandsFreeDirectorythatis sharedbetweentheBluetoothand OnStarsystems.
The following commands are used delete and store phonenumbers.
Store: This command will store a phonenumber, oragroup of numbers as anametag.
DigitStore: This command allows a phonenumbertobestoredasa nametagbyenteringthedigitsone atatime.
Delete: This command is used to delete individual nametags.
DeleteAllNameTags: This command deletes all stored name tags in the Hands Free Calling Directory and the On Star Turn by Turn Destinations Directory.
Usingthe"Store"Command
- Pressandrelease
2.Say"Store."
- Say the phonenumber group of numbers you want to store all at once with no pauses, then follow the directions given by the system to save an ametag for this number.
Usingthe“DigitStore”Command
Ifanunwantednumberis recognizedbythesystem, say "Clear"atanytimetoclearthelast number.
Tohearallofthenumbers recognizedbythesystem, say "Verify"atanytime.
- Pressandrelease
2.Say"DigitStore."
7-26InfotainmentSystem
- Sayeachdigit, oneatatime, thatyouwanttostore. After each digitisentered, the system repeats backthedigititheard followed by atone. After the last digithasbeenentered, say "Store," and then follow the directions given by the system to save anametag forth this number.
Usingthe"Delete"Command
- Pressandrelease
2.Say"Delete." - Saythenametagyouwantto delete.
Usingthe"DeleteAllNameTags" Command
Thiscommanddeletesallstored nametagsintheHandsFree CallingDirectoryandthe OnStarTurnbyTurnDestinations Directory.
Todeleteallnametags:
- Pressandrelease
- Say "Deleteallnametags."
ListingStoredNumbers
Thelistcommandwilllistallthe storednumbersandnametags.
Usingthe"List"Command
- Pressandrelease
2.Say"Directory." - Say "HandsFreeCalling."
4.Say"List."
MakingaCall
Callscanbemadeusingthe followingcommands.
DialorCall: Thedialorcall commandcanbeused interchangeablytodialaphone numberorastorednametag.
DigitDial: This command allows a phonenumbertobedialed by entering the digits one at time.
Re-dial: This command is used to dial the last number used on the cell phone.
Using the "Dial" or "Call" Command
- Pressandrelease
- Say "Dial" or "Call."
- Saytheentirenumberwithout pausingorsaythenametag.
Onceconnected, thepersoncalled willbeheardthroughtheaudio speakers.
Usingthe“DigitDial”Command
Thedigitdialcommandallowsa phonenumbertobedialedby enteringthedigitsoneatatime. Aftereachdigitisentered, the systemrepeatsbackthedigitit heardfollowedbyatone.
Ifanunwantednumberis recognizedbythesystem, say "Clear"atanytimetoclearthelast number.
Tohearallofthenumbers recognizedbythesystem, say "Verify"atanytime.
- Pressandrelease
2.Say"DigitDial." - Sayeachdigit, oneatatime, thatyouwanttodial. After each digitisentered, the system repeats back the digitit heard followed by atone. After the last digithas been entered, say "Dial."
Onceconnected, thepersoncalled willbeheardthroughtheaudio speakers.
Usingthe"Re-dial"Command
- Pressandrelease
- Afterthetone, say "Re-dial."
Onceconnected, thepersoncalled willbeheardthroughtheaudio speakers.
ReceivingaCall
When an incoming call is received, the audiosystemmutes and aring tone is heardinthe vehicle. Press and release ^2 to answer the call.
CallWaiting
Callwaitingmustbesupported on theBluetoothphoneandenabledby thewirelessservicecarriertowork.
- Pressandrelease ^w toanswer anincomingcallwhenanother callisactive. Theoriginalcallis placedonhold.
- Pressandrelease ^16 e ^2 againto returntotheoriginalcall.
• Toignoretheincomingcall, continuewiththeoriginalcall withnoaction.
Three-WayCalling
Three-WayCallingmustbe supportedontheBluetoothphone andenabledbythewirelessservice carriertowork.
- Whileonacallpressand release .
2.Say"Three-waycall." - Usethedialorcallcommandto dialthenumberofthethirdparty tobecalled.
- Oncethecallisconnected, press Ⓞtolinkallthecallers together.
EndingaCall
Toendacall:
- Pressandrelease
2.Say"EndCall."
MutingaCall
Duringacall, all sounds from inside the vehicle can be muted so that the person on the other end of the call cannot hear them.
Tomuteacall, press "c,and then say"MuteCall."
Tocancelmute, press "¿", and then say "Un-muteCall."
TransferringaCall
Audiocanbetransferredbetween theBluetoothsystemandthecell phone.
The cell phonemustbepaired and connected with the Bluetooth system before acall can be transferred. The connection process cantakeuptotwominutes after the ignitionisturned to ON/RUN.
ToTransferAudioFromthe BluetoothSystemtoaCellPhone
During acall with the audio in the vehicle:
- Pressandrelease
2.Say"TransferCall."
ToTransferAudiototheBluetooth SystemFromaCellPhone
During acallwiththeaudioonthe cellphone, press formorethan twoseconds. The audiotransfersto the vehicle. If the audiodoes not transferto the vehicle, us the audio transfer feature on the cellphone. Seeyour cell phonemanufacturer's user guide form more information.
VoicePass-Thru
VoicePass-Thruallowsaccessto thevoicerecognitioncommandson thecellphone.Seethecellphone manufacturer'suserguidetoseeif thecellphonesupportsthisfeature. Thisfeaturecanbeusedtoverbally accesscontactsstoredinthecell phone.
-
Pressandrelease
-
Say "Bluetooth." This command can be skipped.
3.Say"Voice."
- Thecellphone'snormal promptmessageswillgo throughitscycleaccording to the phone'soperating instructions.
DualToneMulti-Frequency (DTMF)Tones
TheBluetoothsystemcansend numbersandthenumbersstoredas nametagsduringacall.Youcan usethisfeaturewhencallinga menudrivenphonesystem.Account numberscanalsobestoredforuse.
SendingaNumberorNameTag DuringaCall
- Press "W". Thesystemresponds "Ready," followed by atone.
2.Say"Dial." - Saythenumberornametag tosend.
ClearingtheSystem
Unlessinformationisdeletedoutof their-vehicleBluetoothsystem,it willberetainedindefinitely.This includesallsavednametagsinthe phonebookandphonepairing information.Forinformationonhow todeletethisinformation,seethe abovesectionsonDeletingaPaired PhoneandDeletingNameTags.
OtherInformation
TheBluetooth ^® wordmark and logosareowned by the Bluetooth SIG, Inc. and any use of such marks by General Motors is under license. Other trademarks and tradenames are those of their respective owners.
SeeRadioFrequencyStatementon page 13-22forinformation regardingPart15oftheFederal CommunicationsCommission(FCC) rulesandIndustryCanada StandardsRSS-GEN/210/220/310.
7-30InfotainmentSystem
NOTES
ClimateControls
ClimateControlSystems
ClimateControlSystems.....8-1
AirVents
AirVents....8-3
ClimateControlSystems
Theheating, cooling, and ventilation for the vehicle can be controlled with this system.
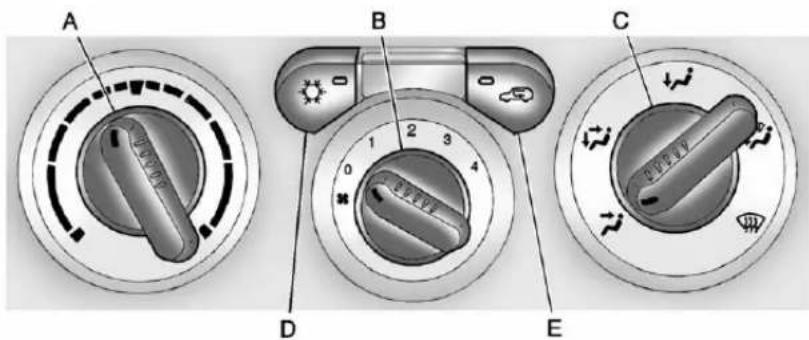
A. TemperatureControl
B.FanControl
C.AirDeliveryModeControl
D. AirConditioning
E. Recirculation
8-2ClimateControls
TemperatureControl: Turn the knobclockwise or counterclockwise to increase or decrease the temperature of the air inside the vehicle.
(FanControl): Turntheknob clockwiseorcounterclockwiseto increaseordecreasethefanspeed.
Iftheknobisseton "0"(zero), some outside air will still enter the vehicle and will be directed according to the position of themodeknob.
AirDeliveryModeControl: Turn theknobclockwiseor counterclockwisetochangethe currentairflowmode.
Selectfromthefollowingmodes:
(Vent):Airisdirectedtothe instrumentpaneloutlets.
(Bi-Level):Airisdivided betweentheinstrumentpanel outletsandfloorandsidewindow outlets.Coolerairisdirectedtothe upperoutletsandwarmerairtothe flooroutlets.
(Floor):Airisdirectedtothe flooroutlets.Recirculationcannot beselectedwhileinfloormode becausethiscouldcausethe interiorwindowtofog.
(Floor/Defog): Thismode clearsthowindowsoffogor moisture.Airisdirectedtothefloor, windshield, andsidewindowoutlets. Whenthismodeisselected, the systemrunstheairconditioning compressorunlesstheoutside temperature isnearfreezingor below. Recirculationisnotavailable inthismode.
(Defrost): This mode clear the windshield off fogor frost more quickly. Air is directed to the windshield and sidewindow outlets. Whent his mode is selected, the system runst he air conditioning compressor unless the outside temperature is near, or below freezing. Recirculation is not available in this mode.
Donotdrivethevehicleuntilallthe windowsareclear.
(AirConditioning): Pressto turn the air conditioningsystem on or off. An indicator light on the button comes on to show that the air conditioning is on.
Thefancontrolmustbeontouse theairconditioning.
Theremightbeaslightchangein engineperformancewhentheair conditioningcompressorshutsoff andturnsonagain. Thisisnormal. Thesystemisdesignedtomake adjustmentstohelpwithfuel economywhilestillmaintainingthe selectedtemperature.
The air conditioningsystem removes moisture from the air, soa small amount of water might drip under the vehicle while idling or after turning off the engine. This is normal.
(Recirculation): Presstoturn therecirculationmodeonoroff. An indicatorlightonthebuttoncomes ontoshowthattherecirculation modeison. Thismoderecirculates andhelpstoquicklycooltheair insidethevehicle. Itcanbeused to preventoutsideairandodorsfrom enteringthevehicle.
There circulation mode cannot be used with floor/defog, defrost, or defogging modes. If recirculation is selected in the semodes, the indicator will flash or not come on.
AirVents
Usethethumbwheelontheoutlets tochangethedirectionofthe airflow.
Liftuporpushdownonthe thumbwheellocatedinthecenterof theoutlettodirecttheairupor down,orslidethumbwheelto theleftorrighttodirecttheairflow fromside-to-side.
OperationTips
- Clearawayanyice, snowor leaves from the airinlets at the base of the windshield that may block the flow of air into the vehicle.
• Useofnon-GMapprovedhood deflectorsmayadverselyaffect theperformanceofthesystem. - Keepthepathunderthefront seatsclearofobjectstohelp circulatetheairinsideofthe vehiclemoreeffectively.
8-4ClimateControls
NOTES
Driving and Operating
DrivingInformation
DistractedDriving......9-2
DefensiveDriving......9-3
DrunkDriving....9-3
ControlofaVehicle......9-3
Braking....9-4
Steering....9-4
Off-RoadRecovery......9-5
LossofControl......9-5
Off-RoadDriving....9-6
DrivingonWetRoads......9-12
HighwayHypnosis......9-13
HillandMountainRoads.....9-14
WinterDriving......9-15
IftheVehicleIsStuck......9-17
VehicleLoadLimits......9-19
Truck-CamperLoading
Information......9-25
StartingandOperating
NewVehicleBreak-In......9-26
IgnitionPositions......9-26
StartingtheEngine......9-28
EngineHeater......9-30
RetainedAccessory
Power(RAP)....9-31
ShiftingIntoPark(Automatic Transmission)....9-
ShiftingoutofPark(Automatic Transmission)....9-32
Parking(Manual Transmission)....9-33
ParkingoverThings ThatBurn....9-34
EngineExhaust
EngineExhaust......9-34
RunningtheVehicleWhile Parked....9-35
AutomaticTransmission
AutomaticTransmission.....9-36
ManualTransmission
ManualTransmission......9-38
DriveSystems
Four-WheelDrive......9-40
Brakes
AntilockBrake System(ABS)....9-44
ParkingBrake......9-45
BrakeAssist......9-46
RideControlSystems
TractionControl System(TCS)......9-47
StabiliTrak® System......9-48
Limited-SlipRearAxle.....9-50
CruiseControl
CruiseControl....9-50
9-2DrivingandOperating
Fuel
Fuel....9-53
RecommendedFuel......9-53
GasolineSpecifications(U.S. andCanadaOnly)....9-53
CaliforniaFuel Requirements......9-53
FuelsinForeignCountries...9-54
FuelAdditives......9-54
FillingtheTank......9-55
FillingaPortableFuel Container....9-57
Towing
GeneralTowing
Information......9-57
DrivingCharacteristics and Towing Tips....9-58
TrailerTowing....9-62
TowingEquipment......9-66
ConversionsandAdd-Ons
Add-On Electrical
Equipment......9-67
PickupConversionto ChassisCab....9-67
DrivingInformation
DistractedDriving
Distractioncomesinmanyforms andcantakeyourfocusfromthe taskofdriving.Exercisegood judgmentandonotletother activitiesdivertyourattentionaway fromtheroad.Manylocal governmentshaveenactedlaws regardingdriverdistraction.Become familiarwiththelocallawsin yourarea.
Toavoiddistracteddriving,always keepyoureyesontheroad,hands onthewheel,andmindonthedrive.
- Donotuseaphonein demandingdrivingsituations. Useahands-freemethodto placeorreceivenecessary phonecalls.
-
Watchtheroad.Donotread, takenotes,orlookup informationonphonesorother electronicdevices.
-
Designateafrontseat passengertohandlepotential distractions.
- Becomefamiliarwithvehicle featuresbeforedriving,suchas programmingfavoriteradio stationsandadjustingclimate controlandseatsettings. Programalltripinformationinto anynavigationdevicepriorto driving.
- Waituntilthevehicleisparked toretrieveitemsthathavefallen tothefloor.
- Stoporparkthevehicletotend tochildren.
- Keeppetsinanappropriate carrierorrestraint.
- Avoidstressfulconversations whiledriving,whetherwitha passengeroronacellphone.
WARNING
Takingyoureyesofftheroadtoo longortoooftencouldcausea crashresultingininjuryordeath. Focusyourattentionondriving.
Refertotheinfotainmentsectionfor moreinformationonusingthat system,includingpairingandusing acellphone.
Ifequipped, refertothenavigation manualforinformationonthat system, includingpairingandusing acellphone.
DefensiveDriving
Defensivedrivingmeans"always expecttheunexpected."Thefirst stepindrivingdefensivelyistowear thesafetybelt.See SafetyBeltson page3-11.
- Assumethatotherroadusers (pedestrians, bicyclists, and otherdrivers) are going to be careless and make mistakes. Anticipate what they might do and beready.
- Allowenoughfollowingdistance betweenyouandthedriverin frontofyou.
• Focusonthetaskofdriving.
DrunkDriving
Deathandinjuryassociatedwith drinkinganddrivingisaglobal tragedy.
WARNING
Drinkingandthendrivingisvery dangerous.Yourreflexes, perceptions, attentiveness,and judgmentcanbeaffectedbyevenasmallamountofalcohol.You canhaveaserious—oreven fatal—collisionifyoudriveafter drinking.
Donotdrinkanddriveorridewith adriverwhohasbeendrinking. Ridehomeinacab;orifyouare withagroup,designateadriver whowillnotdrink.
ControlofaVehicle
Braking, steering, and accelerating are important factors in helping to control vehicle while driving.
Braking
Brakingactioninvolvesperception timeandreactiontime.Decidingto pushthebrakepedalisperception time.Actuallydoingitis reactiontime.
Averagedriverreactiontimeis about three-quarters of a second. In that time, a vehicle moving at 100 km/h (60 mph) travels 20 m (66 ft), which could be a lot of distance in an emergency.
Helpfulbrakingtipstokeepinmind include:
- Keepenoughdistancebetween youandthevehicleinfront ofyou.
- Avoidneedlessheavybraking.
- Keeppacewithtraffic.
If the engine ever stops while the vehicle is being driven, brake normally but donot pump the brakes. Doings could make the pedal hardertopushdown. If the engine stops, there will become power brake assist but it will be used when the brake is applied. Oncethe power assist is used up, it cantakelongertostop and the brake pedal will be hardertopush.
Steering
HydraulicPowerSteering
Yourvehiclehashydraulic powersteering.Itmayrequire maintenance.SeePowerSteering Fluidonpage10-25.
If power steering assist is lost due to asystem malfunction, the vehicle can be steered, but may require increased effort.
Seeyourdealerifthereisa problem.
CurveTips
• Takecurvesatareasonable speed.
- Reducespeedbeforeenteringa curve.
- Maintainareasonablesteady speedthroughthecurve.
- Waituntilthevehicleisoutof thecurvebeforeaccelerating gentlyintothestraightaway.
SteeringinEmergencies
- Therearesomesituationswhen steeringaroundaproblemmay bemoreeffectivethanbraking.
- Holdingbothsidesofthe steeringwheelallowsyoutoturn 180degreeswithoutremoving ahand.
• TheAntilockBrakeSystem (ABS)allowssteeringwhile braking.
Off-RoadRecovery
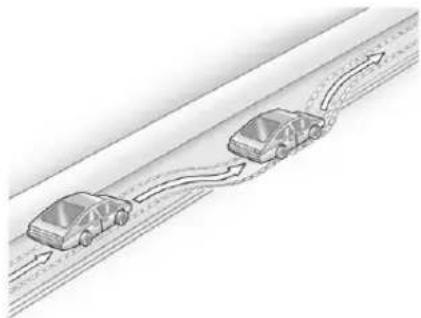
natural_image
Diagram of two cars driving on a road with directional arrows indicating flow (no text or symbols)Thevehicle'srightwheelscandrop offtheedgeofaroadontothe shoulderwhiledriving.Follow thesetips:
-
Easeofftheacceleratorand then, if there is nothing in the way, steer the vehicles that it straddlesthe edge of the pavement.
-
Turnthesteeringwheelabout one-eighthofaturn, until the rightfronttirecontactsthe pavementedge.
- Thenturnthesteeringwheelto gostraightdowntheroadway.
LossofControl
Skidding
Therearethreetypesofskidsthat correspondtothevehicle'sthree controlsystems:
- BrakingSkid—wheelsarenot rolling.
• SteeringorCornering Skid—toomuchspeedor steeringinacurvecausestires toslipandlosecorneringforce. - AccelerationSkid—toomuch throttlecausesthedriving wheelstospin.
Defensivedriversavoidmostskids bytakingreasonablecaresuitedto existingconditions,andbynot overdrivingthoseconditions.But skidsarealwayspossible.
If the vehicle start to slide, follow these suggestions:
- Easeyourfootoffthe acceleratorpedalandquickly steerthewayyouwantthe vehicletogo.Thevehiclemay straightenout.Bereadyfora secondskidifitoccurs.
- Slowdownandadjustyour drivingaccordingtoweather conditions.Stoppingdistance canbelongerandvehicle controlcanbeaffectedwhen tractionisreducedbywater, snow,ice,gravel,orother materialontheroad.Learnto recognizewarningclues—such asenoughwater,ice,orpacked snowontheroadtomakea mirroredsurface—andslow downwhenyouhaveanydoubt.
9-6DrivingandOperating
- Trytoavoidsuddensteering, acceleration, or braking, including reducing vehiclespeed by shifting to lower gear. Any sudden changes could cause the rest of the vehicle.
Remember: Antilockbrakeshelp avoidonlythebrakingskid.
Off-RoadDriving
Off-RoadDriving
Four-wheel-drive vehicles can be used for off-road driving. Vehicles without four-wheeldrive and vehicles note equipped with All Terrain (AT) or On-Off Road (OOR) tires must not be driven off-road exception level, solids surface. To contact the tire manufacturer for more information about the original equipment, seethe Limited Warranty and Owner Assistance Information manual.
Controllingthevehicleisthekeyto successfuloff-roaddriving. One of thebestwaystocontrolthevehicle istocontrolthespeed.
WARNING
Whendrivingoff-road, bouncing and quickchangesindirection caneasilythrowyououtof position. Thiscouldcauseyouto losecontrolandcrash. Youand yourpassengersshouldalways wearsafetybelts.
BeforeDrivingOff-Road
• Have all necessary maintenance and servicework completed.
- Fuelthevehicle,fillfluidlevels, andcheckinflationpressurein alltires,includingthespare, ifequipped.
- Readalltheinformationabout four-wheel-drivevehiclesinthis manual.
- Makesureallunderbody shields, ifequipped, areproperly attached.
- Knowthelocallawsthatapplyto off-roaddriving.
Togainmoregroundclearanceif needed, it may be necessary to remove the front fascialower airdam.
Notice: Operating the vehicle for extended period without the front fascialowerairdam installed can cause improper air flow to the engine. Re-attach the front fasciaairdama after off-road driving.
LoadingtheVehiclefor Off-RoadDriving
WARNING
- Unsecuredcargoontheload floorcanbetossedabout whendrivingoverrough terrain.Youoryour passengerscanbestruckby flyingobjects.Securethe cargoproperly.
- Keepcargointhecargoarea asfarforwardandaslowas possible. Theheaviestthings shouldbeonthefloor, forwardoftherearaxle.
- Heavyloadsontheroofraise thevehicle'scenterofgravity, makingitmorelikelytoroll over. Youcanbeseriouslyor fatallyinjuredifthevehicle rollsover. Putheavyloads insidethecargoarea, noton thereof.
Formoreinformationaboutloading thevehicle,seeVehicleLoadLimits onpage9-19andTireson page10-47.
EnvironmentalConcerns
- Alwaysuseestablishedtrails, roads,andareasthathavebeen setasideforpublicoff-road recreationaldrivingandobeyall postedregulations.
- Donotdamageshrubs,flowers, trees,orgrassesordisturb wildlife.
- Donotparkoverthingsthat burn.SeeParkingoverThings ThatBurnonpage9-34.
DrivingonHills
Drivingsafelyonhillsrequiresgood judgmentandunderstandingof whatthevehiclecanandcannotdo.
WARNING
Manyhillsaresimplytoosteep foranyvehicle.Drivinguphills cancausethevehicletostall. Drivingdownhillscancauseloss ofcontrol.Drivingacrosshillscan causearollover.Youcouldbe injuredorkilled.Donotdriveon steephills.
Beforedrivingonahill, assess thesteepness, traction, and obstructions. If the terrainahead cannot be seen, get out of the vehicle and walk the hill before driving further.
9-8DrivingandOperating
Whendrivingonhills:
• Usealowgearandkeepafirm griponthesteeringwheel.
- Maintainaslowspeed.
- Whenpossible,drivestraightup ordownthehill.
- Slowdownwhenapproaching thetopofthehill.
- Useheadlampsevenduringthe daytomakethevehiclemore visible.
WARNING
Drivingtothetopofahillathigh speedcancauseanaccident. Therecouldbeadrop-off, embankment, cliff, oreven another vehicle. You could be seriously injuredorkilled. As you nearthetopofahill, slowdown and stayalert.
- Nevergodownhillforwardor backward witheither the transmissionortransfercasein N(Neutral). Thebrakescould overheatandyoucouldlose control.
WARNING
If the vehicle has the two-speed automatic transference, shifting the transfer case to N (Neutral) can cause your vehicle to roll even if the transmission is in P (Park) for an automatic transmission or any gear position for a manual transmission. This is because the N (Neutral) position on the transfer case overrides the transmission. You are someone else could be injured. If leaving the vehicle, set the parking brake and shift the transmission to P (Park) for an automatic transmission or any gear position for a manual transmission. Shift the transfer case to any position but N (Neutral).
- Whendrivingdownahill, keep thevehicleheadedstraight down. Usealowgearbecause theenginewillworkwiththe brakestoslowthevehicleand helpkeepthevehicleunder control.
WARNING
Heavybrakingwhengoingdown ahillcancauseyourbrakesto overheatandfade. This could cause lossof control and you or others could be injuredorkilled. Apply the brakes slightly when descending ahilland use alow gearto keep vehicles speed under control.
Ifthevehiclestallsonahill:
-
Apply the brake stop the vehicle, and then apply the parking brake.
-
ShiftintoP(Park)foran automatictransmissionor 1(First)foramanual transmissionandthenrestart theengine.
- Ifdrivinguphillwhenthe vehiclestalls, shiftto R(Reverse), releasethe parkingbrake, and back straightdown.
- Nevertrytoturnthevehicle around. If the hill is steep enough to stall the vehicle, it is steepenought cause it to rollover.
• If you cannot make it up the hill, back straightdown the hill.
• Neverbackdownahillin N(Neutral)usingonlythe brake.
• Thevehiclecanroll backwardquicklyandyou couldlosecontrol.
- Ifdrivingdownhillwhenthe vehiclestalls, shifttoa lowergear, releasethe parkingbrake, anddrive straightdownthehill.
9-10DrivingandOperating
- If the vehicle cannot be restarted after stalling, set the parking brake, shift an automatic transmission into P (Park) or a manual transmission into 1 (First), and turn the vehicle off.
3.1.Leavethevehicle and seekhelp.
3.2. Stayclearofthepaththe vehiclewouldtakeifit rolleddownhill.
- Avoidturnsthattakethevehicle acrosstheinclineofthehill. Ahillthatcanbedrivenstraight upordownmightbetoosteepto driveacross.Drivingacrossan inclineputsmoreweightonthe downhillwheelswhichcould causeadownhillslideora rollover.
- Surfaceconditionscanbea problem. Loosegravel, muddy spots, orevenwetgrasscan causethetirestoslipsideways, downhill. If the vehicles slips sideways, it can hits something that will tripit—arock, arut, etc.—and rollover.
- Hiddenobstaclescanmakethe steepnessoftheinclinemore severe. Ifarockisdrivenacross with theuphillwheels, orifthe downhillwheelsdropintoarut ordepression, thevehiclecantilt evenmore.
- Ifaninclinemustbedriven across,andthevehiclestartsto slide,turndownhill.Thisshould helpstraightenoutthevehicle andpreventthesideslipping.

WARNING
Gettingoutofthevehicleonthe downhillsidewhenstopped acrossaninclineisdangerous. Ifthevehiclerollsover,youcould becrushedorkilled.Alwaysget outontheuphillsideofthe vehicleandstaywellclearofthe rolloverpath.
DrivinginMud, Sand, Snow, orlce
Usealowgearwhendrivingin mud-thedeeperthemud,the lowerthegear.Keepthevehicle movingtoavoidgettingstuck.
Tractionchangeswhendrivingon sand. Onloosesand, suchason beachesorsanddunes, thetires tendtosinkintothesand. This affectssteering, accelerating, and braking. Driveatareducedspeed and avoidsharpturnsorabrupt maneuvers.
Tractionisreducedonhardpacked snowandiceanditiseasytolose control.Reducevehiclespeedwhen drivingonhardpackedsnow andice.
WARNING
Drivingonfrozenlakes, ponds, orriverscanbedangerous. Ice conditions vary greatly and the vehicle could fall through the ice; you and your passengers could drown. Drive your vehicle on safe surfaces only.
DrivinginWater
WARNING
Drivingthroughrushingwatercan bedangerous.Deepwatercan sweepyourvehicledownstream andyouandyourpassengers coulddrown.Ifitisonlyshallow water,itcanstillwashawaythe groundfromunderyourtires. Tractioncouldbelost,andthe vehiclecouldrollover.Donot drivethroughrushingwater.
Notice: Donotdrivethrough standingwaterifitisdeep enoughtocoverthewheelhubs, axlesorexhaustpipe. Deepwater candamagetheaxleandother vehicleparts.
Ifthestandingwaterisnottoodeep, driveslowlythroughit.Atfaster speeds,watersplashesonthe ignitionsystemandthevehiclecan stall.Stallingcanalsooccurifyou gettheexhaustpipeunderwater. Whiletheexhaustpipeisunder water,youwillnotbeabletostart theengine.Whengoingthrough water,thebrakesgetwet,andit mighttakelongertostop.See DrivingonWetRoadson page9-12.
AfterOff-RoadDriving
Removeanybrushordebristhat hascollectedontheunderbody, orchassis,orunderthehood. Theseaccumulationscanbeafire hazard.
Afteroperationinmudorsand, havethebrakeliningscleaned and checked. Thesesubstancescan causeglazingandunevenbraking. Checkthebodystructure,steering, suspension,wheels,tires,and exhaustsystemfordamageand checkthefuellinesandcooling systemforanyleakage.
Morefrequentmaintenanceservice isrequired. Refertothe MaintenanceScheduleon page 11-3 formoreinformation.
DrivingonWetRoads
Rainandwetroadscanreduce vehicletraction and affect your ability to stop and accelerate. Always drives slower in the set types of driving conditions and avoid driving through large puddles and deep-standing or flowing water.

WARNING
Wetbrakescancausecrashes.
Theymightnotworkaswellina quickstopandcouldcause pullingtooneside.Youcould losecontrolofthevehicle.
Afterdrivingthroughalarge puddleofwateroracar/vehicle wash, lightlyapplythebrake pedaluntilthebrakeswork normally.
(Continued)
WARNING(Continued)
Flowingorrushingwatercreates strongforces.Drivingthrough flowingwatercouldcausethe vehicletobecarriedaway.Ifthis happens,youandothervehicle occupantscoulddrown.Donot ignorepolicewarningsandbe verycautiousabouttryingtodrive throughflowingwater.
Hydroplaning
Hydroplaningisdangerous.Water canbuildupunderthevehicle's tiressotheyactuallyrideonthe water.Thiscanhappeniftheroadis wetenoughandyouaregoingfast enough.Whenthevehicleis hydroplaning,ithaslittleorno contactwiththeroad.
Thereisnohardandfastruleabout hydroplaning. Thebestadviceisto slowdownwhentheroadiswet.
OtherRainyWeatherTips
Besidesslowingdown,otherwet weatherdrivingtipsinclude:
- Allowextrafollowingdistance.
- Passwithcaution.
- Keepwindshieldwiping equipmentingoodshape.
- Keepthewindshieldwasherfluid reservoirfilled.
- Havegoodtireswithproper treaddepth.See Tireson page 10-47.
• Turnoffcruisecontrol.
HighwayHypnosis
Alwaysbealertandpayattentionto yoursurroundingswhiledriving. Ifyoubecometiredorsleepy,finda safeplacetoparkthevehicle andrest.
Otherdrivingtipsinclude:
- Keepthevehiclewellventilated.
- Keeptheinterior temperaturecool.
- Keepyoureyesmoving—scan theroadaheadandtothesides.
- Checktherearviewmirrorand vehicleinstrumentsoften.
9-14DrivingandOperating
HillandMountainRoads
Driving on steephills through mountains is different than driving on flator rolling terrain. Tips for driving in these second conditions include:
- Keepthevehicleservicedandin goodshape.
- Checkallfluidlevelsandbrakes, tires,coolingsystem,and transmission.
- Shifttoalowergearwhengoing downsteeporlonghills.
WARNING
If you donot shift down, the brakes could get so hot that they would not work well. You would then have poor braking over no going down a hill. You could crash. Shift downtolet the engine assist the brakes on a steep downhill slope.
WARNING
CoastingdownhillinN(Neutral) orwiththeignitionoffis dangerous. Thebrakeswillhave todoalltheworkofslowingdown andtheycouldgetsohotthat theywouldnotworkwell. You wouldthenhavepoorbrakingor evennonegoingdownahill. You couldcrash.Alwayshavethe engineerunningandthevehiclein gearwhengoingdownhill.
- Stayinyourownlane.Donot swingwideorcutacrossthe centeroftheroad.Driveat speedsthatletyoustayinyourownlane.
- Bealertontopofhills; somethingcouldbeinyourlane (stalledcar,accident).
- Payattentiontospecialroad signs(fallingrocksarea,winding roads,longgrades,passingor no-passingzones)andtake appropriateaction.
WinterDriving
DrivingonSnoworIce
Drivecarefullywhenthereissnow oricebetweenthetiresandthe road,creatinglesstractionorgrip. Weticecanoccuratabout0°C (32°F)whenfreezingrainbeginsto fall,resultinginevenlesstraction. Avoiddrivingonweticeorin freezingrainuntilroadscanbe treatedwithsaltorsand.
Drivewith caution, whatever the condition. Accelerategently so traction is not lost. Accelerating too quickly cause the wheel stospin and make the surface under the tiresslick, so there is even less traction.
Trynottobreakthefragiletraction. If you accelerate at toofast, the drive wheels will spin and polish the surface under the treseven more.
TheAntilockBrakeSystem(ABS) onpage9-44improvesvehicle stabilityduringhardstopson slipperyroads,butapplythebrakes soonerthanwhenondrypavement.
Allowgreaterfollowingdistanceon anyslipperyroadandwatchfor slipperyspots.lcypatchescan occuronotherwiseclearroadsin shadedareas.Thesurfaceofa curveoranoverpasscanremainicy whenthesurroundingroadsare clear.Avoidsuddensteering maneuversandbrakingwhile onice.
Turnoffcruise control on slippery surfaces.
BlizzardConditions
Beingstuckinsnowcanbea serioussituation.Staywiththe vehicleunlesssthereishelpnearby. Ifpossible,usetheRoadside AssistanceProgram(U.S.and Canada)onpage13-8orRoadside AssistanceProgram(Mexico)on page13-10.Togethelpandkeep everyoneinthevehiclesafe:
• Turnonthehazardwarning flashers.
- Tiearedclothtoanoutside mirror.
WARNING
Snowcantrapengineexhaust underthevehicle. This may cause exhaust gas to get inside. Engine exhaust contains carbon monoxide (CO) which cannot be seen or smelled. It can cause unconsciousness and even death.
Ifthevehicleisstuckinthesnow:
- Clearawaysnowfromaround thebaseofyourvehicle, especiallyanythatisblocking theexhaustpipe.
- Checkagainfromtimeto timetobesuresnowdoes notcollectthere.
- Openawindowabout5cm (2in)onthesideofthe vehiclethatisawayfromthe windtobringinfreshair.
(Continued)
WARNING(Continued)
- Fullyopentheairoutletson orundertheinstrument panel.
- Adjusttheclimatecontrol systemtoasettingthat circulatestheairinsidethe vehicleandsetthefanspeed tothehighestsetting.See "ClimateControlSystems"in theIndex.
Formoreinformationabout carbonmonoxide,seeEngine Exhaustonpage9-34.
Runtheengineforshortperiods onlyasneededtokeepwarm,but becareful.
Tosavefuel, runtheengineforonly shortperiodsasneededtowarm thevehicleandthenshuttheengine offandclosethewindowmostof thewaytosaveheat.Repeatthis untilhelparrivesbutonlywhenyou feelreallyuncomfortablefromthe cold.Movingabouttokeepwarm alsohelps.
Ifittakessometimeforhelpto arrive,nowandthenwhenyourun theengine,pushtheaccelerator pedalslightlysotheengineruns fasterthantheidlespeed.This keepsthebatterychargedtorestart thevehicleandtosignalforhelp withtheheadlamps.Dothisaslittle aspossibletosavefuel.
IftheVehiclesStuck
Slowlyandcautiously spinthe wheelstofreethe vehicle when stuckinsand, mud, ice, or snow. See "Rocking Your vehiclet ogetlt Out" later in this section.
Ifstucktooseverelyforthetraction systemtofreethevehicle,turnthe tractionsystemoffandusethe rockingmethod.
WARNING
If the vehicle's tiresspinathigh speed, they can explode, and you or others could be injured. The vehicle can overheat, causing an engine compartment fire or other damage. Spin the wheels as little as possible and avoid going above 55 km/h (35 mph).
Forinformationaboutusingtire chainsonthevehicle,see Tire Chainsonpage10-68.
RockingtheVehicletog ItOut
Turnthesteeringwheelleftand righttocleartheareaaroundthe frontwheels. Forfour-wheeldrive vehicles, shift into 4 HI. Turnoffany tractionsystem. Shiftback and forth between R (Reverse) and a forward gear, or with a manual transmission, between 1 (First) or 2 (Second) and R (Reverse), spinning the wheels as little as possible. Top prevent transmission wear, wait until the wheels stop spinning before shifting gears. Releasethe accelerator pedal while shifting, and press lightly on the accelerator pedal when the transmission is in gear. Slowly spinning the wheels in the forward and reversed directions causes arocking motion that could freethe vehicle. If that does not get the vehicle out after a few tries, it might need to be towed out. Recovery hook scan be used, if the vehicle has them. If the vehicle does need to be towed out, see Towing the Vehicle on page 10-91.
RecoveryHooks

WARNING
Neverpullonrecoveryhooks fromtheside. Thehookscould breakandyouandotherscould beinjured. Whenusingrecovery hooks, alwayspullthevehicle straightout.
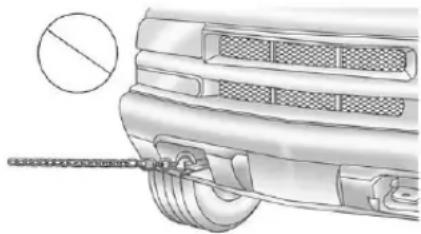
natural_image
Diagram of a car wheel with a rope tied to the side, showing no text or symbolsNotice: Never user recovery hookstotowthe vehicle. Your vehicle could bed damaged and it would not be recovered by warranty.
Forvehicleswithrecoveryhooksat thefrontofthevehicle,youcanuse themifyouarestuckoff-roadand needtobepulledtosomeplace whereyoucancontinuedriving.
VehicleLoadLimits
Itisveryimportanttoknowhow muchweightyourvehiclecan carry. Thisweightiscalledthe vehiclecapacityweightand includestheweightofall occupants, cargo, and all nonfactory-installedoptions. Twolabelsonyourvehicleshow howmuchweightitmay properlycarry, the Tire and LoadingInformationlabel and the Certification/Tirelabel.
WARNING
Donotloadthevehicleany heavierthantheGross VehicleWeightRating (GVWR), oreitherthe maximumfrontorrearGross AxleWeightRating(GAWR). Thiscancausesystemsto breakandchangethewaythe vehiclehandles. Thiscould causelossofcontrolanda crash. Overloadingcanalso shortenthelifeofthevehicle.
TireandLoadingInformation Label
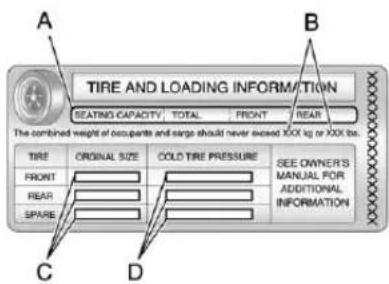
text_image
A TIRE AND LOADING INFORMATION SEATING CAPACITY TOTAL FRONT REAR The combined weight of occupants and large should never exceed XXX kg or XXX lbs. B TIRE ORIGINAL SIZE COLD TIRE PRESSURE SEE OWNER'S MANUAL FOR ADDITIONAL INFORMATION FRONT REAR SPARE C DLabelExample
AvehiclespecificTireand LoadingInformationlabelis attachedtothevehicle'scenter pillar(B-pillar).Withthedriver dooropen,youwillfindthelabel attachedbelowthedoorlatch post.Vehicle'swithoutacenter pillar,likeextendedcabmodels, willhavetheTireandLoading Informationlabelattachedtothe driversideextendedcabdoor,
abovethedoorlatchpost. The Tire and Loading Information label show sthenumber of occupant seating positions (A), and them a maximum vehicle capacity weight (B) inkilograms and pounds.
The Tire and Loading Information label also shows the sizeofthe originalequipment tires (C) and there recommended cold tire inflation pressures (D). Formore information on tires and inflation see Tireson page 10-47 and Tire Pressure on page 10-54.
Thereisalsoimportant informationontheCertification/Tirelabel.IttellsyoutheGross VehicleWeightRating(GVWR) andtheGrossAxleWeight Rating(GAWR)forthefrontand rearaxles.See“Certification/TireLabel”laterinthissection.
StepsforDeterminingCorrect LoadLimit
-
Locatetheatement "Thecombinedweightof occupantsandcargoshould neverexceedXXXkgor XXXlbs" onyourvehicle's placard.
-
Determinethecombined weightofthedriverand passengersthatwillberiding inyourvehicle.
-
Subtract the combined weight of the driver and passengers from XXXkgor XXXlbs.
-
Theresultingfigureequals theavailableamountofcargo andluggageloadcapacity. Forexample,ifthe"XXX" amountequals1400lbsand therewillbefive150lb passengersinyourvehicle, theamountofavailablecargo andluggageloadcapacityis 650lbs(1400-750(5x150) =650lbs).
-
Determinethecombined weightofluggageandcargo beingloadedonthevehicle. Thatweightmaynotsafely exceedtheavailablecargo andluggageloadcapacity calculatedinStep4.
-
If your vehicle will betowing a trailer, the load from your trailer will be transferred to your vehicle. Consult this manual to determine how this reduces the available cargo and luggage load capacity of your vehicle.
See Trailer Towingon page9-62 for important information on towinga trailer, towingsafety, and trailering tips.
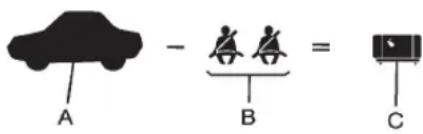
text_image
A - B = CExample1
A. Vehicle Capacity Weight for Example 1=453kg(1,000lbs)
B. SubtractOccupantWeight@
68kg(150lbs)×2=136kg
(300lbs)
C. Available Occupant and Cargo Weight=317kg(700lbs)
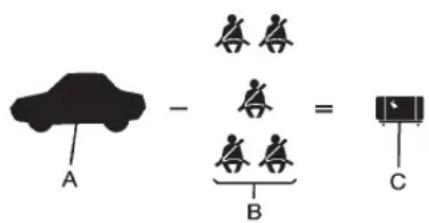
text_image
A - B = CExample2
A. Vehicle Capacity Weight for Example2=453kg(1,000lbs)
B. SubtractOccupantWeight@
68kg(150lbs)×5=340kg
(750lbs)
C. Available Cargo Weight=113kg(250lbs)
9-22DrivingandOperating
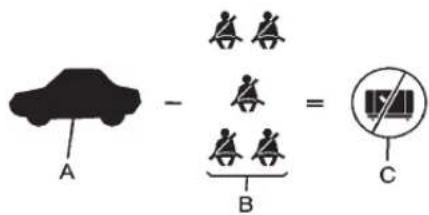
text_image
A - B = CExample3
A. Vehicle Capacity Weight for Example3=453kg(1,000lbs)
B. SubtractOccupantWeight@
91kg(200lbs)×5=453kg
(1,000lbs)
C. Available Cargo Weight=0kg(0lbs)
Refertoyourvehicle's Tire and Loading Information label for specific information about your vehicle's capacity weight and seating positions. The combined weight of the driver, passengers, cargo, and any accessories or equipment added to your vehicle after the factory should never exceed your vehicle's capacity weight.
Certification/TireLabel
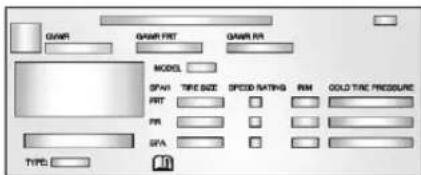
text_image
GAWR GAWR FRT GAWR PA MODEL SPX10 TIPID SIZE SPEED RATING RIM GOLD TAC PRESSURE PRT PR SPA TYPE:LabelExample
AvehiclespecificCertification/Tirelabelisattachedtothe bottomsectionofthedriverside centerpillar(B-pillar)oronthe endofthedriversideinstrument panel.Vehicleswithoutacenter pillar,likeextendedcabmodels, willhavetheCertification/Tire labelattachedtotheedgeofthe driverside,extendedcabdoor, belowthedoorlatchpost.The labelshowstheGrossVehicle
WeightRating(GVWR).The GVWRincludestheweightof thevehicle,allocupants,fuel, cargo,andtrailertongueweight, ifpullingatrailer.
The Certification/Tirelabel also tells you the maximum weights for the front and rear axles, called Gross Axle Weight Rating (GAWR). To find out the actual load on your front and rear axles, you need to go to a weigh station and weigh your vehicle. Your dealer can help you with this. Besuretospread out your loadequally on both sides of the centerline.
NeverexceedtheGVWRfor yourvehicle,ortheGAWRfor eitherthefrontorrearaxle.
Iftheloadisheavy, it should be spreadout.
Similarappearingvehiclesmay havedifferentGVWRsand capacityweights.Plesenote yourvehicle's Certification/Tire labelorconsultyourdealerfor additionaldetails.
WARNING
Donotloadthevehicleany heavierthantheGross VehicleWeightRating (GVWR), oreitherthe maximumfrontorrearGross AxleWeightRating(GAWR). Thiscancausesystemsto breakandchangethewaythe vehiclehandles. Thiscould causelossofcontrolanda crash. Overloadingcanalso shortenthelifeofthevehicle.
Usingheaviersuspension componentstogetadded durabilitymightnotchangeyour weightratings.Askyourdealer tohelpyouloadyourvehiclethe rightway.
Notice: Overloading the vehicle may caused damage. Repairs would not be recovered by the vehicle warranty. Do not overload the vehicle.
If you put things inside your vehicle—likesuit cases, tools, packages, or anything else—they will go as fast as the vehicle goes. If you havet to stop or turn quickly, or if there is a crash, they will keep going.
WARNING
Thingsyouputinsidethe vehiclecanstrikeandinjure peopleinasuddenstopor turn, orinacrash.
- Putthingsinthecargo areaofthevehicle.Tryto spreadtheweightevenly.
- Neverstackheavier things,likesuitcases, insidethevehiclesothat someofthemareabove thetopsoftheseats.
(Continued)
WARNING(Continued)
- Donotleavean unsecuredchildrestraint inthevehicle.
- Whenyoucarrysomething insidethevehicle,secure itwheneveryoucan.
- Donotleaveaseatfolded downunlessyouneedto.
Thereisalsoimportantloading informationforoff-roaddriving in thismanual. See "LoadingYour VehicleforOff-RoadDriving" under Off-RoadDrivingonpage9-6.
Remembernottoexceedthe GrossAxleWeight rating(GAWR)ofthefrontor rearaxle.
Two-TieredLoading
Forvehicleswithasixfootbed, anupperloadplatformcanbe createdbypositioningfour5cm (2inches)by15cm(6inches) woodenplanksacrossthewidth ofthepickupbox.Theplanks mustbeinsertedinthepickup boxdepressions.
When using this upper load platform, besuretheload is securely tied downtopreventit from shifting. Theload's center of gravity should be positioned in a zone over therearaxle.
Anyloadthatextendsbeyond thevehicle'staillampareamust beproperlymarkedaccordingto localawsandregulations.
Remembernottoexceed theGrossAxleWeight Rating(GAWR)oftherearaxle.
Add-OnEquipment
Whenyoucarryremovable items,youmayneedtoputa limitonhowmanypeopleyou carryinsideyourvehicle.Be suretoweighyourvehicle beforeyoubuyandinstallthe newequipment.
Notice: Overloading the vehicle may caused damage. Repairs would not be recovered by the vehicle warranty. Do not overload the vehicle.
Remembernottoexceed theGrossAxleWeight Rating(GAWR)oftherearaxle.
Areinforcementkitformounting atoolboxisrecommended.See yourdealer.
Truck-CamperLoading Information
The vehicle was neither designed nor intended to carry a slide-intypecamper.
Notice: Adding aslide-in camperorsimilarequipment to the vehicle candamageit, and therepairs would not be covered by the vehicle warranty. Donot install a slide-incamperorsimilar equipment on the vehicle.
Starting and Operating
NewVehicleBreak-In
Notice: The vehicle does not need an elaborate break-in. But it will perform better in the long run if you follow these guidelines:
- Keepthevehiclespeedat 88km/h(55mph)orlessfor thefirst805km(500miles).
-
Donotdriveatanyone constantspeed, fastorslow, forthefirst805km (500miles).Donotmake full-throttlestarts.Avoid downshiftingtobrakeor slowthevehicle.
-
Avoidmakinghardstopsfor thefirst322km(200miles)or so.Duringthistimethenew brakeliningsarenotyet brokenin.Hardstopswith newliningscanmean prematurewearandearlier replacement.Followthis breaking-inguidelineevery timeyougetnewbrake linings.
- Donottowatrailerduring break-in. See Trailer Towing on page 9-62 forthetrailer towing capabilities of the vehicle and more information.
Followingbreak-in, enginespeed and load can be gradually increased.
IgnitionPositions
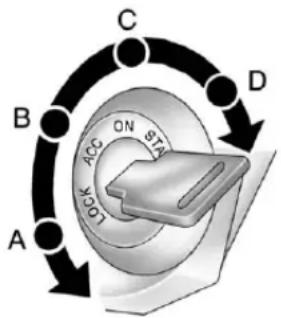
flowchart
graph TD
    A["Point A"] -->|ON| B["Point B"]
    B -->|ST| C["Point C"]
    C -->|ON| D["Point D"]
    D -->|ST| A
    style A fill:#f9f,stroke:#333
    style B fill:#ccf,stroke:#333
    style C fill:#cfc,stroke:#333
    style D fill:#fcc,stroke:#333
Theignitionswitchhasfourdifferent positions.
ToshiftoutofP(Park), turn the ignition to ON/RUN and apply the regular brake pedal.
Notice: Using atooltoforcethe key to turn in the ignition could caused damage to the switchor break the key. Use the correct key, makes sure it is all the way in, and turn it only with your hand. If the key cannot be turned by hand, see your dealer.
A(STOPPINGTHEENGINE/LOCK/OFF): Whenthevehicleis stopped, turntheignitionswitchto LOCK/OFFtoturntheengineoff. RetainedAccessoryPower(RAP) willremainactive. SeeRetainedAccessoryPower(RAP) on page9-31.
Thispositionlockstheignition. Italsolocksthetransmissionon automatictransmissionvehicles. Itlocksthesteeringwheelon manualtransmissionvehicles. The keycanonlyberemovedin LOCK/OFF.
Donotturntheengineoffwhenthe vehicleismoving. This will cause a loss of power assist in the brake and steeringsystems and disable the airbags.
If the vehicle must be shutoff in an emergency:
- Brakeusing a firmand steady pressure. Donotpump the brakes repeatedly. This may deplete power assist, requiring increased brake pedal force.
2.Shiftthevehicletoneutral.This canbedonewhilethevehicleis moving.Aftershiftingtoneutral, firmlyapplythebrakesandsteer thevehicletoasafelocation.
-
Cometoacompletestop.Shift toP(Park)withanautomatic transmission,orneutralwitha manualtransmission.Turnthe ignitiontoLOCK/OFF.
-
Settheparkingbrake. See ParkingBrakeonpage9-45.
WARNING
Turningoffthevehiclewhile movingmaycauselossofpower assistinthebrakeandsteering systemsanddisabletheairbags. Whiledriving,onlyshutthe vehicleoffinanemergency.
If the vehicle cannot be pulled over, and must be hutoff while driving, turn the ignition to ACC/ACCESSORY.
Onvehicleswithanautomatic transmission, theshiftlevermustbe inP(Park)toturntheignitionswitch toLOCK/OFF.
Thesteeringcanbindwiththe wheelsturnedoffcenter.Ifthis happens,movethesteeringwheel fromrighttoleftwhileturningthe keytoACC/ACCESSORY.Ifthis doesn'twork,thenthevehicleneeds service.
B(ACC/ACCESSORY): This is the position in which you can operate the electrical accessories or items plugged into the accessory power outlets. On automatic transmission vehicles, this position unlocks the ignition. On manual transmission vehicles, it unlock the ignition and steering wheel. Use this position if the vehicle must be pushed or towed.
C(ON/RUN): This position can be used to operate the electrical accessories and to display some instrument panel cluster warning and indicator lights. This position can also be used for service and diagnostics, and to verify the proper operation of them malfunction indicator lamp as may be required for remission inspection purposes. The switch stays in this position when the engine is running. The transmission is all unlocked in this position on automatic transmission vehicles.
IfyouleavethekeyintheACC/ACCESSORYorON/RUNposition withtheengineoff,thebatterycould bedrained.Youmaynotbeableto startyourvehicleifthebatteryis allowedtodrainforanextended periodoftime.
D(START): This is the position that starts the engine. When the engine starts, releases the key. The ignition switch return to ON/RUN for driving.
A warningtonewillsoundwhenthe driverdoorisopened, theignitionis inACC/ACCESSORYorLOCK/OFF andthekeyisintheignition.
StartingtheEngine
Placethetransmissioninthe propergear.
AutomaticTransmission
MovetheshiftlevertoP(Park)or N(Neutral). Theenginewillnotstart inanyotherposition. Torestartthe vehiclewhenitisalreadymoving, useN(Neutral)only.
Notice: Donottrytoshiftto P(Park)ifthevehicleismoving. If youdo, you could damage the transmission. ShifttoP(Park) only when the vehicle is stopped.
ManualTransmission
Theshiftlevershouldbein N(Neutral)andtheparkingbrake engaged. Holdtheclutchpedal downtothefloorandstartthe engine. Thevehiclewillnotstartif theclutchpedalisnotallthe waydown.
StartingProcedure
- With your footoff the accelerator pedal, turn the ignition key to START. When the engine starts, let go of the key. The edgespeed will godownasthe engine warms. Donotracethe engine immediately after starting it. Operatethe engine and transmissionently to allow the oil to warmup and lubricate all moving parts.
Thevehiclehasa Computer-ControlledCranking System. Thisfeatureassistsin startingtheengineandprotects components. Iftheignitionkeyis turnedtotheSTARTposition, and thenreleasedwhenthe enginebeginscranking, the enginewillcontinuecrankingfor afewsecondsoruntilthe vehiclestarts. Iftheenginedoes notstartandthekeyisheldin STARTformanyseconds, crankingwillbestoppedafter 15secondstoppreventcranking motordamage.
Topreventgeardamage, this systemalsopreventscrankingif theengineisalreadyrunning. Enginecrankingcanbestopped byturningtheignitionswitchto ACC/ACCESSORYor LOCK/OFF.
Notice:Crankingtheenginefor longperiodsoftime,byreturning thekeytotheSTARTposition immediatelyaftercrankinghas ended,canoverheatanddamage thecrankingmotor,anddrainthe battery.Waitatleast15seconds betweeneachtry,toletthe crankingmotorcooldown.
- If the engine does not start after 5-10 seconds, especially in very cold weather (below 0°F or -18°C), it could be flooded with toomuch gasoline. Push the accelerator pedal all the way to the floor and holding it there as you hold the key in START for maximum of 15 seconds. Wait at least 15 seconds between each try, to allow the cranking motor to cool.
Whentheenginestarts, let go of the key and accelerator. If the vehicle starts briefly but then stops again, repeat the procedure. This clear the extra gasoline from the engine. Donot racethe engine immediately after starting it. Operat the engine and transmission gently until the oil warms up and lubricates all moving parts.
Notice: Theengineisdesignedto workwiththeelectronicsinthe vehicle. If youaddelectricalparts oraccessories, youcouldchange thewaytheengineoperates. Beforeaddingelectrical equipment, checkwithyour dealer. If youdonot, theengine mightnotperformproperly. Any resultingdamagewouldnotbe coveredbythevehiclewarranty.
EngineHeater
Theenginecoolantheatercan provideeasierstartingandbetter fueleconomyduringengine warm-upincoldweatherconditions atorbelow-18°C(0°F).Vehicles withanenginecoolantheater shouldbepluggedinatleast fourhoursbeforestarting.An internalthermostatintheplug-end ofthecordmayexistwhichwill preventenginecoolantheater operationattemperatures above-18°C(0°F).
ToUsetheEngineHeater
- Turnofftheengine.
- Openthehood and unwrap the electrical cord. The cord is located in the engine compartment behind the underhood fuse block on the driver side of the vehicle.
- Plugitintoanormal, grounded 110-voltACoutlet.

WARNING
Pluggingthecordintoan ungroundedoutletcouldcausean electricalshock.Also,thewrong kindofextensioncordcould overheatandcauseafire.You couldbeseriouslyinjured.Plug thecordintoaproperlygrounded three-prong110-voltACoutlet. Ifthecordwillnotreach,usea heavy-dutythree-prongextension cordratedforatleast15amps.
- Before starting the engine, be suretounplugandstorethe cordtopreventdamage.
Thelengthoftimetheheatershould remainpluggedindependson severalfactors.Askadealerinthe areawhereyouwillbeparkingthe vehicleforthebestadviceonthis.
RetainedAccessory Power(RAP)
These vehicle accessories can be used for up to 20 minutes after the engine is turned off:
- AudioSystem
- Wipers
- PowerWindows
Thesefeaturesworkwhen thekeyisinON/RUNorACC/ACCESSORY.Oncethekeyis turnedfromON/RUNtoLOCK/OFF, powertothesefeaturescontinueto workforupto20minutesoruntila doorisopened.
ShiftingIntoPark (AutomaticTransmission)
WARNING
Itcanbedangeroustogetoutof thevehicleiftheshiftleverisnot fullyinP(Park)withtheparking brakefirmlyset.Thevehiclecan roll.Ifyouhavelefttheengine running,thevehiclecanmove suddenly.Youorotherscouldbe injured.Tobesurethevehiclewill notmove,evenwhenyouareon fairlylevelground,usethesteps thatfollow.Ifyouarepullinga trailer,seeDrivingCharacteristics and TowingTipsonpage9-58.
- Holdthebrakepedaldownwith yourrightfootandsetthe parkingbrake.
See Parking Brakeonpage9-45 formoreinformation.
WARNING
If you have four-wheeldrive, the vehicle will be frontoroll—even if the shift leverisin P(Park)—if the transfer case is in Neutral. So, be sure that transfer case is in drive gear, two-wheel high (2H) or four-wheel high (4H) or four-wheel low (4L)—not in Neutral.
- MovetheshiftleverintoP(Park) bypullingthelevertowardyou andmovingitupasfarasit willgo.
- Turntheignitionkeyto LOCK/OFF.
- Removethekey and take it with you. If you can leave the vehicle with the key, the vehicle is in P(Park).
LeavingtheVehicleWiththe EngineRunning(Automatic Transmission)

WARNING
Itcanbedangeroustoleavethe vehiclewiththeengine running. The vehicle could moves suddenly if the shift lever is not fully in P(Park) with the parking brake firmly set. And, if you leavethe vehicle with the engineer running, it could overheat and even catch fire. You or others could be injured. Donotleavethe vehicle with the engineer running.
If you havetoleavethe vehicle with the engineer running, besure the vehicle is in P (Park) and the parking brake is firmly set before you leave it. After you have moved the shifttlever into P (Park), hold the regular brake pedaldown. Then, see if you can movetheshift lever away from P (Park) without first pulling it toward you. If you can, the shift lever was not fully locked into P (Park).
TorqueLock(Automatic Transmission)
If you are parking on a hill and you donot shift the transmission into P (Park) properly, the weight of the vehicle may put too much force on the parking paw in the transmission. You may find it difficult to pull the shift lever out of P (Park). This is called torque lock. To prevent torque lock, set the parking brake and thenshift into P (Park) properly before you leave the driver
seat. Tofindouthow, see "Shifting IntoPark(AutomaticTransmission)" inthissection.
Whenyouarereadytodrive,move theshiftleveroutofP(Park)before youreleasetheparkingbrake.
Iftorquelockdoesoccur,youmay needtohaveanothervehiclepush yoursalittleuphilltotakesomeof thepressurefromtheparkingpawl inthetransmission,soyoucanpull theshiftleveroutofP(Park).
ShiftingoutofPark (AutomaticTransmission)
The vehicle has an automatic transmission shift lock control system. You have to fully apply the brake pedal before you can shift from P(Park) when the ignition is ON/RUN. See Automatic Transmission on page 9-36.
Theshiftlockcontrolsystemis designedtodothefollowing:
• Preventtheignitionkeyfrom beingremovedunlessstheshift leverisinP(Park).
- Preventmovementoftheshift leveroutofP(Park), unless the ignitionisinON/RUNandthe brakepedalisapplied.
Theshiftlockcontrolsystemis alwaysfunctionalexceptinthecase ofadeadbatteryorlowvoltage (lessthan9V)battery.
If the vehicle has an uncharged battery or a battery with low voltage, trycharging or jump starting the battery. See Jump Starting on page 10-87 form more information.
ToshiftoutofP(Park)usethe following:
-
Applythebrakepedal.
-
Movetheshiftlevertothe desiredposition.
If you still are unable to shift out of P(Park):
-
Easethepressureontheshift lever.
-
While holding down the brake pedal, push the shift lever all the way into P (Park).
-
Movetheshiftlevertothe desiredposition.
If you are still having a problem shifting, then have the vehicle serviced.
Parking(Manual Transmission)
If the vehicle has a manual transmission, before you get out of the vehicle, movetheshift lever into R(Reverse), and firmly apply the parking brake. Oncetheshift lever has been placed into R(Reverse) with the clutch pedalpressed in, turn the ignition key to LOCK/OFF, removethe key and releasethe clutch.
If you are parking on a hill, or if the vehicle is pulling at a trailer, see Driving Characteristics and Towing Tips on page 9-58.
ParkingoverThings ThatBurn

WARNING
Thingsthatcanburncouldtouch hotexhaustpartsunderthe vehicleandignite.Donotpark overpapers,leaves,drygrass, orotherthingsthatcanburn.
EngineExhaust

WARNING
Engineexhaustcontainscarbon monoxide(CO)whichcannot be seenorsmelled.ExposuretoCO cancauseunconsciousnessand evendeath.
Exhaustmayenterthevehicleif:
- The vehicleidlesinareas with poor ventilation (parking garages, tunnels, deep snow that may block under body airflowortail pipes).
• Theexhaustsmellsor soundsstrangeordifferent.
• Theexhaustsystemleaks duetocorrosionordamage.
• Thevehicleexhaustsystem has been modified, damaged orimproperly repaired.
(Continued)
WARNING(Continued)
- Thereareholesoropenings inthevehiclebodyfrom damageoraftermarket modificationsthatarenot completelysealed.
Ifunusualfumesaredetectedor ifitissuspectedthatexhaustis comingintothevehicle:
- Driveitonlywiththewindows completelydown.
- Havethevehiclerepaired immediately.
Neverparkthevehiclewiththe engineerunninginanenclosed areasuchasagarageora buildingthathasnofreshair ventilation.
RunningtheVehicle WhileParked
Itisbetternottoparkwiththe engine running. Butifyoueverhave to, herearesomethingstoknow.
WARNING
Idlingvehicleinanenclosed areawithpoorventilationis dangerous.Engineexhaustmay enterthevehicle.Engineexhaust containscarbonmonoxide(CO) whichcannotbeseenorsmelled. Itcancauseunconsciousness andevendeath.Neverrunthe engineinanenclosedareathat hasnofreshairventilation.For moreinformation,seeEngine Exhaustonpage9-34.
WARNING
Itcanbedangeroustogetoutof thevehicleiftheautomatic transmissionshiftleverisnotfully inP(Park)withtheparkingbrake firmlyset.Thevehiclecanroll.Do notleavethevehiclewhenthe engineisrunningunlessyou haveto.Ifyouhaveleftthe engineerunning,thevehiclecan movesuddenly.Youorothers couldbeinjured.Tobesurethe vehiclewillnotmove,evenwhen itisonfairlylevelground,always settheparkingbrakeandmove theautomatictransmissionshift levertoP(Park),orthemanual transmissionshiftlevertoNeutral.
WARNING
Four-wheeldrivevehicleswith the transfercaseinN(Neutral)will allowthevehicletoroll,evenif theautomatictransmissionshift leverisinP(Park).So,besure thetransfercaseisinadrive gear—notinN(Neutral).Always settheparkingbrake.
Followtheproperstepstobesure thevehiclewillnotmove.See ShiftingIntoPark(Automatic Transmission)onpage9-31.
Ifpullingatrailer,seeDriving CharacteristicsandTowingTipson page9-58.
Automatic Transmission
PRND321
The vehicle has ashift lever on the steering column.
Itfeaturesanelectronicshift positionindicatorwithinthe instrumentcluster. This displayis poweredanytimetheshiftleveris capableofbeingmovedoutof P(Park). This mean that if the ignitionisturnedoff, but not in LOCK/OFF, there will be small current drain on the battery which could discharge the battery over a period of time. If you need to leave the key in the ignition but not in LOCK/OFF for an extended period, it is recommended that you
disconnectthebatterycablefrom thebatterytopreventdischarging thebattery.
Thereareseveraldifferentpositions fortheshiftlever.
P(Park): This position lock the rearwheels. It is the best position to use when you start the engine because the vehicle cannot move easily.

WARNING
It is dangerous to get out of the vehicle if the shift lever is not fully in P (Park) with the parking brake firmly set. The vehicle can roll.
Donotleavethevehiclewhenthe engineisrunningunlessyou haveto.Ifyouhaveleftthe engineerunning,thevehiclecan movesuddenly.Youorothers couldbeinjured.Tobesurethe vehiclewillnotmove,evenwhen youareonfairlylevelground,
(Continued)
WARNING(Continued)
alwayssettheparkingbrakeand movetheshiftlevertoP(Park). See ShiftingIntoPark(Automatic Transmission)onpage9-31. If you are pulling at a trailer, see DrivingCharacteristics and TowingTipsonpage9-58.
Makesuretheshiftleverisfullyin P(Park)beforestartingtheengine. Thevehiclehasanautomatic transmissionshiftlockcontrol system.Youmustfullyapplythe brakepedalbeforeyoucanshift fromP(Park)whentheignitionkey isinON/RUN.Ifyoucannotshiftout ofP(Park),easepressureonthe shiftleverbypushingtheshiftlever allthewayintoP(Park)asyou maintainbrakeapplication.Then movetheshiftleverintoanother gear.SeeShiftingoutofPark (AutomaticTransmission)on page9-32.
R(Reverse):Usethisgearto backup.
Notice: ShiftingtoR(Reverse) while the vehicle is moving forward could damage the transmission. There pairs would not be recovered by the vehicle warranty. Shift to R(Reverse) only after the vehicle is stopped.
Torockyourvehiclebackandforth togetoutofsnow,ice,orsand withoutdamagingthetransmission, seelftheVehicleIsStuckon page9-17.
N(Neutral):Inthisposition,the enginedoesnotconnectwiththe wheels.Torestarttheenginewhen thevehicleisarealreadymoving, useN(Neutral)only.
WARNING
Shifting into a drive gear while the engine is running at high speed is dangerous. Unless your foot is firmly on the brake pedal, the vehicle could move very rapidly. You could close control and hit people or objects. Donot shift into a drive gear while the engine is running at high speed.
Notice: Shifting out of P (Park) or N (Neutral) with the engine running at high speed may damage the transmission. The repairs would not be recovered by the vehicle warranty. Besure the engine is not running at high speed when shifting the vehicle.
D(Drive): This position is for normal driving. It provides the best fueleconomy. If you need more power for passing, and you are:
- Goinglessthanabout55km/h (35mph), pushtheaccelerator pedalabouthalfwaydown.
- Goingabout55km/h(35mph)or more,pushtheacceleratorall thewaydown.
Thetransmissionwillshiftdown tothenextgearandthevehicle willhavemorepower.
Downshiftingthetransmissionin slipperyroadconditionscouldresult inskidding,see "Skidding" under LossofControlonpage9-5.
3(Third): Thispositionisalsoused fornormaldriving. However, it reduces vehiclespeedmorethan D(Drive)withoutusingthebrakes. Youmightchoose3(Third)instead ofD(Drive)whendrivingonhilly, windingroads,orwhentowinga trailer,sothereislessshifting betweengearsandwhengoing downasteephill.
2(Second): Thispositionreduces vehiclespeedevenmorethan 3(Third)withoutusingthebrakes. Youcanuse2(Second)tohelp controlvehiclespeedonsteep mountainroads,butthenyouwould alsowanttousethebrakesoff andon.
1(First): Thispositionreduces vehiclespeedevenmorethan 2(Second)withoutusingthebrakes. Youcanuseitonverysteephills, orindeepsnowormud.Iftheshift leverisputin1(First)whilethe vehicleismovingforward,the transmissionwillnotshiftintofirst gearuntilthevehicleisgoingslowly enough.
Notice: Spinningthetiresor holdingthevehicleinoneplace onahillusingonlythe acceleratorpedalmaydamage thetransmission. Therepairwill notbecoveredbythevehicle warranty. If you are stuck, donot spinthetires. When stopping on ahill, usethebrakestohold the vehicleinplace.
ManualTransmission
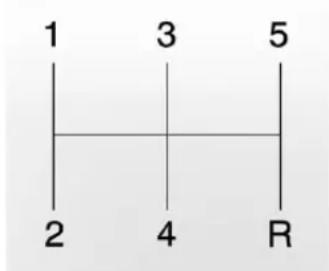
text_image
1 3 5 2 4 RThisisyourshiftpattern.
Hereishowtooperatethemanual transmission:
1(First):Presstheclutchpedal andshiftinto1(First).Then,slowly letupontheclutchpedalasyou slowlypressdownonthe acceleratorpedal.
Youcanshiftinto1(First)whenyou aregoinglessthan30km/h (20mph).Ifyouhavecometoa completestopanditishardtoshift into1(First),puttheshiftleverin Neutralandletupontheclutch. Thenpresstheclutchpedalback downandshiftinto1(First).
2(Second): Presstheclutchpedal asyouletupontheaccelerator pedalandshiftinto2(Second). Then, slowlyletupontheclutch pedalasyoupresstheaccelerator pedal.
3(Third),4(Fourth)and5(Fifth): Shiftinto3(Third),4(Fourth)and 5(Fifth)thesamewayyoudofor 2(Second).Slowlyletuponthe clutchpedalasyoupressthe acceleratorpedal.
Tostop, letupon the accelerator pedaland pressthebrake pedal. Just before the vehicle stops, press the clutch pedaland the brake pedal, and shift to Neutral.
Neutral: Usethispositionwhen youstartoridletheengine.
R(Reverse):Tobackup,pressthe clutchpedal.Afterthevehiclestops, shiftintoR(Reverse).Slowlyletup ontheclutchpedalasyoupressthe acceleratorpedal.Ifitishardto shift,lettheshiftleverreturnto Neutralandreleasetheclutch pedal.Thenpresstheclutchagain andshiftintoR(Reverse).Donot attempttoshiftinto5(Fifth)priorto shiftingintoR(Reverse).The transmissionhasalockoutfeature whichpreventsa5(Fifth)gearto R(Reverse)gearshift.
Notice: ShiftingtoR(Reverse) while the vehicle is moving forward could damage the transmission. There pairs would not be recovered by the vehicle warranty. Shift to R(Reverse) only after the vehicle is stopped.
UseR(Reverse), alongwiththe parkingbrake, forparkingthe vehicle.
ShiftSpeeds

WARNING
If you skip a page when you downshift, you could close control of the vehicle. You could injure yourself for others. Donot shift down more than one gear at a tim when you down shift.
DriveSystems
Four-WheelDrive
If the vehicle has four-wheeldrive, you can send the engine's driving power to all four wheels for extratraction. To get the best performance out of four-wheel drive, you must be familiar with its operation. Read this section before using four-wheeldrive. You should use two-wheel drive high form most normal driving conditions.
Notice: Driving on clean, dry pavement in four-wheeldrive for an extended period of time can cause premature wear on the vehicle's power train. Donot drive on clean, dry pavement in Four-Wheel Drive forextended period so time.
Notice: If the vehicle has four-wheeldrive and adifferent sizesparetire is installed, donot drive infour-wheeldrive until the flattire is repaired and/or replaced. The vehicle could be damaged and there repairs would not be recovered by the warranty. Never use four-wheeldrive when adifferentsizesparetire is installed on the vehicle.
Notice: If the vehicle has four-wheeldrive and the compact spare tire is installed on the vehicle, donot drive infour-wheel drive until you can havethe flat tirerepaired and/or replaced. You could damage the vehicle, and therepair cost would not be covered by your warranty. Never use four-wheeldrive when the compact spare tire is installed on the vehicle.
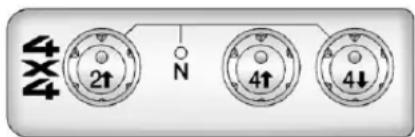
text_image
TX 2↑ N 4↑ 4↓Thetransfercasebuttonsare locatedtotherightofthesteering wheelontheinstrumentpanel.
RecommendedTransferCaseSettings
| DrivingConditions | TransferCaseSettings | |||
| 2 ↑4↑4↓ | N | |||
| NormalYES | ||||
| SevereYES | ||||
| ExtremeYES | ||||
| VehicleinTow*YES | ||||
| *See Recreational Vehicle Towing on page 10-91 or Towing the Vehicle on page10-91forfurtherinformation. | ||||
ShiftingintoFour-WheelLow willturnTractionControland StabiliTrak® off.See Traction ControlSystem(TCS)onpage9-47 andStabiliTrak® Systemon page9-48formoreinformation.
Usethesebuttonstoshiftintoand outoffour-wheeldrive.Youcan choosefromthefollowing:
2 ↑(Two-WheelHigh): This setting is for driving in most street and highways situations. The frontaxle is not engaged into two-wheeldrive.
WARNING
Shiftingthetransfercaseto N(Neutral)cancausethevehicle torollevenifthetransmissionis inP(Park).Youorsomeoneelse couldbeseriouslyinjured. Be suretosettheparkingbrake beforeplacingthetransfercasein N(Neutral).SeeParkingBrakeon page9-45.
N(Neutral): Shiftthevehicle's transfercasetoN(Neutral)only whentowingthevehicle.
4 ↑(Four-WheelHigh): This settingengagesthefrontaxleto helpdrivethevehicle. Use four-wheelhighwhenyouneed extratraction,suchasonsnowyor icyroads,orinmostoff-road situations.
4↓(Four-WheelLow): Thissetting also engage the frontax letogive you extratraction. It sends the maximum power to all four wheels. You might choose four-wheellow if you were driving off-roadins and mud, or deep snow and while climbing or descending steephills.
ShiftingintoFour-WheelLowwill turnTractionControland StabiliTrak® off.See Traction ControlSystem(TCS)onpage9-47 andStabiliTrak® Systemon page9-48formoreinformation.
Indicatorlightsinthebuttonsshow youwhichsettingyouarein.The indicatorlightswillcomeonbriefly whenyouturnontheignitionand onewillstayontheselectedsetting. Ifthelightsdonotcomeon,you shouldtakethevehicleinfor service.Anindicatorlightwillflash whileshifting.Itwillstayonwhen theshiftiscompleted.
If the transfercasedoesnotshift, it will return to the last chosen setting.
ShiftingfromTwo-WheelHighto Four-WheelHigh
PressandreleasetheFour-Wheel Highbutton. This can bedone at any speed, and the front axle will lock automatically.
Shifting from Four-Wheel High to Two-Wheel High
PressandreleasetheTwo-Wheel Highbutton. This can be done at any speed, and the front axle will unlock automatically.
Itisnormaltohearandfeelthe vehicle'stransfercaseshiftinto Four-WheelHigh.Ifyoushiftwith thevehiclestopped,theindicator lightmaystillflashslowly.Itmaybe necessarytoshiftthetransmission momentarilyintoR(Reverse)and D(Drive),foranautomatic transmission,orR(Reverse)and 1(First)foramanualtransmission tohavethelightstopflashing.
ShiftingfromTwo-WheelHighor Four-WheelHighto Four-WheelLow
ToshiftfromTwo-WheelHighor Four-WheelHightoFour-Wheel Low,thevehiclemustbestoppedor movinglessthan5km/h(3mph) withthetransmissioninN(Neutral) foranautomatictransmissionorthe clutchpedalpressedforamanual transmission.Thepreferredmethod forshiftingintoFour-WheelLowis tohaveyourvehiclemoving 1.6to3.2km/h(1to2mph).
PressandreleasetheFour-Wheel Lowbutton. You must wait for the Four-Wheel Lowindicator light to stop flashing and stay on before shifting the transmission into gear or releasing the clutch pedal.
If the Four-Wheel Low button is pressed when the vehicle is being gear and /ormoving faster than 5 km/h (3 mph), the Four-Wheel Low indicator light will flash for 30 seconds and not complete the shift.
ShiftingfromFour-WheelLowto Two-WheelHighor Four-WheelHigh
ToshiftfromFour-WheelLowto Two-WheelHighorFour-Wheel High, the vehicle must bestopped or moving less than 5 km/h (3 mph) with the transmission in N (Neutral) for an automatic transmission or the clutch pedal pressed for a manual transmission. The preferred method for shifting out of Four-Wheel Low is to have your vehicle moving 1.6 to 3.2 km/h (1 to 2 mph).
PressandreleasetheFour-Wheel HighorTwo-WheelHighbutton.You mustwaitfortheFour-WheelHigh orTwo-WheelHighindicatorlightto stopflashingandstayonbefore shiftingthetransmissionintogearor releasingtheclutchpedal.
If the Four-Wheel Highor Two-Wheel Highbutton is pressed when the vehicle is in gear and/or moving faster than 5 km/h (3 mph), the Four-Wheel Highor Two-Wheel High indicator light will flash for 30 seconds but not complete the shift.
ShiftingtoNeutral
UseN(Neutral)whenyouplanto towthevehicle.SeeRecreational Vehicle Towingonpage10-91for towinginstructions.Toshiftthe transfercaseintoN(Neutral)dothe following:
- Settheparkingbrake.
2.Startthevehicle. -
Presstheregularbrakepedal andshiftthetransmission in N(Neutral), or pressintheclutch for vehicles with a manual transmission.
-
Shiftthetransfercaseto Two-WheelHigh.
- PressandholdtheTwo-Wheel HighandFour-WheelLow buttonsatthesametimefor 10seconds. TheN(Neutral)light willcomeonwhenthetransfer caseshifttoN(Neutral)is complete.
- Pressandholdtheregularbrake pedalandshiftthetransmission toR(Reverse)foronesecond, thenshiftthetransmission to D(Drive)foronesecond, or1(First)forvehicleswith manualtransmissions, and let outtheclutchtoinsurethe transfercaseisinN(Neutral). Ifthetransfercaseisnotin N(Neutral), repeatthis procedurestartingatStep3.
9-44DrivingandOperating
- Turntheengineoffbyturning thekeytoACC/ACCESSORY.
- Placethetransmissionshift leverinP(Park), or 1 (First) for vehiclesthathaveamanual transmission.
- TurntheignitiontoLOCK/OFF.
ShiftingOutofNeutral
Aftertowingthevehicle,youwill havetoshiftoutofN(Neutral)in ordertodrive.Toshiftoutof N(Neutral),dothefollowing:
- Settheparkingbrakeandapply theregularbrakepedal.
- Startvehiclewithanautomatic transmissioninP(Park).Use 1(First)forvehicleswitha manualtransmission.
3.Shiftthetransmissiono N(Neutral),orpresstheclutch pedalforvehicleswithamanual transmission.
4. Pressthebuttonforthedesired transfercaseshiftposition (Two-WheelHigh, Four-Wheel High, or Four-WheelLow).
5. After the transfer case has shifted out of N(Neutral), the indicator light will go out.
6. Releasetheparkingbrake.
7. Shiftthetransmissiontothe desiredposition.
Brakes
AntilockBrake System(ABS)
ThisvehiclehastheAntilockBrake System(ABS),anadvanced electronicbrakingsystemmathelps preventabrakingskid.
Whentheengineisstartedandthe vehiclebeginstodriveaway,ABS checksitself.Amomentarymotoror clickingnoisemightbeheardwhile thistestisgoingon,anditmight evenbenoticedthatthebrake pedalmovesalittle.Thisisnormal.
If there is a problem with ABS, this warning light stays on. See Antilock Brake System (ABS) Warning Light on page 5-16.
Ifdrivingsafelyonawetroadandit becomesnecessarytoslamonthe brakesandcontinuebrakingto avoidasuddenobstacle,a computersensesthatthewheels areslowingdown.Ifoneofthe wheelsisabouttostoprolling,the computerwillseparatelyworkthe brakesateachwheel.
ABScanchangethebrakepressure toeachwheel, asrequired, faster thananydrivercould. Thiscanhelp thedriversteeraroundtheobstacle while brakinghard.
Asthebrakesareapplied, the computerkeepsreceivingupdates onwheelspeedandcontrols brakingpressureaccordingly.
Remember:ABSdoesnotchange thetimeneededtogetafootupto thebrakepedaloralwaysdecrease stoppingdistance.Ifyougettoo closetothevehicleinfrontofyou, therewillnotbeenoughtimeto applythebrakesifthatvehicle
suddenlyslowsorstops.Always leaveenoughroomupaheadto stop,evenwithABS.
UsingABS
Donotpumpthebrakes.Justhold thebrakepedaldownfirmlyandlet ABSwork.YoumightheartheABS pumpormotoroperatingandfeel thebrakepedalpulsate,butthisis normal.
BrakinginEmergencies
ABSallowsthedrivertosteerand brakeatthesametime.Inmany emergencies,steeringcanhelp morethaneventheverybest braking.
ParkingBrake
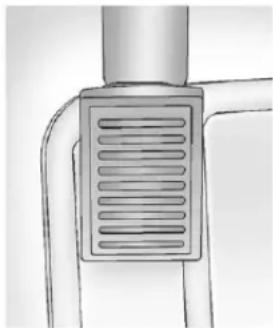
natural_image
Technical line drawing of a mechanical component with a cylindrical shaft and internal grooves (no text or symbols)Theparkingbrakepedalislocated totheleftofthebrakepedal, near thedriverdoor.
Tosettheparkingbrake, hold the brakepedaldown, then push the parkingbrakepedaldowntoits fully-applied position.
Achimewillactivateandthebrake warninglight,locatedonthe instrumentpanel,willflashwhenthe parkingbrakeisappliedandthe vehicleismovingatleast5km/h (3mph)foratleastthreeseconds. Thechimewilldeactivateandthe lightwillturnoffwhentheparking brakeissetandthevehicleis movingbelow5km/h(3mph).See BrakeSystemWarningLighton page5-15.
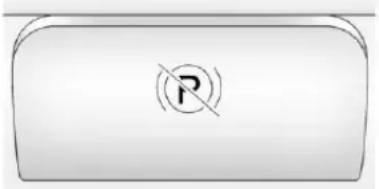
text_image
Button icon with a circular 'P' symbol and crossed-out arrow, indicating no parking or restriction.Toreleasetheparkingbrake, hold theregularbrakepedaldown. Pull thebottomedgeofthelever,
locatedabovetheparkingbrake pedal, with the parking brake symbol, directly rearward to release the parking brake.
If the ignition is on when the parking brake is released, the brakes system warning light will go off.
Notice: Driving with the parking brake on can overheat the brake system and cause premature wear ordamagetobrakesystem parts. Makes sure that the parking brake is fully released and the brakewarning light is off before driving.
If you are towing a trailer and are parking on any hill, see Driving Characteristics and Towing Tips on page 9-58.
BrakeAssist
This vehicle has a brake assist feature designed to assist the driver instopping or decreasing vehicle speed in emergency driving conditions. This feature uses the stability system hydraulic brake control module to supplement the power brakesystem under conditions where the driver has quickly and forcefully applied the brake pedalin an attempt to quickly stoporslow down the vehicle. The stability system hydraulic brake control module increases brake pressure at each corner of the vehicle until the ABS activates. Minor brake pedal pulsation or pedal movement during this time is normal and the drivers should continueto apply the brake pedal as the drivingsituation dictates. The brake assist feature will automatically disengag when the brake pedal is released or brake pedal pressure is quickly decreased.
RideControlSystems
TractionControl System(TCS)
The TractionControlSystem(TCS) is part of Stabili Trak. TCS limits wheelslip which is especially useful in slippery road conditions. The system operates only if its senses that any of the wheels are spinning or beginning to lose traction. When this happens, TCS applies the brake limit wheelspin and also reduces engine power. The system may be heard or felt while it is working. This is normal and does not mean there is a problem with the vehicle.
Notice: If the wheel(s) of one axle is allowed to spin excessively while the Stabili Trak ^® , ABS, brake warning lights, and any relevant DIC messages are displayed, the transfer case could be damaged.
Therepairswouldnotbecovered bythevehiclewarranty.Reduce enginepoweranddonotspinthe wheel(s)excessivelywhilethese lightsandmessagesare displayed.
TCScanoperateondryroads undersomeconditions.Whenthis happens,thesystemmaybe heardworkingorareductionin accelerationmaybenoticed.Thisis normalanddoesnotmeanthereis aproblemwiththevehicle. Examplesoftheseconditions includehardaccelerationinaturn, anabruptupshiftordownshiftofthe transmissionordrivingonrough roads.
Ifcruisecontrolisbeingusedwhen TCSbeginstolimitwheelspin, thecruisecontrolautomatically disengages. Thecruisecontrol canbere-engagedwhenroad conditionsallow.SeeCruiseControl onpage9-50.
ThemessageTRACTIONFAULT appearsintheDriverInformation Center(DIC)whenaTCSor AntilockBrakeSystem(ABS) problemhasbeendetectedandthe vehicleneedsservice.Whenthis messageison,thesystemwillnot limitwheelspin.Adjustyourdriving accordingly.SeeRideControl SystemMessagesonpage5-26.
TheTCS/StabiliTraklightwillflash ontheinstrumentpanelcluster whentheTCSsystemorStabiliTrak isbothonandactivated.
TheTCS/StabiliTrakbuttonis locatedontheinstrumentpanel.
ToturnoffTCS,pressandrelease theTCS/StabiliTrakbutton.The StabiliTrakOfflightcomesoninthe instrumentpanelcluster,andTRAC OFFcomesontheDIC.Toturn TCSbackon,pressandreleasethe TCS/StabiliTrakbutton.
Addingnon-dealer/non-retailer accessoriescanaffectthevehicle performance.SeeAccessoriesand Modificationsonpage 10-4.
StabiliTrak® System
The vehicle has an electronic stability control system called Stabili Trak. It is an advanced computer controlled system that assists the driver with directional control of the vehicle difficult driving conditions.
StabiliTrakactivateswhenthe computersensesadiscrepancy betweentheintendedpathandthe directionthevehicleisactually traveling.StabiliTrakselectively appliesbrakingpressureatanyone ofthevehicle'sbrakestoassistthe driverwithkeepingthevehicleon theintendedpath.
Whenthevehicleisstartedand beginstomove,thesystem performsseveraldiagnosticchecks toinsuretherearenoproblems. Thesystemmaybeheardorfelt whileitisworking.Thisisnormal anddoesnotmeanthereisa problemwiththevehicle.The systemshouldinitializebeforethe vehiclereaches32km/h(20mph).
Insomecases, it may take approximately two miles of driving before the system initializes.
Ifcruisecontrolisbeingusedwhen StabiliTrakactivates, thecruise controlautomaticallydisengages. Thecruisecontrolcan be re-engagedwhenroadconditions allow. See CruiseControlon page9-50.
Ifthereisaproblemdetectedwith StabiliTrak,aSERVICESTABSYS messagedisplaysontheDriver InformationCenter(DIC).SeeRide ControlSystemMessageson page5-26formoreinformation. Whenthismessageisdisplayed, thesystemisnotworking.Adjust yourdrivingaccordingly.
StabiliTrakandTractionControl (TCS)comeonautomatically wheneverthevehicleisstartedand thesystemsareresetwitheach ignitioncycle. However,whenthe transfercaseisplacedin Four-Wheel-Lowmode,StabiliTrak isautomaticallydisabled.
See Four-WheelDriveon page 10-30 form more information. It is recommended to leave the system on normal driving conditions, but it may be necessary to turn the TCS portion of the system off the vehicle is stuck in sand, mud, ice, or snow, and it is necessary to "rock" the vehicle to attempt to free it. If traction control is turned off, only the brake-traction control portion of traction control will work. The enginespeed management will be disabled. In this mode, engine power is not reduced automatically and the drivewheels can spin more freely. This can cause the brake-traction control to activate constantly. See if the Vehicle Is Stuck on page 9-17.
The TCS/StabiliTraklightwillflash ontheinstrumentpanelcluster whentheTCSsystemorStabiliTrak isbothonandactivated.
The TCS/StabiliTrakbuttonis located on the instrument panel.
ToturnoffTCSandStabiliTrak, pressandholdtheTCS/StabiliTrak buttonuntiltheTRACOFFand STABSYSOFFmessagecomeon theDICandtheStabiliTrakOfflight comesontheinstrumentpanel.To turnTCSandStabiliTrakbackon, pressandreleasetheTCS/StabiliTrakbutton.
When the TCSorStabiliTraksystem is turned off, the StabiliTrakOfflight and the appropriate TRACOFF for STABSYSOFF message will be displayed on the DIC. The vehicle will still have brake-traction control when TCSorStabiliTrakisoff, but will not be able to set the engine speed management system. The TCS/StabiliTraklight flashes when either system is actively working. See TractionControlSystem(TCS) on page 9-47 form more information.
Limited-SlipRearAxle
Vehicleswithalimited-sliprearaxle cangivemoretractiononsnow, mud,ice,sandogravel.Itworks likeastandardaxlemostofthe time,butwhentractionislow,this featureallowsthedrivewheelwith themosttractiontomovethe vehicle.
CruiseControl
Withcruisecontrol, aspeed of about 40 km/h (25 mph) or more can be maintained without keeping your foot on the accelerator. Cruise controldoesnotworkatspeeds below about 40 km/h (25 mph).
If the brakes are applied, the cruise controlshutsoff.

WARNING
Cruisecontrolcanbedangerous whereyoucannotdrivesafelyat asteadyspeed.So,donotuse thecruisecontrolonwinding roadsorinheavytraffic.
Cruisecontrolcanbedangerous onslipperyroads. Onsuchroads, fastchangesintiretraction can causeexcessivewheelslip, and youcouldlosecontrol.Donotuse cruisecontrolonslipperyroads.
Ifthevehicle'sStabiliTrak ^® /Traction ControlSystem(TCS)beginsto limitwheelspinwhilethecruise controlison, thecruisecontrol automaticallydisengages.See StabiliTrak ^® Systemonpage9-48or TractionControlSystem(TCS)on page9-47.Whenroadconditions allowyoutosafelyuseitagain,the cruisecontrolcanbeturned backon.
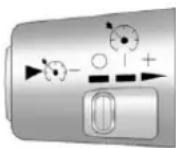
Thesecontrolsarelocatedatthe endofthemultifunctionlever.

(Off):Turnsthesystemoff.
|On):Turnsthesystemon.
+(Resume/Accelerate):Useto makethevehicleaccelerateor resumeapreviouslysetspeed.
▶(Set):Pressthebuttonat theendofthelevertosetthe speed.
SettingCruiseControl
If the cruise button is on when not in use, it could get bumped and go into cruise when not desired. Keep the cruise control switch off when cruise is not being used.
- Movethecruise controlleverto
- Getuptothespeeddesired.
- Press ▶-attheendofthe leverandreleaseit.
- Take your foot off the accelerator pedal.
Thislightontheinstrumentpanel clustercomesonwhilethecruise controlison.
ResumingaSetSpeed
If the cruise control lissetata desired speed and then the brakes are applied, the cruise control is disengaged without erasing the set speed from memory.
Oncethevehiclespeedreaches about40km/h(25mph)ormore, movethecruisecontrolleverbriefly from lto+. The vehiclereturnsto the previoussetspeedandstays there.
Iftheleverisheldatresume/acceleratethevehiclekeepsgoing fasteruntiltheleverisreleasedor thebrakeisapplied.Donotholdthe leveratresume/accelerate,unless youwantthevehicletogofaster.
IncreasingSpeedWhileUsing CruiseControl
If the cruise control system is already activated,
- Usetheacceleratorpedaltoget tothehigherspeed.Press
- attheendofthelever, thenreleasethebutton and theacceleratorpedal. If the acceleratorpedal is held longer than 60 seconds, cruise control will turn off.
- Movethecruiseleverfromlto +. Holdituntilthedesired speedisreached, and then releasethelever.
- Toincreasethevehiclespeedin smallamounts, movethelever briefly to +.
ReducingSpeedWhileUsing CruiseControl
If the cruise control system is already activated,
- Pressandhold▶—until the lowerspeeddesiredisreached, thenreleaseit.
- Toslowdowninsmallamounts, brieflypress ▶.
PassingAnotherVehicleWhile UsingCruiseControl
Usetheacceleratorpedalto increasethevehiclespeed. When youtakeyourfootoffthepedal, the vehiclewillslowdowntothe previoussetcruisecontrolspeed.
UsingCruiseControlonHills
Howwellthecruisecontrolworks onhillsdependsuponthevehicle speed,load,andthesteepnessof thehills.Whengingupsteephills, youmighthavetosteponthe acceleratorpedaltomaintainthe vehiclespeed.Whenging downhill,youmighthavetobrakeor shifttoalowergeartokeepthe vehiclespeeddown.Whenthe brakesareappliedthecruisecontrol isdisengaged.
EndingCruiseControl
Therearetwowaystoendcruise control:
- Todisengagecruisecontrol; steplightlyonthebrakepedalor lightlytaporpresstheclutch,for manualtransmissions.
- Toturnoffthecruisecontrol, movethecruisecontrollever to ○.
ErasingSpeedMemory
Thecruisecontrolsetspeedis erasedfrommemorybymovingthe cruisecontrolleverto ☐orifthe vehicleisturnedoff.
Fuel
Useoftherecommendedfuelis animportantpartoftheproper maintenanceofthisvehicle. To help keeptheenginecleanandmaintain optimumvehicleperformance, we recommendtheuseofgasoline advertisedasTOPTIERDetergent Gasoline.
LookfortheTOPTIERlabelonthe fuelpumptoensuregasolinemeets enhanceddetergencystandards developedbyautocompanies.Alist ofmarketersprovidingTOPTIER DetergentGasolinecanbefoundat www.toptiergas.com.

Detergent Gasoline

Useregularunleadedgasolinewith apostedoctaneratingof87or higher.Iftheoctaneratingisless than87,anaudibleknockingnoise, commonlyreferredtoasspark knock,mightbeheardwhendriving. Ifthisoccurs,useagasolinerated at87octaneorhigherassoonas possible.Ifheavyknockingisheard whenusinggasolineratedat 87octaneorhigher,theengine needsservice.
GasolineSpecifications (U.S.andCanadaOnly)
Ataminimum, gasolines should meet ASTM specification D4814 in the United States or CAN/CGSB-3.5 or 3.511 in Canada. Some gasolines contain an octane-enhancing additive called methylcyclopentadienylmanganese tricarbonyl (MMT). Were recommend against the use of gasolines containing MMT. See Fuel Additives on page 9-54 for additional information.
CaliforniaFuel Requirements
Ifthevehicleiscertifiedtomeet CaliforniaEmissionsStandards,itis designedtooperateonfuelsthat meetCaliforniaspecifications.See theunderhoodemissioncontrol label.Ifthisfuelisnotavailablein statesadoptingCaliforniaEmissions Standards,thevehiclewilloperate satisfactorilyonfuelsmeeting federalspecifications,butemission
controlsystemperformancemight beaffected. Themalfunction indicatorlampcouldturnonandthe vehiclemightfailasmog-checktest. SeeMalfunctionIndicatorLampon page5-13. If this occurs, return to your authorized dealerfordiagnosis. If it is determined that the condition is caused by the type off fuel used, repairs might not be covered by the vehicle warranty.
FuelsinForeign Countries
Neveruseleadedgasolineorany otherfuelnotrecommendedinthe previousstextonfuel.Costlyrepairs causedbyuseofimproperfuel wouldnotbecoveredbythevehicle warranty.
Tocheckthefuelavailability, askan autoclub, orcontactamajoroil companythatdoesbusinessinthe countrywhereyouwillbedriving.
FuelAdditives
Toprovidecleanerair,allgasolines intheUnitedStatesarenow requiredtocontainadditivesthat helppreventengineandfuelsystem depositsfromforming,allowingthe emissioncontrolsystemtowork properly.Inmostcases,nothing shouldhavetobeaddedtothefuel. However,somegasolinescontain onlytheminimumamountof additiverequiredtomeetU.S.EnvironmentalProtectionAgency regulations.Tohelpkeepfuel injectorsandintakevalvesclean andavoidproblemsduetodirty injectorsorvalves,lookforgasoline thatisadvertisedasTOPTIER DetergentGasoline.Lookforthe TOPTIERlabelonthefuelpumpto ensuregasolinemeetsenhanced detergencystandardsdevelopedby theautocompanies.Alistof marketersprovidingTOPTIER DetergentGasolinecanbefoundat www.toptiergas.com.
ForcustomerswhodonotuseTOP TIERDetergentGasolineregularly, onebottleofGMFuelSystem TreatmentPLUS,addedtothefuel tankateveryengineoilchange,can helpcleandepositsfromfuel injectorsandintakevalves.GMFuel SystemTreatmentPLUSistheonly gasolineadditiverecommendedby GeneralMotors.Itisavailableat yourdealer.
Gasolinescontainingoxygenates, suchasethersandethanol, and reformulatedgasolinesmightbe availableinyourarea. We recommendthatyouusethese gasolines,iftheycomplywiththe specificationsdescribedearlier. However,E85(85%ethanol)and otherfuelscontainingmorethan 15%ethanolmustnotbeusedin vehiclesthatwerenotdesignedfor thosefuels.
Notice: This vehicle was not designed for fuel that contains methanol. Donotuse fuel containing methanol. It can corrode metal parts in the fuel system and also damage plastic and rubber parts. That damage would not be covered under the vehicle warranty.
Somegasolinesthatare notreformulatedforlow emissionscancontainan octane-enhancingadditivecalled methylcyclopentadienylmanganese tricarbonyl(MMT);asktheattendant whereyoubuygasolinewhetherthe fuelcontainsMMT.Werecommend againsttheuseofsuchgasolines. FuelscontainingMMTcanreduce sparkpluglifeandaffectemission controlsystemperformance.The malfunctionindicatorlampmight turnon.Ifthisoccurs,returntoyour dealerforservice.
FillingtheTank
WARNING
Fuelvaporburnsviolentlyanda fuelfirecancausebadinjuries. Tohelpavoidinjuriestoyouand others,readandfollowallthe instructionsonthefuelpump island.Turnofftheenginewhen refueling.Donotsmokenearfuel orwhenrefuelingthevehicle.Do notusecellularphones.Keep sparks,flames,andsmoking materialsawayfromfuel.Donot leavetheuelpumpunattended whenrefuelingthevehicle.Thisis againstthelawinsomeplaces. Donotre-enterthevehiclewhile pumpingfuel.Keepchildrenaway fromthefuelpump;neverlet childrenpumpfuel.
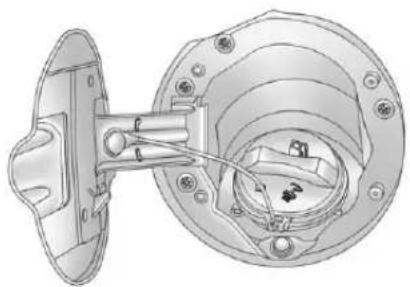
natural_image
Technical illustration of a mechanical assembly with no visible text or symbolsThetetheredfuelcapislocated behindahingedfueldooronthe driversideofthevehicle.
Toremovethefuelcap, turnit slowlycounterclockwise.
Whilerefueling,hangthetethered fuelcapfromthehookonthe fueldoor.

WARNING
Fuelcansprayoutonyouifyou openthefuelcaptooquickly. Ifyouspillfuelandthen somethingignitesit,youcouldbe badlyburned.Thisspraycan happenifthetankisnearlyfull, andismorelikelyinhotweather. Openthefuelcapslowlyandwait foranyhissnoisetostop.Then unscrewthecapalltheway.
Becarefulnottospillfuel.Donot topofforoverfillthetankandwaita fewsecondsafteryouhavefinished pumpingbeforeremovingthe nozzle.Cleanfuelfrompainted surfacesassoonaspossible.See ExteriorCareonpage 10-96.
Whenreplacingthefuelcap,turnit clockwiseuntilitclicks.Makesure thecapisfullyinstalled.The diagnosticsystemcandetermineif thefuelcaphasbeenleftoffor improperlyinstalled.Thiswould allowfueltoevaporateintothe atmosphere.Ifthefuelcapisnot properlyinstalled,theFUELCAP messageappearsontheDriver InformationCenter(DIC)andthe checkenginelightwillbelitonthe instrumentpanelcluster.SeeFuel SystemMessagesonpage5-25 andMalfunctionIndicatorLampon page5-13formoreinformation.

WARNING
Ifafirestartswhileyouare refueling, donotremovethe nozzle. Shutofftheflowoffuelby shuttingoffthepumporby notifyingthestationattendant. Leavetheareaimmediately.
Notice:Ifanewfuelcapis needed,besuretogetheright typeofcapfromyourdealer.The wrongtypeoffuelcapmightnot fitproperly,mightcausethe malfunctionindicatorlampto light,andcoulddamagethefuel tankandemissionssystem.See MalfunctionIndicatorLampon page5-13.
FillingaPortableFuel Container

WARNING
Neverfillaportablefuelcontainer whileitisinthevehicle.Static electricitydischargefromthe containercanignitethefuel vapor.Youcanbebadlyburned andthevehicledamagedifthis occurs.Tohelpavoidinjurytoyou andothers:
- Dispensefuelonlyinto approvedcontainers.
- Donotfillacontainerwhileit isinsideavehicle,ina vehicle'strunk,pickupbed, oronanysurfaceotherthan theground.
(Continued)
WARNING(Continued)
- Bringthefillnozzleincontact withtheinsideofthefill openingbeforeoperatingthe nozzle.Contactshouldbe maintaineduntilthefillingis complete.
- Donotsmokewhile pumpingfuel.
- Donotuseacellularphone whilepumpingfuel.
Towing
GeneralTowing Information
Onlyusetowingequipmentthathas beendesignedforthevehicle.
Contact your dealer or trailering dealer for assistance with preparing the vehicle for towing a trailer.
Seethefollowingtrailertowing informationinthissection:
- Forinformationondrivingwhile towingatrailer,see"Driving Characteristicsand TowingTips."
- Formaximumvehicleandtrailer weights,see"TrailerTowing."
- Forinformationonequipmentto towatrailer,see“Towing Equipment.”
Forinformationontowingadisabled vehicle, see TowingtheVehicleon page 10-91. Forinformationon towingthevehiclebehindanother vehiclesuchasamotorhome, see RecreationalVehicleTowingon page 10-91.
DrivingCharacteristics and TowingTips
PullingATrailer
Herearesomeimportantpoints:
-
Therearemanydifferentlaws, includingspeedlimitrestrictions, havingtodowithtrailering. Makesuretherigwillbelegal, notonlywhereyoulivebutalso whereyouwillbedriving. Agoodsourceforth this informationcanbestateor provincialpolice.
-
Considerusingaswaycontrol. See "Hitches" in Towing Equipmentonpage9-66.
- Donottowatraileratallduring thefirst800km(500miles)the newvehicleisdriven. The engine,axleorotherpartscould bedamaged.
- Then, during the first 800 km (500 miles) that a trailer is towed, donot drive over 80 km/h (50 mph) and donot make starts at full throttle. This helps the engine and other part so the vehicle wear in at the heavier loads.
- Vehicleswithautomatic transmissionscantowin D(Drive),butyoumaywantto shifttoalowergearselectionif thetransmissionshiftstoooften (e.g.,underheavyloadsand/or hillyconditions).Ifthevehicle hasamanualtransmissionitis betternottousethe highestgear.
Threeimportantconsiderations havetodowithweight:
• Theweightofthetrailer
• Theweightofthetrailertongue
• Theweightonthevehicle'stires
DrivingwithaTrailer

WARNING
Whentowingatrailer, exhaust gasesmaycollectattherearof thevehicleandenterifthe liftgate,trunk/hatch,orrear-most windowisopen.
EngineexhaustcontainsCarbon Monoxide(CO)whichcannotbe seenorsmelled.Itcancause unconsciousnessandevendeath.
(Continued)
WARNING(Continued)
Tomaximizes safety whentowing atrailer:
- Have the exhaust system inspected for leaks and make necessary repairs before starting a trip.
- Neverdrivewiththeliftgate, trunk/hatch,orrear-most windowopen.
- Fullyopentheairoutletson orundertheinstrument panel.
- AdjusttheClimateControl systemtoasettingthat bringsinonlyoutsideairand setthefanspeedtothe highestsetting.SeeClimate ControlSysteminthelndex.
Formoreinformationabout CarbonMonoxide,seeEngine Exhaustonpage9-34.
Towingatralerrequiresacertain amountofexperience.Gettoknow therigbeforesettingoutforthe openroad.Getacquaintedwiththe feelofhandlingandbrakingwiththe addedweightofthetrailer.And alwayskeepinmindthatthevehicle youaredrivingisnowlongerand notasresponsiveasthevehicleis byitself.
Beforestarting, checkalltrailerhitch partsandattachments, safety chains, electricalconnectors, lamps, tiresandmirroradjustments. If the trailerhaselectricbrakes, startthe vehicleandtrailermovingandthen applythetrailerbrakecontrollerby handtobesurethebrakesare working. Thischeckstheelectrical connectionatthesametime.
Duringthetrip, checkoccasionally tobesurethattheloadissecure, and thatthelampsandanytrailer brakesarestillworking.
Whiletowingatrailerorwhen exposedtolongperiodsof sunshine, thefloorofthetruckbed maybecomeverywarm. Avoid puttingitemsinthetruckbed that mightbeaffectedbyhighambient temperatures.
FollowingDistance
Stayatleasttwiceasfarbehindthe vehicleaheadasyouwouldwhen drivingthevehiclewithoutatrailer. Thiscanhelptoavoidsituations thatrequireheavybrakingand suddenturns.
Passing
Morepassingdistanceisneeded whentowingatrailer.Because the rigislonger,itisnecessarytogo muchfartherbeyondthepassed vehiclebeforereturningtothelane.
BackingUp
Holdthebottomofthesteering wheelwithonehand. Then, tomove thetrailertotheleft, movethathand totheleft. Tomovethetralertotheright, moveyourhandtotheright. Alwaysbackupslowlyand, ifpossible,havesomeone guideyou.
MakingTurns
Notice: Making very sharp turns while trailering could cause the trailertocome in contact with the vehicle. The vehicle could be damaged. Avoid making very sharp turns while trailering.
Whenturningwithatrailer,make widerturnsthannormal.Dothisso thetrailerwillnotstrikesoft shoulders,curbs,roadsigns,trees orotherobjects.Avoidjerkyor suddenmaneuvers.Signalwellin advance.
TurnSignalsWhenTowinga Trailer
Thearrowsontheinstrumentpanel flashwheneversignalingaturnor lanechange.Properlyhookedup, thetrailerlampsalsoflash,telling otherdriversthevehicleisturning, changinglanesorstopping.
Whentowingatrailer, thearrowson theinstrumentpanelflashforturns evenifthebulbsonthetrailerare burnedout. For thisreasonyoumay thinkotherdriversareseeingthe signalwhentheyarenot. It is important to check occasionally to besurethetrailerbulbsarestill working.
DrivingOnGrades
Reducespeedandshifttoa lowergearbeforestartingdowna longorsteepdowngrade. If the transmissionisnotshifteddown, the brakesmighthavetobeusedso muchthattheywouldgethotandno longerworkwell.
Vehicleswithautomatic transmissionscantowinD(Drive), butyoumaywanttoshifttoalower gearselectionifthetransmission shiftstoooften(e.g.,underheavy loadsand/orhillyconditions).Ifthe vehiclehasamanualtransmissionit isbetternottousethehighestgear.
Whentowingathighaltitudeon steepuphillgrades,considerthe following:Enginecoolantwillboilat alowertemperaturethanatnormal altitudes.Iftheengineisturnedoff immediatelyaftertowingathigh altitudeonsteepuphillgrades,the vehiclemayshowsignssimilarto engineoverheating.Toavoidthis, lettheenginerunwhileparked, preferablyonlevelground,withan automatictransmissioninP(Park) oramanualtransmissionin N(Neutral)withtheparkingbrake applied,forafewminutesbefore turningtheengineoff.Ifthe overheatwarningcomeson,see EngineOverheatingonpage 10-23.
ParkingonHills

WARNING
Parkingthevehicleonahillwith thetrailerattachedcanbe dangerous. If something goes wrong, therigcouldstarttomove. People can be injured, and both the vehicle and the trailer can be damaged. When possible, always parktherigonaflatsurface.
Ifparkingtherigonahill:
-
Pressthebrakepedal, butdo notshiftintoP(Park)yetfor vehicleswithanautomatic transmission, orintogearfor vehicleswithamanual transmission. Turnthewheels into the curbiffacingdownhillor intotrafficif facinguphill.
-
Havesomeoneplacechocks underthetrailerwheels.
-
Whenthewheelchocksarein place, releasethebrakepedal untilthechocksabsorbtheload.
- Reapplythebrakepedal. Then applytheparkingbrakeandshift into P(Park)forvehicleswithan automatictransmissionorinto gearforvehicleswithamanual transmission.
- If the vehicle has four-wheel-drive, besure the transfercase is inadrive gear and not in N(Neutral). See Four-WheelDrive on page 10-30 form more information.
- Releasethebrakepedal.
LeavingAfterParkingonaHill
-
Apply and hold the brake pedal while you:
-
Starttheengine
-
Shiftintoagear
• Releasetheparkingbrake -
Letuponthebrakepedal.
-
Driveslowlyuntilthetraileris clearofthechocks.
- Stopandhavesomeonepickup andstorethechocks.
MaintenanceWhenTrailer Towing
Thevehicleneedsservicemore oftenwhenpullingatrailer.See Maintenance Scheduleon page 11-3orthelIndexformore information. Thingsthatare especiallyimportantintrailer operationareautomatic transmissionfluid,engineoil,axle lubricant,belts,coolingsystem and brakesystem.Itisagoodideato inspectthesebeforeandduring thetrip.
Checkperiodicallytoseethatall hitchnutsandboltsaretight.
TrailerTowing

WARNING
Thedrivercanlosecontrolwhen pullingatrailerifthecorrect equipmentisnotusedorthe vehicleisnotdrivenproperly. For example, if the traileristoo heavy, the brakesmaynotwork well—orevenatall. Thedriver and passengers could be seriously injured. The vehicle may also bedamaged; theresulting repairs would not be covered by the vehicle warranty. Pullatrailer only if all the steps in this section have been followed. Ask your dealer for advice and information about towinga trailer with the vehicle.
Notice: Pullingatrailer improperlycandamagethe vehicleandresultincostly repairsnotcoveredbythevehicle warranty.
Topullatrailercorrectly, follow the advice in this section and see your dealer for important information about towing a trailer with the vehicle.
To identify the trailering capacity of the vehicle, read the information in "Weight of the Trailer" that appears later in this section.
Traileringisdifferentthanjust drivingthevehiclebyitself. Traileringmeanschangesin handling,acceleration,braking, durabilityandfueleconomy. Successful,safetraileringtakes correctequipment,andithastobe usedproperly.
The following information has many time-tested, important trailering tips and safety rules. Many of these are important for your safety and that of your passengers. Sopleaseread this section carefully before pulling a trailer.
WeightoftheTrailer
Howheavycanatrailersafelybe? Itdependsonhowtherigisused. Forexample, speed, altitude, road grades, outside temperature and howmuchthevehicleisusedtopull atrailerareallimportant.Itcan dependonanyspecialequipment onthevehicle,andtheamountof tongueweightthevehiclecancarry. See“WeightoftheTrailerTongue” laterinthissectionformore information.
Maximum trailerweightiscalculated assumingonlythedriverisinthe towvehicleandithasallthe requiredtraileringequipment. The weightofadditionaloptional equipment,passengersandcargoin thetowvehiclemustbesubtracted fromthemaximumtrailerweight.
Usethefollowingcharttodetermine howmuchthevehiclecanweigh, baseduponthevehiclemodeland options.
| VehicleAxleRatioMaxi | mumTrailerWeightG | CWR* | |
| 2WDRegularCab | |||
| 2.9LL4AutomaticTransmission3.731 | 542kg(3,400lbs)3175 | kg(7,000lbs) | |
| 2.9LL4ManualTransmission3.73108 | 9kg(2,400lbs)2722 | kg(6,000lbs) | |
| 3.7LL5AutomaticTransmission3.731 | 814kg(4,000lbs)3856 | kg(8,500lbs) | |
| 2WDExtendedCab | |||
| 2.9LL4AutomaticTransmission3.731 | 452kg(3,200lbs)3175 | kg(7,000lbs) | |
| 2.9LL4ManualTransmission3.73998 | kg(2,200lbs)2722 | kg(6,000lbs) | |
| 3.7LL5AutomaticTransmission3.732 | 495kg(5,500lbs)4309 | kg(9,500lbs) | |
| 5.3LV8AutomaticTransmission | 3.423.73 | 2722kg(6,000lbs) | 4717kg(10,400lbs) |
| 5.3LV8AutomaticTransmission,ZQ8SportSuspension | 3.421814kg( | 4,000lbs)3856kg(8,500lbs) | |
| 2WDCrewCab | |||
| 2.9LL4AutomaticTransmission3.731 | 361kg(3,000lbs)3175 | kg(7,000lbs) | |
| 2.9LL4ManualTransmission3.73953 | kg(2,100lbs)2722 | kg(6,000lbs) | |
| 3.7LL5AutomaticTransmission3.732 | 495kg(5,500lbs)4309 | kg(9,500lbs) | |
| 5.3LV8AutomaticTransmission | 3.423.73 | 2722kg(6,000lbs) | 471Tkg(10,400lbs) |
9-64DrivingandOperating
| VehicleAxleRatioMaxi | numTrailerWeightG | CWR* | |
| 5.3LV8AutomaticTransmission,ZQ8SportSuspension | 3.421724kg(3,800lbs)3856kg(8,500lbs) | ||
| 4WDRegularCab | |||
| 2.9LL4AutomaticTransmission3.73 | 406kg(3,100lbs)317 | 5kg(7,000lbs) | |
| 2.9LL4ManualTransmission3.7395 | 3kg(2,100lbs)2722kg(6,000lbs) | ||
| 3.7LL5AutomaticTransmission3.73 | 814kg(4,000lbs)408 | 2kg(9,000lbs) | |
| 4WDExtendedCab | |||
| 2.9LL4AutomaticTransmission3.73 | 315kg(2,900lbs)317 | 5kg(7,000lbs) | |
| 2.9LL4ManualTransmission3.7386 | kg(1,900lbs)2722kg(6,000lbs) | ||
| 3.7LL5AutomaticTransmission3.73 | 2495kg(5,500lbs)444 | 5kg(9,800lbs) | |
| 5.3LV8AutomaticTransmission | 3.424.10 | 2722kg(6,000lbs) | 4717kg(10,400lbs) |
| 4WDCrewCab | |||
| 3.7LL5AutomaticTransmission3.73 | 2495kg(5,500lbs)444 | 5kg(9,800lbs) | |
| 5.3LV8AutomaticTransmission | 3.424.10 | 2722kg(6,000lbs) | 4717kg(10,400lbs) |
| *TheGrossCombinationWeightRating(GCWR)isthetotalallowableweightofthecompletelyloadedvehicleand trailerincludinganypassengers,cargo,equipmentandconversions.TheGCWRforthevehicleshouldnotbe exceeded. | |||
Ask your dealer for our trailering information or advice, or write us at our Customer Assistance Offices. See Customer Assistance Offices (U.S. and Canada) on page 13-5 or Customer Assistance Offices (Mexico) on page 13-5 form more information.
WeightoftheTrailerTongue
Thetongueload(A)ofanytraileris animportantweighttomeasure becauseitafectsthetotalgross weightofthevehicle.TheGross VehicleWeight(GVW)includes the curbweightofthevehicle,any cargocarriedinit,andthepeople whowillberidinginthevehicle. Iftherearealotofoptions, equipment,passengersorcargoin thevehicle,itwillreducethetongue weightthevehiclecancarry,which willalsoreducethetrailerweightthe vehiclecantow.Iftowingatrailer, thetongueloadmustbeadded to theGVWbecausethevehiclewill becarryingthatweight,too.See
VehicleLoadLimitsonpage9-19 formoreinformationaboutthe vehicle'smaximumloadcapacity.
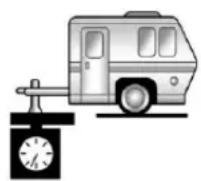
A
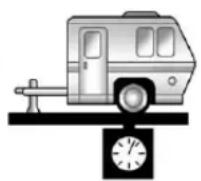
B
Thetrailertongueweight(A) should be 10 percent to 15 percent of the total loaded trailer weight, up to a maximum of 226 kg (500 lbs) with a weight carrying hitch.
Donotexceedthemaximum allowabletongueweightforthe vehicle.Choosetheshortesthitch extensionthatwillpositionthehitch ballclosesttothevehicle.Thiswill helpreducetheeffectoftrailer tongueweightontherearaxle.
Afterloadingthetrailer, weighthe trailerandthenthetongue, separately, toseeiftheweightsare proper. If they are not, adjustments might be made by moving some items around in the trailer.
Traileringmaybelimitedbythe vehicle'sabilitytocarrytongue weight. Tongueweightcannotcause thevehicletoexceedtheGVWR (GrossVehicleWeightRating)or theRGAWR(RearGrossAxle WeightRating). Theeffectof additionalweightmayreducethe traileringcapacitymorethanthe totaloftheadditionalweight.
It is important that the vehicle does not exceed any of its ratings—GCWR, GVWR, RGAWR, Maximum Trailer Rating or Tongue Weight. The only way to be sure it is not exceeding any of these ratings istoweigh the vehicle and trailer.
TotalWeightontheVehicle's Tires
Besurethevehicle'stiresare inflatedtotheupperlimitforcold tires. Thesenumberscanbefound ontheCertification/Tirelabel locatedatthebottomofthecenter pillaronthedriver'ssideofthe vehicle,orseeVehicleLoadLimits onpage9-19.Makesurenottogo overtheGVWlimitforthevehicle, ortheGAWR,includingtheweight ofthetrailertongue.Ifusinga weightdistributinghitch,makesure nottogoovertherearaxlelimit beforeapplyingtheweight distributionspringbars.
TowingEquipment
Hitches
It is important to have the correct hit equipment. Crosswinds, large trucksgoing by and roughroads are afew reasons why therighthitch is needed.
Weight-DistributingHitches and WeightCarryingHitches
Astepbumperhitchcanbeusedfor trailersupto907kg(2,000lbs)total weight,and90kg(200lbs)tongue weight.
Notice: Ifastep-bumperhitchis used, the bumper could be damaged in sharp turns. Make sure there is sampler room when turning to avoid contact between the trailer and the bumper.
SafetyChains
Alwaysattachchainsbetweenthe vehicleandthetrailer.Crossthe safetychainsunderthetongueof thetrailertohelppreventthetongue fromcontactingtheroadifit becomesseparatedfromthehitch. Instructionsaboutsafetychains maybeprovidedbythehitch manufacturerorbythetrailer manufacturer.Fortrailersupto 907kg(2,000lbs)safetychainsmay beattachedtotheattachingpoints onthebumper.Forheaviertrailers,
followthetrailerorhitch manufacturer'srecommendationfor attachingsafetychains.Always leavejustenoughslacksotherig canturn.Neverallowsafetychains todragontheground.
TrailerBrakes
Aloaded trailer that weighs more than 450 kg (1,000 lbs) need to have its own brakes system that is adequate forth the weight of the trailer. Besuretoread and follow the instructions for the trailer brakes so they are installed, adjusted and maintained properly.
Sincethevehicleisequippedwith StabiliTrak®, thetrailercannottap intothevehicle'shydraulicbrake system.
TrailerWiringHarness
The vehicle may be equipped with a four-pin trail alerting harness. This harness has a four-pin trailer connector that is attached to a bracket on the hitch platform. The four-wire harness contains the following trailercircuits:
• Yellow:LeftStop/TurnSignal
• Green:RightStop/TurnSignal
• Brown: Taillamps/Parklamps
- White:Ground
Conversionsand Add-Ons
Add-On Electrical Equipment
Notice: Donotaddanything electrical to the vehicle unless you check with your dealer first. Some electric alequipment can damage the vehicle and the damage would not be covered by the vehicle's warranty. Some add-onelectric alequipment can keep other components from working asthey should.
Add-onequipmentcandrainthe vehicle's 12-voltbattery, even if the vehicle is not operating.
Thevehiclehasanairbagsystem. Beforeattemptingtoaddanything electricaltothevehicle,see ServicingtheAirbag-Equipped Vehicleonpage3-32andAdding EquipmenttotheAirbag-Equipped Vehicleonpage3-33.
PickupConversionto ChassisCab
Weareawarethatsomevehicle ownersmightconsiderhavingthe pickupboxremovedanda commercialorrecreationalbody installed. However, were recommend that conversionsofthistypenotbe donetopickups. Ownersshouldbe awarethat, asmanufactured, there are differencesbetweenachassis cabandapickupwiththebox removedwhichcouldaffectvehicle safety.
9-68DrivingandOperating
NOTES
VehicleCare
GeneralInformation
GeneralInformation......10-2
CaliforniaProposition 65Warning......10-3
CaliforniaPerchlorate MaterialsRequirements....10-3
Accessories and Modifications....10-4
VehicleChecks
DoingYourOwn ServiceWork......10-4
Hood....10-5
EngineCompartment Overview......10-6
EngineOil....10-10
EngineOilLifeSystem.....10-12
AutomaticTransmission Fluid....10-13
ManualTransmission Fluid....10-16
HydraulicClutch......10-17
EngineAirCleaner/Filter....10-17
CoolingSystem......10-18
EngineCoolant......10-19
EngineOverheating.....10-23
EngineFan......10-25
PowerSteeringFluid.....10-25
WasherFluid......10-26
Brakes....10-27
BrakeFluid......10-28
Battery....10-30
Four-WheelDrive......10-30
FrontAxle.....10-31
RearAxle....10-32
StarterSwitchCheck......10-32
AutomaticTransmissionShift LockControlFunction Check......10-33
IgnitionTransmissionLock Check......10-33
ParkBrakeandP(Park) MechanismCheck......10-34
WiperBlade Replacement.....10-34
HeadlampAiming
HeadlampAiming......10-36
BulbReplacement
BulbReplacement......10-36
HalogenBulbs......10-36
Headlamps....10-37
Taillamps, TurnSignal, Stoplamps, and Back-Up Lamps.....10-37
CenterHigh-Mounted Stoplamp(CHMSL).....10-38
LicensePlateLamp......10-39
ReplacementBulbs.....10-39
ElectricalSystem
ElectricalSystem Overload.....10-40
FusesandCircuit Breakers.....10-40
EngineCompartmentFuse Block....10-41
WheelsandTires
Tires....10-47 TireSidewallLabeling.....10-48 TireDesignations....10-50
Tire Terminology and Definitions....10-51
10-2 Vehicle Care
TirePressure....10-54
TirePressureforHigh-Speed Operation....10-55
TirePressureMonitor System....10-56
TirePressureMonitor Operation....10-57
TireInspection......10-60
TireRotation......10-60
WhenItIsTimeforNew Tires....10-62
BuyingNewTires......10-62
DifferentSizeTiresand Wheels....10-64
UniformTireQuality Grading....10-65
WheelAlignmentandTire Balance......10-66
WheelReplacement......10-67
TireChains....10-68
IfaTireGoesFlat......10-69
TireChanging......10-71
SecondaryLatchSystem...10-82
CompactSpareTire.....10-85
Full-SizeSpareTire.....10-86
JumpStarting
JumpStarting......10-87
Towing
TowingtheVehicle......10-91
Recreational Vehicle Towing....10-91
AppearanceCare
ExteriorCare....10-96
InteriorCare....10-99
FloorMats.....10-102
GeneralInformation
Forserviceandpartsneeds,visit yourdealer.Youwillreceive genuineGMpartsandGM-trained andsupportedservicepeople.
GenuineGMpartshaveoneof thesemarks:

Genuine

Parts

Accessories
CaliforniaProposition 65Warning
Mostmotorvehicles, including this one, contain and oremit chemicals known to the State of California to cause cancer and birth defect or other reproductive harm. Engine exhaust, many parts and systems, many fluids, and some component wear by-products contain and/or emit these chemicals.
CaliforniaPerchlorate MaterialsRequirements
Certaintypesofautomotive applications,suchasairbag initiators,safetybeltpretensioners, andlithiumbatteriescontainedin RemoteKeylessEntrytransmitters, maycontainperchloratematerials. Specialhandlingmaybenecessary. Foradditionalinformation,see www.dtsc.ca.gov/hazardouswaste/perchlorate.
Accessories and Modifications
Adding non-dealer accessories or making modification to the vehicle can affect vehicle performance and safety, including such things as airbags, braking, stability, ride and handling, emission systems, aerodynamics, durability, and electronics systems like antilock brakes, traction control, and stability control. These accessories or modifications could deven cause malfunctionordamagenotcovered by the vehicle warranty.
Damageetovehiclecomponents resultingfrommodificationsorthe installationoruseofnon-GM certifiedparts,includingcontrol moduleorsoftwaremodifications,is notcoveredunderthetermsofthe vehiclewarrantyandmayaffect remainingwarrantycoveragefor affectedparts.
GMAccessoriesaredesignedto complementandfunctionwithother systemsonthevehicle.Seeyour dealertoaccessorizethevehicle usinggenuineGMAccessories installedbyadealertechnician.
Also, see Adding Equipment to the Airbag-Equipped Vehicle on page 3-33.
VehicleChecks
DoingYourOwn ServiceWork

WARNING
It can be dangerous to work on your vehicle if you don to have the proper knowledge, service manual, tools, or parts. Always follow owner manual procedures and consult the servicemanual for your vehicle before doing any servicework.
If doing some of your own service work, use the proper service manual. It tells you much more about how to servicethe vehicle than this manual can. To order the proper service manual, see Service Publications Ordering Information on page 13-18.
Thisvehiclehasanairbagsystem. Beforeattemptingtodayyourown servicework,seeServicingthe Airbag-EquippedVehicleon page3-32.
Keeparecordwithallpartsreceipts andlistthemileageandthedateof anyserviceworkperformed.See MaintenanceRecordson page11-16.
Hood
Toopenthehood, dothefollowing:
-
Pull the handle with this symbol on it. It is located inside the vehicle on the lower left side of the instrument panel.
-
Releasethesecondarylatchon thehood. It is located below the frontcenterofthehood.
- Liftthehood.
- Releasethehoodpropfromits retainerandputthehoodprop intotheslotinthehood.
Beforeclosingthehood,besureall thefillercapsareonproperly.Then liftthehoodtorelievepressure on thehoodprop.Removethehood propfromtheslotinthehoodand returntheproptoitsretainer.Lower thehood25to30cm(10to12in) abovethevehicleandreleaseit to latchfully.Checktomakesurethe hoodisclosedandrepeatthe procedureifnecessary.
EngineCompartmentOverview
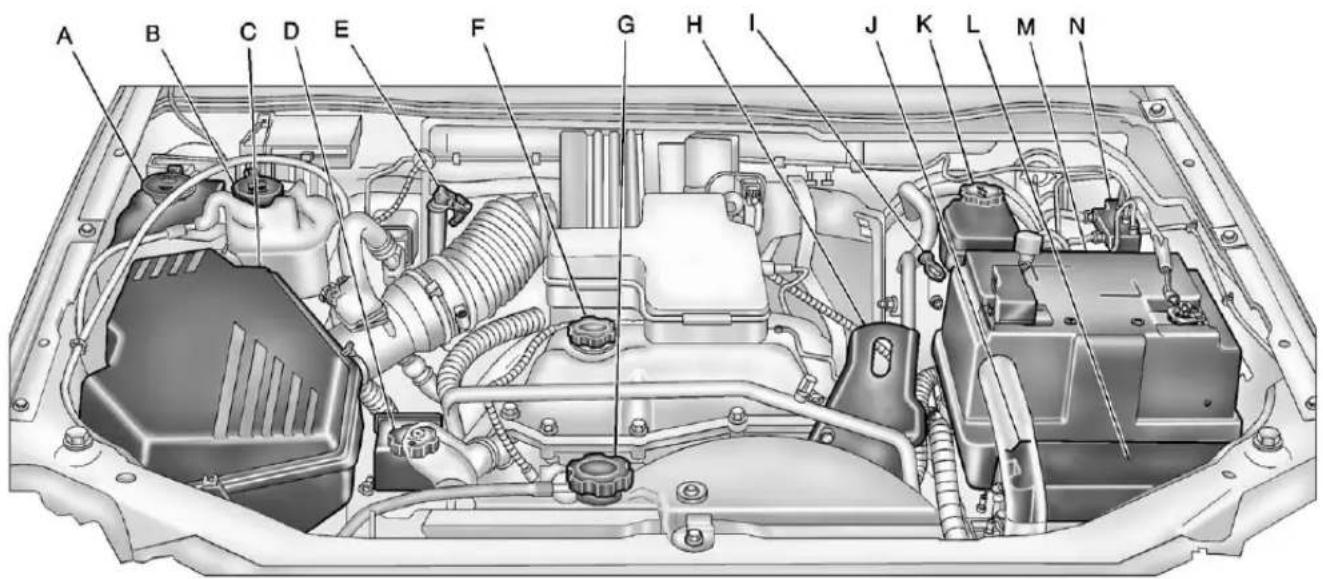
text_image
A B C D E F G H I J K L M N3.7LL5EngineShown(2.9LL4EngineSimilar)
A. Windshield WasherFluid. See "Adding WasherFluid" under WasherFluidonpage 10-26.
B. EngineCoolantRecoveryTank.
SeeEngineCoolanton
page10-19.
C. EngineAirCleaner/Filteron page10-17.
D. PowerSteeringFluidReservoir (lowinenginecompartment). See PowerSteeringFluidon page 10-25.
E. Automatic Transmission Fluid Dipstick (IfEquipped). See "CheckingtheFluidLevel" underAutomatic Transmission Fluidonpage10-13.
F. EngineOilFillCap. See "When toAddEngineOil" under EngineOilonpage 10-10.
G.RadiatorPressureCap.See CoolingSystemonpage10-18.
H. Remote Negative(−)Terminal (GND). See Jump Starting on page 10-87.
I. EngineOilDipstick.See "CheckingEngineOil" under EngineOilonpage10-10.
J.RemotePositive(+)Terminal. See Jump Starting on page 10-87.
K.BrakeFluidReservoir.See BrakeFluidonpage10-28.
L.EngineCompartmentFuse Blockonpage10-41.
M.Batteryonpage10-30.
N.HydraulicClutchFluidReservoir (IfEquipped).SeeHydraulic Clutchonpage10-17.
10-8VehicleCare
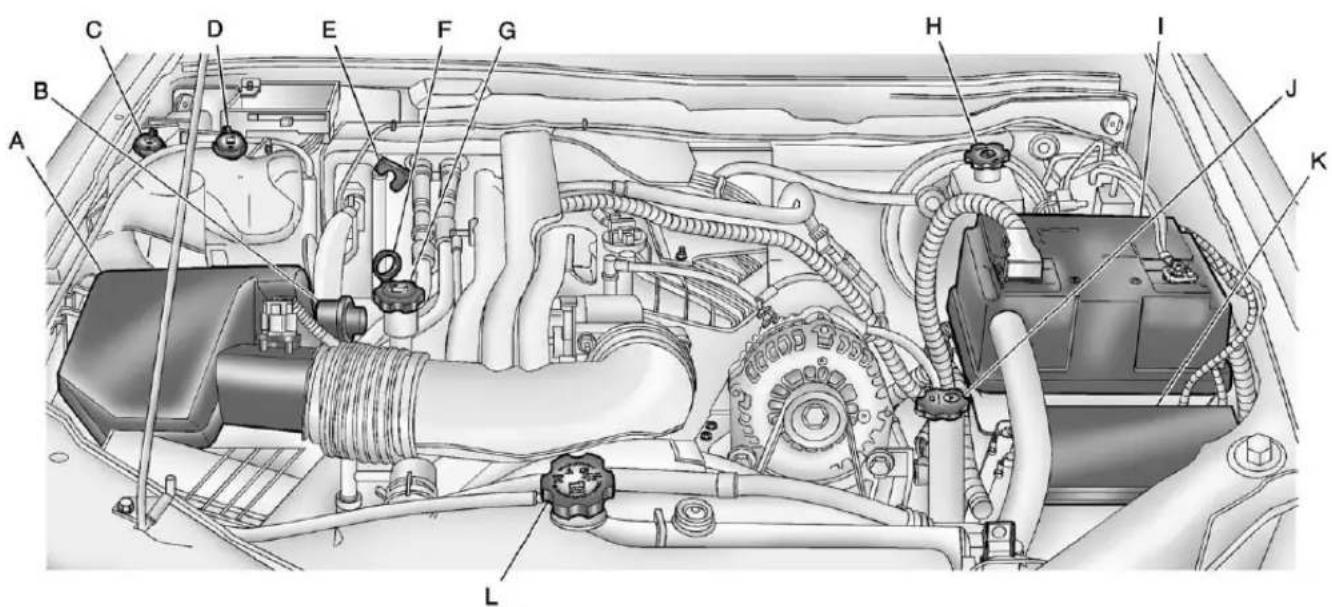
text_image
Technical diagram of a car engine bay with labeled components from A to J5.3LV8Engine
A. EngineAirCleaner/Filteron page 10-17.
B. AirFilterRestrictionIndicator (IfEquipped). See EngineAir Cleaner/Filteronpage 10-17.
C. Windshield Washer Fluid Reservoir. See "Adding Washer Fluid" under Washer Fluid on page 10-26.
D. EngineCoolantRecoveryTank.
SeeEngineCoolanton
page10-19.
E. Automatic Transmission Fluid Dipstick(IfEquipped). See "CheckingtheFluidLevel" underAutomaticTransmission Fluidonpage10-13.
F. EngineOilDipstick.See "CheckingEngineOil" under EngineOilonpage10-10.
G. EngineOilFillCap. See "When toAddEngineOil" under EngineOilonpage 10-10.
H.BrakeFluidReservoir.See BrakeFluidonpage10-28.
I. Batteryonpage 10-30.
J.PowerSteeringFluidReservoir. See Power Steering Fluidon page 10-25.
K.EngineCompartmentFuse Blockonpage10-41.
L.RadiatorPressureCap.See CoolingSystemonpage10-18.
EngineOil
Toensureproperengine performanceandlonglife,careful attentionmustbepaidtoengineoil. Followingthesesimple,but importantstepswillhelpprotect yourinvestment:
- Alwaysuseengineoilapproved totheproperspecificationandof theproperviscositygrade.See "SelectingtheRightEngineOil" inthissection.
- Checktheengineoillevel regularlyandmaintainthe properoillevel.See"Checking EngineOil"and"WhentoAdd EngineOil"inthissection.
- Changetheengineoilatthe appropriatetime.SeeEngineOil LifeSystemonpage10-12.
- Always dispose of engine oil properly. See "What to Dow with Used Oil" in this section.
CheckingEngineOil
Itisagoodideatochecktheengine oillevelateachfuelfill. Inorderto getanaccuratereading, the vehicle must be on level ground. The engine oildipstick handle is yellow loop. See Engine Compartment Overview page 10-6 for the location of the engine oildipstick.
Obtaininganaccurateoillevel readingisessential:
- If the engine has been running recently, turn off the engine and allow several minutes for the oil to drain back into the oil pan. Checking the oil level too soon after engines hutoff will not provide an accurate oil level reading.
- Pulloutthedipstickandcleanit withapapertowelorcloth, then pushitbackinalltheway. Removeitagain, keepingthetip down, and checkthelevel.
WhentoAddEngineOil

L4andL5Engines

V8Engine
If the oil is below the cross-hatched area at the tip of the dipstick, add 1L(1qt) of there recommended oil and then recheck the level. See "Selecting the Right Engine Oil" in this section for an explanation of what kind of oil to use Forengine oil crank case capacity, see Capacities and Specifications on page 12-2.
Notice: Donotaddtoomuchoil. Oil levels above or below the acceptable operating range shown on the dipstick are harmful to the engine. If you find that you have an oil level above the operating range, i.e., the engine has some oil that the oil level gets above the cross-hatched area that shows the proper operating range, the engine could be damaged. You should drain out the excess oil limit driving of the vehicle and seek as service professional to remove the excess amount of oil.
SeeEngineCompartmentOverview onpage10-6forthelocationofthe engineoilfillcap.
Addenoughoiltoputthelevel somewhereintheproperoperating range.Pushthedipstickalltheway backinwhenthrough.
SelectingtheRightEngineOil
Selectingtherightengineoil dependenceboththeproperoil specificationandviscositygrade. SeeRecommendedFluidsand Lubricantsonpage11-12.
Specification
Use and ask for licensed engine oils with the dexos1 ^™ approved certification mark. Engine oils meeting therequirements for the vehicles should have the dexos1 approved certification mark. This certification mark indicates that the oil has been approved to the dexos1 specification.

text_image
dexos™Notice: Failuretousethe recommendedengineoilor equivalentcanresultinengine damagenotcoveredbythe vehiclewarranty.Checkwithyour dealerorserviceprovideron whethertheoilisapprovedtothe dexos1specification.
ViscosityGrade
SAE5W-30isthebestviscosity gradeforthevehicle.Donotuse otherviscositygradeoilssuchas SAE10W-30,10W-40,or20W-50.
Ifinanareaofextremecold, where the temperaturefallsbelow-20°F (-29°C), anSAE0W-30oilshould beused. Anoilofthisviscosity gradewillprovideeasiercold startingfortheengineatextremely lowtemperatures. Whenselecting anoiloftheappropriateviscosity
grade, alwaysselectanol that meetsthedexos1 specification or equivalent. See "Specification" for moreinformation.
EngineOilAdditives/Engine OilFlushes
Donotaddanythingtotheoil. The recommended oil with the dexos specification and displaying the dexos certification mark are all that is needed for good performance and engine protection.
Engineoilsystemflushesarenot recommendedandcouldcause enginedamagenotcoveredbythe vehiclewarranty.
WhattoDowithUsedOil
Usedengineoilcontainscertain elementsthatcanbeunhealthyfor yourskinandcouldevencause cancer.Donotletusedoilstayon yourskinforverylong.Cleanyour skinandnailswithsoapandwater, oragoodhandcleaner.Washor properlydisposeofclothingorrags containingusedengineoil.Seethe manufacturer'swarningsaboutthe useanddisposalofoilproducts.
Usedoilcanbeathreattothe environment. If you change your own oil, besuretodrainallthe oil from the filter before disposal. Never dispose of oil by putting it in the trash or pouring it on the ground, intosewers, or intostreams or bodies of water. Recycle it by taking it to a placethat collects used oil.
EngineOilLifeSystem
WhentoChangeEngineOil
This vehicle has a computer system that indicates when to change the engine oil and filter. This is based on a combination of factors which include engine revolutions, engine temperature, and miles driven. Based on driving conditions, the mileage at which an oil change is indicated can vary considerably. For the oil if system to work properly, the system must be set every time the oil is changed. Whenthesystemhascalculated thatoilifehasbeendiminished, it indicates thatanoilchangeis necessary. ACHANGEOIL message comes on. See Engine Oil Messages on page 5-24. Change the oil as soon as possible within then next 1000 km (600 mi). It is possible that, if driving under the best conditions, the oil lifesystem might indicate that an oil change is not necessary for up to year. The engine oil and filter must be changed at least once a year and, at thistime, the system must be reset. Your dealer has trained people who will perform this work and reset the system. It is also important to check the oil regularly over the course of an oil drain interval and keep it at the proper level.
If the system is ever reset accidentally, the oil must be changed at 5000 km (3,000 mi) sincethelast oil change. Remembertoreset the oil life system whenever the oil is changed.
HowtoResettheEngineOil LifeSystem
Resetthesystemwheneverthe engineoilischangedsothatthe systemcancalculatethenext engineoilchange.Toresetthe system:
- TurntheignitiontoON/RUN, withtheengineoff.
- Pressandreleasethestemin the lowercenterofthe instrumentclusteruntiltheOIL LIFEmessageisdisplayed.
- Oncethealternating OILLIFE and RESET messages appear, press and hold the best until several beep sound. This confirms that the oil if system has been reset.
- TurnthekeytoLOCK/OFF.
If the CHANGEOIL message comes back on when the vehicle is started, the engine oil lifesystem has not been reset. Repeat the procedure.
AutomaticTransmission Fluid
WhentoCheckandChange AutomaticTransmissionFluid
Agoodtimetochecktheautomatic transmissionfluidleveliswhenthe engineoilischanged.
Changethefluidandfilteratthe intervalslistedinMaintenance Scheduleonpage11-3,andbesure tousethetransmissionfluidlistedin RecommendedFluidsand Lubricantsonpage11-12.
HowtoCheckAutomatic TransmissionFluid
Because this operation can be a little difficult, it may be decided to have this done at the dealer service department.
Ifnottakentothedealer, besureto followalltheinstructionshere, ora falsereadingonthedipstickcould result.
Notice: Toomuchortoolittle fluidcandamagethe transmission. Toomuchcan meanthatsomeofthefluidcould comeoutandfallonhotengine partsorexhaustsystemparts, startingafire. Toolittlefluid couldcausethetransmissionto overheat. Besuretogetan accuratereadingifchecking the transmissionfluid.
Waitatleast30minutesbefore checkingthetransmissionfluidlevel ifthevehiclehasbeendriven:
- Whenoutsidetemperaturesare above 32^ C(90^ F) .
• Athighspeedforquiteawhile.
• Inheavytraffic—especially in hotweather. - Whilepullingatrailer.
Together rightreading, the fluid should beat normal operating temperature, which is 82^ C to 93^ C ( 180^ F to 200^ F).
Getthevehiclewarmedupby drivingabout24km(15mi)when outsidetemperaturesareabove 10^ C( 50^ F).Ifitiscolderthan 10^ C ( 50^ F),drivethevehiclein3(Third) untiltheenginetemperaturegauge movesandthenremainssteadyfor 10minutes.
Acoldfluidcheckcanbemade afterthevehiclehasbeensittingfor eighthoursormorewiththeengine off,butthisisusedonlyasa reference.Lettheenginerunatidle forfiveminutesifoutside temperaturesare10°C(50°F)or more.Ifitiscolderthan10°C (50°F),theenginemayhavetoidle longer.Shouldthefluidlevelbelow duringthiscoldcheck,checkthe fluidhotbeforeaddingfluid. Checkingthefluidhotgivesamore accuratereadingofthefluidlevel.
CheckingtheFluidLevel
Topreparethevehicle:
-
Parkthevehicleonalevel place. Keep the engineer running.
-
With the parking brake applied, placetheshift leverin P(Park).
-
With foot on the brake pedal, movetheshift lever through each gear range, pausing for about three seconds each range. Then, position the shift lever in P (Park).
-
Let the engineer unatidle for three minutes or more.
Then, without shutting off the engine:
- Flip the handle up and then pull out the dip stick and wipe it with aclean ragor papertowel.

The automatic transmission dipstick handle with this symbol on its located in the engine compartment on the passenger side of the vehicle.
SeeEngineCompartment Overviewonpage10-6formore informationonlocation.
- Pushitbackinalltheway, wait threesecends, and pullitback outagain.

- Check both sides of the dipstick, and read the lower level. The fluid level must be in the cold area, below the cross-hatched area, for a cold checker in the Hot cross-hatched area, for a hot check. Besure to keep the dipstick pointed down to get an accurate reading.
- If the fluid level is in the acceptablerange, push the dipstick back in all the way; then flip the handled downtolock the dipstick in place.
HowtoAddAutomatic TransmissionFluid
RefertotheMaintenanceSchedule todeterminewhatkindof transmissionfluidtouse.See RecommendedFluidsand Lubricantsonpage11-12.
Addfluidonlyafterchecking the transmissionfluidwhileitishot. Acoldcheckisusedonlyasa reference.Ifthefluidlevelislow, addonlyenoughoftheproperfluid tobringtheleveluptotheHOTarea forahotcheck.Itdoesnottake muchfluid,generallylessthan0.5L (1pt).Donotoverfill.
Notice: Use of the incorrect automatic transmission fluid may damage the vehicle, and the damages may not be recovered by the vehicle warranty. Always use the automatic transmission fluid listed in Recommended Fluids and Lubricantson page 11-12.
- Afteraddingfluid,recheckthe fluidlevelasdescribedunder "HowtoCheckAutomatic TransmissionFluid,"earlierin thissection.
- Whenthecorrectfluidlevelis obtained, pushthedipstickback inalltheway; then flip the handledowntolockthedipstick inplace.
ManualTransmission Fluid
WhentoCheck
Agoodtimetocheckthemanual transmissionfluidiswhenthe engineoilischanged.However,the fluidinthemanualtransmission doesnotrequirechanging.
HowtoCheck
Because this operation can be a little difficult, it may be decided to have this done at the dealer service department.
Ifnottakentothedealer,besureto followalltheinstructionshere,ora falsereadingonthedipstickcould result.
Notice:Toomuchortoo littlefluidcandamagethe transmission.Toolittlefluidcould causethetransmissionto overheat.Besuretogetan accuratereadingifchecking the transmissionfluid.
Checkthefluidlevelonlywhen theengineisoff,thevehicleis parkedonalevelplaceandthe transmissioniscoolenoughto touchthetransmissioncase.
Afterthisisdone:
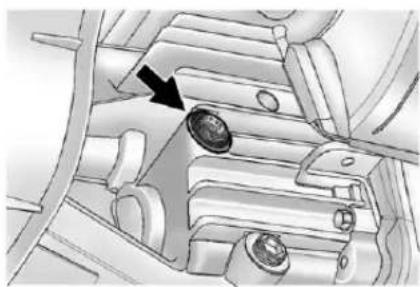
natural_image
Mechanical component diagram showing a gear assembly with an arrow indicating direction (no text or symbols present)- Removethefillplug.
-
Check that the lubricant level is upto the bottom of the fill plughole.
-
If the fluid level is good, install the plug and besure itselfly seated. If the fluid level is slow, add more fluid as described in then next steps.
HowtoAddFluid
Hereishowtoaddfluid. Referto theMaintenanceScheduleto determinewhatkindoffluidtouse. SeeRecommendedFluidsand Lubricantsonpage11-12.
- Removethefillplug.
2.Addfluidatthefillplughole. Addonlyenoughfluidtobring thefluidleveluptothebottomof thefillplughole. - Install the fill plug. Besure the plug is fully seated.
HydraulicClutch
The hydraulicclutch linkage in the vehicle is self-adjusting. The clutch master cylinder reservoir is filled with hydraulic clutch fluid.
The hydraulicclutchfluidreservoir caphasthissymbolonit. See Engine Compartment Overview page 10-6 for reservoir location.
Itisnotnecessarytoregularly checkclutchfluidunlessaleakin thesystemissuspected.Adding fluidwillnotcorrectaleak.
Afluidlossinthissystemcould indicateaproblem.Havethe systeminspectedandrepaired.
WhentoCheckandWhat toUse
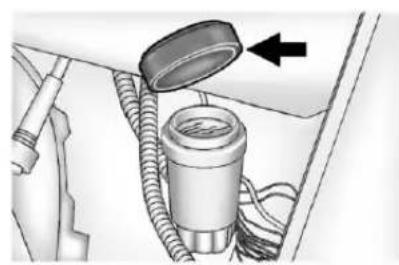
natural_image
Mechanical assembly diagram showing a pipe fitting with a lid and connector (no text or symbols)RefertotheMaintenanceSchedule todeterminehowoftentocheckthe fluidlevelintheclutchmaster cylinderreservoirandfortheproper fluid.SeeRecommendedFluidsand Lubricantsonpage11-12.
HowtoCheckandAddFluid
The proper fluid should be added if the level does not reach the bottom of the diaphragm when it is in place in the reservoir. Se the instructions on the reservoir cap.
EngineAirCleaner/Filter
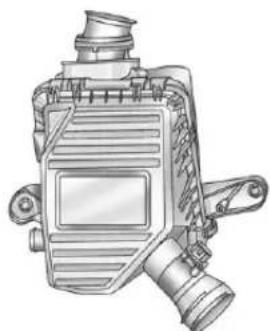
natural_image
Technical line drawing of a mechanical device with no visible text or symbolsTheengineaircleaner/filteris locatedintheenginecompartment onthepassengersideofthe vehicle.SeeEngineCompartment Overviewonpage10-6formore informationonlocation.
WhentolnspecttheEngineAir Cleaner/Filter
Inspecttheaircleaner/filteratthe scheduledmaintenanceintervals andreplaceitatthefirstoilchange aftereach80000km(50,000mi) interval.SeeMaintenanceSchedule onpage11-3formoreinformation. Ifyouaredrivingindusty/dirty conditions,inspectthefilterateach engineoilchange.
HowtoInspecttheEngineAir Cleaner/Filter
Toinspectorreplacetheengineair cleaner/filter,dothefollowing:
- Unfastentheclipsthatholdthe coveronandremovethecover.
- Liftouttheengineaircleaner/ filter.
-
Inspectorreplacetheairfilter. See Maintenance Replacement Partsonpage 11-15 to determinewhichfiltertouse.
-
Reinstalltheengineaircleaner/filtercover.Fastentheclipsto holdthecoverinplace.

WARNING
Operatingtheenginewiththeair cleaner/filteroffcancauseyouor otherstobeburned.Theair cleanernotonlycleanstheair;it helpstostopflamesiftheengine backfires.Usecautionwhen workingontheengineanddonot drivewiththeaircleaner/filteroff.
Notice: If the aircleaner/filter is off, dirtcaneasilyget into the engine, which could damage it. Always havethe aircleaner/filter in place when you are driving.
CoolingSystem
Thecoolingsystemallows the enginetomaintainthecorrect workingtemperature.
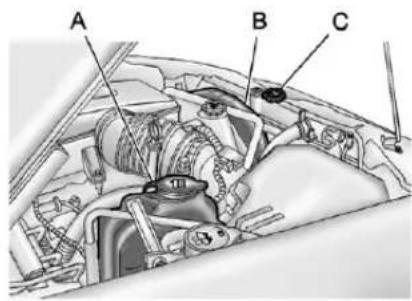
text_image
A B C2.9LL4EngineShown
(3.7LL5EngineSimilar)
A. CoolantRecoveryTank
B. EngineCoolingFan(Out ofView)
C.RadiatorPressureCap
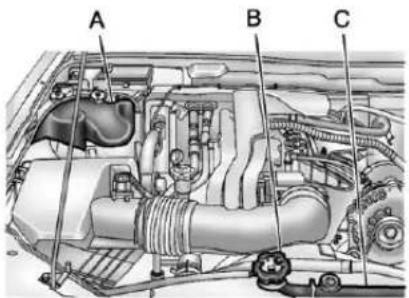
text_image
A B C5.3LV8Engine
A. CoolantRecoveryTank
B. RadiatorPressureCap
C. EngineCoolingFan(Out ofView)
WARNING
Anelectricenginecoolingfan underthehoodcanstartupeven whentheengineisnotrunning andcancauseinjury.Keep hands,clothing,andtoolsaway fromanyunderhoodelectricfan.
WARNING
Heaterandradiatorhoses, and otherengineparts, can be very hot. Donottouchthem. If you do, you can be burned.
Donotruntheengineifthereisa leak.Ifyouruntheengine,it couldloseallcoolant.Thatcould causeanenginefire,andyou couldbeburned.Getanyleak fixedbeforeyoudrivethevehicle.
Notice: Using coolantother than DEX-COOL ^® can cause premature engine, heater core, or radiator corrosion. In addition, the engine coolant could require changing sooner, at 50000 km (30,000 mi) or 24 months, whichever occurs first. Any repairs would not be covered by the vehicle warranty. Always use DEX-COOL (silicate-free) coolant in the vehicle.
EngineCoolant
Thecoolingsysteminthevehicleis filledwithDEX-COOL ^® engine coolant. Thiscoolantisdesigned to remaininthevehiclefor5yearsor 240000km(150,000mi), whichever occursfirst.
The following explains the cooling system and how to check and add coolant when it is slow. If there is a problem with engine overheating, see Engine Overheating on page 10-23.
WhattoUse

WARNING
Addingonlyplainwaterorsome otherliquidtothecoolingsystem canbedangerous. Plainwater andotherliquids, canboilbefore thepropercoolantmixturewill. Thecoolantwarningsystemisset forthepropercoolantmixture. Withplainwaterorthewrong mixture, theenginecouldgettoo hotbutyouwouldnotgetthe overheatwarning. Theengine couldcatchfireandyouor otherscouldbeburned. Usea 50/50mixtureofclean,drinkable waterandDEX-COOLcoolant.
Usea50/50mixtureofclean, drinkablewaterandDEX-COOL coolant. If using this mixture, nothingelseneedstobeaded. This mixture:
• Givesfreezingprotectiondown to -37^(-34^) , outside temperature.
• Givesboilingprotectionupto 129°C(265°F), engine temperature.
- Protectsagainstrustand corrosion.
• Willnotdamagealuminumparts.
• Helpskeeptheproperengine temperature.
Notice: If an improper coolant mixture is used, the engine could overheat and be badly damaged. Therepair cost would not be covered by the vehicle warranty. To much water in them mixture can freeze and crack the engine, radiator, heater core, and other parts.
Notice: If extrainhibitors and/or additives are used in the vehicle cooling system, the vehicle could be damaged. Use only the proper mixture of the engine coolant listed in this manual for the cooling system. See Recommended Fluids and Lubricantson page 11-12 for more information.
Neverdisposeofenginecoolantby puttingitinthetrash,pourington theground,orintosewers,streams, orbodiesofwater.Havethecoolant changedbyanauthorizedservice center,familiarwithlegal requirementsregardingused coolantdisposal.Thiswillhelp protecttheenvironmentandyour health.
CheckingCoolant
The vehicle must be on a level surface when checking the coolant level.
Thecoolantrecoverytankcaphas thissymbolonit.
Itislocatedtowardtherearofthe enginecompartmentonthe passengersideofthevehicle.See EngineCompartmentOverviewon page 10-6formoreinformationon location.
Checktoseeifcoolantisvisiblein thecoolantrecoverytank.Ifthe coolantinsidethecoolantrecovery tankisboiling,donotdoanything elseuntilcoolsdown.Ifcoolantis visiblebutthecoolantlevelisnotat orabovetheFULLCOLDmark,add a50/50mixtureofclean,drinkable waterandDEX-COOLcoolantatthe coolantrecoverytank,butbesure thecoolingsystemmiscoolbefore thisisdone.
The vehicle must be on a level surface. When the engine is cold, the coolant level should be at FULL COLD, or a little higher. When the engine is warm, the level could be above the FULL COLD level.
Whentheengineiscold, thecoolant level should be at least upto the FULLCOLDmark. If it is not, there could be a leak in the cooling system.
HowtoAddCoolanttothe RecoveryTank

WARNING
Youcanbeburnedifyouspill coolantonhotengineparts. Coolantcontainsethyleneglycol anditwillburniftheengineparts arehotenough.Donotspill coolantonahotengine.
Notice: This vehicle has a specific coolantfill procedure. Failure to follow this procedure could cause the engine to overheat and be severely damaged.
Whenthecoolantinthecoolant recoverytankisattheFULLCOLD mark,startthevehicle.
Ifcoolantisneeded,addtheproper DEX-COOLcoolantmixtureatthe coolantrecoverytank.
HowtoAddCoolanttothe Radiator

WARNING
Anelectricenginecoolingfan underthehoodcanstartupeven whentheengineisnotrunning andcancauseinjury.Keep hands,clothing,andtoolsaway fromanyunderhoodelectricfan.

WARNING
Steamandscaldingliquidsfroma hotcoolingsystemcanblowout andburnyoubadly. They are underpressure, andify outurn thesurgetank pressure cap—evenalittle—they can come outathighspeed. Never turnthecapwhenthecooling system, includingthesurgetank pressurecap, ishot. Waitforthe
(Continued)
WARNING(Continued)
coolingsystemandsurgetank pressurecaptocoolifyouever havetoturnthepressurecap.
Ifcoolantisneeded,addtheproper mixturedirectlytotheradiator,but besurethecoolingsystemiscool beforethisisdone.
- Removetheradiatorpressure capwhenthecoolingsystem, includingtheupperradiator hose,isnolongerhot.Turnthe pressurecapslowly counterclockwiseaboutone fullturn.
Ifahissisheard, waitforthatto stop. Ahissmeansthereisstill somepressureleft.
-
Keep turning the cap to remove it.
-
Filltheradiatorwiththeproper DEX-COOLcoolantmixture, up tothebaseofthefillerneck. SeeEngineCoolanton page10-19formoreinformation aboutthepropercoolant mixture.
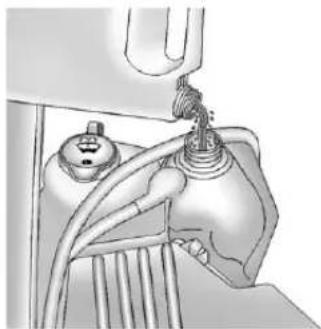
natural_image
Mechanical assembly diagram showing a valve inserted into a housing (no text or labels visible)-
Fill the coolant recovery tank to the FULLCOLD mark.
-
Reinstall the caponthecoolant recovery tank, but leavethe radiator pressure capoff.
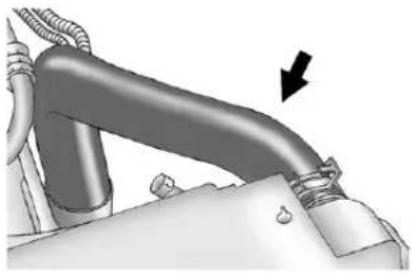
natural_image
Mechanical assembly diagram showing a pipe with hoses and a black arrow indicating direction (no text or symbols)6.Starttheengineandletitrun untiltheupperradiatorhosecan befeltgettinghot.Watchoutfor theenginecoolingfan.
7. Bythistime, the coolant level inside theradiator fillerneck might below. If the level is lower, add more of the proper DEX-COOL coolant mixture through the fillerneck until the level reaches the base of the fillerneck.
8. Replacethepressurecap.
Atanytimeduringthisprocedureif coolantbeginstoflowoutofthe fillerneck,reinstallthe pressurecap.
Notice: If the pressure cap is not tightly installed, coolant loss and possible engine damage may occur. Besure the cap is properly and tightly secured.
EngineOverheating
Thevehiclehasacoolant temperaturegaugedisplayedonthe instrumentpaneltowarnifthe engineisoverheating.SeeEngine CoolantTemperatureGaugeon page5-9.Iftheengineistoohot, theairconditioningmightstop working.Thisisnormalandhelps cooltheengine.
If the decision is madenottolift the hood when the warning appears, but instead gets service help right away. See Roadside Assistance Program (U.S. and Canada) on page 13-8 or Roadside Assistance Program (Mexico) on page 13-10.
If the decisionismadetoliftthe hood, makesurethevehicleis parkedonalevelsurface.
Thenchecktoseeiftheengine coolingfanisrunning.lftheengine isoverheating,thefanshouldbe running.lfitisnot,donotcontinue toruntheengineandhavethe vehicleserviced.
Theenginecoolingfanspeed shouldincreasewhenidlespeedis doubledbypushingtheaccelerator pedaldown.Ifitdoesnot,the vehicleneedsservice.Turnoffthe engine.
Notice: Enginedamage from running the engine without coolant is not covered by the warranty.
Notice: If the engine catches fire because of being driven with no coolant, the vehicle can be badly damaged. The costly repairs would not be covered by the vehicle warranty.
IfSteamisComingfromthe EngineCompartment

WARNING
Steamfromanoverheatedengine canburnyoubadly,evenifyou justopenthehood.Stayaway fromtheengineifyouseeorhear steamcomingfromit.Justturnit offandgeteveryoneawayfrom thevehicleuntilcoolsdown. Waituntilthereisnosignof steamorcoolantbeforeyouopen thehood.
If you keep driving when the engine is overheated, the liquids init can catch fire. You or others could be badly burned. Stop the engine if to overheats, and get out of the vehicle until the engine is cool.
IfNoSteamisComingfrom theEngineCompartment
Ifanengineoverheatwarningis displayedbutnosteamcanbeseen orheard,theproblemmaynotbe tooserious.Sometimesheengine cangetalittletoohotwhenthe vehicle:
• Climbsalonghillonahotday.
- Stopsafterhigh-speeddriving.
• Idlesforlongperiodsintraffic.
- Towsatrailer.See "Drivingon Grades" under Trailer Towingon page9-62.
If the overheat warning is displayed with nosignofsteam:
- Turntheairconditioningoff.
-
Turntheheaterontothehighest temperature and tothehighest fanspeed. Openthewindowsas necessary.
-
In heavy traffic, let the engine idle in N (Neutral) while stopped. If it is a fast to do so, pulloff the road, shift to P (Park) or N (Neutral) and let the engine idle.
If the temperature overheat gauge is nolongerinthe overheat zone oran overheat warning nolonger displays, the vehicle can be driven. Continuetodrivethe vehicles slowly for about 10 minutes. Keep as safe vehicledistance from the vehicle in front. If the warning does not come back on, continuetodrivenormally.
If the warning continues, pullover, stop, and park the vehicle right away.
Ifthereisnosignofsteam,idlethe engineforthreeminuteswhile parked.Ifthewarningisstill displayed,turnofftheengine untilcoolsdown.
EngineFan
Thisvehiclehasaclutchedengine coolingfan. Whentheclutchis engaged, thefanspinsfasterto providemoreairtocooltheengine. Inmosteverydaydrivingconditions, theclutchisnotengaged. This improvesfueleconomyandreduces fannoise. Underheavyvehicle loading, trailertowing and/or high outsidetemperatures, thefanspeed increases when theclutchengages. Soyoumayhearanincreaseinfan noise. This is normal and should not be mistaken asthetransmission slippingormaking extrashifts. It is merely thecoolingsystem functioning properly. The fan will slowdown when additional cooling is not required and the clutch disengages.
Thisfannoisemayalsobeheard whentheengineisstarted.Itwillgo awayasthefanclutchdisengages.
PowerSteeringFluid
The power steering fluid reservoir is located near the front of the engine compartment, behind the radiator. See Engine Compartment Overview on page 10-6 for reservoir location.
WhentoCheckPowerSteering Fluid
Itisnotnecessarytoregularly checkpowersteeringfluidunless thereisaleaksuspectedinthe systemoranunusualnoiseis heard.Afluidlossinthissystem couldindicateaproblem.Havethe systeminspectedandrepaired.
HowtoCheckPowerSteering Fluid
- Turnthekeyoffandletthe enginecompartmentcooldown.
- Wipethecapandthetopofthe reservoirclean.
- Unscrewthecapandwipethe dipstickwithacleanrag.
- Replacethecapandcompletely tightenit.
- Then removethecapagain and lookatthefluidlevelonthe dipstick.
The level should be between the ADD and FULL marks. If necessary, add only enough fluid to bring the level up to the properrange.
WhattoUse
Todeterminewhatkindoffluidto use,seeRecommendedFluidsand Lubricantsonpage11-12.Always usetheproperfluid.
Notice: Useoftheincorrectfluid maydamagethevehicleandthe damagesmaynotbecoveredby thevehicle'swarranty.Always usethecorrectfluidlisted in RecommendedFluidsand Lubricantsonpage11-12.
WasherFluid
WhattoUse
When windshieldwasherfluidis needed, besuretoreadthe manufacturer's instructions before use. If operating the vehicle in an areawherethetemperature may fall below freezing, use fluid that has sufficient protection against freezing.
AddingWasherFluid
Openthecapwiththewasher symbolonit.Addwasherfluiduntil thetankisfull.SeeEngine CompartmentOverviewon page10-6forreservoirlocation.
Notice
- When using concentrated washer fluid, follow the manufacturer's instructions for adding water.
- Donotmixwaterwith ready-to-usewasherfluid. Watercancausethesolution tofreezeanddamagethe washerfluidtankandother partsofthewashersystem. Also,waterdoesnotcleanas wellaswasherfluid.
- Fillthewasherfluidtankonly three-quartersfullwhenitis verycold. This allows for fluidexpansioniffreezing occurs, which could damage the tankifitis completely full.
- Donotuseenginecoolant (antifreeze)inthewindshield washer.ltcandamagethe windshieldwashersystem andpaint.
Brakes
This vehicle has front disc brakes and reardrum brakes.
Discbrakepadshavebuilt-inwear indicatorsthatmakeahigh-pitched warningsoundwhenthebrakepads arewornandnewpadsareneeded. Thesoundcancomeandgoorbe heardallthetimethevehicleis moving,exceptwhenapplyingthe brakepedalfirmly.
WARNING
Thebrakewearwarningsound meansthatsoonthebrakeswill notworkwell.Thatcouldleadto acrash.Whenthebrakewear warningsoundisheard,havethe vehicleserviced.
Notice: Continuing to drivewith worn-out brake pad could result incostly brakerepair.
Somedrivingconditionsorclimates cancauseabrakesquealwhenthe brakesarefirstappliedorlightly applied. Thisdoesnotmean somethingiswrongwiththebrakes.
Properlytorquedwheelnutsare necessarytohelppreventbrake pulsation. Whentiresarerotated, inspectbrakepadsforwear and evenlytightenwheelnutsinthe propersequencetotorque specificationsinCapacitiesand Specificationsonpage12-2.
Reardrumbrakesdonothavewear indicators, butifarearbrake rubbingnoiseisheard, havethe rearbrakeliningsinspected immediately. Rearbrakedrums shouldberemovedandinspected eachtimethetiresareremovedfor rotationorchanging. Drumbrakes haveaninspectionholetoinspect liningwearduringscheduled
maintenance. Whenthefrontbrake padsarereplaced, havetherear brakesinspected, too.
Brakeliningsshouldalwaysbe replacedascompleteaxlesets.
BrakePedalTravel
Seeyourdealerifthebrakepedal doesnotreturntonormalheight, orifthereisarapidincreasein pedaltravel. Thiscouldbeasign thatbrakeservicemightbe required.
BrakeAdjustment
Everytimethebrakesareapplied, withorwithoutthevehiclemoving, thebrakesadjustforwear.
ReplacingBrakeSystemParts
Thebrakingsystemonavehicleis complex. Itsmanypartshavetobe oftopqualityandworkwelltogether ifthevehicleistohavereallygood braking. Thevehiclewasdesigned andtestedwithtop-qualitybrake parts. Whenpartsofthebraking systemarereplaced, besuretoget new, approvedreplacementparts. Ifthisisnotdone, thebrakesmight notworkproperly. Forexample, installingdiscbrakepadsthatare wrongforthevehicle, canchange thebalancebetweenthefrontand rearbrakes—fortheworse. The brakingperformanceexpectedcan changeinmanyotherwaysifthe wrongreplacementbrakepartsare installed.
BrakeFluid
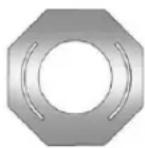
Thebrakemastercylinderreservoir isfilledwithDOT3brakefluid.See EngineCompartmentOverviewon page 10-6forthelocationofthe reservoir.
Thereareonlytworeasonswhythe brakefluidlevelinthereservoir mightgodown:
- Thebrakefluidlevelgoesdown becauseofnormalbrakelining wear.Whennewliningsare installed,thefluidlevelgoes backup.
- Afluidleakinthebrake hydraulicsystemcanalsocause alowfluidlevel.Havethebrake hydraulicsystemfixed,sincea leakmeansthatsoonerolater thebrakeswillnotworkwell.
Donottopoffthebrakefluid. Addingfluiddoesnotcorrectaleak. Iffluidisaddedwhentheliningsare worn,therewillbetoomuchfluid whennewbrakeliningsare installed.Addorremovebrakefluid, asnecessary,onlywhenworkis doneonthebrakehydraulicsystem.

WARNING
Iftoomuchbrakefluidisadded, it canspillontheengineandburn, iftheengineishotenough. You orotherscouldbeburned, and thevehiclecouldbedamaged. Addbrakefluidonlywhenworkis doneonthebrakehydraulic system.See"CheckingBrake Fluid"inthissection.
RefertotheMaintenanceSchedule todeterminewhentocheckthe brakefluid.SeeMaintenance Scheduleonpage11-3.
CheckingBrakeFluid
Checkbrakefluidbylookingatthe brakefluidreservoir.SeeEngine CompartmentOverviewon page 10-6.
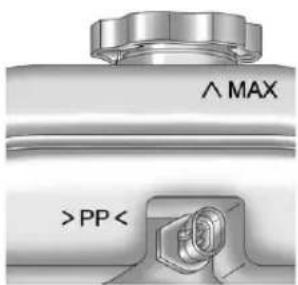
text_image
^ MAX > PP <Thefluidlevelshouldbeabove the PPmark.Ifitisnot,havethebrake hydraulicsystemcheckedtoseeif thereisaleak.
Afterworkisdoneonthebrake hydraulicsystem,makesurethe levelisabovethePPmarkbutnot overtheMAXmark.
WhattoAdd
UseonlynewDOT3brakefluid fromasealedcontainer.See RecommendedFluidsand Lubricantsonpage11-12.
Alwayscleanthebrakefluid reservoircapandtheareaaround thecapbeforeremovingit. This helpskeepdirtfromenteringthe reservoir.
WARNING
Withthewrongkindoffluidinthe brakehydraulicsystem,the brakesmightnotworkwell.This couldcauseacrash.Alwaysuse theproperbrakefluid.
Notice
- Usingthewrongfluidcan badlydamagebrake hydraulicsystemparts. For example, justafewdropsof mineral-basedoil, such as engineoil, inthebrake hydraulicsystemcan damagebrakehydraulic systempartssobadlythat theywillhavetobereplaced. Donotletsomeoneputin thewrongkindoffluid.
- Ifbrakefluidisspilledonthe vehicle'spaintedsurfaces, thepaintfinishcanbe damaged.Becarefulnotto spillbrakefluidonthe vehicle.Ifyoudo,washitoff immediately.
Battery
Refertothereplacementnumber shownontheoriginalbatterylabel whenanewbatteryisneeded.See EngineCompartmentOverviewon page10-6forbatterylocation.

WARNING
Batteryposts,terminals,and relatedaccessoriescontainlead andleadcompounds,chemicals knowntotheStateofCaliforniato causecancerandreproductive harm.Washhandsafterhandling.
VehicleStorage

WARNING
Batterieshaveacidthatcanburn youandgasthatcanexplode. Youcanbebadlyhurtifyouare notcareful.See Jump Startingon page 10-87fortipsonworking aroundabatterywithout gettinghurt.
InfrequentUsage:Removethe black,negative(−)cablefromthe batterytokeepthebatteryfrom runningdown.
ExtendedStorage:Removethe black,negative(−)cablefromthe batteryoruseabatterytrickle charger.
Four-WheelDrive
TransferCase
WhentoCheckLubricant
RefertotheMaintenanceSchedule todeterminehowoftentocheckthe lubricant.SeeMaintenance Scheduleonpage11-3.
HowtoCheckLubricant
Togetanaccuratereading, the vehicles should be on a level surface.
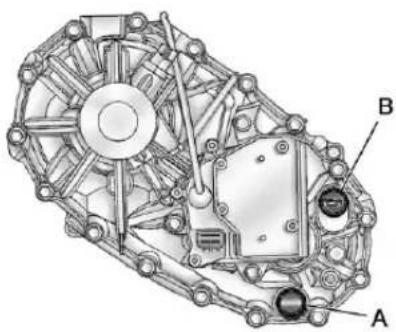
natural_image
Technical diagram of a mechanical assembly with labeled parts A and B (no text or symbols beyond labels)A.DrainPlug
B. FillPlug
If the level is below the bottom of the fill plug hole, located on the transfercase, some lubricant will need to be added. Remov the plug and addenough lubricant toraise the level to the bottom of the fill plug hole. Use carenotto overtighten the plug.
WhattoUse
SeeRecommendedFluidsand Lubricantsonpage11-12.
FrontAxle
WhentoCheckandChange Lubricant
It is not necessary to regularly check the frontax le fluid unless there is a leaks suspected or an unusual noise is heard. A fluid loss could indicate a problem. Have it inspected and repaired.
HowtoCheckLubricant
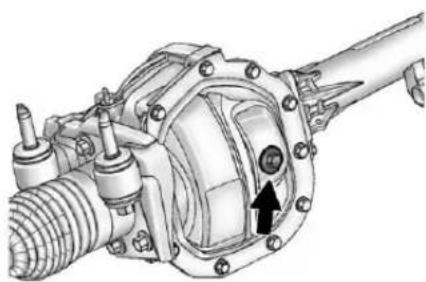
natural_image
Technical illustration of a mechanical assembly with no visible text or symbolsTogetanaccuratereading, the vehicles should be on a level surface.
If the level is below the bottom of the filler plughole, located on the frontaxle, some lubricant may need to be added.
Whenthedifferentialiscold, add enoughlubricanttoraisethelevelto 12mm(1/2in)belowthefill plughole.
Whenthedifferentialisatoperating temperature(warm), addenough lubricant toraisethe level to the bottom of the fill plug hole.
WhattoUse
SeeRecommendedFluidsand Lubricantsonpage11-12.
RearAxle
WhentoCheckandChange Lubricant
Itisnotnecessarytoregularly checkrearaxlefluidunlesssthereis aleaksuspectedoranunusual noiseisheard.Afluidlosscould indicateaproblem.Haveit inspectedandrepaired.
HowtoCheckLubricant
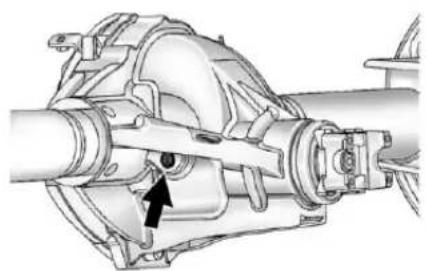
natural_image
Mechanical assembly diagram showing a shaft and gear assembly with no visible text or symbolsTogetanaccuratereading, the vehicles should be on a level surface.
The proper level is from 0 mm to 10 mm (0 to 3/8 in) below the bottom of the fill plug hole, located on the rear axle.
WhattoUse
SeeRecommendedFluidsand Lubricantsonpage11-12to determinewhichkindoflubricant touse.
StarterSwitchCheck
WARNING
Whenyouaredoingthis inspection,thevehiclecould movesuddenly.Ifthevehicle moves,youorotherscouldbe injured.
-
Before starting this check, be sure there is enoughroom around the vehicle.
-
Firmlyapplyboththeparking brakeandtheregularbrake. SeeParkingBrakeon page9-45.
Donotusetheaccelerator pedal, and bereadytoturnoff theengineimmediatelyifit starts.
- For automatic transmission vehicles, try to start the engine in each gear. The vehicle should start only in P (Park) or N (Neutral). If the vehicle starts in any other position, contact your dealer for service.
Formanualtransmission vehicles,puttheshiftleverin Neutral,pushtheclutchpedal downhalfway,andtrytostart theengine.Thevehicleshould startonlywhentheclutchpedal ispusheddownallthewayto thefloor.Ifthevehiclestarts whentheclutchpedalisnot pushedallthewaydown, contactyourdealerforservice.
AutomaticTransmission ShiftLockControl FunctionCheck

WARNING
When you are doing this inspection, the vehicle could moves suddenly. If the vehicle moves, you or others could be injured.
-
Before starting this check, be sure there is a rough room around the vehicle. It should be parked on levels surface.
-
Firmly apply the parking brake. See Parking Brake on page 9-45.
Bereadytoapplytheregular brakeimmediatelyifthevehicle beginstomove. - With the engine off, turn the ignition on, but donot start the engine. Without applying the regular brake, try to mov the shiftlever out of P (Park) with normaleffort. If the shift lever moves out of P (Park), contact your dealer for service.
IgnitionTransmission LockCheck
Whileparked, and with the parking brakeset, try to turn the ignition to LOCK/OFFineachshift lever position.
- Forautomatictransmission vehicles, theignitions should turn to LOCK/OFFonlywhen the shiftleverisinP(Park).
- Formanultransmission vehicles, theignitions should turn to LOCK/OFFonlywhenyou pressthekeyreleasebutton.
Onallvehicles, the ignition key should come out only in LOCK/OFF.
Contactyourdealerifserviceis required.
ParkBrakeandP(Park) MechanismCheck

WARNING
Whenyouaredoingthischeck, thevehiclecouldbegintomove. Youorotherscouldbeinjured andpropertycouldbedamaged. Makesurethereisroominfront ofthevehicleincaseitbeginsto roll.Bereadytoapplytheregular brakeatonceshouldthevehicle begintomove.
Parkonafairlysteephill, with the vehiclefacingdownhill. Keeping yourfootontheregularbrake, set theparkingbrake.
- Tochecktheparkingbrake's holdingability:Withtheengine runningandthetransmissionin N(Neutral),slowlyremovefoot pressurefromtheregularbrake pedal.Dothisuntilthevehicleis heldbytheparkingbrakeonly.
- TochecktheP(Park) mechanism'sholdingability: Withtheengine running, shiftto P(Park). Then releasethe parkingbrake followed by the regularbrake.
Contact your dealer if service is required.
WiperBladeReplacement
Windshieldwiperbladesshouldbe inspectedforwearandcracking. See Maintenance Scheduleon page 11-3 formoreinformation.
Replacementbladescomein differenttypesandareremovedin differentways.Forproperty andlength,seeMaintenance ReplacementPartsonpage11-15.
Allowingthewiperbladearmto touchthewindshieldwhennowiper bladeisinstalledcoulddamagethe windshield.Anydamagethatoccurs wouldnotbecoveredbythevehicle warranty.Donotallowthewiper bladearmtotouchthewindshield.
- Toremovetheoldwiperblades, liftthewiperarmuntillocks intoaverticalposition.
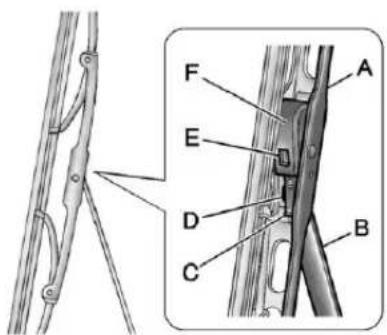
text_image
Technical diagram showing labeled mechanical components with annotations A, B, C, D, E, FA. BladeAssembly
B.ArmAssembly
C.LockingTab
D.BladePivot
E.HookSlot
F.ArmHook
-
Pressdownontheblade assemblypivotlockingtab.Pull downonthebladeassemblyto releaseitfromthewiper armhook.
-
Removetheinsertfromthe bladeassembly. Theinserthas twonotchesatoneendthatare lockedbybottomclawsofthe bladeassembly. Atthenotched end, pulltheinsertfromthe bladeassembly.
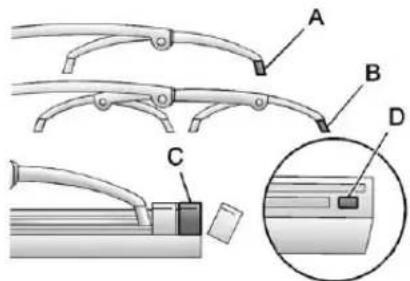
text_image
Technical diagram showing labeled parts A, B, C, and D of a mechanical device with an inset view of a component.-
Toinstallthenewwiperinsert, slidetheinsert(D), notchedend last, intotheendwithtwoblade claws(A). Slidetheinsertall the waythroughthebladeclawsat theoppositeend(B). Theplastic caps(C) will beforcedoffasthe insertisfullyinserted.
-
Besurethatthenotchesare lockedbythebottomclaws. Makesurethatallotherclaws areproperlylockedonboth sidesoftheinsertslots.
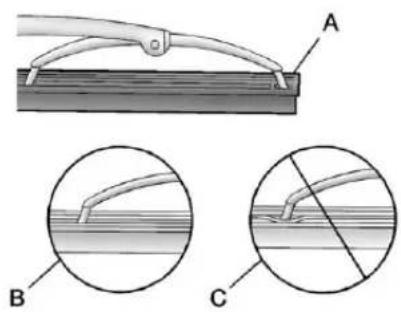
text_image
Technical diagram showing three views (A, B, C) of a mechanical component with labeled parts and cross-sectional views.A.ClawinNotch
B. Correct Installation
C. Incorrect Installation
-
Putthebladeassemblypivotin thewiperarmhook.Pullupuntil thepivotlockingtablocksinthe hookslot.
-
Carefully lower the wiper arm and blade assembly onto the windshield.
HeadlampAiming
Headlampaimhasbeenpresetat thefactoryandshouldneedno furtheradjustment.
However, if the vehicle is damaged inacrash, the headlamp aimmay be affected. Aim adjustment to the low-beam headlamps may be necessary if on coming drivers flash their high-beam headlamps at you (for vertical aim).
Iftheheadlampsneedtobe re-aimed,itisrecommendedthat thevehiclebetakentothedealer forservice.
BulbReplacement
Forthepropertyofreplacement bulbs,seeReplacementBulbson page10-39.
Foranybulb-changingprocedure notlisted in this section, contact your dealer.
HalogenBulbs

WARNING
Halogenbulbshavepressurized gasinsideandcanburstifyou droporscratchthebulb. Youor otherscouldbeinjured. Besure toreadandfollowtheinstructions onthebulbpackage.
Headlamps
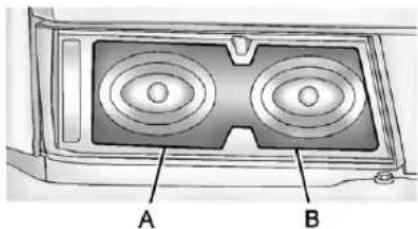
text_image
A BA.Low-BeamHeadlamp/Daytime RunningLamps(DRL)
B. High-BeamHeadlamp
Toreplaceoneofthesebulbs:
-
Openthehood. See Hoodon page 10-5.
-
Reachinandaccessthebulb socketsfrominsidetheengine compartment.
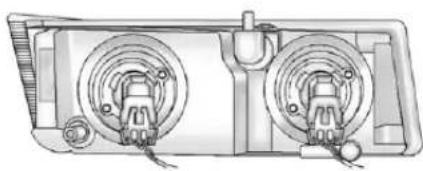
natural_image
Technical illustration of a mechanical component with two circular components and a handle (no text or symbols)-
Turnthebulbsocket counterclockwisetoremoveit fromtheheadlampassembly andpullitstraightout.
-
Unplugtheelectricalconnector from the old bulb by releasing the clipboard the bulb socket.
-
Pulltheoldbulbstraightout.
-
Pushthenewbulbstraightin untilitclickstosecureit.
-
Plugintheelectricalconnector tothenewbulbsocket.
-
Push the bulb socket straight in and turn it clock wiset secure it in the head lamp assembly.
Taillamps, TurnSignal, Stoplamps, and Back-Up Lamps
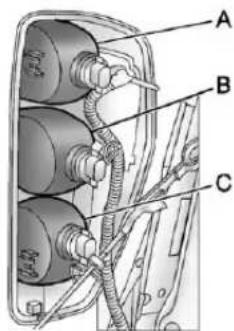
text_image
Technical diagram of a mechanical assembly with labeled parts A, B, and CA. Stoplamp/Taillamp
B. TurnSignal/Taillamp
C.Back-upLamp
10-38VehicleCare
Toreplaceoneofthesebulbs:
- Openthetailgate. See Tailgate onpage2-8.
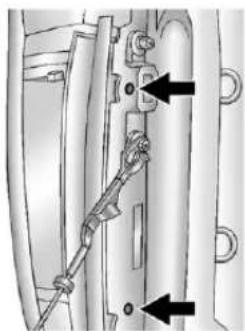
natural_image
Mechanical assembly diagram showing linkage mechanism with arrows indicating movement (no text or symbols)- Removethetworearlamp assemblyscrewsnearthe tailgatelatch.
- Pullthelampassemblyaway fromthevehicle.
-
Turnthebulbsocket counterclockwisetoremoveit fromthetaillampassembly.
-
Holdingthesocket, pulltheold bulb straightouttoreleaseit fromthesocket.
- Pushthenewbulbstraightinto thesocketuntilitclicks.
- Insert the bulb socket into the taillampassembly and turn it clockwise.
- Reinstallthetaillampassembly andtightenthescrews.
CenterHigh-Mounted Stoplamp(CHMSL)
ToreplacetheCHMSLbulb:
- Removethetwoscrewsandlift offthelampassemblyfromthe vehicle.
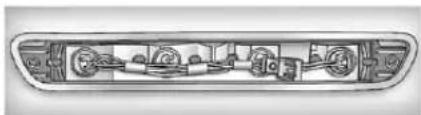
natural_image
Technical line drawing of a mechanical component with gears and shafts (no text or symbols)- Turnthebulbsocket counterclockwiseandremoveit fromthelampassembly.
- Holdingthesocket, pullthebulb toreleaseitfromthesocket.
- Pushthenewbulbintothe socketuntilitclicks.
- Insert the bulb socket into the lamp assembly and turn it clockwise.
- Reinstall the lamp assembly and tightenthescrews.
LicensePlateLamp
Toreplaceoneofthesebulbs:

- Reachundertherearbumperfor thebulbsocket.
- Turnthebulbsocket counterclockwiseandpullthe bulbsocketoutoftheconnector.
- Pulltheoldbulbstraightout fromthebulbsocket.
- Pushthenewbulbstraightin untilitclickstosecureit.
- Reachundertherearbumperto reinstallthebulbsocketintothe connector.
- Turnthebulbsocketclockwise tosecureittotheconnector.
ReplacementBulbs
| ExteriorLamp | Bulb Number |
| CargoLampand CenterHigh-Mounted Stoplamp(CHMSL) | 912LL |
| LicensePlateBulbW5WLL | |
| Headlamps | |
| High-beam9005 | |
| Low-beam/Daytime Running Lamp(DRL) | 9006 |
| ExteriorLamp | Bulb Number |
| Parking/FrontTurn Signal | 3757KA |
| ParkingLamp (Inboard) | 3157A |
| Stoplamp,Rear TurnSignal, Taillamp,and Back-upLamp | 3057 |
Forreplacementbulbsnotlisted here,contactyourdealer.
ElectricalSystem
ElectricalSystem Overload
The vehicle has fuses and circuit breaker stop protect against electrical system overload.
Whenthecurrentelectricalloadis tooheavy, the circuitbreakeropens and closes, protecting the circuit until the current load return to normal or the problem is fixed. This greatly reduces the chance of circuit overload and fire caused by electrical problems.
Fusesandcircuitbreakersprotect powerdevicesinthevehicle.
Replaceabadfusewithanewone oftheidenticalsizeandrating.
If thereisaproblemontheroad and afuseneedstobereplaced, the sameamperagefusecan be borrowed. Choosesomefeature of the vehicle that is not needed to use and replace it as soon as possible.
HeadlampWiring
Anelectricaloverloadmaycause thelampstogoonandoff,orin somecasestoremainoff.Havethe headlampwiringcheckedrightaway ifthelampsgoonandoffor remainoff.
WindshieldWipers
Ifthewipermotoroverheatsdueto heavysnoworice, the windshield wiperswillstopuntilthemotorcools and will then restart.
Although the circuit is protected from electrical overload, overload dueto heavysnow oricemay cause wiper linkaged damage. Always clear rice and heavysnow from the windshield before using the windshield wipers.
If the overload is caused by an electrical problem and not snow or ice, besure to get it fixed.
FusesandCircuit Breakers
Thewiringcircuitsinthevehicleare protectedfromshortcircuitsbya combinationoffusesandcircuit breakers. Thisgreatlyreducesthe chanceoffirescausedbyelectrical problems.
Lookatthesilver-coloredband insidethefuse. Ifthebandisbroken ormelted, replacethefuse. Besure youreplaceabadfusewithanew oneoftheidenticalsizeandrating.
If you ever have a problemon the road and donothave aspare fuse, you can borrow onethathasthe same amperage. Just picks some feature of the vehicle that you can get along without—likether adioor cigarette lighter—and use its fuse, if it is the correct amperage. Replace it as soon as you can.
EngineCompartment FuseBlock
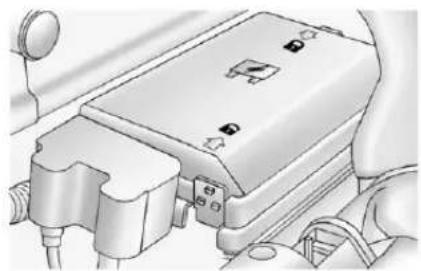
natural_image
Technical illustration of a mechanical device with no visible text or symbolsTheenginecompartmentfuseblock islocatedonthedriversideofthe enginecompartment.SeeEngine CompartmentOverviewon page 10-6formoreinformationon location.
Toremovethecover, pushinonthe tabontheendofthecoverandlift. Toreinstallthecover, lineupthetab andpushdownonthecoveruntil thetabclicksintoplace.
Notice: Spilling liquidon any electrical component on the vehicle may damage it. Always keep the cover on any electrical component.
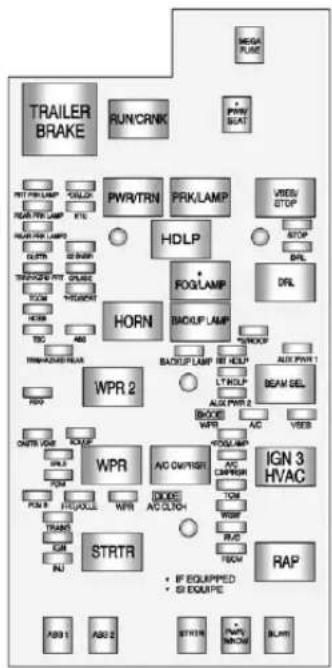
flowchart
graph TD
    A["TRAILER BRAKE"] --> B["PWR/TRN"]
    B --> C["PRK/LAMP"]
    C --> D["HOLP"]
    D --> E["FOGLAMP"]
    E --> F["HORN"]
    F --> G["WPR 2"]
    G --> H["WPR"]
    H --> I["AC OUP/RES1"]
    I --> J["STIRTR"]
    J --> K["RAP"]
    K --> L["IGN 3 HVAC"]
    L --> M["ICM"]
    M --> N["TRIANS"]
    N --> O["ICM"]
    O --> P["INJ"]
    P --> Q["STRTR"]
    Q --> R["ICM"]
    R --> S["INJ"]
    S --> T["INJ"]
    T --> U["INJ"]
    U --> V["INJ"]
    V --> W["INJ"]
    W --> X["INJ"]
    X --> Y["INJ"]
    Y --> Z["INJ"]
    Z --> AA["INJ"]
    AA --> AB["INJ"]
    AB --> AC["INJ"]
    AC --> AD["INJ"]
    AD --> AE["INJ"]
    AE --> AF["INJ"]
    AF --> AG["INJ"]
    AG --> AH["INJ"]
    AH --> AI["INJ"]
    AI --> AJ["INJ"]
    AJ --> AK["INJ"]
    AK --> AL["INJ"]
    AL --> AM["INJ"]
    AM --> AN["INJ"]
    AN --> AO["INJ"]
    AO --> AP["INJ"]
    AP --> AQ["INJ"]
    AQ --> AR["INJ"]
    AR --> AS["INJ"]
    AS --> AT["INJ"]
    AT --> AU["INJ"]
    AU --> AV["INJ"]
    AV --> AW["INJ"]
    AW --> AX["INJ"]
    AX --> AY["INJ"]
    AY --> AZ["INJ"]
    AZ --> BA["INJ"]
    BA --> BB["INJ"]
    BB --> BC["INJ"]
    BC --> BD["INJ"]
    BD --> BE["INJ"]
    BE --> BF["INJ"]
    BF --> BG["INJ"]
    BG --> BH["INJ"]
    BH --> BI["INJ"]
    BI --> BJ["INJ"]
    BJ --> BK["INJ"]
    BK --> BL["INJ"]
    BL --> BM["INJ"]
    BM --> BN["INJ"]
    BN --> BO["INJ"]
    BO --> BP["INJ"]
    BP --> BQ["INJ"]
    BQ --> BR["INJ"]
    BR --> BS["INJ"]
    BS --> BT["INJ"]
    BT --> BU["INJ"]
    BU --> BV["INJ"]
    BV --> BW["INJ"]
    BW --> BX["INJ"]
    BX --> BY["INJ"]
    BY --> BZ["INJ"]
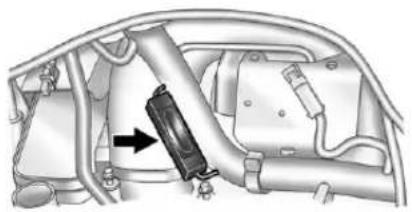
natural_image
Mechanical assembly diagram showing a connector inserted into a vehicle chassis (no text or labels)Thetrailerbrakerelayislocated on thebottomsideofthebattery harness.
| FusesUsage | |
| O2SNSR | OxygenSensors, AirInjection Reactor(AIR) Relay |
| A/C | AirConditioning ControlHead, PowerSeats |
| A/C CMPRSR | AirConditioning Compressor |
| FusesUsage | |
| ABS | AntilockBrake System(ABS), ABSModule, Four-WheelDrive, GravitySensor |
| ABS1ABS1(ABSLogic) | |
| ABS2ABS2(ABSPump) | |
| AUXPWR1AccessoryPower1 | |
| AUXPWR2AccessoryPower2 | |
| BCK/UPBack-upLights | |
| BLWR | Climate ControlFan |
| CLSTRCluster | |
| CNSTR VENT | FuelCanisterVent Solenoid |
| CRUISE | CruiseControl Switch,Inside RearviewMirror, TransferCase ControlModule, BrakeSwitch, ClutchDisable |
| FusesUsage | |
| DR/LCK | PowerDoorLocks(IfEquipped) |
| DRL | DaylightRunningLamps |
| ERLS | MassAirFlow(MAF)Sensor,CanPurgeSolenoid,AirInjectorReactor(AIR)Relay |
| ETC | ElectronicThrottleControl(ETC) |
| FOG/LAMP | FogLamps(IfEquipped) |
| FRTPRKLAMP | FrontPark/TurnLamps,DriverandPassengerSidePowerWindowSwitchesLighting |
| FRT/AXLEFront | AxleActuator |
| FSCM | FuelSystemControlModule |
| BACKUP LAMP | BackupLamp |
| HORN Horn | |
| HTD/SEAT | Heated Seat (IfEquipped) |
| IGN | Ignition, Clutch Starter Switch, Neutral Safety Back-Up Switch, IgnitionCoils 1-5, Air Conditioning Relay |
| INJInjectors | |
| LTHDLP | DriverSide Headlamp |
| PCMB | PowerControl Module (PCM)B |
| PCMI | PowerControl Module (PCM) |
| PWR/SEAT | PowerSeat Circuit Breaker (IfEquipped) |
| FusesUsage | |
| PWR/WNDW | PowerWindows (IfEquipped) |
| RDORadio | |
| REAR PRKLAMP | RearParking Lamp1, Passenger SideTaillamp, LicensePlate Lamps |
| REARPRK LAMP2 | DriverSideRear Taillamp, PassengerSide AirbagIndicator Lighting, InstrumentPanel DimmingPower (2WD/4WDswitch lighting) |
| RTHDLP | PassengerSide Headlamp |
| RVC | RegulatedVoltage Control |
| S/ROOFNotUsed | |
| FusesUsage | |
| STOPStopLamps | |
| STRTR | StarterSolenoid Relay |
| TBC | TruckBody Controller |
| TCM | Transmission ControlModule |
| TCCM | TransferCase ControlModule |
| TRAILER BRAKE | TrailerBrake |
| TRANS | Transmission Solenoid |
| TRN/HAZRDFRT | Turn/Hazard/Courtesy/Cargo Lamps/Mirrors |
| TRN/HAZRD REAR | RearTurn/Hazard Lights |
| VSES/STOP | VehicleStability Enhancement System/Stop |
10-44VehicleCare
| FusesUsage | |
| WPRWiper | |
| WSW | Wiper/WasherSwitch |
| RelaysUsage | |
| A/C CMPRSR | AirConditioning Compressor |
| BackupLampB | BackupLamp |
| BEAMSELBeam | mSelection |
| DRL | DaylightRunning Lamps |
| FOG/LAMP | FogLamps (IfEquipped) |
| HDLPHeadlamps | |
| HORN Horn | |
| IGN3HVAC | Ignition3,Climate Control,Climate ControlHead Fuse,Power SeatFuse |
| RelaysUsage | |
| PRK/LAMP | FrontParking LampFuse,Rear ParkingLamps |
| PWR/TRN | Powertrain, ElectronicThrottle ControlFuse, Oxygen SensorFuse |
| RAP | Retained Accessory Power(Power WindowFuse, Wiper/Washer SwitchFuse) |
| RUN/CRNK | Run/Crank,Airbag SystemFuse, CruiseControl Fuse,Ignition Fuse,Back-Up Lamps,ABSFuse, FrontAxle,PCM-1, InjectorsFuse, Transmission Fuse,ERLS |
| RelaysUsage | |
| STRTR | StarterRelay(PCM Relay) |
| VSES | VehicleStability Enhancement System |
| WPRWipers(On/Off) | |
| WPR2Wiper2(High/Low) | |
| MiscellaneousUsage | |
| A/CCLTCH | Diode—Air Conditioning, Clutch |
| MEGAFUSEMegaFuse | |
| WPR | Diode—Wiper |
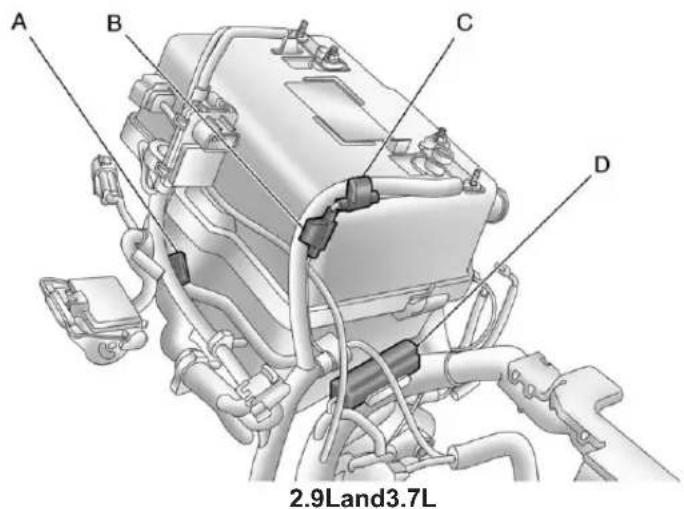
text_image
A B C D 2.9Land3.7L10-46VehicleCare
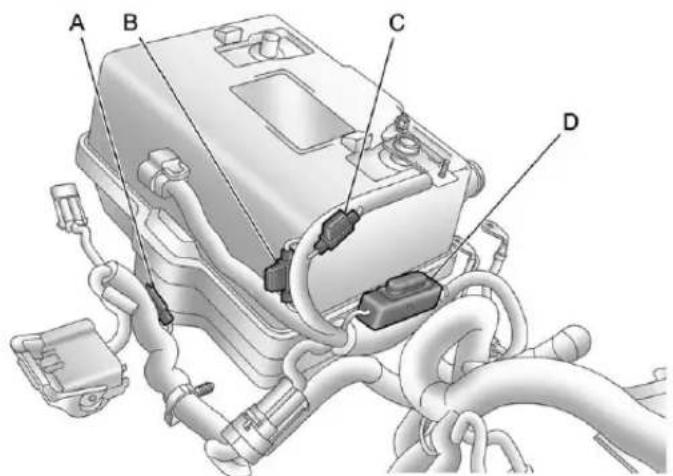
text_image
A B C D5.3L
| FusesUsage | |
| D | TrailerAuxiliary Maxi-Fuse |
| FusesUsage | |
| ATrailerParkLamp | |
| B | CommunicationInterfaceModule |
| FusesUsage | |
| C | Supplemental InflatableRestraint System,Sensing andDiagnostic Module |
WheelsandTires
Tires
EverynewGMvehiclehas high-qualitytiresmadebya leadingtiremanufacturer.See thewarrantymanualfor informationregardingthetire warrantyandwheretoget service.Foradditional informationrefertothetire manufacturer.

WARNING
- Poorlymaintained and improperly used tires are dangerous.
• Overloadingthetirescan causeoverheatingasaresult oftoomuchflexing.There couldbeablowoutanda seriouscrash.See Vehicle LoadLimitsonpage9-19.
(Continued)
WARNING(Continued)
- Underinflatedtiresposethe samedangerasoverloaded tires. Theresultingcrash couldcauseseriousinjury. Checkalltiresfrequently to maintaintherecommended pressure. Tirepressure shouldbecheckedwhenthe tiresarecold.
• Overinflatedtiresaremore likelytobecut, punctured, orbrokenbyasudden impact—suchaswhen hittingapothole. Keeptiresat therecommended pressure. - Wornoroldtirescancausea crash. If the treadis badly worn, replacethem.
- Replaceanytiresthathave beendamagedbyimpacts withpotholes,curbs,etc.
(Continued)
WARNING(Continued)
- Improperlyrepairedtirescan causeacrash. Only the dealeroranauthorized tire servicecenters should repair, replace, dismount, and mount the tires.
- Donotspinthetiresin excessof55km/h(35mph) onslipperysurfacesuchas snow,mud,ice,etc. Excessivespinningmay causethetirestoexplode.
TireSidewallLabeling
Usefulinformationaboutatireis moldedintoitssidewall. The examplesshowatypical passengervehicletireanda compactsparetiresidewall.
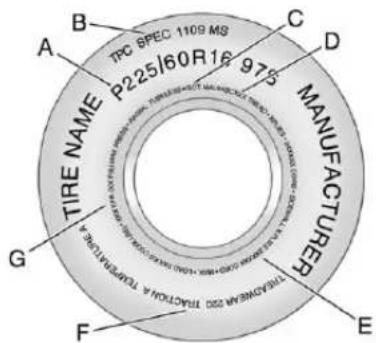
text_image
A B C D P225/60R16 975 MANUFACTURER TIRE NAME G F EPassenger(P-Metric)TireExample
(A)TireSize: Thetiresizeisa combinationoflettersand numbersusedtodefinea particulartire'swidth,height, aspectratio,constructiontype,
andservicedescription.Seethe "TireSize"illustrationalterinthis sectionformoredetail.
(B)TPCSpec(Tire PerformanceCriteria
Specification): Original equipmenttiresdesignedto GM'sspecificireperformance criteriahaveaTPCspecification codemoldedontothesidewall. GM'sTPCspecificationsmeetor exceedallfederalsafety guidelines.
(C)DOT(Department of Transportation): The
Department of Transportation (DOT) code indicates that the tire is incompliance with the U.S. Department of Transportation Motor Vehicle Safety Standards.
(D) TireIdentificationNumber (TIN): The letters and numbers following the DOT (Department of Transportation) code are the TireIdentificationNumber (TIN). The TIN shows the manufacturer and plant code, tiresize, and datethetire was manufactured. The TIN is molded on both sides of the tire, although only ones idemay havethedate of manufacture.
(E)TirePlyMaterial :Thetype ofcordandnumberofpliesin thesidewallandunderthetread.
(F)UniformTireQuality Grading(UTQG) :Tire manufacturersarerequiredto gradetiresbasedonthree performancefactors:treadwear, traction,andtemperature resistance.Formoreinformation see Uniform Tire Quality Gradingonpage 10-65.
(G)MaximumColdInflation LoadLimit : Maximumload that can be carried and the maximum pressure needed to support that load.
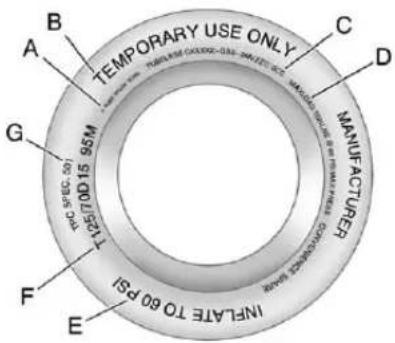
text_image
TEMPORARY USE ONLY A B C D G MANUFACTURER INFATE TO 60 PSI F ECompactSpareTireExample
(A)TirePlyMaterial: Thetype ofcordandnumberofpliesin thesidewallandunderthetread.
(B)TemporaryUseOnly :The compactsparetireortemporary usetirehasatreadlifeof approximately5000km (3,000mi)andshouldnotbe
drivenatspeedsover105km/h (65mph). Thecompactspare tireisforemergencyusewhena regularroadtirehaslostairand goneflat. If the vehicle has a compact sparetire, see Compact Spare Tire on page 10-85 and If a Tire Goes Flatonpage 10-69.
(C) TireIdentificationNumber (TIN): Thelettersandnumbers followingtheDOT(Department ofTransportation)codeare the TireIdentificationNumber (TIN).TheTINshowsthe manufacturerandplantcode, tiresize,anddatethetirewas manufactured.TheTINis moldedontobothsidesofthe tire,althoughonlyonesidemay havethedateofmanufacture.
(D)MaximumColdInflation LoadLimit :Maximumload thatcanbecarriedandthe maximumpressureneededto supportthatload.
(E) Tire Inflation : The temporary usetire or compact spare tireshould be inflated to 420kPa(60psi). Formore information on tire pressure and inflation see Tire Pressure on page 10-54.
(F)TireSize :A combination of letters and numbers define a tire's width, height, aspect ratio, construction type, and service description. The letter Tasthe first character in the tiresize meansthetire is for temporary use only.
(G)TPCSpec(Tire PerformanceCriteria Specification):Original equipmenttiresdesignedto GM'sspecificireperformance criteriahaveaTPCspecification codemoldedontothesidewall. GM'sTPCspecificationsmeetor exceedallfederalsafety guidelines.
TireDesignations
TireSize
The following is an example of typical passenger vehicle tiresize.
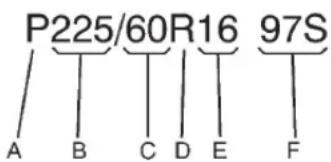
text_image
P225/60R16 97S A B C D E F(A) Passenger(P-Metric) Tire: The United States version of a metric timesizing system. The letter Pasthe first character in the timesizes means passenger vehicle tire engineered to standards set by the U.S. Tire and Rim Association.
(B)TireWidth : Thethree-digit numberindicatesthetiresection widthinmillimetersfrom sidewalltosidewall.
(C)AspectRatio :Atwo-digit numberthatindicatesthetire height-to-widthmeasurements. Forexample,ifthetiresize aspectratiois60,asshownin
itemCoftheillustration, it would mean that the tire's sidewallis 60 percent ashighasitiswide.
(D)ConstructionCode :A lettercodeisusedtoindicate thetypeofplyconstructionin thetire.TheletterRmeans radialplyconstruction;the letterDmeansdiagonalorbias plyconstruction;andtheletterB meansbelted-biasply construction.
(E)RimDiameter :Diameterof thewheelininches.
(F)ServiceDescription :These charactersrepresenttheload indexandspeedratingofthe tire. Theloadindexrepresents theloadcarryingcapacityatire iscertifiedtocarry. Thespeed ratingisthemaximumspeeda tireiscertifiedtocarryaload.
TireTerminology and Definitions
AirPressure:Theamountof airinsidethetirepressing outwardoneachsquareinch of thetire.Airpressureis expressedinkPa(kilopascal) orpsi(poundspersquareinch).
AccessoryWeight : The combinedweightofoptional accessories. Some examples of optional accessories are automatic transmission, power steering, power brakes, power windows, power seats, and air conditioning.
AspectRatio :Therelationship ofatire'sheighttoitswidth.
Belt: Arubbercoatedlayerof cordsthatislocatedbetween thepliesandthetread. Cords maybemadefromsteelorother reinforcingmaterials.
Bead: Thetirebead contains steelwireswrapped by steel cordsthathold the tire onto therim.
BiasPlyTire :Apneumatictire inwhichthepliesarelaidat alternateangleslessthan 90degreestothecenterlineof thetread.
ColdTirePressure :The amountofairpressureinatire, measuredinkPa(kilopascal) orpsi(poundspersquareinch) beforeatirehasbuiltupheat fromdriving.See TirePressure onpage 10-54.
CurbWeight : The weight of a motor vehicle with standard and optionalequipment including the maximum capacity off fuel, oil, and coolant, but without passengers and cargo.
DOTMarkings :Acodemolded intothesidewallofatire signifyingthatthetireisin compliancewiththeU.S. DepartmentofTransportation (DOT)MotorVehicleSafety Standards.TheDOTcode includestheTireIdentification Number(TIN),analphanumeric designatorwhichcanalso identifythetiremanufacturer, productionplant,brand,and dateofproduction.
GVWR: Gross Vehicle Weight Rating. See Vehicle Load Limits on page 9-19.
GAWRFRT : Gross Axle Weight Rating for the front axle. See Vehicle Load Limit on page 9-19.
GAWRRR : Gross Axle Weight Rating for therear axle. See Vehicle Load Limit on page 9-19.
IntendedOutboardSidewall: Thesideofanasymmetricaltire, thatmustalwaysfaceoutward whenmountedonavehicle.
Kilopascal(kPa) : Thematic unitforairpressure.
LightTruck(LT-Metric)Tire :A tireusedonlightdutytrucksand somemultipurposepassenger vehicles.
LoadIndex : Anassigned numberranging from 1 to 279 that correspond stotheload carrying capacity of atire.
MaximumInflationPressure : Themaximumairpressureto whichacoldtirecanbeinflated. Themaximumairpressureis moldedontothesidewall.
MaximumLoadRating :The loadratingforatireatthe maximumpermissibleinflation pressureforthattire.
MaximumLoadedVehicle Weight: Thesumofcurb weight, accessoryweight, vehiclecapacityweight, and productionoptionsweight.
NormalOccupantWeight :The numberofoccupantsavehicle isdesignedtoseatmultipliedby 68kg(150lbs).See Vehicle LoadLimitsonpage9-19.
OccupantDistribution : Designatedseatingpositions.
OutwardFacingSidewall :The sideofanasymmetricaltirethat hasaparticularsidethatfaces outwardwhenmountedona vehicle. Thesideofthetirethat containsawhitewall,bears whitelettering,orbears manufacturer,brand,and/or modelnamemoldingthatis higherordeeperthanthesame moldingsontheothersidewall ofthetire.
Passenger(P-Metric)Tire :A tireusedonpassengercarsand somelightdutytrucksand multipurposevehicles.
Recommended Inflation Pressure: Vehicle manufacturer's recommended tireinflation pressureasshown on the tire placard. See Tire Pressure on page 10-54 and Vehicle Load Limit on page 9-19.
RadialPlyTire :Apneumatic tireinwhichtheplycordsthat extendtothebeadsarelaidat 90degreestothecenterlineof thetread.
Rim: Ametalsupportforatire anduponwhichthetirebeads areseated.
Sidewall: The portion of atire between the read and the bead.
SpeedRating: An alphanumeric code assigned to atire indicating the maximum speed at which atire can operate.
Traction: Thefrictionbetween thetireandtheroadsurface. Theamountofgripprovided.
Tread: The portion of atire that comes into contact with theroad.
TreadwearIndicators :Narrow bands,sometimescalledwear bars,thatshowacrossthetread ofatirewhenonly1.6mm (1/16in)oftreadremains.See WhenItIsTimeforNewTires onpage 10-62.
UTQGS(UniformTireQuality GradingStandards) :Atire informationsystemthat providesconsumerswith ratingsforatire'straction, temperature,andtreadwear. Ratingsaredetermined bytiremanufacturersusing governmenttestingprocedures. Theratingsaremoldedintothe sidewallofthetire.SeeUniform TireQualityGradingon page10-65.
VehicleCapacityWeight :The numberofdesignatedseating positionsmultipliedby 68kg(150lbs)plustherated cargoload.See VehicleLoad Limitsonpage9-19.
VehicleMaximumLoadonthe Tire:Loadonanindividualtire duetocurbweight,accessory weight,occupantweight,and cargoweight.
VehiclePlacard :Alabel permanentlyattachedtoa vehicleshowingthevehicle capacityweightandtheoriginal equipmenttiresizeand recommendedinflationpressure. See "TireandLoading InformationLabel" under Vehicle LoadLimitsonpage9-19.
TirePressure
Tiresneedthecorrectamountof airpressuretooperate effectively.
Notice: Neithertire underinflation nor overinflation is good. Underinflated tires, ortires that donothaveenoughair, can result in:
- Tireoverloading and overheating which could lead to ablowout.
• Prematureor irregularwear. - Poorhandling.
- Reducedfueleconomy.
Overinflatedtires, ortiresthat havetoomuchair, can resultin:
- Unusualwear.
- Poorhandling.
- Roughride.
- Needlessdamagefrom roadhazards.
The Tire and Loading Information label on the vehicle indicate the originalequipment tires and the correct cold tire inflation pressures. The recommended pressure is the minimum air pressure needed to support the vehicle's maximum loadcarrying capacity.
For additional information regarding how much weight the vehicle can carry, and an example of the Tire and Loading Information label, see Vehicle Load Limit on page 9-19. How the vehicle is loaded affects vehicle handling and ride comfort. Never load the vehicle with more weight than it was designed to carry.
WhentoCheck
Checkyourtiresonceamonth ormore.Donotforgettocheck thesparetire.Ifthevehiclehas acompactsparetire,itshould beat420kPa(60psi).See CompactSpare Tireon page10-85andFull-SizeSpare Tireonpage10-86foradditional information.
HowtoCheck
Useagoodqualitypocket-type gaugetochecktirepressure. Propertireinflationcannotbe determinedbylookingatthetire. Checkthetireinflationpressure whenthetiresarecold,meaning thevehiclehasnotbeendriven foratleastthreehoursorno morethan1.6km(1mi).
Removethevalvecapfromthe tirevalvestem.Pressthetire gaugefirmlyontothevalveto getapressuremeasurement. Ifthecoldtireinflationpressure matchestherecommended pressureontheTireand LoadingInformationlabel,no furtheradjustmentisnecessary. Iftheinflationpressureislow, addairuntiltherecommended pressureisreached.Ifthe inflationpressureishigh,press onthemetalsteminthecenter ofthetirevalvetoreleaseair.
Re-checkthetirepressurewith thetiregauge.
Return the valve capson the valvestem stop prevent leaks and keep out dirt and moisture.
TirePressurefor High-SpeedOperation
WARNING
Drivingathighspeeds, 160km/h (100mph) or higher, puts an additional strainontires. Sustained high-speed driving causes excessive heat buildup and can cause sudden tire failure. You could have acrash and you or others could be killed. Some high-speed rated tires require inflation pressure adjustment for high-speed operation. When speed limits and road conditions are such that vehicle can be driven at high speeds, makes sure the tires aerated for high-speed operation, in excellent condition, and set to the correct cold tire inflation pressure for the vehicle load.
VehicleswithP235/50R18sizetires requireinflationpressureadjustment whendrivingthevehicleatspeeds of 160km/h(100mph)or higher. Setthecoldinflationpressureto the maximuminflationpressureshown onthetiresidewall,or241kPa (35psi),whicheverislower.Seethe examplefollowing.Returnthetires totherecommendedcoldtire inflationpressurewhenhigh-speed drivinghasended.See Vehicle LoadLimitsonpage9-19and Tire Pressureonpage10-54.
Example:
Themaximumloadandinflation pressureismoldedonthetire sidewall,insmallletters,near therimflange.Itwillread somethinglikethis:Maximumload 690kg(1521lbs)300kPa(44psi) Max.Press.
Forthisexample, settheinflation pressure for high-speed driving at 241 kPa (35 psi).
TirePressureMonitor System
The Tire Pressure Monitor System (TPMS) uses radio and sensor technology to check tire pressure levels. The TPMS sensors monitor the air pressure in your tires and transmittire pressurereading stoa receiver located in the vehicle.
Eachtire, including the spare (if provided), should be checked monthly when cold and inflated to the inflation pressurerecommended by the vehicle manufacturer on the vehicle placardortire inflation pressure label. (If your vehicle has tires of different sizing thanthesize indicated on the vehicle placardortire inflation pressure label, you should determinethe propertire inflation pressure forthosetires.)
Asanaddedsafetyfeature,your vehiclehasbeenequippedwitha tirepressuremonitoringsystem (TPMS)thatilluminatesalowtire
pressuretelltalewhenoneormore ofyourtiresissignificantly under-inflated.
Accordingly, whenthelowtire pressuretelltaleilluminates, you shouldstopandcheckyourtiresas soonaspossible, andinflatethem totheproperpressure. Drivingona significantlyunder-inflatedtire causesthetiretooverheatandcan leadtotirefailure. Under-inflation alsoreducesfuelefficiencyandtire treadlife, andmayaffectthe vehicle'shandlingandstopping ability.
PleasenotethattheTPMSis notasubstituteforpropertire maintenance, anditisthedriver's responsibility to maintain incorrect tire pressure, even if under-inflation has not reached the level to trigger illumination of the TPMSlow tire pressure telltale.
Yourvehiclehasalsobeen equippedwithaTPMSmalfunction indicatortoindicatewhenthe systemisnotoperatingproperly.
The TPMSmalfunctionindicatoris combinedwiththelowtirepressure telltale. Whenthesystemdetectsa malfunction, thetelltalewillflashfor approximatelyoneminuteandthen remaincontinuouslyilluminated. Thissequencewillcontinueupon subsequentvehiclestart-upsas longasthemalfunctionexists.
Whenthemalfunctionindicatoris illuminated, thesystemmaynotbe abletodetectorsignallowtire pressureasintended. TPMS malfunctionsmayoccurforavariety ofreasons, includingtheinstallation ofreplacementoralternatetiresor wheelsonthevehiclethatprevent theTPMSfromfunctioningproperly. AlwayschecktheTPMSmalfunction telltaleafterreplacingoneormore tiresorwheelsonyourvehicleto ensurethatthereplacementor alternatetiresandwheelsallowthe TPMStocontinuetofunction properly.
See TirePressureMonitor Operationonpage10-57for additionalinformation.
FederalCommunications Commission(FCC)Rulesand withIndustryCanada Standards
SeeRadioFrequencyStatementon page 13-22forinformation regardingPart15oftheFederal CommunicationsCommission(FCC) RulesandwithIndustryCanada StandardsRSS-GEN/210/220/310.
TirePressureMonitor Operation
This vehicle may have a Tire Pressure Monitor System (TPMS). The TPMS is designed to warn the driver when alow tire pressure condition exists. TPMS sensors are mounted on to each tire and wheel assembly on your vehicle, excluding the spare tire. The TPMS sensors monitor the air pressure in your tires and transmit the tire pressure reading to are receiver located in the vehicle.
Whenalowtirepressurecondition is detected, the TPMSilluminates the lowtirepressurewarninglight located on the instrument cluster.
If the warning light comes on, stop as soon as possible and inflate the rest of there recommended pressures shown on the tire loading information label. See Vehicle Load Limitson page 9-19.
Amessagetocheckthepressurein aspecifictiredisplaysintheDriver InformationCenter(DIC).Thelow tirepressurewarninglightandthe DICwarningmessagecomeonat eachignitioncycleuntilthetiresare inflatedtothecorrectinflation pressure.Foradditionalinformation anddetailsabouttheDICoperation
anddisplaysseeDriverInformation Center(DIC)onpage5-20andTire Messagesonpage5-27.
Thelowtirepressurewarninglight maycomeonincoolweatherwhen thevehicleisfirststarted,andthen turnoffasthevehicleisdriven.This couldbeanearlyindicatorthatthe airpressureisgettinglowand needstobeinflatedtotheproper pressure.
ATireandLoadingInformationlabel showsthesizeoftheoriginal equipmenttiresandthecorrect inflationpressureforthetireswhen theyarecold.SeeVehicleLoad Limitsonpage9-19,foranexample oftheTireandLoadingInformation labelanditslocationonyour vehicle.AlsoseeTirePressureon page 10-54.
Yourvehicle'sTPMScanwarnyou aboutalowtirepressurecondition butitdoesnotreplacenormaltire maintenance.See TireInspection onpage10-60,TireRotationon page 10-60and Tireson page 10-47.
Notice: Tiresealantmaterials are notallthesame. Anon-approved tiresealantcoulddamagethe TPMSsensors. TPMSsensor damagecausedbyusingan incorrecttiresealantisnot coveredbythevehiclewarranty. Alwaysuseonlythe GM-approvedtiresealant availablethroughyourdealeror includedinthevehicle.
TPMSMalfunctionLightand Message
The TPMS will not function properly if one or more of the TPMS sensors are missing or in operable. When the system detects a malfunction, the low tire pressure warning light flashes for about one minute and then stay on for their remainder of the ignition cycle. ADIC warning message also displays. The malfunction light and DIC warning message come on at each ignition cycle until the problem is corrected. Some of the condition that can cause the set to come on are:
- Oneoftheroadtireshasbeen replacedwiththesparetire. The sparetiredoesnothavea TPMSsensor. Themalfunction lightandtheDICmessage shouldgooffaftertheroadtire isreplacedandthesensor matchingprocessisperformed successfully. See"TPMSSensor MatchingProcess"laterinthis section.
- TheTPMSsensormatching processwasnotdoneornot completedsuccessfullyafter rotatingthevehicle'stires.The malfunctionlightandtheDIC messagesshouldgooffoncethe TPMSsensormatchingprocess isperformedsuccessfully.See "TPMSSensorMatching Process"laterinthissection.
- OneormoreTPMSsensorsare missingordamaged. The malfunctionlightandtheDIC messageshouldgooffwhenthe TPMSsensorsareinstalledand thesensormatchingprocessis performedsuccessfully.See yourdealerforservice.
- Replacementtiresorwheelsdo notmatchtheoriginalequipment tiresorwheels.Tiresandwheels otherthanthoserecommended couldpreventtheTPMSfrom functioningproperly.SeeBuying NewTiresonpage10-62.
- Operatingelectronicdevicesor beingnearfacilitiesusingradio wavefrequenciessimilartothe TPMScouldcausetheTPMS sensorstomalfunction.
If the TPMS is not functioning properly, it cannot detectorsignala lowtirecondition. Seeyourdealer for service if the TPMS malfunction light and DIC message comes on and stay on.
TPMSSensorMatching Process
EachTPMSsensorhasaunique identificationcode. Theidentification codeneedstobematchedtoanew tire/wheelpositionafterrotatingthe vehicle'stiresorreplacingoneor moreoftheTPMSsensors. Also, theTPMSsensormatchingprocess shouldbeperformedafterreplacing asparetirewitharoadtire containingtheTPMSsensor. The malfunctionlightandtheDIC messagesshouldgooffatthenext ignitioncycle. Thesensorsare matchedtothetire/wheelpositions, usingaTPMSrelearntool, in the following order: driversidefronttire, passengersidefronttire, passenger sidereartire, and driversiderear. Seeyourdealerforserviceorto purchasearelearntool.
Thereisoneminutetomatchthe firsttire/wheelposition,and fiveminutesoveralltomatchallfour tire/wheelpositions.Ifittakes longer,thematchingprocessstops andmustberestarted.
The TPMSsensormatching procedure is:
- Settheparkingbrake.
- TurntheignitiontoON/RUNwith theengineoff.
- Turntheexteriorlampswitch from AUTOtoOFFfourtimes withinthreeseconds. Adouble hornchirpwillsoundandthe TPMSlowtirewarninglight startsflashing. Thedoublehorn chirpandflashingTPMS warninglightindicates the TPMS matchingprocesshasstarted.
The TPMS warning light should continue flashing throughout the matching procedure. The LOW TIRE messaged display on the Driver Information Center (DIC).
- Startwiththedriverside fronttire.
- Placetherelearntoolagainst thetiresidewall, nearthevalve stem. Thenpressthebuttonto activatetheTPMSsensor. Ahornchirpconfirmsthatthe sensoridentificationcodehas beenmatchedtothistireand wheelposition.
- Proceed to the passengers side front tire, and repeat the procedure in Step 5.
- Proceed to the passengers side reartire, and repeat the procedure in Step 5.
-
Proceed to the driversiderear tire, and repeat the procedure in Step5.
-
Afterhearingtheconfirminghorn chirpforthedriversidereartire, checktoseeiftheTPMSlowtire warninglightandtheDICLOW TIREmessageshaveturnedoff. Ifyes,theTPMSsensorshave beenrelearned.Turntheignition switchtoLOCK/OFF.
Ifthelowtirewarninglightand theSERVTPMmessageonthe DICareonaftercompleting Step5forthedriversiderear tire,thesensorrelearnprocess hasnotbeensuccessful.Turn theignitiontoLOCK/OFFand repeatthematchingprocess beginningwithStep2.
- Setallfourtirestothe recommendedairpressure levelasindicatedontheTire andLoadingInformationlabel.
TireInspection
Werecommendthatthetires, includingthesparetire,ifthe vehiclehasone,beinspected forsignsofwearordamageat leastonceamonth.
Replacethetireif:
• Theindicatorsatthreeor moreplacesaroundthetire canbeseen.
- Thereiscordorfabric showingthroughthetire's rubber.
- Thetreadorsidewallis cracked, cut, orsnagged deepenoughtoshowcordor fabric.
- Thetirehasabump, bulge, orsplit.
- Thetirehasapuncture, cut, orotherdamagethatcannot berepairedwellbecauseof thesizeorlocationofthe damage.
TireRotation
Tiresshouldberotatedevery 12000km(7,500mi).See MaintenanceScheduleon page11-3.
Tiresarerotatedtoachievea uniformwearforalltires. The firstrotationisthemost important.
Anytimeunusualwearis noticed,rotatethetiresassoon aspossibleandcheckthewheel alignment.Alsocheckfor damagedtiresorwheels.See WhenItIsTimeforNewTires onpage 10-62andWheel Replacementonpage 10-67.
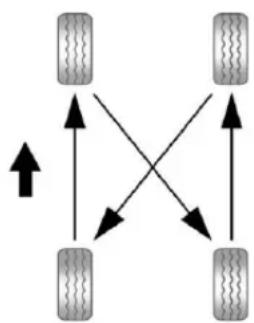
flowchart
graph TD
    A["Terr 1"] --> B["Terr 2"]
    B --> C["Terr 3"]
    C --> D["Terr 4"]
    D --> A
    A --> B
    B --> C
    C --> D
    D --> A
Use this rotation pattern when rotating the tires.
If the vehicle has a compact spare tire, donot include it in the tirerotation.
Adjustthefrontandreartiresto therecommendedinflation pressureontheTireand LoadingInformationlabelafter thetireshavebeenrotated.See TirePressureonpage10-54 and VehicleLoadLimitson page9-19.
ResettheTirePressureMonitor System.See TirePressure MonitorOperation on page10-57.
Check that all wheel nuts are properly tightened. See "Wheel Nut Torque" under Capacities and Specifications on page 12-2.
WARNING
Rustordirtonawheel,oronthe partstowhichitisfastened,can makewheelnutsbecomeloose aftertime. Thewheelcouldcome offandcauseanaccident.When changingawheel,removeany rustordirtfromplaceswherethe wheelattachestothevehicle.In anemergency,aclothorapaper towelcanbeused;however,use ascaperorwirebrushlaterto removeallrustordirt.
Lightlycoatthecenterofthe wheelhubwithwheelbearing greaseafterawheelchangeor tirerotationtopreventcorrosion orrustbuild-up.Donotget greaseontheflatwheel mountingsurfaceoronthe wheelnutsorbolts.
WhenItIsTimeforNew Tires
Factors, such as maintenance, temperatures, drivingspeeds, vehicleloading, and road conditions affect the wear rate of the tires.
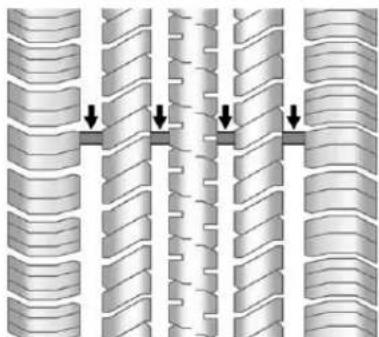
natural_image
Diagram showing two parallel corrugated structures with downward arrows indicating compression or dislocation (no text or symbols present)Treadwearindicatorsareonewayto tellwhenitistimefornewtires. Treadwearindicatorsappearwhen thetireshaveonly1.6mm(1/16in) orlessoftreadremaining.Some commercialtrucktiresmaynothave treadwearindicators.
See Tire Inspection on page 10-60 and Tire Rotation on page 10-60 for additional information.
Therubberintiresagesovertime. Thisalsoappliestothesparetire, ifthevehiclehasone, evenifitis neverused. Multipleconditions includingtemperatures, loading conditions, andinflationpressure maintenanceaffecthowfastaging takesplace. Tireswilltypicallyneed tobereplacedduetowearbefore theymayneedtobereplaced duetoage. Consultthetire manufacturerformoreinformation onwhentiresshouldbereplaced.
VehicleStorage
Tiresagewhenstorednormally mountedonaparkedvehicle.Park avehiclethatwillbestoredforat leastamonthinacool,dry,clean areaawayfromdirectsunlightto slowaging.Thisareashouldbe freeofgrease,gasolineorother substancesthatcandeteriorate rubber.
Parkingforanextendedperiodcan causeflatspotsonthetiresthat mayresultinvibrationswhile driving.Whenstoringavehiclefor atleastamonth,removethetiresor raisethevehicletoreducethe weightfromthetires.
BuyingNewTires
GMhasdevelopedandmatched specifictiesforthevehicle. The originalequipmenttiresinstalled weredesignedtomeetGeneral MotorsTirePerformanceCriteria Specification(TPCSpec)system rating.Whenreplacementtiresare needed,GMstronglyrecommends buyingtireswiththesameTPC Specrating.
GM's exclusive TPCSpecsystem considers overadozencritical specification that impact the overall performance of the vehicle, including brakesystem performance, ride and handling, traction control, and tire pressure monitoring performance. GM's TPC Specnumberismolded onto the tire's sidewall near the tiresize. If the tires have an all-seasontread design, the TPCSpecnumber will be followed by MS form and snow. See Tire Sidewall Labeling on page 10-48 for additional information.
GMrecommendsreplacingallthe tiresatthesametime.Uniformtread depthonalltireswillhelpto maintaintheperformanceofthe vehicle.Brakingandhandling performancemaybeadversely affectedifallthetiresarenot replacedatthesametime.SeeTire Inspectiononpage 10-60and Tire Rotationonpage 10-60for informationonpropertirerotation.
WARNING
Tirescouldexplodeduring improperservice.Attempting tomountordismountatire couldcauseinjuryordeath. Onlyyourdealerorauthorized tireservicecentershould mountordismountthetires.
WARNING
Mixingtiresofdifferentsizes, brands,ortypesmaycause lossofcontrolofthevehicle, resultinginacrashorother vehicledamage. Usethe correctsize,brand,andtype oftiresonallwheels.
WARNING
Usingbias-plytiresonthe vehiclemaycausethewheel rimflangestodevelopcracks aftermanymilesofdriving. Atireand/orwheelcouldfail suddenlyandcauseacrash. Useonlyradial-plytireswith thewheelsonthevehicle.
If the vehicle tires must bere placed with atire that does not have a TPC Spec number, makes sure they are the namesize, load range, speed rating, and construction (radial) as the original tires.
Vehiclesthathaveatirepressure monitoringsystemcouldgivean inaccuratelow-pressurewarningif non-TPCSpecratedtiresare installed.SeeTirePressureMonitor Systemonpage10-56.
The Tire and Loading Information label indicates the original equipment tires on the vehicle. See Vehicle Load Limit on page 9-19, forthelabellocation and more information about the Tire and Loading Information label.
DifferentSizeTiresand Wheels
If wheels sortires are installed that are different sizethan the original equipment wheels and tires, vehicle performance, including its braking, ride and handling characteristics, stability, and resistancetorollover maybe affected. If the vehicle has electronics system such as antilock brakes, rollover airbags, traction control, and electronic stability control, the performance of these system scan also be affected.

WARNING
If different-sized wheels are used, theremay not bean acceptable level of performance and safety if tires not recommended forth those wheels are selected. This increases the chance of a crash and serious injury. Only use GM specific wheel and tires systems developed for the vehicle, and havethem properly installed by a GM certified technician.
SeeBuyingNewTireson page 10-62 and Accessories and Modifications on page 10-4 for additional information.
UniformTireQuality Grading
Qualitygradescanbefound whereapplicableonthetire sidewallbetweentreadshoulder andmaximumsectionwidth. For example:
Treadwear200TractionAA TemperatureA
The following information relates to the system developed by the United States National Highway Traffic Safety Administration (NHTSA), which gradestires by treadwear, traction, and temperature performance. This applies only to vehicle less sold in the United States. The grades are molded on the sidewall of most passenger cartires. The Uniform Tire Quality Grading (UTQG) system does not apply to debtread, winter-types now tires, space-saver, or temporary
usesparetires, tires with nominal rim diameters of 10 to 12 inches (25 to 30 cm), ortosomelimited-production tires.
While the tires available on General Motors passengers cars and light trucks may vary with respect to these grades, they must also conform to federal safety requirements and additional General Motors Tire Performance Criteria (TPC) standards.
All Passenger Car Tires Must Conform to Federal Safety Requirements In Addition To These Grades.
Treadwear
Thetreadweargradeisa comparativeratingbasedonthe wearrateofthetirewhentested undercontrolledconditionsona specifiedgovernmenttest course. Forexample, atire graded150wouldwearoneand ahalf(1½)timesaswellonthe governmentcourseasatire graded100. Therelative performanceoftiresdepends upontheactualconditionsof theiruse, however, and may departsignificantlyfromthe normduetovariationsindriving habits, servicepractices anddifferencesinroad characteristicsandclimate.
Traction-AA,A,B,C
Thetractiongrades, from highest to lowest, are AA, A, B, and C. Those grades represent the tire's ability to stop on wet pavement as measured under controlled condition on specified government test surfaces of asphalt and concrete. At remarked C may have poor traction performance. Warning: The traction grade assigned to histire is based on straight-ahead braking traction tests, and does not include acceleration, cornering, hydroplaning, or peak traction characteristics.
Temperature-A,B,C
ThetemperaturegradesareA (thehighest), B, and C, representing the tire's resistance to the generation of heat and its ability to dissipate heat when tested under controlled condition as specified indoor laboratory test wheel. Sustained hightemperature can cause the material of the tire to degenerate and reducetire life, and excessivetemperature can lead to sudden tire failure. The grade Correspond to a level of performance which all passenger cartires must meet under the Federal Motor Safety Standard No. 109. Grades Band Are present higher level sof performance on the laboratory test wheel than the minimum required by law. Warning: The temperature grade forthistire is
establishedforatirethatis properlyinflatedandnot overloaded.Excessivespeed, underinflation,orexcessive loading,eitherseparatelyorin combination,cancauseheat buildupandpossibletirefailure.
WheelAlignmentandTire Balance
Thetiresandwheelswerealigned andbalancedatthefactoryto providethelongesttirelifeandbest overallperformance.Adjustmentsto wheelalignmentandtirebalancing willnotbenecessaryonaregular basis.However,checkthe alignmentifthereisunusualtire wearorifthevehicleispullingto onesideortheother.Ifthevehicle vibrateswhendrivingonasmooth road,thetiresandwheelsmight needtoberebalanced.Seeyour dealerforproperdiagnosis.
WheelReplacement
Replaceanywheelthatisbent, cracked,orbadlyrustedor corroded.Ifwheelnutskeepcoming loose,thewheel,wheelbolts,and wheelnutsshouldbereplaced. Ifthewheelleaksair,replaceit. Somealuminumwheelscanbe repaired.Seeyourdealerifanyof theseconditionsexist.
Yourdealerwillknowthekindof wheelthatisneeded.
Eachnewwheelshouldhavethe sameload-carryingcapacity, diameter,width,offset,andbe mountedthesamewayastheoneit replaces.
Replacewheels, wheelbolts, wheel nuts, or Tire Pressure Monitor System (TPMS) sensors with new GM originalequipment parts.
WARNING
Using the wrong replacement wheels, wheel bolts, or wheel nutscan be dangerous. It could affect the braking and handling of the vehicle. Tirescan lose air, and causel loss of control, causing a crash. Always use the correct wheel, wheel bolts, and wheel nuts for replacement.
Notice: The wrong wheel can also cause problems with bearing life, brake cooling, speedometer orodometeralibration, headlampaim, bumper height, vehicleground clearance, and tire ortirechain clear anctothe body and chassis.
SeelfaTireGoesFlaton page 10-69 formoreinformation.
UsedReplacementWheels
WARNING
Replacingawheelwithaused oneisdangerous.Howithas beenusedorhowfarithasbeen drivenmaybeunknown.Itcould failsuddenlyandcauseacrash. Whenreplacingwheels,usea newGMoriginalequipment wheel.
TireChains

WARNING
If your vehicle has P215/70R16, P235/75R16, P265/70R17, P235/50R18, or P265/65R18 sizetires, donot usetirechains. They can damage your vehicle because there is not enough clearance. Tire chains used on a vehicle without the proper amount of clearance can caused damage to the brakes, suspension, or other vehicle parts. The areadamaged by the tire chains could cause you to lose control of your vehicle and you or others maybe injured in crash.
(Continued)
WARNING(Continued)
Useanother type of traction device only if its manufacturer recommends it for use on your vehicle and tiresize combination and road conditions. Follow that manufacturer's instructions. To help avoid damage to your vehicle, drives slowly, readjust, or removed the device if it is contacting your vehicle. Donot spin the vehicle's wheels.
If youdofindtractiondevicesthat will fit, install themontherear tires.
Notice: If your vehicle has atire size other than P215/70R16, P235/75R16, P265/70R17, P235/50R18, or P265/65R18 usetire chains only where legal and only when you must. Use chain that are the propersize for your tires. Install them on the tires of therear axle. Donot use chains on the tires of the front axle. Tightenthemas tightly as possible with the ends securely fastened. Drive slowly and follow the chain manufacturer's instructions. If you can hear the chains contacting your vehicle, stop and retightenthem. If the contact continues, slowdown until stops. Driving to first for spinning the wheels with chains on will damage your vehicle.
IfaTireGoesFlat
Itisunusualforatiretoblowout whiledriving,especiallyifthetires aremaintainedproperly.Ifairgoes outofatire,itismuchmorelikelyto leakoutslowly.Butifthereeverisa blowout,hereareafewtipsabout whattoexpectandwhattodo:
Ifafronttirefails, theflattire createsadragthatpullsthevehicle towardthatside. Takeyourfootoff theacceleratorpedalandgripthe steeringwheelfirmly. Steerto maintainlaneposition, and then gentlybraketoastop, welloffthe road, if possible.
Arearblowout,particularlyona curve,actsmuchlikeaskidand mayrequirethesamecorrectionas usedinaskid. Stoppressingthe acceleratorpedalandsteerto straightenthevehicle. Itmaybe verybumpyandnoisy. Gentlybrake toastop, wellofftheroad, ifpossible.
WARNING
Drivingonaflattirewillcause permanentdamagetothetire. Re-inflatingatireafterithas beendrivenonwhileseverely underinflatedorflatmaycausea blowoutandaseriouscrash. Neverattempttore-inflateatire thathasbeendrivenonwhile severelyunderinflatedorflat. Haveyourdealeroranauthorized tireservicecenterrepairor replacetheflattireassoonas possible.
WARNING
Liftingvehicleandgetting underittodomainaintenanceor repairsidangerouswithoutthe appropriatesafetyequipmentand training.Ifajackisprovidedwith thevehicle,itisdesignedonlyfor changingaflattire.Ifitisusedfor anythingelse,youorotherscould bebadlyinjuredorkilledifthe vehicleslipsoffthejack.Ifajack isprovidedwiththevehicle,only useitforchangingaflattire.
Ifatiregoesflat, avoidfurthertire andwheeldamagebydrivingslowly toalevelplace, wellofftheroad, ifpossible. Turnonthehazard warningflashers.SeeHazard WarningFlashersonpage6-4.

WARNING
Changingatirecanbe dangerous. The vehiclecanslip off the jack and rollover or fall causing injury or death. Find a level placetochangethe tire. To help prevent the vehicle from moving:
- Settheparkingbrakefirmly.
- Putanautomatic transmission in P(Park) or a manual transmission in 1(First) or R(Reverse).
- For four-wheel-drive vehicles, besure the transfercaseisinadrive gear—notinN(Neutral).
(Continued)
WARNING(Continued)
- Turnofftheengineanddo notrestartwhilethevehicle israised.
- Donotallowpassengersto remaininthevehicle.
- Placewheelblocksonboth sidesofthetireatthe oppositecornerofthetire beingchanged.
Whenthevehiclehasaflattire(B), usethefollowingexampleasa guidetoassistintheplacementof thewheelblocks(A).
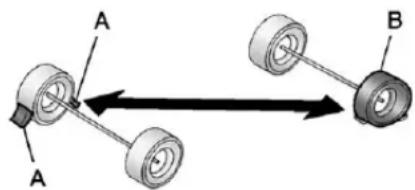
text_image
A A BA.WheelBlock
B.FlatTire
The following information explains howtousethejackandchange atire.
TireChanging
RemovingtheSpareTireand Tools
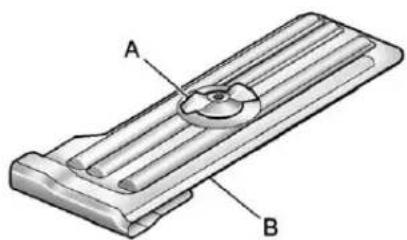
natural_image
3D mechanical component diagram showing a slot with labeled parts A and B (no text or symbols beyond labels)A.WingNut
B.StorageBagandTools
Thetoolsarelocatedundertheright frontpassengerseat.
-
Movetheseatalltheway forwardtolocatethetoolbag.
-
Turnthewingnut(A) counterclockwisetoreleasethe toolbag(B).
Putthetoolstothesidewhileyou accessthejackandwheelblocks.
Regular/ExtendedCab
Forregularandextendedcab vehicles,thejackandwheelblocks arelocatedunderthecoveratthe centerofthevehiclebehindthe frontseats.
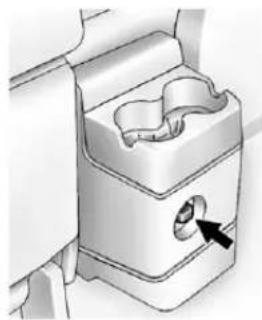
natural_image
Mechanical component diagram showing a handle with an arrow pointing to a small knob (no text or symbols present)- Turnthewingnutonthecover counterclockwisetoremoveit.
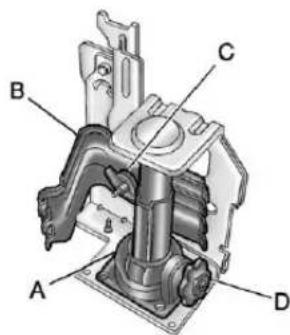
text_image
Technical diagram of a mechanical assembly with labeled parts A, B, C, and DA.Jack
B.WheelBlocks
C.WingNut
D.JackKnob
-
Lowerthejack(A) by turning the jackknob(D) counterclockwise toreleasethejack(A) from the bracket.
-
Turnthewingnut(C) counterclockwisetoreleasethe wheelblocks(B).
10-72VehicleCare
CrewCab
Forcrewcabmodels,thejackand wheelblocksarelocatedunderthe driversiderearseat.
- Reachundertherearseatto accesssthejackandwheel blocks.
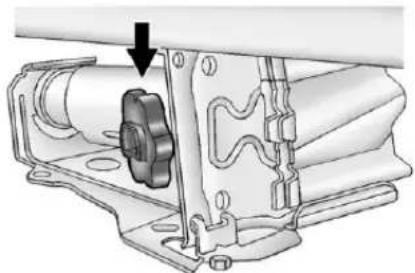
natural_image
Mechanical assembly diagram showing a gear mechanism inside a housing (no text or labels)-
Turnthejackknob counterclockwisetolowerthe jackallthewayandreleaseit fromthebracket.
-
Turnthewingnut counterclockwisetoremovethe wheelblocksandthewheel blockretainer.
Usethejackhandleextensionsand thewheelwrenchtoremovethe underbody-mountedsparetire.
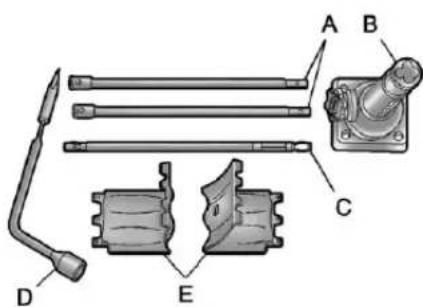
text_image
Technical diagram of mechanical components with labeled parts A, B, C, D, and EA. JackHandleExtensions
B.Jack
C.JackHandle
D.WheelWrench
E.WheelBlocks
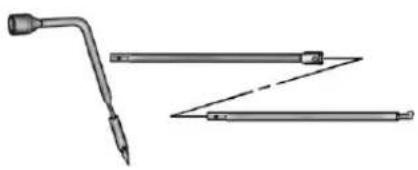
natural_image
Technical line drawing of a tool with three different designs, no text or symbols present- Assemble the wheel wrench, the jack handle extensions, and the jack handle, as shown.
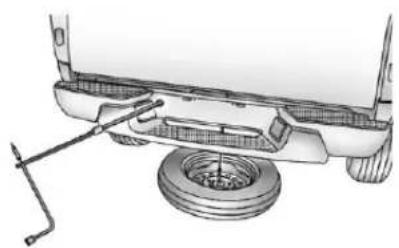
natural_image
Technical line drawing of a mechanical assembly with a central bearing and mounting bracket (no text or symbols)-
Insert the chiseled end of the jack handle at as light angle through the hole in therear bumper and into the funnel-shaped guide.
-
Turnthewheelwrench counterclockwisetolowerthe sparetiretotheground. Continuetoturnthewheel wrenchuntilthesparetirecan bepulledoutfromunderthe vehicle.
If the spare tired does not lower to the ground, these secondary latch is engaged causing the tire not to lower. See Secondary Latch System on page 10-82.
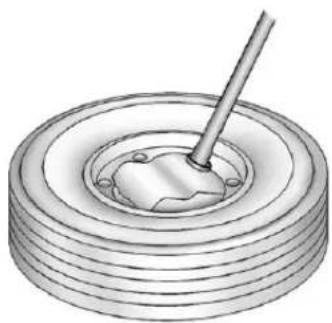
natural_image
Technical illustration of a mechanical pulley with a lever (no text or symbols)-
Tilttheretainerwhenthetirehas beenlowered, and slide it up the cablesoit can be pulled up through the wheel opening.
-
Putthesparetirenearthe flattire.
RemovingtheFlatTireand InstallingtheSpareTire
Usethefollowingpicturesand instructionstoremovetheflattire andraisethevehicle.
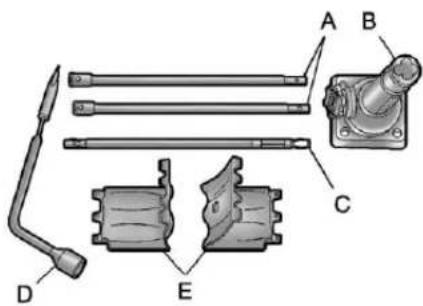
text_image
Technical diagram of mechanical components with labeled parts A, B, C, D, and EA. JackHandleExtensions
B.Jack
C.JackHandle
D.WheelWrench
E.WheelBlocks
- Doasafetycheckbefore proceeding. See Ifa Tire Goes Flatonpage 10-69 form more information.
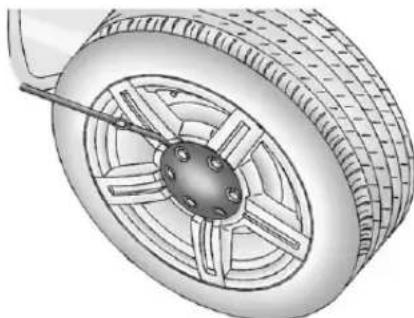
natural_image
Technical illustration of a car wheel assembly with visible tire, hub, and hub screw (no text or symbols)- Removethecentercapby placingthechiselendofthe wheelwrenchintooneofthe slotsonthewheelandgently pryingthecapout.
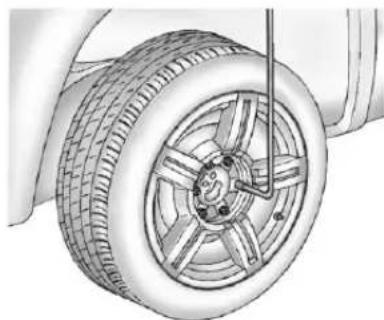
natural_image
Technical illustration of a car tire assembly with a wheel and suspension rod (no text or symbols)- Turnthewheelwrench counterclockwisetoloosenall thewheelnuts.Donotremove thewheelnutsyet.
WARNING
Getting under vehicle whenitis jacked up is dangerous. If the vehicles lip soff the jack you could be badly injured or killed. Never get under vehicle whenitis supported only by a jack.
WARNING
Raisingthevehiclewiththejack improperlypositionedcan damagethevehicleandeven makethevehicelfall. To help avoidpersonalinjuryandvehicle damage, besuretofitthejacklift headintotheproperlocation beforeraisingthevehicle.
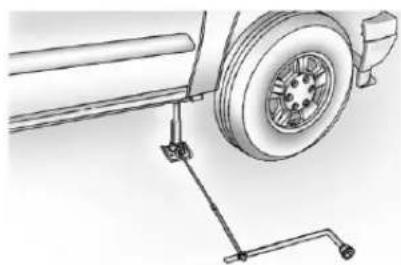
natural_image
Technical line drawing of a car tire mounted on an anti-rotor lift, with no visible text or symbolsFrontPosition
- Position the jack under the vehicle, as shown, for the front or rear locations.
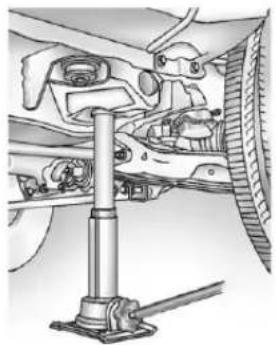
natural_image
Mechanical assembly diagram showing a vehicle suspension system with no visible text or symbolsFrontPosition
Iftheflattireisonthefrontof thevehicle,positionthejackto therearofthefronttireinthe pocketoffoftheframe.
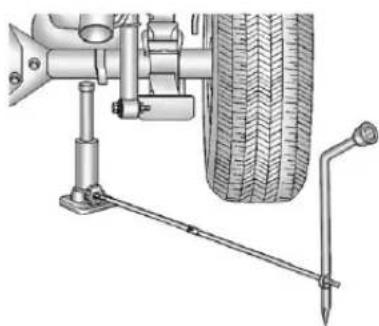
natural_image
Mechanical assembly diagram showing a tire, lever, and support structure (no text or labels)RearPosition
Iftheflattireisontherear, positionthejackundertherear axleandgetascloseas possibletotheshockabsorber.
-
Makesurethejackheadis positionedsothattherearaxle isrestingsecurelybetweenthe groovesthatareonthe jackhead.
-
Turnthewheelwrench clockwisetoraisethevehicle. Raisethevehiclefarenoughoff thegroundsothereisenough roomforthesparetiretofit underthewheelwell.
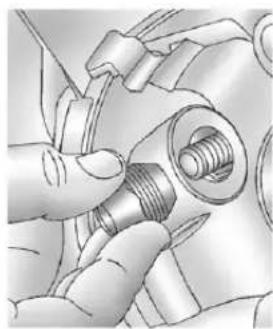
natural_image
Close-up of hands adjusting a mechanical component with threaded bolt (no visible text or symbols)- Remove all the wheel nuts and the flattire.

WARNING
Rustordirtonawheel, oronthe partstowhichitisfastened, can makewheelnutsbecomeloose aftertime. The wheel could come off and cause an accident. When changing a wheel, remove any rustordirt from places where the wheel attachest othe vehicle. In an emergency, aclothorapaper towel can be used; however, use ascaper or wire brush laterto remove all trustordirt.

natural_image
Illustration of a hand cleaning a car brake disc with a cloth (no text or symbols)-
Remove any rustordirt from the wheel bolts, mountingsurfaces and spare wheel.
-
Installthesparetire.

WARNING
Neveruseoilorgreaseonbolts ornutsbecausethenutsmight comeloose. The vehicle's wheel could falloff, causing acrash.
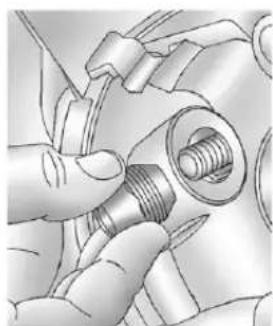
natural_image
Close-up of hands adjusting a mechanical component with threaded bolt (no visible text or symbols)- Putthewheelnutsbackon withtheroundedendofthe nutstowardthewheel. Tighten eachwheelnutbyhand. Then usethewheelwrenchto tightenthenutsuntilthewheel isheldagainsttthehub.
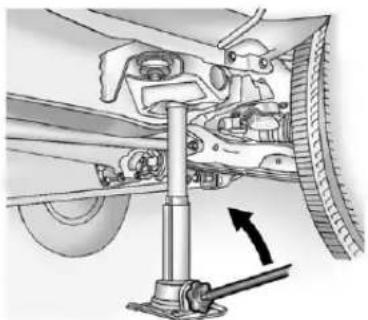
natural_image
Mechanical assembly diagram showing a car suspension system with no visible text or symbolsFrontPosition
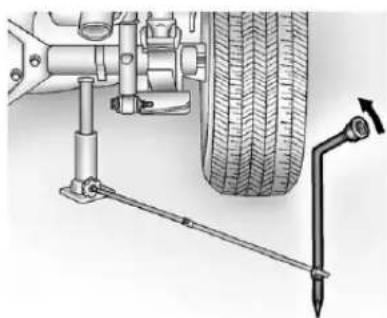
natural_image
Mechanical assembly diagram showing a car tire mounted on a lever with a tool inserted, no visible text or symbolsRearPosition
- Turnthewheelwrench counterclockwisetolowerthe vehicle. Lowerthejack completely.

WARNING
Wheelnutsthatareimproperlyor incorrectlytightenedcancause thewheelstobecomelooseor comeoff. Thewheelnutsshould beightenedwithatorquewrench tothepropertorquespecification (Continued)
WARNING(Continued)
afterreplacing.Followthetorque specificationsuppliedbythe aftermarketmanufacturerwhen usingaccessorylockingwheel nuts.SeeCapacitiesand Specificationsonpage12-2for originalequipmentwheelnut torquespecifications.
Notice:Improperlytightened wheelnutscanleadtobrake pulsationandrotordamage.To avoidexpensivebrakerepairs, evenlytightenthewheelnutsin thepropersequenceandtothe propertorquespecification.See CapacitiesandSpecificationson page12-2forthewheelnut torquespecification.
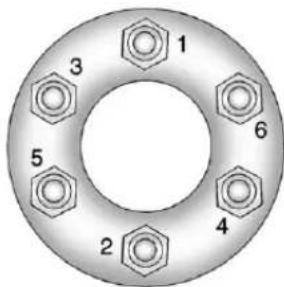
text_image
1 3 5 2 4 6- Tightenthewheelnutsfirmly in acrisscrosssequence, as shown, by turning the wheel wrench clockwise.
Reinstallthecentercapwhenthe regularwheelandtireare reinstalled. Placethecaponthe wheelandtapitintoplaceuntilis flushwiththewheel. Thecaponly goesononeway. Besuretolineup thetabonthecentercapwiththe indentationonthewheel.
StoringaFlatorSpareTire andTools

WARNING
Storingajack, atire, or other equipment in the passenger compartment of the vehicle could cause injury. In sudden stop or collision, loose equipment could strike someone. Store all these in the proper place.
Notice: Storinganaluminum wheel with a flattire underyour vehicle for an extended period of time or with the valvestem pointing up and damage the wheel. Always stow the wheel with the valvestempointing down and havethewheel/tire repaired as soon as possible.
Storethetireundertherearofthe vehicleinthesparetirecarrier.
- Put the tire on the ground at the rear of the vehicle with the valve stemp pointed down.

natural_image
Technical illustration of a tire assembly with a central component and mounting holes (no text or symbols)- Tilttheretainerdownward and through the center wheel opening. Makesuretheretainer is fully seated across the underside of the wheel.

natural_image
Technical line drawing of a mechanical tool with two angled components and a zigzag handle (no text or symbols)- Assemble the wheel wrench, the jack handle extensions, and the jack handle, as shown.
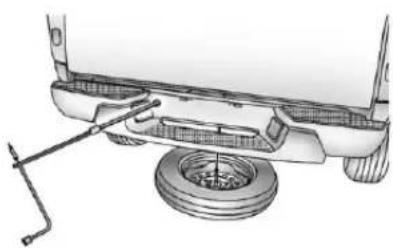
natural_image
Technical line drawing of a vehicle chassis with a wheel and attached components (no text or symbols)- Insert the chiseled end of the jack handle at as light angle through the hole in therear bumper and into the funnel-shaped guide.
- Turnthewheelwrench clockwisetoraisethetirepart wayup. Makesuretheretainer isseatedinthewheelopening andthevalvestemis pointeddown.
Continueraisingthetire,watch tomakesureitdoesnotget caughtonanythingonthe underbody.Ifthetiredoesget caught,loosentwoorthreeturns andpushandpullthetireand thenretighten.
Repeatthisprocedureasmany timesasneededtoensure properstowage.
- Whenthetireisproperlyseated totheunderbody, continue turningthewheelwrench clockwiseuntilyouheartwo click sorfeelitskiptwise. You cannotovertightenthecable.
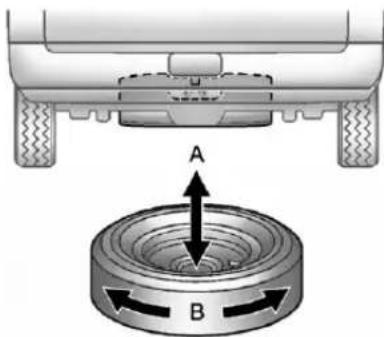
text_image
A B- Makesurethetireisstored securely.Push,pull(A),and thentrytoturn(B)thetire.Ifthe tiremoves,checktomakesure thetirevalvestemispointing down,thenusethewheel wrenchtoloosenandthen tightenthecable.
Tostorethetools:
- Returnthetoolstothe storagebag.
- Attachthestoragebagtothe floorunderthefront passengerseat.
- Reinstallthewingnuttosecure thebagtothevehicle.
Tostorethejackandwheelblocks:
Regular/ExtendedCab
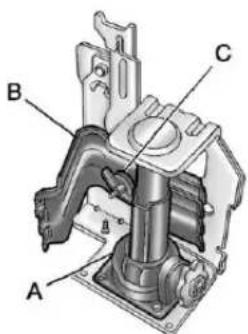
text_image
Technical diagram of a mechanical assembly with labeled parts A, B, and CA.Jack
B.WheelBlocks
C.WingNut
- Installthewheelblocks(B)first.
-
Turnthewingnut(C)clockwise tosecurethewheelblockstothe vehicle.
-
Lowerthejack(A)alltheway andinsertthejackintothe bracket.
- Raisethejackbyturningthe handleclockwisetosecurethe jackwithinthebracket.
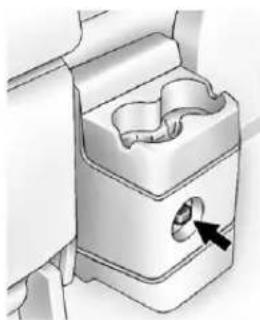
natural_image
Mechanical component diagram showing a slot with an arrow pointing to a specific area (no text or symbols present)- Put the cover in position and insert and tightent hewing nut to secure it.
CrewCab
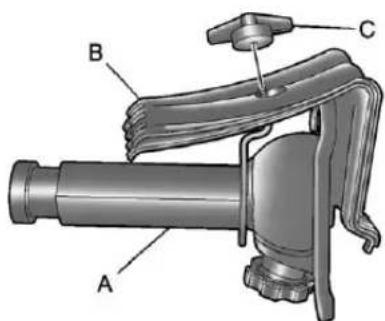
text_image
A B CA.Jack
B.WheelBlocks
C.WingNut
-
Attachthewheelblocks(B) to thejack(A) withthewheelblock retainerandthewingnut(C).
-
Reinstallthejackandwheel blockassemblyinthemounting bracket. Makesuretoposition theholesinthebaseofthejack ontothepinsinthemounting bracket.
-
Turnthehandletoraisethejack untilitissecure, butdonot overtightenthejackinthe bracket.
SecondaryLatchSystem
Thisvehiclehasanunderbody-mountedtirehoistassemblythat hasasecondarylatchsystem.Itis designedtostopthesparetirefrom suddenlyfallingoffthevehicle.For thesecondarylatchtowork,the sparemustbeinstalledwiththe valvestempointingdown.See "StoringaFlatorSpareTireand Tools"under TireChangingon page 10-71.

WARNING
Beforebeginningthisprocedure readalltheinstructions.Failureto readandfollowtheinstructions coulddamagethehoistassembly andyouandotherscouldget hurt.Readandfollowthe instructionslistednext.
Toreleasethesparetirefromthe secondarylatch:
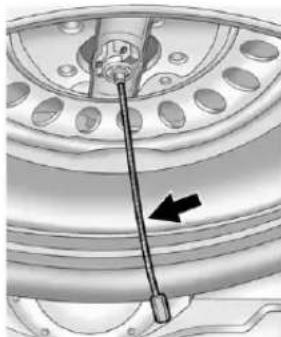
natural_image
Mechanical component diagram showing a shaft and wheel assembly with an arrow indicating direction (no text or symbols)-
Checkunderthevehicletoseeif thecableendfittingisvisible.
-
If the cable end fitting is not visible, proceed to Step 6.
Ifitisvisible,firsttrytotighten thecablebyturningthewheel wrenchclockwiseuntilyouhear twoclicksorfeelitskiptwice. Thecablecannotbe overtightened.
- Loosenthecablebyturningthe wheelwrenchcounterclockwise threeorfourturns.
- Repeat this procedure at least twotimes. If these prepare tire lower to the ground, continue with Step 5 under "Storinga Flat or Spare Tire and Tools" under Tire Changing on page 10-71.
- Turnthewrench counterclockwise until approximately 15cm(6in) of cable is exposed.
- Standthewheelblocksontheir shortestends, withthebacks facingeachother.
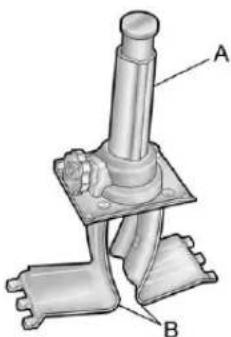
natural_image
Mechanical component diagram showing a shaft and base assembly with labeled points A and B (no text or symbols beyond labels)A.Jack
B.WheelBlocks
- Placethebottomedgeofthe jack(A)onthewheelblocks(B). Separatethewheelblocksso thatthejackisbalanced securely.
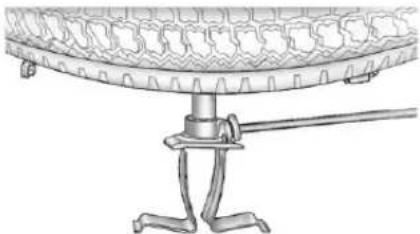
natural_image
Technical line drawing of a mechanical component with a circular base and lever (no text or symbols)- Attachthejackhandle, extension, and wheel wrench to the jack and place it, with the wheel blocks, under the vehicle toward the front of the rear bumper. Position the center lift point of the jack under the wheel.
- Turnthewheelwrench clockwisetoraisethejackuntil liftsthetire.
- Continueraising the jack until the rest stops moving upward and is held firmly in place.
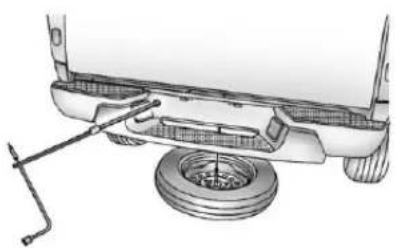
natural_image
Technical illustration of a mechanical assembly with a central bearing and a side-mounted shaft (no text or symbols)- Removethejackhandle and insertthehoistendofthe extensionthroughthehole in therearbumper.
Turnthewheelwrench counterclockwiseoneturnor untilthewheelretainer assemblyisdisengaged.
- Reinsertthejackhandleinto thejack. Lowerthejackby turningthewheelwrench counterclockwise. Keep loweringthejackuntilthe spareireslidesoffthejackor ishangingbythecable.
WARNING
Someonestandingtooclose duringtheprocedurecouldbe injuredbythejack.Ifthespare tiredoesnotslideoffthejack completely,makesurenooneis behindyouoroneithersideof youasyoupullthejackoutfrom underthespare.
- Disconnect the jack handle from the jack and carefully movethe jack. Use one hand to push against the spare while firmly pulling the jack out from underthespare tire with the other hand.
Ifthesparetireishangingfrom thecable,insertthehoistend oftheextensionintothehoist shaftholeinthebumperand turnthewheelwrench counterclockwisetolowerthe sparetherestoftheway.
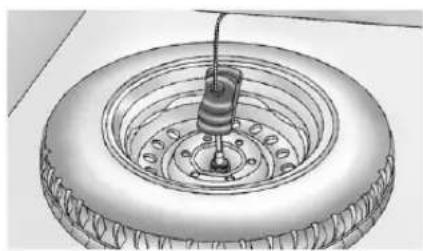
natural_image
Technical illustration of a tire assembly with a central component and mounting holes (no text or symbols)-
Tiltthetireretainerattheend of the cable and pull through the wheel opening. Pull the tire out from under the vehicle.
-
If the cable is hanging under the vehicle, turn the wheel wrench clockwisetoraisethe cable.
Havethehoistassembly inspectedassoonasyoucan. Aspareorflattirecannotbe storedusingthehoist assemblyuntilithasbeen replaced.
To continue changing the flattire, see "Removing the Flat Tire and Installing the Spare Tire" under Tire Changing on page 10-71.
CompactSpareTire
Yourvehiclemayhaveacompact sparetire.Althoughthecompact sparetirewasfullyinflatedwhen yourvehiclewasnew,itcanloseair overtime.Checktheinflation pressureregularly.Itshouldbe 60psi(420kPa).
Notice: If the vehicle has four-wheeldrive and the compact spare tire is installed on the vehicle, donot drive infour-wheel drive until you can havethe flat tirerepaired and/or replaced. You could damage the vehicle, and therepair cost would not be covered by your warranty. Never use four-wheeldrive when the compact spare tire is installed on the vehicle.
Afterinstallingthecompactspare onyourvehicle,youshouldstopas soonaspossibleandmakesure yourvehicle'ssparetireiscorrectly inflated.Thecompactspareismade toperformwellatspeedsupto 62mph(100km/h)forddistancesup to500miles(804km).Forheavy payloadsortowing,andforlow tractionorfour-wheel-drive conditions,repairorreplacethe full-sizetire.Ofcourse,itisbestto replaceyourvehicle'ssparewitha full-sizetireassoonasyoucan.
Thesparetirewilllastlongerandbe ingoodshapeincaseyouneedit again.
Notice: Whenthecompactspare is installed, donottakethe vehiclethroughanautomaticcar washwithguiderails. The compactsparecangetcaughton therailswhichcandamagethe tire, wheel, and other part of the vehicle.
Donotuseyourcompactspareon othervehicles.
Anddonotmixyourcompactspare tireorwheelwithotherwheelsor tires.Theywillnotfit.Keepyour sparetireanditswheeltogether.
Notice: Tirechains will not fit the compact spare. Using them can damagethe vehicle and can damagethe chain too. Donot usetire chains on the compact spare.
Full-SizeSpareTire
Yourvehiclemayhaveafull-size spare tire, which, when new, was fully inflated. Aspare tire may lose airovertime, so check its inflation pressureregularly. See Tire Pressure on page 10-54 and Vehicle Load Limit on page 9-19 for information regarding property inflation and loading your vehicle. For instruction on how to remove, install, or store as spare tire, see "Removing the Flat Tire and Installing the Spare Tire" and "Storing a Flator Spare Tire and Tools" under Tire Changing on page 10-71.
Yourvehiclemayhaveadifferent sizesparetirethantheroadtires originallyinstalledonyourvehicle. This sparewasdevelopedforuse onyourvehicle,soitisalrightto driveonit.Ifyourvehiclehas four-wheeldriveandthedifferent sizesparetireisinstalled,keepthe vehicleintwo-wheeldrive.
Notice: If the vehicle has four-wheeldrive and adifferent sizesparetire is installed, donot drive infour-wheeldrive until the flattire is repaired and/or replaced. The vehicle could be damaged and there repairs would not be recovered by the warranty. Never use four-wheeldrive when adifferentsizesparetire is installed on the vehicle.
Afterinstallingthesparetireonyour vehicle,youshouldstopassoonas possibleandmakesurethespareis correctlyinflated.Thesparetireis madetoperformwellatspeedsup to62mph(100km/h)fordistances upto500miles(804km).Forheavy payloadsortowing,andforlow tractionorfour-wheel-drive conditions,repairorreplacethe full-sizetire.Havethedamagedor flatroadtirerepairedorreplacedas soonasyoucanandinstalledback ontoyourvehicle.Thisway,the sparetirewillbeavailableincase youneeditagain.
Donotmixtiresandwheelsof differentsizes, because they will not fit. Keep your spare tire and its wheel together.
JumpStarting
Formoreinformationaboutthe vehiclebattery,seeBatteryon page10-30.
Ifthevehiclebatteryhasrundown, youmaywanttouseanother vehicleandsomejumpercablesto startyourvehicle.Besuretouse thefollowingstepstodoitsafely.

WARNING
Batteriescanhurtyou. They can be dangerous because:
• They contain acid that can burn you.
- Theycontainingasthatcan explodeorignite.
• They contain enough electricity to burn you.
If you donot follow these steps exactly, some or all of these things can hurt you.
Notice: Ignoring the seven steps could result in costly damage to the vehicle that would not be covered by the warranty.
Trying to start the vehicle by pushing or pulling it will not work, and it could damage the vehicle.
- Check the other vehicle. It must have a 12-volt battery with a negative ground system.
Notice: Only use vehicle that has a 12-voltsystem with a negative ground for jump starting. If the other vehicle does not have a 12-voltsystem with a negative ground, both vehicles can be damaged.
- Getthevehiclescloseenough sothejumpercablescanreach, butbesurethevehiclesarenot touchingeachother.Iftheyare, itcouldcauseaground connectionyoudonotwant.You wouldnotbeabletostartyour
vehicle, and the badgrounding could damage the electrical systems.
To avoid the possibility of the vehicles rolling, set the parking brake firmly on both vehicles involved in the jump start procedure. Put an automatic transmission in P (Park) or a manual transmission in Neutral before setting the parking brake. If you have a four-wheel-drive vehicle, besure the transfer case is not in Neutral.
Notice:Ifanyaccessoriesareleft onorpluggedinduringthejump startingprocedure,theycouldbe damaged.Therepairswouldnot recoveredbythevehicle warranty.Wheneverpossible, turnofforunplugallaccessories oneithervehiclewhenjump startingthevehicle.
- Turnofftheignitiononboth vehicles. Unplugunnecessary accessoriespluggedintothe cigarettelighterortheaccessory poweroutlets. Turnofftheradio andalllampsthatarenot needed. Thiswillavoidsparks andhelpsavebothbatteries. Anditcouldsavetheradio!
- Openthehoodsandlocatethe positive(+)andnegative(-) terminallocationsontheother vehicle. Yourvehiclehasa remotepositive(+)andaremote negative(-)jumpstarting terminal.SeeEngine CompartmentOverview on page 10-6 formoreinformation on the terminal allocations.
WARNING
Using amatchnearabatterycan cause batterygastoexplode. People have been hurt doing this, and some have been blinded. Use a flashlight you need more light.
Besurethebatterieshave enoughwater.Youdonotneed toaddwatertotheACDelco® battery(orbatteries)installedin yournewvehicle.Butifabattery hasfillercaps,besuretheright amountoffluidisthere.Ifitislow, addwatertotakecareofthat first.Ifyoudonot,explosivegas couldbepresent.
Batteryfluidcontainsacidthat canburnyou.Donotgetiton you.Ifyouaccidentallygetitin youreyesoronyourskin,flush theplacewithwaterandget medicalhelpimmediately.
WARNING
Fansorothermovingengine partscaninjureyoubadly.Keep yourhandsawayfrommoving partsoncetheengineisrunning.
- Check that the jumpercables do nothavelooseormissing insulation. If they do, you could get ashock. The vehicles could be damaged too.
Beforeyouconnectthecables, herearesomebasicthingsyou shouldknow.Positive(+)willgo topositive(+)ortoaremote positive(+)terminalifthevehicle hasone.Negative(-)willgotoa heavy, unpaintedmetalengine partortoaremotenegative(-) terminalifthevehiclehasone.
Donotconnectpositive(+)to negative(-)oryouwillgeta shortthatwoulddamagethe batteryandmaybeotherparts too.Anddonotconnectthe negative(-)cabletothe negative(-)terminalonthedead batterybecausethiscancause sparks.
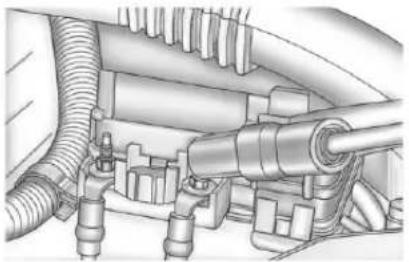
natural_image
Mechanical assembly diagram showing hoses and components (no text or labels)-
Connecttheredpositive(+) cabletothepositive(+)terminal ofthedeadbattery.Usea remotepositive(+)terminalifthe vehiclehasone.
-
Donotlettheotherendtouch metal. Connectitto the positive(+)terminalofthe goodbattery. Usearemote positive(+)terminalifthevehicle hasone.
8.Nowconnecttheblack negative(-)cabletothe negative(-)terminalofthegood battery.Usearemote negative(-)terminalifthe vehiclehasone.
Donotlettheotherendtouch anythinguntilthenextstep. The otherendofthenegative(-) cabledoesnotgotothedead battery.Itgoestoaheavy, unpaintedmetalenginepart, ortoaremotenegative(-) terminalonthevehiclewiththe deadbattery.
-
Connecttheotherendofthe negative(-)cableatleast45cm (18inches)awayfromthedead battery, but not nearengine partsthatmove. The electrical connection is just as good there, and the chance of sparks getting back to the battery is much less. Your vehicle has a remote negative(-)terminal forth this purpose.
-
Now start the vehicle with the good battery and run the engine for awhile.
-
Trytostartthevehiclethathad thedeadbattery.lfitwillnot startafterafewtries, it probablyneedsservice.
Notice: If the jumpercables are connected or removed in the wrong order, electrical shorting may occur and damage the vehicle. There pairs would not be covered by the vehicle warranty. Always connect and remove the jumpercables in the correct order, makingsure that the cables donottouche achother or other metal.
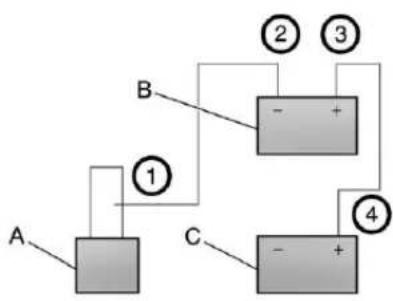
flowchart
graph TD
    A["Component A"] -->|①| B["Component B"]
    B -->|②| C["Component C"]
    B -->|③| D["Component D"]
    C -->|④| E["Component E"]
    D -->|④| E
JumperCableRemoval
A. Heavy, Unpainted Metal Engine Partor Remote Negative (-) Terminal
B. GoodBatteryorRemote Positive(+)andRemote Negative(-)Terminals
C. DeadBatteryorRemote Positive(+)Terminal
Todisconnectthejumpercables frombothvehicles,dothefollowing:
- Disconnecttheblack negative(-)cablefromthe vehiclethathadthedead battery.
2.Disconnecttheblack negative(-)cablefromthe vehiclewiththegoodbattery.
-
Disconnecttheredpositive(+) cablefromthevehiclewiththe goodbattery.
-
Disconnecttheredpositive(+) cablefromtheothervehicle.
Towing
TowingtheVehicle
Notice: To avoid damage, the disabled vehicles should be towed with all four wheel soff the ground. Care must be taken with vehicle sthathavelow ground clearance and or special equipment. Always flat bedona car carrier.
Consultyourdealerora professionaltowingserviceifthe disabledvehiclemustbetowed. SeeRoadsideAssistanceProgram (U.S.andCanada)onpage13-8or RoadsideAssistanceProgram (Mexico)onpage13-10.
Totowthevehiclebehindanother vehicleforrecreationalpurposes, suchasbehindamotorhome,see "RecreationalVehicleTowing"inthis section.
Recreational Vehicle Towing
Recreationalvehicletowingmeans towingthevehiclebehindanother vehicle—suchasbehindamotor home. Thetwomostcommontypes ofrecreationalvehicletowingare knownasdinghytowinganddolly towing. Dinghytowingistowingthe vehiclewithallfourwheelsonthe ground. Dollytowingistowingthe vehiclewithtwowwheelsonthe groundandtwowheelsupona deviceknownasadolly.
Herearesomeimportantthingsto considerbeforerecreationalvehicle towing:
- Whatisthetowingcapacity of thetowingvehicle? Besureto readthetowvehicle manufacturer's recommendations.
- Whatisthedistancethatwillbe travelled?Somevehicleshave restrictionsonhowfarandhow longtheycantow.
- Isthepropertowingequipment goingtobeused? Seeyour dealerortraileringprofessional foradditionaladviceand equipmentrecommendations.
- Isthevehiclereadytobe towed?Justaspreparingthe vehicleforalongtrip,makesure thevehicleispreparedtobe towed.
DinghyTowing
Two-WheelDriveVehicles
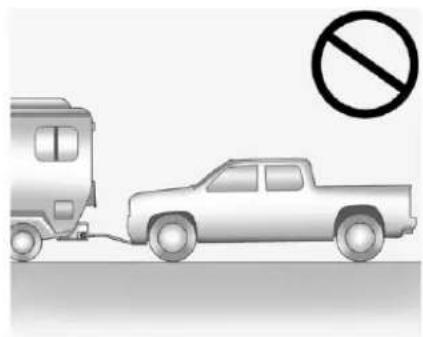
natural_image
Illustration of a pickup truck connected to a car with a no-smoking symbol (no text or labels)Notice: If the vehicle is bestowed with all four wheels on the ground, the drivetrain components could be damaged. There pairs would not be recovered by the vehicle warranty. Donot tow the vehicle with all four wheels on the ground.
Two-wheel-drive vehicle should not be towed with all four wheels on the ground. Two-wheel-drive
transmissionshavenoprovisions for internal lubrication while being towed.
Four-WheelDriveVehicles
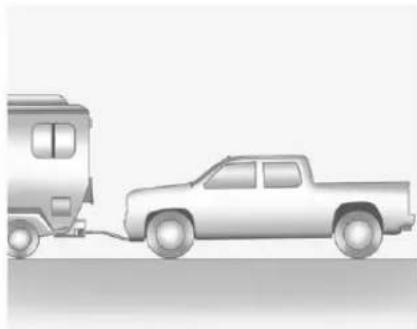
natural_image
Side view illustration of a pickup truck and a pickup truck connected by a cable, no text or symbols presentUsethefollowingprocedure to dinghytowafour-wheel-drive vehicle:
-
Position the vehicle being towed behind the tow vehicle.
-
Putanautomatictransmission inP(Park)oramanual transmissionin1(First).
-
Turntheengineoffandfirmlyset theparkingbrake.SeeParking Brakeonpage9-45.
-
Securelyattachthevehicle beingtowedtothetowvehicle.

WARNING
Shiftingafull-time four-wheel-drivevehicle's transferenceintoN(Neutral)can causethevehicletorollevenif theautomatictransmissionisin P(Park)orthemanual transmissionisinanygear.You orotherscouldbeinjured.Make suretheparkingbrakeisfirmly setbeforethetransferenceis shiftedtoN(Neutral).
5.Shiftthetransfercaseto N(Neutral).See"Shiftinginto N(Neutral)"underFour-Wheel Driveonpage10-30.
- TurntheignitiontoLOCK/OFF andremovethekey—thefront wheelswillstillturn.
- Releasetheparkingbrakeonly afterthevehiclebeingtowedis firmlyattachedtothetowing vehicle.
Aftertowingsee"ShiftingOutof N(Neutral)"underFour-WheelDrive onpage10-30.
If the vehicle being towed will not be started or driven for six weeks or more, remove the battery cable from then negativetermal (post) of the battery to prevent the battery from draining.
DollyTowing
FrontTowing(FrontWheelsOff theGround)—Two-Wheel-Drive Vehicles
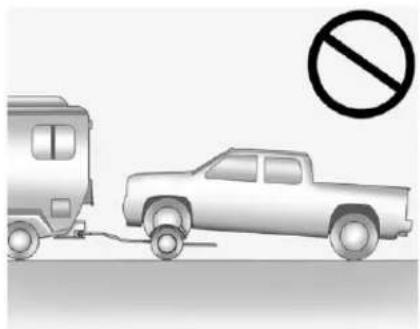
natural_image
Illustration of a pickup truck and a pickup truck with a no-smoking symbol (no text or labels)Notice: If atwo-wheeldrive vehicleistowedwiththerear wheelsontheground, the transmissioncouldbedamaged. Therepairswouldnotbecovered bythevehiclewarranty.Never towthevehiclewiththerear wheelsontheground.
Two-wheel-drive vehicle should not be towed with therear wheels on the ground. Two-wheel-drive transmissions havenoprovisions for internal lubrication while being towed.
Todollytowatwo-wheel-drive vehicle, the vehicle must be towed with therear wheels on the dolly. See "Rear Towing (Rear Wheels Off the Ground)" later in this section for more information.
FrontTowing(FrontWheelsOff theGround)-Four-Wheel-Drive Vehicles
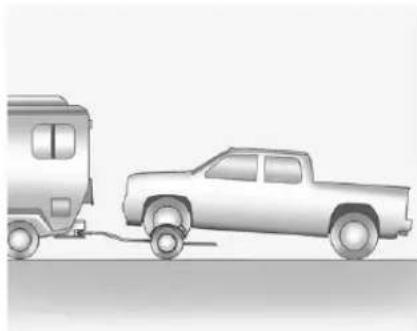
natural_image
Side view illustration of a pickup truck and a pickup truck on a road (no text or symbols)Usethefollowingproceduredodolly towafour-wheel-drivevehiclefrom thefront:
-
Attachthedollytothetow vehiclefollowingthedolly manufacturer'sinstructions.
-
Drivethefrontwheelsontothe dolly.
-
Putanautomatictransmissionin P(Park)oramanual transmissionin1(First).
-
Turntheengineoffandfirmlyset theparkingbrake.SeeParking Brakeonpage9-45.
WARNING
Shiftingafull-timefour-wheel-drivevehicle'stransfercaseinto N(Neutral)cancausethevehicle torolleveniftheautomatic transmissionisinP(Park)orthe manualtransmissionisinany gear.Youorotherscouldbe injured.Makesuretheparking brakeisfirmlysetbeforethe transfercaseisshiftedto N(Neutral).
- Secure the vehicle to the wholly following the manufacturer's instructions.
6.Shiftthetransfercaseto N(Neutral).See"Shiftinginto N(Neutral)"underFour-Wheel Driveonpage10-30. - Releasetheparkingbrakeonly afterthevehiclebeingtowedis firmlyattachedtothetowing vehicle.
- TurntheignitiontoLOCK/OFF.
Aftertowing, see "ShiftingOutof N(Neutral)" under Four-WheelDrive on page 10-30.
If the vehicle being towed will not be started or driven for six weeks or more, remove the battery cable from then negativetermal (post) of the battery to prevent the battery from draining.
RearTowing(RearWheelsOffthe Ground)-Two-Wheel-Drive Vehicles

natural_image
Side view illustration of a pickup truck and a moving vehicle (no text or symbols)Use the following procedure today to watwo-wheel-drive vehicle from therear:
-
Attachthedollytothetow vehiclefollowingthedolly manufacturer'sinstructions.
-
Drivetherearwheelsontothe dolly.
-
Firmlysettheparkingbrake. SeeParkingBrakeon page9-45.
- Putanautomatictransmissionin P(Park)oramanual transmissionin1(First).
- Secure the vehicle to the dolly following the manufacturer's instructions.
- Use an adequate clamping device designed for towing to ensure that the front wheels are locked into the straight position.
- TurntheignitiontoLOCK/OFF. If the vehicle being towed will not best started or driven for six weeks more, remove the battery cable from then negative terminal (post) of the battery to prevent the battery from draining.
RearTowing(RearWheelsOffthe Ground)—Four-Wheel-Drive Vehicles
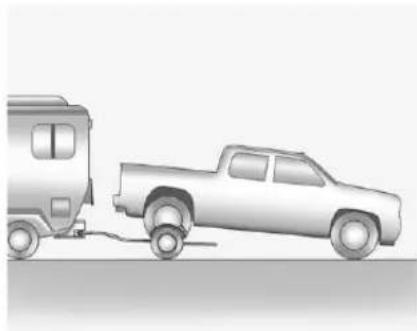
natural_image
Side view illustration of a pickup truck and a moving vehicle (no text or symbols)Usethefollowingproceduredodolly towafour-wheel-drivevehiclefrom therear:
- Attachthedollytothetow vehiclefollowingthedolly manufacturer'sinstructions.
- Drivetherearwheelsontothe dolly.
-
Firmlysettheparkingbrake. SeeParkingBrakeon page9-45.
-
Putanautomatictransmission inP(Park)oramanual transmissionin1(First).
- Secure the vehicle to the Holly following the manufacturer's instructions.
- Use an adequate clamping device designed for towing to ensure that the front wheels are locked into the straight position.

WARNING
Shiftingafull-time four-wheel-drivevehicle's transfercaseintoN(Neutral)can causethevehicletorollevenif theautomatictransmissionisin P(Park)orthemanual transmissionisinanygear.You orotherscouldbeinjured.Make suretheparkingbrakeisfirmly setbeforethetransfercaseis shiftedtoN(Neutral).
- Shiftthetransfercaseto N(Neutral). See "Shiftinginto N(Neutral)" under Four-Wheel Driveonpage 10-30.
- TurntheignitiontoLOCK/OFF. If the vehicle being towed will not best started or driven for six weeks more, remove the battery cable from then negative terminal (post) of the battery to prevent the battery from draining.
Aftertowing, see "ShiftingOutof N(Neutral)" under Four-WheelDrive on page 10-30.
AppearanceCare
ExteriorCare
WashingtheVehicle
Topreservethevehicle'sfinish, washitoftenandoutofdirect sunlight.
Notice: Donotusepetroleum based, acidic, or abrasive cleaning agents asthey can damage the vehicle's paint, metal, or plastic parts. If damage occurs, it would not be recovered by the vehicle's warranty. Approved cleaning product scan be obtained from your dealer. Follow all manufacturer directions regarding correct product usage, necessary safety precautions, and appropriate disposal of any vehicle care product.
Notice: Avoid using high pressure washes closer than 30cm(12in) to the surface of the vehicle. Use of power washers exceeding 8,274kPa (1,200 psi) can result in damage or removal of paint and decals.
Rinsethevehiclewell, before washing and after, to remove all cleaning agents completely. If they are allowed today on the surface, they could stain.
Drythefinishwithasoft, clean chamoisoranall-cottontowel to avoidsurfacescratchesandwater spotting.
FinishCare
Applicationofaftermarketclearcoat sealant/waxmaterialsisnot recommended.Ifpaintedsurfaces aredamaged,seeyourdealerto havethedamageassessedand repaired.Foreignmaterialssuchas calciumchlorideandothersalts,ice meltingagents,roadoilandtar,tree sap,birddroppings,chemicalsfrom industrialchimneys,etc.,can
damagethevehicle'sfinishifthey remainonpaintedsurfaces.Wash thevehicleassoonaspossible. Ifnecessary,usenon-abrasive cleanersthataremarkedsafefor paintedsurfacestoremoveforeign matter.
Occasionalhandwaxingormild polishingshouldbedonetoremove residuefromthepaintfinish.See yourdealerforapprovedcleaning products.
Notice: Machine compounding or aggressive polishing on a basecoat/clearcoat paint finish may damage it. Use only non-abrasivewaxes and polishes that are made for abasecoat/clearcoat paint finish on the vehicle.
Tokeep the paint finish looking new, keep the vehiclegaragedor covered whenever possible.
Protecting Exterior Bright Metal Parts
Regularlycleanbrightmetalparts withwaterorchromepolishon chromeorstainlesssteeltrim, ifnecessary.
Foraluminum, never use autoor chromepolish, steam, or caustic soaptoclean. A coating of wax, rubbed to high polish, is recommended for all bright metal parts.
CleaningExteriorLamps/Lenses
Useonlylukewarmorcoldwater, a softcloth, and acar washing soap to clean exterior lamps and lenses. Follow instructions under "Washing the Vehicle" later in this section.
WindshieldandWiperBlades
Cleantheoutsideofthewindshield withglasscleaner.
Cleanrubberbladesusinglint-free clothorpapertowelsoakedwith windshieldwasherfluidoramild detergent.Washthewindshield thoroughlywhencleaningthe blades.Bugs,roadgrime,sap,and abuildupofvehiclewash/wax treatmentsmaycausewiper streaking.
Replacethewiperbladesifthey arewornordamaged.Damagecan becausedbyextremedusty conditions,sand,salt,heat,sun, snowandice.
Weatherstrips
Applysiliconegreaseon weatherstripstomakethemlast longer,sealbetter,andnotstickor squeak.SeeRecommendedFluids andLubricantsonpage11-12.
Tires
Useastiffbrushwithtirecleanerto cleanthetires.
Notice: Using petroleum-based tiredressing product on the vehicle may damage the paint finish and/or tires. When applying atiredressing, always swipe off any overspray from all painted surfaces on the vehicle.
WheelsandTrim—Aluminum orChrome
Useasoft, cleanclothwithmild soapandwatertocleanthewheels. Afterrinsingthoroughlywithclean water, drywithasoft, cleantowel. Awaxmaythenbeapplied.
Keepthewheelscleanusingasoft, cleanclothwithmildsoapand water.Rinsewithcleanwater.After rinsingthoroughly,drywithasoft, cleantowel.Awaxmaythenbe applied.
Notice: Chromewheels and other chrometrimmay bedamaged if the vehicle is not washed after driving on road sthath have been sprayed with magnesium, calcium, or sodium chloride. These chlorides are used on roads for condition such as ice and dust. Always wash the chromewith soap and water after exposure.
Notice: To avoid surface damage, do not use strong soaps, chemicals, abrasive polishes, cleaners, brushes, or cleaners that contain acidental aluminum chrome-plated wheels. Use only approved cleaners. Also, never drive vehicle with aluminum chrome-plated wheel through an automatic car wash that uses silicone car bidetire cleaning brushes. Damage could occur and there pairs would not be covered by the vehicle warranty.
Steering, Suspension, and ChassisComponents
Visuallyinspectfrontandrear suspensionandsteeringsystemfor damaged,loose,ormissingpartsor signsofwear.Inspectthepower steeringforproperhook-up,binding, leaks,cracks,chafing,etc.Visually checkconstantvelocityjoints, rubberboots,andaxlesealsfor leaks.
BodyComponentLubrication
Lubricateallkeylockcylinders, hoodhinges,liftgatehinges,and steelfueldoorhingeunlessthe componentsareplastic.Applying siliconegreaseonweatherstrips withacleanclothwillmakethem lastlonger,sealbetter,andnotstick orsqueak.
UnderbodyMaintenance
Useplainwatertoflushdirtand debrisfromthevehicle'sunderbody. Yourdealeroranunderbodycar washingsystemcandothis.Ifnot removed,rustandcorrosioncan develop.
SheetMetalDamage
If the vehicle is damaged and requires sheet metal repair or replacement, makes sure the body repair shop applies anti-corrosion material to parts repaired or replaced to restore corrosion protection.
Originalmanufacturer replacement partswillprovidethe corrosion protectionwhilemaintainingthe vehiclewarranty.
FinishDamage
Quicklyrepairminorchipsand scratcheswithtouch-upmaterials availablefromyourdealertoavoid corrosion. Largerareasoffinish damagecanbecorrectedinyour dealer'sbodyandpaintshop.
ChemicalPaintSpotting
Airbornepollutantscanfallupon andattackpaintedvehiclesurfaces causingblotchy, ring-shaped discolorations, and small, irregular darkspotsetched into the paint surface.
InteriorCare
Topreventdirtparticleabrasions, regularlycleanthevehicle'sinterior. Immediatelyremoveanysoils. Note thatnewspapersordarkgarments thatcantransfercolortohome furnishingscanalsopermanently transfercolortothevehicle's interior.
Useasoftbristlebrushtoremove dustfromknobsandcrevicesonthe instrumentcluster. Usingamild soapsolution,immediatelyremove handlotions,sunscreen,andinsect repellantfromallinteriorsurfacesor permanentdamagemayresult.
Yourdealermayhaveproductsfor cleaningtheinterior.Usecleaners specificallydesignedforthe surfacesbeingcleanedtoprevent permanentdamage.Toprevent overspray,applyallcleanersdirectly tothecleaningcloth.Cleaners shouldberemovedquickly.Never allowcleanerstoremainonthe surfacebeingcleanedforextended periodsoftime.
Cleanersmaycontainsolventsthat canbecomeconcentratedinthe interior.Beforeusingcleaners,read andadheretoallsafetyinstructions onthelabel.Whilecleaningthe interior,maintainadequate ventilationbyopeningthedoors andwindows.
Topreventdamage, donotclean theinteriorusingthefollowing cleanersortechniques:
- Neverusearazororanyother sharpobjecttoremoveasoil fromanyinteriorsurface.
- Neveruseabrushwithstiff bristles.
- Neverrubanysurface aggressivelyorwithexcessive pressure.
-
Donotuselaundrydetergents ordishwashingsoapswith degreasers. For liquid cleaners, use approximately 20 drops per 3.78L (1gal) of water. A concentrated soapsolution will leave a residue that creates streaks and attracts dirt. Donot uses solution that contain strong or caustic soap.
-
Donotheavilysaturatethe upholsterywhencleaning.
- Donotusesolventsorcleaners containingsolvents.
InteriorGlass
Toclean, useateryclothfabric dampenedwithwater. Wipedroplets leftbehindwithacleandrycloth. Commercialglasscleanersmaybe used, if necessary, aftercleaning theinteriorglasswithplainwater.
Notice: Topreventscratching, neveruseabrasivecleanerson automotiveglass.Abrasive cleanersoraggressivecleaning maydamagetherearwindow defogger.
Fabric/Carpet
Startbyvacuumingthesurface usingasoftbrushattachment.lfa rotatingbrushattachmentisbeing usedduringvacuuming,onlyuseit onthefloorcarpet.Beforecleaning, gentlyremoveasmuchofthesoil aspossibleusingoneofthe followingtechniques:
• Gentlyblotliquidswithapaper towel. Continueblottinguntilno moresoilcanberemoved.
- Forsolidsoils, removeasmuch aspossibleprioritovacuuming.
Toclean:
- Saturateacleanlint-free colorfastclothwithwaterorclub soda. Microfibercloth is recommended to prevent lint transfertothefabricorcarpet.
-
Remove excess moisture by gently wringing until water does not drip from the cleaning cloth.
-
Startontheoutsideedgeofthe soilandgentlyrubtowardthe center. Rotatethecleaningcloth toacleanareafrequentlyto preventforcingthesoilintothe fabric.
- Continue gently rubbing the soiled area until there is no longer any color transfer from the soil to the cleaning cloth.
- If the soil is not completely removed, use a mild soap solution followed by only a club soda or plain water.
Ifthesoilisnotcompletely removed, it may be necessary to use a commercial upholstery cleaner or spot lifter. Testasmall hidden area for color fastness before using a commercial upholstery cleaner or spot lifter. If ring formation occurs, clean the entire fabric or carpet.
Following the cleaning process, a papertowel can be used to blot excess moisture.
InstrumentPanel, Leather, Vinyl, & Other Plastic Surfaces
Useasoftmicrofibercloth dampenedwithwatertoremove dustandloosedirt.Foramore thoroughcleaning,useasoft microfiberclothdampenedwitha mildsoapsolution.
Notice: Soakingorsaturating leather, especially perforated leather, as well as other interior surfaces, may cause permanent damage. Wipe excess moisture from these surfaces after cleaning and allow them today naturally. Never use heat, steam, spotlifters or spotremovers. Do not use cleaner that contain silicone or wax-based products. Cleaners containing these solvent scan permanently change the appearance and feel of leather or soft trim and are not recommended.
Donotusecleanersthatincrease gloss,especiallyontheinstrument panel. Reflectedglarecandecrease visibilitythroughthewindshield undercertainconditions.
Notice: Useofairfreshenersmay cause permanent damageto plastics and painted surfaces. Ifanairfreshenercomes in contact with any plasticor painted surface in the vehicle, blot immediately and clean with a soft cloth dampened with a mild soapsolution. Damage caused by airfresheners would not be covered by the vehicle warranty.
CareofSafetyBelts
Keepbeltscleananddry.

WARNING
Donotbleachordyesafetybelts. Itmayseverelyweakenthem. In acrash, they might not be able to provide adequate protection. Cleansafetybeltsonly with mild soap and lukewarmwater.
FloorMats

WARNING
Ifafloormatisthewrongsizeor isnotproperlyinstalled,itcan interferewiththepedals. Interferencewiththepedalscan causeunintendedacceleration and/orincreasedstopping distancewhichcancauseacrash andinjury.Makesurethefloor matdoesnotinterferewiththe pedals.
Usethefollowingguidelinesfor properfloormatusage.
- Theoriginalequipmentfloor matsweredesignedforthe vehicle.Ifthefloormatsneed replacing,itisrecommended thatGMcertifiedfloormatsbe purchased.Non-GMfloormats maynotfitproperlyandmay interferewiththepedals.Always checkthatthefloormatsdonot interferewiththepedals.
- Usethefloormatwiththe correctsideup.Donotturn itover.
- Donotplaceanythingontopof theriversidefloormat.
• Useonlyasinglefloormaton theriverside. - Donotplaceonefloormaton topofanother.
Service and Maintenance
GeneralInformation
GeneralInformation......11-1
MaintenanceSchedule
MaintenanceSchedule......11-3
SpecialApplicationServices
SpecialApplication
Services....11-8
Additional Maintenance and Care
AdditionalMaintenance
andCare....11-8
RecommendedFluids, Lubricants,andParts
RecommendedFluidsand
Lubricants......11-12
MaintenanceReplacement
Parts......11-15
MaintenanceRecords
MaintenanceRecords.....11-16
GeneralInformation
Yourvehicleisanimportant investment. Thissectiondescribes therequiredmaintenanceforthe vehicle. Followthischeduletohelp protectagainstmajorrepair expensesresultingfromneglector inadequatemaintenance.Itmay alsohelptomaintainthevalueof thevehicleifitissold.Itisthe responsibilityoftheownertohave allrequiredmaintenanceperformed.
Yourdealerhastrainedtechnicians whocanperformrequired maintenanceusinggenuine replacementparts.Theyhave up-to-datetoolsandequipment forfastandaccuratediagnostics. Manydealershaveextended eveningandSaturdayhours, courtesytransportation,andonline schedulingtoassistwithservice needs.
Yourdealerrecognizesthe importanceofproviding competitivelypricedmaintenance andrepairservices.Withtrained technicians,thedealeristheplace forroutinemaintenancesuchasoil changesandtirerotationsand additionalmaintenanceitemslike tires,brakes,batteries,andwiper blades.
Notice: Damagecaused by improper maintenance can lead to costly repairs and may not be covered by the vehicle warranty. Maintenance intervals, checks, inspections, recommended fluids, and lubricants are important to keep the vehicle in good working condition.
The Tire Rotation and Required Services are theresponsibility of the vehicle owner. It is recommended to have your dealer perform these services every 12000 km/7,500 mi. Proper vehicle maintenance help to keep the vehicle in good working condition, improves fueleconomy, and reduces vehicle emissions.
11-2ServiceandMaintenance
Becauseofthewaypeopleuse vehicles,maintenanceneedsvary. Theremayneetobemore frequentchecksandservices. TheAdditionalRequired Services-Normalarefor vehiclesthat:
- Carrypassengersandcargo withinrecommendedlimitson the TireandLoadingInformation label.SeeVehicleLoadLimits onpage9-19.
- Aredrivenonreasonableroad surfaceswithinlegaldriving limits.
- Usetherecommendedfuel.See RecommendedFuelon page9-53.
Refertotheinformationinthe MaintenanceScheduleAdditional RequiredServices-Normalchart.
TheAdditionalRequired Services-Severeareforvehicles thatare:
• Mainlydriveninheavycitytraffic inhotweather.
• Mainlydriveninhillyor mountainousterrain.
• Frequentlytowingatraler.
• Usedforhighspeedor competitivedriving.
• Usedfortaxi, police, ordelivery service.
Refertotheinformationinthe MaintenanceScheduleAdditional RequiredServices-Severechart.

WARNING
Performingmaintenanceworkcan bedangerousandcancause seriousinjury.Perform maintenanceworkonlyifthe requiredinformation,propertools, andequipmentareavailable. Iftheyarenot,seeyourdealerto haveatrainedtechniciandothe work.SeeDoingYourOwn ServiceWorkonpage10-4.
Maintenance Schedule
OwnerChecksandServices
AtEachFuelStop
- Checktheengineoillevel.See EngineOilonpage10-10.
OnceaMonth
- Checkthetireinflation pressures. See TirePressureon page 10-54.
• Inspectthetiresforwear. See TireInspectiononpage10-60. - Checkthewindshieldwasher fluidlevel.See WasherFluidon page 10-26.
EngineOilChange
WhentheCHANGEENGINEOIL SOONmessagedisplays,havethe engineoilandfilterchangedwithin thenext1000km/600mi.lfdriven underthebestconditions,the engineoillifesystemmightnot indicateetheneedforvehicleservice formorethanayear.Theengineoil andfiltermustbechangedatleast onceayearandtheoillifesystem mustbereset.Yourtraineddealer techniciancanperformthiswork. Iftheengineoillifesystemisreset accidentally,servicethevehicle within5000km/3,000misincethe lastservice.Resettheoillife systemwhentheoilischanged. SeeEngineOilLifeSystemon page 10-12.
TireRotationandRequired ServicesEvery12000km/7,500mi
Rotatethetires, if recommended for the vehicle, and perform the followingservices. See Tire Rotationonpage 10-60.
- Checkengineoillevelandoil lifepercentage.Ifneeded, changeengineoilandfilter,and resetoillifesystem.SeeEngine Oilonpage 10-10 and Engine OilLife System on page 10-12.
- Checkenginecoolantlevel.See EngineCoolantonpage10-19.
- Checkwindshieldwasherfluid level. See WasherFluidon page 10-26.
11-4ServiceandMaintenance
- Visuallyinspectwindshieldwiper bladesforwear,cracking, orcontamination.SeeExterior Careonpage10-96.Replace wornordamagedwiperblades. SeeWiperBladeReplacement onpage10-34.
- Checktireinflationpressures. See TirePressureon page10-54.
• Inspecttirewear. See Tire Inspectiononpage10-60.
• Visuallycheckforfluidleaks. - Inspectengineaircleanerfilter. SeeEngineAirCleaner/Filteron page10-17.
-
Inspectbrakesystem.
-
Visuallyinspectsteering, suspension, and chassis components for damaged, loose, or missing parts or sign of wear. See Exterior Care on page 10-96.
- Checkrestraintsystem components.SeeSafetySystem Checkonpage3-19.
- Visuallyinspectfuelsystemfor damageorleaks.
- Visuallyinspectexhaustsystem andnearbyheatshieldsfor looseordamagedparts.
• Lubricatebodycomponents.See ExteriorCareonpage10-96. -
Checkstarterswitch.SeeStarter SwitchCheckonpage10-32.
-
Checkautomatictransmission shiftlockcontrolfunction.See AutomaticTransmissionShift LockControlFunctionCheckon page10-33.
- Checkignitiontransmissionlock. SeeIgnitionTransmissionLock Checkonpage10-33.
- Checkparkingbrakeand automatictransmissionpark mechanism.SeeParkBrakeand P(Park)MechanismCheckon page10-34.
- Checkacceleratorpedalfor damage, higheffort, orbinding. Replace if needed.
- Visually inspect gas strut for sign of wear, cracks, or other damage. Check the hold open ability of the strut. See your dealer if service is required.
| Maintenance ScheduleAdditional RequiredServices - Normal | 12 000 km/7,500 mi | 24 000 km/15,000 mi | 36 000 km/22,500 mi | 48 000 km/30,000 mi | 60 000 km/37,500 mi | 72 000 km/45,000 mi | 84 000 km/52,500 mi | 96 000 km/60,000 mi | 108 000 km/67,500 mi | 120 000 km/75,000 mi | 132 000 km/82,500 mi | 144 000 km/90,000 mi | 156 000 km/97,500 mi | 168 000 km/105,000 mi | 180 000 km/112,500 mi | 192 000 km/120,000 mi | 204 000 km/127,500 mi | 216 000 km/135,000 mi | 228 000 km/142,500 mi | 240 000 km/150,000 mi |
| Rotate tires and perform RequiredServices. Check engine oil level andoil life percentage. Change engine oiland filter, if needed. | √ | √ | √ | √ | √ | √ | √ | √ | √ | √ | √ | √ | √ | √ | √ | √ | √ | √ | √ | √ |
| Inspect evaporative control system. (a) | √ | √ | √ | |||||||||||||||||
| Replace engine air cleaner filter. (b) | √ | √ | √ | |||||||||||||||||
| Replace spark plugs. Inspect sparkplug wires. | √ | |||||||||||||||||||
| Change automatic transmission fluid, ifequipped. If filter is serviceable,change filter. | √ | |||||||||||||||||||
| Change transfer case fluid, if equippedwith 4WD. (c) | √ | |||||||||||||||||||
| Drain, flush, and fill engine coolingsystem. (d) | √ | |||||||||||||||||||
| Visually inspect accessory drive belts. (e) | √ |
11-6ServiceandMaintenance
Footnotes—Maintenance ScheduleAdditionalRequired Services—Normal
a) Checkallfuelandvaporlines and hosesforproperhook-up, routing, and condition. Check that the purgevalve, if the vehicle has one, works properly. Replace as needed.
b) Oreveryfouryears, whichever comesfirst.
c) Donotdirectlypowerwashthe transfcaseoutputseals. High pressurewatercanovercomethe sealsandcontaminatethetransfer casefluid. Contaminatedfluidwill decreasethelifeofthetransfer caseandshouldbereplaced.
d) Oreveryfiveyears, whichever comesfirst. See Cooling System on page 10-18.
e)Orevery10years,whichever comesfirst.Inspectforfraying, excessivecracking,ordamage; replace,ifneeded.
| Maintenance ScheduleAdditional RequiredServices – Severe | 12 000 km/7,500 mi | 24 000 km/15,000 mi | 36 000 km/22,500 mi | 48 000 km/30,000 mi | 60 000 km/37,500 mi | 72 000 km/45,000 mi | 84 000 km/52,500 mi | 96 000 km/60,000 mi | 108 000 km/67,500 mi | 120 000 km/75,000 mi | 132 000 km/82,500 mi | 144 000 km/90,000 mi | 156 000 km/97,500 mi | 168 000 km/105,000 mi | 180 000 km/112,500 mi | 192 000 km/120,000 mi | 204 000 km/127,500 mi | 216 000 km/135,000 mi | 228 000 km/142,500 mi | 240 000 km/150,000 mi |
| Rotate tires and perform RequiredServices. Check engine oil level andoil life percentage. Change engine oiland filter, if needed. | √ | √ | √ | √ | √ | √ | √ | √ | √ | √ | √ | √ | √ | √ | √ | √ | √ | √ | √ | √ |
| Inspect evaporative control system. (a) | √ | √ | √ | |||||||||||||||||
| Replace engine air cleaner filter. (b) | √ | √ | √ | |||||||||||||||||
| Change automatic transmission fluid, ifequipped. If filter is serviceable,change filter. | √ | √ | √ | |||||||||||||||||
| Change transfer case fluid, if equippedwith 4WD. (c) | √ | √ | √ | |||||||||||||||||
| Replace spark plugs. Inspect sparkplug wires. | √ | |||||||||||||||||||
| Drain, flush, and fill engine coolingsystem. (d) | √ | |||||||||||||||||||
| Visually inspect accessory drive belts. (e) | √ |
Footnotes—Maintenance ScheduleAdditionalRequired Services—Severe
a) Checkallfuelandvaporlines and hosesforproperhook-up, routing, and condition. Check that the purgevalve, if the vehicle has one, works properly. Replace as needed.
b) Oreveryfouryears, whichever comesfirst.
c) Donotdirectlypowerwash the transfcaseoutputseals. High pressurewatercanovercomethe sealsandcontaminatethetransfer casefluid. Contaminatedfluidwill decreasethelifeofthetransfer caseandshouldbereplaced.
d) Oreveryfiveyears, whichever comesfirst. See CoolingSystemon page 10-18.
e)Orevery10years,whichever comesfirst.Inspectforfraying, excessivecracking,ordamage; replace,ifneeded.
SpecialApplication Services
- SevereCommercialUse VehiclesOnly:Lubricatechassis componentsevery5000km/3,000mi.
• Haveunderbodyflushingservice performedonceayear.
Additional Maintenance and Care
Yourvehicleisanimportant investmentandcaringforitproperly mayhelptoavoidfuturecostly repairs.Tomaintainvehicle performance,additional maintenanceservicesmaybe required.Itisrecommendedthat yourdealerperformthese services—theirtraineddealer techniciansknowyourvehiclebest. Yourdealercanalsoperforma thoroughassessmentwitha multi-pointinspectiontorecommend whenyourvehiclemayneed attention.Thefollowinglistis intendedtoexplaintheservicesand conditionstolookforthatmay indicatesservicesarerequired.
Battery
The battery supplies powertostart the engine and operate any additionalelectrical accessories.
• To avoid break-downor failure to start the vehicle, maintain a battery with full cranking power.
- Traineddealertechnicianshave thediagnosticequipmenttotest thebatteryandensurethatthe connectionsandcablesare corrosion-free.
Belts
- Beltsmayneedreplacingifthey squeakorshowsignsof crackingorsplitting.
- Traineddealertechnicianscan inspectthebeltsand recommendreplacementwhen necessary.
Brakes
Brakesstopthevehicleandare crucialtosafedriving.
- Signsofbrakewearmayinclude chirping,grinding,orsquealing noises,ordifficultystopping.
- Traineddealertechnicianshave accesstotoolsandequipment toinspectthebrakesand recommendqualityparts engineeredforthevehicle.
Fluids
Properfluid levels and approved fluids protect the vehicle's systems and components. See Recommended Fluids and Lubricantson page 11-12 for GM approved fluids.
• Engineoilandwindshield washerfluidlevelsshouldbe checkedateveryfuelfill.
- Instrumentclusterlightsmay comeontoindicatethatfluids maybelowandneedtobe filled.
Hoses
Hosestransportfluidsandshould beregularlyinspectedtoensure thattherearenocracksorleaks. Withamulti-pointinspection,your dealercaninspectthehosesand adviseifreplacementisneeded.
Lamps
Properlyworkingheadlamps, taillamps, and brakelamps are important to see and beseen on theroad.
- Signsthattheheadlampsneed attentionincludedimming,failure tolight,cracking,ordamage. Thebrakelampsneedtobe checkedperiodicallytoensure thattheylightwhenbraking.
- Withamulti-pointinspection, yourdealercancheckthelamps andnoteanyconcerns.
ShocksandStruts
Shocksandstrutshelpaidincontrol forasmootherride.
- Signsofwearmayinclude steeringwheelvibration,bounce/swaywhilebraking,longer stoppingdistance,oruneventirewear.
- Aspartofthemulti-point inspection, traineddealer technicianscanvisuallyinspect theshocksandstrutsforsigns ofleaking, blownseals, ordamage, and can advise whenserviceisneeded.
Tires
Tiresneedtobeproperlyinflated, rotated,andbalanced.Maintaining thetirescansavemoney,fuel,and canreducetheriskoftirefailure.
- Signsthatthetiresneedtobe replacedincludethreeormore visibletreadwearindicators;cord orfabricshowingthroughthe rubber;cracksorcutsinthe treadorsidewall;orabulgeor splitinthetire.
- Traineddealertechnicianscan inspectandrecommendtheright tires. Yourdealercanalso providetire/wheelbalancing servicestoensuresmooth vehicleoperationatallspeeds. Yourdealersellsandservices namebrandtires.
VehicleCare
To help keep the vehicle looking like new, vehicle care products are available from your dealer. For information on how to clean and protect the vehicle's interior and exterior, see Interior Care on page 10-99 and Exterior Care on page 10-96.
WheelAlignment
Wheelalignmentiscriticalfor ensuringthatthetiresdeliver optimalwearandperformance.
- Signsthatthealignmentmay needtobeadjustedinclude pulling,impropervehicle handling,orunusualtirewear.
- Yourdealerhastherequired equipmenttoensureproper wheelalignment.
Windshield
Forsafety, appearance, and the bestviewing, keep the windshield clean and clear.
• Signsofdamageinclude scratches,cracks,andchips.
- Traineddealertechnicianscan inspectthewindshield and recommendproperreplacement ifneeded.
WiperBlades
Wiperbladesneedtobecleaned andkeptingoodconditionto provideaclearview.
- Signsofwearincludestreaking, skippingacrossthewindshield, andwornorsplitrubber.
- Traineddealertechnicianscan checkthewiperbladesand replacethemwhenneeded.
RecommendedFluids,Lubricants,andParts
RecommendedFluidsandLubricants
Fluidsandlubricantsidentifiedbelowbyname, partnumber, orspecification can be obtained from your dealer.
| UsageFluid/Lubricant | |
| EngineOil | Useonlyengineoillicensedtothedexos1specification,orequivalent,of theproperSAEviscositygrade.ACDelcodexos1SyntheticBlendis recommended.SeeEngineOilonpage10-10. |
| EngineCoolant | 50/50mixtureofclean,drinkablewateranduseonlyDEX-COOLCoolant.SeeEngineCoolantonpage10-19. |
| HydraulicBrakeSystem | DOT3HydraulicBrakeFluid(GMPartNo.12377967,in Canada89021320). |
| WindshieldWasherOptikleen | ^ WasherSolvent. |
| ParkingBrakeCableGuides | ChassisLubricant(GMPartNo.12377985,inCanada88901242)or lubricantmeetingrequirementsofNLGI#2,CategoryLBorGC-LB. |
| PowerSteeringSystemGMPower | rSteeringFluid(GMPartNo.89021184,inCanada89021186). |
| AutomaticTransmissionDEXRON | ^ -VIAutomaticTransmissionFluid. |
| ManualTransmissionManualTransmissionFluid(GMPartNo.89021806,inCanada89021807). | |
| HydraulicClutchSystem | HydraulicClutchFluid(GMPartNo.12345347,inCanada10953517)orequivalentDOT-3brakefluid. |
| KeyLockCylinders | Multi-PurposeLubricant,Superlube(GMPartNo.12346241,inCanada10953474). |
| ChassisLubrication | ChassisLubricant(GMPartNo.12377985,inCanada88901242)orlubricantmeetingrequirementsofNLGI#2,CategoryLBorGC-LB. |
| FrontandRearAxle | SAE75W-90SyntheticAxleLubricant(GMPartNo.89021677,inCanada89021678). |
| TransferCase | SynchronmeshTransmissionFluid(GMPartNo.12345349,inCanada10953465). |
| RearDrivelineCenterSplineandUniversalJoints | ChassisLubricant(GMPartNo.12377985,inCanada88901242)orlubricantmeetingrequirementsofNLGI#2,CategoryLBorGC-LB. |
11-14ServiceandMaintenance
| UsageFluid/Lubricant | |
| ConstantVelocityUniversalJoint | ChassisLubricant(GMPartNo.12377985,inCanada88901242)or lubricantmeetingrequirementsofNLGI#2,CategoryLBorGC-LB. |
| HoodLatchAssembly,Secondary Latch,Pivots,SpringAnchor,and ReleasePawl | LubriplateLubricantAerosol(GMPartNo.12346293,inCanada992723) orlubricantmeetingrequirementsofNLGI#2,CategoryLBorGC-LB. |
| HoodandDoorHinges,BodyDoor HingePins,LiftgateHingeand Linkage,andFuelDoorHinge | Multi-PurposeLubricant,Superlube(GMPartNo.12346241,in Canada10953474). |
| OuterTailgateHandlePivotPoints andHinges | Multi-PurposeLubricant,Superlube(GMPartNo.12346241,in Canada10953474). |
| WeatherstripConditioning | WeatherstripLubricant(GMPartNo.3634770,inCanada10953518)or DielectricSiliconeGrease(GMPartNo.12345579,inCanada992887). |
| WeatherstripSqueaks | SyntheticGreasewithTeflon,Superlube(GMPartNo.12371287,in Canada10953437). |
MaintenanceReplacementParts
Replacementpartsidentifiedbelowbyname, partnumber, orspecification can be obtained from your dealer.
| PartGMPartNumberACDelcoPartNumber | ||
| EngineAirCleaner/Filter15942429— | ||
| EngineOilFilter | ||
| 2.9LL4Engine19210283PF46 | ||
| 3.7LL5Engine19210285PF61 | ||
| 5.3LV8Engine89017524PF48 | ||
| SparkPlugs | ||
| 2.9LL4and3.7LL5Engines12625058 41-103 | ||
| 5.3LV8Engine12609877 41-985 | ||
| WiperBlades | ||
| Driver Side — 55 cm (22 in) | 10389562 | — |
| Passenger Side — 48 cm (19 in) | 10389563 | — |
MaintenanceRecords
After the scheduled services are performed, record the date, odometer reading, who performed the service, and the type of services performed in the boxes provided. Retain all maintainancereceipts.
| Date | Odometer Reading | ServicedByServices | Performed |
11-18ServiceandMaintenance
| Date | Odometer Reading | ServicedByServices | Performed |
TechnicalData
VehicleIdentification
VehicleIdentification
Number(VIN)......12-1
ServicePartsIdentification
Label.....12-1
VehicleData
Capacitiesand
Specifications......12-2
EngineDriveBeltRouting...12-4
VehicleIdentification
VehicleIdentification Number(VIN)

Thislegalidentifierisinthefront corneroftheinstrumentpanel, on theleftsideofthevehicle.Itcanbe seenthroughthewindshieldfrom outside. TheVINalsoappearson theVehicleCertificationandService Partslabelsandcertificatesoftitle andregistration.
Engineldentification
TheeighthcharacterintheVINis theenginecode. Thiscode identifiesthevehicle'sengine, specifications, and replacement parts. See "EngineSpecifications" under Capacities and Specifications on page 12-2 for the vehicle's enginecode.
ServiceParts IdentificationLabel
Thislabel, ontheinsideoftheglove box, hasthefollowinginformation:
• VehicleIdentification Number(VIN).
- Modeldesignation.
- Paintinformation.
• Productionoptionsandspecial equipment.
Donotremovethislabelfromthe vehicle.
VehicleData
CapacitiesandSpecifications
The following approximate conversion capacities are given in metric and English conversions. See Recommended FluidsandLubricantsonpage11-12formoreinformation.
CapacitiesandSpecifications
| Application | Capacities | |
| MetricEnglish | ||
| AirConditioningRefrigerantR134a | Fortheairconditioningsystemrefrigerantcharge amount,seetherefrigerantlabellocatedunderthe hood.Seeyourdealerformoreinformation. | |
| CoolingSystem | ||
| 2.9LL4Engine9.8L10.4qt | ||
| 3.7LL5Engine10.0L10.6qt | ||
| 5.3LV8Engine | 13.0L13.7qt | |
| EngineOilwithFilter | ||
| 2.9LL4Engine4.7L 5.0qt | ||
| 3.7LL5Engine5.7L 6.0qt | ||
| 5.3LV8Engine | 5.7L | 6.0qt |
| FuelTank | 74L | 19.5gal |
CapacitiesandSpecifications(cont'd)
| Application | Capacities | |
| MetricEnglish | ||
| Transmission | ||
| Automatic(PanRemovalandFilterReplacement)4.7L5.0qt | ||
| Manual–Rear-WheelDrive(DrainandRefill)2.2L2.3qt | ||
| Manual–Four-WheelDrive(DrainandRefill)2.3L2.4qt | ||
| WheelNutTorque140N•m100lbft | ||
| Allcapacitiesareapproximate.Whenadding,besuretofilltotheapproximatelevel,asrecommendedinthis manual.Recheckfluidlevelafterfilling. | ||
EngineSpecifications
| TypeVINCode | Transmission | SparkPlugGap | |
| 2.9LL4 | 9 | Automatic Manual | 1.01mm(0.040in) |
| 3.7LL5 | E | Automatic | 1.01mm(0.040in) |
| 5.3L V8 | P | Automatic | 1.01 mm (0.040 in) |
12-4 TechnicalData
EngineDriveBeltRouting
natural_image
Abstract diagram of interconnected spheres with connecting lines (no text or symbols)2.9Land3.7LEngines
natural_image
Abstract geometric diagram of interconnected spheres with connecting lines (no text or symbols)5.3LEngine
Customer Information
CustomerInformation
CustomerSatisfaction
Procedure(U.S.and
Canada)....13-1
CustomerSatisfaction
Procedure(Mexico)......13-4
CustomerAssistanceOffices
(U.S.andCanada)......13-5
CustomerAssistanceOffices
(Mexico)....13-5
CustomerAssistanceforText
Telephone(TTY)Users(U.S.
andCanada)....13-6
OnlineOwnerCenter......13-6
GMMobilityReimbursement
Program(U.S.and
Canada)....13-7
Roadside Assistance Program
(U.S.andCanada)......13-8
Roadside Assistance
Program(Mexico)......13-10
SchedulingService
Appointments(U.S.and
Canada)....13-13
CourtesyTransportation
Program(U.S.and
Canada)....13-14
CollisionDamageRepair
(U.S.andCanada)......13-15
ServicePublications
Ordering Information.....13-18
ReportingSafetyDefects
ReportingSafetyDefectsto
theUnitedStates
Government......13-19
ReportingSafetyDefectsto
theCanadian
Government......13-19
Reporting Safety Defectsto
GeneralMotors......13-20
VehicleDataRecordingand
Privacy
VehicleDataRecordingand
Privacy....13-20
EventDataRecorders.....13-20
OnStar ^® ......13-21
RadioFrequency
Identification(RFID)......13-22
RadioFrequency
Statement......13-22
CustomerInformation
CustomerSatisfaction Procedure(U.S.and Canada)
Yoursatisfactionandgoodwillare importanttoyourdealerandto Chevrolet.Normally,anyconcerns withthesaletransactionorthe operationofthevehiclewillbe resolvedbyyourdealer'ssalesor servicedepartments.Sometimes, however,despitethebestintentions ofallconcerned,misunderstandings canoccur.Ifyourconcernhasnot beenresolvedoyoursatisfaction, thefollowingstepsshouldbetaken:
STEPONE: Discuss your concern with a member of dealership management. Normally, concerns can be quickly resolved at that level. If them matter has already been reviewed with the sales, service, or parts manager, contact the owner of your dealership or the general manager.
13-2 Customer Information
STEPTWO: If after contacting a member of dealership management, it appears your concern cannot be resolved by your dealership without further help, in the U.S., call the Chevrolet Customer Assistance Center at 1-800-222-1020. In Canada, call General Motors of Canada Customer Care Centreat 1-800-263-3777 (English), or 1-800-263-7854 (French).
Weencourageyoutocallthe toll-freenumberinordertogiveyour inquirypromptattention.Havethe followinginformationavailableto givetheCustomerAssistance representative:
- VehicleIdentification Number(VIN). This is available from the vehicleregistration or title, or the plate at the top of the instrument panel and visible through the windshield.
• Dealershipnameandlocation.
• Vehicledeliverydate and presentmileage.
When contacting Chevrolet, remember that your concern will likely be resolved at a dealer's facility. That is why we suggest following Step One first.
STEPTHREE—U.S.Owners:
BothGeneralMotorsandyour dealerarecommittedtomaking sureyouarecompletely satisfied withyournewvehicle. However, ifyoucontinuetoremainunsatisfied afterfollowingtheprocedure outlinedinStepsOneandTwo,you canfilewiththeBetterBusiness Bureau(BBB)AutoLine ^® Program toenforceyourrights.
TheBBBAutoLineProgramisan out-of-courtprogramadministered bytheCouncilofBetterBusiness Bureaustosettleautomotive disputesregardingvehiclerepairsor theinterpretationoftheNewVehicle LimitedWarranty.Althoughyoumay berequiredtoresorttothisinformal disputesresolutionprogrampriorto filingacourtaction,useofthe programisfreeofchargeandyour casewillgenerallybeheardwithin 40days.Ifyoudonotagreewiththe decisiongiveninyourcase,you mayrejectitandproceedwithany othervenueforreliefavailable toyou.
YoumaycontacttheBBBAutoLine Programusingthetoll-free telephonenumberorwritethemat thefollowingaddress:
BBBAutoLineProgram CouncilofBetterBusiness Bureaus,Inc. 4200WilsonBoulevard Suite800 Arlington,VA22203-1838
Telephone:1-800-955-5100 www.dr.bbb.org/goauto
Thisprogramisavailableinall 50statesandtheDistrictof Columbia. Eligibilityislimitedby vehicleage, mileage, and other factors. General Motorsreserves therighttochangeeligibility limitationsand/ordiscontinueits participationinthisprogram.
STEPTHREE—Canadian
Owners: Intheeventthatyoudo notfeelyourconcernshavebeen addressedafterfollowingthe procedureoutlinedinStepsOne andTwo, GeneralMotorsofCanada Limitedwantsyoutobeawareofits participationinano-charge Mediation/ArbitrationProgram. GeneralMotorsofCanadaLimited hascommittedtobindingarbitration ofownerdisputesinvolving factory-relatedvehicleservice claims. Theprogramprovidesfor thereviewofthefactsinvolvedby animpartialthirdpartyarbiter,and mayincludeaninformalhearing beforethearbiter. Theprogramis designedsothattheentiredispute settlementprocess,fromthetime youfileyourcomplainttothefinal decision,shouldbecompletedin about70days. Webelieveour impartialprogramoffersadvantages overcourtsinmostjurisdictions becauseitisinformal,quick,and freeofcharge.
For further information concerning eligibility in the Canadian Motor Vehicle Arbitration Plan (CAMVAP), call toll-free 1-800-207-0685, or call the General Motors Customer Care Centre, 1-800-263-3777 (English), 1-800-263-7854 (French), or writeto:
TheMediation/ArbitrationProgram c/oCustomerCareCentre GeneralMotorsofCanadaLimited MailCode:CA1-163-005 1908ColonelSamDrive Oshawa,OntarioL1H8P7
Your inquiry should be accompanied by the Vehicle Identification Number(VIN).
CustomerSatisfaction Procedure(Mexico)

Garantía PLUS
DidyougettheWarrantyExtension Plan?Thisplanisrecommendedby GeneralMotorstosupplementthe warrantyincludedwiththenew vehiclepurchase.
Seeyourdealerfordetails.
CustomerAssistance Procedure
Ownersatisfactionandgoodwillare veryimportanttoyourdealerand GeneralMotors.
Normally, any problem with the transaction, sale, or usage of the vehicle must be handled by your dealers' sales or serviced departments. However, were cognizethat despite
thegoodintentionsofallparties involved, sometimesa misunderstandingmayoccur.
If you have a problem that has not been satisfactorily handled through then normal means, we suggest the following steps:
STEPONE
Explainyourcasetoyourdealer serviceagent,servicemanager, dealersalesagent,orsales manager,dependingonyourcase.
Makesurethattheyhaveall necessaryinformation.Theyare interestedinyourcontinual satisfaction.
STEPTWO
If you are not satisfied, please contact the general manager your dealership owner to ask for their help. If they are not able to resolve your case, ask them to contact the right people at General Motors for support, if needed.
STEPTHREE
If your case is not resolved in reasonable amount to time by your dealer, please call the General Motors Customer Assistance Center (CAC) and provide the following information:
- Name
- Address
- Phonenumber
- Modelyear
- Brand
• VehicleIdentification Number(VIN) - Mileage
- Deliverydate
• Descriptionoftheproblem - Dealershipname
- Dealershipaddress
See Customer Assistance Offices (U.S. and Canada) on page 13-5 or Customer Assistance Offices (Mexico) on page 13-5 form more information.
CustomerAssistance Offices(U.S.andCanada)
Chevroletencouragescustomers tocallthetoll-freenumberfor assistance. However, if customer wishestowriteore-mail Chevrolet, the letters should be addressed to:
UnitedStates
ChevroletMotorDivision
ChevroletCustomerAssistance
Center
P.O.Box33170
Detroit, MI48232-5170
www.Chevrolet.com
1-800-222-1020
1-800-833-2438(ForText
TelephoneDevices(TTYs))
Roadside Assistance:
1-800-243-8872
FromPuertoRico:
1-800-496-9992(English)
1-800-496-9993(Spanish)
From U.S. Virgin Islands:
1-800-496-9994
Canada
General Motors of Canada Limited
CustomerCareCentre, MailCode:
CA1-163-005
1908ColonelSamDrive
Oshawa,OntarioL1H8P7
www.gm.ca
1-800-263-3777(English)
Mexico, Central America, and Caribbean Islands/Countries (Except Puerto Rico and U.S. Virgin Islands)
General Motors de Mexico, S. de R.L. de C.V.
CustomerAssistanceCenter
CustomerAssistance Offices(Mexico)
TocontacttheCustomerAssistance
Center(CAC), usethephone
numberslistedinthissection.
Customerassistanceisavailable
MondaythroughFriday,08:00to
20:00hours,andSaturdaysfrom
08:00to15:00hours.
Alle-mailinquiriestotheCustomer
AssistanceCenter(CAC)shouldbe
sentto:cac.chevrolet@gm.com.
13-6 Customer Information
Mexico
FromMexicoCity
5329-0811
FromOtherMexicoLocations
01-800-466-0811
UnitedStatesandCanada
1-866-466-8190
CostaRica
00-800-052-1005
Guatemala
1-800-999-5252
Panama
00-800-052-0001
DominicanRepublic
1-888-751-5301
EISalvador
800-6273
Honduras
800-0122-6101
CustomerAssistancefor TextTelephone(TTY) Users(U.S.andCanada)
Toassistcustomerswhoaredeaf, hardofhearing,orspeech-impaired andwhouseTextTelephones (TTYs),ChevrolethasTTY equipmentavailableatitsCustomer AssistanceCenter.AnyTTYuserin theU.S.cancommunicatewith Chevroletbydialing: 1-800-833-2438.TTYusersin Canadacandial1-800-263-3830.
OnlineOwnerCenter
Manageyourvehicle(U.S.)at chevrolet.com.Clickon "Owners,"then"ManageMy Chevrolet/OwnersLogin."
Information and services customized for your specific vehicle—all in one convenient place.
• Digitalownermanual, warranty information, and more.
• Storageforonlineservice and maintenancerecords.
• Chevroletdealerlocator for servicenationwide.
• Exclusiveprivilegesandoffers.
- Recallnoticesforyourspecific vehicle.
- OnStarandGMCardmember ServicesEarningssummaries.
OtherHelpfulLinks
Chevrolet—www.chevrolet.com
ChevroletMerchandise—www.chevymall.com
HelpCenter—www.chevrolet.com/pages/mds/helpcenter/faq.do
- FAQ
- ContactUs
ChevroletOwnerCentre (Canada)chevroletowner.ca
TakeatriptotheChevroletOwner Centre:
- Chatlivewithonlinehelp representatives.
-
UsetheVehicleToolssection.
• Accessthirdpartyenthusiast sitesandsocialmedianetworks. -
Locateownerresourcessuchas lease-end,financing,and warrantyinformation.
- Retrieveyourfavoritearticles, quizzes,tipsandmultimedia galleriesorganizedintothe FeaturesandAutoCare Sections.
- Downloadtheownermanualfor yourvehicle,quicklyandeasily.
• Findthe Chevrolet-recommended maintenanceservicesforyour vehicle.
GMMobility ReimbursementProgram (U.S.andCanada)
GM MOBILITY
Thisprogramisavailableto qualifiedapplicantsforcost reimbursementofeligible aftermarketadaptiveequipment requiredforthevehicle,suchas handcontrolsorawheelchair/ scooterliftforthevehicle.
Formoreinformationonthelimited offer,visitwww.gmmobility.comor calltheGMMobilityAssistance Centerat1-800-323-9935.Text Telephone(TTY)users,call 1-800-833-9935.
13-8 Customer Information
General Motors of Canada also has a Mobility Program. Call 1-800-GM-DRIVE(463-7483) for details. TTY users call 1-800-263-3830.
Roadside Assistance Program(U.S.and Canada)
For U.S.-purchased vehicles, call 1-800-243-8872; (TextTelephone (TTY): 1-888-889-2438).
For Canadian-purchased vehicles, call 1-800-268-6800.
Serviceisavailable24hoursaday, 365daysayear.
CallingforAssistance
WhencallingRoadsideAssistance, havethefollowinginformation ready:
- Yourname,homeaddress,and hometelephonenumber.
• Telephonenumberofyour location. - Locationofthevehicle.
• Model, year, color, and license platenumberofthevehicle. - Odometerreading, Vehicle IdentificationNumber(VIN), and deliverydateofthevehicle.
• Descriptionoftheproblem.
Coverage
Servicesareprovidedupto5years/160000km(100,000mi),whichever comesfirst.
IntheU.S.,anyonedrivingthe vehicleiscovered.InCanada,a persondrivingthevehiclewithout permissionfromtheownerisnot covered.
Roadside Assistance is not part of the New Vehicle Limited Warranty. Chevrolet and General Motors of Canada Limited reservation right to make any changes disorder continue the Roadside Assistance program at any time without notification.
Chevrolet and General Motors of Canada Limited reserved to its services or payment to owner or driver if they decide the claims are made too often, or the same type of claim is mademany times.
ServicesProvided
• EmergencyFuelDelivery: Deliveryofenoughfuelforthe vehicletogettothenearest servicestation.
- Lock-OutService:Serviceto unlockthevehicleifyouare lockedout.Aremoteunlockmay beavailableifyyouhaveOnStar. Forsecurityreasons,thedriver mustpresentidentification beforethisserviceisgiven.
- EmergencyTowfromaPublic RoadorHighway:Towtothe nearestChevroletdealerfor warrantyservice,orifthevehicle wasinacrashandcannotbe driven.Assistanceisalsogiven whenthevehicleisstuckinthe sand,mud,orsnow.
- FlatTireChange:Serviceto changeaflattirewiththespare tire. Thesparetire, ifequipped, mustbeingoodconditionand properlyinflated. Itistheowner's responsibilityfortherepairor replacementofthetireifitisnot coveredbythewarranty.
- BatteryJumpStart:Serviceto jumpstartadeadbattery.
ServicesNotIncludedin RoadsideAssistance
- Impoundtowingcausedby violationofanylaws.
- Legalfines.
- Mounting, dismounting, or changing of snowtires, chains, or other traction devices.
- Towingorservicesforvehicles drivenonanon-publicroador highway.
ServicesSpecifictoCanadian PurchasedVehicles
- FuelDelivery:Reimbursement is approximately \$5Canadian. Dieselfueldeliverymaybe restricted.Propaneandother fuelsarenotprovidedthrough thisservice.
- Lock-OutService: Vehicle registration is required.
-
TripRoutingService:Detailed mapsofNorthAmericaare providedwhenrequestedeither withthemostdirectrouteorthe mostscenicroute.Thereisa limitofsixrequestsperyear. Additionaltravelinformationis alsoavailable.Allowthree weeksfordelivery.
-
TriplInterruptionBenefitsand Assistance:Mustbeover 250kilometersfromwhereyour tripwasstartedtoqualify. General Motors of Canada Limited requires pre-authorization, original detailed receipts, andacopy of therepairorders.Once authorization has been received, the Roadside Assistance advisor will help to make arrangements and explain how to receive payment.
- AlternativeService:If assistancecannotbeprovided rightaway,theRoadside Assistanceadvisormaygive permissiontogetlocal emergencyroadservice.Youwill receivepayment,upto\$100, aftersendingtheoriginalreceipt toRoadsideAssistance. Mechanicalfailuresmaybe covered,howeveranycostfor partsandlaborforrepairsnot coveredbythewarrantyarethe ownerresponsibility.
Roadside Assistance Program(Mexico)
Asanewowner,yourvehicleis automaticallyenrolledinthe RoadsideAssistanceprogram.The servicesareavailableatnocost underthetermsandconditionsof theprogram.TheRoadside Assistanceprogramisnotpartof, orincluded,inthecoverage providedbytheNewVehicleLimited Warranty.
Roadside Assistance provides assistance to the driver and passengers while driving the vehicle within your city of residence or on any passableroad in Mexico, the United States, and Canada. Services are subject to the limitations described in the following pages. Program coverage varies by country.
Roadside Assistance is available 24 hours, day, 365 days of the year.
This program expires two years from the date of the invoice for the vehicle, regardless of vehicle mileage and changes in vehicle ownership.
Formoreinformationaboutthe renewalofthisprogramattheend ofitsterm,contacttheChevrolet CustomerAssistanceCenterat 01-800-466-0800.
ServicesProvided
-
FlatTireChange:Ifunableto changeaflattire,Roadside Assistancewillprovidetowing servicetothenearestauthorized Chevroletdealership.Itisthe owner'sresponsibilityforthe repairorreplacementofthetire. Thisserviceislimitedtothe transferofthevehicletotherpairfacility.
• EmergencyFuelDelivery: Deliveryofenoughfuelforthe vehicletogettothenearest servicestation. -
Lock-OutService:Serviceto unlockthevehicleifyouare lockedout.
- BatteryJumpStart: Serviceto jumpstartadeadbattery.
• *EmergencyMessages: Transmissionofurgentphone messages.
• *EmergencyCalls:Callfor emergencyservices.
• *DealershipLocation Assistance: Information regarding addresses and telephonenumbers for Chevrolet dealers. - EmergencyTowing: Towtothe nearestdealerforwarranty serviceifthevehiclecannotbe driven.
Ifthevehicleisinvolvedinan accidentduringthecommission ofacrime,administrative violation,orbreachoftraffic regulations,Roadside Assistancewillnotprovide service.Whenthevehicleisnot
accessibletobetowed, all maneuversrequiredtoaccessit willbeattheowner'sexpense.
Ifthevehicleisinanothercity outsideofyourresidence, RoadsideAssistanceislimited to movingthevehicletoth nearestdealer.Ifyouwouldlike thevehiclemovedtoadifferent dealer,youwillbeaskedto coverthedifferenceincostat thetimeofthemove.
If the vehicle cannot be received by the nearest Chevrolet dealer duetoscheduling conflicts, the vehicle will be taken to as safe place where it will remain for up to 48 hours until it can be taken to the dealer. If the storage costs exceed the amount authorized, the owner is responsible to pay the difference at the time of service. Contact Roadside Assistance form more information on authorized amounts.
*TriplInterruption: This service is provided if you are prevented from further usage of your vehicle while traveling and it is not possible for the nearest Chevrolet dealership to repair the vehicle the same day, requiring the vehicle to stay at the dealership for an eight or more. If this happens, in addition to the previously listed services and prior to confirmation by the dealership, you are entitled to choose one of the following alternatives, within the limit of existing Roadside Assistance program guidelines. If the costs exceed the amount authorized for these services, you must pay the difference at the time of service.
Roadside Assistance will coordinate hotel accommodations for all vehicle travelers foruptotwonights.
13-12 Customer Information
Arentalcarwillbeprovidedfor uptotwodaysandthevehicle mustbereturnedtoitsoriginal destination,excludingvehicles withacarryingcapacitygreater than3.5tons.
Complimentary Transportation: If you prefer to continue your trip to the intended destination or return to your place of residence, and the trip requires more than eight hours driving on theroad, transportation for the driver and passengers by first class bus or coach commercial airlinewill be provided to a location chosen by Roadside Assistance, depending on availability at the chosen destination. Restrictions apply based on vehicle specifications.
If you are on the road, taxi servicetothenearest bus station or airport will be provided.
- *Complimentary TransportationforVehiclePick Up:Transportationtopickup yourvehicleafterrepairsare complete.Oncethedealerhas reportedthatthevehiclehas beenrepaired,Roadside Assistancewillprovidebusor commercialairlineone-way service(subjecttoavailability) forthepersondesignatedbyyou tocollectyourvehicleatthe dealership'slocationifyouorthe designatedpersonarenotinthe sametownorcityasthe dealership.
*Theseservicesarenotprovidedfor U.S.orCanadaresidents. All servicesprovidedintheU.S.and Canadaareattheowner'sexpense andwillbereimbursedbyRoadside Assistance.
ServicesNotIncludedinRoadside Assistance
RoadsideAssistancedoesnot coverorreimburseservicesforthe following:
• Eventscausedbyfraudorbad faithbythedriver.
- Vehicleimmobilizationsituations duetoamajorforceor unforeseencircumstances, such as naturalphenomenaofan extraordinarynature, earthquakes, volcaniceruptions, andothercyclonicstorms.
- Vehicleimmobilizationsituations arising from car accidents caused by the driver of the vehicle or third parties. This means any occurrence that causes physical injury to the occupants and/or the vehicle caused by external forces.
- Actsofterrorism, riotoruproar, armedforcesorpoliceactions which preventtimelydelivery of assistance services.
- Foodservice,beverages, telephonecalls,orotherextra costs.Accommodationcosts applyonlytoMexicoperthe termsandconditionsofthe RoadsideAssistanceprogram.
- Anydamagetothevehicle withoutintent,derivedfromthe servicesprovided.
- Costoftowingatrailerwhen choosingaChevroletdealerthat isnearesttothetemporary storagefacilityforthedisabled vehicle.
- Costofallmaneuversrequired toaccessthevehiclewhenitis notavailabletobetowed.
- Costoffuelprovided.
Routinevehiclerepaircosts arenotcoveredbytheRoadside Assistanceprogram. Formore information, seeyournewvehicle warranty.
ContactingRoadsideAssistance
RoadsideAssistanceservicesareof nocosttoyouandavailable 24hoursaday,365daysayear. Costsareonlyincurredinsituations thatexceedthelimitsofthe program,someofwhicharelisted previouslyinthissection.
TocontactRoadsideAssistanceby phone, usethefollowingnumbers:
Mexico
01-800-466-0800
UnitedStates
1-866-466-8901
Canada
1-800-268-6800
Chevroletreservestherighttomake anychangesordiscontinuethe RoadsideAssistanceprogramat anytimewithoutnotification.
SchedulingService Appointments(U.S.and Canada)
Whenthevehiclerequireswarranty service,contactyourdealer and requestanappointment. By schedulingaserviceappointment andadvisingtheserviceconsultant ofyourtransportationneeds,your dealercanhelpminimizeyour inconvenience.
If the vehicle cannot be scheduled into the serviced department immediately, keep driving it until it can be scheduled for service, unless, of course, the problem is safety related. Ifitis, please call your dealership, let them know this, and ask for instructions.
If your dealer requests you to bring the vehicle for service, you are urged todos to easily in the work day as possible to allow for same-day repair.
Courtesy Transportation Program(U.S.and Canada)
Toenhanceyourownership experience,weandourparticipating dealersareproudtoofferCourtesy Transportation,acustomersupport programforvehicleswiththe Bumper-to-Bumper(BaseWarranty CoverageperiodinCanada), extendedpowertrain,and/or hybrid-specificwarrantiesinboth theU.S.andCanada.
SeveralCourtesyTransportation optionsareavailabletoassistin reducinginconveniencewhen warrantyrepairsarerequired.
Courtesy Transportation is not a part of the New Vehicle Limited Warranty. A separate booklet entitled "Warranty and Owner Assistance Information" furnished with each new vehicle provides detailed warranty coverage information.
TransportationOptions
Warrantyservicecangenerallybe completedwhileyouwait.However, ifyouareunabletowait,GMhelps tominimizeinconvenienceby providingseveraltransportation options.Dependingonthe circumstances,yourdealercan offeroneofthefollowing:
ShuttleService
Shuttleserviceisthepreferred meansofofferingCourtesy Transportation.Dealersmayprovide shuttleservicetogetyoutoyour destinationwithminimalinterruption ofyourdailyschedule.Thisincludes one-wayorround-tripshuttleservice withinreasonabletimeanddistance parametersofyourdealer'sarea.
PublicTransportationorFuel Reimbursement
If the vehiclerequires overnight warranty repairs, and public transportation is used instead of your dealer's shuttleservice, the expense must be supported by original receipts and can only be up to them maximum amount allowed by GM for shuttleservice. In addition, for U.S. customers, should you arrangetransportation through a friend or relative, limited reimbursement for reasonable fuel expenses may be available. Claim amount should reflect actual costs and be supported by original receipts. See your dealer for information regarding the allowance amounts for reimbursement off fuel or other transportation costs.
CourtesyRentalVehicle
Yourdealermayarrangetoprovide youwithacourtesyrentalvehicleor reimburseyouforarentalvehicle thatyouobtainifthevehicleiskept foranovernightwarrantyrepair. Rentalreimbursementwillbelimited andmustbesupportedbyoriginal receipts. Thisrequiresthatyousign andcompletearentalagreement andmeetstate/provincial,local,and rentalvehicleproviderrequirements. Requirementsvaryandmayinclude minimumagerequirements, insurancecoverage,creditcard, etc.Youareresponsibleforfuel usagechargesandmayalsobe responsiblefortaxes,levies,usage fees,excessiveemileage,orrental usagebeyondthecompletionofthe repair.
Itmaynotbepossibletoprovide a likevehicleasacourtesyrental.
AdditionalProgram Information
Allprogramoptions,suchasshuttle service,maynotbeavailableat everydealer.Pleasecontactyour dealerforspecificinformation aboutavailability.AllCourtesy Transportationarrangementswillbe administeredbyappropriatedealer personnel.
General Motors reserve the righttounilaterally modify, change, or discontinue Courtesy Transportation at any time and to resolve all questions of claim eligibility pursuant to the terms and conditions described herein at its solediscretion.
CollisionDamageRepair (U.S.andCanada)
If the vehicle is involved in a collision and it is damaged, have the damage repaired by a qualified technician using the proper equipment and quality replacement parts. Poorly performed collision repairs diminish the vehicular resale value, and safety performance can be compromised in subsequent collisions.
CollisionParts
GenuineGMCollisionpartsarenew partsmadewiththesamematerials andconstructionmethodsasthe partswithwhichthevehiclewas originallybuilt.GenuineGM Collisionpartsarethebestchoiceto ensurethatthevehicle'sdesigned appearance,durability,andsafety arepreserved.TheuseofGenuine GMpartscanhelpmaintaintheGM NewVehicleLimitedWarranty.
13-16 Customer Information
Recycledoriginalequipmentparts mayalsobeusedforrepair. These partsaretypicallyremovedfrom vehiclesthatweretotallossesin priorcrashes.Inmostcases,the partsbeingrecycledarefrom undamagedsectionsofthevehicle. ArecycledoriginalequipmentGM partmaybeanacceptablechoiceto maintainthevehicle'soriginally designedappearanceandsafety performance;however,thehistoryof thesepartsisnotknown.Suchparts arenotcoveredbytheGMNew VehicleLimitedWarranty,andany relatedfailuresarenotcoveredby thatwarranty.
Aftermarketcollisionpartsarealso available. Thesearemadeby companiesotherthanGMandmay nothavebeentestedforthevehicle. Asaresult, thesepartsmayfit poorly, exhibitprematuredurability/corrosionproblems, and may not performproperlyin subsequent collisions. Aftermarketpartsarenot covered by the GMNewVehicle
Limited Warranty, and any vehicle failurerelated to such parts is not covered by that warranty.
RepairFacility
GMalsorecommendsthatyou chooseacollisionrepairfacilitythat meetsyourneedsbeforeyouever needcollisionrepairs. Yourdealer mayhaveacollisionrepaircenter withGM-trainedtechniciansand state-of-the-artequipment,orbe abletorecommendacollisionrepair centerthathasGM-trained techniciansandcomparable equipment.
InsuringtheVehicle
ProtectyourinvestmentintheGM vehiclewithcomprehensiveand collisioninsurancecoverage.There aresignificantdifferencesinthe qualityofcoverageaffordedby variousinsurancepolicyterms. Manyinsurancepoliciesprovide
reducedprotectiontotheGM vehiclebylimitingcompensationfor damagerepairsthroughtheuseof aftermarketcollisionparts.Some insurancecompanieswillnot specifyaftermarketcollisionparts. Whenpurchasinginsurance,we recommendthatyouensurethatthe vehiclewillberepairedwithGM originalequipmentcollisionparts. Ifsuchinsurancecoverageisnot availablefromyourcurrent insurancecarrier,considerswitching toanotherinsurancecarrier.
Ifthevehicleisleased,theleasing companymayrequireyoutohave insurancethatensuresrepairswith GenuineGMOriginalEquipment Manufacturer(OEM)partsor GenuineManufacturerreplacement parts.Readtheleasecarefully,as youmaybechargedattheendof theleaseforpoorqualityrepairs.
IfaCrashOccurs
Iftherehasbeenaninjury,call emergencyservicesforhelp.Donot leavethesceneofacrashuntilall mattershavebeentakencareof. Movethevehicleonlyifitsposition putsyouindanger,oryouare instructedtomoveitbyapolice officer.
Giveonlythenecessaryinformation topoliceandotherpartiesinvolved inthecrash.
Foremergencytowingsee RoadsideAssistanceProgram(U.S. andCanada)onpage 13-8or RoadsideAssistanceProgram (Mexico)onpage 13-10.
Gatherthefollowinginformation:
-
Drivename, address, and telephonenumber.
• Driverlicensenumber. -
Ownername, address, and telephonenumber.
• Vehiclelicenseplatenumber.
• Vehiclemake, model, and modelyear.
• VehicleIdentification Number(VIN).
• Insurancecompanyandpolicy number. - Generaldescriptionofthe damagetotheothervehicle.
Choose areputablerepairfacility that uses quality replacement parts. See "Collision Parts" earlier in this section.
If the airbag has inflated, see What Will You See after an Airbag Inflates? on page 3-26.
ManagingtheVehicleDamage RepairProcess
Intheeventthatthevehiclerequires damagerepairs, GMrecommends thatyoutakeanactiveroleinits repair. If you have apre-determined repair facility of choice, takethe vehicle there, or have it towed there. Specify to the facility that any required replacement collision parts be originalequipment parts, either new Genuine GM parts or recycled original GM parts. Remember, recycled part will not be covered by the GM vehicle warranty.
Insurancepaysthebillfortherepair, butyoumustlivewiththerepair. Dependingonyourpolicylimits, yourinsurancecompanymay initiallyvaluetherepairusing aftermarketparts.Discussthiswith therepairprofessional,andinsiston GenuineGMparts.Remember, ifthevehicleisleased,youmaybe obligatedtohavethevehicle repairedwithGenuineGMparts, evenifyourinsurancecoverage doesnotpaythefullcost.
13-18 Customer Information
Ifanotherparty'sinsurance companyispayingfortherepairs, youarenotobligatedtoaccepta repairvaluationbasedonthat insurancecompany'scollisionpolicy repairlimits,asyouhaveno contractuallimitswiththatcompany. Insuchcases,youcanhavecontrol oftherepairandpartschoicesas longasthecoststayswithin reasonablelimits.
ServicePublications OrderingInformation
ServiceManuals
ServiceManualshavethediagnosis andrepairinformationonthe engines,transmission,axle, suspension,brakes,electrical, steering,body,etc.
ServiceBulletins
ServiceBulletinsgiveadditional technicalserviceinformation neededtoknowledgeablyservice GeneralMotorscarsandtrucks.
Eachbulletincontainsinstructions toassistinthediagnosis and serviceofthevehicle.
OwnerInformation
Ownerpublicationsarewritten specificallyforownersandintended toprovidebasicoperational informationaboutthevehicle. The OwnerManualincludesthe MaintenanceScheduleforall models.
In-Portfolio: IncludesaPortfolio, OwnerManual, and Warranty Booklet.
RETAILSELLPRICE: \$35.00(U.S.) plushandlingand shippingfees.
WithoutPortfolio:Owner Manualonly.
RETAILSELLPRICE: \$25.00(U.S.) plushandlingand shippingfees.
CurrentandPastModels
TechnicalServiceBulletinsand Manualsareavailableforcurrent andpastmodelGMvehicles.
ORDERTOLLFREE: 1-800-551-4123Monday–Friday 8:00AM–6:00PMEasternTime
ForCreditCardOrdersOnly (VISA-MasterCard-Discover), visit Helm, Inc. at: www.helminc.com.
Orwriteto:
Helm, Incorporated Attention: CustomerService 47911 HalyardDrive Plymouth, MI48170
Pricesaresubjecttochangewithout noticeandwithoutincurring obligation.Allowampletimefor delivery.
All listed prices are quoted in U.S. funds. Make checks payable in U.S. funds.
ReportingSafety Defects
ReportingSafetyDefects totheUnitedStates Government
If you believethat your vehicle has a defect which could cause acrashor could cause injury or death, you should immediately inform the National Highway Traffic Safety Administration (NHTSA) in addition to notifying General Motors.
IfNHTSAreceivessimilar complaints, itmayopenan investigation, and if it find that as safety defect exists in a group of vehicles, it may order are recall and remedycampaign.
However, NHTSA cannot become involved in individual problems between you, your dealer, or General Motors.
TocontactNHTSA,youmaycall theVehicleSafetyHotline toll-freeat1-888-327-4236 (TTY:1-800-424-9153);goto http://www.safercar.gov;or writeto:
Administrator, NHTSA 1200 New Jersey Avenue, S.E. Washington, D.C. 20590
Youcanalsoobtainother informationaboutmotor vehiclesafetyfrom http://www.safercar.gov.
ReportingSafetyDefects totheCanadian Government
IfyouliveinCanada, and you believethatthevehiclehasasafety defect, notifyTransportCanada immediately, and notifyGeneral MotorsofCanadaLimited. Call TransportCanadaat 1-800-333-0510orwriteto:
TransportCanada RoadSafetyBranch 80rueNoel
Gatineau, QCJ8Z0A1
ReportingSafetyDefects toGeneralMotors
InadditiontonotifyingNHTSA(or TransportCanada)inasituationlike this, notifyGeneralMotors.
Call1-800-222-1020, orwrite:
ChevroletMotorDivision ChevroletCustomerAssistance Center P.O.Box33170 Detroit,MI48232-5170
InCanada, call 1-800-263-3777 (English) or 1-800-263-7854 (French), or write:
General Motors of Canada Limited Customer Care Centre, Mail Code: CA1-163-005 1908 Colonel Sam Drive Oshawa, Ontario L1H8P7
VehicleData Recordingand Privacy
ThisGMvehiclehasanumberof sophisticatedcomputersthatrecord informationaboutthevehicle's performanceandhowitisdriven. Forexample,thevehicleuses computermodulestomonitorand controlengineandtransmission performance,tomonitorthe conditionsforairbagdeployment anddeployairbagsinacrash,and, ifsoequipped,topprovideantilock brakingtohelpthedrivercontrolthe vehicle. Thesemodulesmaystore datatohelpyourdealertchnician servicethevehicle.Somemodules mayalsostoredataabouthowyou operatethevehicle,suchasrateof fuelconsumptionoraveragespeed. Thesemodulesmayalsoretainthe owner'spersonalpreferences,such asradiopresets,seatpositions,and temperaturesettings.
EventDataRecorders
ThisvehiclehasanEventData Recorder(EDR). Themainpurpose of an EDRistorecord, incertain crashnearcrash-likesituations, such as an airbag deploymentor hitting a road obstacle, data that will assist in understanding how a vehicle's systems performed. The EDR is designed to record data related to vehicled dynamics and safety systems for a short period of time, typically 30 seconds or less. The EDR in this vehicle is designed to record such data as:
• Howvarious systems in the vehicle were operating.
- Whetherornotthedriverand passengersafetybeltswere buckled/fastened.
- Howfar, ifatall, the driver was pressing the accelerator and/or brake pedal.
• Howfastthevehiclewas traveling.
This data can help provide better understanding of the circumstances in which crashes and injuries occur.
Important:EDRdataisrecorded bythevehicleonlyifanon-trivial crashesituationoccurs;nodatais recordedbytheEDRundernormal drivingconditionsandnopersonal data(e.g.,name,gender,age, andcrashlocation)isrecorded. However,otherparties,suchaslaw enforcement,couldcombinethe EDRdatawiththetypeof personallyidentifyingdataroutinely acquiredduringacrash investigation.
ToreaddatarecordedbyanEDR, specialequipmentisrequired,and accesstothevehicleortheEDRis needed.Inadditiontothevehicle manufacturer,otherparties,suchas lawenforcement,thathavethe specialequipment,canreadthe informationiftheyhaveaccessto thevehicleortheEDR.
GMwillnotaccessthisdataor shareitwithothersexcept:withthe consentofthevehicleowneror, ifthevehicleisleased, withthe consentofthelessee;inresponse toanofficialrequestbypoliceor similargovernmentoffice;aspartof GM'sdefenseoflitigationthrough thediscoveryprocess;or, as requiredbylaw.DatathatGM collectsorreceivesmayalsobe usedforGMresearchneedsormay bemadeavailabletoothersfor researchpurposes,whereaneedis shownandthedataisnottiedtoa specificvehicleorvehicleowner.
OnStar®
Ifthevehicleisequippedwithan activeOnStarsystem,thatsystem mayalsorecorddataincrashor nearcrash-likesituations.The OnStarTermsandConditions providesinformationondata collectionanduseandisavailable intheOnStargloveboxkit,at www.onstar.com(U.S.)or www.onstar.ca(Canada),orby pressingthe buttonand speakingtoanadvisor.
RadioFrequency Identification(RFID)
RFIDtechnologyisusedinsome vehiclesforfunctionssuchastire pressuremonitoringandignition systemsecurity,aswellasin connectionwithconveniencessuch askeyfobsforremotedoorlocking/unlockingandstarting,and in-vehicletransmittersforgarage dooropeners.RFIDtechnologyin GMvehiclesdoesnotuseorrecord personalinformationorlinkwithany otherGMsystemcontaining personalinformation.
RadioFrequency Statement
This vehiclehassystemsthat operateonaradiofrequencythat complywithPart15oftheFederal CommunicationsCommission(FCC) rulesandwithIndustryCanada StandardsRSS-GEN/210/220/310.
Operationissubjecttothefollowing twoconditions:
-
Thedevicemaynotcause harmfulinterference.
-
The device must accept any interference received, including interference that may cause undesired operation of the device.
Changesormodificationstoanyof thesesystemsbyotherthanan authorizedservicefacilitycouldvoid authorizationtousethisequipment.
A
Accessoriesand
Modifications......10-4
AccessoryPower......9-31
Add-On Electrical
Equipment......9-67
Adjustments
Lumbar, FrontSeats......3-4
AirCleaner/Filter, Engine.....10-17
AirVents....8-3
AirbagSystem
Check....3-34
HowDoesanAirbag
Restrain?......3-25
PassengerSensing
System......3-27
WhatMakesanAirbag
Inflate?......3-25
WhatWillYouSeeafteran
AirbagInflates?......3-26
AirbagSystem(cont'd)
WhenShouldanAirbag
Inflate?......3-24
WhereAretheAirbags?.....3-22
Airbags
AddingEquipmenttothe
Vehicle....3-33
PassengerStatusIndicator...5-11
ReadinessLight......5-10
ServicingAirbag-Equipped
Vehicles....3-32
SystemCheck......3-20
AlarmSystem
Anti-theft....2-10
AM-FMRadio....7-7
Antenna
SatelliteRadio....7-14
Anti-theft
AlarmSystem......2-10
AntilockBrake
System(ABS)....9-44
WarningLight......5-16
AppearanceCare
Roadside......13-8,13-10
AudioPlayers......7-15
CD....7-15
AudioSystem
ChimeLevelAdjustment.....5-6
FixedMastAntenna......7-14
RadioReception......7-13
Theft-DeterrentFeature......7-2
Automatic
DoorLocks....2-6
HeadlampSystem......6-3
Transmission......9-36
TransmissionFluid...... 10-13
AutomaticTransmission
ShiftLockControl
FunctionCheck...... 10-33
Axle, Front.....10-31
Axle,Rear 10-32
i-2INDEX
B
Battery....10-30
JumpStarting.....10-87
LoadManagement......6-7
PowerProtection......6-7
VoltageandCharging
Messages......5-23
BladeReplacement,Wiper...10-34
Bluetooth....7-21
Brake
SystemWarningLight......5-15
Brakes....10-27
Antilock....9-44
Assist....9-46
Fluid....10-28
Parking....9-45
SystemMessages......5-23
Braking....9-4
Break-In, NewVehicle......9-26
BulbReplacement......10-39
CenterHigh-Mounted
Stoplamp(CHMSL).....10-38
FogLamps....6-5
BulbReplacement(cont'd)
HalogenBulbs......10-36
HeadlampAiming......10-36
Headlamps.....10-36,10-37
LicensePlateLamps.....10-39
Taillamps, TurnSignal,
Stoplamps, and
Back-upLamps......10-37
BuyingNewTires......10-62
C
Calibration....5-3
California
FuelRequirements......9-53
PerchlorateMaterials
Requirements......10-3
Warning......10-3
CanadianVehicleOwners......iii
Capacitiesand
Specifications......12-2
CarbonMonoxide
EngineExhaust......9-34
Tailgate....2-8
WinterDriving....9-15
Cautions, Danger, and
Warnings......iv
CDPlayer....7-15
CenterConsoleStorage......4-2
CenterHigh-Mounted
Stoplamp(CHMSL)......10-38
Chains,Tire......10-68
ChargingSystemLight......5-12
Check
EngineLight....5-13
Ignition
TransmissionLock......10-33
ChildRestraints
InfantsandYoung
Children......3-37
LowerAnchorsand
TethersforChildren......3-43
INDEXi-3
ChildRestraints(cont'd)
OlderChildren....3-35
Securing......3-54,3-57,3-59
Systems....3-39
CigaretteLighter....5-5
CircuitBreakers......10-40
Cleaning
ExteriorCare......10-96
InteriorCare....10-99
ClimateControlSystems......8-1
AirConditioning......8-1
Heating....8-1
Clock....5-4
Cluster,Instrument......5-7
Clutch,Hydraulic....10-17
CollisionDamageRepair.....13-15
CompactSpareTire......10-85
Compass....5-3
ControlofaVehicle......9-3
ConvexMirrors......2-13
Coolant
Engine....10-19
EngineTemperatureGauge...5-9
CoolingSystem......10-18
EngineMessages......5-24
Courtesy Transportation
Program....13-14
CruiseControl....9-50
Light....5-19
Cupholders......4-1
CustomerAssistance......13-6
Offices....13-5
TextTelephone(TTY)
Users....13-6
CustomerInformation
ServicePublications
OrderingInformation.....13-18
CustomerSatisfaction
Procedure....13-1,13-4
D
DamageRepair,Collision.....13-15
Danger,Warnings, and
Cautions......iv
DataRecorders,Event......13-20
DaytimeRunning
Lamps(DRL)......6-3
DefensiveDriving....9-3
DistractedDriving....9-2
DomeLamps....6-6
Door
AjarMessages......5-24
Locks....2-5
PowerLocks......2-6
RearDoors....2-7
DriveBeltRouting,Engine.....12-4
DriverInformation
Center(DIC)....5-20
Driving
Characteristicsand
TowingTips......9-58
Defensive....9-3
Drunk....9-3
ForBetterFuelEconomy.....1-19
HighwayHypnosis......9-13
HillandMountainRoads.....9-14
IftheVehicleisStuck......9-17
LossofControl....9-5
i-4INDEX
Driving(cont'd)
Off-Road....9-6
Off-RoadRecovery......9-5
VehicleLoadLimits......9-19
WetRoads....9-12
Winter....9-15
E
Electrical Equipment,
Add-On....9-67
ElectricalSystem
EngineCompartment
FuseBlock......10-41
FusesandCircuit
Breakers......10-40
Overload....10-40
Engine
AirCleaner/Filter......10-17
CheckandServiceEngine
SoonLight....5-13
CompartmentOverview......10-6
Coolant....10-19
Engine(cont'd)
CoolantTemperatureGauge...5-9
CoolingSystem......10-18
CoolingSystemMessages...5-24
DriveBeltRouting......12-4
Exhaust....9-34
Fan....10-25
Heater....9-30
OilLifeSystem......10-12
OilMessages......5-24
Overheating....10-23
PowerMessages......5-25
PressureLight......5-18
RunningWhileParked......9-35
Starting....9-28
Equipment, Towing......9-66
EventDataRecorders......13-20
ExitLighting......6-7
Extender, Safety Belt......3-19
ExteriorCargoLamps......6-5
ExteriorLampControls......6-1
ExteriorLampsOffReminder...6-2
F
Fan
Engine....10-25
Filter,
EngineAirCleaner.....10-17
Flash-to-Pass......6-2
Flashers,HazardWarning......6-4
FlatTire....10-69
Changing....10-71
FloorMats....10-102
Fluid
AutomaticTransmission....10-13
Brakes....10-28
Four-WheelDrive
TransferCase......9-40
PowerSteering......10-25
Washer....10-26
FogLamps
BulbReplacement......6-5
Four-WheelDrive.....10-30,9-40
FrontAxle.....10-31
FrontSeats
Adjustment....3-3
Heated....3-7
Fuel....9-53
Additives....9-54
EconomyDriving......1-19
FillingaPortableFuel
Container....9-57
FillingtheTank....9-55
ForeignCountries......9-54
GasolineSpecifications......9-53
Gauge....5-8
Recommended......9-53
Requirements, California.....9-53
SystemMessages......5-25
Full-SizeSpareTire......10-86
Fuses
EngineCompartment
FuseBlock......10-41
FusesandCircuit
Breakers.....10-40
G
Gasoline
Specifications....9-53
Gauges
EngineCoolant
Temperature......5-9
Fuel....5-8
Odometer....5-8
Speedometer....5-8
Tachometer....5-8
TripOdometer......5-8
WarningLightsand
Indicators......5-6
GeneralInformation
ServiceandMaintenance.....11-1
Towing....9-57
VehicleCare....10-2
GloveBox....4-1
GMMobilityReimbursement
Program....13-7
H
HalogenBulbs....10-36
HazardWarningFlashers.....6-4
HeadRestraints....3-2
Headlamps....10-37
Aiming....10-36
Automatic....6-3
BulbReplacement......10-36
DaytimeRunning
Lamps(DRL)......6-3
Flash-to-Pass......6-2
High-BeamOnLight.....5-19
High/LowBeamChanger.....6-2
HeatedFrontSeats......3-7
Heater
Engine....9-30
HeatingandAirConditioning...8-1
High-BeamOnLight......5-19
High-SpeedOperation......10-55
HighwayHypnosis......9-13
HillandMountainRoads.....9-14
Hood....10-5
i-6INDEX
Horn....5-2
HowtoWearSafetyBelts
Properly....3-12
HydraulicClutch......10-17
|
IgnitionPositions......9-26
IgnitionTransmissionLock
Check....10-33
Immobilizer......2-11
InfantsandYoungChildren,
Restraints....3-37
Infotainment....7-1
InstrumentCluster......5-7
Introduction......iii
J
JumpStarting.....10-87
K
KeylessEntry
Remote(RKE)System......2-3
Keys....2-2
L
Labeling,TireSidewall......10-48
Lamps
DaytimeRunning(DRL)......6-3
Dome......6-6
ExteriorCargo......6-5
ExteriorControls......6-1
ExteriorLampsOff
Reminder......6-2
LicensePlate......10-39
MalfunctionIndicator......5-13
Messages......5-25
LapBelt....3-18
Lap-ShoulderBelt......3-13
LATCHSystem
ReplacingPartsaftera
Crash....3-54
LATCH, LowerAnchorsand
TethersforChildren......3-43
Latches,Seatback......3-6
Lighter, Cigarette....5-5
Lighting
Exit...... 6-7
IlluminationControl......6-6
Lights
AirbagReadiness......5-10
AntilockBrakeSystem
(ABS)Warning......5-16
BrakeSystemWarning......5-15
ChargingSystem......5-12
CruiseControl......5-19
EngineOilPressure......5-18
Flash-to-Pass......6-2
High-BeamOn....5-19
High/LowBeamChanger.....6-2
SafetyBeltReminders......5-9
Security......5-19
StabiliTrak® OFF......5-17
TirePressure....5-18
TractionControlSystem
(TCS)/StabiliTrak® .....5-17
Limited-SlipRearAxle.....9-50
Locks
AutomaticDoor......2-6
Door.....2-5
LockoutProtection......2-6
PowerDoor.....2-6
Safety....2-6
LossofControl....9-5
LowerAnchorsandTethers
forChildren(LATCH
System)....3-43
LumbarAdjustment......3-4
FrontSeats......3-4
M
Maintenance
Records......11-16
MaintenanceSchedule
RecommendedFluids
andLubricants......11-12
TransferCase....9-40
MalfunctionIndicatorLamp....5-13
ManualMirrors....2-14
ManualTransmission......9-38
Fluid....10-16
ManualWindows......2-17
Messages
BatteryVoltageand
Charging......5-23
BrakeSystem......5-23
DoorAjar....5-24
EngineCoolingSystem......5-24
EngineOil....5-24
EnginePower......5-25
FuelSystem......5-25
Lamp....5-25
RideControlSystem......5-26
ServiceVehicle....5-26
Tire....5-27
Transmission......5-27
Vehicle....5-23
Mirrors
AutomaticDimming
Rearview......2-15
Convex....2-13
Manual....2-14
Mirrors(cont'd)
ManualRearview......2-15
Power....2-14
MonitorSystem, Tire
Pressure....10-56
N
NewVehicleBreak-In......9-26
0
Odometer....5-8
Trip....5-8
Off-Road....9-6
Driving....9-6
Recovery....9-5
Oil
Engine....10-10
EngineOilLifeSystem.....10-12
Messages......5-24
PressureLight......5-18
OlderChildren, Restraints.....3-35
OnlineOwnerCenter......13-6
i-8INDEX
OnStar®
System, InBrief.....1-20
Operation, Infotainment
System......7-3
Ordering
ServicePublications......13-18
Outlets
Power....5-5
Overheating,Engine......10-23
P
Park
ShiftingInto......9-31
ShiftingOutof....9-32
Parking....9-33
Brake....9-45
BrakeandP(Park)
MechanismCheck......10-34
OverThingsThatBurn......9-34
PassengerAirbagStatus
Indicator....5-11
PassengerSensingSystem...3-27
PerchlorateMaterials
Requirements, California.....10-3
Phone
Bluetooth....7-21
PickupConversionto
ChassisCab....9-67
Power
DoorLocks....2-6
Mirrors....2-14
Outlets....5-5
Protection, Battery......6-7
RetainedAccessory(RAP)...9-31
SeatAdjustment......3-3
SteeringFluid......10-25
Windows....2-17
Pregnancy, Using Safety
Belts 3-18
Privacy
RadioFrequency
Identification(RFID)......13-22
Program
CourtesyTransportation....13-14
Proposition65Warning,
California....10-3
R
RadioFrequency
Identification(RFID)......13-22
Statement......13-22
Radios
AM-FMRadio....7-7
Reception......7-13
Satellite....7-11
RearAxle....10-32
Limited-Slip....9-50
RearDoors....2-7
RearSeats 3-8,3-9
RearStorage....4-2
RearWindows....2-19
RearviewMirrors......2-15
AutomaticDimming......2-15
RecliningSeatbacks......3-4
Recommended
Fuel....9-53
RecommendedFluidsand
Lubricants....11-12
Records
Maintenance....11-16
Recreational Vehicle
Towing....10-91
ReimbursementProgram,
GMMobility......13-7
RemoteKeylessEntry
(RKE)System......2-2,2-3
ReplacementBulbs.....10-39
ReplacementParts
Airbags....3-34
Maintenance....11-15
ReplacingAirbagSystem.....3-34
ReplacingLATCHSystem
PartsafteraCrash......3-54
ReplacingSafetyBelt
SystemPartsafteraCrash...3-20
ReportingSafetyDefects
CanadianGovernment.....13-19
GeneralMotors......13-20
U.S.Government......13-19
Restraints
WheretoPut....3-41
RetainedAccessory
Power(RAP)......9-31
RideControlSystems
LimitedSlipRearAxle......9-50
Messages......5-26
Roads
Driving,Wet....9-12
RoadsideAssistance
Program......13-8,13-10
Rotation, Tires.....10-60
Routing,EngineDriveBelt.....12-4
RunningtheVehicleWhile
Parked....9-35
S
SafetyBelts 3-11
Care....3-19
Extender....3-19
HowtoWearSafetyBelts
Properly....3-12
LapBelt....3-18
Lap-ShoulderBelt......3-13
Reminders......5-9
ReplacingafteraCrash .....3-20
UseDuringPregnancy......3-18
SafetyDefectsReporting
CanadianGovernment.....13-19
GeneralMotors......13-20
U.S.Government......13-19
SafetyLocks......2-6
SafetySystemCheck......3-19
SatelliteRadio....7-11
SchedulingAppointments.....13-13
SeatbackLatches ....3-6
Seats
Adjustment, Front......3-3
HeadRestraints....3-2
HeatedFront....3-7
LumbarAdjustment, Front.....3-4
PowerAdjustment, Front .....3-3
Rear....3-8,3-9
RecliningSeatbacks......3-4
SecondaryLatchSystem.....10-82
SecuringChild
Restraints......3-54,3-57,3-59
Security
Light....5-19
Vehicle....2-10
i-10INDEX
Service
Accessoriesand
Modifications......10-4
DoingYourOwnWork......10-4
EngineSoonLight......5-13
MaintenanceRecords......11-16
Maintenance, General
Information......11-1
PartsIdentificationLabel.....12-1
PublicationsOrdering
Information......13-18
SchedulingAppointments...13-13
VehicleMessages......5-26
ServicingtheAirbag......3-32
ShiftLockControlFunction
Check, Automatic
Transmission....10-33
Shifting
IntoPark....9-31
OutofPark....9-32
Signals, Turnand
Lane-Change......6-4
SpareTire
Compact....10-85
Specificationsand
Capacities....12-2
Speedometer....5-8
StabiliTrak
OFFLight....5-17
System......9-48
StarterSwitchCheck......10-32
StartingtheEngine......9-28
Steering....9-4
Fluid,Power......10-25
WheelAdjustment......5-2
StoplampsandBack-upLamps
BulbReplacement......10-37
Storage
Rear....4-2
StorageAreas
CenterConsole......4-2
GloveBox....4-1
StuckVehicle....9-17
SunVisors....2-19
Symbols......iv
System
Infotainment....7-1
T
Tachometer....5-8
Tailgate....2-8
Taillamps
BulbReplacement......10-37
TextTelephone(TTY)Users...13-6
Theft-Deterrent
Systems......2-11,2-13
Immobilizer......2-11
Time....5-4
Tires
BuyingNewTires......10-62
Chains....10-68
Changing....10-71
CompactSpare......10-85
Designations......10-50
DifferentSize......10-64
Full-SizeSpare......10-86
IfaTireGoesFlat......10-69
InflationMonitorSystem....10-57
Inspection......10-60
Messages......5-27
Pressure....10-55
Tires(cont'd)
PressureLight......5-18
PressureMonitorSystem...10-56
Rotation....10-60
SecondaryLatchSystem...10-82
SidewallLabeling......10-48
Terminology and
Definitions......10-51
UniformTireQuality
Grading....10-65
WheelAlignmentandTire
Balance....10-66
WheelReplacement......10-67
WhenItIsTimeforNew
Tires....10-62
Towing
DrivingCharacteristics......9-58
Equipment....9-66
GeneralInformation......9-57
Recreational Vehicle.....10-91
Trailer....9-62
Vehicle......10-91
Traction
ControlSystem(TCS)......9-47
ControlSystem(TCS)/
StabiliTrak® Light......5-17
Limited-SlipRearAxle......9-50
Trailer
Towing....9-62
TransferCase......9-40
Transmission
Automatic....9-36
Fluid,Automatic......10-13
Fluid,Manual....10-16
Messages......5-27
TransportationProgram,
Courtesy....13-14
TripOdometer....5-8
Truck-CamperLoading
Information......9-25
TurnandLane-Change
Signals......6-4
TurnSignal
BulbReplacement......10-37
U
UniformTireQuality
Grading....10-65
UsingThisManual......iv
V
Vehicle
CanadianOwners......iii
Control....9-3
Identification
Number(VIN)......12-1
LoadLimits....9-19
Messages......5-23
Security......2-10
Towing....10-91
VehicleCare
TirePressure......10-54
Ventilation,Air......8-3
Visors....2-19
i-12INDEX
W
Warning
BrakeSystemLight......5-15
WarningLights, Gauges, and
Indicators......5-6
Warnings......iv
CautionsandDanger......iv
HazardFlashers......6-4
WasherFluid......10-26
Wheels
AlignmentandTire
Balance....10-66
DifferentSize......10-64
Replacement......10-67
When It Is Time for New
Tires....10-62
WheretoPuttheRestraint....3-41
Windows....2-16
Manual....2-17
Power....2-17
Rear....2-19
Windshield
Wiper/Washer....5-2
Winter
Driving....9-15
WiperBladeReplacement....10-34