Miro Cube 2 - Lighting Rosco - Free user manual and instructions
Find the device manual for free Miro Cube 2 Rosco in PDF.

| Product Type | LED Light Fixture |
| Dimensions (W x H x D) | 150 mm x 150 mm x 100 mm |
| Weight | 0.5 kg |
| Power Supply | 24V DC, 50W |
| Light Source | RGBW LED |
| Beam Angle | 30° |
| Control Protocols | DMX512, Standalone |
| DMX Channels | 4 or 8 channel modes |
| Dimming | 0-100% smooth |
| Strobe | 0-20 Hz |
| Housing Material | Aluminum |
| IP Rating | IP20 |
| Certifications | CE, RoHS |
| Operating Temperature | 0°C to 40°C |
| Fan Noise | Silent (passive cooling) |
| Mounting Options | Floor, truss, bracket |
| Included Accessories | Power cord, gel frame, manual |
| Maintenance | Wipe with dry cloth; avoid liquids |
| Safety | Disconnect power before cleaning |
Frequently Asked Questions - Miro Cube 2 Rosco
User questions about Miro Cube 2 Rosco
0 question about this device. Answer the ones you know or ask your own.
Ask a new question about this device
Download the instructions for your Lighting in PDF format for free! Find your manual Miro Cube 2 - Rosco and take your electronic device back in hand. On this page are published all the documents necessary for the use of your device. Miro Cube 2 by Rosco.
USER MANUAL Miro Cube 2 Rosco
natural_image
Blue and white abstract icon of a device with four circular holes, no text or symbols present.Table of Contents
Your Miro Cube® 2
Safety and Precautions 03
Product Description 04
Product Specifications 05
What's in the Box 06
Miro Cube ^® 2 Modes
DMX/RDM Mode 08
RDM Command List....08
Universe 1 or Universe 2....09
RDM/DMX Profiles for 4C & 4CA....10
RDM/DMX Profiles for WNC & UV365....11
DMX Channel Layout for 4C & 4CA....12
DMX Channel Layout for WNC & UV365....13
DMX/RDM Options....14
Wiring/0-10V Dimming 16
User Interface - Classic Conversion Only....17
Manual Mode....17
4C & 4CA Manual Mode....18
WNC Manual Mode....18
UV365 Manual Mode....19
Color Wash Mode....20
Serial Mode....21
User Interface DMX Options....21
User Interface Options....22
Beam Angles
OPTI-SCULPT™ Beam Shaping Lenses 22
Safety and Precautions
Warning Messages:
Loss of DMX Signal
On startup, if the fixture is set to DMX mode and a DMX signal is not present via the DMX connectors, all of the LEDs will glow dimly. This feature can be used for troubleshooting your DMX control lines. Once DMX is detected the fixture will instantaneously respond to the command it is given.
Overheating and Fan Fault
All Miro Cube 2 fixtures are equipped with an internal temperature sensor.
4C & 4CA: If an overheat condition is experienced, all of the red LEDs will glow dimly. If the fixture experiences a fan fault, all of the blue LEDs will glow dimly.
WNC: If an overheat condition is experienced, the Warm LEDs will glow dimly. If the fixture experiences a fan fault, the Cool LEDs will glow dimly.
UV365: If an overheat condition or fan fault condition is experienced, all of the LEDs will glow dimly.
Should either of these conditions occur, disconnect the fixture from its power source and wait three seconds.
Plug the fixture in again. If the condition persists, contact TechSupport@rosco.com for assistance.
General Precautions:
- The use of a safety cable is recommended when rigging the fixture.
- Before use, make sure all screws and safety points are secured.
- Make sure the light is unplugged before performing any service to the unit.
- ALWAYS keep this product out of reach of children and untrained persons.
- ALWAYS adhere to safety instructions and warnings, including any and all instructions set forth in the Product Specifications.
- To allow for proper cooling, airflow must not be restricted through the front and rear of the fixture - do not block off the front or rear panel.
- For Dry locations/Indoor use only.
- Fixtures should be positioned so that prolonged staring at the emitters is not expected. 3.3m for the 4C & 4CA, 0.31m for the WNC.
- Do not look directly into the Miro Cube 2 UV365 during operation. Eye and skin exposure to UV energy can cause severe damage to humans and animals. Take every precaution to limit exposure to UV energy, including the use of UV-blocking eye protection.
FCC Warning:
This equipment has been tested and found to comply with the regulations for a Class A digital device, pursuant to Part 15 of the FCC Rules. These limits are designed to provide reasonable protection against harmful interference when the equipment is operated in a commercial environment. This equipment generates, uses, and can radiate radio frequency energy and, if not installed and used in accordance with this user's guide, may cause harmful interference to radio communications. Operation of this equipment in a residential area is likely to cause harmful interference, in which case the user will be required to correct the interference at his own expense.
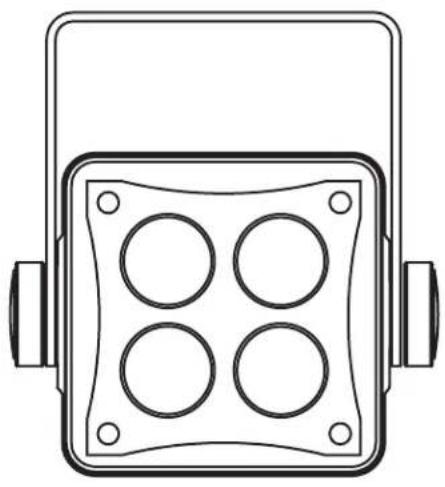
What's in the Box
Miro Cube® 2 - Front
natural_image
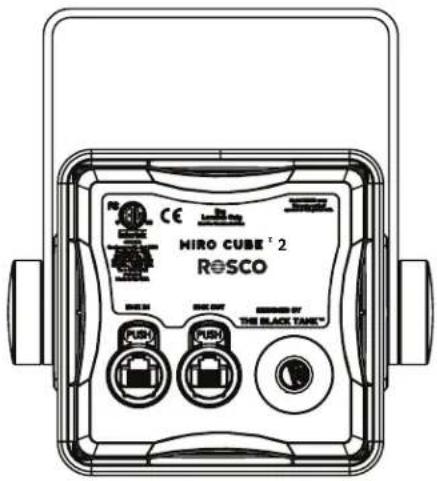
Line drawing of a four-pin electrical connector with mounting brackets (no text or symbols)Miro Cube® 2 - Back
OPTI-SCULPT™ Bean Shaping Lenses
Included with 4C, 4CA, and WNC fixtures
10^ Lens Optic
Included with UV365

natural_image
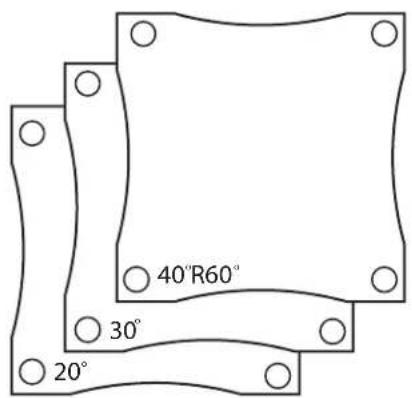
Black square with four small white dots at corners (no text or symbols)Miro Cube 2 4C, 4CA, and WNC fixtures ship with an OPTI-SCULPT Lens Kit that contains three Rosco OPTI-SCULPT Lenses: 20°, 30°, and the reversible 40°R60°. All of the other individual OPTI-SCULPT lenses are available for the Miro Cube 2 as well. Visit the Rosco OPTI-SCULPT product page to learn more about these unique beam-shaping lenses.
An additional 22° Lens Optic Accessory is also available for wider beam spreads.
Note: OPTI-SCULPT is not intended for use with the Miro Cube 2 UV365 black light.
Product Description
The Miro Cube® 2 range of LED fixtures is engineered to provide lighting designers and integrators with precision light control and tech-enabled solutions so they can execute their projects with accuracy and efficiency. The sophisticated features inside these compact and powerful light fixtures make specification and integration simple.
The sleek new design of the Miro Cube 2 is packed with state-of-the-art technology. Available in RGBW, RGBA, UV & tunable white light models, the patented technology inside Miro Cube 2 provides maximum output, and flicker-free dimming from a 4-in. (10 cm) cube-shaped LED light. Not only does the fixture offer multiple control options, designers can also specify their Miro Cube 2 to arrive preset to a specific hue or color temperature for easy integration.
All of these features make Miro Cube 2 fixtures an excellent choice for illuminating retail stores, museums, themed environments, broadcast studios, or any other installation that needs a voluminous amount of light – but doesn't have space for large, bulky fixtures.
- Patented Ludicrous Mode™ intelligently redistributes the fixture's power per-channel to produce maximum brightness for any color temperature or hue.
- Incredibly high output from an ultra-compact fixture thanks to its patented heat management system.
- Fixtures can be Pre-Tuned with factory presets to a specified hue or color temperature.
- Master Dim Mode enables users to set their hue or color temperature, then dim the fixture via a single channel.
- Multiple control options, including: RDM compatible DMX and 0-10VDC
- Can be controlled with a mobile device using the myMIX® Connect accessory and the myMIX® App.
- Flicker-free dimming via 16kHz PWM in 8- or 16-bit resolution, or via the fixture's unique NO PWM mode.
- The 4C, 4CA, and WNC fixtures ship with a kit of 20^ , 30^ , and the reversible 40^60^ OPTI-SCULPT™ beam-shaping lenses. Other OPTI-SCULPT Lens accessories are also available.
- A Classic Conversion option, featuring the Powercon/XLR connectors and LCD user interface used in the original Miro Cube, is also available.
Product Specifications
| WNC 4C 4CA UV365 | ||||
| Input Voltage: 90-240VAC 50/60Hz | ||||
| Power Consumption: 50W | ||||
| Power Input: Hard-wired pigtail, 6 feet/1.82 meters | ||||
| Lumen Maintenance: 72,600 hours at L80 at 45°C | ||||
| Data Connector: RJ45 In/Out Connectors | ||||
| Max Output: 4100lm 1443lm | 1135lm 10,800m/W | |||
| Color Temp. Range: | 2700K-6000K | 3200K-10,000K | 2200K-10,000K | N/A |
| Avg. CRI (White Light): | 92+ | 80+ | 92+ | N/A |
| LED Color Specifications: | W: 2700KN: 4000KC: 6000K | R: 625nmG: 525nm G: 525nmB: 453nmW: x0.32, y0.32 | R: 625nm@365nmB: 453nmA: x0.57, y0.42 | Peak output |
| True Rosco ColorTM Gel Matches: | N/A | 44 | 54 | N/A |
| Operation: DMX RDM or 0-10V Dimmable | ||||
| Operating Temp.: -13° to 113°F (-20° to 45°C) | ||||
| Humidity: 0-95% non-condensing | ||||
| Dimensions: 4.3 in x 4.3 in x 4.9 in (109mm x 109mm x 125mm) | ||||
| Weight: 2.1 lbs (0.95 kg) | ||||
| Housing: Powder coated, die-cast aluminum | ||||
| Approvals: cETL, ETL, CE, UKCA, FCC Class A Compliant; Dry Locations | ||||
| IP Rating: IP20 | ||||
| DMX Channels: | 1,2,3,4,6 | 1,2,4,5,8 | 1,2,4,5,8 | 1 |
| myMIX® Connect Compatible: Yes | ||||
| Finish: Black, White, Custom | Black Only | |||
Miro Cube 2 Classic Conversion
(same as above except for the following)
| WNC 4C | 4CA UV365 | |
| Power Input: | Neutrik Powercon, 6.56 feet/2 meters | |
| Data Connector: | 5-Pin XLR In/Out connectors | |
| Operation: | DMX RDM + Full Text LCD screen user-interface | |
| Finish: | Black Only | |
| myMIX* Connect Compatible: | No | |
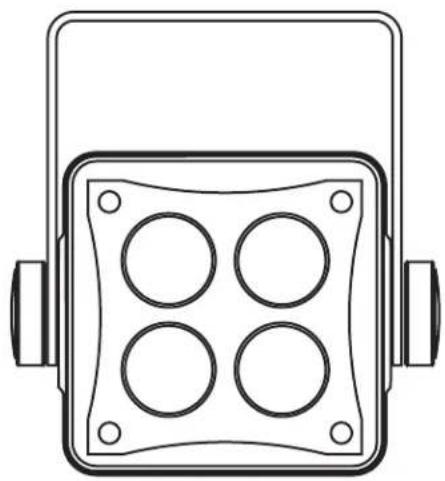
What's in the Box - Classic Conversion
Miro Cube® 2 - Front
natural_image
Line drawing of a four-pin electrical socket with mounting brackets (no text or symbols)Miro Cube® 2 - Back
Neutrik Powercon Cable
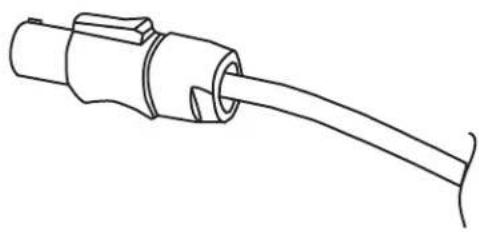
natural_image
Line drawing of a cable connector with a cylindrical body and terminal connectors (no text or symbols)OPTI-SCULPT™ Bean Shaping Lenses
Included with 4C, 4CA, and WNC fixtures

Miro Cube 2 4C, 4CA, and WNC fixtures ship with an OPTI-SCULPT Lens Kit that contains three Rosco OPTI-SCULPT Lenses: 20°, 30°, and the reversible 40°R60°. All of the other individual OPTI-SCULPT lenses are available for the Miro Cube 2 as well. Visit the Rosco OPTI-SCULPT product page to learn more about these unique beam-shaping lenses.
Note: OPTI-SCULPT is not intended for use with the Miro Cube 2 UV365 black light.
DMX/RDM Mode
In DMX mode, the unit is controlled by the data it receives via the RJ45 connectors, or the 5-pin XLR connectors on the Classic Conversion model, on the rear panel. The number of DMX channels required to control the fixture is dependent on the factory setting in use (See DMX Channel Layout section of this manual).
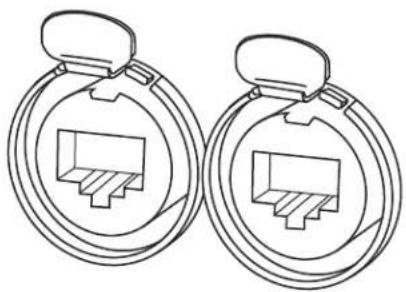
natural_image
Two identical circular diagrams with internal connector symbols, no text or labels presentRJ45 Connectors
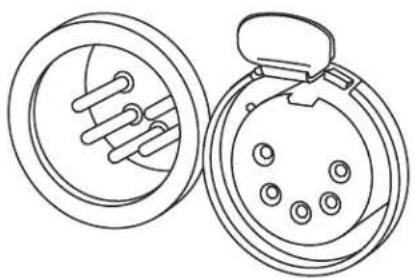
natural_image
Technical line drawing of a circular component with internal spring-like elements and a separate inset showing a multi-pin connector (no text or symbols)5-Pin XLR Connectors Classic Conversion
Remote Device Management
Miro Cube® 2 fixtures have RDM (Remote Device Management) functionality. RDM allows bidirectional control and communication over the DMX512 cable. See Below for RDM Command List:
• DISC_UNIQUE_BRANCE
• DISC MUTE
• DISC UN MUTE
- STATUS_MESSAGES G
- STATUS_ID_DESCRIPTION G
• SUPPORTED_PARAMETERS G
• DEVICE_INFO G
• DEVICE_MODEL_DESCRIPTION G
• MANUFACTURER_LABEL G
•DEVICE_LABEL G/S
- SOFTWARE_VERSION_LABEL G
• DMX_PERSONALITY G/S
• DMX_PERSONALITY_DESCRIPTION G
- DMX_START_ADDRESS G/S
- SENSOR_DEFINITION G
- SENSOR_VALUE G
• CURVE G/S
• CURVE DESCRIPTION G
• OUTPUT_RESPONSE_TIME G/S
• OUTPUT RESPONSE_TIME Descriptive G
•MODULATION_FREQUENCY G/S
•MODULATION_FREQUENCY_DESCRIPTION
•DEVICE_HOURS G
• DEVICE_POWER_CYCLES G
• IDENTIFY_DEVICE G/S
- RESET_DEVICE S
G = GET S = SET
NOTE: If the fan stops spinning or if the fixture overheats a fault will occur. The RESET_DEVICE RDM command can be used to remotely clear a fault. The fixture can also be power cycled to clear faults.
Universe 1 or Universe 2 - RJ45 Connector
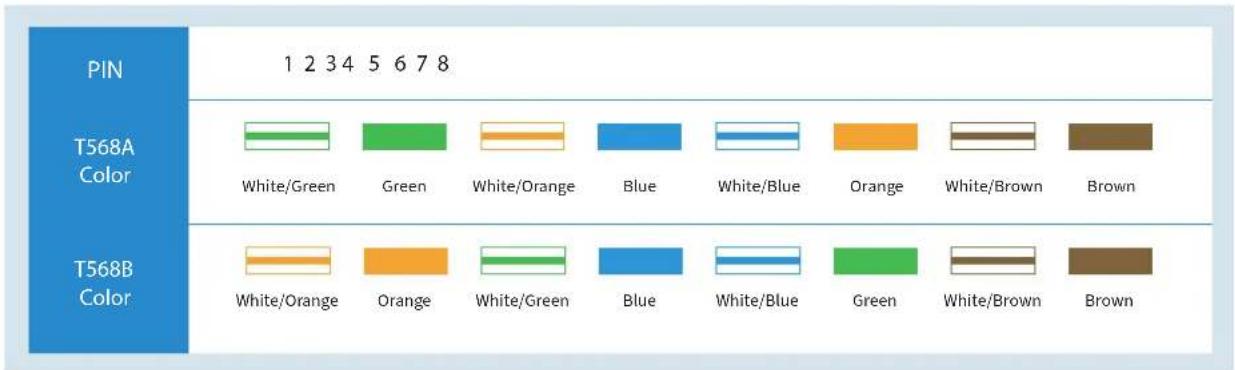
The Miro Cube® 2 can be controlled via two unique DMX universes. DMX can be input on pins 1&2 (Universe1) or pins 3&6 (Universe2) via the RJ45 connectors on the rear panel. This allows two complete universes of DMX to be transmitted on a single cable.
bar
| PIN | T568A Color | T568B Color | |---|---|---| | 1 | White/Green | White/Orange | | 2 | Green | Orange | | 3 | White/Orange | White/Green | | 4 | Blue | Blue | | 5 | White/Blue | White/Blue | | 6 | Orange | Green | | 7 | White/Brown | White/Brown | | 8 | Brown | Brown |Universe 1 or Universe 2 - 5-Pin XLR Connector (Classic Conversion)
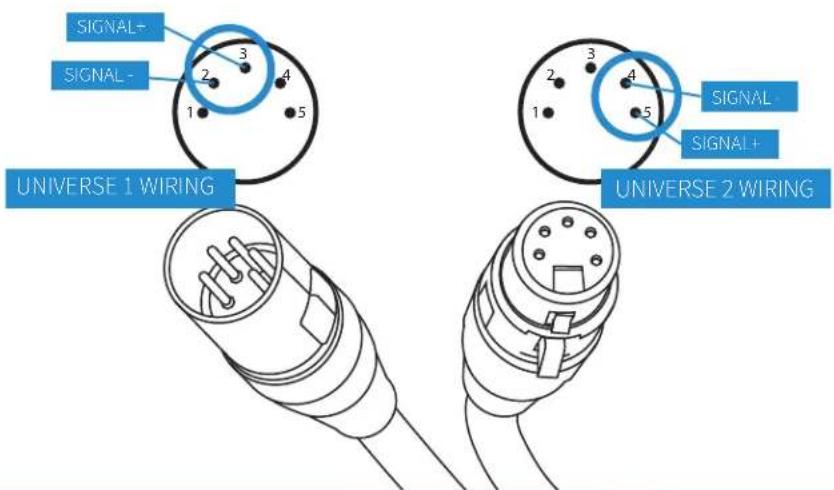
The Miro Cube® 2 can be controlled via two unique DMX universes. DMX can be input on pins 2&3 (Universe 1) or pins 4&5 (Universe 2) via the 5-pin XLR connectors on the rear panel. This allows two complete universes of DMX to be transmitted on a single cable.
To change from Universe 1 to Universe 2 (or from Universe 2 to Universe 1) press MENU until “SET TO UNIVERSE 2?” or “SET TO UNIVERSE 1?” appears on the LCD, then press OK
RDM/DMX Profiles for Miro Cube® 2 4C & 4CA
- 8bit LEGACY (4ch): This mode uses 4 raw intensity faders (red, green, blue, amber/white)
- 16bit LEGACY (8ch): This mode uses 8 faders to control the colors (red coarse, red fine, green coarse, green fine, blue coarse, blue fine, amber/white coarse, amber/white fine)
- 8bit+ MASTER (5ch): This mode uses 4 raw intensity faders (red, green, blue, amber/white) and uses a fifth fader for master dimmer.
- 8bit+CCT_2CH (2ch): This mode uses two faders to control CCT and intensity. The first fader is CCT (2200K to 10,000K), and the second fader is intensity.
- 8bit_1MASTER (1ch): This mode can be used to "lock" in a specific color/recipe. For example, if the user is in personality #1 and mixes a color purple, then switches to personality #5, the color purple will be locked into memory. Even when the fixture is power cycled, the color purple will always come up. This locked in color can be dimmed with a single channel of DMX, and/or 0-10V on hardwired versions.
- 8bit+ DUAL (6ch): This mode allows the user to switch between CCT white mode, and raw color mode using the 6th DMX fader. When the 6th channel is below 50%, the fixture will use 4 raw intensity faders (red, green, blue, amber/white) and channel 5 for master dimmer. When the 6th channel is above 50%, the first channel will be CCT, and channel 5 will remain master dimmer.
- 8bit NO PWM (4ch): This mode uses 4 raw intensity faders and does NOT PWM the LEDs - the fixture adjusts the currents to change the brightness. This causes the fixture to be more "steppy" between brightness settings, but will never flicker on camera (even at high frame rates).
RDM/DMX Profiles for Miro Cube® 2 WNC
- 8bit LEGACY (3ch): This mode uses 3 raw intensity faders (warm, neutral, cool)
- 16bit LEGACY (6ch): This mode uses 6 faders to control the colors (warm coarse, warm fine, neutral coarse, neutral fine, cool coarse, cool fine)
- 8bit+ MASTER (4ch): This mode uses 3 raw intensity faders (warm, neutral, cool) and uses a forth fader for master dimmer.
- 8bit+CCT_2CH (2ch): This mode uses two faders to control CCT and intensity. The first fader is CCT (2800K to 6000K), and the second fader is intensity.
- 8bit_1MASTER (1ch): This mode can be used to "lock" in a specific color/recipe. For example, if the user is in personality #1 and mixes warm and cool and then switches to personality #5, the recipe will be locked into memory. Even when the fixture is power cycled, the recipe will always come up. This locked in color can be dimmed with a single channel of DMX, and/or 0-10V on hardwired versions.
- 8bit+ DUAL (6ch): This mode allows the user to switch between CCT white mode, and raw color mode using the channel 6 DMX fader. When the 6th channel is below 50%, the fixture will use 3 raw intensity faders (warm, neutral, cool) and channel 5 for master dimmer. When the 6th channel is above 50%, the first channel will be CCT, and channel 5 will remain master dimmer.
- 8bit NO PWM (3ch): This mode uses 3 raw intensity faders and does NOT PWM the LEDs - the fixture adjusts the currents with analog to change the brightness. This causes the fixture to be more "steppy" between brightness settings, but will never flicker on camera (even at high frame rates).
RDM/DMX Profiles for Miro Cube® 2 UV365
- 8bit LEGACY (1ch): This mode uses 1 raw intensity fader (UV)
- 16bit LEGACY (2ch): This mode uses 2 faders to control the colors (UV Coarse, UV Fine)
- 8bit+ MASTER (2ch): This mode uses 1 raw intensity fader (UV) and uses a second fader for master dimmer.
- 8bit NO PWM (1ch): This mode uses 1 raw intensity fader and does NOT PWM the LEDs - the fixture adjusts the currents with analog to change the brightness. This causes the fixture to be more "steppy" between brightness settings, but will never flicker on camera (even at high frame rates).
- 8bit_1MASTER(1ch): This mode can be used to "lock" in a specific brightness. Then one channel of DMX on 0-10V on hardwired versions can be used to dim the brightness down.
DMX Channel Layout for Miro Cube® 2 4C & 4CA Profiles
Personality 1 (8 Bit):
- Red
- Green
- Blue
- Amber/White
Personality 2 (16 Bit):
- Red Coarse 5. Blue Coarse
- Red Fine 6. Blue Fine
- Green Coarse 7. Amber/White Coarse
- Green Fine 8. Amber/White Fine
Personality 3 (8 Bit+Master):
- Red
- Green
- Blue
- Amber/White
- Master Dimmer
Personality 4 (CCT Mode):
- Color Temp
- Master Dimmer
Personality 5 (8 Bit 1 Master):
- Master Dimmer
Personality 6 (8 Bit+Dual):
If Dual is below 50% If Dual is above 50%
1. Red 1. Color Temperature
2. Green 2. NA
3. Blue 3. NA
4. Amber/White 4. NA
5. Master Dimmer 5. Master Dimmer
6. Dual 6. Dual
Personality 7 (No PWM):
- Red
- Green
- Blue
- Amber/White
DMX Channel Layout for Miro Cube® 2 WNC Profiles
Personality 1 (8 Bit):
- Warm
- Neutral
- Cool
Personality 2 (16 Bit):
- Warm Coarse 4. Neutral Coarse
- Warm Fine 5. Cool Fine
- Neutral Coarse 6. Cool Coarse
Personality 3 (8 Bit+Master):
- Warm
- Neutral
- Cool
- Master Dimmer
Personality 4 (CCT Mode):
- Color Temp
- Master Dimmer
Personality 5 (8 Bit 1 Master):
- Master Dimmer
Personality 6 (8 Bit+Dual):
If Dual is below 50% If Dual is above 50%
1. Warm 1. Color Temperature
2. Neutral 2. NA
3. Cool 3. NA
4. NA 4. NA
5. Master Dimmer 5. Master Dimmer
6. Dual 6. Dual
Personality 7 (No PWM):
- Warm
- Neutral
- Cool
DMX Channel Layout for Miro Cube® 2 UV365 Profiles
Personality 1 (8 Bit):
- UV Intensity
Personality 2 (16 Bit):
- UV Coarse
- UV Fine
Personality 3 (8 Bit+Master):
- UV Intensity
- Master Dimmer
Personality 4 (NO PWM):
- UV Intensity
Personality 5 (8 Bit 1 Master):
- Master Dimmer
Filament Fade (Output Response Time)
Filament Fade can be set with RDM or with the User Interface. This setting will overlay a smooth dimming effect over the incoming DMX which will cause the fixture to better emulate the dimming curve of traditional fixtures. This feature can also be used to help smooth out a steppy DMX source.
Four settings are available:
- OFF
- MIN
- MED
- MAX
Ludicrous Mode ^™ vs. Standard Mode (Dimming Curve)
Traditional four color fixtures will divide the total power consumption evenly across all four channels. For example, a 50W four color fixture will allocate 12.5W for each color which will only allow the user to achieve the full 50W power level when all colors are set to full.
Our patented Ludicrous Mode technology enables Miro Cube 2 fixtures to utilize their full potential – no matter what hue or color temperature they're producing. For example, Ludicrous Mode will allow the user to achieve the full 50W output when the color purple is mixed with Red and Blue. A traditional fixture would only output 25W with Red and Blue.
Miro Cube 2 ships with Ludicrous Mode enabled. Two settings are available.
- Ludicrous Mode
- Standard
PWM Frequency (Modulation Frequency)
In all personalities except NO PWM mode, the PWM frequency can be set. Typically, faster PWM frequencies are better. The fixture ships in 16khz by default.
Two settings are available:
- 16kHz (16,000hz)
- 4kHz (4,000hz)
Device Label
The fixtures can be given a name by editing the Device Label using RDM.
DMX Address
The fixture's DMX Start Address can be adjusted using RDM.
Serial Number and Firmware Revision
The fixture's unique Serial Number and Firmware Revision can be obtained using RDM
Air Temperature (Sensors)
The Air Temperature flowing through the fixture can be monitored using RDM. The fixture will Over Temperature fault at 76^ C ( 170^ F). This internal temperature will only be reached when the fixture is operating at full power in environments over 50^ C ( 122^ F) ambient temperatures.
Runtime and Power Cycles (Power/Lamp)
The total runtime in Hours and number of Power Cycles is recorded and can be obtained using RDM.
Wiring/0-10V Dimming
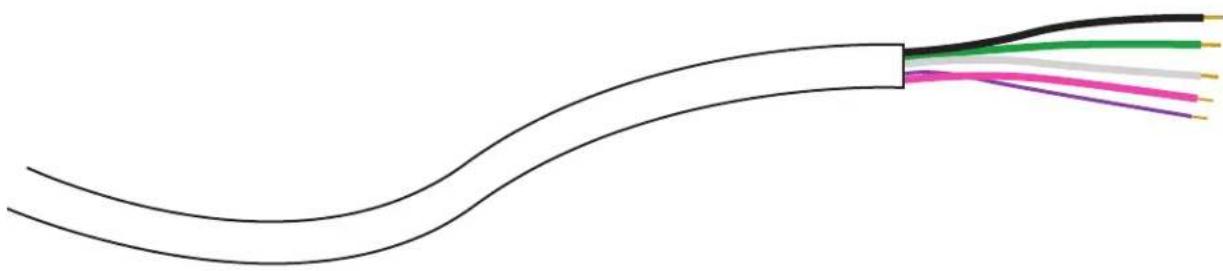
| Wire Color | Assignment |
| Green | Earth Ground |
| White | Line Voltage Neutral |
| Black | Line Voltage Hot |
| Purple | 0-10V Dimming (leave disconnected when not using 0-10V dimming) |
| Pink | 0-10V (leave disconnected when not using 0-10V dimming) |
Wiring:
The hard-wired power cable attached to Miro Cube 2 fixtures can be used with standard 0-10V dimmers to adjust global intensity using the fixtures' Master Dim Mode.
natural_image
Pure electrical circuit lines without any symbolsPurple and Pink wires are to be used with standard 0-10V dimmers. These wires should be properly insulated from all electrical circuits when not used.
NOTE: To achieve proper 0-100% intensity control, high-level and low-level trimming may be required on the 3rd party dimmer depending on the total number of fixtures connected together. A maximum of 200uA will be sourced from each fixture to the dimmer.
Control:
The Miro Cube® 2 must be set to a personality that uses Master Dimmer for use with a 0-10V dimmer. The DMX channel associated with Master Dimmer will set the maximum global brightness, and the 0-10V dimmer will lower the global brightness from that point.
If a 0-10V dimmer is not connected to the Purple and Pink wires, the fixture will ignore 0-10V control.
Personality 5 can be used in conjunction with a 0-10V dimmer without DMX. A user can “lock in” a recipe or color into Personality 5, DMX can be removed and a 0-10V dimmer can be used by itself to adjust intensity.
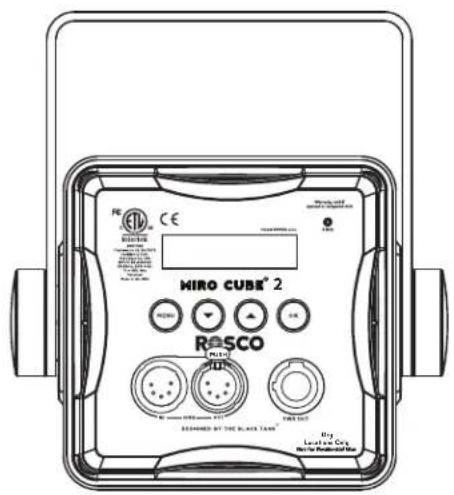
User Interface - Classic Conversion Only
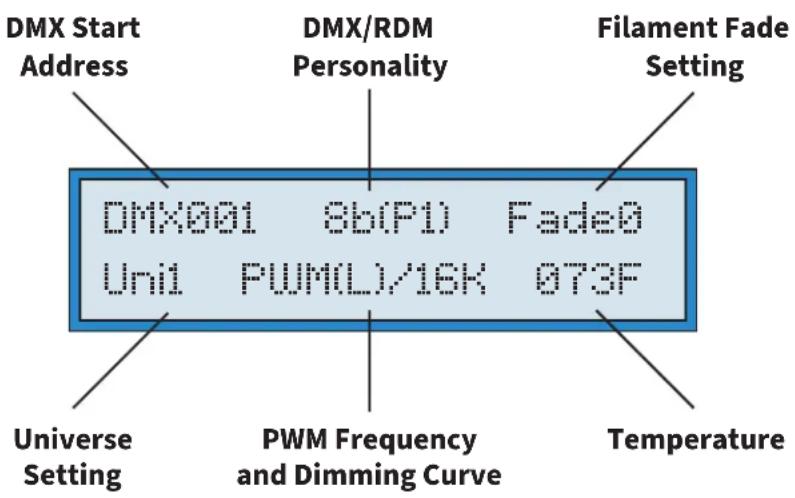
The User Interface allows for your fixture to be controlled without the need of a DMX console or control device. Here is what the interface will look like:
Manual Mode
WARNING: DO NOT CONNECT ANY Miro Cube® 2 IN MANUAL MODE TO ANY OTHER DMX SENDING DEVICE AS CONTENTION ON THE DMX512 INPUT WILL RESULT.
In Manual Mode, the Miro Cube ^® 2 can be controlled directly from its rear panel without the need of a DMX console or a DMX control device. Standalone control capabilities vary according to the factory setting in use (Four Color, Three Color, or One Color). Factory settings are password protected but can be adjusted. See page 21 for password steps.
(All standalone, DMX address and configuration settings are non-volatile, meaning they will not change if power is lost or switched off and restored. When set to manual mode, the Miro Cube operates as a DMX Master and is sending DMX512 data.)
User Interface - Classic Conversion Only
MIRO CUBE® 2 4C & 4CA Manual Mode:
Manual Mode allows you to set the color of your fixture by adjusting the intensity of the LEDs using the rear panel and the LCD display. The current value of each setting is shown on the main screen.
MANUAL Temp=77F
R000 G000 B000 W000
To adjust the color values, press the MENU key until the desired color is listed on the LCD screen. Press OK. Use the ▲ or ▼ keys to select a value between "0" and "255". Then press OK. Press MENU to select the next color.
NOTE: CCT Mode and Master Dimmer can also be enabled and used in Manual Mode with 4C and 4CA fixtures.
MIRO CUBE® 2 WNC Manual Mode:
When set to Manual Mode, the WNC allows you to set the color of your fixture by adjusting the temperature of the LEDs using the rear panel and the LCD display. The current value of each setting is shown on the main screen.
MÁNUAL Temp=77F
WRM000 NEU000 CLD000
To adjust color values, press the MENU key until the desired color is listed on the LCD screen. Press OK. Use the ▲ or ▼ keys to select a value between "0" and "255". Then press OK. Press MENU to select the next color.
Color Temperature: Warm = 2700K | Neutral = 4000K | Cool = 6500K
NOTE: CCT Mode and Master Dimmer can also be enabled and used in Manual Mode with WNC fixtures.
User Interface - Classic Conversion Only
MIRO CUBE® 2 UV365 Manual Mode:
Manual Mode can be used to adjust the brightness of a Miro Cube® 2 UV365. The current brightness level is shown on the main screen.
MANUAL Temp=77F
Brightness = 255
To adjust the color values, press the MENU key until the desired color is listed on the LCD screen. Press OK. Use the ▲ or ▼ keys to select a value between "0" and "255". Then press OK. Press MENU to select the next color.
User Interface - Classic Conversion Only
Color Wash Mode:
Color wash is only available in Miro Cube® 2 4C & 4CA. In Color Wash mode, the Miro Cube automatically cycles through its entire saturated color spectrum by modulating the intensity of the red, green, and blue LEDs.
COLOR WASH Temp=77F
Time00:15 Offset=000
Using the MENU button to toggle through the options select “CHANGE OPERATE MODE” and click OK. Next use the MENU keys to toggle through the options select “COLOR WASH” and click OK. There are two user settings that can be adjusted in Color Wash mode. The current value of each setting is shown on the main screen.
Wash Timer:
The wash timer determines how long it takes for the Miro Cube® 2 to complete an entire color cycle, and, by extension, the rate at which the colors change. Choose a short time for a rapid wash or a longer time for a slower wash. To change the Wash Timer, press MENU and select “CHANGE WASH TIMER?” by pressing OK. Use the ▲ or ▼ keys to select a Wash Time between 15 seconds and 60 minutes (in 15 second intervals).
Wash Offset:
When set to Color Wash Mode, the Miro Cube ^® 2 is operating as a DMX master and is sending DMX512 data, allowing it to control unique color washes on up to fourteen additional fixtures in a chain (set to DMX mode).
NOTE: Slave fixtures should be set to DMX Mode and assigned to channels five, nine, thirteen, etc (in four channel increments).
Use the Wash Offset function to control the interaction between multiple Miro Cube 2 ^™ fixtures in a Color Wash chain. The Wash Offset determines the length of delay between each light, or how long it takes to “pass” a color from one light to the next. Set the Wash Offset to “0” and the lights will color wash in unison, displaying the same color at the same time. Create a multi-fixture Chasing Rainbow effect, where colors pass from light to light, by increasing the Wash Offset. The larger the offset time, the longer it takes for a color to pass to the next light.
To change the Wash Offset, press MENU and select "CHANGE WASH OFFSET?" by pressing OK. Use the ▲ or ▼ keys to select the time delay (up to 511 seconds) between lights.
User Interface - Classic Conversion Only
Serial Mode:
In Serial mode, the unit is controlled by the serial data it receives on the XLR connector located on the rear panel or via MIXconnect™. If your unit does not have Serial Mode you will need to enable it by entering FACTORY SETUP using the MENU button. For the password enter "3270". Using the MENU button to toggle through the options select "CHANGE OPERATE MODE" and click OK. Next use the MENU keys to toggle through the options select "SERIAL" and click OK.
The serial address required to control the fixture is dependent on the factory setting in use (for example - four color Miro Cube ^® 2 fixtures use four Serial Channels while one color MIRO Cube 2 ^™ fixtures use one).
Serial Address:
To change the Serial address, press MENU until "CHANGE SER ADDRESS?" appears on the LCD, and press OK. Select the desired Serial address using the ▲ or ▼ keys, and press OK.
DMX Address
To change the DMX address of the Miro Cube® 2, press MENU until “CHANGE DMX ADDRESS?” appears on the LCD, and press OK. Select the desired DMX address using the ▲ or ▼ keys, and press OK.
DMX Universe 1 or Universe 2
Universe 1 and 2 can be adjusted with the User Interface. To change the Universe of the Miro Cube® 2, press MENU until “SET TO UNIVERSE 2?” appears on the LCD, and press OK. Select the desired DMX address using the ▲ or ▼ keys, and press OK.
DMX Personality
The DMX/RDM Personality can be selected using the User Interface. To change the personality of the Miro Cube® 2, press MENU until “CHANGE PERSONALITY?” appears on the LCD, and press OK. Select the desired DMX personality using the ▲ or ▼ keys, and press OK.
User Interface - Classic Conversion Only
Filament Fade:
An incandescent lamp has a slight delay, or lag with changing intensities, whereas an LED responds instantly. The difference is most noticeable during a theatrical black out. The Miro Cube® 2 can emulate an incandescent lamp by selecting one of the Tungsten Fade settings.
To change the Filament Fade setting, press MENU until “CHANGE FILAMNT FADE?” appears on the screen, and press OK. Using the ▲ and ▼ keys select from “OFF”, “1 (MIN)”, “2 (MID)” or ”3 (MAX)” and press OK. A setting of “3 (MAX)” provides the greatest delay. A setting of “0” will turn the Filament Fade off, and allow the LEDs to respond instantly to changing DMX input.
Ludicrous vs. Standard:
The fixture has two dimming curve modes, Ludicrous and Standard. In Ludicrous Mode, the Miro Cube® 2 increases the brightness up to 4x of any color or CCT. To change to Ludicrous or Standard Mode press MENU until “CHANGE DIMMING CURV?” appears on the LCD, then press OK. Select the desired dimming curve using the ▲ or ▼ keys, and press OK.
Power LED Brightness:
The blue power LED on the rear of the fixture can be adjusted with the User Interface (ENT versions only). To change the power LED Brightness setting, press MENU until “CHANGE POWER LED?” appears on the screen, and press OK. Using the ▲ and ▼ keys select from OFF, MIN, MED and MAX and press OK.
PWM Frequency:
In all personalities except NO PWM mode, the PWM frequency can be set. Typically, faster PWM frequencies are better. The fixture ships in 16khz by default. To change the PWM Frequency setting, press MENU until “SET TO 16KHZ PWM?” or “SET TO 4KHZ PWM?” appears on the screen, and press OK.
OPTI-SCULPT™ Beam Shaping Lenses
The beam angle can be easily adjusted using Rosco OPTI-SCULPT™ beam shaping lenses. Using a Miro Cube® 2 without an OPTI-SCULPT lens will create a narrow beam angle.
NOTE: DISCONNECT THE FIXTURE FROM POWER BEFORE REMOVING THUMBSCREWS.
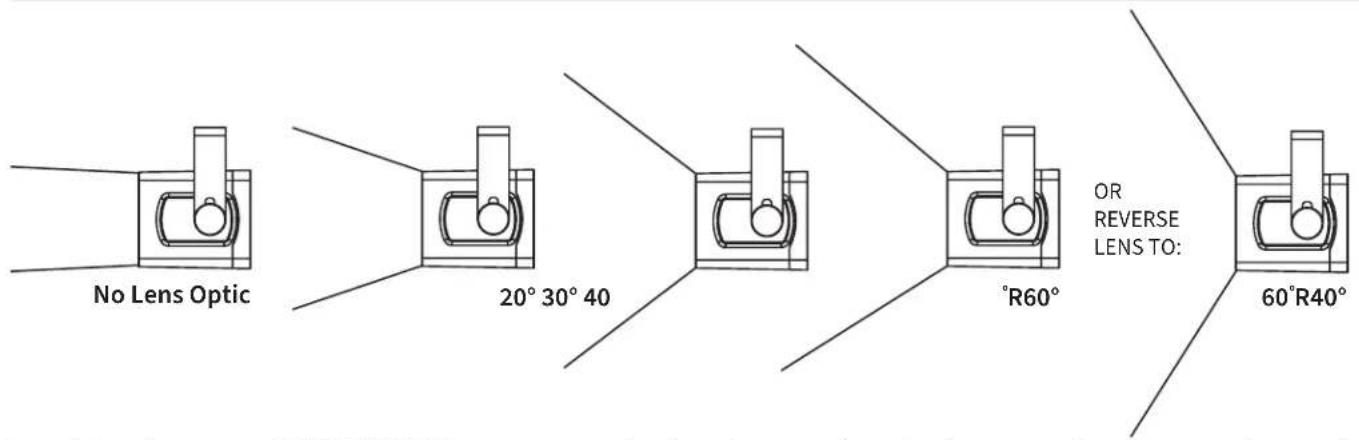
To add or change an OPTI-SCULPT lens, unscrew the thumbscrews from the front panel and remove the acrylic panel. Install the desired OPTI-SCULPT onto the posts. Place the acrylic panel on top and re-secure it with the four thumbscrews.

natural_image
Technical line drawing of a mechanical housing with mounting holes and a separate view showing angular dimensions (20°, 30°, 40°) without any text or symbols.NOTE: Miro Cube 2 4C, 4CA, and WNC fixtures ship with an OPTI-SCULPT Lens Kit that contains three Rosco OPTI-SCULPT Lenses: 20°, 30°, and the reversible 40°R60°. All of the other individual OPTI-SCULPT lenses are available for the Miro Cube 2 as well. Visit the Rosco OPTI-SCULPT product page to learn more about these unique beam-shaping lenses.
OPTI-SCULPT is not intended for use with the Miro Cube 2 UV365 black light. The UV365 model ships with a custom-engineered 10° Lens Optic that attaches to the fixture via the same style of thumbscrews. A 22° Lens Optic accessory is also available if a wider beam spread is needed.