Black BK-T61 - Loudspeaker OSD Audio - Free user manual and instructions
Find the device manual for free Black BK-T61 OSD Audio in PDF.


| Product Type | Passive Bookshelf Speaker |
| Speaker Configuration | 2-way |
| Woofer Size | 6.5 inches |
| Tweeter Size | 1 inch silk dome |
| Impedance | 8 ohms |
| Sensitivity | 90 dB |
| Frequency Response | 50 Hz - 20 kHz |
| Power Handling (RMS) | 100 watts |
| Power Handling (Peak) | 200 watts |
| Cabinet Material | MDF with vinyl finish |
| Grille | Detachable black cloth |
| Connector Type | 5-way binding posts |
| Mounting Options | Bookshelf or wall mount via keyhole slot |
| Dimensions (H x W x D) | 14 x 8.5 x 10 inches |
| Weight per Speaker | 12 lbs |
| Recommended Amplifier Power | 20 - 150 watts per channel |
| Warranty | 5 years |
| Application | Home theater or stereo listening |
Frequently Asked Questions - Black BK-T61 OSD Audio
User questions about Black BK-T61 OSD Audio
0 question about this device. Answer the ones you know or ask your own.
Ask a new question about this device
Download the instructions for your Loudspeaker in PDF format for free! Find your manual Black BK-T61 - OSD Audio and take your electronic device back in hand. On this page are published all the documents necessary for the use of your device. Black BK-T61 by OSD Audio.
USER MANUAL Black BK-T61 OSD Audio
- Pencil - Wire Cutter - Safety Eye Wear
- Drill - Phillips Screwdriver - Gloves
- Tape Measure - Utility Knife - Sandpaper
18AWG minimum - for distances up to 10 ft
16AWG - from 10 to 50 ft
14AWG - from 50 to 100 ft
Considerations
- Where is the best place to install the speakers?
- Where do the speakers sound the best?
-
Separate the speakers 6 - 10 feet apart.
-
(For Ceiling LCR models only) Place speakers with the 15° angled woofer pointed towards the main listening area.
- If you intend to paint the grilles, do so before installation.
Placement
There are many options for proper speaker placement depending upon speaker type and application. It's important to carefully plan the placement of your speakers, as installation requires that you cut a hole in your wall or ceiling.
(See Diagram 1.) Typical speaker placement for a 5.1 and 7.1 speaker system.
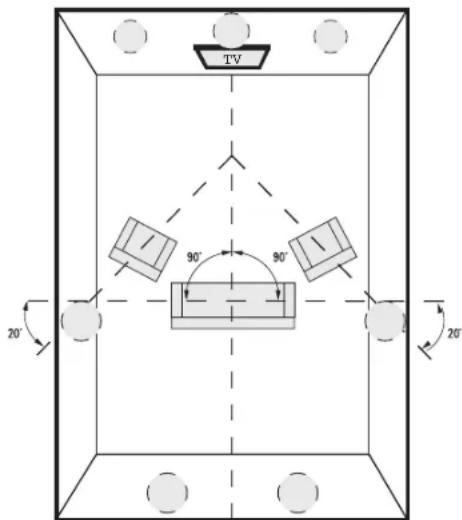
Diagram 1
Installation:
Cut Out
NOTE: This is the most important part of the entire installation. If you are not certain whether any obstructions exist behind the desired mounting area, you should start by cutting a small hole in the center of your penciled mounting hole with a drywall saw.
Trace along the included template. Cut along the traced line using a drywall saw or rotary drill. Use a piece of sandpaper to sand down the cut out edge for a smoother contour. (See Diagram 2.)
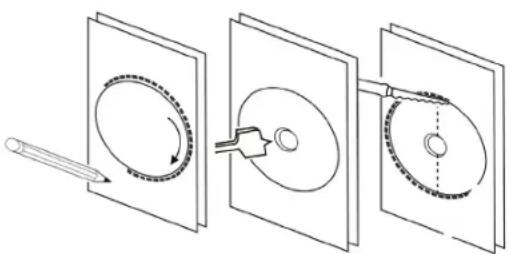
Diagram 2

BLACK SERIES INSTALL GUIDE
SPECIFICATIONS

Mounting
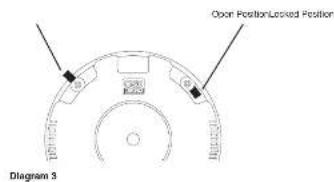
Tighten the mounting brackets by simply turning the screws on the front of the speaker battle slowly clockwise. The quick-turn mounting system and frame will "sandwich" or clamp around the dry-wall to hold the speaker securely in place once fully tightened to the locked position.
(See Diagram 3.)
Connection
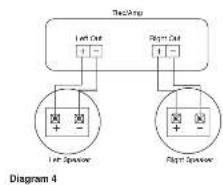
When connecting any speakers to the amplifier or receiver, always make sure the power is off. Locate the connection terms on the back of your receiver or amplifier. Always make sure to connect audio out from the back of your receiver or amplifier to the speakers. (See Diagram 4.)
NOTE: Not all Amplifier/Receivers can safely play more than one pair of speakers at once. Please refer to your owner's manual for impedance and wattage compatibility.
Adjustment
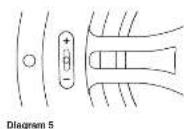
On select models ('Performance, Reference') of OSD Black Series, a front mounted 3-position ±3dB table contour switch can be used to tailor high frequencies according to speaker placement or the listeners preference. (See Diagram 5.)
* Excludes Shallow Mount Series
Pivoting Tweeter
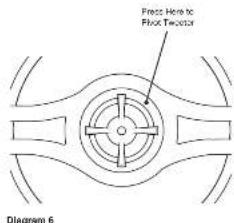
Your Black series speaker comes from the factory with the tweeter centered in the neutral position. This will provide the smoothest response. However, select models come with a pivoting tweeter so you can focus the sound directly towards the listening area if needed. In order to do this, carefully press on the edge of the tweeter battle in the direction you wish to focus the sound. (See Diagram 6.)
CAUTION: When adjusting the pivoting tweeter be sure not to touch the dome as you may cause damage to the speaker.
flowchart
graph TD
    A["Two-Part"] --> B["Left Cut"]
    A --> C["Right Cut"]
    B --> D["Left Operator"]
    C --> E["Right Operator"]
    D --> F["+"]
    E --> G["-"]
    style A fill:#f9f,stroke:#333
    style B fill:#ccf,stroke:#333
    style C fill:#ccf,stroke:#333
    style D fill:#cfc,stroke:#333
    style E fill:#cfc,stroke:#333
| Model Description Wooler Tweeter | Freq Response | Power Sensitivity Impedance Dimension Depth Cut Out | ||||||||
| R51 | Ceiling Sputter A3/2024 | S 2.5" Pority W/ British Carried | S 7" Pority C/6 Box 2 Box | C 2 Box | T 5W | X 500 | L 2 Box | X 2 | X 61 | X 7 |
| R52 | Ceiling Sputter A3/2024 | S 3" Pority W/ British Carried | S 7" Pority C/6 Box 2 Box | X 7 Box | X 8W | X 8W | L 2 Box | X 7 | X 91 | X 9 |
| R53 | Ceiling Sputter A3/2024 | S 2" Pority W/ British Carried | S 7" Pority C/6 Box 2 Box | X 7 Box | X 10W | X 10W | L 2 Box | X 7 | X 91 | X 9 |
| R61 | Ceiling Sputter A3/2024 | S 2" Pority W/ British Carried | S 7" Pority C/6 Box 2 Box | X 7 Box | X 10W | X 600 | L 2 Box | X 7 | X 91 | X 9 |
| R82 | Ceiling Sputter A3/2024 | S 3" Pority W/ British Carried | S 7" Pority C/6 Box 2 Box | X 7 Box | X 10W | X 10W | L 2 Box | X 7 | X 91 | X 9 |
| R53 | Ceiling Sputter A3/2024 | S 2" Pority W/ British Carried | S 7" Pority C/6 Box 2 Box | X 7 Box | X 10W | X 10W | L 2 Box | X 7 | X 91 | X 91 |
| R62DT | Ceiling Sputter A3/2024 | S 3" Pority W/ British Carried | S 7" Pority C/6 Box 2 Box | X 7 Box | X 10W | X 600 | L 2 Box | X 7 | X 91 | X 9 |
| R82A | Ceiling Sputter A3/2024 | S 3" Pority W/ British Carried | S 7" Pority C/6 Box 2 Box | X 7 Box | X 10W | X 10W | L 2 Box | X 7 | X 91 | X 9 |
| R83A | Ceiling Sputter A3/2024 | S 3" Pority W/ British Carried | S 7" Pority C/6 Box 2 Box | X 7 Box | X 10W | X 600 | L 2 Box | X 7 | X 91 | X 9 |
| R81 | Ceiling Sputter A3/2024 | S 3" Pority W/ British Carried | S 7" Pority C/6 Box 2 Box | X 7 Box | X 10W | X 600 | L 2 Box | X 7 | X 91 | X 9 |
| R82 | Ceiling Sputter A3/2024 | S 3" Pority W/ British Carried | S 7" Pority C/6 Box C/6 Box | X 7 Box | X 10W | X 600 | L 2 Box | X 7 | X 91 | X 9 |
| R83 | Ceiling Sputter A3/2024 | S 3" Pority W/ British Carried | S 7" Pority C/6 Box C/6 Box | X 7 Box | X 10W | X 10W | L 2 Box | X 7 | X 91 | X 9 |
| R83DT | Ceiling Sputter A3/2024 | S 3" Pority W/ British Carried | S 7" Pority C/6 Box C/6 Box | X 7 Box | X 10W | X 600 | L 2 Box | X 7 | X 91 | X 9 |
| R82DT | Ceiling Sputter A3/2024 | S 3" Pority W/ British Carried | S 7" Pority C/6 Box C/6 Box | X 7 Box | X 10W | X 600 | L 2 Box | X 7 | X 91 | X 9 |
| R82A | Ceiling Sputter A3/2024 | S 3" Pority W/ British Carried | S 7" Pority C/6 Box C/6 Box | X 7 Box | X 10W | X 600 | L 2 Box | X 7 | X 91 | X 9 |
| R83A | Ceiling Sputter A3/2024 | S 3" Pority W/ British Carried | S 7" Pority C/6 Box C/6 Box | X 7 Box | X 10W | X 10W | L 2 Box | X 7 | X 91 | X 9 |
| R62 SM | Heating Sputter White Coat Diameter Bevel and Tangle | L 2" Box | L 7" Box | X 7 Box | X 10W | X 600 | L 2 Box | X 7 | X 91 | X 9 |
| R62 SM | Heating Sputter White Coat Diameter Bevel and Tangle | L 2" Box | L 7" Box | X 7 Box | X 10W | X 10W | L 2 Box | X 7 | X 91 | X 9 |
| R62SS | Heating Sputter White Coat Diameter Bevel and Tangle | L 2" Box | L 7" Box | X 7 Box | X 10W | X 10W | L 2 Box | X 7 | X 91 | X 9 |
| T52LCR | Heating Sputter White Coat Diameter Bevel and Tangle | L 2" Box | L 7" Box | X 7 Box | X 10W | X 600 | L 2 Box | X 7 | X 91 | X 91 |
| T53LCR | Heating Sputter White Coat Diameter Bevel and Tangle | L 2" Box | L 7" Box | X 7 Box | X 10W | X 600 | L 2 Box | X 7 | X 91 | X 91 |
| T61 | Heating Sputter White Coat Diameter Bevel and Tangle | L 2" Pority W/ British Carried | S 7" Pority C/6 Box C/6 Box | X 7 Box | X 10W | X 600 | L 2 Box | X 7 | X 91 | X 91 |
| T62 | Heating Sputter White Coat Diameter Bevel and Tangle | L 2" Pority W/ British Carried | S 7" Pority C/6 Box C/6 Box | X 7 Box | X 10W | X 10W | L 2 Box | X 7 | X 91 | X 91 |
| T63 | Heating Sputter White Coat Diameter Bevel and Tangle | L 2" Pority W/ British Carried | S 7" Pority C/6 Box C/6 Box | X 7 Box | X 10W | X 600 | L 2 Box | X 7 | X 91 | X 91 |
| T81 | Heating Sputter White Coat Diameter Bevel and Tangle | L 2" Pority W/ British Carried | S 7" Pority C/6 Box C/6 Box | X 7 Box | X 10W | X 600 | L 2 Box | X 7 | X 91 | X 91 |
| T82 | Heating Sputter White Coat Diameter Bevel and Tangle | L 2" Pority W/ British Carried | S 7" Pority C/6 Box C/6 Box | X 7 Box | X 10W | X 600 | L 2 Box | X 7 | X 91 | X 91 |
| T83 | Heating Sputter White Coat Diameter Bevel and Tangle | L 2" Pority W/ British Carried | S 7" Pority C/6 Box C/6 Box | X 7 Box | X 10W | X 10W | L 2 Box | X 7 | X 91 | X 91 |
NOTE: All specification and dimensions are subject to change without notice.
All Optimal Speaker Design speaker products have Limited Lifetime Warranty against defects in materials and workmanship. Proof of purchase must accompany all claims. During the warranty period Optimal Speaker Design will replace any defective part and correct any defect in workmanship without charge for either parts or labor Optimal Speaker Design may replace returned speakers with a product of equal value and performance. In such cases, some modification to the mounting may be necessary and are not Optimal Speaker Designs responsibility.
For this warranty to apply, the unit must be installed and used according to its written instructions. If necessary, repairs must be performed by Optimal Speaker Design. The unit must be returned to Optimal Speaker Design at the owner's expense and with prior written permission. Accidental damage and shipping damage are not considered defects, nor is damaged resulting from abuse or from servicing performed by an agency or person not specifically authorized in writing by Optimal Speaker Design
Optimal Speaker Design sells products only through authorized dealers and distributors to ensure that customers obtain proper support and service. Any Optimal Speaker Design product purchased from an unauthorized dealer or other source, including retailers, mail over dealers and on-line sellers will not be honored or serviced under existing Optimal Speaker Design warranty policy. Any sale of product by an unauthorized source or other manner not authorized by Optimal Speaker Design shall void the warranty on the applicable product.
Damage to or destruction of components due to application of excessive power voids the warranty on those parts. In these cases, repairs will be made on the basis of the retail value of the parts and labor. To return for repairs, you must email customer service at RMA@audiogeargroup.com for a Returned Merchandise Authorization (RMA) number# then the unit must be shipped to Optimal Speaker Design at the owner's expense, along with a note explaining the nature of service required. Be sure to pack the speaker(s) in a corrugated container with at least 3 inches of resilient material to protect the unit from damage in transit.
This Warranty Does Not Cover: Damage caused by abuse, accident, misuse, negligence, or improper operation (installation) • Any products that have been altered or modified • Any product whose identifying number of decal, serial #, etc. has been altered, defaced or removed • Normal wear and maintenance.
Brand : OSD Audio
Model : Black BK-T61
Category : Loudspeaker