Jumbo Oval O200 - Trampoline Springfree - Free user manual and instructions
Find the device manual for free Jumbo Oval O200 Springfree in PDF.

| Product Type | Oval Trampoline |
| Model | Jumbo Oval O200 |
| Brand | Springfree |
| Shape | Oval |
| Overall Dimensions | Approx. 508 x 305 cm (200 x 120 inches) |
| Jumping Surface Size | Approx. 366 x 213 cm (144 x 84 inches) |
| Weight Capacity | 250 kg (550 lbs) |
| Net Height | 190 cm (75 inches) |
| Safety System | Springless design with flexible composite rods and full enclosure net |
| Frame Material | Galvanized steel with anti-rust coating |
| Mat Material | UV-treated polypropylene |
| Rod Material | Flexible composite (springless) |
| Pad Material | Foam padding covering rods |
| Recommended Age | 6 years and up |
| Assembly Required | Yes, requires 2-3 adults, approx. 5-6 hours |
| Power Source | None (manual operation) |
| Warranty | 10 years frame, 2 years mat and net |
| Maintenance | Regularly check frame, rods, net, and padding; clean with mild soap |
| Cleaning | Wipe with damp cloth; avoid harsh chemicals |
| Accessories Included | Enclosure net, rod padding, anchor kit |
| Optional Accessories | Weather cover, ladder, basketball hoop |
| Repairability | Replacement parts available (mat, net, rods, padding) |
Frequently Asked Questions - Jumbo Oval O200 Springfree
User questions about Jumbo Oval O200 Springfree
0 question about this device. Answer the ones you know or ask your own.
Ask a new question about this device
Download the instructions for your Trampoline in PDF format for free! Find your manual Jumbo Oval O200 - Springfree and take your electronic device back in hand. On this page are published all the documents necessary for the use of your device. Jumbo Oval O200 by Springfree.
USER MANUAL Jumbo Oval O200 Springfree
natural_image
A young girl jumping on a black trampoline outdoors, surrounded by green trees (no text or symbols visible)North America:
1 877 JUMP SAFE / 1 877 586 7723
www.springfree.com
UK:
01276477461
sales@rainbowplaysystems.co.uk
www.springfreetrampoline.co.uk
Australia:
1800586772
www.springfreetrampoline.com.au
New Zealand:
0800586772
www.springfreetrampoline.co.nz


WARNING/ATTENTION!
READ THESE WARNINGS AND MATERIALS BEFORE ASSEMBLY AND USE OF THE TRAMPOLINE AND ENCLOSURE.
TRAMPOLINE AND ENCLOSURE ASSEMBLY, INSTALLATION, CARE, MAINTENANCE, SAFETY, AND USE INSTRUCTIONS

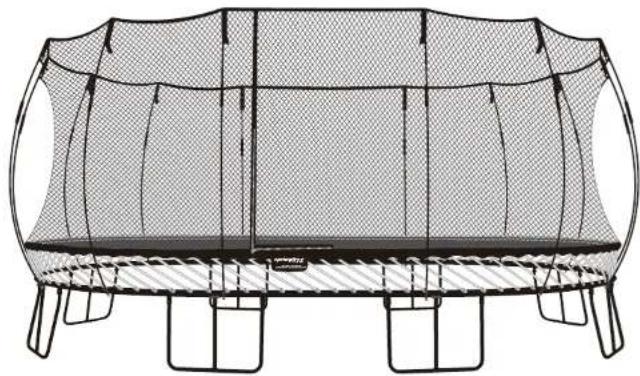
200
JUMBO OVAL

natural_image
Technical line drawing of a trampoline with mesh netting and support legs (no text or symbols)| MAT DIAMETER | MINIMUM NET HEIGHT FROM MAT | MAT HEIGHT FROM GROUND | MAXIMUM USER WEIGHT |
| 19 ft x 12 ft (5.7 m x 3.8 m) | 6 ft (1.8 m) | 3.3 ft (1 m) | 220 lbs (100 kg) |

WARNING
READ THESE WARNINGS AND MATERIALS BEFORE ASSEMBLY AND USE OF THE TRAMPOLINE AND ENCLOSURE.

Treat any loaded rod with caution until you are sure it is properly installed or uninstalled. Keep face clear of loaded rods. An improperly installed rod could release and cause facial injury or blindness.

No more than one person at a time. Multiple jumpers increase the chances of loss of control and collision and can result in serious head, neck, back, leg, arm or other injuries.

No somersaults or flips. Landing on the head or neck can cause serious injury, paralysis, or death, even when landing in the middle of the bed.

Never remove a net rod from its net rod pocket or disengage (unlock) the metal joiner while the net rod is under tension.

Do not hold onto, or place fingers between the rods while someone is jumping on the trampoline.

If you anticipate severe weather, consider lowering the enclosure, moving the trampoline to a sheltered location or disassembling the trampoline completely.

The trampoline is not intended for children under 6 years of age as entrapment hazards may result.

The Maximum User Weight for this trampoline is located on the front panel of this manual. Jumpers at or near the Maximum User Weight should take extra precautions in their manoeuvres to ensure they do not initiate contact with the ground while jumping as this can cause serious injury.

WARNING
READ THESE WARNINGS AND MATERIALS BEFORE ASSEMBLY AND USE OF THE TRAMPOLINE AND ENCLOSURE.
- Two people are recommended for assembly.
- Keep small children at least 25 ft (7.5 m) away while assembling the trampoline; they could be injured by improperly assembled rods releasing and ejecting from the frame.
- Be aware that when loaded, the rods can spring back and may cause injury. Keep your face well clear of the rods during assembly or disassembly. An improperly installed rod could release and cause facial injury or blindness.
- The sleeves on the rods are intended to provide protection from fibers or splinters. Do not remove. If they are damaged, replace them.
- Only use approved Springfree® Trampoline accessories, and install in accordance to installation instructions. Do not make modifications to the trampoline or accessories.
- Use trampoline/enclosure only with mature, knowledgeable supervision. Enforce all safety rules and be familiar with these warnings and materials to assist in following trampoline enclosure instructions and trampoline safety.
Properly secure the trampoline against unauthorized and unsupervised jumping when not in use. If a trampoline ladder is used, the supervisor should remove it from the trampoline when leaving the area to prevent unsupervised access.
8. Record the purchase date of your trampoline on the net serial number tag. It is located under the net warnings, which are sewn into the edge of the net next to the entrance.
9. Do not attempt to use the trampoline / enclosure until it is completely assembled.
10. The owner and supervisor of the trampoline/enclosure are responsible for ensuring all users are aware of the warnings and practices specified.
11. The enclosure is only to be used as an enclosure for a trampoline and the trampoline must be of the appropriate size and model as specified by and supplied by Springfree Trampoline.
12. The trampoline shall be assembled by an adult in accordance with the Assembly Instructions and thereafter checked before the first use.
13. Do not bury the trampoline as this can alter the safety elements of the trampoline and may result in injury.
14. Ensure that you follow the instructions as set out in the Assembly Instructions supplied.

WARNING
READ THESE WARNINGS AND MATERIALS BEFORE ASSEMBLY AND USE OF THE TRAMPOLINE AND ENCLOSURE.
INSTALLATION AND PLACEMENT
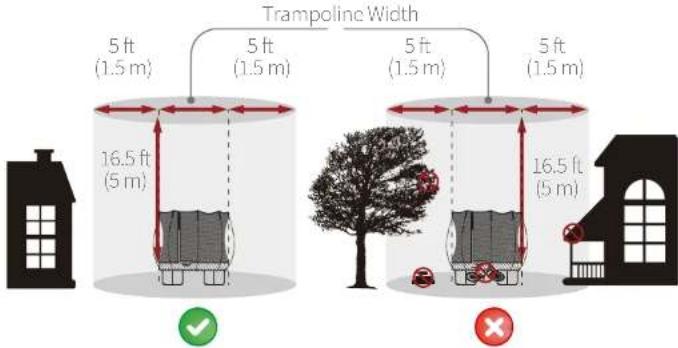
- Maintain a minimum clearance of 16.5 ft. (5m) above the mat [in USA and Canada, 24 ft. (7.3m) above the trampoline from ground level] in order to prevent users from inadvertently contacting overhead hazards such as electrical wires, tree limbs or clotheslines.
-
Maintain a minimum clearance of 5 ft. (1.5m) [in EU countries, 6.5 ft. (2.0m)] on all sides of the trampoline. This area should not include concrete, bitumen, brick or other hard surfaces or be in the proximity of other conflicting installations (e.g. pools, swings, slides, and climbing frames) as these can cause serious injuries if users fall off the trampoline.
-
Place the trampoline on a flat level surface with impact attenuating properties such as grass and ensure that it is sufficiently stable to prevent it from tipping over and/or blowing away.
- Place the trampoline/enclosure in a well-lit area. Artificial illumination may be required for indoor or shady areas.
- Do not locate the trampoline on top of other objects or store anything underneath the trampoline bed. Make sure that the area around, underneath and above the trampoline is clear of objects that could interfere with the person jumping. Do not allow children, pets, toys or other play equipment to be present under the trampoline.
- The trampoline is intended for indoor/outdoor usage. Refer to Trampoline Location Information above.
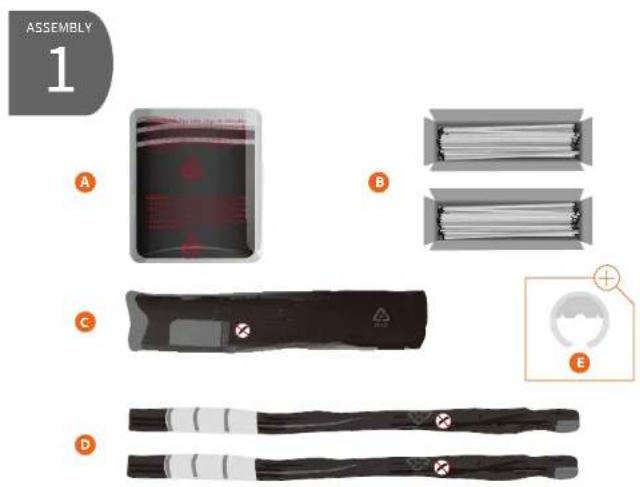
| Part | Quantity Part Quantity | ||
| A. Mat | 1 | D. Net Rods + Horizontal Rods | 14+2 |
| B. Mat Rods | 100 | E. Spare C clips | 2 |
| C. Net | 1 | ||
- Lay out the parts as shown.

| Part | Quantity Part Quantity | ||
| A. Curved Frame Sections | 6 | F. Tools | 2 |
| B. Straight Frame Sections | 2 | G. C-clips (Attached to Frame) | 14 |
| C. Bent Legs (Orange Sticker) | 4 | H. Small Bolts & Nuts | 16 |
| D. Legs (Yellow Sticker) | 4 | I. Large Bolts & Nuts | 8 |
| E. Center Posts | 8 | ||
- Lay out the remaining parts as shown. The colored stickers all face upwards.
- If you are missing any parts please contact Springfree Trampoline directly.

WARNING - Use the tools provided to fasten the nuts. Do not over tighten the nuts. The use of power tools may cause serious damage to the trampoline.

- Position the frame sections together.
- Connect and fasten frame sections using the large nuts and bolts. When finished, the bolt head should be flush with the frame and the nut should face the center of the trampoline.
- Attach a center post to the middle of each leg section.
- Then, in the order shown, carefully lift the frame and evenly insert the legs into the leg sockets on the underside of the frame.
- Fasten each leg to the frame using the small nuts and bolts before going to the next leg.

TIP - Fastening the final two frame sections often requires additional effort. Two people are required for assembly.
TIP - When installing the legs, it is easiest when one person to holds the frame up and horizontal while the other person inserts the legs into the leg sockets.
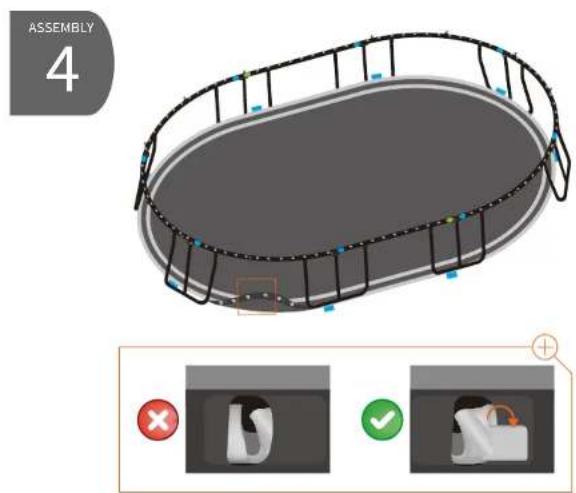
- Lay out the mat with the gray banding facing upwards inside the trampoline frame.
- The blue ■ tags on the mat should approximately align with the blue ● stickers on the frame.
- Before moving to the next step, ensure that the mat rod holders are correctly positioned with the mat rod holder tab outside the mat rod holder pocket, as per the insert. If the mat rod holder tab is inside the pocket, adjust accordingly.
- Locate the green ▪ tag on the bottom edge of the net and match it with any green ● sticker on your trampoline frame.
- Holding the net so that the green □ tag is facing you, gently place the rest of the net inside the frame as shown. DO NOT let go of the green □ tag.
- Put a mat rod through the hole to the immediate left of the green ■ tag in the net and then into the mat rod socket next to the green ● sticker.
- Then, working carefully around the frame, insert the remaining mat rods through the net holes and into the corresponding mat rod socket. When finished, the net should be stretched tightly around the OUTSIDE of the frame.
- Be sure that the mat rods are seated down to the bottom of each mat rod socket.

NOTE - As you install the mat rods into the mat rod sockets the net will become tight against the frame. Handle the net with care and be sure that it does not get caught or it may tear. NOTE - The net must be installed BEFORE installing the mat.

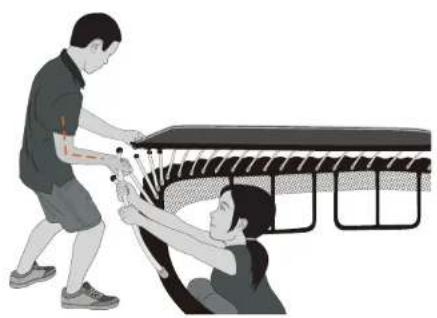
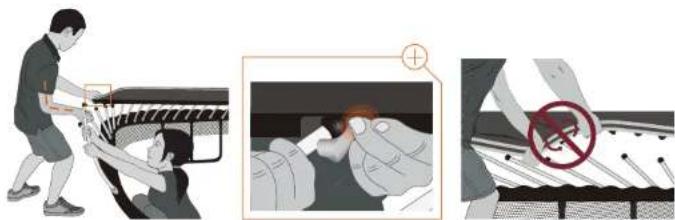
ROD INSTALLATION TECHNIQUE
Please read before continuing. DO NOT INSTALL any of the mat rods yet.
natural_image
Illustration of two people handling a large object, possibly a table or bench, with no visible text or symbols.Outside Person:
- Hold the mat rod near the ball end with your palm facing up and bend your arm at a right angle as shown.
- Hold the mat edge with your other hand.
- Pull your elbow into your hip and always push using your body weight.
Inside Person:
- Hold the mat rod with both hands as shown to assist the outside person.
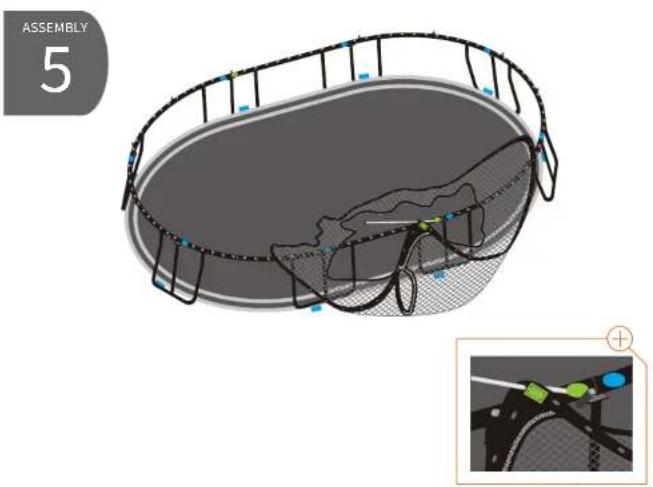
ASSEMBLY
6b
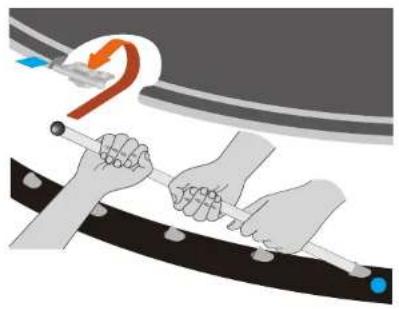
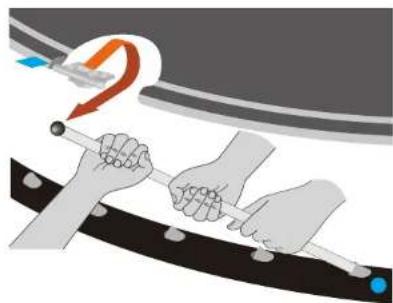
ROD INSTALLATION TECHNIQUE
Please read before continuing. DO NOT INSTALL any of the mat rods yet.
natural_image
Illustration of hands using a tool to interact with a curved object, no text or symbols presentOutside Person:
- Push the mat rod, guiding the ball along the path shown, into the mat rod holder.
• In one swift movement:
Forward and under the mat rod holder. - Up until the ball hits the mat underside.
- Back towards you, guiding the ball into the mat rod holder.
Inside Person:
- Pull the mat rod to assist the outside person in guiding the ball.
- Maintain a steady grip until the ball is securely installed in the mat rod holder.

TIP - Keep the mat level when you install or uninstall the mat rods. TIP - If you need to uninstall a mat rod, see the Disassembly Instructions.
ASSEMBLY
7a
FIRST ROD INSTALL
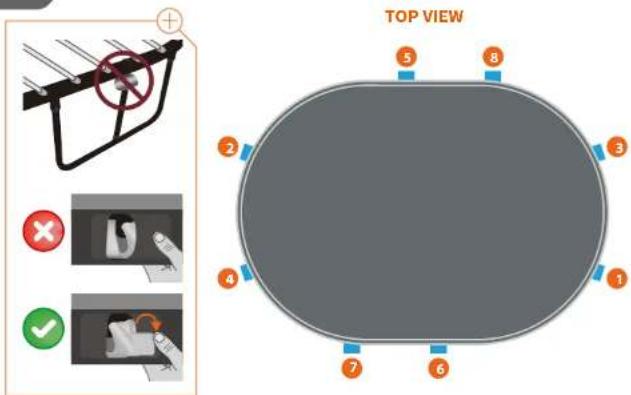
- Check that the center post of every leg is correctly seated under the trampoline frame. If they are not, adjust them now.
- Check every mat rod holder tab is outside the mat rod holder pocket.
- At position 1 find the blue ● sticker on the frame and the blue ■ tag on the mat.
- Install the mat rod at the blue ● sticker location into the mat rod holder at the blue tag location.
- Repeat at position 2. Pulling the mat edge while pushing the mat rod will be required to install this second rod.
- Continue installing one rod at each of the remaining positions 3,5,7,8
- Move to Step 7b.

WARNING - Treat any loaded rod with caution until you are sure it is properly installed or uninstalled. Keep your face well away from any loaded rod.

NOTE - Following the sequence shown spreads the tension evenly across the mat. If you do not follow this sequence, it will be very difficult to attach the mat.
ASSEMBLY
7b
REMAINING ROD INSTALL
flowchart
graph TD
    A["Top View"] --> B["Arrow to Top View"]
    B --> C["Arrow to Top View"]
    C --> D["Arrow to Top View"]
    D --> E["Arrow to Top View"]
    E --> F["Arrow to Top View"]
    F --> G["Arrow to Top View"]
    G --> H["Arrow to Top View"]
    H --> I["Arrow to Top View"]
    I --> J["Arrow to Top View"]
    J --> K["Arrow to Top View"]
    K --> L["Arrow to Top View"]
    L --> M["Arrow to Top View"]
    M --> N["Arrow to Top View"]
    N --> O["Arrow to Top View"]
    O --> P["Arrow to Top View"]
    P --> Q["Arrow to Top View"]
    Q --> R["Arrow to Top View"]
    R --> S["Arrow to Top View"]
    S --> T["Arrow to Top View"]
    T --> U["Arrow to Top View"]
    U --> V["Arrow to Top View"]
    V --> W["Arrow to Top View"]
    W --> X["Arrow to Top View"]
    X --> Y["Arrow to Top View"]
    Y --> Z["Arrow to Top View"]
- Complete Step 7a before continuing.
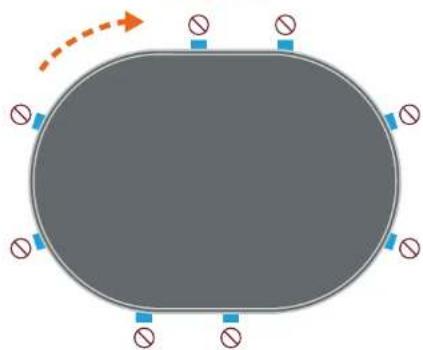
- Start at any blue - tag location and install two additional mat rods into the mat rod holders: one to the right and one to the left of the already installed mat rod.
- Move clockwise to the next blue ▪ tag location and repeat the above step.
- Continue clockwise installing two additional mat rods at every blue ▪ tag location, several times around the trampoline, until all of the rods are installed.

WARNING - Treat any loaded rod with caution until you are sure it is properly installed or uninstalled. Keep your face well away from any loaded rod.

NOTE - Following the sequence shown spreads the tension evenly across the mat. If you do not follow this sequence, it will be very difficult to attach the mat.
ASSEMBLY
8
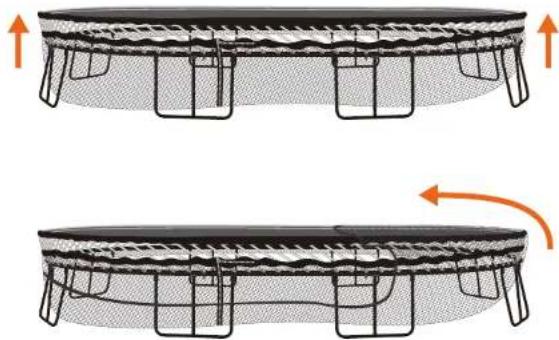
natural_image
Two identical diagrams showing a mat with mesh structure and rotation arrows, no text or symbols present.- Moving clockwise around the frame, carefully slide the net up to the top of the mat rods.
- Then, starting at one of the blue stickers on the curved frames, gently and slowly pull the net up and over the edge of the mat. It is normal for the net to be tight. Take extra care not to tug the net and check that the net is not snagged on the trampoline frame or the bolts.
- Working slowly around the frame, carefully lift the rest of the net over the edge of the mat until the bottom band of the net is pulled all the way to the top of the mat rods.

WARNING - Do not use the trampoline until it is completely assembled. Failure to follow these instructions may cause rods to break or eject from the trampoline frame.

NOTE - Check that the net is not caught on the trampoline frame or the bolts or under the legs; if the net catches, it may tear.
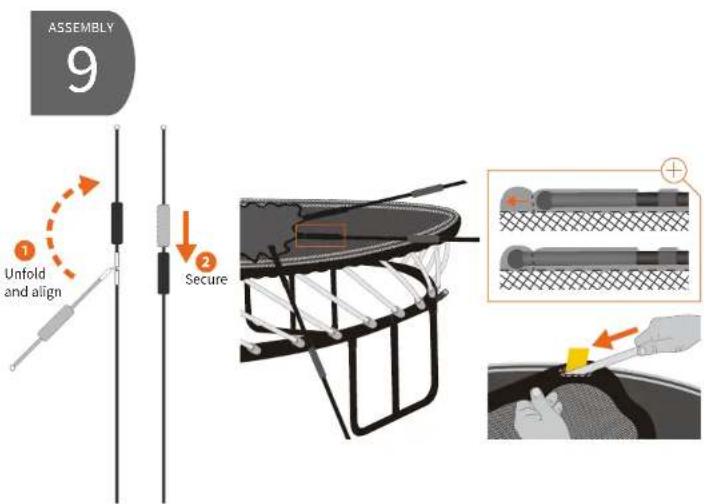
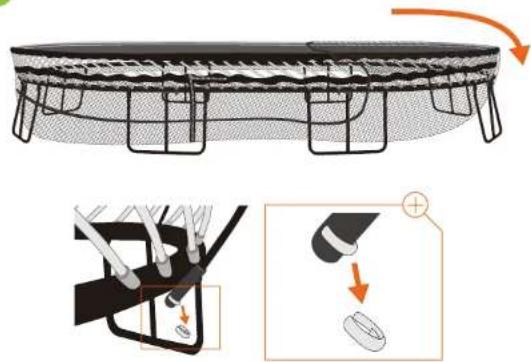
- Locate the yellow ☐ tags along the top edge of the net. Select one of the horizontal net rods and slide it into the pocket at the yellow ☐ tag. It is normal for the rod to be a tight fit. Once fully inserted, tuck the end of the rod into the pocket and check that the rod is centered within the pocket.
- Repeat on the other side of the trampoline.
- Assemble the net rods as shown.
- Locate the pockets at the top edge of the net and install all of the net rods.
- Take care to fully push the ball of the net rod into the pocket as shown. There is an internal catch at the top of the pocket and the ball must be pushed past this internal catch or else it will come out. You will feel some resistance as the ball is pushed through.

WARNING - Treat any loaded rod with caution until you are sure it is properly installed or uninstalled. Keep your face well away from any loaded rod.

NOTE - If you purchased a FlexrHoop™ with your trampoline, you could stop and install it right now. This will save you a couple of steps later.
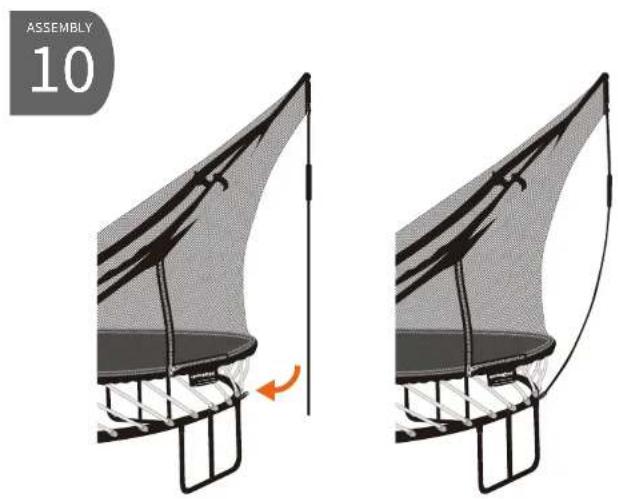
natural_image
Two identical diagrams of a trampoline netting setup, showing structural deformation with no text or symbols.- To install the net, raise the net rods and carefully flex the bottom of the rods into the corresponding net rod socket on the trampoline frame. Take care to completely insert the net rod into the socket. You will hear a click when the net rod is fully seated.
- Ensure the sleeve does not slide down the net rod as this prevents the c-clip from engaging the groove at the bottom of the net rod.
- Congratulations! You have successfully installed your trampoline. Happy bouncing!

WARNING - Never remove a net rod from its net rod pocket or disengage (unlock) the metal joiner while the net rod is under tension. First, remove the net rod from the net rod socket on the frame. Always ensure a solid grip when handling and do not stand directly in front of the rods.

TIP - For added safety, and stability, it is recommended to secure your trampoline to prevent displacement especially in areas of harsh weather conditions. Springfree Ground Anchors are available for purchase from www.springfree.com.

Outside Person:
- Remove the c-clips located on the net rod sockets. Lift the bottom end of the net rods out of the net rod sockets and lower the net.
- Remove the net rods from the net rod pockets and lay them flat on the ground.
- Replace the c-clips in the net rod sockets to keep them safe.
- Starting at one end, carefully pull the top edge of the net down over the edge of the mat. Continue around the trampoline until the net is sitting at the bottom of the mat rods.

WARNING - Do not remove the legs until the end of the last step. Failure to follow these steps in the correct order could cause serious injury or damage the trampoline.
WARNING - Never remove a net rod from its net rod pocket or disengage (unlock) the metal joiner while the net rod is under tension. First, remove the net rod from the net rod socket on the frame. Always ensure a solid grip when handling and do not stand directly in front of the rods.
DISASSEMBLY
2a
ROD REMOVAL TECHNIQUE
Please read before continuing. Do not remove any of the mat rods yet.
natural_image
Illustration showing a person using a piano keyboard to adjust the keyboard, with an inset close-up of hands performing hand gestures (no text or symbols present)Outside Person:
- When you remove a rod from the mat, do not twist or rotate the mat edge. This could cause serious injury or damage the trampoline.
- Hold the mat edge flat with your left hand as shown. Push up behind the mat rod holder tab without obstructing the opening. This prevents the ball from catching in the mat.
- Hold the mat rod near the ball end with your palm facing up and bend your arm at a right angle as shown.
- Pull your elbow into your hip and always push using your body weight.
Inside Person:
- Hold the mat rod with both hands as shown to assist the outside person.
DISASSEMBLY
2b
ROD REMOVAL TECHNIQUE
Please read before continuing. Do not remove any of the mat rods yet.
natural_image
Illustration of hands using a tool to interact with a curved surface, showing motion direction (no text or symbols)Outside Person:
- Push the mat rod out of the mat rod holder, guiding the ball along the path shown.
• In one swift movement: - Up and forward into the mat underside, out of the mat rod holder.
- Down and away from the mat underside.
- Back towards you, easing it to a resting position.
Inside Person:
- Pull the mat rod to assist the outside person in guiding the ball up and out of the mat rod holder.
- Maintain a steady grip until the ball is securely removed from the mat rod holder.

WARNING - Treat any loaded rod with caution until you are sure it is properly installed or uninstalled. Keep your face well away from any loaded rod. WARNING - Both people must maintain a steady grip on the rod until it is in its resting position.
DISASSEMBLY
3
MAT ROD REMOVAL
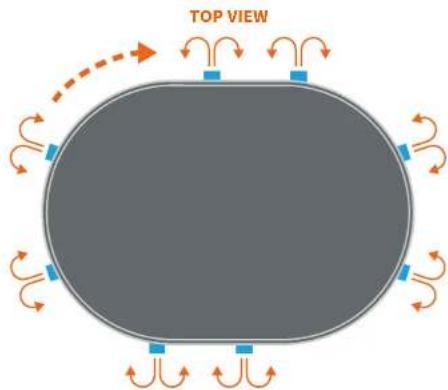
TOP VIEW
natural_image
Diagram of an oval-shaped object with surrounding blue and orange symbols, no text or labels present- Moving clockwise between the blue ☐ tag locations, remove every other installed mat rod (remove one, skip one). Do NOT remove the mat rods at the blue ☐ tag locations.
- Repeat the above step (removing every other installed mat rod), several times around the trampoline, until only the mat rods at the blue ▪ tag locations remain.
- Continue clockwise removing the final mat rods at each of the blue ▪ tag locations. Pulling the mat edge while pushing the rod will be required to uninstall these rods.
- Remove the mat rods from the frame and then pack the net, mat and rods.
- Disassemble the frame in the reverse order to which it was assembled.

WARNING - Treat any loaded rod with caution until you are sure it is properly installed or uninstalled. Keep your face well away from any loaded rod.

NOTE - Following the sequence shown maintains the tension evenly across the mat. If you do not follow this sequence, it will be very difficult to remove the mat.
YEARS OF SPRINGFREE FUN
Welcome to the Springfree family! Each of our products have been thoroughly tested for maximum functionality and performance and inspected to ensure the highest level of quality. If you encounter any issues during assembly or if you believe your product has a manufacturing fault or defect, locate and contact your nearest Springfree Trampoline customer service center. Alternatively, you can lodge a warranty claim online at http://springfr.ee/wclaim. If you made your purchase at a store, contact Springfree Trampoline first, before returning your product.
As part of the Springfree family, you can trust that your family will enjoy many years of backyard fun. Not only will you enjoy the peace of mind that comes from our commitment to quality and safety, you'll also have access to the expertise and support of our friendly Customer Care team.
MAINTENANCE SUPPORT
As with any investment for your home, your Springfree Trampoline will need some basic care and attention to ensure it stays in top condition for many years. As a Springfree owner you'll receive handy tips and friendly reminders to help maintain your trampoline.
REPLACEMENT COMPONENTS
Your Springfree Trampoline is designed to be robust and strong, but like any product installed outdoors, accidents can happen and damage can occur. That is why we supply spare parts for all Springfree models and our Customer Care team are on hand to assist.
CLEANING PROCEDURE
Over time, your trampoline may accumulate dirt and surface build-up as a result of local climate and environment including grime, moss, lichen, and insects. The only cleaning product that should be used on the trampoline is a mild liquid dishwashing soap labelled as dye and chemical free, non-toxic, and safe for use in hand washing. Do not use any oil or solvent-based cleaners, or hydrocarbon propelled insecticides on your trampoline as such products may result in degeneration of the product.
∴ Keep trampoline fully assembled during washing.
2. Use a bucket of clean warm water and a long handled soft bristle broom.
3. Thoroughly wet the trampoline net and mat using a hose.
4. Apply the washing solution onto the net using a sponge or cloth.
5. Using the same sponge or cloth, work the solution into the mat. WARNING: This will make the mat slippery.
6. When finished, rinse the trampoline thoroughly with clean water and let air dry.
CARE AND MAINTENANCE
Springfree Trampoline is made from the highest quality materials. Components of this trampoline are susceptible to deterioration from use and environmental conditions, such as sunlight, rain, salt and heat, to varying degrees. It is essential that you inspect the following areas before each use and replace any worn, defective, or missing parts before further use. Use only parts that are recommended by the manufacturer. 1. Punctures, frays, tears, or holes in bed, bed edge or in enclosure barrier.
- Deterioration in the stitching or fabric of the bed, the edge system or enclosure barrier.
- Broken, missing, or splintered white mat rods, or white mat rods disconnected from the mat edge.
- A sagging, loose, or improperly or insecurely attached mat or net.
- Broken or damaged enclosure entry system (e.g. zippers or enclosure barrier).
- White mat rods need not fully inserted in frame sockets or the ball at the end of the mat rod not secured into the mat rod holder.
- Deteriorated, missing or damaged mat rod holders.
- Missing or improperly assembled black net rods, or black net rods not completely inserted into the net pockets.
- Missing C-clips from the net rod sockets on the frame.
- Bent or broken frame or sharp protrusions on the frame, bed suspension system or enclosure barrier.
- Frame joints correctly installed and all nuts and bolts installed and secured.
- If your trampoline is outdoors it is recommended that it be equipped with a device that in strong wind conditions prevents displacement. Springfree Ground Anchors are available for purchase for all models.
- It is an industry recommendation that components such as enclosures which can be exposed to high level of wear and UV are inspected and if required, replaced every 10 years or when damaged.
TRAMPOLINE HEALTH CHECK
Your Springfree Trampoline is designed using the highest quality materials. However, all products will incur general wear and tear, so it's important to inspect your trampoline from time to time. Use this health check to help guide you through an inspection of your Springfree to ensure your trampoline remains in great condition.
Date of Purchase:
day / month / year
(Retain proof of purchase)
Installation Date:
day / month / year
(Check serial label on the net for installations)
TRAMPOLINE POSITIONING
□ Trampoline is positioned and stable on a flat, level surface.
□ Trampoline is positioned on a soft surface (e.g. well-maintained grass).
☐ Minimum clearance of 16.5 ft. (5 m) above the mat [in USA and Canada, 24 ft. (7.3 m) above the trampoline from the ground].
☐ Minimum clearance of 5 ft. (1.5 m) [in EU countries, 6.5 ft. (2 m)] from hard surfaces or other conflicting installations (e.g. pools, swings, slides, and climbing frames).
☐ The space beneath the trampoline bed is clear of objects (e.g. bikes, lawn mowers, garden tools and toys).
TRAMPOLINE FRAME RODS
Frame is in good condition (e.g. not bent, broken, or corroded) with no sharp edges.
☐ Legs and frame joints are secured and bolted into position with the centre legs positioned under the frame.
☐ Leg and frame joints are in good condition (e.g. no signs of stress, or corrosion).
☐ White mat rods are not damaged.
☐ All white mat rods are correctly seated into mat rod holders and frame sockets. NOTE: Always inspect from underneath the trampoline.
☐ There is no deterioration white mat rod sleeves.
TRAMPOLINE MAT (JUMPING SURFACE)
□ Mat is in good condition (e.g. no punctures, tears, holes, sagging or other damage).
□ Fabric and stitching around the edge of the mat is in good condition.
☐ Mat rod holders are all correctly seated in the mat (e.g. small tab outside the mat). NOTE: Always inspect from underneath the trampoline.
TRAMPOLINE NET
Net is in good condition (e.g. no punctures, tears, holes, sagging or other damage).
☐ Stitching of the net is in good condition (e.g. around enclosure rod pockets, zippers)
☐ Net entrance zippers are in good working condition.
☐ C-clips at the base of the black net rods are all present and correctly engaged.
☐ All black net rods are correctly installed (e.g. joiners properly engaged, black net rod ball fully seated into the top of the net pocket and bottom of rod fully seated in frame socket).
If you've checked any of these boxes, contact your nearest Springfree Trampoline customer service center.
NOTE: This is an inspection only. If you need to disassemble any part of the trampoline please refer to the Assembly Disassembly Instructions, and adhere to all safety warnings and follow all procedural steps.
WINTER CARE
Springfree trampolines are constructed with all weather parts, however, there are several steps you can take to guard your trampoline from winter climate extremes.
- If you anticipate severe or extreme weather, or your region has high snow falls, your trampoline should be moved to a sheltered location or disassembled.
- Regularly clear the snow from your trampoline. Do not allow snow or ice to accumulate on the trampoline as this may shorten the life of the white mat rods. Damage caused by excessive snow loads on the trampoline is not covered under warranty.
- The most effective tool to remove snow build up from your trampoline is a soft bristle broom. Do not use anything with sharp edges.
USER WARNINGS
Please read the following precautions carefully before you assemble and use the trampoline and enclosure. Retain for future reference.
- Do not exceed the maximum user weight. (Refer to information on the front panel of this manual and on the trampoline WARNING labels).
- Children should be educated by responsible adults to always climb on and off the trampoline, and never jump or bounce off. It is dangerous practice to jump or bounce from a trampoline when dismounting. Never use rods or suspension elements as hand grips when getting on or off the trampoline.
- Do not use the trampoline as a springboard to other objects. Use the trampoline only for trampoline style bouncing.
- Bounce in the center of the mat.
- Stop bounce by flexing knees as feet come in contact with the trampoline bed. Learn this skill before attempting others.
- Learn fundamental bounce and body positions thoroughly before trying more advanced manoeuvres. A variety of trampolines activities can be carried out by performing the basic fundamentals in various series and combination, or performing one fundamental bounce after the other, with or without bounces between them.
- Avoid bouncing too high or for too long. Stay low until bounce control and repeated landing in the center of the trampoline can be accomplished. Always control your bounce. Control is more important than height. Do not try to jump over the enclosure.
- While keeping the head erect, focus eyes on the trampoline toward the perimeter. This will help control your bounce.
- To learn more advanced trampolining skills contact a suitable gymnastics/trampoline club.
- Limit the time of continuous usage. Avoid jumping when tired.
- Do not allow a child or other person under the trampoline.
-
Do not use the mat / bed when it is wet. The mat will be slippery and make landing less sure.
-
Keep small children away from the trampoline while others are bouncing on it because the edge can move in and out vigorously. There is potential for injury if the bouncer lands heavily on or near the edge.
- Do not use a trampoline while under the influence of alcohol or drugs. Balance, perception and assessment of risk will be affected and may lead to injury.
- Wear comfortable clothing that won't become entangled in the trampoline's components and become a strangulation hazard. Do not wear jewellery or drawstrings / cords that can catch on the trampoline and create a strangulation hazard. Remove shoes as they may damage the bed and increase the risk of injury.
- Adults should model safe use of trampolines when children are present.
- Active, competent supervision is essential. Always supervise children while they are using the trampoline.
- Enter and exit the enclosure only at the enclosure door or barrier designated for that purpose.
- Do not eat while jumping. Do not jump immediately after a meal.
- Always close the net opening before jumping.
- Empty pockets and hands before jumping.
- Do not attempt to crawl under the enclosure.
- Properly secure the trampoline when not in use. Protect it against unauthorised use. If a trampoline ladder is used, the supervisor should remove it from the trampoline when leaving the area to prevent unsupervised access by children under 6 years of age.
- Use only when the enclosure net has no holes, mat rods are secure in the mat rod holder and the frame socket, and the enclosure is properly suspended.
- Enclosure systems are designed to prevent users falling off the trampoline. Do not allow users to intentionally bounce towards or off the barrier, as this can unbalance the trampoline and continual impact may damage the enclosure. Do not hang, kick, cut or climb on the enclosure. Do not attempt to jump over the enclosure.
- Do not attach anything to the enclosure that is not a manufacturer-approved accessory or part of the enclosure system.
- This enclosure is to be used only in connection with certain trampolines. Read and follow all warnings and instructions before using the trampoline / enclosure. Warnings and instructions for the care, maintenance, and use of this trampoline are included to promote safe, enjoyable use of this equipment.
- Check the trampoline / enclosure before use and ensure it is correctly and securely positioned and in good condition. Replace any worn, missing or broken parts. Use only parts that are recommended by the manufacture.
- Anchor and secure the trampoline in strong wind conditions and do not use.
-
Keep enclosure tightly fastened to the trampoline in accordance with the manufacturer's instructions. Failure to properly assemble and maintain a tight, secure trampoline/enclosure boundary may result in serious injury, strangulation, or death.
-
Trampoline is intended for indoor and outdoor usage. Refer to trampoline installation location.
- Modifications made by the customer to the original trampoline (e.g. the adding of an accessory) shall be carried out according to the instructions of the manufacture.
- The trampoline shall neither be installed over concrete, asphalt or any other hard surface nor at proximity of other conflicting installations (e.g. paddling pools, swings, slides, climbing frames etc.).
- The edge of the Springfree trampoline is designed to reduce injury. It is not designed to cope with deliberate, continuous, vigorous bouncing activity. Do not deliberately bounce around the edge.
- Check all trampoline components for wear or damage prior to reassembly and use.
ACCIDENT PREVENTION
RESPONSIBILITIES OF THE OWNER AND THE SUPERVISOR
- Use trampoline / enclosure only with mature, knowledgeable supervision.
- Active, competent supervision is essential. Always provide supervision for all jumpers regardless of age or skill.
- Understand and enforce all of the safety rules and information in this manual.
- Assess skill level, provide basic jump instructions, and ensure all users understand and follow the trampoline safety guidelines.
- Properly secure the trampoline when not in use. Protect it against unauthorised use. If a trampoline ladder is used, the supervisor should remove it from the trampoline when leaving the area to prevent unsupervised access by children under 6 years of age.
- Keep small children away from the trampoline while others are bouncing on it because the edge can move in and out vigorously. There is potential for injury if the bouncer lands heavily on or near the edge.
- Do not allow a child or other persons under the trampoline.
- No more than one person at a time. Multiple jumpers increase the chances of loss of control and collision and can result in serious head, neck, back, leg, arm or other injuries.
- Inspect the trampoline / enclosure before each use to avoid potential hazards.
- Keep enclosure tightly fastened to the trampoline in accordance with the manufacturer's instructions. Failure to properly assemble and maintain a tight, secure trampoline/enclosure boundary may result in serious injury, strangulation, or death.
- Do not attach anything to the trampoline / enclosure that is not a manufacturer-approved accessory or part of the trampoline / enclosure system.
- Over-confidence can lead to injury.
RESPONSIBILITIES OF THE USER
- Children should be educated by responsible adults to always climb on and off the trampoline, and never jump or bounce off. It is dangerous practice to jump or bounce from a trampoline when dismounting. Never use rods or suspension elements as hand grips when getting on or off the trampoline.
- Before jumping, warm up the muscles. This increases blood flow, which increases flexibility, joint mobility and reduces the risk of injury.
- When initially using the trampoline, bounce in the center center of the mat with low controlled bounces.
- Understand the basic trampoline skills and techniques below.
- Understand and follow all the safety guidelines. In particular, do not attempt or allow somersaults and do not allow more than one person on the trampoline / in the enclosure at a time.
- Make sure someone is supervising at all times. Empty pockets and hands before jumping.
- Always close the net opening before jumping.
- Do not eat while jumping. Do not jump immediately after a meal.
- Avoid bouncing too high or for too long. Stay low until bounce control and repeated landing in the center of the trampoline can be accomplished. Always control your bounce. Control is more important than height. Do not try to jump over the enclosure.
- Do not use the trampoline as a springboard to other objects. Use the trampoline only for trampoline style bouncing.
For further information or additional instructional material, contact a certified trampoline instructor.
BASIC TRAMPOLINE SKILLS
BOUNCING
The most important basic skill in jumping on a trampoline is controlling the height and landing of your bounce. The basic bounce should always begin low, with jumper always landing with both feet at the same time. High, reckless bouncing should never be allowed. The goal is to land as close to the center of the mat as possible.
STOPPING
This technique allows the jumper to gain control by stopping quickly. It is done by keeping your feet in contact with the bed and absorbing the rebound of the trampoline with your knees and waist. This skill should be learned first and should be employed whenever you feel out of balance or land away from the center area. To learn the stop bounce:
-
Stand in center of the bed with feet about hipwidth apart.
-
Attempt about three easy bounces. Keep them low and controlled.
-
Focus your eyes towards the perimeter of the trampoline while bouncing in order to keep your balance.
- Stop the bounce by bending at your knees and hips with your feet in contact with the bed.
- Your torso should remain vertical. When stopping the bounce, move your arms either in front of your body or above your head.
KEEPING YOUR BALANCE
Arms are very important for proper control and lift. When you go up, your arms go up to a set position at approximately shoulder height and shoulder width. They should remain in this balanced position until you start down. Then they circle down and slightly behind the hips, ready to lift again as you bounce up. There are three phases that your arms go through when bouncing, as follows.
- The first is the drive phase. As you make contact with the trampoline, your legs push hard into the trampoline and your arms start to drive up in front of your body.
- The second is the lift phase, where your arms continue to drive up in front of your body until they are straight above your head.
- The third phase is the balance, where your hands flair out the side and your arms slowly come back down, keeping your body balanced, ready to start the process again.
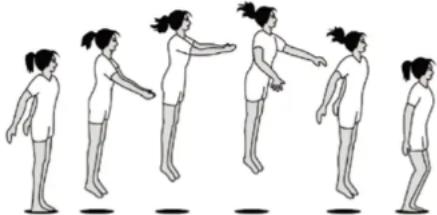
natural_image
Sequence of six illustrated figures showing a stretching or gymnastic motion, no text or symbols presentBOUNCE VARIATIONS
The figures below show three variations: the tuck, the pike and the straddle pike. These should be assumed at the top of the bounce before resuming the normal landing position on your feet. Practice these simple variations and concentrate on perfect form. Make sure that your toes are pointed and fingers are straight. These are simple variations to the basic bounce and are very important for gaining experience in coordinated movement.
TUCK PIKE STRADDLE PIKE

natural_image
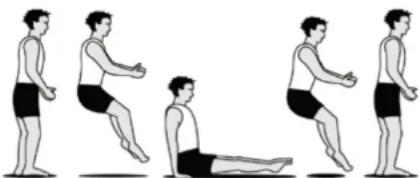
Three sequential illustrations of a person performing seated or stretching exercises (no text or symbols)BASIC LANDING POSITIONS
Proper position for all seat, hand and knee drops should first be practiced on the ground in a stationary position and then on the trampoline bed. Drops should be performed after 'priming' the trampoline bed. Priming is done by bending your knees and pushing down repeatedly on the trampoline bed, thereby setting the bed in motion. Feet stay in contact with the bed during the entire priming motion.
THE SEAT DROP
If you are at or near the maximum user weight you should not attempt this manoeuvre from a height greater than 4.5 ft (1.4 m) above the bed as there is a risk of spinal injury due to contact with the ground. To learn the seat drop:
- From the standing position, prime the bed several times.
- Pick up your feet at the top of the last bounce and sit down. Land so your body is in a sitting position with legs straight out in front and your toes pointed. Hands should be on the bed slightly behind your hips. Fingers should be together and your toes pointed.
- Push on the bed with your hands to rebound up to your feet.
natural_image
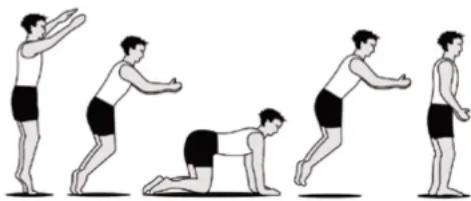
Sequence of five sequential illustrations showing a person performing a leg extension or exercise (no text or symbols)THE HANDS AND KNEES DROP
To do this drop properly, there should be as much weight on your hands as on your knees. Your back should be parallel to the bed. Knees and hands should land simultaneously with the middle of the body landing in the center of the trampoline. Hands should be directly under the shoulders; knees should be directly under the hips and your toes should be pointed. To learn the hands and knees drop:
- Get down on your hands and knees on the bed. Make sure you have weight on both your hands and your knees. Do not sit on your heels.
- Remain in this position and try to bounce. Do not rock back and forth between the hands and knees. Develop an even landing on all four points.
- From the standing position, prime the bed several times. Lift upward with your hips, reach forward with your hands and land on all fours. Look slightly in front of your hands on landing. Push to rebound to your feet.
natural_image
Sequence of five sequential illustrations showing a person performing a stretching or exercise movement (no text or symbols)Springfree™ Trampoline, FlexiNet™, SoftEdge™, FlexrHoop™, FlexrStep™, and FlexrShade™ are registered trademarks of Board & Batten International Inc. tgoma®, Smart Trampoline™, Alien Stomp™, and Fruitants™ are registered trademarks of Tgoma NZ Ltd. The following Intellectual Property Rights (patents granted and pending) cover the tgoma design elements including, but are not limited to, signal processing and sensor design, software application elements, firmware design, and interconnection systems. The following Intellectual Property Rights (patents granted and pending) cover Springfree trampoline design elements including, but are not limited to, the rod based trampoline concept, visual edge, proprietary rod retaining cleat system, FlexiNet™ safety enclosure, rod safety systems, the trampoline accessory attachment arrangement, soft edge trampolines, round rod based trampolines, and oval trampolines: US 6,319,174, AU 2002351531, CA 2471272, CN ZL02825390.6, EP 1455904, NZ 513331, US 12/406572, AU 2004244931, CA 2536580, EP 04748813.5, US 7,708,667, AU 2004298391, CA 2553767, EP 04808913.0, US 7,854,687, AU 2004243128, CA 2527749, EP 1628715, AU 2004243127, CA 2527745, EP 04735534.2, AU 2005312433, CA 2591090, CN ZL200580046951.1, CZ 1824571, DE 60 2005 026 436.1, EP 1824571, ES 1824571, FR 1824571, GB 1824571, AU 2011201758, CA 2546014, CZ 1684875, DE 1684875, EP 1684875, ES 1684875, FR 1684875, GB 1684875, AU 2005247279, CA 2591007, EP 1814635, AU 2008202739, CA 2636402, CN 200810131785.0, CZ 2008694, DE 60 2008 004 693.1, EP 2008694, ES 2008694, FR 2008694, GB 2008694, IN 1091/KOL/2008, SE 2008694, US 7,678,024, AU 2008325304, CA 2704854, CN 200880122507.7, EP 08847146.1, IN 1630/KOLNP/2010, US 12/741481, AU 311568-311575, CA 117236 & 124457, EP 000580717-0001-000580717-0008, CN 201220117512.2, CN 201220107213.0 and CN 201220107595.7. Equivalent patents, registered designs, and applications exist in other countries. The information in this document is subject to change without notice. © Copyright Springfree™ Trampoline Inc. 2005. 2022. All rights reserved.
YOU REALLY SHOULD READ THIS ...
IMPORTANT INFORMATION ABOUT YOUR TRAMPOLINE WARRANTY
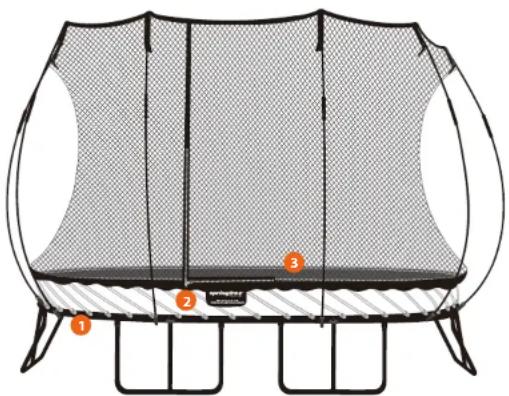
We encourage you to register your Springfree® Trampoline warranty online within one (1) year from the date of purchase. By registering your warranty, we will create a customer profile which will allow us to provide future support and send you important product notifications. To register your product, locate and contact the Springfree Trampoline customer care team at www.springfree.com or springfr.ee/w-reg. To complete your registration, you will need to provide your name, address, trampoline model name, serial number, date and place of purchase and scan your purchase receipt. We recommend keeping your purchase receipt in a safe place to ensure you have this information. The frame serial number is located on one of the frame sections (1). The net serial number is located under the sewn warnings (2). The mat serial number is next to the sewn warnings (3). Your personal information will be kept strictly confidential and not given or sold to anyone. To learn more about our privacy policy, go to springfr.ee/p-policy.
IMPORTANT NOTE: If you have purchased a Springfree trampoline from a Springfree store, office or from our website, your warranty may have been pre-registered for you and you may not need to complete an online registration form. To confirm if this is the case, or to ensure the information we have on file is correct, please contact your local Springfree customer care team at www.springfree.com.
natural_image
Diagram of a trampoline with mesh net and seat structure, no text or symbols present
SPRINGFREE TRAMPOLINE LIMITED WARRANTY
WHAT IS COVERED
Springfree Trampoline and its authorized service partners warrant your Springfree Trampoline against original defects in material and workmanship. All components of the trampoline are warranted for ten (10) years from the date of purchase (proof of purchase required). This warranty is only valid when used for private household purposes in accordance with the Springfree Trampoline Owner's Manual. This warranty provides, at no extra cost to you, all parts necessary to ensure your trampoline is in proper working condition throughout the 10 year warranty period. You are entitled to have the goods repaired or replaced if the goods fail to be of acceptable quality. Goods presented for repair may be replaced by refurbished goods of the same type rather than being repaired. Refurbished parts may be used to repair the goods.
WHAT IS NOT COVERED
This limited warranty is subject to the following terms:
- For customers whose trampoline is subjected to sea spray or who reside within 1 mile (1.6 km) or less of a salt water environment, the warranty on the steel frame shall be reduced by 25%.
- Springfree Trampoline shall not be liable for costs, damages or repairs incurred as a result of:
Trampolines purchased from an unauthorized dealer. - Improper installation not in accordance with the Trampoline and Enclosure Assembly, Installation, Care, Maintenance, Safety, and Use Instructions.
- Careless operation or handling, misuse, abuse and/or lack of maintenance or use not in accordance with the Trampoline and Enclosure Assembly, Installation, Care, Maintenance, Safety, and Use Instructions.
External sources such as weather, theft, fire damage, cuts or vandalism. - Repairs or alterations carried out by unauthorized parties or agents.
- Use of the trampoline other than for private household purposes. For example, for commercial or rental purposes.
- This limited warranty does not cover misuse or minor imperfections in trampolines that meet design specifications or do not materially alter functionality.
- This limited warranty does not cover expenses related to on-site labor, travel, assembly or disassembly or other charges associated with the repair or replacement of covered components.
- Shipping costs associated with approved warranty claims lodged within 45 days from the date of purchase will be covered by Springfree Trampoline. Beyond this 45 day period, all shipping costs are the responsibility of the customer.
SUBMITTING YOUR WARRANTY CLAIM
If you believe your Springfree Trampoline has a manufacturing fault or a product defect and you need to make a warranty claim, locate and contact your nearest Springfree Trampoline customer service center at www.springfree.com. Alternatively, you can lodge your warranty claim online at http://springfr.ee/wclaim. The terms of the limited warranty require that you contact Springfree Trampoline with your model name, serial number, date and place of purchase and a scan of your purchase receipt. Replacement parts provided under this warranty do not extend the period of the warranty.
WARRANTY LIMITATIONS
- Springfree Trampoline is not responsible or liable for indirect, special or consequential damages arising out of or in connection with the use or performance of the product or any other damages with respect to any economic loss, loss of property, loss of revenue or profits, loss of enjoyment or use, cost of removal, installation, disassembly or other consequential damages. This limitation is not allowed by some states, provinces or territories and so this limitation may not apply to you.
- Springfree Trampoline will not be liable for any consequential damages or incidental damages you may incur in connection with your purchase and use of your trampoline. This limitation is not allowed by some states, provinces, or territories and so this limitation may not apply to you.
- Any implied warranties relating to your trampoline, including but not limited to warranty of merchantability or warranty of fitness for a particular purpose, are limited to the duration of this warranty. This limitation is not allowed by some states, provinces or territories and so this limitation may not apply to you.
This limited warranty gives you specific legal rights. You may also have other rights which vary by state, province or territory.
For customers in Australia, our goods come with guarantees that cannot be excluded under the Australian Consumer Law. You are entitled to a replacement or refund for a major failure and compensation for any other reasonably foreseeable loss or damage. You are also entitled to have the goods repaired or replaced if the goods fail to be of acceptable quality and the failure does not amount to a major failure. Goods presented for repair may be replaced by refurbished goods of the same type rather than being repaired. Refurbished parts may be used to repair the goods. - This limited warranty is not transferable and applies only to the consumer who originally purchased the trampoline.
This warranty does not cover Springfree Trampoline accessories.
If you have any questions or concerns regarding this limited warranty, locate and contact your nearest Springfree Trampoline customer service center at www.springfree.com.
If you need replacement parts but your warranty has expired, you can purchase them by contacting your nearest Springfree Trampoline customer service center.