
Smart Steps EZ Bouncer - Baby bouncer Baby Trend - Free user manual and instructions
Find the device manual for free Smart Steps EZ Bouncer Baby Trend in PDF.


| Product Type | Baby Bouncer |
| Brand | Baby Trend |
| Model | Smart Steps EZ Bouncer (BC20xxxS) |
| Weight Limit | 20 lb (9 kg) or when baby starts trying to sit up |
| Age Range | Newborn until baby can sit up unassisted |
| Power Source | Music/vibration unit requires 2 C batteries (not included) |
| Features | Toy bar with toys, adjustable headrest, padded seat, footrest, vibration and music |
| Restraint System | 3-point harness, adjustable |
| Assembly Required | Yes, adult assembly required |
| Cleaning Seat Pad & Headrest | Machine wash gentle cold, hang dry; do not bleach, iron, or dry clean |
| Cleaning Frame | Wipe with soft cloth and mild soap |
| Cleaning Toy Bar & Toys | Wipe with damp cloth and mild soap, air dry; do not immerse |
| Safety Warnings | Use only on floor; never on soft surfaces; never leave baby unattended; not for sleep; never carry baby in bouncer; always use restraints |
| Warranty | 1 year limited warranty against workmanship defects |
| Customer Service | 1-800-328-7363 (Mon-Fri 8am-4:30pm PST) |
| FCC Compliance | Class B digital device, complies with Part 15 |
| Includes | Frame, seat pad, headrest, toy bar, music/vibration unit |
| Battery Safety | Remove batteries for long storage; do not mix old/new or different types |
Frequently Asked Questions - Smart Steps EZ Bouncer Baby Trend
User questions about Smart Steps EZ Bouncer Baby Trend
0 question about this device. Answer the ones you know or ask your own.
Ask a new question about this device
Download the instructions for your Baby bouncer in PDF format for free! Find your manual Smart Steps EZ Bouncer - Baby Trend and take your electronic device back in hand. On this page are published all the documents necessary for the use of your device. Smart Steps EZ Bouncer by Baby Trend.
USER MANUAL Smart Steps EZ Bouncer Baby Trend
Baby Trend, Inc.
13048 Valley Blvd.
Fontana CA 92335
1-800-328-7363
(8:00 a.m. \~ 4:30 p.m. PST)
www.babytrend.com
BC20xxxS_2L_092623

Instruction Manual Manual de Instrucciones
BC20xxxS
Trend EZ Bouncer
babytrend
WARRANTY
DO NOT RETURN YOUR PRODUCT TO THE STORE. PLEASE CONTACT BABY TREND® FOR REPLACEMENT PARTS, SERVICE AND REPAIR.
The Baby Trend® warranty covers workmanship defects within 1 year of purchase. Any product which has been subjected to misuse, abuse, abnormal use, excessive wear and tear, improper assembly, negligence, environmental exposure, alteration or accident, or has had its serial number altered or removed invalidates all claims against the manufacturer. Any damage to property during installation is the sole responsibility of the end user.
Customer Service Department can be contacted at 1 (800) 328-7363 Monday through Friday between 8:00 a.m. and 4:30 p.m. (PST). Return Authorizations are required prior to returning product(s) to Baby Trend®. Please visit http://babytrend.com/pages/limited-warranty for complete warranty details.
GARANTIA
NO DEVUELVA SU PRODUCTO A LA TIENDA. POR FAVOR CONTACTE A BABY TREND® PARA PIEZAS DE REPUESTO, SERVICIO Y REPARACION.
Baby Trend, Inc. 13048 Valley Blvd. Fontana CA 92335
1-800-328-7363 • (8:00am \~ 4:30pm PST)
www.babytrend.com
WARNING WARNING

WARNING! Not intended for infant sleep and should never be used for this purpose.
FALL HAZARD: Babies have suffered skull fractures falling while in and from bouncers.
- Use bouncer ONLY on floor.
- ALWAYS use restraints. Adjust to fit snugly.
- NEVER lift or carry baby in bouncer.
SUFFOCATION HAZARD: Babies have suffocated when bouncers tipped over on soft surfaces and/or when bouncers have been used as a sleep product.
- NEVER use on a bed, sofa, cushion, or other soft surface.
- Stay near and watch baby during use. This product is not safe for sleep or unsupervised use. If baby falls asleep, remove baby as soon as possible and place baby on a firm, flat sleep surface such as a crib or bassinet.
TO PREVENT FALLS AND SUFFOCATION:
- ALWAYS use restraints. Adjust to fit snugly.
-
STOP using bouncer when baby starts trying to sit up or has reached 20 lb (9 kg), whichever comes first.
-
Toy bar is NOT designed to be used to as a carry handle.
- NEVER use on any elevated surface.
• NEVER leave baby unattended. - NEVER Allow your bouncer to be used as a toy.
- NEVER move bouncer with the child inside.
• NEVER substitute parts. - Bouncer is NOT intended for use as a carrier.
Check your bouncer for loose screws, worn parts, torn material or stitching on a regular basis. Replace or repair parts as needed.
Discontinue use of the bouncer should it malfunction or become damaged.
IMPORTANT: Adult assembly required. Care should be taken in unpacking and assembly. Examine product frequently for damage, missing or loose parts. DO NOT use if any parts are missing, damaged or broken. Contact Baby Trend for replacement part and instructions if needed. Dial (800) 328-7363
Seat pad Almonadilla del asiento

Backrest Tube
Tubo del respaldo
Attached 3 - Way Connectors
Conector de 3 Vías Adjunto
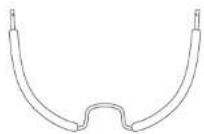
Padded Footrest Wire
Alambre del apoyapiés
Acolchado

IMPORTANT! To ensure safe operation of your bouncer, please follow these instructions carefully. Please keep these instructions for future reference.
IMPORTANT! Before assembly and each use, inspect this product for damaged hardware, loose joints, missing parts or sharp edges. NEVER use if any parts are missing or broken.
IMPORTANT! Adult assembly is required.
ASSEMBLY ASAMBLEA ASSEMBLY ASAMBLEA
BOUNCER FRAME ASSEMBLY MONTAJE DEL ARMAZÓN DEL REBOTADOR
1) • Place the rear base frame tube on a flat surface (Fig. 1a) and lift the plastic corners (Fig. 1b). Insert the left and right base frame wires into the rear base frame tube, Push the plastic corners back down until they snap securely onto the base frame wires (Fig. 1c). Set the assembled Base frame aside and proceed to step 2.
2) • Reference the 3-Way Connector Diagram below for Steps 2 and 3.
- The 3-Way Connectors will be preassembled at corner A (Fig 2a). Place the Base frame upright on a flat surface with corners B and C of the 3-Way Connectors pointing up (Fig. 2b). The Backrest Bar has 2 square brackets with an opening for the Toy Bar. Be sure that the openings are facing up (Fig 2b). Align the Backrest bar to corner B. Insert both ends into the 3-Way connector until they click into place (Fig 2c).
• DO NOT Discard the Foam Padding from the Footrest Wire (Fig 2d).
- To Insert the Footrest Wire, align the ends to corner C of the 3-Way Connector. Be sure the small curvature parallels with the surface and the ends of the wire both point up (Fig 2d). Insert the ends into the 3-Way Connectors and be sure that they click into place.
NOTE: The pins on the 2 Bars must click into position when inserted into the connectors correctly (Fig. 2e).
ASSEMBLY ASAMBLEA ASSEMBLY ASAMBLEA
Fig. 3

Fig.4

Fig. 5
ASSEMBLY ASAMBLEA ASSEMBLY ASAMBLEA
The music/vibration unit requires two size C batteries (not included). It is recommended that you use alkaline batteries for longer battery life.
⚠️ CAUTION: To prevent battery leaks, which can burn skin and eyes:
- Remove batteries when storing product for a long time.
- Dispose of used batteries immediately.
• Always replace the entire set of batteries at one time. - Never mix old and new batteries, or batteries of different brands or types.
WARNING: Keep batteries out of children's reach. Old and new batteries should not be mixed. Alkaline, standard carbon-zinc, and rechargeable nickel-cadium batteries should not be mixed. Remove batteries before storing music center for a long period of time.
Fig. 6
7) • Align the mounting groove on the unit to the corresponding slot on Footrest wire. Slide the unit onto the mounting groove until it is securely in place (Fig. 7).
Fig. 7
ASSEMBLY ASAMBLEA ASSEMBLY ASAMBLEA
Fig. 9
Fig. 10c
Copyright © 2023, Baby Texas Inc., All Rights Reserved. Todos los derechos reservadas.
ASSEMBLY ASAMBLEA ASSEMBLY ASAMBLEA
11) • Secure the seat pad to the frame by buckling the straps on the back of the pad (Fig. 11). Place the bouncer back in the upright position.
12) • Position the toy bar above the bouncer as shown (Fig. 12a). Insert the ends of the toy bar through the corresponding holes in the seat pad and into corresponding holes on the frame. Push in until both sides click into place. To remove, press the release clips and pull up (Fig. 12b).
Fig. 11
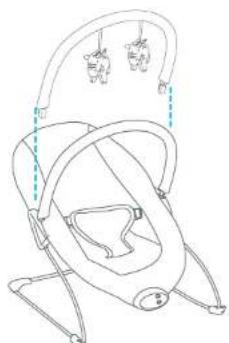
Fig. 12a
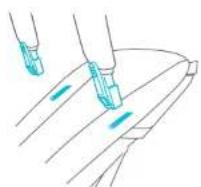
Fig. 12b
HEADREST APOYACABEZA
13) • To hook the Headrest to the Bouncer, use the adjustable hook and loop strap. Thread it from front to back through the headrest hoop. To adjust detach and attach the hook and place it at your desired height (Fig. 13).

Fig. 13
SAFETY SEGURIDAD
OTHER OTRO
14) • If buckled, unbuckle the straps on each side of the seat restraint (Fig. 14a). Carefully place the child in the bouncer seat and buckle the straps (Fig. 14b). Adjust the straps so that the restraint fits the child snugly (Fig. 14c).
Fig. 14a
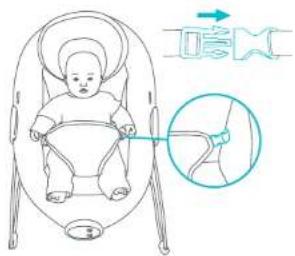
Fig. 14b

Fig. 14c
CARE AND CLEANING CUIDADO Y LIMPIEZA
15) Remove the seat pad and headrest from the frame. Ensure that all buckles on the seat pad are fastened. Do not iron. Do not dry clean.
WASHING INSTRUCTIONS (Seat Pad / Head Rest): Machine wash on gentle delicate cycle with cold water. Do not bleach. Do not tumble dry. Hang to dry. Do not iron. Do not dry clean.
TOY BAR AND TOYS: Wipe clean with a damp cloth and mild soap. Air dry. Do not immerse in water.
FRAME: Wipe the metal frame with soft, clean cloth and mild soap.
Instrucciones:
This device complies with Part 15 of the FCC rules. Operation is subject to the following two conditions:
1 this device may not cause harmful interference, and
2 this device must accept any interference received, including interference that may cause undesired operation.
WARNING: Changes or modifications to this unit not expressly approved by the party responsible for compliance could void the user's authority to operate the equipment.
NOTE: This equipment has been tested and found to comply with the limits for a Class B digital device, pursuant to Part 15 of the FCC Rules. These limits are designed to provide reasonable protection against harmful interference in a residential installation. This equipment generates, uses and can radiate radio frequency energy and, if not installed and used in accordance with the instructions, may cause harmful interference to radio communications.
However, there is no guarantee that interference will not occur in a particular installation. If this equipment does cause harmful interference to radio or television reception, which can be determined by turning the equipment off and on, the user is encouraged to try to correct the interference by one or more of the following measures:
• Reorient or relocate the receiving antenna.
- Increase the separation between the equipment and receiver,
- Connect the equipment into an outlet on a circuit different from that to which the receiver is connected.
- Consult the dealer or an experienced radio/TV technician for help.
This Class B digital apparatus complies with Industry Canada Standard ICES-003.
Operation is subject to the following two conditions:
1 this device may not cause harmful interference, and
2 this device must accept any interference received, including interference that may cause undesired operation.


- BABYTREND
- WARRANTY
- GARANTIA
- WARNING WARNING
- TO PREVENT FALLS AND SUFFOCATION
- ASSEMBLY ASAMBLEA ASSEMBLY ASAMBLEA
- BOUNCER FRAME ASSEMBLY MONTAJE DEL ARMAZÓN DEL REBOTADOR
- ⚠️ CAUTION: TO PREVENT BATTERY LEAKS, WHICH CAN BURN SKIN AND EYES
- WARNING: KEEP BATTERIES OUT OF CHILDREN'S REACH. OLD AND NEW BATTERIES SHOULD NOT BE MIXED. ALKALINE, STANDARD CARBON-ZINC, AND RECHARGEABLE NICKEL-CADIUM BATTERIES SHOULD NOT BE MIXED. REMOVE BATTERIES BEFORE STORING MUSIC CENTER FOR A LONG PERIOD OF TIME
- HEADREST APOYACABEZA
- SAFETY SEGURIDAD
- OTHER OTRO
- CARE AND CLEANING CUIDADO Y LIMPIEZA
- INSTRUCCIONES
- WARNING: CHANGES OR MODIFICATIONS TO THIS UNIT NOT EXPRESSLY APPROVED BY THE PARTY RESPONSIBLE FOR COMPLIANCE COULD VOID THE USER'S AUTHORITY TO OPERATE THE EQUIPMENT
Brand : Baby Trend
Model : Smart Steps EZ Bouncer
Category : Baby bouncer