GGSPA600W - Air purifier Sôlt - Free user manual and instructions
Find the device manual for free GGSPA600W Sôlt in PDF.


| Product Type | Air Purifier |
| Brand | Sôlt |
| Model | GGSPA600W |
| Dimensions (H x W x D) | 600 x 400 x 200 mm |
| Weight | 8 kg |
| Power Supply | 220-240V, 50/60Hz |
| Power Consumption | 60 W |
| Coverage Area | Up to 50 m² |
| Airflow Rate | 300 m³/h |
| Filter Type | HEPA + Activated Carbon |
| Noise Level | 25 - 50 dB |
| Functions | Auto Mode, Sleep Mode, Timer, Air Quality Indicator |
| Filter Replacement | Every 6-12 months |
| Pre-filter Cleaning | Monthly with vacuum |
| Safety Features | Overheat Protection, Child Lock |
| Spare Parts | HEPA Filter, Carbon Filter, Pre-filter |
| Repairability | User-replaceable filters, accessible components |
| Warranty | 2 years |
| Energy Efficiency | Energy Star Rated (estimated) |
Frequently Asked Questions - GGSPA600W Sôlt
User questions about GGSPA600W Sôlt
0 question about this device. Answer the ones you know or ask your own.
Ask a new question about this device
Download the instructions for your Air purifier in PDF format for free! Find your manual GGSPA600W - Sôlt and take your electronic device back in hand. On this page are published all the documents necessary for the use of your device. GGSPA600W by Sôlt.
USER MANUAL GGSPA600W Sôlt
Congratulations on purchasing your new Air Purifier! The Sôlt brand is proudly distributed within Australia by Residentia Group Pty Ltd.
Residentia Group
-
Head Office.
165 Barkly Ave
Burnley
Victoria 3121
Australia
一
ACN.
600 546 656
一
Online.
residentia.group
Please refer to the warranty card at the rear of this manual for information regarding your product's parts and labour warranty, or visit us online at www.residentia.group
At Residentia Group, we are customer obsessed and our Support Team are there to ensure you get the most out of your appliance. Should you want to learn more about your Air Purifier features, and importantly taking care of your appliance when cleaning, our Support Team are here to help.
You can use our online Support Centre at anytime by visiting http://support.residentiagroup.com.au, or you can contact us via calling us on 1300 11 HELP (4357).
Sôlt
-
Online.
www.solt.house
-
Instagram.
/solt.house
一
Facebook.
/solt.appliances
It is important that you read through the following use and care manual thoroughly to familiarise yourself with the installation and operation requirements of your appliance to ensure optimum performance.
Again, thank you for choosing an Sôlt appliance and we look forward to being of service to you.
Kind Regards,
The Residentia Team
Contents 2 Welcome
4 General Instructions
5 Your Air Purifier
6 Assembly Instructions
7 Operating Instructions
10 Cleaning and Maintenance
15 Technical Specifications
16 Purchase Details
18 Warranty Information
Customer Care
Sôlt recommends the use of original spare parts. When contacting our customer service team, please ensure that you have the following information at hand (which can be found on your appliances' rating plate).
—ModelNumber
— Serial Number
General Instructions
-
If the supply cord is damaged, it must be replaced by the manufacturer, its service agent or similarly qualified persons in order to avoid a hazard.
-
The appliance must be disconnected from the supply mains before cleaning or other maintenance.
-
This appliance can be used by children aged from 8 years and above and persons with reduced physical, sensory or mental capabilities or lack of experience and knowledge if they have been given supervision or instruction concerning use of the appliance in a safe way and understand the hazards involved. Children shall not play with the appliance. Cleaning and user maintenance shall not be made by children without supervision.
-
Children should be supervised to ensure that they do not play with the appliance.
-
Indoor and household use only.
-
When the appliance is not in use and before cleaning, unplug the appliance from the outlet.
-
Please use the original filter provided by the factory. In case of other filters, the best results cannot be achieved.
-
Do not insert the fingers or objects into the air inlets or air outlets to prevent the product from physical damages or malfunction.
-
Please unplug the power cord immediately and contact the service center in time when the appliance suffers abnormal sound or burnt smell or smoke.
-
Do not block the air inlets/outlets of the appliance with any item.
-
This appliance cannot replace natural ventilation and other appliances like the vacuum cleaner, kitchen ventilator, etc.
-
When the appliance is working, it must be placed on a dry, flat and stable floor, with at least 30cm space reserved around it.
-
The mist produced by the ultrasonic humidifier may affect the PM2.5 detection of this appliance, and both should maintain a certain distance.
-
To protect against the risk of electrical shock, do not immerse the unit, cord or plug in water or other liquid.
-
Do not place other items on top of the appliance, and forbid sitting or standing on this appliance.
-
Do not spray flammable substances near the appliance; Do not spray water directly on the appliance or use chemical cleaners like alcohol or hydrochloric acid, etc.; Do not place water containers, medicines, or flammable materials on the appliance.
-
Do not put it in a place with direct sunlight.
-
To prevent electromagnetic disturbance, the appliance must keep a certain distance from the TV, radio, microwave oven and others.
-
Do not disassemble or modify this appliance without authorization to avoid accidents.
-
Do not pull the adapter cable to move the appliance.
-
The appliance is only to be used with the power supply unit provided with the appliance.
-
WARNING: To reduce the risk of fire or electric shock, do not use this fan with any solid-state speed control device.
-
Do not operate any fan with a damaged cord or plug. Discard fan or return to an authorized service facility for examination and/or repair.
-
Do not run cord under carpeting. Do not cover cord with throw rugs, runners, or similar coverings. Do not route cord under furniture or appliances. Arrange cord away from traffic area and where it will not be tripped over.
The appliance must not be disposed of with regular household waste. At the end of its service life, the appliance must be properly delivered to a collection point for the recycling of electrical and electronic equipment. By Collection and recycling of old appliances, you are making an important contribution to the conservation of our natural resources and provide for environmentally sound and healthy disposal.

Your Air Purifier
PRODUCT OVERVIEW
GGSPA200W
GGSPA360W
- Air quality LED
- Split button
- Control panel/display screen
- Air outlet grille
- PM2.5 sensor
- Back cover
- Adapter
- Filter assembly
- Air inlet grille
Included by not shown:
• Power adapter
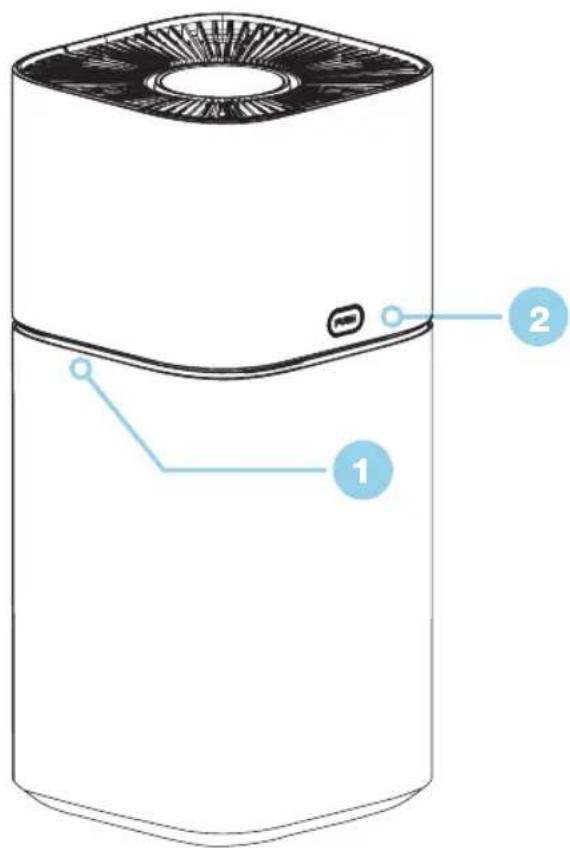
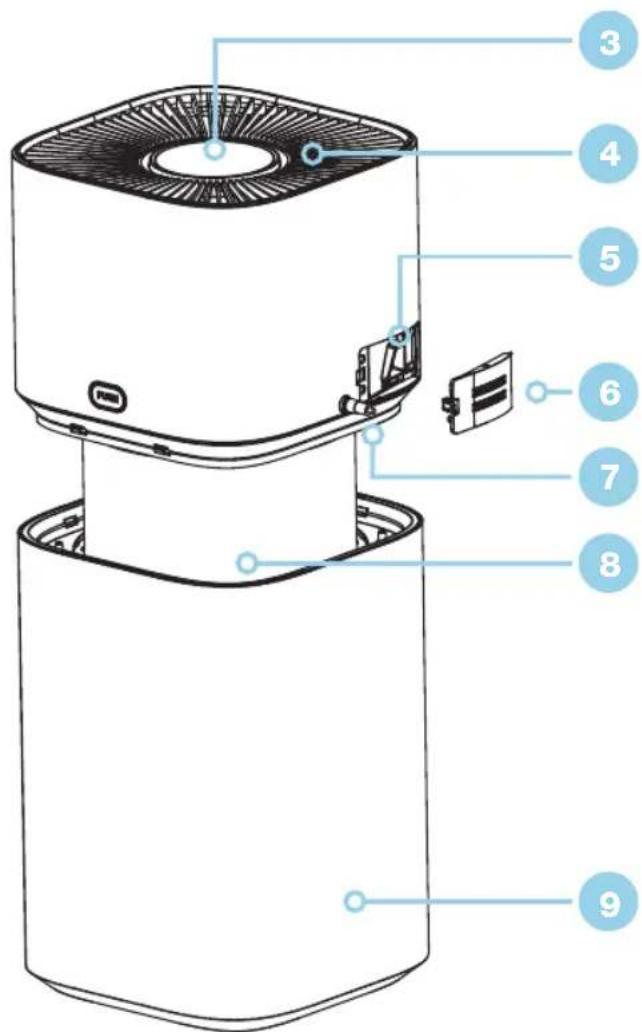
Note: The images in this user manual are for explanatory purposes only. Your Air Purifier may appear slightly different.
Your Air Purifier
PRODUCT OVERVIEW
GGSPA500W
-
Air outlet grille
-
Operation keytop
-
VOC sensor
-
PM2.5 sensor
-
Air quality LED
-
Display panel
-
VOC LED
-
Back cover
-
Power cord
-
Split button
-
Filter assembly
-
Air intake grille
Included by not shown:
- Power adapter
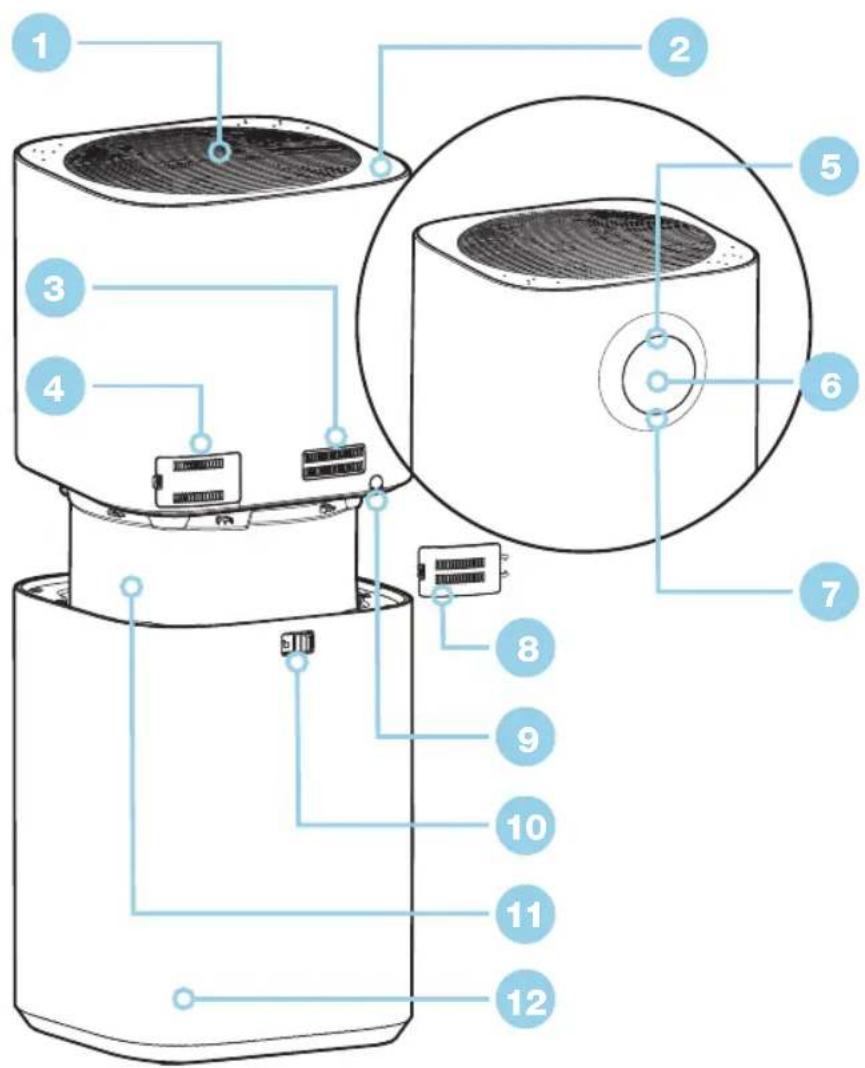
Note: The images in this user manual are for explanatory purposes only. Your Air Purifier may appear slightly different.
Your Air Purifier
PRODUCT OVERVIEW
GGSPA600W
- Air outlet grille
- Operation keytop
- Display panel
- Air inlet
- Odour, temperature and humidity sensor
- PM2.5 sensor
- Handle
- Back cover
- Power cord
- Castor
Included by not shown:
- Power adapter
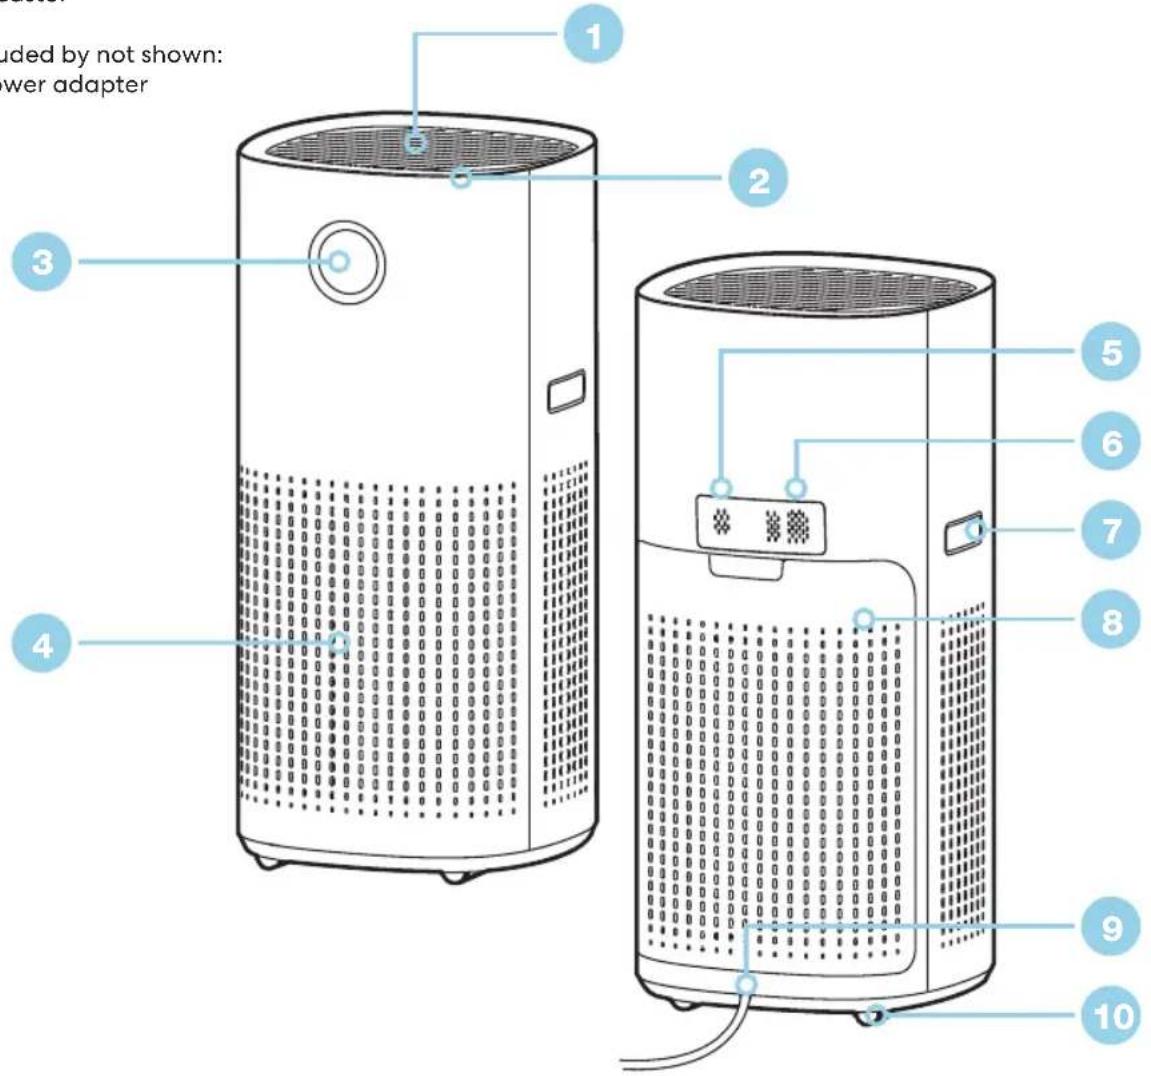
Note: The images in this user manual are for explanatory purposes only. Your Air Purifier may appear slightly different.
Assembly Instructions
GGSPA200W
GGSPA360W
GGSPA500W
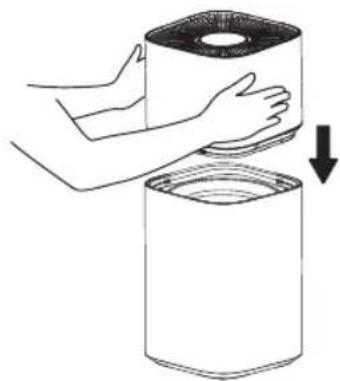
STEP 1
Remove the base plate.
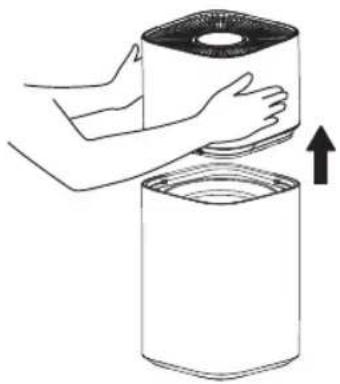
natural_image
Illustration of hands handling a cylindrical container with an upward arrow (no text or symbols)STEP 3
Install the HEPA filter.
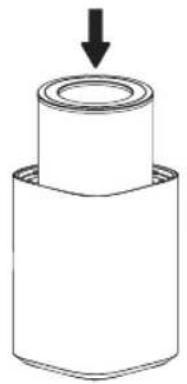
natural_image
Simple line drawing of a cylindrical object with a downward arrow indicating force or direction (no text or symbols)STEP 5
Plus in adapter cable and plug into power supply.
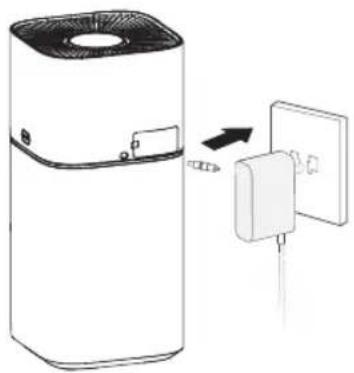
natural_image
Diagram of a large air purifier connected to a wall-mounted electrical outlet (no text or symbols present)STEP 2
Remove the protective film of the filter assembly.
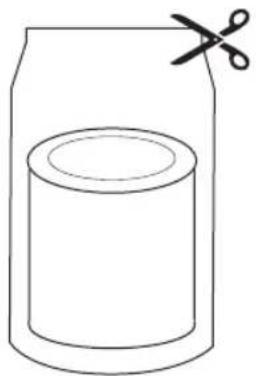
natural_image
Simple line drawing of a cylindrical container with scissors placed above it (no text or symbols)STEP 4
Install the base plate
natural_image
Illustration of a hand pressing down on a cylindrical container with a downward arrow indicating compression (no text or symbols)Assembly Instructions
GGSPA600W
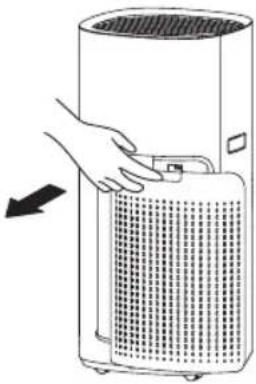
STEP 1
Open the filter cover.
natural_image
Illustration of a hand pressing down on a cylindrical device with a grid-patterned lid (no text or symbols)STEP 3
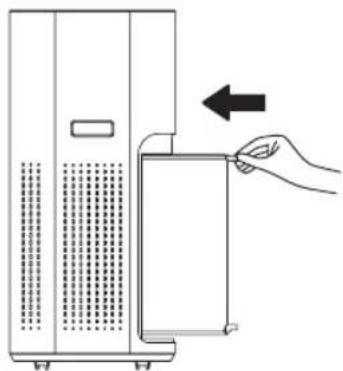
Install the HEPA filter.
natural_image
Diagram of a hand inserting a card into a device (no text or symbols present)STEP 5
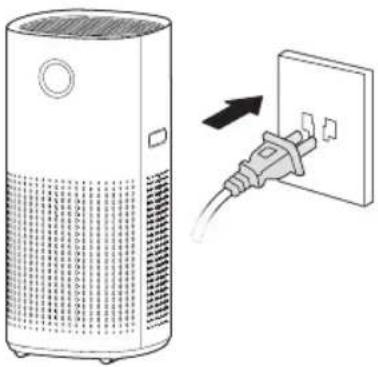
Plus in adapter cable and plug into power supply.
natural_image
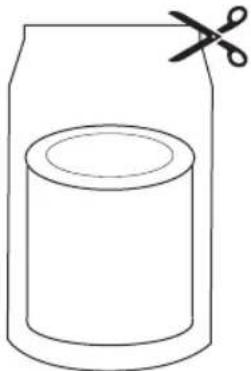
Illustration of a portable air purifier next to an open electrical outlet plug (no text or symbols)STEP 2
Remove the internal filter from the machine.
natural_image
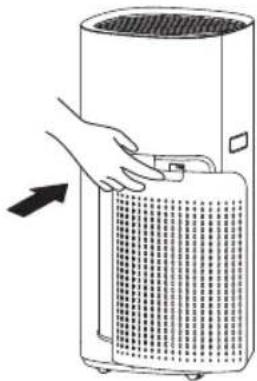
Simple line drawing of a cylindrical container with scissors placed above it (no text or symbols)STEP 4
Close the filter cover.
natural_image
Illustration of a hand pressing down on a portable air conditioner unit (no text or symbols visible)Operating Instructions
GGSPA200W
GGSPA360W
NOTE
- The machine enters the working mode before the standby state every time it is switched on without power supply.
• After an accidental power failure (e.g. power failure at home or unplugging the power cord for normal operation) and re-powering, it automatically resumes the working state before the power failure.
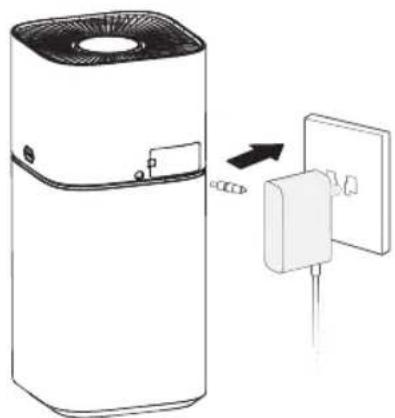
STEP 1
Plug in the power adapter and then connect it to the power source.
natural_image
Diagram of a large air purifier next to a wall-mounted electrical outlet (no text or symbols present)STEP 2
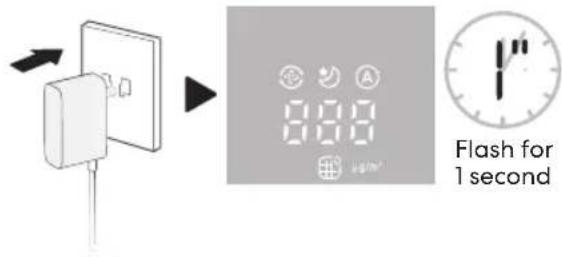
When powered on for the first time, the display panel will flash for 1 second and then turn off, entering the standby mode.
STEP 3
Press the power/standby button to turn on the standby mode.
natural_image
Simple circular icon with a black power button symbol (no text or numbers)STEP 4
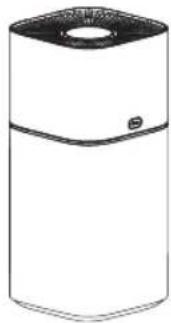
The particulate matter sensor enters the preheating state. The air quality LED will turn on after 10 seconds and enter normal operation.
natural_image
Simple line drawing of a cylindrical device with a top and side panels (no text or symbols)STEP 5
The purifier will enter the auto mode after initial power-on.
GGSPA200W & GGSPA360W
Auto mode
Operating Instructions
GGSPA500W
GGSPA600W
NOTE
- The machine enters the working mode before the standby state every time it is switched on without power supply.
• After an accidental power failure (e.g. power failure at home or unplugging the power cord for normal operation) and re-powering, it automatically resumes the working state before the power failure.
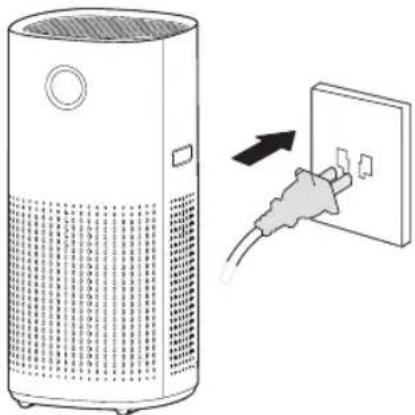
STEP 1
Plug in the power adapter and then connect it to the power source.
natural_image
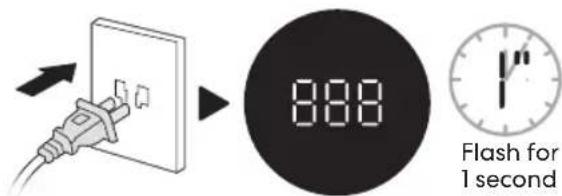
Illustration of a portable air purifier next to an open electrical outlet with a hand inserting wires (no text or symbols)STEP 2
When powered on for the first time, the display panel will flash for 1 second and then turn off, entering the standby mode.
STEP 3
Press the power/standby button to turn on the standby mode.
natural_image
Simple circular icon with a black power button symbol (no text or numbers)STEP 4
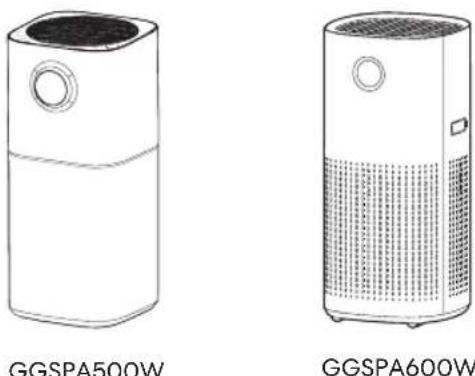
The particulate matter sensor and VOC sensor (GGSPA600W) enters the preheating state. The air quality LED will turn on after 10 seconds and enter normal operation.
natural_image
Line drawings of two household air purifiers, GGSPA500W and GGSPA600W, shown from different angles (no text or symbols on the devices themselves)STEP 5
The purifier will enter fan speed mode after initial power-on.

natural_image
Simple line drawing of a four-petal flower inside a circle (no text or symbols)Operating Instructions (Continued)
GGSPA200W
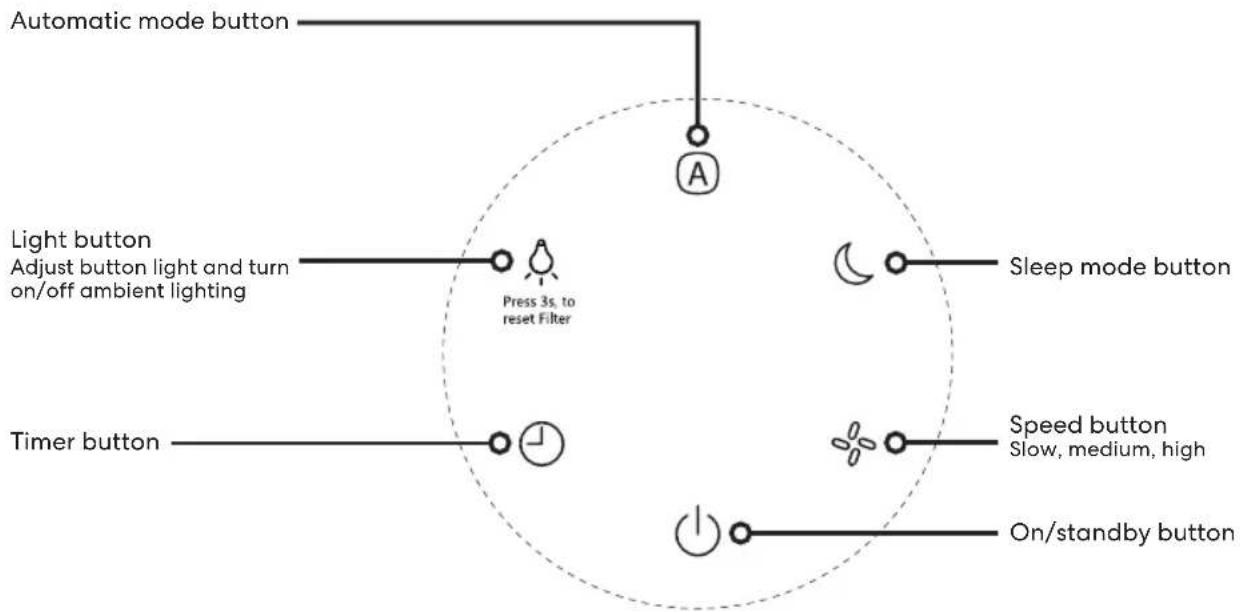
CONTROL PANEL
flowchart
graph TD
    A["Automatic mode button"] --> B["A"]
    C["Light button\nAdjust button light and turn on/off ambient lighting"] --> D["Press 3s, to reset Filter"]
    E["Timer button"] --> F["On/standby button"]
    G["Sleep mode button"] --> H["Slow, medium, high"]
    I["Speed button\nSlow, medium, high"] --> J["On/standby button"]
DISPLAY PANEL
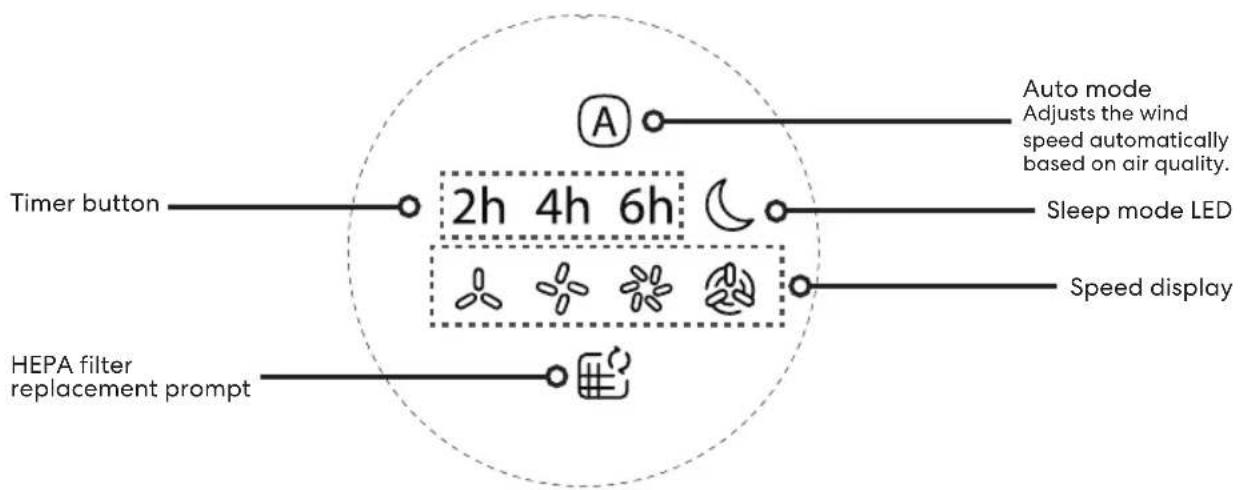
Air quality LED
Blue — Excellent
Green — Good
Orange — Medium
Red — Poor
Operating Instructions (Continued)
GGSPA360W
CONTROL PANEL
Ionizer function on/off button Note: The ionizer function is designed to neutralise harmful substances such as airborne mould and viruses in the air, thus achieving air purification effects.
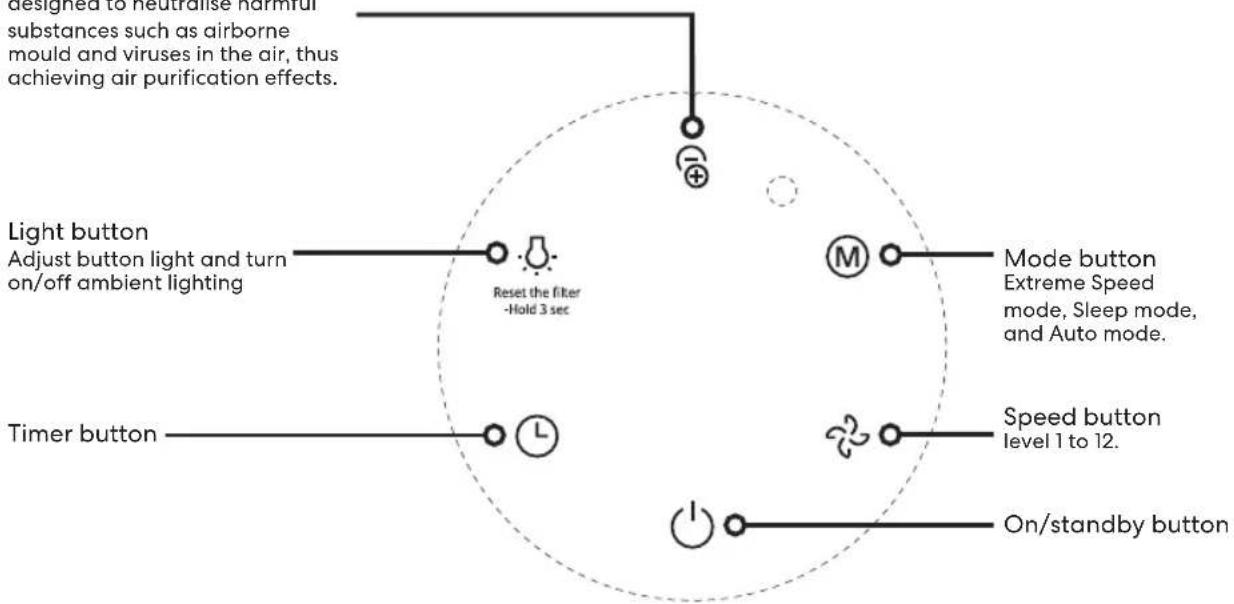
DISPLAY PANEL
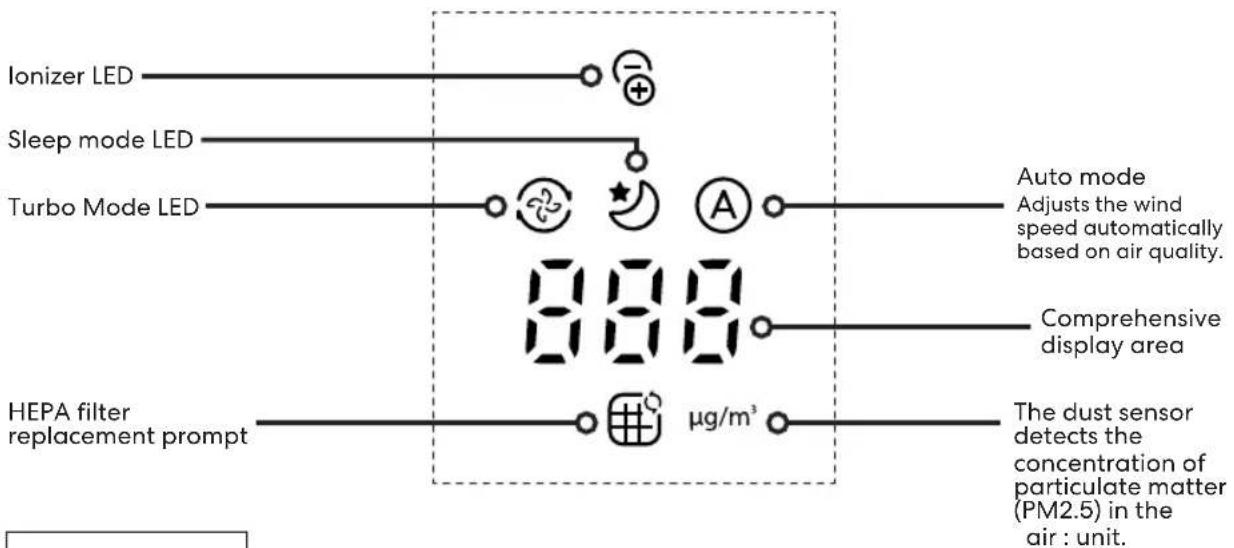
Air quality LED
Blue — Excellent
Green — Good
Orange — Medium
Red — Poor
Operating Instructions (Continued)
GGSPA500W
CONTROL PANEL
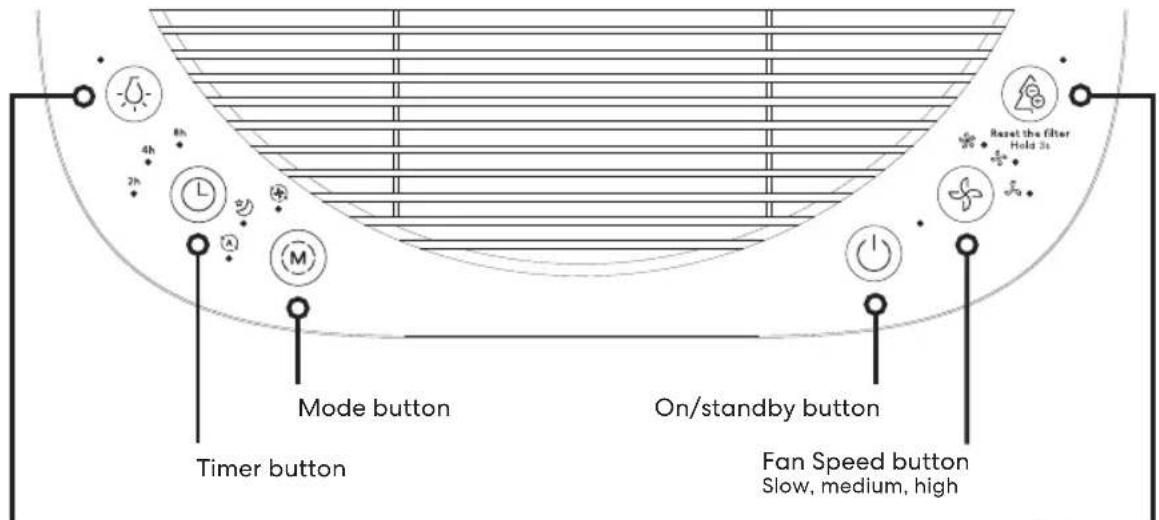
Light button
Used for switch the light of the purifier.
lonizer function on/off button
Note: The ionizer function is designed to neutralise harmful substances such as airborne mould and viruses in the air, thus achieving air purification effects.
DISPLAY PANEL
Operating Instructions (Continued)
GGSPA600W
CONTROL PANEL
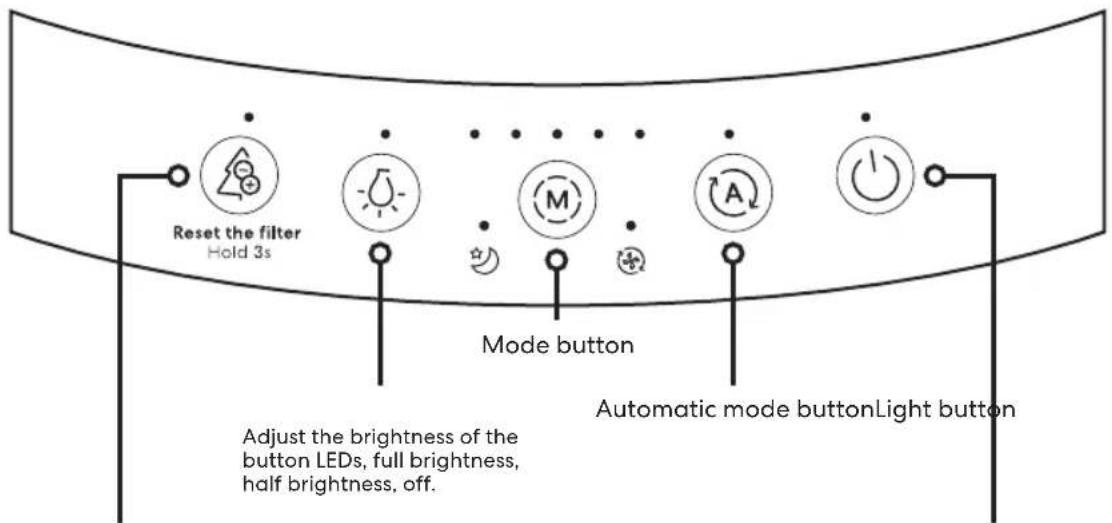
lonizer function on/off button
Note: The ionizer function is designed to neutralise
harmful substances such as airborne mould and viruses
in the air, thus achieving air purification effects.
On/standby button
DISPLAY PANEL
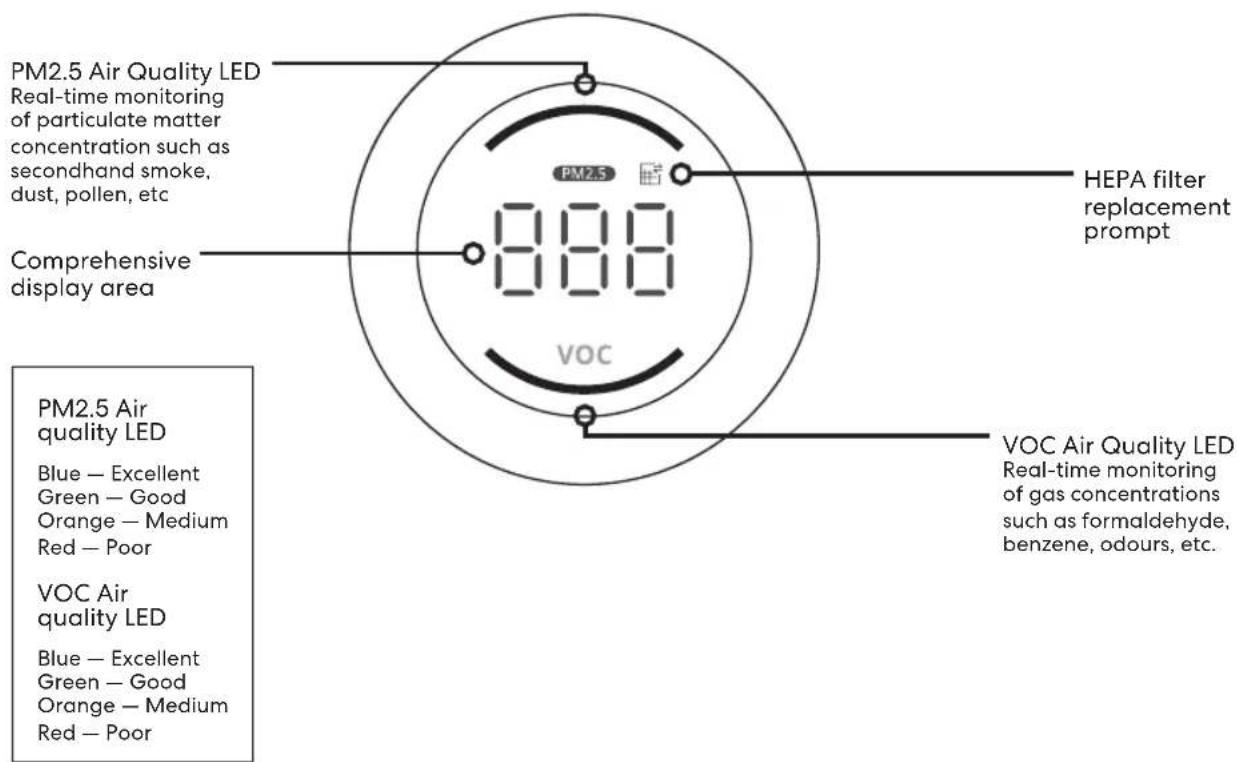
PM2.5 Air Quality LED
Real-time monitoring of particulate matter concentration such as secondhand smoke, dust, pollen, etc
Comprehensive display area
PM2.5 Air quality LED
Blue — Excellent Green — Good Orange — Medium Red — Poor
VOC Air quality LED
Blue — Excellent Green — Good Orange — Medium Red — Poor
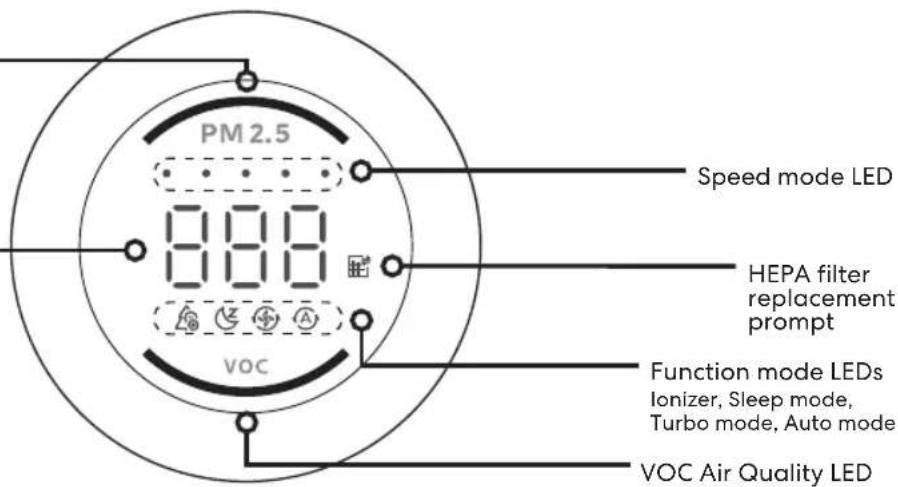
Speed mode LED
HEPA filter replacement prompt
Function mode LEDs Ionizer, Sleep mode, Turbo mode, Auto mode
VOC Air Quality LED Real-time monitoring of gas concentrations such as formaldehyde, benzene, odours, etc.
This page is intentionally left blank
Cleaning and Maintenance
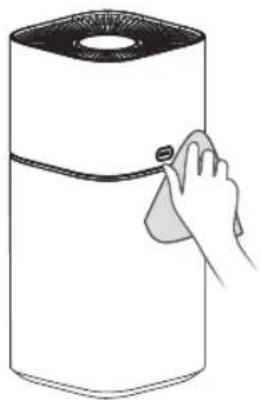
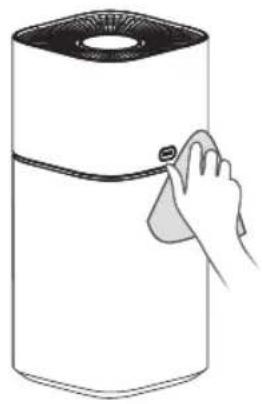
MAIN UNIT
Wipe the body with a soft towel.
natural_image
Illustration of a hand cleaning a cylindrical container with a cloth (no text or symbols)VENT GRILLE
Use a vacuum cleaner to remove dust or wipe with a cloth.
natural_image
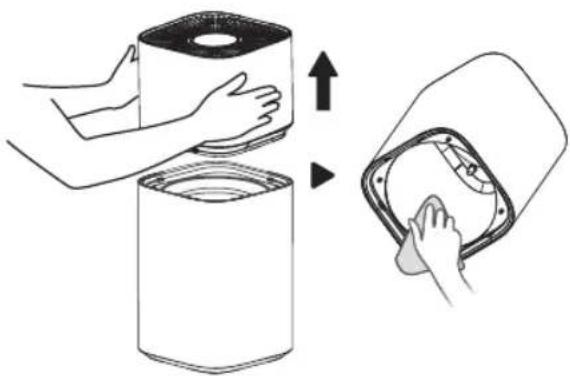
Illustration of a hand cleaning a cylindrical container with a cloth (no text or symbols)BODY INTERIOR
Press the "PUSH" button on the body and lift the upper part of the air purifier. Use a vacuum cleaner to remove dust or wipe with a cloth
natural_image
Illustration showing two steps of a device being placed on cylindrical containers, one with upward arrow indicating motion (no text or symbols)CLEANING THE DUST SENSOR
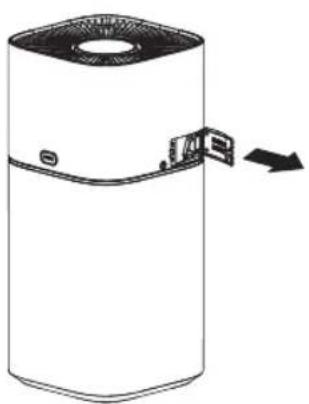
STEP 1
Open the back cover.
natural_image
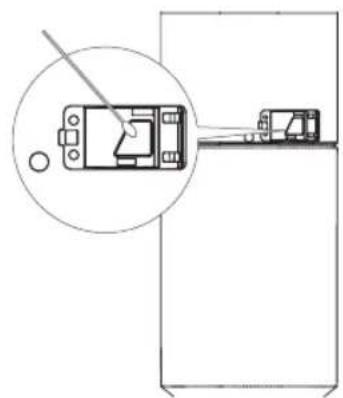
Diagram of a cylindrical device with a lid and arrow indicating direction (no text or symbols)STEP 2
Use a vacuum cleaner to remove dust from the sponge inside the back cover, and then use a cotton swab to clean the vent of the dust sensor.
natural_image
Diagram showing a device with a magnified inset view, no text or symbols presentCleaning and Maintenance (Continued)
REGULAR MAINTENANCE
When the air purifier is not in use for a long period of time, it is recommended to store the entire unit in a packaging bag to prevent dust from contaminating the filters;
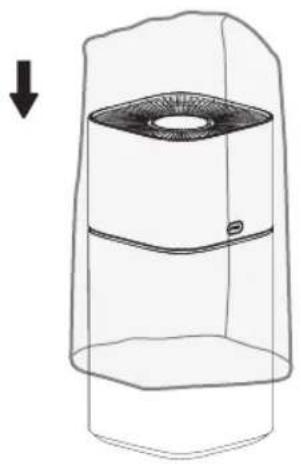
natural_image
Diagram of a cylindrical container with a central circular top and a side slot, showing an arrow pointing downward (no text or symbols)REPLACEMENT OF FILTER COMPONENTS
STEP 1
Filter model: FC-40Z2
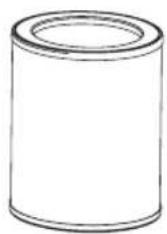
STEP 3
Replace the old filter with a new one
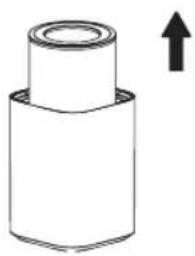
natural_image
Simple line drawing of a cylindrical mechanical part with an upward arrow indicating direction (no text or symbols)After removing the filters from the packaging bag, it is advised to regularly run the air purifier to keep the filters dry and prevent the growth of bacteria or unpleasant odours;
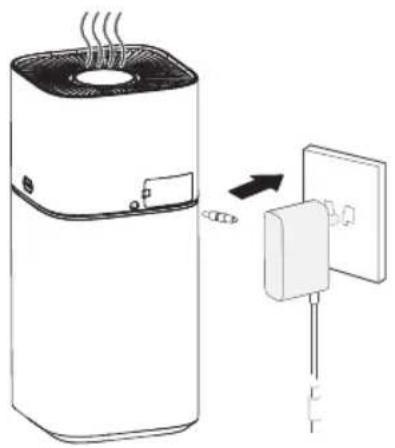
natural_image
Diagram showing a steam rising from a cylindrical device to a wall-mounted electrical outlet (no text or symbols present)STEP 2
When the filter replacement LED is ON, it indicates that the filter needs to be replaced

GGSPA200W & GGSPA360W

GGSPA500W & GGSPA600W
STEP 4
Press and hold the light button (GGSPA200W & GGSPA360W) or ionizer button (GGSPA500W & GGSPA600W) for 3 sec to reset the filter. The filter replacement LED will turn off

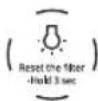
Light button
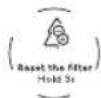

lonizer button
Cleaning and Maintenance (Continued)
FILTER CLEANING AND REPLACEMENT
NOTE
Before performing any maintenance operation, please make sure to turn off the air purifier and disconnect the power supply.
STEP 1
Unplug the air purifier and remove the filter components.
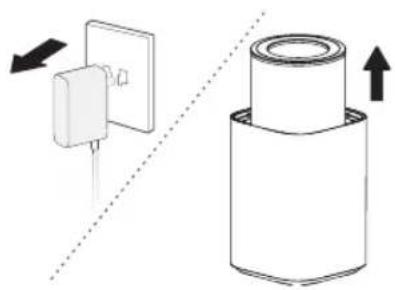
natural_image
Diagram showing a wall-mounted switch and a cylindrical housing with an upward arrow, no text or symbols present.STEP 3
Dampen the intake grilles and gently brush the surface of the grilles with a soft bristle brush dipped in kitchen detergent to clean off any accumulated dust
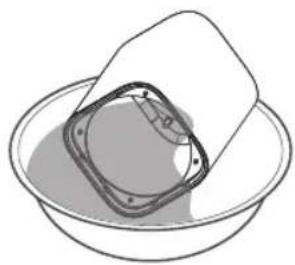
natural_image
Simple line drawing of a container with a lid partially submerged in liquid (no text or symbols)STEP 5
Allow the inlet grilles to air dry until no liquid is draining out;
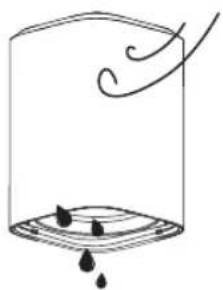
natural_image
Simple line drawing of a container with liquid and small droplets, no text or symbols presentSTEP 2
Use a vacuum cleaner to remove dust or wipe with a dry cloth.
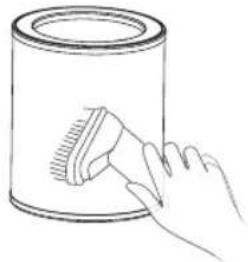
natural_image
Line drawing of a hand using a brush to clean or brush the paint on a cylindrical container (no text or symbols)STEP 4
Rinse the inlet grilles thoroughly with clean water
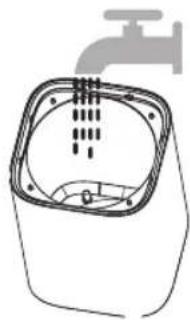
natural_image
Diagram of a faucet with liquid level indicator inside a square basin (no text or symbols)STEP 6
Install the filter components.
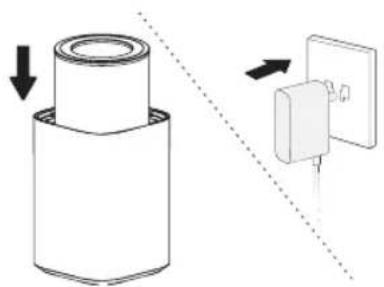
natural_image
Diagram showing a cylindrical object with a downward arrow and a separate mechanical component with an arrow (no text or symbols)- It is recommended to clean the filters every two weeks and replace them every six months;
- Do not wash the filters with water
- When cleaning the filters, it is advisable to use a smaller, soft brush or a household vacuum cleaner
- When using a brush, brush horizontally along the filters, avoiding brushing vertically to prevent damage to the filters
- When using a vacuum cleaner for cleaning, maintain a distance of 5-10mm between the suction inlet and the surface of the filters to avoid damaging them
• The filters act as collectors for air pollutants, and severe pollution can accelerate the development of unpleasant odours. The filter replacement frequency can be adjusted based on the usage environment
Technical Specifications
Below outlines the technical specifications for your Air Purifier.
GGSPA200W
GGSPA360W
| Model GGSPA200W GGSPA360W | ||
| Operating voltage 24V 24V | --- | --- |
| Rated Power 22W 35W | ||
| CADR (particulate matter) 200 | ^3/h 380m | ^3/h |
| Noise 35-65dB(A) 35-65dB(A) | ||
| Usable area 27m | ^2 | 30.6 m^2 |
| Accessory Input | Output | |
| Power adapter | 100/240V~ 50/60Hz 1.5A | 24V--- 1.5A |
• The performance parameters listed in the table are measured at the factory and are for reference only
- Due to product improvements, the parameters may be subject to change. Please refer to the product nameplate for the specific parameters
- The applicable area is calculated based on the theoretical value of (0.07\~0.12) multiplied by the CADR of particulate matters. However, the applicable area may vary depending on factors such as the environmental conditions and indoor pollution levels
- Purification principle: The air purifier's fan draws in air and filters it through the built-in filter, primarily removing dust particles (such as PM2.5) for purification purposes
Technical Specifications
Below outlines the technical specifications for your Air Purifier.
GGSPA500W GGSPA600W
| Model GGSPA500W GGSPA600W | ||
| Operating voltage 220-240V~ 220-240V~ | ||
| Frequency 50Hz 50Hz | ||
| Rated Power 50W 49W | ||
| CADR (particulate matter) 500 | ^3/h 600 | ^3/h |
| Noise 35-66dB(A) 35-66dB(A) | ||
| Usable area | 35-60m ^2 | 45-78m ^2 |
• The performance parameters listed in the table are measured at the factory and are for reference only
- Due to product improvements, the parameters may be subject to change. Please refer to the product nameplate for the specific parameters
- The applicable area is calculated based on the theoretical value of (0.07\~0.12) multiplied by the CADR of particulate matters. However, the applicable area may vary depending on factors such as the environmental conditions and indoor pollution levels
- Purification principle: The air purifier's fan draws in air and filters it through the built-in filter, primarily removing dust particles (such as PM2.5) for purification purposes
• VOC Detection: Primarily detects the overall concentration of volatile organic compounds, such as formaldehyde, alcohol, benzene, carbon monoxide, sulfides, and other harmful gases. It does not measure the actual concentration of single volatile organic gases (e.g. formaldehyde)
- PM2.5 Detection: Primarily detects particulate matter ranging from 1 to 10 micrometers, including tobacco smoke, pollen, household dust, and other airborne particles
Sensor Sensitivity Range
• VOC Detection Method: Spray alcohol or perfume spray near the sensor and observe changes in the sensor
- PM2.5 Detection Method: Place cigarettes or incense near the sensor and observe changes in the sensor. (Please handle with care to avoid ash falling into the sensor, affecting detection accuracy)
Troubleshooting Guide
GGSPA500W
GGSPA600W
Operation of your appliance can lead to errors and malfunctions. The following tables contain possible causes and notes for resolving an error message or malfunction. It is recommended to read the table below carefully in order to save your time and money that may cost for calling to the service center.
| Problem Cause Solution | ||
| PM2.5 air quality LED remains red when running continuously | Room size may exceed the purification capacity of the machine | Keep the purifier running continuously |
| Filter assembly may not be installed install the filter assembly properly | ||
| Purifier cannot work | Power cord may not be plugged in, or of poor contact | Plug in the power cord and ensure good contact |
| Power switch is not turned on Turn on the power switch | ||
| Poor smoke and odor removal | Filter assembly may not be installed install the filter assembly properly | |
| Filter assembly may be past its lifespan | Replace the filter assembly with a new one | |
| Air inlet may be obstructed by foreign objects | Clear the foreign objects from theair inlet | |
| PM2.5 air quality LED does not change | Sensor sensitivity may be unstable after a period of operation; if it remains green, the air may be clean | Wait for a few minutes after starting operation, and blow cigarette smoke towards the sensor; if the indicator light changes color, it's normal |
| Purifier may be placed in a location where it's difficult to detect dirt, or sensor may be dirty | Move the purifier to a different location, or clean the sensor | |
| Strong indoor odours, which may cause a decrease in sensor sensitivity | Adjust the fan speed to high and run for several hours to a day | |
| Filter cleaning LED remains on | Filter reset operation may not have been completed after cleaning or replacing the filter | Complete the filter reset operation as required by the model after cleaning or replacing the filter |
| Difficulties in removing odours and smoke | Filter assembly may still be wrapped in packaging | Remove the packaging from the filter assembly |
| Display shows “E7” | Key board and control board communication failure | Contact after-sales service for assistance |
In case of following situations, please send for repair:
1. The machine operates abnormally or fails to operate despite trying the above methods;
2. Abnormal operation occurs due to the infiltration of external substances or water.
Purchase Details
For future reference, please record the following information which can be found on the rating plate and the date of purchase which can be found on your sales invoice.
STORE DETAILS
| STORE NAME | |
| ADDRESS | |
| TELEPHONE | |
| PURCHASE DATE |
PRODUCT DETAILS
| MODEL NO. | | |
| SERIAL NO.* | | |
Attach your receipt to this page

Warranty Information
WARRANTY TERMS & CONDITIONS AIR PURIFIER
This document sets out the terms and conditions of the product warranties for Residentia Group Appliances. It is an important document. Please keep it with your proof of purchase documents in a safe place for future reference should you require service for your Appliance.
1. IN THIS WARRANTY
(a) ‘acceptable quality’ as referred to in clause 10 of this warranty has the same meaning referred to in the ACL;
(b) 'ACL' means Trade Practices Amendment (Australian Consumer Law) Act (No.2) 2010;
(c) 'Appliance' means any Residentia Group product purchased by you accompanied by this document;
(d) 'ASR' means Residentia Group authorised service representative;
(e) ‘Residentia Group’ means Residentia Group Pty Ltd of 165 Barkly Ave, Burnley VIC 3121, ACN 600 546 656 in respect of Appliances purchased in Australia;
(f) ‘major failure’ as referred to in clause 10 of this warranty has the same meaning referred to in the ACL and includes a situation when an Appliance cannot be repaired or it is uneconomic for Residential Group, at its discretion, to repair an Appliance during the Warranty Period;
(g) 'Warranty Period' means:
(i) where the Appliance is used for personal, domestic or household use (i.e. normal single family use) as set out in the instruction manual, the Appliance is warranted against manufacturing defects for 24 months, following the date of original purchase of the Appliance;
(h) 'you' means the purchaser of the Appliance not having purchased the Appliance for re-sale, and 'your' has a corresponding meaning.
2. This warranty only applies to Appliances purchased and used in Australia and is in addition to (and does not exclude, restrict, or modify in any way) any non-excludable statutory warranties in Australia.
3. During the Warranty Period Residentia Group or its ASR will, at no extra charge if your Appliance is readily accessible for service, without special equipment and subject to these terms and conditions, repair or replace any parts which it considers to be defective. Residentia Group or its ASR may use remanufactured parts to repair your Appliance. You agree that any replaced Appliances or parts become the property of Residentia Group. This warranty does not apply to light globes, batteries, filters or similar perishable parts.
4. Parts and Appliances not supplied by Residential Group are not covered by this warranty.
Warranty Information (Continued)
- You will bear the cost of transportation, travel and delivery of the Appliance to and from Residentia Group or its ASR. If you reside outside of the service area, you will bear the cost of:
(a) travel of an authorised representative;
(b) transportation and delivery of the Appliance to and from Residentia Group or its ASR, in all instances, unless the Appliance is transported by Residentia Group or its ASR, the Appliance is transported at the owner's cost and risk while in transit to and from Residentia Group or its ASR.
-
Proof of purchase is required before you can make a claim under this warranty.
-
You may not make a claim under this warranty unless the defect claimed is due to faulty or defective parts or workmanship. Residentia Group is not liable in the following situations (which are not exhaustive):
(a) the Appliance is damaged by:
(i) accident
(ii) misuse or abuse, including failure to properly maintain or service
(iii) normal wear and tear
(iv) power surges, electrical storm damage or incorrect power supply
(v) incomplete or improper installation
(vi) incorrect, improper or inappropriate operation
(vii) insect or vermin infestation
(viii) failure to comply with any additional instructions supplied with the Appliance;
(b) the Appliance is modified without authority from Residentia Group in writing;
(c) the Appliance's serial number or warranty seal has been removed or defaced;
(d) the Appliance was serviced or repaired by anyone other than Residentia Group, an authorised repairer or ASR.
-
This warranty, the contract to which it relates and the relationship between you and Residentia Group are governed by the law applicable where the Appliance was purchased.
-
To the extent permitted by law, Residentia Group excludes all warranties and liabilities (other than as contained in this document) including liability for any loss or damage whether direct or indirect arising from your purchase, use or non use of the Appliance.
-
For Appliances and services provided by Residentia Group in Australia, the Appliances come with a guarantee by Residentia Group that cannot be excluded under the Australian Consumer Law. You are entitled to a replacement or refund for a major failure and for compensation for any other reasonably foreseeable loss or damage. You are also entitled to have the Appliance repaired or replaced if the Appliance fails to be of acceptable quality and the failure does not amount to a major failure. The benefits to you given by this warranty are in addition to your other rights and remedies under a law in relation to the Appliances or services to which the warranty relates.
-
At all times during the Warranty Period, Residential Group shall, at its discretion, determine whether repair, replacement or refund will apply if an Appliance has a valid warranty claim applicable to it.
-
Missing parts are not covered by warranty. Residentia Group reserves the right to assess each request for missing parts in a case by case basis. Any parts that are not reported missing in the first week after purchase will not provide free of charge.
-
To enquire about claiming under this warranty, please follow these steps:
(a) carefully check the operating instructions, user manual and the terms of this warranty;
(b) have the model and serial number of the Appliance available;
(c) have the proof of purchase (e.g. an invoice) available;
(d) telephone the numbers shown below.
- You accept that if you make a warranty claim, Residentia Group and its ASR may exchange information in relation to you to enable Residentia Group to meet its obligations under this warranty.
IMPORTANT
Before calling for service, please ensure that the steps in point 13 have been followed.
Telephone contacts
▶ Service: Please call 1300 11 HELP (4357)
▶ Spare Parts: Please call 1300 11 SPARE (7727)
The Australian Consumer Law requires the inclusion of the following statement with this warranty:
Our goods come with guarantees that cannot be excluded under the Australian Consumer Law. You are entitled to a replacement or refund for a major failure and for compensation for any other reasonably foreseeable loss or damage. You are also entitled to have the goods repaired or replaced if the goods fail to be of acceptable quality and the failure does not amount to a major failure.
An initiative by Residentia Group

T. 1300 11 4357
E. support@residentiagroup.com.au
www.solt.house
- Congratulations on purchasing your new Air Purifier! The Sôlt brand is proudly distributed within Australia by Residentia Group Pty Ltd.
- Residentia Group
- Sôlt
- Contents 2 Welcome
- Customer Care
- General Instructions
- Your Air Purifier
- PRODUCT OVERVIEW
- GGSPA200W
- GGSPA360W
- GGSPA500W
- GGSPA600W
- Assembly Instructions
- STEP 1
- STEP 3
- STEP 5
- STEP 2
- STEP 4
- Operating Instructions
- NOTE
- Operating Instructions (Continued)
- CONTROL PANEL
- DISPLAY PANEL
- Cleaning and Maintenance
- MAIN UNIT
- VENT GRILLE
- BODY INTERIOR
- CLEANING THE DUST SENSOR
- Cleaning and Maintenance (Continued)
- REGULAR MAINTENANCE
- REPLACEMENT OF FILTER COMPONENTS
- FILTER CLEANING AND REPLACEMENT
- STEP 6
- Technical Specifications
- Troubleshooting Guide
- Purchase Details
- Attach your receipt to this page
- Warranty Information
- WARRANTY TERMS & CONDITIONS AIR PURIFIER
- IN THIS WARRANTY
- Warranty Information (Continued)
- IMPORTANT
- An initiative by Residentia Group
Brand : Sôlt
Model : GGSPA600W
Category : Air purifier