NBX25M - Subwoofer NAKAMICHI - Free user manual and instructions
Find the device manual for free NBX25M NAKAMICHI in PDF.

| Product Type | Subwoofer |
| Brand | Nakamichi |
| Model | NBX25M |
| RMS Power Output | 100W |
| Peak Power Output | 200W |
| Impedance | 4 ohms |
| Frequency Response | 30 Hz - 150 Hz |
| Driver Size | 8 inches (203 mm) |
| Dimensions (W x H x D) | 12.5 x 14.5 x 13 inches (318 x 368 x 330 mm) |
| Weight | 18.5 lbs (8.4 kg) |
| Power Supply | AC 120V / 60Hz (or 240V / 50Hz, depending on region) |
| Connectivity | RCA LFE input, speaker level input |
| Enclosure Type | Bass reflex (ported) |
| Color | Black |
| Standby Power Consumption | < 0.5W |
| Adjustable Crossover | 40 Hz - 120 Hz |
| Phase Control | 0° / 180° |
| Auto Power On/Off | Yes, signal sensing |
| Maintenance | Wipe with a soft, dry cloth. Do not use solvents. |
| Safety Precautions | Do not expose to water or moisture. Place on a stable surface. |
| Spare Parts & Repairability | Contact Nakamichi support for service. No user-serviceable parts inside. |
| General Information | Designed for home theater and music systems. Enhances low frequencies. |
Frequently Asked Questions - NBX25M NAKAMICHI
User questions about NBX25M NAKAMICHI
0 question about this device. Answer the ones you know or ask your own.
Ask a new question about this device
Download the instructions for your Subwoofer in PDF format for free! Find your manual NBX25M - NAKAMICHI and take your electronic device back in hand. On this page are published all the documents necessary for the use of your device. NBX25M by NAKAMICHI.
USER MANUAL NBX25M NAKAMICHI
natural_image
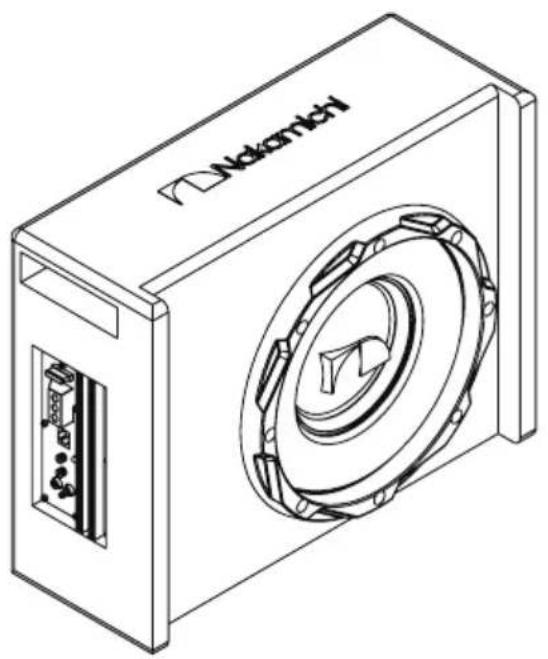
Black speaker chamber with a red logo on the front panel, no visible text or symbols10" ACTIVE SUBWOOFER BOX
Dear Customer,
Congratulations on purchasing our Nakamichi mobile system product for your sound system.
This product has been designed and manufactured to Nakamichi's exacting standards to ensure many years of audio enjoyment. For the best performance, we recommend that you have your Nakamichi product installed by an authorized Nakamichi dealer.
If you would like to install this product on your own, we recommend for you to go through this manual to familiarize yourself with all the installation requirements and procedures.
If you encounter any issues or if you have any questions on the operation of this product, please contact your nearest authorized Nakamichi dealer for assistance, or you may also contact us through our website or social media channels.
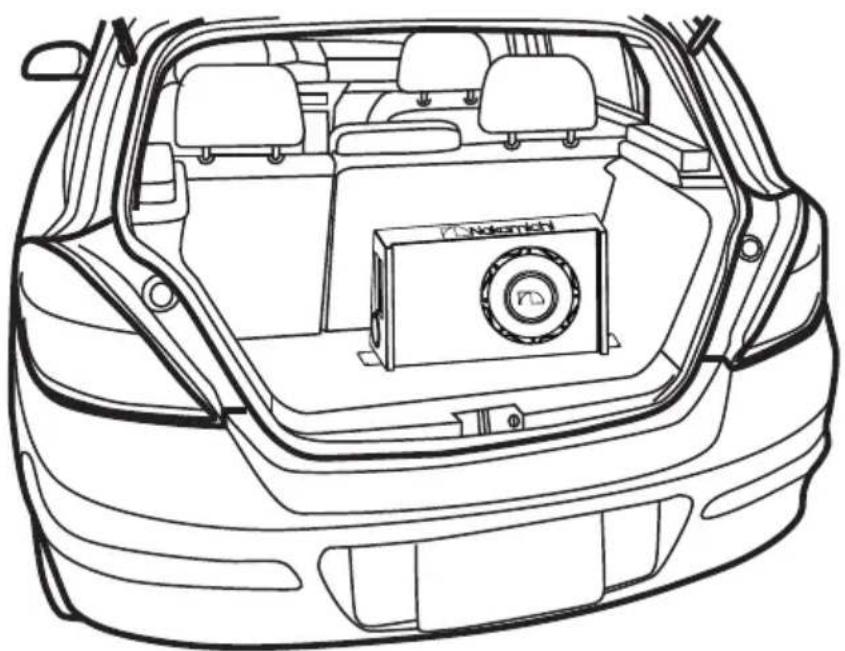
Installation of Your Product
In today's modern vehicles, it is very easy to cause damage to existing systems through improper installation. Please follow and scrutinize all wiring diagrams to ensure that you have connected everything in its proper place.
If you find yourself uncomfortable of unfamiliar with understanding the wiring and installation diagrams or testing instructions, do contact your nearest Nakamichi dealer to perform the installation for you.
Safety Warnings and Considerations
- Clean only with a dry cloth or other similar materials.
- Install your product in a dry, well-ventilated location that does not interfere with your vehicle's safety equipment.
- Do not block any ventilation openings when installing this product.
- Do not mount the product in the engine compartment of your vehicle or in any areas of extreme heat such as mufflers, silencers, exhaust pipes or other heat producing apparatus.
- Securely mount the product so that it does not come loose in the event of a collision or as a result of repeated vibrations that might occur during normal operation.
• Installation of the apparatus must be done with great care to prevent damage to your vehicle's fuel lines, power, and other electrical wiring, hydraulic brake lines, and other systems. If possible, always visit your nearest Nakamichi dealer to perform the installation.
- Do not run any wiring outside or underneath the vehicle. Keep all wires inside the vehicle.
• Take the necessary precautions when making connections to the vehicle's battery to avoid any potential shock.
- Protect all system wires from sharp edges by carefully routing them, always use rubber grommets to protect wiring and cables whenever you are installing them through metal openings.
- Secure all wiring using cable ties or wire clamps to protect them from moving parts and sharp edges.
- This apparatus shall not be exposed to dripping or splashing, and no object filled with liquids, shall be placed on the apparatus.
- Refer all servicing to qualified service personnel. Servicing is required when the apparatus has been damaged in any way, such as the power input terminals are damaged, liquid has been spilled or objects have fallen into the apparatus, the apparatus has been exposed to rain or moisture, does not operate normally, or has been dropped.
- Fuses shall be replaced only with the correct type and fuse value, and only when the apparatus is powered off.
- Exposure to high sound pressure levels may lead to permanent hearing loss. Take every precaution to protect your hearing.
- This product is designed specifically for use with 12 volt, negative-ground electrical systems only. Using this product in systems with positive ground and/or voltages other than 12V may result in damage to the product and your system.
natural_image
Technical line drawing of a device labeled 'Nektentech' with a circular component and ports (no readable text beyond label)
text_image
148 173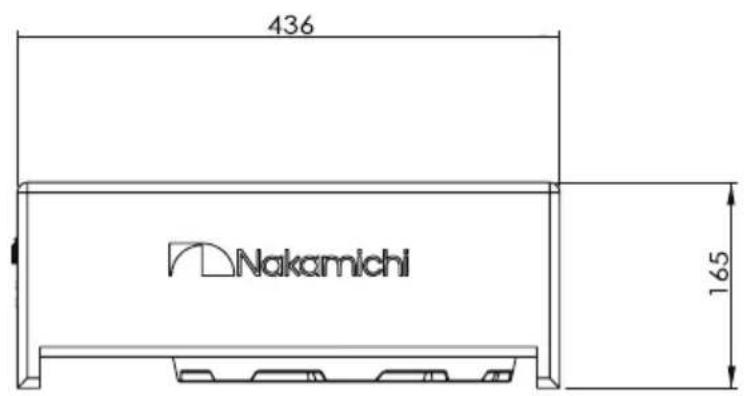
text_image
436 Nakamichi 165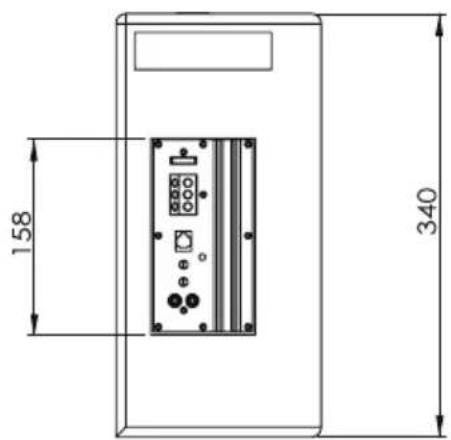
text_image
158 340SPECIFICATIONS
| Subwoofer: | 10" Active Subwoofer Box |
| N-power: | 150watts |
| Peak Power: | 1000watts |
| Sensitivity(dB/W/m): | 86 ± 3dB |
| Subwoofer Magnet: | 120 x 60 x 20mm |
| Frequency Response: | 74 - 300Hz |
| Impedance: | 4 Ω |
| Voice Coil: | ASVΦ35.5mm |
| Magnet Mass: | 32Oz(907g) |
| Net Mass (1set): | Approx. 8.2kg |
Check and identify the contents of your package:
- Subwoofer x 1pc
- Screw ∅4x25mm x 8pcs
- Fuse 20A x 1pc
- Installation Bracket x 2pcs
- Remote Cable 5m x 1pc
- User Manual x 1pc
- Screw ∅3x14mm x 2pcs
- Remote Control x 1pc
INSTALLATION
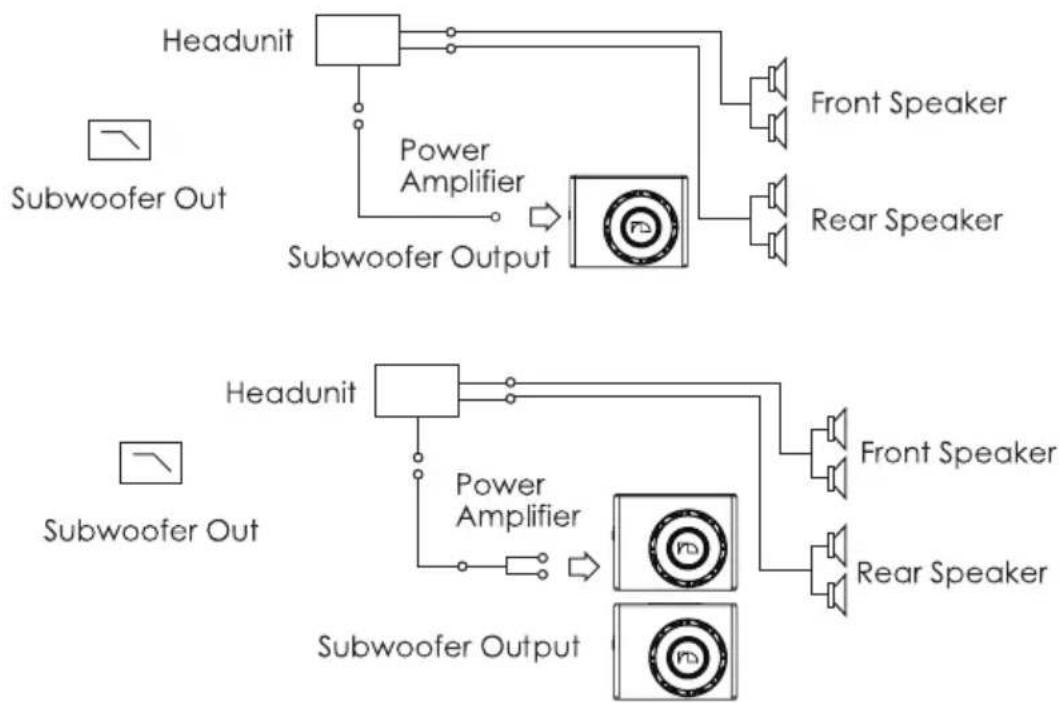
flowchart
graph TD
    A["Headunit"] --> B["Power Amplifier"]
    B --> C["Subwoofer Output"]
    D["Front Speaker"] --> E["Speaker"]
    F["Rear Speaker"] --> G["Speaker"]
    H["Subwoofer Out"] --> I["Headunit"]
    J["Subwoofer Output"] --> K["Power Amplifier"]
    K --> L["Subwoofer Output"]
    M["Front Speaker"] --> N["Speaker"]
    O["Rear Speaker"] --> P["Speaker"]
    Q["Subwoofer Output"] --> R["Power Amplifier"]
    S["Subwoofer Output"] --> T["Subwoofer Output"]
natural_image
Line drawing of a car interior showing the rear and front views with no text or symbols
text_image
NBX25M INPUT R L FILTER HZ 140 40 0° 180° MAX MIN PRE PWR 160 LEVEL REMOTE REM +12V GND POWER FUSE ① ③ ⑤ ⑥ ④ ② ⑧ ⑦① Low Level Inputs The unit accepts low level RCA inputs here.
② Bass Boost Adjustment For optimal bass adjustment according to listening preferences and music characteristics.
③ Low Pass Filter You can select a cut off frequency from 40Hz to 150Hz.
④ Bass Boost Remote Connect the bass boost remote to this port and change your bass boost settings on the go.
⑤ Phase Switch Adjust the phase from 0 to 180 degrees.
⑥ Power and Protection Indicator When the power is turned on, the power indicator shows green.
⑦ Fuse Socket Always replace the fuse of the rating prescribed.
⑧ Power Input Terminal
PARTS INCLUDED
① Installation Bracket x 2pcs
② Screw ∅3x14mm x 2pcs
③ Screw ∅4x25mm x 8pcs
④ Remote Cable 5m x 1pc
⑤ Remote Control x 1pc
⑥ Fuse 20A x 1pc

text_image
Screw Ø4x25mm x 8pcs Remote Cable 5m x 1pc Remote Control x 1pc Fuse 20A x 1pc
text_image
QR code with a red logo in the center, likely linking to a digital resource or website.SCAN OUR QR CODE OR VISIT WWW.NAKAMICHICARAUDIO.COM
FOR COMPLETE AUDIO SETTINGS INSTRUCTIONS
f nakamichi.global 📷 nakamichi.caraudio
