
Planetarium Projector - Toy Sharper Image - Free user manual and instructions
Find the device manual for free Planetarium Projector Sharper Image in PDF.


| Product Type | Planetarium Projector |
| Brand | Sharper Image |
| Model | Planetarium Projector |
| Color | Black with white accents |
| Dimensions | 6 x 4 x 4 inches (15.2 x 10.2 x 10.2 cm) |
| Weight | 0.5 lb (227 g) |
| Power Source | Battery operated |
| Battery Type | 3 AA batteries (not included) |
| Battery Life | Approximately 4-6 hours continuous use |
| Projection Distance | Up to 8 feet (2.4 m) |
| Number of Stars | Over 10,000 stars and constellations |
| Rotation Function | Yes, automatic rotation for dynamic effect |
| Timer Setting | 30-minute auto shut-off timer |
| Focus Adjustment | Manual focus ring for sharp image |
| Material | ABS plastic |
| Lens Type | Optical glass lens |
| Recommended Age | 8 years and up |
| Safety Warnings | Choking hazard - small parts. Not for children under 3 years. |
| Cleaning Instructions | Wipe lens gently with a soft, dry cloth. Do not use liquids. |
| Spare Parts Availability | Replacement bulbs and batteries widely available |
| Contents | Planetarium projector, constellation guide, instruction manual |
| Usage Instructions | Place on flat surface, point at ceiling, turn on, and focus. |
Frequently Asked Questions - Planetarium Projector Sharper Image
User questions about Planetarium Projector Sharper Image
0 question about this device. Answer the ones you know or ask your own.
Ask a new question about this device
Download the instructions for your Toy in PDF format for free! Find your manual Planetarium Projector - Sharper Image and take your electronic device back in hand. On this page are published all the documents necessary for the use of your device. Planetarium Projector by Sharper Image.
USER MANUAL Planetarium Projector Sharper Image
natural_image
White 3D-printed spherical device with digital display and control buttons, displayed on reflective surface (no visible text or symbols)Thank you for purchasing the Sharper Image Planetarium Projector. Please take a moment to read this guide and store it for future reference.
COMPONENTS
- ON/STOP/OFF switch
- Sleep Timer Button
- 30 Minute Sleep Indicator
- 60 Minute Sleep Indicator
- Rotate Right Button
- Rotate Right Indicator
- Slide Tray Eject Button
- Rotate Left Button
- Rotate Left Indicator
- Shooting Star Button
- Shooting Star Indicaton
- Date Dial
- Time Scale
- Focus Dial
- Stand
- Star Discs [2 pieces]
- Speaker ON/OFF/Pairing Button
- Vol + / Next Song Button
- Quickpress = Next Song
- Press & Hold = Volume Up
- Vol - / Previous Song Button
- Quickpress = Previous Song
- Press & Hold = Volume Down
- Play/Pause Button
- Star Disc tray
- Speakers
- Shooting star projection lens
- Main projection lens
- Audio IN Connector
- 5V DC IN Connector
- Speaker Status LED
- Audio cable


natural_image
Coiled white cable with two terminal connectors, labeled with number 28 (no text or symbols on the cable itself)SETTING UP THE PLANETARIUM PROJECTOR
-
Open the battery cover at the bottom of the unit and insert 3 AA size batteries. Please refer to the "Battery Installation Section" below. Replace battery cover firmly.
-
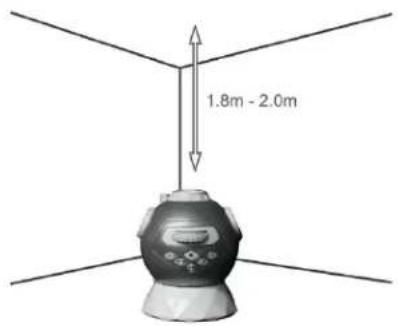
Place the unit over the stand [15] on a flat and stable platform [e.g. a table], the optimum project distance is about 1.8m to 2m. [6 to 6.5 ft.].
- Press the Slide Tray Eject Button [7] to open the tray and install the star disc [16]. Note: The keys on the disc must match the ridges on the tray.

natural_image
3D illustration of a mechanical device with a circular inset showing internal components (no text or symbols)- While the slide tray is still open, set the time and date of the night sky you want to view by aligning the desired date on Date Dial with the desired hour on the Time Scale.

Time Scale [Fixed]
Time from 20:00 [8 p.m.] to 02:00 [2 a.m.] is shown. Align the Date Dial with it to project stars at a particular time. [Each subdivision equals 30 minutes.]

Date Dial [Adjustable]
The Date Dial has 365 days. Adjust the dial to project stars you want to see on a particular date. [Each subdivision equals to 2 days. The long mark corresponds to the last day of the previous month.]

Example 1: If you want to see the star pattern at midnight [00:00] on 7th July, align 00:00 on the time scale with 7th July. Position of the date 7th is between 6th and 8th.

Example 2: If you want to see the star pattern at 22:30 [10:30 p.m.] on 30th December, align 22:30 on the time scale with 30th December. As shown in the figure, the small marking represents 3 days. Therefore, the day 30th would be at 2/3 of the marking. [The same setting applies to January, March, May, July, August and October.] Note that 28th and 29th of February are at the same mark.

- Close the tray. Note that you are looking to the north when you face the star projector from the front. Please do not turn the Date Dial when the tray is closed. You need to open the tray again if you want to set the date, or you can use the Rotate Left [8] or Rotate Right button [5] while the unit is turned on.
![Sharper Image Planetarium Projector - Date Dial [Adjustable] - 4](/content/2026/05/1064788/images/5859fb237ee3175fed3011e3490d36361e95e3e97df6db4668b1eb1875ff2206.jpg)
natural_image
3D rendering of a funnel-shaped object with a small emblem on its base, no visible text or symbols![Sharper Image Planetarium Projector - Date Dial [Adjustable] - 5](/content/2026/05/1064788/images/031e50f9010b3b28b6ea512dae6b2decb9eaa8d965aeea9e1615f771b2cffd7d.jpg)
natural_image
Exterior view of a spacecraft with a large cone and a spherical base, no visible text or symbols- Press the ON/STOP/OFF switch [1] once to turn on the Projector Light. Dim or turn off the light in the room for the best visual experience. Note that the unit cannot be turned on when the tray is opened.
- You can freely adjust the projection angle of the projection head over the stand [15] to suit viewing on the ceiling or sidewall.
- Adjust the focus dial [14] until the projected star field is sharp. The optimum project distance is 1.8m to 2m. The image will become blurry if the distance is too near or too far.
![Sharper Image Planetarium Projector - Date Dial [Adjustable] - 6](/content/2026/05/1064788/images/d2366143dd6cf664fce103eae1f6d236ec320b02064f82f98e09af512101d40d.jpg)
natural_image
Top-down view of a gray spherical device with internal components and a central circular dial (no text or symbols visible)Using the Star Motion Function
- Press the Rotate Left Button [8] to rotate the night sky anticlockwise, which is the motion of the stars in the Northern hemisphere. Press the button again to increase the rotation speed. A total of five speeds are available. Each press will select the next higher speed. The Rotate Left Indicator [9] will blink according to the speed. Press the "ON/STOP/OFF" button to stop.
- Similarly, press the Rotate Right Button [5] to rotate the stars clockwise, which is the motion of the stars in the Southern hemisphere. A total of five speeds are also selectable.
Using the Shooting Star Function
When the night sky is in the rotating state, press the Shooting Star Button [10] to enable the shooting star function. A shooting star will appear in the night sky at regular time intervals. It will appear more frequently if the rotating speed is set higher. Press the same button again to disable the shooting star function.
Using the Timer Function
Press the Sleep Timer button [2] to enable 30 or 60 minute sleep timer. The corresponding LED indicator will show the current selected timer. To disable Sleep Timer, press the timer button until both timer indicator lights [3,4] are off. However, the projector will always turn off automatically in 2 hours to conserve battery power.
Powering OFF
Press and hold the ON/STOP/OFF [1] button to turn off the projector.
Setting up the Bluetooth speaker
Note: Ensure the audio cable is removed from the "Audio Input" jack [25] of the speaker in order to use the Bluetooth function.
Pairing the speaker and a device
Make sure the speaker is turn off and keep it within 30 feet of the device it is paired to. Now press and hold the On/Off/Pairing button until a second tone is emitted. The status LED [27] will flash in RED and BLUE alternatively, indicating it is in pairing mode.
On your device (smartphone or tablet), locate your Bluetooth setting and turn on Bluetooth.
In Bluetooth Settings, scan for devices if necessary, then select “Planetarium Spkr” from your device’s list. The status LED will change to blinking twice [in BLUE] every 5 seconds if the connection is successful. Your device and speaker are paired and your speaker is ready to use.
Pairing another device
Turn off the speaker by pressing and holding the On/Off/Pairing button until a second tone is emitted. The status LED [27] will turn off. Repeat steps 1-3 above to connect to a new device.
Reconnecting to a paired device
Turn on the speaker by pressing and holding the On/Off/Pairing button until a first tone is emitted. The status LED (27) will flash BLUE quickly indicating it is in device searching mode.
Turn on Bluetooth function of your device within 45 seconds. Connection is established automatically and a double tone will sound. However, if Bluetooth is turned on after this period or automatic connection is unsuccessful, you can still connect manually by selecting “Planetarium Spkr” from your device’s list.
Playing Music
Select the desired music and press "Play" button on your paired device. The speaker will automatically start playing back the music.
- On the speaker, press and hold the “◀+” or “◀-” button [18,19] to increase or decrease volume.
- Quickpress the “◀+” or “◀-” button to skip forward or backward a track.
- Press "▶/||" button [20] to pause or resume play.
LED Status Lights
| Mode Light Function | |
| Pairing mode RED and BLUE LED blinks alternatively every second | |
| Searching connection BLUE LED blinks once every half second | |
| Disconnected BLUE LED blinks once every 5 seconds | |
| Connected BLUE LED blinks twice every 5 seconds | |
| Playing music RED and BLUE LED blinks every 5 seconds | |
| Power on / Power off RED and BLUE LED blinks 3 times | |
Connecting a Music Player via Audio Cable
Connect a music player's audio output or smartphone's headphone output to the Audio IN connector [25] at the back of the unit with a 3.5mm audio cable (included). The speaker automatically disconnects from Bluetooth. Press and hold the “◀+” or “◀-” buttons to adjust the volume.
TROUBLESHOOTING
| Problem Check the following points | |
| Power does not come on. · Check the battery. | |
| The speaker won't pair. · Move the speaker | and your device close together.· Pairing mode is disabled automatically after about 45 seconds. Turn the speaker off, then long press the On/Off/Pairing button until a second tone is emitted to enter pairing mode.· Forget the "Planetarium Spkr" device in your device list. Scan for new Bluetooth device. Then try pairing again. |
| The sound is too quiet or too loud. · Adjust | the volume on your device. It should be about 50%.· Adjust the speaker volume. |
| The speaker is powered off automatically. · | The battery is exhausted. Replace the battery or connect the AC adapter [not included] |
| No sound output. · Check if the volume level | of the speaker is set to the minimum.· Check if the volume level of your Bluetooth device connected to the system is set to minimum or set to mute.· Check if your audio cable is connected to the Audio In jack of the speaker. Unplug the cable. |
| I hear crackling noises. · For best audio quality, keep the speaker close to your device. | |
| No sound output via Bluetooth or Bluetooth connection cannot be restored automatically. | · The speaker may be powered off and powered on when playing back a track over Bluetooth connection. You need to make the connection again. |
| Speaker does not power off with the Planetarium Projector. | · The speaker and planetarium functions are independent and operate separately. Power on/off the speaker using the ON/OFF/Pairing button. |
BATTERY INSTALLATION
The Planetarium Projector requires 3 AA [LR6] batteries [not included]:
- Twist and open the battery compartment door at the bottom.
- Remove the battery cover with a screwdriver.
- Insert three AA [LR6] batteries into the unit with polarity as indicated on the battery compartment.
- Replace the battery cover and battery door.
- Replace a new battery when the light becomes dim.
- Insert new batteries according to the polarity marks.

natural_image
Close-up of a mechanical device with a screwdriver inserted into a circular component (no visible text or symbols)Using an AC/DC adapter (not included)
This unit can be powered by an AC/DC adapter [not included]. Connect an AC/DC adapter [5V 1000mA Output, 3.5mm Center Positive Plug into the Planetarium's 5V DC IN connector [26] and plug it into an AC wall outlet.
IMPORTANT: Keep these instructions. DO NOT DISCARD.
Only adults should install and replace batteries. Alkaline batteries are recommended. If the unit has not been used for a long time, remove the batteries. Non-rechargeable batteries are not to be recharged. Rechargeable batteries are to be removed from the unit before being charged. Rechargeable batteries are only to be charged under adult supervision. Do not mix old and new batteries. Do not mix alkaline, standard [carbon zinc] or rechargeable [nickel cadmium] batteries. Exhausted batteries are to be removed from the unit. The supply terminals are not to be short-circuited. Only batteries of the same or equivalent type as recommended are to be used. Batteries are to be inserted with the correct polarity.
WARNING
Choking hazard. Never try to dismantle the product yourself, or push objects of any kind into the product, as this may cause short circuits which could result in a fire or electric shock. Do not expose this product to rain or moisture.
FCC INFORMATION
This equipment complies with FCC radiation exposure limits set forth for an uncontrolled environment. This equipment should be installed and operated with minimum distance 8 inches between the radiator and your body.
This device complies with Part 15 of the Federal Communications Commission (FCC) Rules. Operation is subject to the following two conditions:
- This device may not cause harmful interference.
- This device must accept any interference received, including interference that may cause undesired operation.
CAUTION
Changes or modifications to this unit not expressly approved by the party responsible for compliance could void the user's authority to operate this equipment.
This equipment has been tested and found to comply with the limits for a Class B digital device, pursuant to Part 15 of the FCC Rules. These limits are designed to provide reasonable protection against harmful interference in a residential installation. This equipment generates, uses and can radiate radio frequency energy and, if not installed and used in accordance with the manufacturer's instructions, may cause interference harmful to radio communications.
There is no guarantee, however, that interference will not occur in a particular installation. If this equipment does cause harmful interference to radio or television reception, which can be determined by turning the equipment off and on, the user is encouraged to try to correct the interference by one or more of the following measures:
- Reorient or relocate the receiving antenna.
- Increase the separation between the equipment and receiver.
- Connect the equipment to an outlet on a circuit different from that to which the receiver is connected.
- Consult the dealer or an experienced radio or TV technician for help.
TECHNICAL SPECIFICATIONS
Projection Method: Optical
Viewing Location: N350
Constellations: 61
Stars: 8000
Light Source: High Brightness White LED
Star Field Orientation Adjustment: Date, Hour
Projection Area: 1.8 x 2.2m at 2.0m distance
Number of Stars: 8000 [each star disc]
Auto Off Timer: 30 / 60 minutes
Power: 5V DC / 3 x 1.5V AA/LR6
Speaker Power: 1.5W x 2
Bluetooth: Version 3.0+EDR A2DP
If at any time in the future you should need to dispose of this product please note that waste electrical products should not be disposed of with household waste. Please recycle where facilities exist. Check with your Local Authority or retailer for recycling advice. [Waste Electrical and Electronic Equipment Directive]

Item No.: 207639
Input: 3 X 1.5V LR6 / DC 5V 1000mA
Made in China


WARRANTY / CUSTOMER SERVICE
Sharper Image branded items purchased from SharperImage.com include a 1-year limited replacement warranty. If you have any questions not covered in this guide, please call our Customer Service department at 1 (877) 210-3449. Customer Service agents are available Monday through Friday, 9:00 a.m. to 6:00 p.m. ET.

- COMPONENTS
- SETTING UP THE PLANETARIUM PROJECTOR
- Time Scale [Fixed]
- Date Dial [Adjustable]
- Using the Star Motion Function
- Using the Shooting Star Function
- Using the Timer Function
- Powering OFF
- Setting up the Bluetooth speaker
- Pairing the speaker and a device
- Pairing another device
- Reconnecting to a paired device
- Playing Music
- Connecting a Music Player via Audio Cable
- BATTERY INSTALLATION
- Using an AC/DC adapter (not included)
- IMPORTANT: Keep these instructions. DO NOT DISCARD.
- WARNING
- FCC INFORMATION
- CAUTION
- TECHNICAL SPECIFICATIONS
- WARRANTY / CUSTOMER SERVICE
Brand : Sharper Image
Model : Planetarium Projector
Category : Toy