ASM-MNTKIT - Senal - Free user manual and instructions
Find the device manual for free ASM-MNTKIT Senal in PDF.


| Product Type | Mounting Kit |
| Brand | Senal |
| Model | ASM-MNTKIT |
| Dimensions (approx.) | 150 mm x 100 mm x 30 mm |
| Weight (approx.) | 0.5 kg |
| Material | Steel with anti-corrosion coating |
| Color | Black |
| Mounting Type | Wall or surface mount |
| Compatibility | Most Senal audio equipment and accessories |
| Maximum Load Capacity | 10 kg |
| Fasteners Included | Yes (screws, anchors, washers) |
| Installation Tools Required | Drill, screwdriver, level |
| Installation Difficulty | Easy (15-30 minutes) |
| Adjustability | Fixed angle |
| Safety Features | Secure locking mechanism and safety latch |
| Repairability | Spare parts available from Senal support |
| Warranty | 1 year limited warranty |
| Maintenance | Clean with damp cloth; avoid solvents |
Frequently Asked Questions - ASM-MNTKIT Senal
User questions about ASM-MNTKIT Senal
0 question about this device. Answer the ones you know or ask your own.
Ask a new question about this device
Download the instructions for your in PDF format for free! Find your manual ASM-MNTKIT - Senal and take your electronic device back in hand. On this page are published all the documents necessary for the use of your device. ASM-MNTKIT by Senal.
USER MANUAL ASM-MNTKIT Senal
MOUNTING BRACKET FOR
ASM-SERIES SPEAKER
Precautions
- Please read and follow these instructions and keep this manual in a safe place.
- Clean this product with only a soft, dry cloth.
- Keep this product away from children.
- Make sure that this product is intact and that there are no missing parts.
- To avoid damage to this product, be careful not to overtighten or improperly thread any of the threaded fittings.
- Do not exceed the maximum load capacity.
- All photos are for illustrative purposes only.
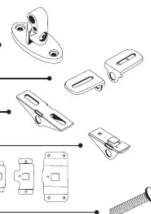
Contents Include
- Wall plate
- Two (2) vertical mounting brackets
• Horizontal mounting bracket - Removable mounting bracket
• 4 Removable mounting plates - Mounting-plate bolt
- Two (2) Mounting-plate nuts
- Two (2) 6 × 40 ~mm mounting screws
- Two (2) 6 × 60 ~mm mounting screws
- 8 mm screw
- Two (2) 3/8" screw anchors
- Two (2) 4 × 12 ~mm machine screws
• Two (2) 5 × 12 mm machine screws
• Two (2) 6 × 12 mm machine screws - 5 mm hex key


Vertical Mounting
-
Start with the wall plate on a flat surface. Orient the mounting plate's bolt-head so it's facing you.
-
Place one of the vertical mounting brackets onto the right-hand side of the wall plate so their bolt holes are aligned. Hold the mounting bracket in place with the nut that has a small bolt-hole.
Tip: The shape of the nut will conform to the corresponding side of the wall plate.

natural_image
Technical line drawing of a mechanical bracket assembly (no text or symbols)-
Place the other vertical mounting bracket on the left-side of the wall plate. Hold the mounting bracket in place with the nut that has a large bolt-hole.
-
Insert the mounting-plate bolt through the nut that has a large bolt-hole and use the included hex key to screw the bolt in place until secure.
-
Confirm the desired mounting location on your wall. Hold the wall plate against the wall at the desired mounting location, and use a pencil to mark the exact location of the mounting holes.
-
Use a drill with a 1/4" bit to drill holes through the pencil marks.
-
Fully insert the included screw anchors into the holes.
-
Position the wall plate with the swivel-action bolt-head facing up. Align the mounting holes with the screw anchors, and use the 6 × 40 mm or 6 × 60 mm mounting screws to secure the wall plate to the anchors.
Note: Use the 6 × 40 mm screws for the ASM-3 and ASM-4 speakers. Use the 6 × 60 mm screws for the ASM-5 and ASM-6 speakers.
- Align the slots in the vertical mounting brackets with the mounting holes in the speaker. Use the machine screws to secure the speaker to the mounting bracket assembly. Use the 4 × 12 mm screws for the ASM-3, the 5 × 12 mm screws for the ASM-4, and the 6 × 12 mm screws for the ASM-5 and ASM-6.
Horizontal Mounting
Note: When mounting a pair of speakers horizontally, make sure to position the tweeters on the outside in order to achieve proper stereo imaging.
- Start with the mounting plate on a flat surface, with the mounting plate's bolt-head facing you.
- Place the horizontal mounting bracket onto the mounting plate so their bolt holes are aligned.
- Place the nut that has a small bolt-hole on the right-hand side of the wall plate, and the nut that has a large bolt-hole on the left-hand side of the wall plate, and hole them in place.
Tip: The shape of the nut will conform to the corresponding side of the wall plate.
- Insert the mounting-plate bolt through the nut that has a large bolt-hole and use the included hex key to screw the bolt in place until secure.
- Confirm the desired mounting location on your wall. Hold the wall plate against the wall at the desired mounting location, and use a pencil to mark the exact location of the mounting holes.
- Use a drill with a 1/4" bit to drill holes through the pencil marks.
- Fully insert the included screw anchors into the holes.
- Position the wall plate with the swivel-action bolt-head facing up. Align the mounting holes with the screw anchors and use the 6 × 40 mm or 6 × 60 mm mounting screws to secure the wall plate to the anchors.
Note: Use the 6 × 40 mm screws for the ASM-3 and ASM-4 speakers. Use the 6 × 60 mm screws for the ASM-5 speakers.
- Align the horizontal mounting brackets with the mounting holes in the speaker, and use the machine screws to secure the brackets to your speaker. Use the 4 x 12 mm screws for the ASM-3, the 5 x 12 mm screws for the ASM-4, and the 6 x 12 mm screws for the ASM-5 and ASM-6.

natural_image
Line drawing of hands holding a CD or DVD disc with an eye (no text or symbols)Removable Mounting
- Start with the mounting plate on a flat surface. Orient the mounting plate's bolt-head so it's facing you.
- Place the removable mounting bracket onto the mounting plate so their bolt holes are aligned. Make sure the removable mounting bracket is positioned so that when you hold the assembly with the swivel-action bolt-head facing up, the bracket's hook is also facing up, as it will need to support your speaker. When
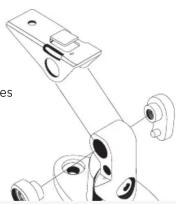
secure.
- Confirm the desired mounting location on your wall. Hold the wall plate against the wall at the desired mounting location, and use a pencil to mark the exact location of the mounting holes.
- Use a drill with a 1/4" bit to drill holes through the pencil marks.
- Fully insert the included screw anchors into the holes.
- Position the wall plate with the swivel-action bolt-head facing up. Align the mounting holes with the screw anchors and use the 6 × 40 mm mounting screws to secure the wall plate to the anchors.
-
Determine which of removable mounting plates fits your speaker by aligning its mounting holes with the mounting holes in your speaker. They should line up perfectly. The mounting plate should be flush against the back of your speaker.
-
Use the provided machine screws to secure the removable mounting plate to your speaker.
Note: Use the 4 × 12 mm
machine screws for the ASM Z speaker. Use the
5 × 12 mm machine
screws for the ASM-4 and
ASM-5 speakers. Use the 6 x 12
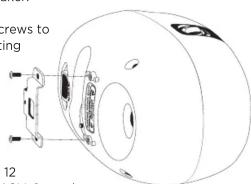
- Lift the speaker and carefully mount it onto the removable mounting bracket's hook via the removable mounting plate.
To permanently fix ye
Mounting the ASM-6
- The ASM-6 requires two horizontal mounts per speaker so you'll need two of these kits for each one. Follow steps 1 through 4 of the Horizontal Mounting instructions to assemble the horizontal mounts.
- The horizontal mounts fit vertically onto the ASM-6, one on each side of the speaker. Confirm the desired mounting location on your wall and measure two spots 4" (10.2 cm) apart, one for each horizontal mount.
- At each mounting location, hold the wall plate against the wall, and use a pencil to mark the exact location of the mounting holes.
- Use a drill with a 1/4" bit to drill holes through the pencil marks.
- Fully insert the included screw anchors into the holes.
- Position the wall plates with the swivel-action bolt-heads facing up. Align the mounting holes with the screw anchors and use the 6 × 60 mm mounting screws to secure the wall plates to the anchors.
- Align the horizontal mounting brackets with the mounting holes in the speaker and use the 6 × 12 mm machine screws to secure the brackets to your speaker.

natural_image
Line drawing of a mechanical device with no visible text or symbolsTilting and Swiveling the Speaker
To adjust the vertical angle of the speaker, use the included hex key to slightly loosen the horizontal mounting bolt. Tilt the speaker as desired and retighten the bolt until secure.
To adjust the horizontal angle of the speaker, use the included hex key to slightly loosen the vertical mounting bolt. Swivel the speaker as desired and retighten the bolt until secure.
Important!
Always exercise caution when tilting and swiveling your speakers. Make sure to keep one hand on the speaker to hold it steady.
Note: The ASM-6 can be adjusted only vertically.
Specifications
| Compatibility | Senal ASM-series speakers |
| Construction | Aluminum |
| Tilt | 90° |
| Swivel | 160° |
| Maximum load capacity | 13.3 lb. (6 kg) |
| Wall clearance | 2.6" (6.5 cm) |
| Wall plate dimensions | 2.4" × 1.8" × 3.8" (6 × 4.5 × 9.6 cm) |
| Weight | 14.5 oz. (410 g) |
One-Year Limited Warranty
Senal provides a limited warranty to the original purchaser that this product is free from defects in materials and workmanship under normal consumer use for a period of one (1) year from the original purchase date or thirty (30) days after replacement, whichever occurs later. Senal's
Shipment of the defective product is at the purchaser's own risk.
This warranty does not cover damage or defect caused by misuse, neglect, accident, alteration, abuse, improper installation or maintenance. EXCEPT AS PROVIDED HEREIN, SENAL MAKES NEITHER ANY EXPRESS WARRANTIES NOR ANY IMPLIED WARRANTIES, INCLUDING BUT NOT LIMITED TO ANY IMPLIED WARRANTY OF MERCHANTABILITY OR FITNESS FOR A PARTICULAR PURPOSE. This warranty provides you with specific legal rights, and you may also have additional rights that vary from state to state.
Brand : Senal
Model : ASM-MNTKIT