
KAPRL007HTA - Projector Kogan - Free user manual and instructions
Find the device manual for free KAPRL007HTA Kogan in PDF.


| Product Type | Video Projector |
| Brand | Kogan |
| Model | KAPRL007HTA |
| Native Resolution | 1920 x 1080 (Full HD) |
| Brightness | 2000 ANSI Lumens |
| Contrast Ratio | 2000:1 |
| Projection Size | 30 - 150 inches |
| Aspect Ratio | 16:9 |
| Lamp Life | Up to 30,000 hours |
| Keystone Correction | ±15° Vertical |
| Connectivity | HDMI, VGA, USB, AV, Audio Out |
| Built-in Speakers | 2 x 3W |
| Power Supply | AC 100-240V, 50/60Hz |
| Power Consumption | 150W (Normal), <1W (Standby) |
| Dimensions (W x D x H) | 260 x 200 x 80 mm |
| Weight | 2.5 kg |
| Noise Level | ≤35 dB |
| Supported Image Formats | JPEG, BMP, PNG |
| Supported Video Formats | MP4, AVI, MKV, MOV |
| Remote Control | Included |
| Cleaning | Use a soft, dry cloth; avoid liquids |
| Safety | Do not block ventilation; keep away from heat sources |
Frequently Asked Questions - KAPRL007HTA Kogan
User questions about KAPRL007HTA Kogan
0 question about this device. Answer the ones you know or ask your own.
Ask a new question about this device
Download the instructions for your Projector in PDF format for free! Find your manual KAPRL007HTA - Kogan and take your electronic device back in hand. On this page are published all the documents necessary for the use of your device. KAPRL007HTA by Kogan.
USER MANUAL KAPRL007HTA Kogan
natural_image
Line drawing of a rectangular projector with a circular vent and mesh grille (no text or symbols)GOOGLE TV PROJECTOR
KAPRL007HTA
SAFETY & WARNINGS
Read all instructions before you use this device. Do not make any changes or create settings that are not described in this user guide.
- Ventilation: Ensure the projector is installed in a well-ventilated area to avoid overheating. Keep ventilation holes unblocked to allow adequate air intake and exhaust. Avoid placing the projector in excessively hot or humid environments.
- Placement: Do not install the projector in areas with high levels of dust or smoke. Position the projector away from temperature and smoke sensors to prevent malfunction. Avoid exposure to direct blasts from heating or air conditioning vents as it may cause projector failure.
- Lens Safety: Avoid looking directly into the lens while the projector is in use to prevent eye injury.
- Water and Liquids: Keep the projector clear of water and other liquids as it is not waterproof.
- Power Supply: Use only the power adapter supplied with your projector. Always turn off the projector before disconnecting it from the electrical outlet. Protect the power cord from being pinched or stepped on, especially near plugs and where it exits the device. Disconnect the projector during lightning storms or if not in use for extended periods. Ensure the power plug remains accessible as a means of disconnection. Disconnect all devices from the power source before making any connections. Never handle the power cable or connector with wet hands.
- Cleaning: Use a soft lint-free cloth for cleaning. Avoid liquid aerosol or flammable cleaners. Do not use liquid cleaning agents on the lens to prevent damage to the coating. It is recommended to use lens cleaning paper when cleaning the projector lens. Regularly clean vents and speakers with a soft brush to prevent dust accumulation and overheating.
- Repairs: Do not attempt repairs on the projector yourself. Always contact help.Kogan.com for support. Improper maintenance can lead to injuries or damage to the projector. All servicing should be performed by qualified personnel.
- High Temperature Warning: The area near the outlet may become hot during and after use. Avoid touching to prevent burns.
Remote Control Safety
• Water: Do not submerge the remote control in water.
- Fire and Heat: Do not place the remote control near fire or in wet or hot places.
- Battery Usage: Do not use old and new batteries together in the remote control.
- Battery Storage: Remove the batteries if the remote control will not be used for an extended period to avoid battery leakage.
- IR Receiver: Point the remote control toward the IR receiver on the projector.
- Usage Range: Use the remote control within a distance of 6m and at a 30-degree angle.
- Missing Parts: If any parts are missing, contact help.Kogan.com for support.
Compliance Information
This product complies with the relevant regulatory standards in Australia and New Zealand.
- Australian Communications and Media Authority (ACMA) Compliance: This device meets the requirements for electromagnetic compatibility (EMC) and radio communications equipment as set forth by the Australian Communications and Media Authority (ACMA).
- Radio Spectrum Management (RSM) New Zealand Compliance: This device complies with the standards for radio frequency equipment as established by Radio Spectrum Management (RSM) in New Zealand.
- Radiation Exposure Statement: This equipment complies with the radiation exposure limits set forth for an uncontrolled environment. The equipment should be installed and operated with a minimum distance of 20 cm between the radiator and your body. This transmitter must not be co-located or operated in conjunction with any other antenna or transmitter.
- Interference Statement: This equipment has been tested and found to comply with the limits for digital devices in accordance with the regulations in Australia and New Zealand. These limits are designed to provide reasonable protection against harmful interference in a residential installation. This equipment generates, uses, and can radiate radio frequency energy and, if not installed and used in accordance with the instructions, may cause harmful interference to radio communications.
- If this equipment does cause harmful interference to radio or television reception, which can be determined by turning the equipment off and on, you are encouraged to try to correct the interference by one or more of the following measures:
o Reorient or relocate the receiving antenna.
o Increase the separation between the equipment and the receiver.
- Connect the equipment to an outlet on a circuit different from that to which the receiver is connected.
- Consult the dealer or an experienced radio/TV technician for help.
COMPONENTS

natural_image
Front view of a rectangular electronic device with a circular lens and a small display (no text or symbols visible)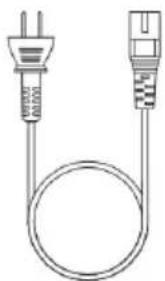
natural_image
Simple line drawing of two connected electrical plugs (no text or symbols)
natural_image
Pure electrical circuit lines without any symbolsProjector Power Cable HDMI Cable
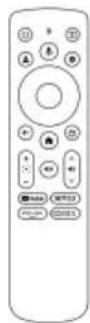
Remote Control
(Batteries not included)

natural_image
Illustration of a pair of matchsticks with a close-up of the same object (no text or symbols)Cleaning Tools User Guide
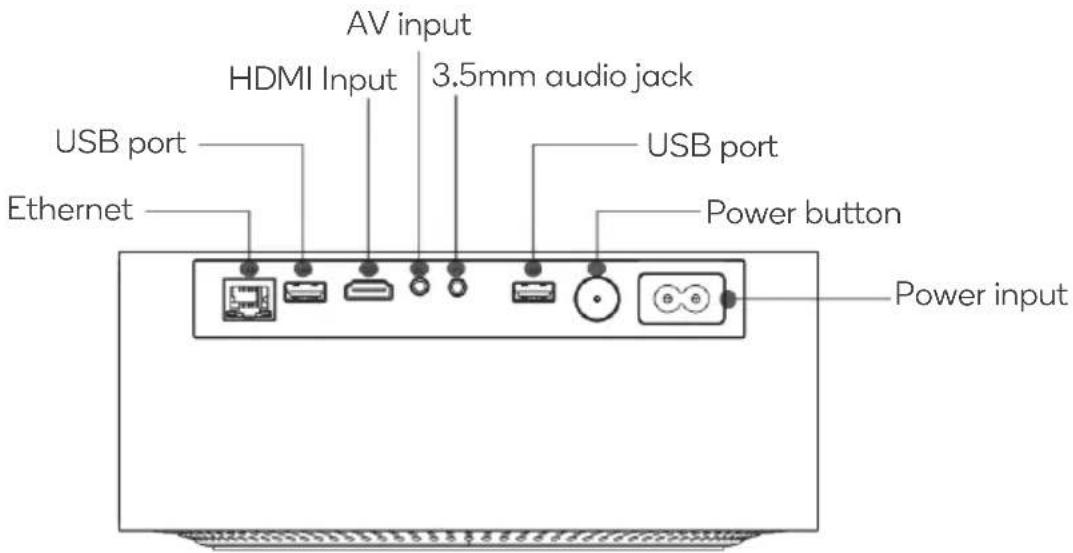
OVERVIEW


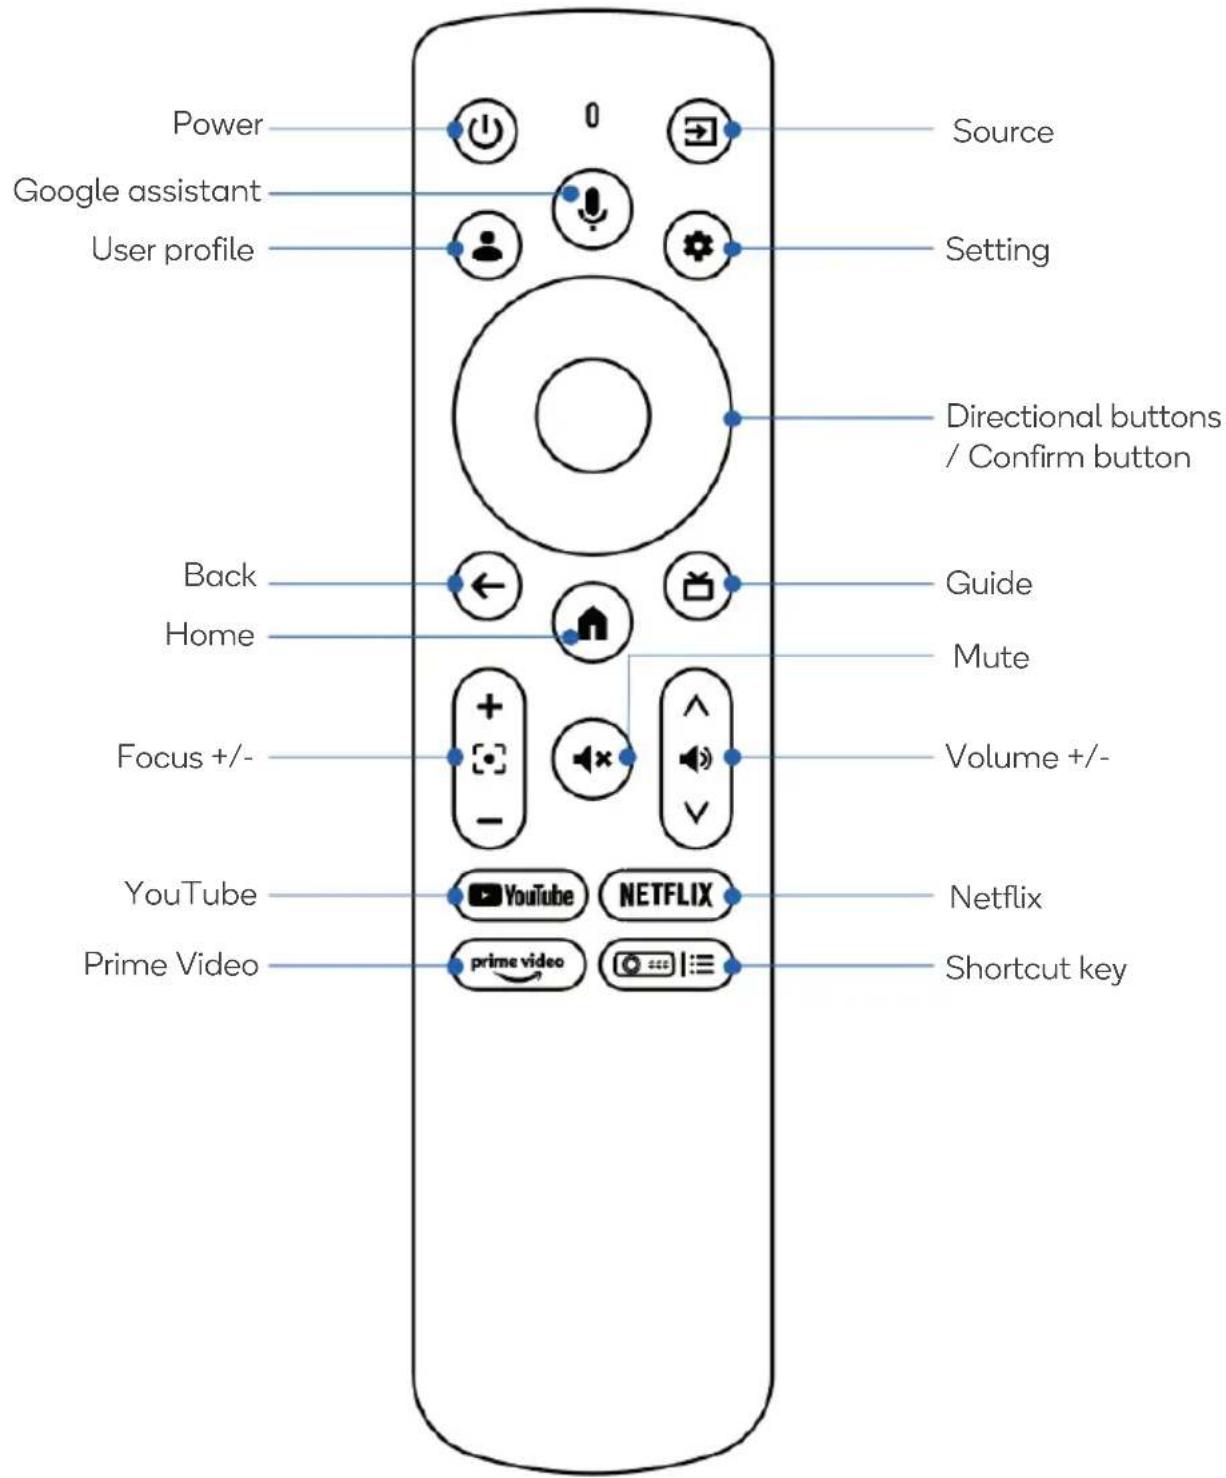
Remote Control
OPERATION
1. Selecting a Location:
- Choose a well-ventilated area to install the projector.
- Avoid placing the projector in areas with excessive heat, humidity, dust, or smoke.
- Ensure the location has a stable, flat surface for the projector to sit on.
2. Connecting to Power:
- Use the power cable supplied with your projector.
- Plug the power cable into the projector's power input port.
- Connect the power cable to an electrical outlet.
3. Connecting to a Video Source:
- HDMI Connection: Connect your video source (e.g., computer, media player) to the projector using an HDMI cable. Select "HDMI" as the input source on the projector.
- AV Connection: Use an AV cable (not supplied) to connect your media player to the projector. Select "AV" as the input source on the projector.
- USB Connection: Insert a USB flash drive into one of the USB ports on the projector. Select "USB" as the input source on the projector.
4. Installing Remote Batteries
- Open the battery compartment by sliding the cover on the back of the remote.
- Insert x2 AAA batteries (not included), matching the polarity markings.
- Close the compartment by sliding the cover back until it clicks.
Note: Do not mix old and new batteries. Remove batteries if not using the remote for a long time.
5. Initial Setup:
- Turn on the projector by pressing the power button.

- Follow the on-screen instructions to pair the remote control with the projector.

- Select your preferred language from the on-screen menu.
- Choose your region from the options provided.
- Accept the data collection and firmware updates notice.

6. Connecting to Wi-Fi:
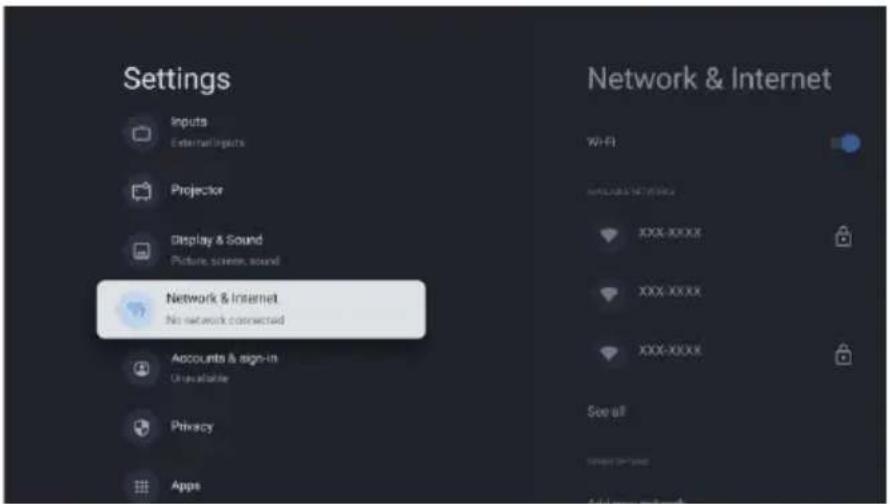
- Select "Settings" on the home page and navigate to "Network."
- Choose "Wi-Fi" and select your home's Wi-Fi network from the list of available networks.
- Enter your Wi-Fi password and press "OK" to connect.
7. Setting Up Streaming Services:
- Select "Start Netflix" to sign in to your Netflix account or choose "SKIP" to bypass this step.
- Access other streaming services like YouTube or Prime Video from the home screen by selecting the respective icons.
8. Adjusting the Projection:
- Focus: Use the "Focus+" and "Focus -" buttons on the remote control to adjust the focus for a clear image. You can also enable auto-focus from the settings.
- Keystone Correction: Navigate to Projector → Image Correction" to adjust the picture shape. Use the auto-correction feature or manually adjust the four points for the best projection effect.

9. Bluetooth Speaker Mode
- Select "Settings" on the home page and navigate to "Projector Bluetooth Speaker Mode"
- Ensure the device is in pairing mode.
- Select the projector name 'Projector_BT_Speakers' on the list of your Bluetooth device to connect.


10. Completing the Setup:
- Once all connections and settings are configured, press "OK" to continue to the home screen. This screen will automatically close after 5 seconds.
- Your projector is now ready for use. Access your favourite apps and media from the home screen.
11. Mounting the Projector:
- The projector features a single mounting hole dual-use design.
- It is compatible with standard camera tripods and 5/16-inch screw projector tripod stands.
- You can rotate the 360^ screw to meet different angle needs.
Tips:
- Blurry Image:
- Wait for the projector to automatically keystone correct to a rectangular shape.
- Use the remote control's focus adjustment function for optimal sharpness.
- Optimum Projection Distance: The optimal distance for projection is between 1.5 to 2 meters.
- Ensure the projector is on a stable surface to prevent vibrations and movement during operation.
- Regularly clean the projector lens with a lens cleaning paper to maintain image clarity.
- If using the projector outdoors, avoid direct sunlight on the projector lens to prevent overheating and damage.
- When not in use, cover the projector with a dust cover to protect it from dust and debris.
Projector Settings
By clicking on the "Projector" option in the menu or using the "OK!" button on the remote control, you can access the projector settings page.

Network Settings
You can change and manage your Wi-Fi network here.
SETTING UP GOOGLE TV
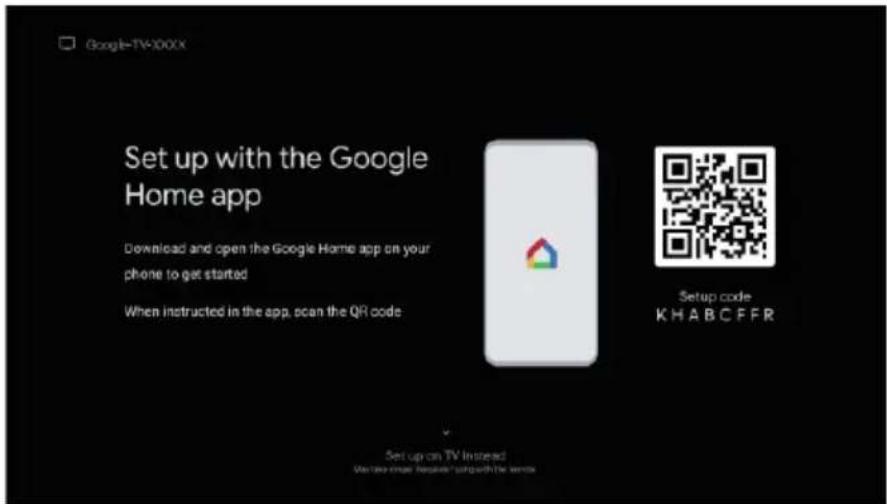
Follow these steps to set up Google TV ^™ with the Google Home app. Please note that this process may take some time and requires typing with the remote.

1. Download and Open the Google Home App
- Download the Google Home app from the Google Play Store or Apple App Store.
- Open the Google Home app on your mobile device.
2. Add the Device
- In the Google Home app, tap the "+" icon to add a new device.
- Select "Set up device" and then choose "New device."
3. Select the Projector
The app will start searching for devices. Once it finds your projector, select it from the list.
4. Follow On-Screen Instructions
- Follow the instructions provided by the Google Home app to complete the setup process.
-
You may need to type using the remote control to enter your Google account information.
-
Connect to Wi-Fi: Select your Wi-Fi network and wait for the connection to be established successfully.
-
Accept Terms: Click 'Accept' to agree to the terms and conditions.


Accessing Settings
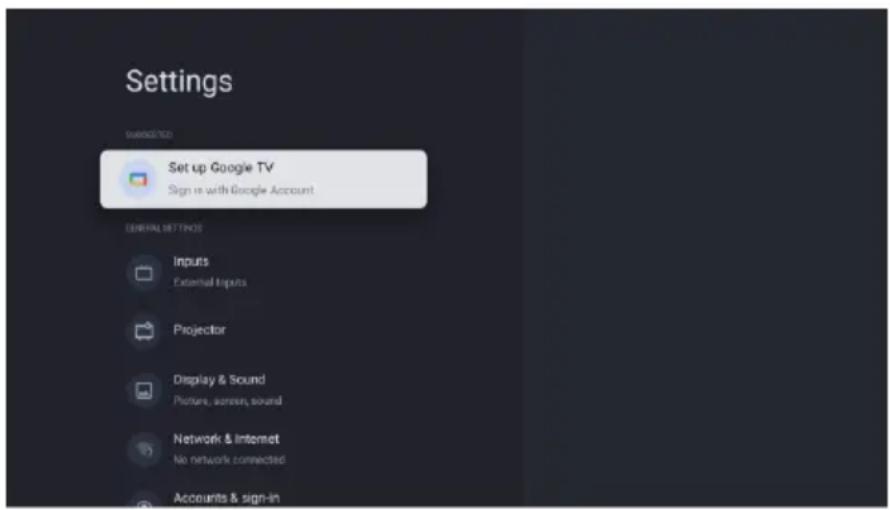
You can access the settings by clicking the gear icon in the top right corner of the dashboard or by pressing the “💡” button on the remote control.
In the settings menu, you can manage your Google Account and adjust other settings to personalize your Google TV experience.
Need more information?
We hope that this user guide has given you the assistance needed for a simple set-up.
For the most up-to-date guide for your product, as well as any additional assistance you may require, head online to help.kogan.com
kogan.com

- GOOGLE TV PROJECTOR
- SAFETY & WARNINGS
- Remote Control Safety
- Compliance Information
- COMPONENTS
- OVERVIEW
- Remote Control
- OPERATION
- Selecting a Location:
- Connecting to Power:
- Connecting to a Video Source:
- Installing Remote Batteries
- Initial Setup:
- Connecting to Wi-Fi:
- Setting Up Streaming Services:
- Adjusting the Projection:
- Bluetooth Speaker Mode
- Completing the Setup:
- Mounting the Projector:
- Tips:
- - Blurry Image:
- Projector Settings
- Network Settings
- SETTING UP GOOGLE TV
- Download and Open the Google Home App
- Add the Device
- Select the Projector
- Follow On-Screen Instructions
- Accessing Settings
- Need more information?
Brand : Kogan
Model : KAPRL007HTA
Category : Projector