
SKSLV2421MS - Oven LG - Free user manual and instructions
Find the device manual for free SKSLV2421MS LG in PDF.


| Product Type | Freestanding Electric Oven |
| Model | SKSLV2421MS |
| Brand | LG |
| Oven Capacity | 6.9 cu. ft. |
| Width | 29.9 inches |
| Height | 36.4 inches |
| Depth | 27.3 inches |
| Weight | 195 lbs |
| Power Supply | 240 V, 60 Hz, 40 A |
| Cooking Modes | Bake, Broil, Convection Bake, Convection Roast, Self-Clean, Proof, Warm |
| Number of Racks | 3 |
| Interior Light | Yes, halogen |
| Oven Window | Large, triple-layer glass |
| Control Type | Touch & Knob |
| Display | Digital LCD |
| Self-Cleaning | Yes, steam clean option |
| Convection Fan | Yes, with dual fans |
| Sabbath Mode | Yes |
| Safety Features | Child lock, auto shut-off, cool-touch door |
| Cleaning | Self-clean cycle, steam clean; wipe interior with damp cloth |
| Spare Parts Available | Racks, heating elements, control board, door gasket |
| Repairability Index | 7.5/10 (estimated) |
| Warranty | 1 year parts and labor |
| User Manual Language | English (PDF download) |
Frequently Asked Questions - SKSLV2421MS LG
User questions about SKSLV2421MS LG
0 question about this device. Answer the ones you know or ask your own.
Ask a new question about this device
Download the instructions for your Oven in PDF format for free! Find your manual SKSLV2421MS - LG and take your electronic device back in hand. On this page are published all the documents necessary for the use of your device. SKSLV2421MS by LG.
USER MANUAL SKSLV2421MS LG
www.signaturekitchensuite.it
Copyright © 2023 Signature Kitchen Suite. All Rights Reserved.
INDICE
3 ISTRUZIONI IMPORTANTI SULLA SICUREZZA
8 MANUTENZIONE
8 Come pulire
9 Pulire
natural_image
Diagram of a kitchen appliance with a hand cleaning the oven (no text or symbols visible)natural_image
Line drawing of a hand cleaning a microwave oven with a cloth (no text or symbols)Pulire
Pulizia rapida
natural_image
Line drawing of a cabinet interior with drawers and doors (no text or symbols)Ventilazione
NOTA
natural_image
Illustration showing a hand inserting a component into a device (no text or symbols present)Smart Diagnosis™ attraverso il Servizio Concierge
LG Electronics Inc. Single Point of Contact (EU/UK) : Krijgsman 1, 1186 DM Amstelveen, The Netherlands.
Customer Information Center
Read this owner's manual thoroughly before operating the appliance and keep it handy for reference at all times.
SKSLV2421MS

MFL70548903_00
www.signaturekitchensuite.it
Copyright © 2023 Signature Kitchen Suite. All Rights Reserved.
2 TABLE OF CONTENTS
TABLE OF CONTENTS
3 IMPORTANT SAFETY INSTRUCTIONS
8 MAINTENANCE
8 How To Clean
9 Clean
9 Steam Maintenance
11PRODUCT OVERVIEW
11 Parts
11 Accessories
12 Technical specifications
13 INSTALLATION
13 Before Installing the Oven
14 Installation Information
16 Ventilation
16 Installation
17 OPERATION
17 Control Panel Overview
18 Getting Started
18 Changing Oven Settings
18 Settings
18 Child Lock
19 Time
19 Wi-Fi
19 Remote On
19 Brightness
19 Microwave Quick start
20 Language Selection
20 Volume
20 Preheat Alarm Light
20 Units
20 Smart Diagnosis™
20 Program Update
21 Demo Mode
21 Factory Data Reset
21 Open Source License
21 Using the Oven
21 Timer
22 Oven Cooling
22 Microwave
24 Hot Air / Top Bottom Heat / Roasting / Auto Roast / Pizza Mode / Grill / Crispy Grill / Bottom Heat
24 Hot Air Combi. / Roast Combi./Auto Roast Combi. / Grill Combi.
25 Defrost
25 Cooking Guide
27 My Recipe
27 Auto Cook
28 Auto Cook Guide
34 Steam Cook
36 Gourmet Steam Guide
37 Information for test institutes
38 SMART FUNCTIONS
38 LG ThinQ Application
40 Smart Diagnosis™ Function
41 Open Source Software Notice Information
41 Remote On
42 MICROWAVE-SAFE UTENSILS
43 FOOD CHARACTERISTICS & MICROWAVE COOKING
45 TROUBLESHOOTING
45 FAQs
46 Before Calling for Service
48 Customer service & spare parts
IMPORTANT SAFETY INSTRUCTIONS
READ CAREFULLY AND KEEP FOR FUTURE REFERENCE
Read and follow all instructions before using your oven to prevent the risk of fire, electric shock, personal injury, or damage when using the appliance.
This guide does not cover all possible conditions that may occur. Always contact your service agent or manufacturer about problems that you do not understand.

This is the safety alert symbol. This symbol alerts you to potential hazards that can cause death or serious injury. All safety messages will follow the safety alert symbol and either the word "WARNING" or "CAUTION". These words mean:

WARNING - This symbol will alert you to hazards or unsafe practices which could cause serious bodily harm or death.

CAUTION - This symbol will alert you to hazards or unsafe practices which could cause bodily injury or property damage.
WARNING
- Do not attempt to tamper with, or make any adjustments or repairs to the door, door seals, control panel, safety interlock switches or any other part of the oven which would involve the removal of any cover protecting against exposure to microwave energy. Do not operate the oven if the door seals and adjacent parts of the microwave oven are faulty. Repairs should only be undertaken by a qualified service technician.
- Unlike other appliances, the microwave oven is a high-voltage and a high electrical-current piece of equipment.
Improper use or repair could result in harmful exposure to excessive microwave energy or in electric shock.
- Do not use the oven for the purpose of dehumidification. (ex. Operating the microwave oven with wet newspapers, clothes, toys, electric devices, pet or child etc.) - It can be the cause of serious damage to safety such as a fire, a burn or a sudden death due to an electric shock.
- This appliance is not intended for use by persons (including children) with reduced physical, sensory or mental capabilities, or lack of experience and knowledge, unless they have been given supervision or instruction concerning use of the appliance by a person responsible for their safety. (Young) Children should be supervised to ensure that they do not play with the appliance.
- Improper use may cause damage such as a fire, electric shock or burn.
- Accessible parts may become hot during use. Young children should be kept away.
- They may get a burn.
- Liquids and other foods must not be heated in sealed containers since they are liable to explode. Remove the plastic wrapping from food before cooking or defrosting. Note though that in some cases food should be covered with plastic film, for heating or cooking.
- They could burst.
- Be certain to use proper accessories on each operation mode.
- Improper use could result in damage to your oven and accessories, or could make spark and a fire.
4 IMPORTANT SAFETY INSTRUCTIONS
- The children should not allow to play with accessories or hang down from the door handle.
- They may get hurt.
- It is hazardous for anyone other than a competent person to carry out any service or repair operation that involves the removal of a cover which gives protection against exposure to microwave energy.
- When the appliance is operated in the combination mode, children should only use the oven under adult supervision due to the temperatures generated.
- Do not operate your oven if it is damaged. It is particularly important that the oven door closes properly and that there is no damage to the: (1) door (bent), (2) hinges and latches (broken or loosened), (3) door seals and sealing surfaces.
- It could result in harmful exposure to excessive microwave energy.
- If the door or door seals are damaged, the oven must not be operated until it has been repaired by a competent person.
- The appliance is supplied from a cord extension set or an electrical portable outlet device, the cord extension set on electrical portable outlet device must be positioned so that it is not subject to splashing or ingress of moisture.
- Only allow children to use the oven without supervision when adequate instructions have been given so that the child is able to use the oven in a safe way and understands the hazards of improper use.
- The appliance and its accessible parts become hot during use. Care should be taken to avoid touching heating elements. Children less than 8 years of age shall be kept away unless continuously supervised.
- During use the appliance becomes hot. Care should be taken to avoid touching heating elements inside the oven.
- Do not use harsh abrasive cleaners or sharp metal scrapers to clean the oven door glass since they can scratch the surface, which may result in shattering of the glass.
CAUTION
- You cannot operate your oven with the door open due to the safety interlocks built into the door mechanism. It is important not to tamper with the safety interlocks.
- It could result in harmful exposure to excessive microwave energy. (Safety interlocks automatically switch off any cooking activity when the door is opened.)
- Do not place any object (such as kitchen towels, napkins, etc.) between the oven front face and the door or allow food or cleaner residue to accumulate on sealing surfaces.
- It could result in harmful exposure to excessive microwave energy.
- Please ensure cooking times are correctly set, small amounts of food require shorter cooking or heating time.
- Over cooking may result in the food catching on fire and subsequent damage to your oven.
- When heating liquids, e.g. soups, sauces and beverages in your microwave oven,
- Avoid using straight sided containers with narrow necks.
- Do not overheat.
-
Stir the liquid before placing the container in the oven and again halfway through the heating time.
-
After heating, let it stand in the oven for a short time; stir or shake it again carefully and check the temperature of it before consuming to avoid burns (especially, contents of feeding bottles and baby food jars).
-
Microwave heating of beverages can result in delayed eruptive boiling, therefore care must be taken when handling the container.
-
An exhaust outlet is located on the top, bottom or side of the oven. Don't block the outlet.
- It could result in damage to your oven and poor cooking results.
- Do not operate the oven when empty. It is best to leave a glass of water in the oven when not in use. The water will safely absorb all microwave energy, if the oven is accidentally started.
- Improper use could result in damage to your oven.
- Do not cook food wrapped in paper towels, unless your cook book contains instructions for the food you are cooking. And do not use newspaper in place of paper towels for cooking.
- Improper use can cause an explosion or a fire.
- Do not use wooden containers and ceramic containers that have metallic (e.g. gold or silver) inlays. Always remove metal twist ties. Only use utensils that are suitable for use in microwave ovens. Metallic containers for food and beverages are not allowed during microwave cooking.
- They may heat-up and char. Metal objects in particular may arc in the oven, which can cause serious damage.
- Do not use recycled paper products.
- They may contain impurities which may cause sparks and/or fires when used in cooking.
- Do not rinse the tray and rack by placing it in water just after cooking. This may cause breakage or damage.
- Improper use could result in damage to your oven.
- Be certain to place the oven so the front of the door is 8cm or more behind the edge of the surface on which it is placed, to avoid accidental tipping of the appliance. - Improper use could result in bodily injury and oven damage.
- Before cooking, pierce the skin of potatoes, apples or any such fruit or vegetables.
- They could burst.
- Do not cook eggs in their shell. Eggs in their shell and whole hard-boiled eggs should not be heated in microwave ovens since they may explode, even after microwave heating has ended.
- Pressure will build up inside the egg which will burst.
- Do not attempt deep fat frying in your oven.
- This could result in a sudden boil over of the hot liquid.
- If smoke is observed (or emitted), switch off or unplug the appliance and keep the door closed in order to stifle any flame.
- It can cause serious damage such as a fire or electric shock.
- When heating food in plastic or paper containers, keep an eye on the oven due to the possibility of ignition.
- Your food may be poured due to the possibility of container deterioration, which also cause a fire.
- An exhaust outlet is located on the top, bottom or side of the oven. Don't block the outlet.
- It could result in damage to your oven and poor cooking results.
- Do not operate the oven when empty. It is best to leave a glass of water in the oven when not in use. The water will safely absorb all microwave energy, if the oven is accidentally started.
- Improper use could result in damage to your oven.
- Do not cook food wrapped in paper towels, unless your cook book contains instructions for the food you are cooking. And do not use newspaper in place of paper towels for cooking.
- Improper use can cause an explosion or a fire.
- Do not use wooden containers and ceramic containers that have metallic (e.g. gold or silver) inlays. Always remove metal twist ties. Only use utensils that are suitable for use in microwave ovens. Metallic containers for food and beverages are not allowed during microwave cooking.
- They may heat-up and char. Metal objects in particular may arc in the oven, which can cause serious damage.
- Do not use recycled paper products.
- They may contain impurities which may cause sparks and/or fires when used in cooking.
- Do not rinse the tray and rack by placing it in water just after cooking. This may cause breakage or damage.
- Improper use could result in damage to your oven.
- Be certain to place the oven so the front of the door is 8cm or more behind the edge of the surface on which it is placed, to avoid accidental tipping of the appliance. - Improper use could result in bodily injury and oven damage.
- Before cooking, pierce the skin of potatoes, apples or any such fruit or vegetables.
- They could burst.
- Do not cook eggs in their shell. Eggs in their shell and whole hard-boiled eggs should not be heated in microwave ovens since they may explode, even after microwave heating has ended.
- Pressure will build up inside the egg which will burst.
- Do not attempt deep fat frying in your oven.
- This could result in a sudden boil over of the hot liquid.
- If smoke is observed (or emitted), switch off or unplug the appliance and keep the door closed in order to stifle any flame.
- It can cause serious damage such as a fire or electric shock.
- When heating food in plastic or paper containers, keep an eye on the oven due to the possibility of ignition.
- Your food may be poured due to the possibility of container deterioration, which also cause a fire.
- The temperature of accessible surfaces may be high when the appliance is operating. Do Not touch the oven door, outer cabinet, rear cabinet, oven cavity, accessories and dishes during grill mode, convection mode and auto cook operations, before clearing make sure they are not hot.
- As they will become hot, there is the danger of a burn unless wearing thick culinary gloves.
• The oven should be cleaned regularly and any food deposits should be removed.
- Failure to maintain the oven in a clean condition could lead to deterioration of the surface that could adversely affect the life of the appliance and possibly result in a hazardous situation.
- Only use the temperature probe recommended for this oven.
- You can not ascertain that the temperature is accurate with an unsuitable temperature probe.
- This model does not provide a temperature probe.
• This appliance is intended to be used in household and similar applications such as:
- Staff kitchen areas in shops, offices and other working environments;
- Farm house;
- By clients in hotels, motels and other residential environments;
- Bed and breakfast type environments.
- This appliance can be used by children aged from 8 years and above and persons with reduced physical, sensory or mental capabilities or lack of experience and knowledge if they have been given supervision or instruction concerning use of the appliance in a safe way and understand the hazards involved. Children shall not play with the appliance. Cleaning and user maintenance shall not be made by children without supervision.
- The microwave oven is intended for heating food and beverages. Drying of food or clothing and heating of warming pads, slippers, sponges, damp cloth and similar may lead to risk of injury, ignition or fire.
- The appliance is not intended to be operated by means of an external timer or separate remote-control system.
- Follow exact directions given by each manufacturer for their popcorn product. Do not leave the oven unattended while the corn is being popped. If corn fails to pop after the suggested times, discontinue cooking. Never use a brown paper bag for popping corn. Never attempt to pop leftover kernels.
- Overcooking could result in the corn catching a fire.
• This appliance must be earthed.
The wires in the mains lead are coloured in accordance with the following codes
BLUE\~Neutral
BROWN\~Live
GREEN & YELLOW\~Earth
As the colours of the wires in the mains lead of this appliance may not correspond with the coloured markings identifying the terminals in your plug proceed as follows:
The wire which is coloured BLUE must be connected to the terminal which is marked with the letter N or coloured BLACK.
The wire which is coloured BROWN must be connected to the terminal which is marked with the letter L or Coloured RED.
The wire which is coloured GREEN & YELLOW or GREEN must be connected to the terminal which is marked with the letter G or ⏻.
If the supply cord is damaged, it must be replaced by the manufacturer, its service agent of similarly qualified persons in order to avoid a hazard.
- Improper use may cause serious electric damage.
- Only use utensils that are suitable for use in microwave ovens.
• This oven should not be used for commercial catering purposes.
- Improper use could result in damage to your oven.
- The connection may be achieved by having the plug accessible or by incorporating a switch in the fixed wiring in accordance with the wiring rules.
- Using improper plug or switch can cause an electric shock or a fire.
• The door or the outer surface may get hot when the appliance is operating.
- Keep the appliance and its cord out of reach of children less than 8 years.
• The contents of feeding bottles and baby food jars shall be stirred or shaken and the temperature checked before consumption, in order to avoid burns.
- Keep the inside and outside of the oven clean. For the details of how to clean your oven please reference above content "How To Clean".
- According to the installation requirements set, otherwise the impact of heat, prone to danger.
• The appliance shall not be cleaned with a steam cleaner.
- Caution, hot surface
When the symbol is used, It means that the surfaces are liable to get hot during use.
- Do not place an object(a book, a box, etc.) on the product. The product may overheat or catch fire or the object may fall, causing injury to persons.
- It is highly recommended that users don't touch such surfaces during use in order to prevent burn hazard.
A special care should be taken for the area very close to the ventilation openings.
• Hot steam may cause scalding.
- Don't open the door and don't touch the vent holes while the steam function is working.
- Use care when opening the door. The hot air and steam that escape can cause burns to the hands, face and eyes. Let hot air or steam escape from the oven before opening the door.
- Steam may condense on the inside of the door. Do not wipe condensation off until the door has cooled.
MAINTENANCE
How To Clean
To Clean Your Oven
- Keep the inside of the oven clean
- Food spatters or spilled liquids stick to oven walls and between the seal and door surface. It is best to wipe up spill-overs with a damp cloth right away. Crumbs and spill-overs will absorb microwave energy and lengthen cooking times. Use a damp cloth to wipe out crumbs that fall between the door and the frame. It is important to keep this area clean to ensure a tight seal. Remove greasy spatters with a soapy cloth then rinse and dry. Do not use harsh detergent or abrasive cleaners. The Metal tray can be washed by hand or in the dishwasher.
- Keep the outside of the oven clean
- Clean the outside of your oven with soap and water, then with clean water and dry with a soft cloth or paper towel. To prevent damage to the operating parts inside the oven, the water should not be allowed to seep into the ventilation openings.
- If steam accumulates inside or around the outside of the oven door, wipe the panels with a soft cloth. This may occur when the oven is operated under high humidity conditions and in no way indicates a malfunction of the unit.
- The door and door seals should be kept clean. Use only warm, soapy water, rinse then dry thoroughly. DO NOT USE ABRASIVE MATERIALS, SUCH AS CLEANING POWDERS OR STEEL AND PLASTIC PADS.
Metal parts will be easier to maintain if wiped frequently with a damp cloth.
- Do not use any steam cleaner
- Unplug your oven from the electrical socket when you clean the control panel with a wet cloth or spray water on the control glass to clean. If it's not, this product can be operated by touching Microwave Quick Start button.
To Clean the Cavity
Cavity front side
After cooking greasy food like fried chicken, wipe the front side of the cavity with a soft sponge with neutral detergent in the direction of right to left following the texture. And finish it with a dry towel. (Inside of the door, remove the grease with a sponge or towel.)

natural_image
Illustration of a kitchen appliance with a hand cleaning the oven (no text or symbols visible)Cavity inside
- Wipe inside with a towel or sponge with neutral detergent, finish it with a dry towel.
- If you do not clean inside the cavity for a long time, oil stains might stick inside and it will be hard to remove and give out a bad smell.
- If it is hard to remove water marks around the steam outlet on the wall of cavity, you can remove it effectively with a sponge and vinegar.
• After cooking with steam, wipe around the kitchen with dry towel. - It would be convenient to use the steam cleaning function after cooking greasy food like fried chicken or fried fish.

natural_image
Line drawing of a hand cleaning a microwave oven with a cloth (no text or symbols)Clean
Speed Clean
This 15-minute process takes advantage of the steam generator in the oven to help lift light soil.
Speed Clean can be used when the temperature inside the oven is below 65 °C. Please use after cooling.
Setting Speed Clean
1 Remove oven racks and accessories from the oven.
2 Fill the water tank with water to the maximum fill line (34 oz/1000 cc).
3 Touch Clean.
4 Touch Speed Clean.
5 Touch Start. The remaining time appears in the display.
Water Tank
The water tank is used during the steam cooking functions. Use filtered, softened water if possible.
NOTE
• After using the steam function, the water tank should be drained. To avoid bacteria or odours, clean and dry the water tank after every use.
- Do not clean in a dishwasher.
Hard Water Scale
If hard water is used in the water tank, the steam generator may become clogged with hard water scale. In areas with hard water, run the Descaling function frequently or use softened water.
Cleaning Scale on Oven Bottom
To remove mineral deposits that remain on the oven bottom after using the steam mode, use a cloth or sponge soaked in vinegar or a weak citric acid solution.
Steam Maintenance
Descaling
After the steam mode is used for 8 hours, a reminder to descale the product appears in the display the next time the steam mode is selected. You will not be able to use the steam mode until the Descaling function has run. To avoid this delay, run the Descaling function after every 2-3 uses of the steam mode.
For instructions on removing and filling the water tank, see "Using the Water Tank."
Setting Descaling
1 Fill the water tank with a 20:1 mixture of water and citric acid. For example, use 4 tsp of citric acid in 414 cups water (20 g citric acid in 1000 ml water).
2 Insert the water tank into the slot over the oven cavity and push it in until it clicks into place.
3 Touch Clean, Steam Maintenance and Descaling in that order.
4 After about 17 minutes of descaling, a pop-up will appear in the display. Following the architecture, drain the tank and fill it with clean water.
5 Insert the tank and start the Rinsing function.
6 Once the Rinsing function is complete, dry the inside of the oven with a soft cloth.
NOTE
The Rinsing function must be completed even if the Descaling function is canceled.
Drying
The Drying function removes residual water inside the steam generator. The function takes a little over 4 minute and runs automatically after any steam cooking cycle. The Drying function can also be started manually, if needed.
Setting Drying
1 Remove water tank before start.
2 Touch Clean, Steam Maintenance and Drying in that order.
3 Touch Start to begin Drying. The remaining time appears in the display.
Evaporation
Use the Evaporation function to dry the oven cavity after a steam cooking cycle. Evaporation runs for 12 minutes.
Setting Evaporation
1 Touch Clean, Steam Maintenance and Evaporation in that order.
2 Touch Start to begin Evaporation. The remaining time appears in the display.
PRODUCT OVERVIEW
Parts

*BUILT IN SPEED OVEN can be used with Drawer.
*The above picture may be different from the actual product.
Oven levels are numbered from the bottom up. The 4th level is used for grill functions.
The cooking tables throughout these operating instructions give you suggested oven settings, however you can change these to suit yourself.
Accessories
Included Accessories

Metal tray (Level 1, 2, 3 use)

Rack
(Cavity bottom, on the metal tray use)
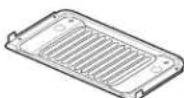
Crisp tray (Level 4 only use)

Oven glove

Owner's manual

Furniture screw (2ea)

Water tank
* You can download the cook book at www.signaturekitchensuite.it
NOTE
- For your safety and for extended product life, only use authorized components.
- The manufacturer is not responsible for any product malfunction or accidents caused by the use of separately purchased, unauthorized components or parts.
Technical specifications
| Oven Model | SKSLV2421MS |
| Mains connection | 230 V~ 50 Hz |
| MAX power consumption | 3150 Watts (3.15 KW) / 13.7 A |
| Microwave output power | Max. 1000 watt (IEC60705 rating standard) |
| Power consumption | Microwave 1300 wattGrill 1600 wattHot Air Combi. 3050 watt |
| Oven installation dimensions (mm) | 594 (W) x 460 (H) x 471 (D) |
| Oven interior dimensions (mm) | 440 (W) x 235 (H) x 310 (D) |
| Volume (Usable capacity) | 32 L |
Microwave Frequency : 2450 MHz +/- 50 MHz (Group 2 / Class B) **
Group 2 equipment: group 2 contains all ISM RF equipment in which radio-frequency energy in the frequency range 9 kHz to 400 GHz is intentionally generated and used or only used, in the form of electromagnetic radiation, inductive and/or capacitive coupling, for the treatment of material or inspection/analysis purposes.
Class B equipment is equipment suitable for use in domestic establishments and in establishments directly connected to a low voltage power supply network which supplies buildings used for domestic purposes.
When operating the microwave oven, If you use a product such as radio, TV, wireless LAN, Bluetooth, medical equipment, wireless equipment etc. Using the same frequency as the microwave oven, the product may receive interference from these products. This interference does not indicate a problem of the microwave or the product and is not a malfunction.
Therefore, it is safe to use. However, medical equipment may receive interference as well, so use caution when using medical equipment near the product.
INSTALLATION
Before Installing the Oven
Remove all tape and packing materials before using the oven. Dispose of all plastic bags after unpacking the oven.
Never allow children to play with packing materials.

WARNING
- The information in this manual should be followed exactly.
- Failure to do so could result in fire or electrical shock, causing property damage, personal injury or death.
- DO NOT put any weight on the oven door. Never allow anyone to climb, sit, stand or hang on the oven door.
- The oven could be tipped and injury might result from contact with hot food or the oven itself.
- The electrical power must be shut off while the electrical connections are being made.
- Failure to do so can result in severe personal injury, death or electrical shock.
- Mounting screws must be used.
- Failure to do so can result in the oven falling out of the cabinet causing serious injury.

CAUTION
- Make sure the cabinets and wall coverings around the oven can withstand the temperature (up to 90^[194^] ) generated by the oven.
- Discoloration, delamination or melting may occur.
- During installation, ensure that no persons can come into contact with live components.
- The oven must be installed by a qualified professional electrician, in accordance with the corresponding regulations and standards.
- The oven is a heavy appliance and must be transported with great care.
- Before initial use, remove all packaging, both external and from inside the appliance.
- No modification may be made to the oven's technical characteristics.
- The integrated cooking area or hotplates is/are provided with special connections. These may only be attached to the appropriate corresponding connections of the same type.
NOTE
This installation must be completed by a qualified installer or technician.
Proper installation is the responsibility of the installer and product failure due to improper installation is NOT covered under warranty.
• Installer: please retain these instructions for local inspector's reference, then leave them with the consumer.
- Consumer: please read and keep these instructions for future reference and be sure to read the entire OWNER'S MANUAL prior to use.
- Do not use the parts except for provided components when you install the product.
- Make sure the oven is flush with the front of the enclosure.
Preparing for Installation
Required Tools
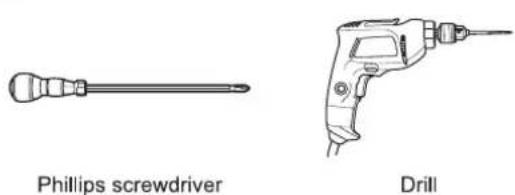

Tape measure

Gloves
Materials Included

Furniture screw (2ea)
Installation Information
The first step of the installation is measure the current cutout dimensions and compare them to the cutout dimensions shown below. Little or no cabinet work may be necessary.
NOTE
Make sure the base is level and the front of the cabinet is square.
- A gap must be minimum 10 mm between the rear of the installed oven and the connecting wall.
- Kitchen cabinets in contact with the oven must be heat resistant up to 90^ (194°F), and fronts of nearby units up to at least 70^ (158°F).
Installation Drawings (With Drawer)
Cutout dimensions
Cutout Depth min. 556 mm
Cutout Width min. 560 mm
Cutout Height min. 595 mm
Ventilation dimension
Cutout Depth min. 50 mm
Cutout Width min. 550 mm
Oven dimensions
Depth 471 mm
Width 594 mm
Height 460 mm
Drawer dimensions
Depth 553 mm
Width 594 mm
Height 139 mm


Remove the back wall of the installation cabinet. If it is difficult to remove the back wall, make a hole at least 100 mm in diameter that the drawer power cord can protrude on the back wall.
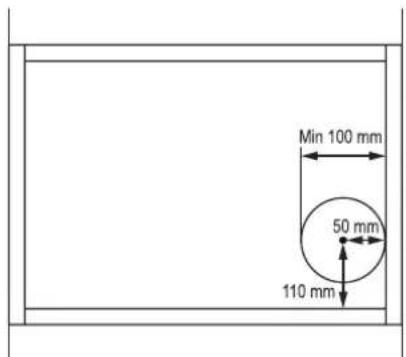
For correct ventilation, a ventilation opening of 50 mm is required between the back wall and the floor of the installation cabinet.
Installation Drawings (Without Drawer)
Cutout dimensions
Cutout Depth min. 556 mm
Cutout Width min. 560 mm
Cutout Height min. 458 mm
Ventilation dimensions
Cutout Depth min. 50 mm
Cutout Width min. 550 mm
Oven dimensions
Depth 471 mm
Width 594 mm
Height 460 mm
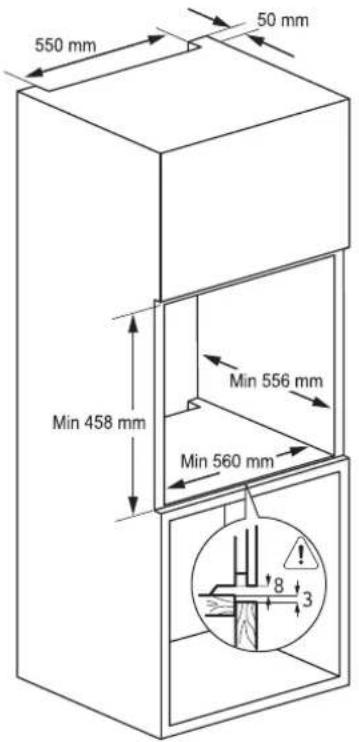
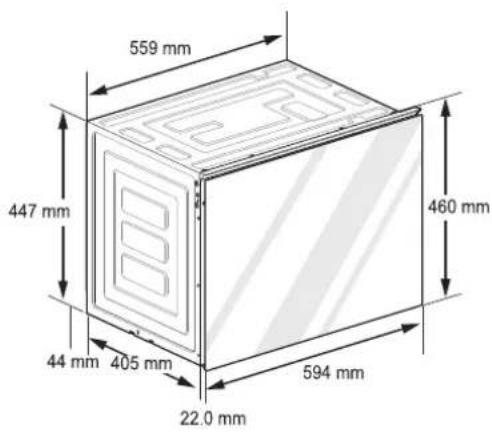
Remove the back wall of the installation cabinet. If it is difficult to remove the back wall, make a hole at least 100 mm in diameter.
For correct ventilation, a ventilation opening of 50 mm is required between the back wall and the floor of the installation cabinet.
Product display

natural_image
Line drawing of a cabinet interior with drawers and a refrigerator (no text or symbols)Ventilation
For correct ventilation, the ventilation opening of 50 mm should be required between the back wall and the floor of the installation cabinet, the ventilation gap of 5 mm is required between the oven top rim and the furniture lower rim, and between the oven both sides rim and the cabinet, these openings must not be closed by any way. So ensure that the sides are not touching the front edges of the housing. Connect the oven to the power supply.

Installation
Clean the cabinet before installing the product as it may be dusty.
Dust inside the cabinet may seep into the product and cause a breakdown.
At least two people must work together.
Installation with drawer
1 Install the drawer in the cabinet.
2 Place oven on the drawer.
3 Open the product's door and tighten the screws on the two holes on the left and right sides of the trim bracket.
Installation without drawer
1 Place oven in the cabinet.
2 Open the product's door and tighten the screws on the two holes on the left and right sides of the trim bracket.

OPERATION
Control Panel Overview

ENGLISH
① Power On/Off Key
Press the Power On/Off Key for 1 second.
② LCD Touchscreen for Oven
③ Door Open Key
You should touch under the light to open the oven door.
You can remove the "Touch Here" label.
Display Icons

① Microwave Quick start
Touch to start microwave mode quickly.
② Ⓛ Timer Icon
Touch to set a timer
3 Lamp Icon
Touch to turn light on/off
4 <> Arrow keys
Touch when you turn on the screen.
5 Lock Icon
Appears when Lockout is on
6 Wi-Fi Icon
• Appears when oven is connected to Wi-Fi
• Appears when oven is disconnected from Wi-Fi or is not registered
7 Remote On Icon
Appears when Remote On is active
8 Oven Cooling Icon
Appears during or after oven operation to indicate cooling fan is running in oven
9 DEMO DEMO Mode Icon
Appears when Demo mode is active
10 ↓ Download Icon
Update the latest version for downloading the program
Getting Started
After turning on the oven for the first time, adjust the settings to suit your preferences.
1 Touch Power On/Off Key.
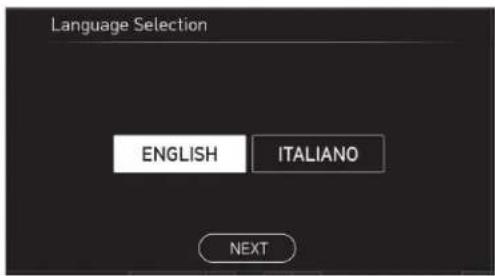
2 After the start-up animation, select the desired language and touch NEXT.
3 Set the current time and choose between a 12-hour or 24-hour time format, then touch NEXT.
4 Read through the application guide in the display and touch DONE.
5 The mode screen appears in the display.

Changing Oven Settings
Settings
To adjust settings after the initial setup, touch Settings at the bottom centre of the Main screen. Swipe the screen or touch the <> arrow keys to navigate through the Settings screens.

Location of Settings
• Page 1: Child Lock, Time, Wi-Fi, Remote On, Brightness, Microwave Quick Start.
• Page 2: Language Selection, Volume, Preheat Alarm Light, Units, Smart Diagnosis™, Program Update.
• Page 3: Demo Mode, Factory Data Reset, Open Source License.
Child Lock
The Child Lock feature automatically prevents most oven controls from being turned on. It does not disable the clock, timer or the interior oven light.
Lock
1 Touch Settings at the bottom centre of the Main screen.
2 Touch Child Lock on the first Settings screen.
3 When Child Lock is turned on, the lock icon 🔒 appears at the top of the display.
Unlock
1 Touch any part of the screen while Child Lock is on.
2 A popup screen appears. Touch Unlock for 3 seconds.
3 The lock icon disappears from the top of the display.
Time
Setting Time of Day
1 Touch Time on the Settings screen.
2 Set the current hour and minute by scrolling. You can also touch the number pad icon 12 and enter the desired numbers.
3 Select either a 12-hour or 24-hour clock mode (12H/24H).
4 Touch OK.
Wi-Fi
Connect the appliance to a home Wi-Fi network to use Remote On and other smart functions. See the Smart Functions section for more details.
Setting Up Wi-Fi
1 Touch Settings at the bottom centre of the Main screen, then touch Wi-Fi in the first Settings screen.
2 Follow the instructions in the Wi-Fi Guide in the display.
3 Select ON, OFF, or RESET and touch OK.
4 If ON is selected, the Wi-Fi icon 📋 appears at the top of the display.
5 Selecting RESET initializes the IP address.
Remote On
Remotely sets the cook mode of the appliance. The appliance must be registered on a home Wi-Fi network to use Remote On.
Setting Remote On
1 Touch Settings at the bottom centre of the Main screen, then touch Remote On in the first Settings screen.
2 Select On or Off and touch OK.
3 If ON is selected, the Remote On icon 📂 appears at the top of the display.
Brightness
Adjust the brightness of the LCD display from 20 % to 100 % in increments of 20 %.
Setting Display Brightness
1 Touch Settings at the bottom centre of the Main screen, then touch Brightness in the first Settings screen.
2 Adjust the display brightness by touching and dragging the dot across the bar, by tapping anywhere on the bar, or by touching + or -.
3 Touch OK.

Microwave Quick start
You can adjust the power level of the microwave from 100 W to 1000 W in increments of 100 W.
The max cook time is 5 minute.
1 Touch Settings at the bottom centre of the Main screen, then touch Microwave Quick Start.
2 Set the power level by scrolling.
3 Set the cook time by scrolling. You can also touch the number pad icon 12 and enter the desired numbers.
Language Selection
Set the display language to ENGLISH, ITALIAN.
Selecting a Language
1 Touch Settings at the bottom centre of the Main screen, swipe to the second Settings screen, and touch Language Selection.
2 Select the desired language.
3 Touch OK.
Volume
Adjust the volume of the oven.
Setting the Volume
1 Touch Settings at the bottom centre of the Main screen, swipe to the second Settings screen, and touch Volume.
2 Select Mute, Low, or High.
3 Touch OK.
Preheat Alarm Light
When the oven reaches its set-temperature, the preheating alarm light flashes 5 times or until the oven door is opened. You can turn the preheat alarm light on or off.
Preheat alarm setting
1 Touch Settings at the bottom centre of the Main screen, swipe to the second Settings screen, and touch Preheat Alarm Light.
2 Select ON or OFF
3 Touch OK
Units
Set the unit of temperature and weight for ease of use.
Setting Units
1 Touch Settings at the bottom centre of the Main screen, swipe to the second Settings screen, and touch Units.
2 Select °C or °F.
3 Select kg or lb.
4 Touch OK.
Smart Diagnosis™
Smart Diagnosis™ can be run through a smartphone application or by calling for support. Place your smartphone's mouthpiece near the top right corner of the screen. See "Smart Diagnosis Function" in the Smart Functions section for detailed instructions.
1 Touch Settings at the bottom centre of the Main screen, swipe to the second Settings screen, and touch Smart Diagnosis.
2 Touch START to start the diagnostic tone.
Program Update
Once the appliance is connected to a home Wi-Fi network, use this setting to check for available programming updates and install them.
1 Touch Settings at the bottom centre of the Main screen, swipe to the second Settings screen, and touch Program Update.
2 The display shows available programming updates. Touch UPDATE to download and install the new version.
Demo Mode
Demo Mode for showroom use only. The oven will not heat up.
1 Touch Settings at the bottom centre of the Main screen, swipe to the third Settings screen, then touch Demo Mode on the Settings screen.
2 Select either a ON or OFF mode.
3 Touch OK.

NOTE
- When Demo Mode is on, the appliance will not heat up.
- The oven Demo Mode icon appears in the display if the Demo Mode is on.
Factory Data Reset
This function returns all settings to the factory defaults.
1 Touch Settings at the bottom centre of the Main screen, swipe to the third Settings screen, and touch Factory Data Reset.
2 If you want to reset data to the factory defaults, touch RESET and then OK.

WARNING
- All stored data will be deleted.
Open Source License
Those products identified by the Product Type and Model Oven above from SIGNATURE KITCHEN SUITE contain the open source soft detailed function. Please refer to the indicated open source licenses (as are included following this notice) for the terms and condition of their use.
1 Touch Settings at the bottom centre of the Main screen and swipe to the third Settings screen.
2 Touch Open Source License.
Using the Oven
Timer
The oven timers don't affect oven operation or cooking time. Use them as extra kitchen timers. Once the time runs out, the oven chimes and "Timer finished" appears in the display.
Setting the Timer
1 Touch either clock icon ⏻ at the bottom of the display.
2 Scroll through the numbers in the popup until the desired time appears in the display and touch OK.
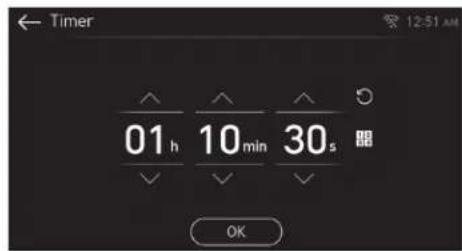
3 The time remaining appears next to the clock icon in the display.
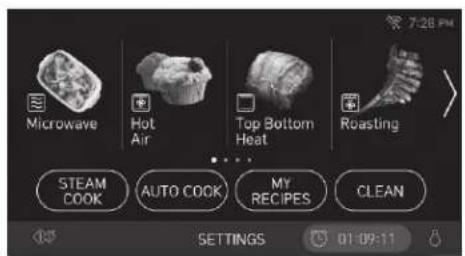
Adjusting or Cancelling the Timer
1 Touch the remaining time next to the clock icon in the display.
2 To cancel the timer, touch Reset (☐) in the popup, then touch OK.
3 To adjust the time, scroll through the numbers in the popup until the desired time appears, then touch OK.
4 The remaining time in the display is adjusted.
Oven Cooling
The oven cooling icon appears in the display if the temperature inside the oven is high during or after operation.


10:25 AM

Microwave
Microwave mode is suitable for boiling and heating food. The oven has 10 levels from 1000W to 100W. The default power level is 1000W.
Setting the Microwave Function
1 Select Microwave in the cooking mode screen.
2 Scroll through the numbers to select a power level.
3 Scroll through the numbers to set the cook time or touch the number pad icon 1/2 3/4 to enter the numbers directly and touch OK.
4 Touch Start.
5 If the cook time is set, the remaining time appears in the display.
6 A chime sounds at the end of the set cook time and a notification appears in the display. Open the oven door and remove the food.
Changing the Cook Settings
1 Touch Edit in the display to bring up the Cook Settings screen.
2 Adjust the settings using the number pad or scroll function.
3 Touch Start.
To pause cooking
1 Touch Pause in the display.
2 If you want to start, touch Start in the display.
To stop cooking
1 Touch Stop in the display, then select Yes.
| Power Level | Use | Accessory |
| 1000 W | Boiling water.Browning ground beef.Making candy.Cooking poultry pieces, fish, & vegetables.Cooking tender cuts of meat. | Rack *Rack Location *Rack Location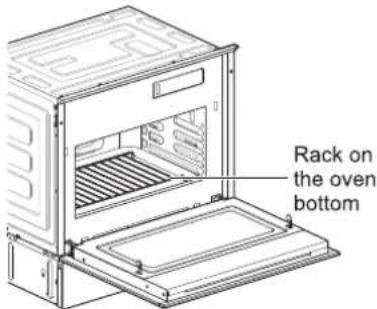 |
| 900 W | Reheating rice, pasta, & vegetables. | |
| 800 W | Reheating prepared foods quickly.Reheating sandwiches. | |
| 700 W | Cooking egg, milk and cheese dishes.Cooking cakes and breads.Melting chocolate. | |
| 600 W | Cooking veal.Cooking whole fish.Cooking puddings and custard. | |
| 500 W | Cooking ham, whole poultry and lamb.Cooking rib roast and sirloin tip. | |
| 400 W | Thawing meat, poultry and seafood. | |
| 300 W | Cooking less tender cuts of meat.Cooking pork chops and roast. | |
| 200 W | Taking chill out of fruit.Softening butter. | |
| 100 W | Keeping casseroles and main dishes warm.Softening butter and cream cheese. |
Hot Air / Top Bottom Heat / Roasting / Auto Roast / Pizza Mode / Grill / Crispy Grill / Bottom Heat (Example : Hot Air)
Setting the Hot Air Function
1 Select the desired oven in the display, then select Hot Air in the Cooking Mode screen.
2 Scroll through the numbers to select a cooking temperature or touch the number pad icon ☐ to enter the numbers directly and touch OK.
3 If desired, set the cook time and delayed start time using the same method. Touch the arrow key on the right side of the display to see the cook time and delayed start time settings.
4 Touch Start. The oven starts to preheat.
5 If the cook time is set, the remaining time appears in the display. If a delayed start time is set, the start time appears in the display.
6 A chime sounds once preheating is complete.
7 A chime sounds at the end of the set cook time and a notification appears in the display. Open the oven door and remove the food.
Changing the Cook Settings
1 Touch Edit in the display to bring up the Cook Settings screen.
2 Adjust the settings using the number pad or scroll function.
3 Touch Start.
To Stop Cooking
1 Touch Stop in the display, then select Yes.
Hot Air Combi. / Roast Combi./Auto Roast Combi. / Grill Combi. (Example : Hot Air Combi.)
Setting the Hot Air Combi. Function
1 Select the desired oven in the display, then select Hot Air Combi. in the Cooking Mode screen.
2 Scroll through the numbers to select a cooking temperature or touch the number pad icon 12 to enter the numbers directly and touch OK.
3 Scroll through the numbers to select a power level.
4 If desired, set the cook time using the same method. Touch the arrow key on the right side of the display to see the cook time settings.
5 Touch Start. The oven starts.
6 If the cook time is set, the remaining time appears in the display.
7 A chime sounds at the end of the set cook time and a notification appears in the display. Open the oven door and remove the food.
Changing the Cook Settings
1 Touch Edit in the display to bring up the Cook Settings screen.
2 Adjust the settings using the number pad or scroll function.
3 Touch Start.
To Stop Cooking
1 Touch Stop in the display, then select Yes.
Defrost
Setting the Defrost Function
1 Select the desired oven in the display, then select Defrost in the Cooking Mode screen.
2 Select food type and weight by scrolling.
3 Touch Start. The oven starts.
4 The remaining time appears in the display.
5 After The BEEP, turn the food over and press start to continue cooking.
6 A chime sounds at the end of the cook time and a notification appears in the display. Open the oven door and remove the food.
To pause cooking
1 Touch Pause in the display.
2 If you want to start, touch Start in the display.
To stop cooking
1 Touch Stop in the display, then select Yes.
Cooking Guide
The size, weight, thickness, starting temperature, and your personal state will affect operating times. This guide is only for reference. Adjust cook time according to your preference.
Always use an oven glove to remove food. Do not touch the broil element. Failure to obey this caution can result in severe personal injury.
| Category | Baking | Roasting | Grilling | Pizza |
| 1 | Baguette | Beef (approx. 1 kg) | Beef steaks | Pizza (Home-made) |
| 2 | Biscuits | Leg of Lamb (approx. 1 kg) | Grilling sausages | Pizza (Frozen, thick) |
| 3 | Bread (rye bread) | Pork (approx. 1 kg) | Hamburgers | Pizza (Frozen, thin) |
| 4 | Lasagne | Poultry (approx. 1.5 kg) | Pork fillet | |
| 5 | Pie | Whole fish (approx. 1.5 kg) | Salmon fillets | |
| 6 | Small cake | Toast | ||
| 7 | Souffle | |||
| 8 | Sponge cake |
Baking Tables
| Hot Air | Top Bottom Heat | |||||||
| Menu | Accessory | Tray position | Temp in °C | Cooking time in mins. | Tray position | Temp in °C | Cooking time in mins. | |
| Biscuits | Metal tray | 1 | 180~190 | 15~30 | 1 | 180~190 | 15~30 | |
| Bread (rye bread) | *Loaf pan on the Metal tray | 1 | 180~190 | 15~40 | 1 | 180~190 | 15~40 | |
| Lasagne | Metal tray | 1 | 180~190 | 40~70 | 1 | 180~190 | 50~80 | |
| Pie | *Pie pan on the Rack | Bottom | 180~190 | 15~35 | Bottom | 180~190 | 20~40 | |
| Small cake | *Paper muffin cups on the Metal tray | 1 | 160 | 15~30 | 1 | 160 | 15~30 | |
| Souffle | Metal tray | 1 | 160~170 | 45~75 | 1 | 160~170 | 45~75 | |
| Sponge cake | Metal tray | 1 | 180 | 10~25 | 1 | 180 | 10~35 | |
| Hot Air | Steam-assist | |||||||
| Menu | Accessory | Tray position | Temp in °C | Cooking time in mins. | Tray position | Steam level | Temp in °C | Cooking time in mins. |
| Baguette | *Baguette tray on the Metal tray | 1 | 200 | 20~30 | 1 | High | 200~210 | 15~25 |
* Loaf pan, * Pie pan, * Paper muffin cups, * Baguette tray : Use these cooking containers in your own.
Roasting Tables
| Auto Roast | Roasting | Steam-assist | ||||||||
| Menu | Accessory | Tray position | Temp in °C | Cooking time in mins. | Tray position | Temp in °C | Cooking time in mins. | Tray position | Temp in °C | Cooking time in mins. |
| Beef (approx. 1 kg) | Rack on the Metal tray | 1 | 180~190 | 80~100 | 1 | 180~190 | 80~100 | 1 | 180~190 | 70~90 |
| Leg of Lamb (approx. 1 kg) | Rack on the Metal tray | 1 | 180~190 | 70~90 | 1 | 180~190 | 70~90 | 1 | 180~190 | 60~80 |
| Pork (approx. 1 kg) | Rack on the Metal tray | 1 | 180~190 | 110~130 | 1 | 180~190 | 110~130 | 1 | 180~190 | 100~120 |
| Poultry (approx. 1.5 kg) | Rack on the Metal tray | 1 | 190~200 | 70~90 | 1 | 190~200 | 70~90 | 1 | 190~200 | 60~80 |
| Whole fish (approx. 1.0 kg) | Rack on the Metal tray | 2 | 160~170 | 30~50 | 2 | 170~180 | 30~50 | 2 | 170~180 | 30~50 |
Grilling Tables
| Grill | |||||
| Menu | Accessory | Tray position | Mode | Cooking time in mins. | |
| 1^st side | 2^nd side | ||||
| Beef steaks | Crisp tray | 4 | Grill_High | 5~10 | 4~9 |
| Grilling sausages | Crisp tray | 4 | Grill_High | 5~15 | 3~10 |
| Hamburgers | Crisp tray | 4 | Grill_High | 5~15 | 3~10 |
| Pork fillet | Crisp tray | 4 | Grill_High | 10~20 | 7~18 |
| Salmon fillets | Crisp tray | 4 | Grill_High | 6~11 | 5~10 |
| Toast | Rack on the Metal tray | 3 | Grill_High | 3~5 | 3~5 |
- Let the oven preheat for approximately five minutes before cooking food.
Pizza Tables
| Hot Air | Pizza Mode | ||||||
| Menu | Accessory | Tray position | Temp in °C | Cooking time in mins. | Tray position | Temp in °C | Cooking time in mins. |
| Pizza (Home-made) | Metal tray | 2 | 190~200 | 10~30 | 2 | 190~200 | 10~30 |
| Pizza (Frozen, thick) | Metal tray | 2 | 190~200 | 10~30 | 2 | 190~200 | 10~30 |
| Pizza (Frozen, thin) | Metal tray | 2 | 190~200 | 10~20 | 2 | 190~200 | 10~20 |
My Recipe
For frequently used cooking menus, you can combine up to three different temperatures and cooking modes into one hot key.
Creating My Recipe
- When combining two or three cooking modes, a cooking time must be set before selecting an additional cooking mode.
1 Touch My Recipe in the Cooking Modes screen.
2 Touch Create to make a new hot key.
3 Select a first cook mode from the list in the display and set the desired cook temperature or level.
4 Touch Set Cook Time.
5 If there are no additional cooking stages, touch Done. To add another cooking stage, set a cooking time for the first stage. Then touch Add Cook Stage.
6 Repeat steps 1-3 until all desired cooking stages have been entered. Then touch Done.
7 Enter a name for your recipe using the keyboard and touch Save.
8 The recipe name is added to the My Recipes menu.
NOTE
• After the steam mode is used for 8 hours, a reminder to descale the product appears in the display the next time the steam mode is selected. You will not be able to use the steam mode until the Descaling function is run. To avoid this delay, run the Descaling function after every 2-3 uses of the steam mode.
- If the descaling reminder appears, press OK to run the Descaling function.
Editing My Recipe
- The Edit function cannot add or remove cooking stages to a recipe. Only the oven temperature, level, and cook time can be changed.
1 Touch My Recipe in the Cooking Modes screen.
2 Select the recipe to edit then touch the pencil icon at the bottom left of the screen.
3 Edit the settings for the first cooking stage and touch Done to proceed to the next cooking stage, if any.
4 Edit the next cooking stage, touch Done, and proceed through all cooking stages in the same way.
5 Once the last cooking stage has been edited, enter a new name for the recipe or keep the previous name, then touch Save.
Deleting My Recipe
1 Select the desired oven and touch My Recipe in the Cooking Mode screen.
2 Select the recipe and touch the trash can icon at the bottom left of the screen.
3 Touch Yes.
Auto Cook
The Auto Cook function provides guidance for cooking foods or dishes that may be unfamiliar. It contains pre-set programs for cooking many popular food items, with information on recommended preheating, accessories, and rack position for optimal results.
Setting Auto Cook Function
1 Select the desired oven and touch Auto Cook in the Cooking Mode screen.
2 Touch a category to filter the options.
3 Scroll through or tap the letters to find and select an item.
4 Follow the recommendations in the display regarding accessories and rack position.
5 Touch Start.
Auto Cook Guide
- Adjust cook time according to the size, thickness, and your personal state.
| Category | Menu | Weight Limit | Step | Accessory | Food Temp. | Tray position | Remark | Instructions | ||||
| Defrost & Cook | 1 | Baguette/ Croissant | 0.1 - 0.3 kg (50 - 100 g / piece) | 0.1 kg | Rack on the metal tray | Frozen | 1 | - | 1. Place frozen bread on the rack on the metal tray. Choose the menu and weight, press start. | |||
| 2 | Chicken Nuggets | 0.2 - 0.4 kg | 0.1 kg | Crisp tray | Frozen | 4 | - | 1. Place chicken nuggets on the crisp tray. Choose the menu and weight, press start. | ||||
| 3 | Frozen Lasagne | 0.4 kg | - | Rack on the metal tray | Frozen | 1 | - | 1. Remove a tray from outer carton and remove protective film.2. Place food on the rack on the metal tray. Choose the menu, press start.3. After cooking, stand covered for 2 minutes. | ||||
| 4 | Frozen Pizza (Thick) | 0.5 kg | - | Rack on the metal tray | Frozen | 2 | - | 1. Remove thick-crust pizza from all packaging.2. Place food on the rack on the metal tray.3. Choose the menu, press start. | ||||
| 5 | Frozen Pizza (Thin) | 0.2 - 0.4 kg | 0.1 kg | Rack on the metal tray | Frozen | 2 | - | 1. Remove thin-crust pizza from all packaging.2. Place food on the rack on the metal tray.3. Choose the menu and weight, press start.This automatic program receives best result for pre-baked frozen pizza. | ||||
| 6 | Salmon Fillets | 0.2 - 0.6 kg | 0.1 kg | Metal tray | Frozen | 2 | - | 1. Choose salmon fillets of 200 g and 2.5 cm thick each. Brush salmon fillet with oil and season as desired.2. Place food on the metal tray.Choose the menu and weight, press start. | ||||
| Healthy Fry | 1 | Chicken Wings | 0.2 - 0.6 kg | 0.1 kg | Crisp tray | Refrigerated | 4 | After the BEEP "Turn food over" | 1. Brush chicken wings with melted butter or oil and season as desired.2. Place food on the crisp tray.Choose the menu and weight, press start.3. After the BEEP, turn food over and press start to continue cooking. | |||
| 2 | Fish Schnitzel | 0.2 - 0.6 kg | 0.1 kg | Crisp tray | Refrigerated | 4 | After the BEEP "Turn food over" | IngredientsFish fillets of 150 - 200 g each1 cup flour2 eggs, lightly beaten1 cup finely ground breadcrumbsSalt and pepper to taste | ||||
| 1. Season fish fillets with salt and pepper or as desired,coat in flour and brush with beaten eggs. Coat with finely ground breadcrumbs and brush crumbled fish with oil.2. Place food on the crisp tray.Choose the menu and weight, press start.3. After the BEEP, turn food over and press start to continue cooking. | ||||||||||||
| Healthy Fry | 3 | French Fries | 0.2 - 0.3 kg | 0.1 kg | Crisp tray | Frozen | 4 | - | 1. Spread frozen potato products out on the crisp tray. For the best results, cook in a single layer.2. Choose the menu and weight, press start. | |||
| 4 | Hamburgers | 0.2 - 0.4 kg | 0.1 kg | Crisp tray | Refrigerated | 4 | After the BEEP "Turn food over" | 1. Choose hamburgers of 100 g and 1 cm thick each. Brush hamburgers with oil.2. Place food on the crisp tray.Choose the menu and weight, press start.3. After the BEEP, turn food over and press start to continue cooking. | ||||
| 5 | Sausages | 0.2 - 0.6 kg | 0.1 kg | Crisp tray | Refrigerated | 4 | - | 1. Remove all packaging and slit on the surface.2. Place food on the crisp tray.Choose the menu and weight, press start. | ||||
| 6 | Wedge Potatoes | 0.2 - 0.4 kg | 0.1 kg | Crisp tray | Room | 4 | - | 1. Wash potatoes and cut into wedges. Brush potatoes with oil.2. Place food on the crisp tray.Choose the menu and weight, press start. | ||||
| Roast & Bake | 1 | Cookies | 24 cookies | - | Metal tray + crisp tray | Room | 1 + 4 | - | Ingredients80 g brown sugar80 g butter, softened1 egg , lightly beaten180 g all - purpose flour, sifted1/2 teaspoon baking powder1/2 teaspoon baking soda100 g mini chocolate chips1. Mix brown sugar and softened butter. Gradually add egg and stir until light and fluffy. Add flour, baking powder, baking soda and chocolate chips and mix well.2. Drop about 18 g of dough by tablespoon onto the greased metal tray and crisp tray. Cookies should be spaced 2 cm apart.3. Place the metal tray and crisp tray in the oven. Choose the menu, press start.4. After cooking, remove from the oven and let them cool. | |||
| Roast & Bake | 2 | Fresh Pizza | 1 Pizza | - | *22 cm pizza pan on the rack on the metal tray | Room | 2 | - | IngredientsDough:120 g all-purpose or bread flour1 teaspoon active dry yeast1/3 teaspoon salt1 teaspoon sugar70 ml warm water1 teaspoon extra-virgin olive oil, plus little for coatingTopping:3 tablespoons pizza sauce30 g sausage, sliced1/2 onion, sliced2 fresh mushrooms, sliced1/2 fresh pepper100 g shredded mozzarella cheese1. Combine all ingredients for Dough in a large mixing bowl.2. Knead with an electric mixer to make smooth and elastic dough.3. Roll dough out and place dough on the pizza pan. Spread pizza sauce. Top with toppings and cheese.4. Place the pizza pan on the rack on the metal tray. Choose the menu, press start. | |||
| 3 | Roast Beef | 0.5 - 1.5 kg | 0.1 kg | Rack on the metal tray | Refrigerated | 1 | After the BEEP “Turn food over” | 1. Brush beef with melted butter or oil and season as desired.2. Place food on the rack on the metal tray. Choose the menu and weight, press start.3. After the BEEP, drain juices and turn food over immediately. And then press start to continue cooking.4. After cooking, stand covered with an aluminium foil for 10 minutes. | ||||
| 4 | Roast Chicken | 0.8 - 1.8 kg | 0.1 kg | Rack on the metal tray | Refrigerated | 1 | After the BEEP “Turn food over” | 1. Brush chicken with melted butter or oil and season as desired.2. Place whole chicken breast side-down on the rack on the metal tray. Choose the menu and weight, press start.3. After the BEEP, drain juices and turn food over immediately. And then press start to continue cooking.4. After cooking, stand covered with an aluminium foil for 10 minutes. | ||||
| 5 | Roast Pork | 0.5 - 1.5 kg | 0.1 kg | Rack on the metal tray | Refrigerated | 1 | After the BEEP “Turn food over” | 1. Brush pork with melted butter or oil and season as desired.2. Place food on the rack on the metal tray. Choose the menu and weight, press start.3. After the BEEP, drain juices and turn food over immediately. And then press start to continue cooking.4. After cooking, stand covered with an aluminium foil for 10 minutes. | ||||
| Roast & Bake | 6 | Small Cakes | 10~15 Small cakes | - | *Paper muffin cups on the metal tray (or *muffin tin on the metal tray) | Room | 1 | - | Ingredients120 g sugar120 g butter, softened2 eggs, lightly beaten150 g all-purpose flour, sifted1 teaspoon baking powder10~15 ea paper muffin cups(50 mm base x 30 mm height)Mix sugar and softened butter.Gradually add eggs and stir until light and fluffy. Add flour and baking powder and mix well.Evenly fill paper muffin cups with batter. (25~30 g per each)Place muffin cups on the metal tray. Choose the menu, press start.After cooking, remove from the oven and let them cool. | |||
| Popular Menu | 1 | Apple Tart | 1 Tart | - | *22 cm tart pan on the rack on the metal tray | Room | 1 | - | Ingredients1 short crust pastry dough5 apples20 g sugar2 tablespoons liquid honeyOn a lightly floured surface, roll out the pastry into a circle and put in the tart pan. Trim edges, leaving a little overhang. Prick with a fork and set aside.Chop 2 1/2 apples and place in a frying pan with sugar. Simmer until apple is soft. Cut remaining apples into 5 mm slices.Spread cooked apples onto the dough and arrange sliced apples in spiralling rosettes over the entire surface. Finally spread honey on top of apples.Place the tart pan on the rack on the metal tray. Choose the menu, press start.After cooking, remove from the oven and let them cool. | |||
| 2 | Lamb Chops | 0.2 - 0.6 kg | 0.1 kg | Crisp tray | Refrigerated | 4 | After the BEEP "Turn food over" | Choose lamb chops of 100 - 150 g weight and 1.5 - 2.0 cm thickness each. Season with salt and pepper or as desired.Place food on the crisp tray.Choose the menu and weight, press start.After the BEEP, turn food over and press start to continue cooking. | ||||
| Popular Menu | 3 | Lasagne | 1 Dish | - | *26 x 17 cm baking dish on the rack on the metal tray | Room | 1 | - | Ingredients9 lasagne sheets500 g spaghetti sauce600 g cheese sauce350 g grated mozzarella cheese10 g grated parmesan cheese | |||
| For Cheese sauce :60 g butter50 g plain flourPinch ground nutmeg500 ml milk20 g grated parmesan cheese1. Melt butter in small saucepan.Add flour and nutmeg, stirring until smooth.2. Gradually add milk and stir until it boils and thickens.3. Reduce heat and add parmesan cheese. Stir until cheese melts well.1. Cook lasagne sheets according to package directions and drain.2. Spread about 125 g spaghetti sauce in a 26 x 17 cm baking dish.3. Layer 3 lasagne sheets, 300 g cheese sauce, 125 g spaghetti sauce, 100 g mozzarella cheese.Repeat layering.4. Finally layer remaining lasagne sheets, spread 125 g spaghetti sauce, sprinkle with 150 g mozzarella cheese and 10 g parmesan cheese.5. Place baking dish on the rack on the metal tray. Choose the menu, press start. | ||||||||||||
| 4 | Pork Chops | 0.2 - 0.6 kg | 0.1 kg | Crisp tray | Refrigerated | 4 | After the BEEP “Turn food over” | 1. Choose Pork chops of 200 g weight and 2.5 cm thickness each. Season with salt and pepper or as desired.2. Place food on the crisp tray.Choose the menu and weight, press start.3. After the BEEP, turn food over and press start to continue cooking. | ||||
| 5 | Potato Gratin | 1.5 kg | - | *20 x 20 cm baking dish on the rack on the metal tray | Room | 1 | - | Ingredients1 kg potatoes1 clove garlic20 g butter200 g cream100 g grated cheeseNutmeg, salt and pepper to taste1. Peel and wash potatoes then cut into 5 mm slices. Rub the inside of a baking dish with a garlic clove and butter.2. Place half of the potatoes in the baking dish and season. Fill with remaining potatoes and season as desired. Then pour cream and cheese over the top.3. Place the baking dish on the rack on the metal tray. Choose the menu, press start. | ||||
| Popular Menu | 6 | Rice/Pasta | 0.1 - 0.3 kg | 0.1 kg | *Microwave-safe Bowl on the rack on the metal tray | Room | 1 | After the BEEP "Stir" | Ingredients for rice | |||
| Rice | 100 g | 200 g | 300 g | |||||||||
| Butter, melted | 30 g | 40 g | 50 g | |||||||||
| Onion, grated | 50 g | 75 g | 100 g | |||||||||
| Chicken stock or water | 250 ml | 500 ml | 750 ml | |||||||||
| Salt | To taste | |||||||||||
| 1. Add rice, melted butter and onion in a deep and large microwave-safe bowl (3 L) and mix well. Pour boiling chicken stock or water and add salt. Cover with plastic wrap and vent.2. Place a microwave-safe bowl on the rack on the metal tray. Choose the menu and weight, press start.3. After the BEEP, stir and press start to continue cooking.4. After cooking, stir and stand covered for 5 - 10 minutes if needed.Ingredients for pasta | ||||||||||||
| Pasta | 100 g | 200 g | 300 g | |||||||||
| Water | 400 ml | 800 ml | 1000 ml | |||||||||
| Salt | To taste | |||||||||||
| 1. Place pasta and boiling water with salt in a deep and large microwave-safe bowl (3 L). Cover with plastic wrap and vent.2. Place a microwave-safe bowl on the rack on the metal tray. Choose the menu and weight, press start.3. After the BEEP, stir and press start to continue cooking.4. After cooking, Rinse pasta with cold water. | ||||||||||||
*22 cm Pizza pan, *Paper muffin cups, *Muffin tin, *Microwave-safe dish, *22 cm Tart pan, *26 x 17 cm baking dish
*20 x 20cm baking dish, *Microwave-safe Bowl : Use these cooking containers in your own.
Steam Cook
Steam cooking uses the moist heat of steam to cook food. This is an ideal cooking method for delicate food items such as seafood, which can lose nutrients when boiled.
The oven provides 3 methods of steam cooking: Steam Assist, Steam Combi., and Gourmet Steam.

CAUTION
• Take care when opening the oven door during or after steam cooking. Hot steam can cause scalding.
Using the Water Tank
The water tank is located over the oven cavity.
1 Gently push the front of the water tank to slide it out.

natural_image
Two-step diagram showing a hand pressing a button on a device, and a close-up of the next button with a cable (no text or symbols)2 Remove the tank and place it on a flat surface.
3 Remove the tank cover or flip open the fill lid at the front of the tank cover.
4 Open the reservoir cap, and then fill the reservoir with 34 oz (1000 ml) of drinkable water. Use softened, filtered water, if possible. Hard water may clog the steam generator more quickly with scale build-up.

5 Assemble the cover or snap the fill lid closed.


CAUTION
- Make sure the tank cover and fill lid are closed before putting in the oven.
6 Carefully insert the tank into the steam feeder slot, making sure to keep the tank level while carrying it. If the tank is not kept level, water will drain out of the tubes in the back.
7 Slide the tank into the slot until it clicks into place.
Steam-Assist Mode
The Steam-Assist mode heats food gradually, using both the oven heating elements and moist steam heat. Preset temperature options start at 160°C (320°F).
NOTE
- If mineral deposits remain on the oven bottom after steam mode, use a cloth or sponge soaked in vinegar or a weak citric acid solution to remove them before using the steam mode again. See the Maintenance section under Descaling for more info. To remove stubborn hard water scale, use the Descaling function.
- Wipe away excess water left over after cooling.
• To avoid damage and extend product life, descale the steam feeder after every 8 hours of use, or more often if needed. - After the steam mode is used for 8 hours, a reminder to descale the product appears in the display the next time the steam mode is selected. You will not be able to use the steam mode until the Descaling function is run. To avoid this delay, run the Descaling function after every 2-3 uses of the steam mode.
- If the descaling reminder appears, press OK to run the Descaling function.
Setting Steam-Assist Mode
1 Touch Steam Cook.
2 Touch Steam-Assist.
3 Select the desired temperature and steam level: Low, Medium, or High.
4 Set the cook time or cooking end time.
5 Touch Start.
6 Once cooking is finished, allow oven to cool completely, then wipe up any water left on the oven interior.
Once Steam-Assist cooking is started, an indicator on the display shows the status of the steam function.
Make sure the water tank is filled with water before starting the Steam-Assist mode. If the water in the tank runs out during cooking, a chime sounds and a pop-up appears on the display. The oven continues to cook without steam.
NOTE
- Remember to drain the water tank after use.
Changing the Steam-Assist Settings
1 Touch Edit in the display to bring up the Cook Settings screen.
2 Adjust the settings as desired.
3 Touch Start.
To Stop Steam-Assist
1 Touch Stop in the display, then select Yes.
Steam Combi. Mode
The Steam Combi. mode heats food gradually, using both the microwave and moist steam heat. Preset power level options start at 1000 W.
Setting Steam Combi. Mode
1 Touch Steam Cook.
2 Touch Steam Combi.
3 Select the desired microwave power level and steam level: Low, Medium, or High.
4 Set the cook time.
5 Touch Start.
6 Once cooking is finished, allow oven to cool completely, then wipe up any water left on oven interior.
Changing the Steam Combi. Settings
1 Touch Edit in the display to bring up the Cook Settings screen.
2 Adjust the settings as desired.
3 Touch Start.
To pause cooking
1 Touch Pause in the display.
2 If you want to start, touch Start in the display.
To stop cooking
1 Touch Stop in the display, then select Yes.
Gourmet Steam
Get great results using preset steam cooking recipes that include recommendations for accessories and rack position.
Setting Gourmet Steam Function
1 Touch Steam Cook.
2 Touch Gourmet Steam.
3 Touch a category to filter the options.
4 Scroll through or tap the letters to find and select an item.
5 Follow the recommendations in the display regarding accessories and rack position.
6 Touch Start.
7 Once cooking is finished, allow oven to cool completely, then wipe up any water left on oven interior.
NOTE
It is normal to hear the sound of boiling water from the steam generator while running the steam functions.
Gourmet Steam Guide
- Adjust cook time according to the size, thickness, and your personal state.
| Category | Menu | Weight Limit | Step | Accessory | Food Temp. | Tray position | Remark | Instructions | |
| Gourmet Steam | 1 | Broccoli/ Cauliflower | 0.2 - 0.5 kg | 0.1 kg | *Microwave-safe dish on the rack on the metal tray | Refrigerated | 1 | Fill the water tank to the max line located at the front of the tank. | 1. Wash vegetables and cut into similar sized pieces.2. Place prepared food on the microwave-safe dish on the rack on the metal tray in a single layer.3. Choose the menu and weight, press start.- Cut small florets.(12-15 g/piece) |
| 2 | Carrot | 0.2 - 0.5 kg | 0.1 kg | *Microwave-safe dish on the rack on the metal tray | Refrigerated | 1 | Fill the water tank to the max line located at the front of the tank. | Same as above- Under 5 mm thickness. | |
| 3 | Eggs | 2 - 9 ea | 1 ea | Rack on the metal tray | Refrigerated | 1 | Fill the water tank to the max line located at the front of the tank. | 1. Place eggs on the rack on the metal tray.2. Choose the menu and weight, press start. | |
| 4 | Fish Fillets | 0.2 - 0.6 kg | 0.1 kg | Rack on the metal tray | Refrigerated | 1 | Fill the water tank to the max line located at the front of the tank. | 1. Wash fish fillets and cut into similar sized pieces.2. Place prepared food on the rack on the metal tray in a single layer.3. Choose the menu and weight, press start.- Cut under 2.5 cm thickness | |
| 5 | Green Beans | 0.1 - 0.3 kg | 0.1 kg | *Microwave-safe dish on the rack on the metal tray | Refrigerated | 1 | Fill the water tank to the max line located at the front of the tank. | 1. Wash vegetables.2. Place prepared food on the microwave-safe dish on the rack on the metal tray in a single layer.3. Choose the menu and weight, press start. | |
| 6 | Prawns | 0.2 - 0.6 kg | 0.1 kg | Rack on the metal tray | Refrigerated | 1 | Fill the water tank to the max line located at the front of the tank. | 1. Wash prawns.2. Place prepared food on the rack on the metal tray in a single layer.3. Choose the menu and weight, press start. | |
*Microwave-safe dish : Use this cooking container in your own.

CAUTION
• Take care when opening the oven door during or after steam cooking. Hot steam can cause scalding.
Information for test institutes
- This table is only for use by test institutes. It includes the best settings for the test recipes out of the standard IEC 60350-1 and IEC 60705
| Mode | Menu | Cook Mode | Temperature [°C] | Microwave power [W] | Accessories | Position | Preheated | Cooking time [min] | Instructions |
| Oven | Small Cake | Top/Bottom Heat | 160 | - | Metal Tray | 1 | Yes | 20-25 | |
| Small Cake | Hot Air | 160 | - | Metal Tray | 2 | Yes | 30-35 | ||
| Apple Pie | Top/Bottom Heat | 170 | - | Rack | bottom | No | 65-75 | ||
| Apple Pie | Hot Air | 170 | - | Rack | bottom | No | 65-75 | ||
| Sponge Cake | Top/Bottom Heat | 160 | - | Rack on Metal Tray | 1 | Yes | 30-35 | ||
| Sponge Cake | Hot air | 160 | - | Rack on Metal Tray | 1 | Yes | 35-40 | ||
| Pastry Stripes | Top/Bottom Heat | 160 | - | Rack on Metal Tray | 3 | Yes | 20-25 | ||
| Pastry Stripes | Hot Air | 140 | - | Rack on Metal Tray | 2 | Yes | 20-25 | ||
| Toast | Grill | High | - | Rack on Metal Tray | 3 | Yes (5Min) | 3-5 | ||
| Beef Steaks | Grill | High | - | Crispy Tray | 3 | Yes (5Min) | 10-15/ 10-15 | Turn after half time | |
| Microwave | Minced meat | Microwave | - | 200 | Rack | bottom | No | 8-12 | |
| Cake | Microwave | - | 400 | Rack | bottom | No | 10-15 | ||
| Egg custard | Microwave | - | 400 | Rack | bottom | No | 25-30 | ||
| Meatloaf | Microwave | - | 400 | Rack | bottom | No | 31-35 | ||
| Combi. | Cake | Hot Air Combi. | 170 | 200 | Rack | bottom | No | 20-25 | |
| Potato gratin | Hot Air Combi. | 170 | 400 | Rack on Metal Tray | 1 | No | 25-35 | ||
| Chicken | Roast Combi. | 200 | 200 | Rack on Metal Tray | 1 | No | 15-20/ 15-20 | Turn after half time |
ENSOLIDH
SMART FUNCTIONS
LG ThinQ Application
This feature is only available on models with Wi-Fi. The LG ThinQ application allows you to communicate with the appliance using a smartphone.
LG ThinQ Application Features
Communicate with the appliance from a smartphone using the convenient smart features.
- Smart Diagnosis™
This function provides useful information for diagnosing and solving issues with the appliance based on the pattern of use.
- Settings
Change oven settings, including the Volume, Preheat Alarm Light.
- Remote On
You can download the cook settings using the LG ThinQ smart phone app.
• Monitoring
See the current status for the oven, remaining cooking time, cook settings, and end cooking time.
- Notification Settings
Turn on alerts in the app to receive notifications about the current status of the appliance. Push alerts are sent even if the LG ThinQ app is off.
- Timer
Set the timer from the app.
NOTE
- If you change your wireless router, internet service provider, or password, delete the registered appliance from the LG ThinQ application and register it again.
• The application is subject to change for appliance improvement purposes without notice to users. - This feature is only available on some models.
Installing LG ThinQ Application and Connecting an LG Appliance
Models with QR Code
Scan the QR code attached to the product using the camera or a QR code reader application on your smartphone.

flowchart
graph TD
    A["Device"] --> B["LG ThinQ"]
    C["Device"] --> D["QR Code"]
    E["Device"] --> F["QR Code"]
    style A fill:#f9f,stroke:#333
    style B fill:#ccf,stroke:#333
    style C fill:#cfc,stroke:#333
    style D fill:#fcc,stroke:#333
    style E fill:#ffc,stroke:#333
    style F fill:#cff,stroke:#333
Models with QR Code
1 Search for and install the LG ThinQ application from the Google Play Store or Apple App Store on a smartphone.
2 Run the LG ThinQ application and sign in with your existing account or create an LG account to sign in.
3 Touch the add (+) button on the LG ThinQ application to connect your LG appliance.
Follow the instructions in the application to complete the process.
NOTE
- To verify the Wi-Fi connection, check that the Wi-Fi indicator on the control panel is lit.
NOTE
- The appliance supports 2.4 GHz Wi-Fi networks only. To check your network frequency, contact your Internet service provider or refer to your wireless router manual.
- LG ThinQ is not responsible for any network connection problems or any faults, malfunctions, or errors caused by network connection.
- The surrounding wireless environment can make the wireless network service run slowly.
- If the distance between the appliance and the wireless router is too far, the signal strength becomes weak. It may take a long time to connect or installation may fail.
- If the appliance is having trouble connecting to the Wi-Fi network, it may be too far from the router. Purchase a Wi-Fi repeater (range extender) to improve the Wi-Fi signal strength.
- The network connection may not work properly depending on the Internet service provider.
- The Wi-Fi connection may not connect or may be interrupted because of the home network environment.
- The appliance cannot be connected due to problems with the wireless signal transmission. Unplug the appliance and wait about a minute before trying again.
- If the firewall on your wireless router is enabled, disable the firewall or add an exception to it.
- The wireless network name (SSID) should be a combination of English letters and numbers. (Do not use special characters.)
- Smartphone user interface (UI) may vary depending on the mobile operating system (OS) and the manufacturer.
- If the security protocol of the router is set to WEP, you may fail to set up the network. Please change it to other security protocols (WPA2 is recommended) and connect the product again.
Smart Diagnosis™ Function
Should you experience any problems with the appliance, it has the capability of transmitting data via your telephone to the SIGNATURE KITCHEN SUITE Customer Information Center. NFC or Wi-Fi equipped models can also transmit data to a smartphone using the LG ThinQ application.

Smart Diagnosis™ through the Concierge Service
This method allows you to speak directly to our trained specialists. The specialist records the data transmitted from the appliance and uses it to analyse the issue, providing a fast and effective diagnosis.
1 Call the SIGNATURE KITCHEN SUITE Concierge Service at 800-978-866.
2 Touch SETTINGS, located at the bottom centre of the main display screen. Swipe to the second Settings screen and select Smart Diagnosis™. Follow the instructions in the display.
NOTE
Do not touch any other buttons or icons on the display screen.
3 Touch Start.
4 Keep the phone in place until the tone transmission has finished.
5 Once the tones have stopped, resume your conversation with the call agent, who will then be able to assist you in using the information transmitted for analysis.
NOTE
- For best results, do not move the phone while the tones are being transmitted.
- If the agent is not able to get an accurate recording of the data, you may be asked to try again.
SIGNATURE KITCHEN SUITE Smart Diagnosis™
Use the Smart Diagnosis feature in the LG ThinQ application for help diagnosing issues with the appliance without the assistance of the SIGNATURE KITCHEN SUITE Customer Information Centre.
Follow the instructions in the LG ThinQ application to perform a Smart Diagnosis using your smartphone.
1 Download the LG ThinQ application on your smartphone.
2 Open the LG ThinQ application on your smart phone. Touch the Smart Diagnosis™ button to advance to the next screen.
3 Follow the directions in the application. If the Wi-Fi method does not work well, follow the instructions for using Audible Diagnosis.
4 Touch [ ? ] in the LG ThinQ application for a more detailed guide on how to use the Wi-Fi function.
NOTE
- Smart Diagnosis™ cannot be activated unless the appliance can be turned on using the Power button. If the appliance cannot be turned on, troubleshooting must be done without using Smart Diagnosis™.
- Call quality differences by region may affect the function.
- Use a landline telephone for better communication performance, resulting in better service.
- Bad call quality may result in poor data transmission from your phone to the machine, which could cause Smart Diagnosis™ to malfunction.
| Wireless LAN Module Specifications | |
| Model | LCW-009 |
| Frequency Range | 2412 MHz - 2472 MHz |
| Output Power (Max) | IEEE 802.11b : 17.64 dBmIEEE 802.11g : 16.81 dBmIEEE 802.11n(HT20) : 15.68 dBmIEEE 802.11n(HT40) : 16.00 dBm |
Wireless function S/W version : V 1.0
For consideration of the user, this device should be installed and operated with a minimum distance of 20 cm between the device and the body.
Declaration of Conformity
CE
Hereby, LG Electronics declares that the radio equipment type Built-in Speed Oven is in compliance with Directive 2014/53/EU. The full text of the EU declaration of conformity is available at the following internet address:
http://www.lg.com/global/support/cedoc/cedoc#
LG Electronics Inc. Single Point of Contact (EU/UK) : Krijgsman 1, 1186 DM Amstelveen, The Netherlands.
Open Source Software Notice Information
To obtain the source code that is contained in this product, under GPL, LGPL, MPL, and other open source licenses that have the obligation to disclose source code, and to access all referred license terms, copyright notices and other relevant documents, please visit https://opensource.lge.com.
SIGNATURE KITCHEN SUITE will also provide open source code to you on CD-ROM for a charge covering the cost of performing such distribution (such as the cost of media, shipping, and handling) upon email request to opensource@lge.com.
This offer is valid to anyone in receipt of this information for a period of three years after our last shipment of this product.
Remote On
If the appliance is registered on a home Wi-Fi network, You can download the oven settings using the LG ThinQ smart phone app.
Preparing the Oven for a Remote On
1 Touch SETTINGS, located at the bottom centre of the display. Touch Remote On on the first Settings screen, then select On. Follow the instructions on the pop-up that opens in the display.
2 Follow the instructions in the LG ThinQ smart phone app for using the Remote On function.
NOTE
- Remote On is disconnected in the following situations:
- Remote On is never set up in the smart phone app.
- The Remote On status is "ready".
- Remote On experiences a problem during operation.
- The Wi-Fi icon on the display shows the status of the appliance's network connection. If the Wi-Fi icon is not list, use the smart phone app to select the Wi-Fi network or register the product again.
- A faulty Wi-Fi connection could delay the Remote On function.
MICROWAVE-SAFE UTENSILS
Never use metal or metal trimmed utensils in using microwave function
Microwaves cannot penetrate metal. They will bounce off any metal object in the oven and cause arcing, an alarming phenomenon that resembles lightning. Most heat resistant non metallic cooking utensils are safe for use in your oven. However, some may contain materials that render them unsuitable as microwave cookware. If you have any doubts about a particular utensil, there's a simple way to find out if it can be used in the microwave.
Place the utensil in question next to a glass bowl filled with water in using microwave function. Microwave at power HIGH for 1 minute. If the water heats up but the utensil remains cool to the touch, the utensil is microwave-safe.
However, if the water does not change temperature but the utensil becomes warm, microwaves are being absorbed by the utensil and it is not safe for use in using microwave function. You probably have many items on hand in your kitchen right now that can be used as cooking equipment in the microwave. Just read through the following checklist.
Dinner plates
Many kinds of dinnerware are microwave-safe. If in doubt consult the manufacturer's literature or perform the microwave test.
Glassware
Glassware that is heat-resistant is microwave-safe. This would include all brands of oven tempered glass cookware.
However, do not use delicate glassware, such as tumblers or wine glasses, as these might shatter as the food warms.
Plastic storage containers
These can be used to hold foods that are to be quickly reheated. However, they should not be used to hold foods that will need considerable time in the oven as hot foods will eventually warp or melt plastic containers.
Paper
Paper plates and containers are convenient and safe to use in using microwave function, provided that the cooking time is short and foods to be cooked are low in fat and moisture. Paper towels are also very useful for wrapping foods and for lining baking trays in which greasy foods such as bacon are cooked. In general, avoid coloured paper products as the colour may run. Some recycled paper products may contain impurities which could cause arcing or fires when used in the microwave.
Plastic cooking bags
Provided they are made specially for cooking, cooking bags are microwave safe. However, be sure to make a slit in the bag so that steam can escape. Never use ordinary plastic bags for cooking in using microwave function, as they will melt and rupture.
Plastic microwave cookware
A variety of shapes and sizes of microwave cookware are available. For the most part, you can probably use items you already have on hand rather than investing in new kitchen equipment.
Pottery, stoneware and ceramic
Containers made of these materials are usually fine for use in using microwave function, but they should be tested to be sure.

CAUTION
- Some items with high lead or iron content are not suitable as cooking utensils.
- Utensils should be checked to ensure that they are suitable for use in the microwave.
FOOD CHARACTERISTICS & MICROWAVE COOKING
Keeping an eye on things
The recipes in the book have been formulated with great care, but your success in preparing them depends on how much attention you pay to the food as it cooks. Always watch your food while it cooks. Your microwave function is equipped with a light that turns on automatically when the oven is in operation so that you can see inside and check the progress of your food. Directions given in recipes to elevate, stir, and the like should be thought of as the minimum steps recommended. If the food seems to be cooking unevenly, simply make the necessary adjustments you think appropriate to correct the problem.
Factors affecting microwave cooking times
Many factors affect cooking times. The temperature of ingredients used in a recipe makes a big difference in cooking times. For example, a cake made with ice-cold butter, milk, and eggs will take considerably longer to bake than one made with ingredients that are at room temperature. All of the recipes in this book give a range of cooking times. In general, you will find that the food remains under-cooked at the lower end of the time range, and you may sometimes want to cook your food beyond the maximum time given, according to personal preference. The governing philosophy of this book is that it is best for a recipe to be conservative in giving cooking times because overcooked food is ruined for good. Some of the recipes, particularly those for bread, cake, and custards, recommend that food be removed from the oven when they are slightly undercooked.
This is not a mistake. When allowed to stand, usually covered, these foods will continue to cook outside of the oven as the heat trapped within the outer portions of the food gradually travels inward. If the food is left in the oven until it is cooked all the way through, the outer portions will become overcooked or even burnt. You will become increasingly skillful in estimating both cooking and standing times for various foods.
Density of food
Light, porous food such as cakes and breads cook more quickly than heavy, dense foods such as roasts and casseroles.
You must take care when microwaving porous food so that the outer edges do not become dry and brittle.
Height of food
The upper portion of tall foods, particularly roasts, will cook more quickly than the lower portion.
Therefore, it is wise to turn tall food several during cooking.
Moisture content of food
Since the heat generated from microwaves causes moisture to evaporate, relatively dry food such as roasts and some vegetables should either be sprinkled with water prior to cooking or covered to retain moisture.
Bone and fat content of food
Bones conduct heat and fat cooks more quickly than meat. Care must be taken when cooking bony or fatty cuts of meat in order to prevent unevenly or overcooked meat.
Quantity of food
The number of microwaves in your oven remains constant regardless of how much food is being cooked.
Therefore, the more food you place in the oven, the longer the cooking time. Remember to decrease cooking times by at least one third when halving a recipe.
Shape of food
Microwaves penetrate only about 2 cm into food, the interior portion of thick foods are cooked as the heat generated on the outside travels inward. Only the outer edge of food is cooked by microwave energy; the rest is cooked by conduction. The worst possible shape for a food that is to be microwaved is a thick square.
The corners will burn long before the centre is even warm. Round thin foods and ring shaped foods cook most successfully in the microwave.
Covering
A cover traps heat and steam which causes food to cook more quickly. Use a lid or microwave cling film with a corner folded back to prevent splitting.
44 FOOD CHARACTERISTICS & MICROWAVE COOKING
Browning
Meats and poultry that are cooked fifteen minutes or longer will brown lightly in their own fat. Foods that are cooked for a shorter period of time may be brushed with a browning sauce such as worcestershire sauce, soy sauce or barbecue sauce to achieve an appetizing colour. Since relatively small amounts of browning sauces are added to food, the original flavour of the recipe is not altered.
Covering with greaseproof paper
It is a looser cover than a lid or cling film, the food may dry out slightly. But because it makes a looser cover than a lid or clingfilm, it allows the food to dry out slightly.
Arranging and spacing
Individual foods such as baked potatoes, small cakes and hors d'oeuvres will heat more evenly if placed in the oven an equal distance apart, preferably in a circular pattern. Never stack foods on top of one another.
Stirring
Stirring is one of the most important of all microwaving techniques. In conventional cooking, food is stirred for the purpose of blending. Microwaved food, however, is stirred in order to spread and redistribute heat.
Always stir from the outside towards the centre as the outside of the food heats first.
Turning over
Large, tall foods such as roasts and whole chickens should be turned so that the top and bottom will cook evenly. It is also a good idea to turn cut up chicken and chops.
Placing thicker portions facing outwards
Since microwaves are attracted to the outside portion of food, it makes sense to place thicker portions of meat, poultry and fish to the outer edge of the baking dish. This way, thicker portions will receive the most microwave energy and the food will cook evenly.
Shielding
Strips of aluminium foil (which block microwaves) can be placed over the corners or edges of square and rectangular foods to prevent those portions from overcooking. Never use too much foil and make sure the foil is secured to the dish or it may cause 'arcing' in the oven.
Elevating
Thick or dense foods can be elevated so that microwaves can be absorbed by the underside and centre of the foods.
Piercing
Foods enclosed in a shell, skin or membrane are likely to burst in the oven unless they are pierced prior to cooking. Such foods include yolks and whites of eggs, clams and oysters and whole vegetables and fruits.
Testing if cooked
Food cooks so quickly in a oven, it is necessary to test it frequently. Some foods are left in the microwave until completely cooked, but most foods, including meats and poultry, are removed from the oven while still slightly undercooked and allowed to finish cooking during standing time. The internal temperature of foods will rise between 3^ C( 5^ F) and 8^ C( 15^ F) during standing time.
Standing time
Foods are often allowed to stand for 3 to 10 minutes after being removed from the oven. Usually the foods are covered during standing time to retain heat unless they are supposed to be dry in texture (some cakes and biscuits, for example). Standing allows foods to finish cooking and also helps flavour blend and develop.
TROUBLESHOOTING
FAQs
Operation
Will the microwave oven be damaged if it operates empty?
Yes. Never operate the oven empty.
Does microwave energy pass through the viewing screen in the door?
No. The metal screen bounces the energy back to the oven cavity. The holes (or ports) allow only light to pass through. They do not let microwave energy pass through.
Can my microwave oven be damaged if food is cooked for too long?
Like any other cooking appliance, it is possible to overcook food to the point that the food creates smoke and even possibly fire, and damage to the inside of the oven. It is always best to be near the oven while you are cooking.
I've plugged the oven in and it does not work properly. What is wrong?
The microcomputer controlling your oven may temporarily become scrambled and fail to function as programmed when you plug the oven in for the first time or when power resumes after a power interruption. Unplug the oven from the 230 V household outlet and then plug it back in to reset the microcomputer.
Is it possible to pop popcorn in a microwave oven?
Yes, if using one of the two methods described below:
(1) microwave-popping devices designed specifically for microwave cooking
(2) pre-packaged commercial microwave popcorn that specifies the cook time and power output needed.
Follow exact directions given by each manufacturer for its popcorn popping product and do not leave the oven unattended while the corn is being popped. If corn fails to pop after the suggested time, discontinue cooking. Overcooking could result in an oven fire.

CAUTION
Never use a brown paper bag for popping corn or attempt to pop leftover kernels.
Why is a standing time recommended after microwave cooking time is over?
Standing time allows foods to continue cooking evenly for a few minutes after the actual microwave oven cooking cycle. The amount of standing time depends upon the density of the foods.
Why is additional time required for cooking food stored in the refrigerator?
As in conventional cooking, the initial temperature of food affects total cooking time. You need more time to cook food taken out of a refrigerator than for food at room temperature.
Is it normal to hear a clicking noise coming from the back of my oven when I am using it?
Your new oven is designed to maintain a tighter control over your oven's temperature. You may hear your oven's heating elements click on and off more frequently on your new oven. This is NORMAL.
During convection cooking the fan stops when I open the door. Is that normal?
Yes, this is normal. When the door is opened, the convection fan will stop until the door is closed.
Why aren't the function buttons working?
Make sure that the oven is not in Child Lock mode. The lock ⏻ will show in the display if Child Lock is activated. To deactivate Child Lock, tap display to see the unlock popup. Press UNLOCK for 3 seconds to cancel the child lock function. The lock icon will disappear from the upper right in the display.
My oven is still dirty after running the Speed Clean cycle. What else should I do?
The Speed Clean cycle only helps to loosen light soil in your oven to assist in hand-cleaning of your oven. It does not automatically remove all soils after the cycle. Some scrubbing of your oven is required after running the Speed Clean cycle.
I tried scrubbing my oven after running Speed Clean, but some soils still remain. What can I do?
The Speed Clean feature works best when the soil is fully soaked and submerged in water before running the cycle and during hand-cleaning. If soil is not sufficiently soaked in water, it can negatively affect the cleaning performance. Repeat the Speed Clean process using sufficient water. Sugar-based and certain greasy soil is especially hard to clean.
Before Calling for Service
Before you call for service, review this list. It may save you time and expense. The list includes common occurrences that are not the result of defective workmanship or materials in this appliance.
| Symptoms | Possible Causes / Solutions |
| Oven does not start | Plug in power cord.Close oven door.Set cooking time. |
| Arcing or Sparking | Cookware is not microwave safe. When in doubt, test cookware before use.Do not operate oven while empty. |
| Oven control beeps and displays F1~F20 error code. | Electronic control error. Press OK to clear the display and stop beeping.Reprogram oven. If fault recurs, record fault number. Press OK and contact a Service agent. |
| Oven will not work | Plug on oven is not completely inserted in the electrical outlet.- Make sure electrical plug is plugged into a live, properly grounded outlet.A fuse in your home may be blown or the circuit breaker tripped.- Replace the fuse or reset the circuit breaker.Oven controls improperly set.- See the Using the Oven section.Oven too hot.- Allow the oven to cool to below locking temperature. |
| Steam is exhausted through the oven vent. | Cooking foods with high moisture produces steam. This is normal. |
| Appliance does not operate. | Make sure cord is plugged correctly into outlet. Check circuit breakers.Power outage. Check house lights to be sure. Call your local electric company for service. |
| Oven light does not work. | This oven uses LED lighting which must be repaired or replaced by an authorized technician. |
| Oven smokes excessively during broiling. | Control not set properly. Follow instructions under Operation.Meat too close to the element. Reposition the tray to provide proper clearance between the meat and the element.Meat not properly prepared. Remove excess fat from meat. Cut remaining fatty edges to prevent curling.Grease has built up on oven surfaces. Regular cleaning is necessary when broiling frequently.- Old grease or food spatters cause excessive smoking. |
| Food does not bake or roast properly | Oven controls improperly set.- See the Using the Oven section.Tray position is incorrect.- See the Using the Oven section.Incorrect cookware or cookware of improper size being used.- See the Using the Oven section. |
| Trouble connecting appliance and smartphone to Wi-Fi network | The password for the Wi-Fi that you are trying to connect to is incorrect.Find the Wi-Fi network connected to your smartphone and remove it, then register your appliance on LG ThinQ.Mobile data for your smartphone is turned on.Turn off the Mobile data on your smartphone before registering the appliance.The wireless network name (SSID) is set incorrectly.The wireless network name (SSID) should be a combination of English letters and numbers. (Do not use special characters.)The router frequency is not 2.4 GHz.Only a 2.4 GHz router frequency is supported. Set the wireless router to 2.4 GHz and connect the appliance to the wireless router. To check the router frequency, check with your Internet service provider or the router manufacturer.The distance between the appliance and the router is too far.If the appliance is too far from the router, the signal may be weak and the connection may not be configured correctly. Move the router closer to the appliance or purchase and install a Wi-Fi repeater. |
| Water pools in the bottom of the oven during or after steam cooking. | During steam cooking, the water in the tank is transferred to the bottom of the oven. It is normal for water to fill the bottom of the oven during or after the Steam mode.If the water leaves mineral deposits on the oven bottom, remove the deposits with a cloth or sponge soaked in vinegar. |
| White residue appears on the oven bottom after steam cooking. | Using hard water in the tank can result in hard water scale on the oven bottom.To remove mineral deposits that remain on the oven bottom, use a cloth or sponge soaked in vinegar or a weak citric acid solution. |
If the fault cannot be rectified by the above measures, contact the LG service centre
NOTE
If faulty, the appliance must not be used. If a fault occurs, the appliance must be isolated by removing the mains plug or switched off by removing the fuse or turning off the circuit breaker in the house fuse box.
The appliance must only be repaired by a specially trained and qualified electrical professional. Repairs carried out improperly may result in considerable damage.

CAUTION
- Repairs to the appliance must be carried out by a specially licensed technician only! Considerable danger may result from incorrect repairs.
- Do not use the appliance if damaged. In the event of a fault or failure, switch off at the mains. In the event of a fault, visits by technicians from Customer Service or dealers may not be covered by the warranty if the cause of failure is the result of abnormal customer use.
Customer service & spare parts
If you require spare parts or a technician, contact your local LG Customer Service Centre.
Your call will be automatically passed on to the Customer Service Centre responsible for your post code area. You can find the address of your local Customer Service Centre and other information for customers on the Internet at www.signaturekitchensuite.it
Please ensure you have the following details to hand:
- Your name and address, including your post code.
- Your telephone number.
• Exact details of the nature of the problem.
• The model, series and serial number. - Your dated receipt of purchase. Please note that proof of purchase is required for any warranty claim. Before requesting a warranty claim, please ensure that you have read through the section on "Troubleshooting". There will be a charge for any inspection carried out by a technician if it should transpire that there is no mechanical or electrical fault present in the appliance.
Customer Service
For general queries on SIGNATURE KITCHEN SUITE, please contact our Customer Service Centre in writing or by telephone or visit our website at www.signaturekitchensuite.it
You can download the owner's manual at www.signaturekitchensuite.it
Disposal of your old appliance

1 This crossed-out wheeled bin symbol indicates that waste electrical and electronic products (WEEE) should be disposed of separately from the municipal waste stream.
2 Old electrical products can contain hazardous substances so correct disposal of your old appliance will help prevent potential negative consequences for the environment and human health. Your old appliance may contain reusable parts that could be used to repair other products, and other valuable materials that can be recycled to conserve limited resources.
3 You can take your appliance either to the shop where you purchased the product, or contact your local government waste office for details of your nearest authorised WEEE collection point. For the most up to date information for your country please see www.lg.com/global/recycling
MEMO


SIGNATURE
KITCHEN SUITE
Customer Information Centre
For inquires or comments, call:
800-978-866
Printed in china
- INDICE
- ISTRUZIONI IMPORTANTI SULLA SICUREZZA
- MANUTENZIONE
- Pulire
- Pulizia rapida
- Ventilazione
- NOTA
- Smart Diagnosis™ attraverso il Servizio Concierge
- TABLE OF CONTENTS
- TABLE OF CONTENTS
- IMPORTANT SAFETY INSTRUCTIONS
- MAINTENANCE
- 11PRODUCT OVERVIEW
- INSTALLATION
- OPERATION
- SMART FUNCTIONS
- MICROWAVE-SAFE UTENSILS
- FOOD CHARACTERISTICS & MICROWAVE COOKING
- TROUBLESHOOTING
- IMPORTANT SAFETY INSTRUCTIONS
- READ CAREFULLY AND KEEP FOR FUTURE REFERENCE
- WARNING
- IMPORTANT SAFETY INSTRUCTIONS
- CAUTION
- MAINTENANCE
- How To Clean
- To Clean Your Oven
- To Clean the Cavity
- Cavity front side
- Cavity inside
- Clean
- Speed Clean
- Setting Speed Clean
- Water Tank
- NOTE
- Hard Water Scale
- Cleaning Scale on Oven Bottom
- Steam Maintenance
- Descaling
- Setting Descaling
- Drying
- Setting Drying
- Evaporation
- Setting Evaporation
- PRODUCT OVERVIEW
- Parts
- Accessories
- Included Accessories
- INSTALLATION
- Before Installing the Oven
- Preparing for Installation
- Installation Information
- Installation Drawings (With Drawer)
- Cutout dimensions
- Ventilation dimension
- Oven dimensions
- Drawer dimensions
- Installation Drawings (Without Drawer)
- Ventilation dimensions
- Product display
- Ventilation
- Installation with drawer
- Installation without drawer
- OPERATION
- Getting Started
- Changing Oven Settings
- Settings
- Location of Settings
- Child Lock
- Lock
- Unlock
- Time
- Setting Time of Day
- Wi-Fi
- Setting Up Wi-Fi
- Remote On
- Setting Remote On
- Brightness
- Setting Display Brightness
- Microwave Quick start
- Language Selection
- Selecting a Language
- Volume
- Setting the Volume
- Preheat Alarm Light
- Preheat alarm setting
- Units
- Setting Units
- Smart Diagnosis™
- Program Update
- Demo Mode
- Factory Data Reset
- Open Source License
- Using the Oven
- Timer
- Setting the Timer
- Adjusting or Cancelling the Timer
- Oven Cooling
- Microwave
- Setting the Microwave Function
- Changing the Cook Settings
- To pause cooking
- To stop cooking
- Setting the Hot Air Function
- Setting the Hot Air Combi. Function
- Defrost
- Setting the Defrost Function
- Cooking Guide
- My Recipe
- Creating My Recipe
- Editing My Recipe
- Deleting My Recipe
- Auto Cook
- Setting Auto Cook Function
- Auto Cook Guide
- Steam Cook
- Using the Water Tank
- Steam-Assist Mode
- Setting Steam-Assist Mode
- Changing the Steam-Assist Settings
- To Stop Steam-Assist
- Steam Combi. Mode
- Setting Steam Combi. Mode
- Changing the Steam Combi. Settings
- Gourmet Steam
- Setting Gourmet Steam Function
- Gourmet Steam Guide
- Information for test institutes
- SMART FUNCTIONS
- LG ThinQ Application
- LG ThinQ Application Features
- Installing LG ThinQ Application and Connecting an LG Appliance
- Models with QR Code
- Smart Diagnosis™ Function
- Smart Diagnosis™ through the Concierge Service
- SIGNATURE KITCHEN SUITE Smart Diagnosis™
- Declaration of Conformity
- CE
- Open Source Software Notice Information
- Preparing the Oven for a Remote On
- MICROWAVE-SAFE UTENSILS
- Never use metal or metal trimmed utensils in using microwave function
- Dinner plates
- Glassware
- Plastic storage containers
- Paper
- Plastic cooking bags
- Plastic microwave cookware
- Pottery, stoneware and ceramic
- FOOD CHARACTERISTICS & MICROWAVE COOKING
- Keeping an eye on things
- Factors affecting microwave cooking times
- Density of food
- Height of food
- Moisture content of food
- Bone and fat content of food
- Quantity of food
- Shape of food
- Covering
- FOOD CHARACTERISTICS & MICROWAVE COOKING
- Browning
- Covering with greaseproof paper
- Arranging and spacing
- Stirring
- Turning over
- Placing thicker portions facing outwards
- Shielding
- Elevating
- Piercing
- Testing if cooked
- Standing time
- TROUBLESHOOTING
- FAQs
- Before Calling for Service
- Customer service & spare parts
- Customer Service
- Disposal of your old appliance
- MEMO
- SIGNATURE
- KITCHEN SUITE
Brand : LG
Model : SKSLV2421MS
Category : Oven