
SKSOV2411S - Oven LG - Free user manual and instructions
Find the device manual for free SKSOV2411S LG in PDF.


| Product Type | Built-in Electric Oven |
| Brand | LG (Signature Kitchen Suite) |
| Model | SKSOV2411S |
| Installation Dimensions (W x H x D) | 560 mm x 595 mm x 556 mm |
| Cavity Dimensions (W x H x D) | 484 mm x 344 mm x 420 mm |
| Capacity | 70 L |
| Weight | 57.9 kg |
| Power Supply | 220–240 V, 50 Hz, 3500 W (15.2 A) |
| Energy Efficiency Class | A+ |
| Energy Consumption (Conventional) | 0.94 kWh/cycle |
| Energy Consumption (Fan-Forced) | 0.69 kWh/cycle |
| Cooking Functions | Hot Air, Eco Hot Air, Top Bottom Heat, Fan Assisted Air, Pizza, Roasting, Light Roast, RapidHeat Roast+, Large/Small Grill, Proof, Warm, Defrost, Steam, Steam-Assist, Sous-vide, Gourmet Steam, My Recipe, Auto Cook |
| Special Features | Wi-Fi Connectivity, LG ThinQ App, Remote Start, Smart Diagnosis, Auto Wake Up, Child Lock, Probe, Telescopic Runners, SpeedClean, Descaling, Drying, Evaporation |
| Display | LCD Touchscreen |
| Oven Lighting | LED (Energy Class E) |
| Safety Features | Child Lock, Automatic Shut-Off (12 h), Emergency Door Unlock, Cooling Fan, Overheat Protection |
| Maintenance | SpeedClean (10 min, water only), Descaling, Drying, Evaporation, Removable Steam Feeder Tank |
| Included Accessories | Wire Grill, Baking Tray, Deep Pan, Perforated Tray, Meat Probe, Shelf-Runner Assembly, Shelf Screws, Furniture Screws, Door Opening Tool |
| Spare Parts & Service | Contact LG Customer Service; www.signaturekitchensuite.com/it |
Frequently Asked Questions - SKSOV2411S LG
User questions about SKSOV2411S LG
0 question about this device. Answer the ones you know or ask your own.
Ask a new question about this device
Download the instructions for your Oven in PDF format for free! Find your manual SKSOV2411S - LG and take your electronic device back in hand. On this page are published all the documents necessary for the use of your device. SKSOV2411S by LG.
USER MANUAL SKSOV2411S LG
• Vedere www.lg.com/global/recycling.
NOTA
NOTA
natural_image
Diagram of a server room interior with a hand reaching toward a central server room (no text or symbols present)natural_image
Diagram of a server room interior with a hand interacting with a device, showing no text or symbols.natural_image
Technical line drawing of an oven interior showing internal components and airflow paths (no text or symbols)NOTA
natural_image
Simple line drawing of a hand pointing at a blank rectangular area, no text or symbols presentTimer
natural_image
Top-down technical diagram of an oven or rack system with numbered callouts (2 and 5) indicating components, no readable text or symbols beyond labels.NOTA
natural_image
Technical line drawing of an oven interior with a close-up inset showing internal components (no text or symbols)natural_image
Illustration showing a hand pressing a button on a device, and a close-up of a CD drive mechanism (no text or symbols)www.signaturekitchensuite.com/it
Customer Information Center
Read this owner's manual thoroughly before operating the appliance and keep it handy for reference at all times.
SKSOV2411S
SKSOV2421MS

MFL70720201_15
TABLE OF CONTENTS
3 IMPORTANT SAFETY INSTRUCTIONS
8 PRODUCT OVERVIEW
8 Parts
8 Accessories
9 Technical specifications
9 Emergency Door Unlock
9 Information on LED Lighting
10 OPERATION
10 Control Overview
11 Getting Started
11 Changing Oven Settings
11 Settings
11 Child lock
11 Time
12 Wi-Fi
12 Remote Start
12 Brightness
12 Auto Wake Up
12 Lamp
13 Rapid Heat
13 Language Selection
13 Volume
13 Preheat Alarm Light
13 Units
14 Smart Diagnosis™
14 Program Update
14 Demo Mode
14 Factory Data Reset
14 Open Source License
15 Using the Oven
15 Initial cleaning
15 Telescopic Runners
16 Oven Cooling
16 Opening the door
16 Timer
17 Manual Cook mode
19 Switching the oven on (Example : Hot air)
20 Switching the oven on (Example : Large Grill)
21 Switching the oven on (Example : RapidHeat Roast+)
21 Defrosting
22 Baking
23 Baking Tables
26 Table for eco hot air
26 Roasting
27 Roasting tables
28 Grilling
29 Probe
32 My Recipe
32 Auto Cook
33 Auto Cook Guide
35 Gourmet Steam Guide
38 Information for test institutes
39 Steam Function
41 Remote Start
42 SMART FUNCTIONS
42 LG ThinQ Application
43 Smart Diagnosis™ Function
44 Open Source Software Notice Information
45 MAINTENANCE
45 Exterior
45 Oven interior
45 Oven Door
46 SpeedClean ^TM
48 Steam Feeder Tank
48 Cleaning Scale on Oven Bottom
48 Descaling
48 Drying
48 Evaporation
49 TROUBLESHOOTING
49 FAQs
50 Before Calling for Service
52 Customer service & spare parts
IMPORTANT SAFETY INSTRUCTIONS
Read and follow all instructions before using your oven to prevent the risk of fire, electric shock, personal injury, or damage when using the appliance.
This guide does not cover all possible conditions that may occur. Always contact your service agent or manufacturer about problems that you do not understand.

This is the safety alert symbol. This symbol alerts you to potential hazards that can cause death or serious injury. All safety messages will follow the safety alert symbol and either the word “WARNING” or “CAUTION”. These words mean:

WARNING - This symbol will alert you to hazards or unsafe practices which could cause serious bodily harm or death.

CAUTION - This symbol will alert you to hazards or unsafe practices which could cause bodily injury or property damage.
- This oven must only be installed by a licensed electrician.
- The installer is responsible for the correct electrical connection of the appliances and the observance of the relative safety codes and recommendations.
- Rating plate is located on the left side of the door or on the back cover.
ELECTRICAL SAFETY
- This appliance must be connected to the mains power supply by a specially licensed electrician only.
- Electrical leads and cables should not be allowed to touch the oven.

WARNING
- The oven should be connected to the electricity supply by means of a proper circuit breaker or fuse. Never use multiple plug adapters or extension leads.
- This connection may be achieved by having the plug accessible or by Incorporating a switch in the fixed wiring in accordance with the wiring rules.
- Failure to do so can result in a fire.
DAMAGE

WARNING
- If the oven has been damaged in transport, do not connect it.
- In the event of a fault or damage to the appliance, do not attempt to operate it.
- Repairs to the appliance should be carried out by a licensed technician only. Wrong repairs may result in considerable danger. If you need repairs, contact an LG Service Centre or your dealer.
- If the supply cord is damaged, it must be replaced by the manufacturer, its service agent or similarly qualified persons in order to avoid a hazard.
- Never remove the outer casing from the oven. If the oven is faulty and needs servicing or you are in doubt about its condition, unplug it from the wall socket and contact the nearest after-sales service centre.
- Failure to do so can result in malfunctioning and death or electrical shock during use.
MAINTENANCE

WARNING
- The power supply of the appliance should be turned off when it is being repaired or cleaned.
- Be careful when connecting electrical appliances to sockets near to this appliance.
- Do not use high-pressure water cleaners or steam jet cleaners for electrical safety reasons.
- Do not use harsh abrasive cleaners or sharp metal scrapers to clean the oven door glass since they can scratch the surface, which may result in shattering of the glass.
- The appliance should be powered down before replacing the lamp to avoid the possibility of electric shock.
- Failure to do so can result in malfunctioning and death or electrical shock during use.
SAFETY DURING OPERATION

WARNING
- Do not touch interior parts until they have cooled down sufficiently.
- When the oven operates, the interior parts will be very hot and burns may occur.
- Accessible parts may become hot during use. Young children should be kept away.
- The appliance is not intended for use by young children or infirm persons without supervision.
- Young children should be supervised to ensure that they do not play with the appliance.
- Children should be kept at a safe distance when the oven operates.
- Children should be kept at a safe distance until the oven has cooled down after cooking.
- This appliance is not intended for use by persons (including children) with reduced physical, sensory or mental capabilities, or lack of experience and knowledge, unless they have been given supervision or instruction concerning the use of the appliance by a person responsible for their safety.
- The appliance and its accessible parts become hot during use. Care should be taken to avoid touching heating elements. Children less than 8 years of age shall be kept away unless continuously supervised.
- During use the appliance becomes hot. Care should be taken to avoid touching heating elements inside the oven.

WARNING
- This appliance can be used by children aged from 8 years and above and persons with reduced physical, sensory or mental capabilities or lack of experience and knowledge if they have been given supervision or instruction concerning the use of the appliance in a safe way and they understand the hazards involved. Children shall not play with the appliance. Cleaning and user maintenance shall not be made by children without supervision.
- Never block the air vents
- The oven may overheat and automatically switch itself off. It will remain inoperable until it has cooled sufficiently.
- Do not cover or obstruct the ventilation with cloth or paper.
- The cloth or paper may catch fire as hot air is emitted from the oven.
- Do not spill or pour water in the vents.
- When in use, the oven interior surfaces become very hot! Care should be taken to avoid touching heating elements inside the oven.
- These walls may be hot enough to burn skin even after cooking is finished, though they do not appear to be so, avoid placing hands and arms inside the oven.
- The oven surfaces will become hot when the appliance is operated at a high temperature for a long period of time.
- The oven door must be closed while cooking.
- When cooking, take care when opening the oven door as hot air and steam will escape rapidly.
- The hot air or steam released may cause scalding.
- When cooking dishes that contain alcohol, the alcohol can evaporate due to the high temperatures. The vapour can catch fire if it comes into contact with a hot oven part.
- Never store flammable or easily deformable materials in the oven to reduce the risk of fire in the oven cavity.
- Should an oven fire occur, leave the oven door closed and turn the oven off. If the fire continues, throw baking soda on the fire or use a fire extinguisher. Do not put water or flour on the fire.
- Flour may be explosive and water can cause a grease fire to spread and cause personal injury.
- Use oven gloves when removing a dish from the oven.
- The trays and racks are hot.
- The oven must be secured by screwing a minimum of 2 thin general purpose self tapping screws into the 2 upper mounting holes located on the outer side fascias, into the cabinetry. Check if the oven is installed properly.
- Do not store or operate this equipment outdoors. Do not use this product near water (for example, near a kitchen sink, in a wet basement, or near a swimming pool, and the like)
- Be sure all packaging materials are removed from the appliance before operating it.
- Do not use this oven for commercial purposes.
- This oven has been designed only for the cooking of household foods and for domestic use.
- Do not use the oven door as a rest table for hot items or cookware.
- Never use your appliance for warming or heating the room.
- Do not step, lean, or sit on the door of the oven.
- These can cause the oven to tip resulting in burns or serious injuries.
- Do not touch an electric cord with a wet hand.
- It is very dangerous. You can get an electric shock.
- Be careful not to damage the power cable.
- Do not operate this appliance if it has a damaged power cable or plug.

WARNING
- Do not immerse power cable or plug in water and keep power cable away from heated surfaces.
- Do not let cord hang over the edge of table or counter.
- Please ensure cooking times are correctly set.
- Over cooking may result in the food catching fire and subsequent damage to your oven.
- Do not pour water onto the oven bottom when it is hot.
- This could cause damage to the enamel surface and deform the base.
- When cooking very moist cakes, use a deep pan (or baking tray).
- Dripping fruit juices from the baking tray will leave stains, which become indelible.
- Frozen foods such as pizzas should be cooked on the wire grill.
- If a Baking tray is used, it may become deformed due to the great difference in temperature.
- Do not heat unopened food containers.
- Build-up of pressure may cause the container to burst and result in injury.
- Do not use the oven door as a rest table under any circumstances.
- Be careful when you remove the door. The door is heavy.
- Do not use the appliance as a storage surface.
- Do not let sparks or open flames come in contact with the appliance when you open the door.
• Always cook with the oven door closed. - Be careful when you remove or install accessories.
- Remaining fat or food in the appliance can cause fire.
- Do not change the specification of this appliance.
- Internally the appliance becomes hot when in operation.
- Do not touch the heating elements that are in the appliance.
- Do not close or open the oven door by foot excessively.
- Do not obstruct the vent hole with tissue.
- Do not use the oven to dry live animals.
- The appliance must not be installed behind a decorative door in order to avoid overheating.
USING STEAM FUNCTION

CAUTION
- Steam cleaner is not to be used.
- Hot steam may cause scalding.
- Don't open the door and don't touch the vent holes while steam function is working.
- Use care when opening the door. The hot air and steam that escape can cause burns to hands, face and eyes. Let hot air or steam escape from the oven before opening the door.
- Steam may condense on the inside of the door. Do not wipe condensation off until the door has cooled.
- In order to avoid a hazard due to inadvertent resetting of the thermal cut-out, this appliance must not be supplied through an external switching device, such as a timer, or connected to a circuit that is regularly switched on and off by the utility.
DISPOSAL

CAUTION
- Your new oven has been correctly packaged for transportation. Remove all of the packaging material before putting the appliance into use.
- The packaging material can be completely recycled. You can obtain addresses for environmentally-friendly disposal operations from your local City Council.
- If you wish to store your oven away temporarily, choose a dry, dust-free place. Dust and damp may adversely affect the working parts in the oven.
USED APPLIANCES

WARNING
- Used appliances must be rendered unusable prior to disposal so that they no longer present a risk. To achieve this, disconnect from the mains supply and remove the power supply cable.
For the protection of the environment, used appliances must be Disposed of properly.
- The appliance must not be disposed of along with normal domestic waste.
- Your local City Council will inform you of times for collecting special waste or identify public disposal facilities for you.
INSTALLATION INSTRUCTIONS
Installation should be undertaken by a qualified professional electrician only.
NOTE
- The oven must be installed in compliance with the manufacturer's instructions. For more information about installation, please refer to the installation manual.
- Do not install the appliance on the floor.
Safety instructions for the installer
- During installation, ensure that no persons can come into contact with live components.
- The housing in which the oven is installed must comply with the stability requirements of the DIN 68930 standard.
- The oven must be installed by a qualified professional electrician, in accordance with the corresponding regulations and standards.
- The oven is a heavy appliance and must be transported with great care.
- Before initial use, remove all packaging, both external and from inside the appliance.
- No modification may be made to the oven's technical characteristics.
- The integrated cooking area and hotplates are provided with special connections. These may only be attached to the appropriate corresponding connections of the same type.
PRODUCT OVERVIEW
Parts

*The above picture may be different from the actual product.
Oven levels are numbered from the bottom up.
The 5 and 6 levels are mainly used for grill functions.
Grilling must be operated with the door closed.
The cooking tables throughout these operating instructions give you suggested oven settings, however you can change these to suit yourself.
NOTE
The rating label is located at the left-hand inner edge of the door or front-side of the oven.
This appliance incorporates an earth connection for functional purposes.
Accessories
Included Accessories

natural_image
Four technical line drawings of rectangular trays with different internal structures, no text or symbols present.Wire grill (1ea) Baking tray (1ea) Deep pan (1ea) Perforated tray (1ea)

natural_image
Technical line drawings of electrical components including a variable resistor, coiled cable, and a lamp (no text or symbols)Meat probe (1ea) Shelf-runner assembly (2ea) Shelf screw (4ea)
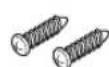


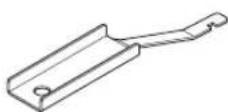
Furniture screw (2ea) Owner's manual Installation manual Door opening tool
*Included accessories may differ depending on the product.
Technical specifications
| Oven Models SKSOV2411S / SKSOV2421MS | |
| Mains connection 220~240 V / 50 Hz | |
| MAX power consumption 3 500 | Watts (3.5 KW) / 15.2 A |
| Oven installation dimensions 560 mm (W) x 595 mm (H) x 556 mm (D) | |
| Oven interior dimensions 484 mm (W) x 344 mm (H) x 420 mm (D) | |
| Volume (Usable capacity) 70 L | |
Emergency Door Unlock
In case of a power outage, use the door opening tool to open the oven door.
1 Locate the latch of the inner vent, visible in the upper left corner of the oven door.
2 Insert the door opening tool so that it is positioned to the left side of the latch, as shown in Figure 2.
3 Pull the tool to the right to open the door, as shown in Figure 3.

NOTE
- During normal operation, use the touch key to open the door.
- Only use the door opening tool in emergencies, such as during a power failure.
Information on LED Lighting
This product contains the light source of energy efficiency class E.
- The LED lighting automatically turns on and off in any of the following cases:
- when pressing Door Open Key
- when pressing Lamp Icon
_ when finishing cooking
• The LED lighting is not dimmable.
• The LED lighting does not contain mercury.
- Please see www.lg.com/global/recycling.
NOTE
- This feature varies depending on the model purchased.
If the LED lighting is not working
Close the door and re-open, or press Lamp Icon. If the LED lighting does not turn on, please contact the LG Electronics customer information centre. Do not attempt removal of the LED lighting.

flowchart
graph TD
    A["LED"] --> B["LED"]
    B --> C["Sensor"]
    C --> D["Sensor"]
    D --> E["LED"]
OPERATION
Control Overview
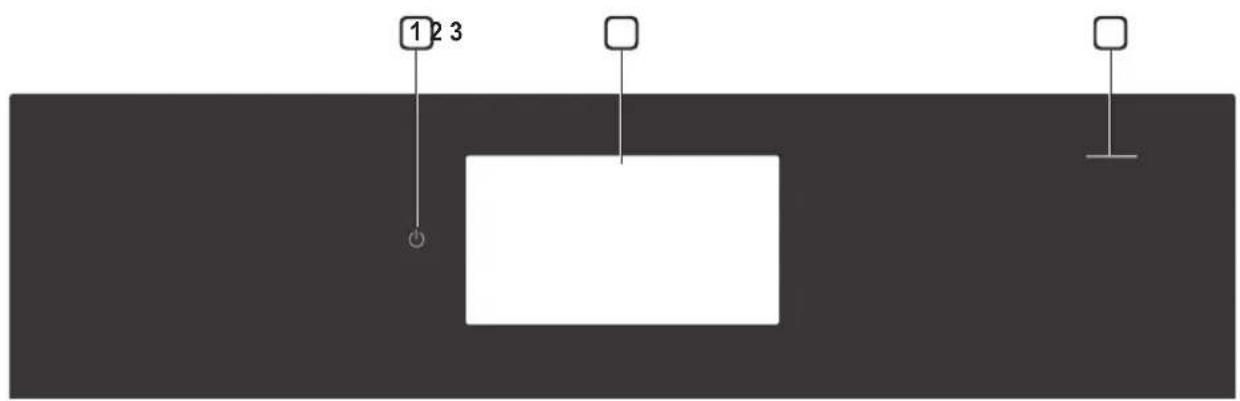
① Power On/Off Key
② LCD Touchscreen for Oven
③ Door Open Key
Display icons

Timer Icon
Touch to set a timer
2 Lamp Icon
Touch to turn light on/off
3 Lock Icon
Appears when Child lock is on
4 Wi-Fi Icon
• Appears when oven is connected to Wi-Fi
- Appears when oven is disconnected from Wi-Fi or is not registered
5 Probe Icon
Appears when probe is connected
6 Remote Start Icon
Appears when Remote Start is active
7 √ Oven Cooling Icon
Appears during or after oven operation to indicate cooling fan is running in oven
8 DEMO DEMO Mode Icon
Appears when Demo mode is active
9 ↓ Download Icon
Update the latest version for downloading the program
Getting Started
After turning on the oven for the first time, adjust the settings to suit your preferences.
1 Touch POWER on the LCD display.
2 After the start-up animation, select the desired language and touch NEXT.
3 Set the correct time of day and choose between a 12-hour or 24-hour time format, then touch NEXT.
4 Read through the application guide in the display and touch DONE.
5 The Mode Selector screen appears in the display.
NOTE
- Press the Power On/Off Key for 1 second.
Changing Oven Settings
Settings
To adjust settings after the initial setup, touch the display to open the Main screen. Touch Settings at the bottom centre of the Main screen. Swipe the screen or touch the <> arrow keys to navigate through the Settings screens.
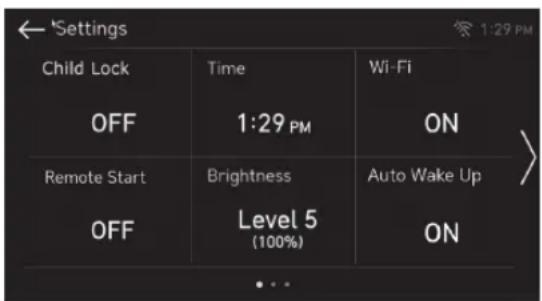
Location of Settings
• Page 1: Child lock, Time, Wi-Fi Setup, Remote Start, Brightness, Auto Wake Up
• Page 2: Lamp, Rapid Heat, Language Selection, Volume, Preheat Alarm Light, Units
- Page 3: Smart Diagnosis™, Program Update, Demo Mode, Factory Data Reset, Open Source License
Child lock
The Child lock feature automatically prevents most oven controls from being turned on. It does not disable the clock, timer and the interior oven light.
Lock
1 Touch Settings at the bottom centre of the Main screen.
2 Touch Child lock on the first Settings screen
3 When Lockout is turned on, the lock icon 🔊 appears at the top of the display.
Unlock
1 Touch any part of screen while Child lock is on.
2 A pop-up screen appears. Touch Unlock for 3 seconds.
3 The lock icon disappears from the top of the display.
Time
The time is shown in the LCD display at the upper right of the Main screen.
Setting Time
1 Touch Settings at the bottom centre of the Main screen, then touch Time on the Settings screen.
2 Touch Time, then set the correct hour and minutes by scrolling. You can also touch the number pad icon 112 and enter the desired numbers.
3 Select either a 12-hour or 24-hour clock mode (12H/24H).
4 Touch OK.

Wi-Fi
Connect the appliance to a home Wi-Fi network to use Remote Start and other smart functions. See the Smart Functions section for more details.
Setting Up Wi-Fi
1 Touch Settings at the bottom centre of the Main screen, then touch Wi-Fi in the first Settings screen.
2 Follow the instructions in the Wi-Fi Guide in the display.
3 Select ON, OFF, or RESET and touch OK.
4 If ON is selected, the Wi-Fi icon 📋 appears at the top of the display.
5 Selecting RESET register the product.
Remote Start
Remotely starts or stops the preheating function of the appliance. The appliance must be registered on a home Wi-Fi network to use Remote Start.
Remote Start (network port activation/deactivation)
1 Touch Settings at the bottom centre of the Main screen, then touch Remote Start in the first Settings screen.
2 Select On to activate remote start or Off to deactivate it and touch OK.
3 Open the oven door and make sure the oven is empty.
4 If ON is selected, the Remote Start icon 🎨 appears at the top of the display.
Brightness
Adjust the brightness of the LCD from 20 % to 100 % in increments of 20 %.
Setting Display Brightness
1 Touch Settings at the bottom centre of the Main Screen.
2 Touch Brightness on the first Settings screen.
3 Adjust the display brightness by touching and dragging the dot across the bar, by tapping anywhere on the bar, or by touching + or −.
4 Touch OK.

Auto Wake Up (Model SKSOV2411S)
When you get close to the product, it will turn on and display the cook mode.
Setting Auto Wake Up Function
1 Touch Settings at the bottom centre of the Main screen, then touch Auto Wake Up in the first Settings screen.
2 Select the desired mode.
3 Touch OK.
Lamp
Adjust the time oven lamp is on.
Selecting the lamp
1 Touch Settings at the bottom centre of the Main screen, swipe to the second Settings screen, and touch Lamp.
2 Select 60 s or Full On.
3 Touch OK.
Rapid Heat
During the rapid heat-up phase the top and rear element in the oven are used to reach the required temperature as quickly as possible.
Rapid heat-up will operate only when Hot air, Fan assisted air, Top Bottom Heat Functions are selected.
1 Touch Settings at the bottom centre of the Main screen, swipe to the second Settings screen, and touch Rapid Heat.
2 Select ON or OFF.
3 Touch OK.
Language Selection
Set the display language to English, Italiano.
Selecting a Language
1 Touch Settings at the bottom centre of the Main screen, swipe to the second Settings screen, and touch Language Selection.
2 Select the desired language.
3 Touch OK.

Volume
Adjust the volume of the oven controls.
Setting the Volume
1 Touch Settings at the bottom centre of the Main screen, swipe to the second Settings screen, and touch Volume.
2 Select Mute, Low, or High.
3 Touch OK.

Preheat Alarm Light
When the oven reaches its set-temperature, the preheating alarm light flashes 5 times or until the oven door is opened.
You can turn the preheat alarm light on or off.
Preheat alarm setting
1 Touch Settings at the bottom centre of the Main screen, swipe to the second Settings screen, and touch Preheat Alarm Light.
2 Select ON or OFF.
3 Touch OK.
Units
Set the unit of temperature and weight that is easiest to use.
Setting Units
1 Touch Settings at the bottom centre of the Main screen, swipe to the second Settings screen, and touch Units.
2 Select °F or °C.
3 Select kg or lb.
4 Touch OK.
Smart Diagnosis™
Smart Diagnosis™ can be run through a smartphone application or by calling for support. Place your smartphone's mouthpiece near the top left corner of the screen. See "Smart Diagnosis Function" in the Smart Functions section for detailed instructions.
1 Touch Settings at the bottom centre of the Main screen, swipe to the third Settings screen, and touch Smart Diagnosis.
2 Touch START to start the diagnostic tone.
Program Update
Once the appliance is connected to a home Wi-Fi network, use this setting to check for available programming updates and install them.
1 Touch Settings at the bottom centre of the Main screen, swipe to the third Settings screen, and touch Program Update.
2 The display shows available programming updates. Download the new version and update as needed.
NOTE
- During the update, the product is unavailable.
Demo Mode
Demo Mode for showroom use only. The oven will not heat up.
1 Touch Settings at the bottom centre of the Main screen, then touch Demo Mode on the Settings screen.
2 Select either ON or OFF mode.
3 Touch OK.
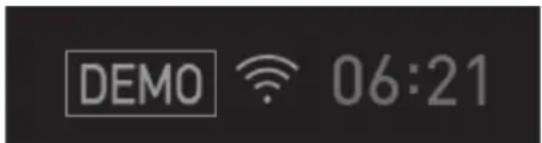
NOTE
- When Demo Mode is on, the appliance will not heat up.
- The oven Demo Mode icon appears in the display if the Demo Mode is on.
Factory Data Reset
This function returns all settings to the factory defaults.
1 Touch Settings at the bottom centre of the Main screen, swipe to the third Settings screen, and touch Factory Data Reset.
2 If you want to reset data to the factory defaults, touch RESET and then OK.

CAUTION
- All stored data will be deleted.
Open Source License
Those products identified by the Product Type and Model Range above from SIGNATURE KITCHEN SUITE contain the open source soft detailed function. Please refer to the indicated open source licenses (included following this notice) for the terms and conditions of their use.
1 Touch Settings at the bottom centre of the Main screen and swipe to the third Settings screen.
2 Touch Open Source License.
Using the Oven
Initial cleaning
Clean the oven carefully before putting it into use.
Important: Do not use any caustic or abrasive cleaners. These can damage the oven surfaces.
Appliance exterior finish
Ovens with an exterior Stainless Steel finish, must be cleaned with standard detergents only. Wipe the front of the appliance with a slightly damp cloth.
Oven interior
1 Open the oven door. The oven light comes on.
2 Clean all baking trays, accessories with warm water and dishwashing liquid.
3 Clean the oven interior in the same way, using warm water and dishwashing liquid.
4 Allow the oven to dry.
Heating up
Before baking or roasting for the first time, the oven should be turned on and allowed to heat up (200\~230 °C) and allowed to cool without food, so that it may wear away any unpleasant odours.
Open the windows and ensure there is adequate ventilation during this procedure.
1 Ensure that the time of day is set correctly.
2 Remove all accessories from the oven.
3 Touch the display screen to select the Manual mode: Hot Air(♣) or Roasting(♣) at 200 °C
4 Leave the oven on in this operating mode for one hour.
Telescopic Runners
Attaching the Telescopic Runners
Before using the oven for the first time, you must install the telescopic runners.
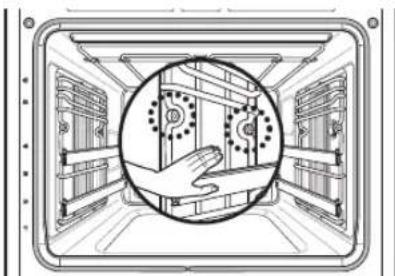
1 Align the 2 U-bends in the telescopic runner assembly so they fit around the 2 raised screw openings.
natural_image
Interior view of a server room with a hand pointing to a circular diagram showing server racks and a hand interacting with a device (no text or symbols present)2 Insert the 2 screws provided and turn clockwise to secure.

natural_image
Interior view of a server room with a hand interacting with a touchscreen (no text or symbols visible)3 Attach the other telescopic runner assembly in the same way.
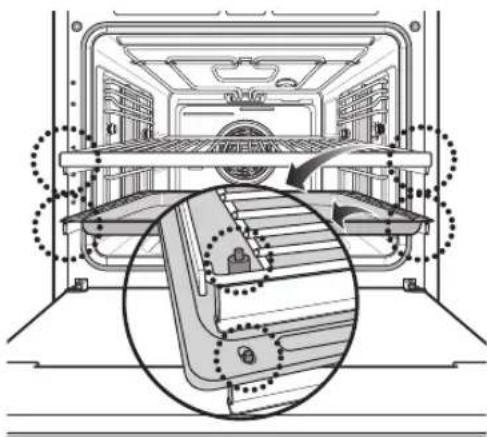
4 The baking tray and wire grill should be positioned accurately on the upright pins of the telescopic runners. A misalignment of the baking tray and the telescopic runners may cause the tray to drop or food to fall onto the floor of the oven.
natural_image
Technical line drawing of a mechanical assembly with internal components and alignment arrows (no text or symbols)NOTE
• To remove the telescopic runners, unscrew the front screws and pull the runners forward and out of the oven interior.
Oven Cooling
The oven cooling icon appears in the display if the temperature inside the oven is high during or after operation.

Opening the door
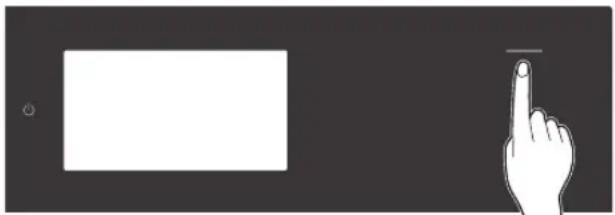
To open the door, touch the bottom of the LED at the top right of the door.
- Model SKSOV2411S: The LED light will turn on when you get close to the product.
- Model SKSOV2421MS: The LED light will turn on when you touch POWER on the LCD display.
natural_image
Simple line drawing of a hand pressing a button on a screen (no text or symbols)Timer
The oven timers don't affect oven operation or cooking time. Use them as extra kitchen timers. Once the time runs out, the oven chimes and "Timer finished" appears in the display.
Setting the Timer
1 Touch clock icon at the bottom of the display.
2 Scroll through the numbers in the pop-up until the desired time appears in the display and touch OK.

Adjusting or Cancelling the Timer
1 Touch the remaining time next to the clock icon in the display.
2 To cancel the timer, touch Reset (5) in the popup, then touch OK.
3 To adjust the time, scroll the numbers in the pop-up until the desired time appears, then touch OK.
4 The remaining time in the display is adjusted.
Manual Cook mode
| Functions Temperature range Description | ||
 Hot Air Hot Air | 40 - 230 °CDefault Temperature 160 °C | Hot Air mode uses only the heating element in the back wall and the convection fan. The recommended temperature is 160 °C. It is also possible to bake on more than one level in Hot Air( [IMAGE]) mode. This means that it is suitable for fruit cakes and stirred cake or yeast-dough, for example a bread plait. |
 Eco Hot Air Eco Hot Air | 40 - 230 °CDefault Temperature 160 °C | The Eco Hot Air mode uses the optimised heating system to save energy while cooking food. The recommended temperature is 160 °C. In this mode, residual heat can be used to conserve energy. To avoid losing heat, always keep the door closed when cooking. |
 Top Bottom Heat Top Bottom Heat | 40 - 230 °CDefault Temperature 170 °C | For Top Bottom Heat, the upper and concealed lower heating elements are used. This operating mode is suitable for baking cakes, baking for a short time, and sensitive doughs. The recommended temperature is 170 °C. |
 Fan Assisted Air Fan Assisted Air | 40 - 230 °CDefault Temperature 160 °C | In addition to the Top Bottom (upper and concealed lower) heating elements, Fan Assisted Air mode uses the convection fan. This means that the roasting and baking temperature can be reduced by 20-40 °C. The recommended temperature is 160 °C. This mode is suitable for cakes and biscuits, as it is possible to bake on more than one level at the same time. |
 Pizza Mode Pizza Mode | 180 - 230 °CDefault Temperature 180 °C | In this mode, the concealed heating element at the bottom of the oven cavity and the element in the back wall and convection fan are activated. The recommended temperature is 180 °C. When using pizza mode, the cooking time must vary depending on the type and thickness of the dough and topping. |
 Roasting Roasting | 40 - 230 °CDefault Temperature 190 °C | In this mode, the upper heating element and the convection fan are on. The recommended temperature is 190 °C. This function is suitable for large pieces of meat or poultry, such as rolled roast or turkey. |
 Light Roast Light Roast | Roast beefRoast vealFillet of beef | Light Roast uses the algorithm of Hot Air. With the Light Roast function, meat becomes marvellously tender and remains particularly succulent. Up to 20 percent less energy is consumed than with normal roasting, when roasting with Light Roast. The sub menus are Roast beef, Roast veal, and Fillet of beef. |
 RapidHeat Roast+ RapidHeat Roast+ | The RapidHeat Roast+ feature is designed to quickly roast poultry. The combination of intense heat from the upper heating elements and steam results in crispier food and shorter cooking times. The RapidHeat Roast+ is especially good for medium sized poultry. | |
 Small Grill Small Grill | High / Medium / LowDefault Temperature High | The Small grill( [IMAGE]) operates in the same way as the Large grill( [IMAGE]), however, only part of the grill heating element is used. This makes it suitable for smaller dishes. The preset level is High. Always grill with the door closed. |
| Functions Temperature range Description | ||
 Large Grill Large Grill | High / Medium / LowDefault Temperature High | The Large grill( ) uses the entire grill heating element. No specific temperature can be set. You can choose between three settings. The Large grill ( ) is suitable for cooking steaks, cutlets, fish or making toast, and for browning when cooking larger dishes with a gratin topping. The preset level is high. Always grill with the door closed. |
 Proof Proof | 30 - 50 °CDefault Temperature 40 °C | This feature maintains a warm oven for rising yeast leavened products before baking.To avoid lowering the oven temperature and lengthening proofing time, do not open the oven door unnecessarily.Check bread products early to avoid over proofing.Do not use the proofing mode for warming food or keeping food hot. The proofing oven temperature is not hot enough to keep foods at safe temperatures. Use the Warm feature to keep food warm. |
 Warm Warm | 40 - 100 °CDefault Temperature 75 °C | For Warm mode, the heating element at the top and concealed element at the bottom of the oven cavity are activated. You can use this function for keeping food warm until ready to serve. In this mode, a selectable temperature from 40 to 100 °C can be set. The duration of this function can also be set. |
 Defrost Defrost | In defrost mode, only the fan is used without heating.The circulating air speeds up the defrosting process.Place the frozen food in a suitable container to trap the liquid produced during defrosting. Where appropriate, you can use the wire grill and a deep pan (or baking tray) to avoid soiling the oven. If water is allowed to run out into the oven, the door seals will be contaminated and an unpleasant odour may result. | |
 Warm Dishes Warm Dishes | 40 - 100 °CDefault Temperature 65 °C | Warm Dishes mode is used to keep dishes warm evenly.In this operating mode, the system uses the Convection heating element and fan located at the back of the oven to circulate warm air. A selectable temperature from 40 to 100 °C can be set. The duration of this function can also be set. Please ensure that the dishes are oven compatible. |
 Bottom Heat Bottom Heat | 40 - 230 °CDefault Temperature 170 °C | In Bottom Heat mode, only the concealed heating element in the oven floor is used. The recommended temperature is 170 °C. This function is particularly suitable for finishing off cakes or pizzas on one of the lower oven levels. |
Switching the oven on (Example : Hot air)
Setting the Hot air Function
1 Select Hot air in the cooking mode screen.
2 Scroll through the numbers to select a cooking temperature or touch the number pad icon 1/2 to enter the numbers directly.
3 If desired, set the cook time and cooking end time using the same method.
Touch the arrow key on the right side of the display to see the cook time and cooking end time settings.
4 Touch Start. The oven starts to preheat.
5 If the cook time is set, the remaining time appears in the display.
If a cooking end time is set, the start time appears in the display.
6 A chime sounds once preheating is complete.
7 A chime sounds at the end of the set cook time and a notification appears in the display. Open the oven door and remove the food.
- If no cook time is set, the oven turns off automatically after 12 hours.

CAUTION
- Touching the power key during cooking clears all settings.
- To retain settings while cooking, do not touch the power key before opening or closing the oven door.
Changing the Cook Settings
1 Touch Edit in the display to bring up the Cook Settings screen.
2 Adjust the settings using the number pad or scroll function.
3 Touch Start.
To Stop Cooking
1 Touch Stop in the display, then select Yes.
NOTE
The oven fan runs while Hot Air is operating. The fan stops when the door is open. In some cases, the fan may shut off during a hot air cycle.
Tips for Hot air
- Use Hot Air for faster and more even multiple-rack cooking of pastries, cookies, muffins, biscuits, and breads of all kinds.
- Bake cookies and biscuits on pans with no sides or very low sides to allow heated air to circulate around the food. Food baked on pans with a dark finish will cook faster.
- When using Hot Air with a single rack, place the wire grill in position 3. If cooking on multiple racks, place the wire grill in positions 2 and 5 (for two racks).
- Multiple oven rack cooking may slightly increase cook times for some foods.
- Cakes, cookies and muffins have better results when using multiple racks.
Tips for Using Eco Hot Air
- When possible, do not preheat the oven before placing food inside.
- Only preheat if it is specified in the recipe.
- To maximise energy efficiency, do not open the door during cooking.
- Use dark black enameled tins that absorb heat particularly well.
- Remove unused accessories from the oven.
Switching the oven on (Example : Large Grill)
Setting the Large Grill Function
1 Select Large Grill in the cooking mode screen.
2 Scroll to set the desired temperature: Low, Medium, or High.
If desired, scroll to set a cook time and cooking end time or touch the number pad icon 1.18 to enter the numbers directly.
3 Touch Start.
The oven door must be closed to use the Grill function.
4 Let the oven preheat for approximately five minutes before cooking the food.
5 If the cook time is set, the remaining time appears in the display.
If a cooking end time is set, the start time appears in the display.
6 Touch STOP to cancel at any time or when cooking is complete.
Changing the Grill Settings
1 Touch Edit in the display to bring up the Cook Settings screen.
2 Adjust the settings.
3 Touch Start.
To Stop Grilling
1 Touch Stop in the display, then select Yes.
NOTE
- This oven is designed for closed-door grilling. Close the door to set the Grill function. If the door is open, the Grill function cannot be set and a pop-up appears in the display. If the door remains open for longer than 5 seconds, the grill heater turns off. Once the door is closed, the grill heater turns back on automatically.
Smoking
Due to the intense heat associated with grilling, it is normal to experience smoke during the cooking process. This smoke is a natural by product of searing and should not cause you to worry. If you are experiencing more smoke than you are comfortable with, use the following tips to reduce the amount of smoke in your oven.
1 Always use a wire grill. Do not use saute pans or regular baking sheets for safety reasons.
2 The wire grill should always be thoroughly cleaned and at room temperature before cooking.
3 Keep the interior of your oven as clean as possible. Leftover debris from prior meals can burn or catch fire.
4 Avoid fatty marinades and sugary glazes. Both of these will increase the amount of smoke you experience. If you would like to use a glaze, apply it at the very end of cooking.
5 If you are experiencing significant smoke with any food item, consider:
- Lowering the grill level to the Lo setting.
- Lowering the rack position to cook the food further away from the heater.
- Using the Hi grill setting to achieve the level of searing you desire, and then either switching to the Lo grill setting, or switching to the Bake function.
6 As a rule, fattier cuts of meat and fish will produce more smoke than leaner items.
7 Adhere to the recommended broil settings and cooking guidelines in the chart on the following page whenever possible.
Switching the oven on (Example : RapidHeat Roast+)
Setting the RapidHeat Roast+ Function
1 Select the desired oven in the display, then touch RapidHeat Roast+.
2 Touch Start.
3 If the cook time is set, the remaining time appears in the display. If a cooking end time is set, the start time appears in the display.
Changing the Cook Settings
1 Touch Edit in the display to bring up the Cook Settings screen.
2 Adjust the settings using the number pad or scroll function.
3 Touch Start.
To Stop Cooking
1 Touch Stop in the display, then select Yes.
NOTE
- The recommended cook time is 50-60 minutes for a whole chicken weighing 1.5 kg.
- Adjust the cook time according to the weight of the poultry.
- Place the oven rack in position 2.
- RapidHeat Roast+ is designed to reduce the cooking time. There is no need for preheating.
- This function is optimized for poultry, so the cooking temperature cannot be adjusted.
- It is normal for the fan to operate during the RapidHeat Roast+ function.
- If the descaling reminder appears, press OK to run the Descaling function.
- Take care when opening the oven door during or after steam cooking. Hot steam can cause scalding.
- After any steam cooking cycle, the drying function will run automatically. It is normal to hear the steam pump running during the drying function.
Defrosting
Use the Defrost( operating mode to defrost food.
Defrosting dishes
- Remove the dish from its packaging, put it on a plate and place the plate on the wire grille.
- Do not cover the dish with a plate or bowl, as this can considerably extend the defrosting time.
- Do not use the liquid produced during defrosting for cooking the dish to avoid the risk of salmonella. Ensure that the liquid produced during defrosting is free to run off the food onto the plate or a baking pan if using the wire grille.
Oven levels
- For defrosting, use the wire grille on Level 1, or Level 2 for larger dishes.
Defrosting table
The following table contains reference values for defrosting.
| Dish | Defrosting time (mins.) | Comments |
| Chicken, 1 kg | 100–140 | Use the wire grille with the deep pan(or baking tray). Turn the chicken after half of the time. |
| Meat, 1 kg 100–140 | Turn the meat after half of the time or cover with tin foil. | |
| Meat, 500 g 90–120 | Turn the meat after half of the time or cover with tin foil. | |
| Trout, 150 g 23–35 Do not cover. | ||
| Strawberries, 300 g | 20–30 Do | not cover. |
Baking
General information
When baking, use the Hot Air(☐) or Top Bottom Heat (☐) modes.
Baking tins
- When baking in Top Bottom Heat(☐) modes, use baking tins with a dark metal or coated surface.
- When baking with Hot Air( ), you can also use baking tins with a bright metal surface.
• Always place cake tins in the middle of the tray or wire grill. - When baking with Top Bottom Heat(☐), you can place two baking tins side by side in the oven. This means that the baking time is only slightly longer.
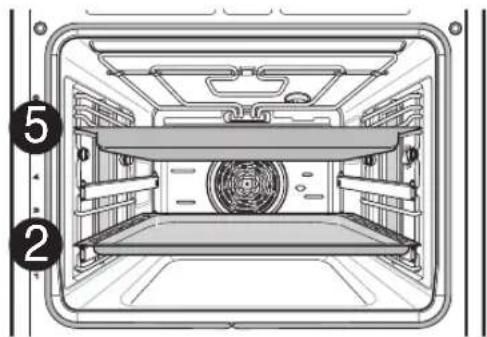
- When using two trays (baking tray and deep pan), place the deep pan on Level 5 and the baking tray on Level 2.
natural_image
Top-down architectural diagram of a double-door air vent with numbered annotations (2 and 5) indicating structural components.NOTE
Included tray may differ depending on the product.
Oven levels
The Oven levels are numbered from the bottom up.
When using Top Bottom Heat(☐), you can bake on one level only, for example Level 4.
When using Hot Air( ), you can bake sponge bases and biscuits on up to 2 baking trays at the same time, for example on levels 2 and 5.
Using baking tables
The tables contain the temperature settings, baking times and Oven levels for a selection of typical dishes.
- Temperatures and baking times should be regarded as reference figures only. The actual values depend on the type of preparation, quality of ingredients and the baking tin in use.
• We recommend first selecting a lower temperature and then increasing it if necessary, for example if you want a higher degree of browning or the baking time is too long. - If you cannot work out the settings for a specific recipe, simply use the settings for the most similar recipe.
- When baking cakes on baking trays or in tins on more than one level, the baking time may be extended by 10–15 minutes.
- Foods with a high liquidity content (e.g. pizza, fruit cakes, etc.) should be baked on a single level only.
- With cakes and baked items with different levels of dough, uneven browning may take place initially. In this case, do not alter the temperature setting. The degree of browning will even itself out over the baking process.
- For energy saving, use the residual heat for 8 minutes before you finish cooking.
Baking Tables
Baking on a single oven level
| Operating mode Hot Air | Top Bottom Heat Baking time | ||||
| Recipe | Oven level | Temp. in °C | Oven level | Temp. in °C | For both types of baking, in h, min. |
| Cakes in baking tins | |||||
| Ring-shaped pound cake 2 150-160 | 2 160 | -180 0:50-1:10 | |||
| Biscuits / pancakes 2 140-160 2 150-170 | 0:30-0:60 | ||||
| Sponge finger 2 150-160 2 160-180 | 0:25-0:40 | ||||
| Flan base - shortcrust pastry 3 170-180 2 | 190-210 | 1) | 0:10-0:25 | ||
| Flan base - cake mixture 3 150-170 | 2 170 | -190 0:20-0:25 | |||
| Apple pie 3 160-180 1 170-190 | 0:65-0:75 | ||||
| Spicy cakes and flan base (e.g. quiche lorraine) | 2 160 | -180 2 190-210 | 0:30-1:10 | ||
| Cheesecake 3) | 2 140 | -160 2 170-190 | 1:00-1:30 | ||
| Cakes on baking tray | |||||
| Bread plaits / larger cakes 3 160-1 | 70 4 170 | -190 0:30-0:40 | |||
| Christmas stolen 3 150-170 | 1) | 4 160-180 | 1) | 0:40-1:00 | |
| Bread (rye bread) | 2 180 | -200 | 2 230 | 1) | 0:20 |
| Fermentation is required | 140-160 | 160-180 | 0:30-1:00 | ||
| Pie / eclair | 3 160 | -170 | 4 190-210 | 0:15-0:30 | |
| Swiss roll | 3 150 | -170 | 4 180-200 | 1) | 0:10-0:20 |
| Fruit cake with shortcrust pastry | 3 160 | -170 | 4 170-190 | 1) | 0:40-1:20 |
| Slices with topping/ filling, e.g. quark, cream, sugar, almonds | 4 160-180 | 1) | 0:40-1:20 | ||
| Pizza (thick base) 2) 3) | 1 180 | -200 1 190-210 | 1) | 0:30-1:00 | |
| Pizza (thin base) 2) | 1 200 | -220 1 230 | 1) | 0:10-0:25 | |
| Unleavened bread | 1 200 | -220 1 230 | 1) | 0:08-0:15 | |
| Swiss flan | 1 180 | -200 1 210-230 | 0:35-0:50 | ||
| Biscuits 2) | |||||
| Shortcrust biscuits 2) | 3 150 | -160 4 170-190 | 1) | 0:06-0:20 | |
| Iced biscuits 2) | 3 140 | -150 4 160-180 | 0:10-0:40 | ||
| Cake mixture biscuits 2) | 3 150 | -160 4 170-190 | 0:15-0:20 | ||
| Cakes and pastries with egg white, meringues | 3 | 80-100 | 4 100-120 | 2:00-2:30 | |
| Macaroons | 3 100 | -120 4 120-140 | 0:30-1:00 | ||
| Yeast dough biscuits 2) | 3 160 | -170 4 170-190 | 0:20-0:40 | ||
| Puff pastry cakes and pastries | 3 160 | -180 | 4 190-210 | 1) | 0:20-0:30 |
| Bread rolls | 3 180 | -200 | 4 180-220 | 1) | 0:20-0:35 |
1) Preheat the oven.
2) Always switch off "Rapid heat" when baking on more than one oven level.
3) Use deep pan (or baking tray).
Always count Oven levels from the bottom up.
Baking on more than one oven level
| Recipe | Fan Assisted Air | Baking time in h, min. | |
| Oven level | Temp. in °C | ||
| Cakes /cakes and pastries on baking sheet 2) | |||
| Pie / eclair 2) | 2/5 160- | 180 1) | 0:35-1:00 |
| Dry sponge cake with crumble topping 2) | 2/5 140- | 160 0:30-1:00 | |
| Biscuits 2) | |||
| Shortcrust biscuits 2) | 2/5 150- | 160 0:15-0:35 | |
| Iced biscuits 2) | 2/5 140- | 150 0:20-1:00 | |
| Cake mixture biscuits 2) | 2/5 160- | 170 0:25-0:40 | |
| Cakes and pastries with egg white,meringues 2) | 2/5 80-1 | 00 2:10-2:50 | |
| Macaroons 2) | 2/5 100- | 120 0:40-1:20 | |
| Yeast dough cookies 2) | 2/5 160- | 170 0:30-1:00 | |
| Puff pastry cakes and pastries 2) | 2/5 170- | 180 1) | 0:30-0:50 |
| Bread rolls 2) | 2/5 180- | 190 1) | 0:30-0:55 |
1) Preheat the oven.
2) Always switch off "Rapid heat" when baking on more than one oven level.
Always count Oven levels from the bottom up.
Place the deep pan (or baking tray) on level 5.
NOTE
This is optional for products with two trays.
Table for strudel and baked dishes
| Recipe | Top Bottom Heat | Baking time in h, min. | |
| Oven level | Temp. in °C | ||
| Baked pasta 1 180–200 0:45–1:00 | |||
| Lasagne 1 180–200 0:30–1:00 | |||
| Baked vegetables 1 200–220 | 1) | 0:15–0:30 | |
| Pizza baguette | 1 200–220 | 1) | 0:15–0:30 |
| Soufflé 1 180–200 0:20–0:50 | |||
| Fish pie 1 180–200 0:30–1:00 | |||
| Stuffed vegetables 1 180–200 0:30–1:00 | |||
1) Preheat the oven.
Always count oven levels from the bottom up.
Baking tables for frozen ready-made dishes
| Dish Oven level | Oven function | Temperature Time | ||
| Frozen pizza 3 Conventional Heat | Follow instructions on pack. | Follow instructions on pack. | ||
| Baguettes 3 Conventional Heat Follow instructions on | pack. | Follow instructions on pack. | ||
| Fruit cake base 3 Conventional Heat Follow instructions on | pack. | Follow instructions on pack. | ||
| Chips | 3 Convection Heat | 200–220 °C 15–25 min. | ||
Preheat the oven.
Always count oven levels from the bottom up.
NOTE
Turn chips 2 or 3 times when heating. When heating frozen dishes, the baking tray may bend out of shape because of the great difference in the temperature of the frozen food and the oven. Trays normally return to their original shape once they have cooled down.
Baking tips
| Results of baking Possible cause Solution | ||
| The cake base is too light | Wrong oven level Use a dark baking tin or put the cake one level lower down. | |
| Cake collapses (turns lumpy, soggy) | Oven temperature too high Set the temperature slightly lower. | |
| Baking time too short Set a longer baking time. The baking time cannot be reduced by setting a higher temperature. | ||
| Mixture contains too much liquid | Use less liquid. Follow instructions for dough mixing times, especially when using kitchen appliances. | |
| Cakes are too dry | Oven temperature too low | Next time set a slightly higher temperature. |
| Baking time too long Set a slightly shorter baking time. | ||
| Cakes are browned unevenly | Baking temperature too high and baking time too short | Set a slightly lower baking temperature and a slightly higher baking time. |
| Mixture unevenly distributed | Distribute the mixture evenly over the baking tray/tin. | |
| Baking time too long | Temperature too low | Next time set a slightly higher temperature. |
Table for eco hot air
| Recipe | Oven level | Temp. in °C | Time(min.) |
Cakes in baking tins
| Flan base - cake mixture | 3 150-170 35~45 | |
| Spicy cakes and flan base (e.g. quiche lorraine) | 2 160-180 30~70 |
Cakes on baking tray
| Pizza (thin base) | 1 20 | 0-220 15~30 |
Biscuits
| Iced biscuits 3 | 140-150 | 10~40 | |
| Cake mixture biscuits | 3 150 | -160 25~35 |
Food
| Beef (approx. 1 kg) | 2 190 | 60~80 | |
| Poultry (approx. 1 kg) | 2 210 | 50~70 | |
| Poultry (approx. 2 kg) | 2 210 | 60~80 |
- This table is intended as a guide only, individual tastes and cuts of meat will vary.
• Always count Oven levels from the bottom up. - The durations given are for an oven which has not been pre-heated.
Roasting
When roasting, use the Roasting( Top Bottom Heat ( □ ) modes.
TIP:
- Use heat resistant dishes when roasting (follow manufacturer's instructions).
- Stainless steel roasting pans are only of limited use, as they reflect the heat to a very large extent.
- When using dishes with plastic handles, ensure that the handles are heat resistant (follow manufacturer's instructions).
- Large items for roasting or a number of items can be placed directly on the wire grill above the deep pan (or baking tray) (e.g. turkey, goose, 3\~4 chickens, 3\~4 knuckles of veal).
- Lean meat should be roasted in a roasting tray with a lid (e.g. veal, braised beef, deep frozen meat). This keeps the juices in the meat.
- For cooking crispy crusts or bacon, a casserole dish with no lid should be used (e.g. pork, minced meat, lamb, mutton, duck, knuckle of veal, chicken, poultry meat, roast beef, fillet of beef, game birds).
- Pour enough water into the deep pan (or baking tray) to prevent smoke generation when you use roasting mode.
- Clean the oven as soon as possible after use if you are roasting in an open-topped tin or dish. It is easier to remove fat splashes when the oven is still warm.

WARNING
- Allow the oven to cool down enough to ensure there is no risk of burning yourself.
Using roasting tables
The table contains the required temperatures, roasting times and oven levels for various kinds of meat. The figures stated are approximate figures only.
- We recommend cooking meat and fish weighing over 1 kg in the oven.
- For lean meat and fish, use Top Bottom Heat. For all other kinds of meat we recommend Roasting ( ) mode.
- Add a little liquid to prevent roasting juices or fat from getting burned onto the pan surfaces.
- Turn the food over after about half or two thirds of the cooking time.
TIP:
For better roasting results, baste joints and poultry with their own juices a number of times during the roasting process.
Roasting tables
Roasting Table
| Food Oven level | Roasting Top Bottom Heat | ||||
| Temp. (°C)1) | Time (min.) Temp. (°C)1) | Time (min.) | |||
| Beef(approx. 1 kg) | 22) | 190 50~70 | 200 70~90 | ||
| Venison(approx. 1 kg) | 22) | 180 75~100 | 200~230 100~120 | ||
| Leg of pork(approx. 1 kg) | 22) | 180~190 80~ | 110 200 100~120 | ||
| Rolled pork(approx. 1 kg) | 22) | 180~190 90~ | 120 200~220 110~130 | ||
| Leg of lamb(approx. 2 kg) | 2 180 110~130 200 150 | ||||
| Poultry(approx. 1 kg) | 22) | 210 50~60 | 200~220 70~90 | ||
| Poultry(approx. 2 kg) | 2 200 60~80 200~220 110~120 | ||||
| Poultry(approx. 4 kg) | 2 180~190 120~140 190~210 130~150 | ||||
| Whole fish(approx. 1.5 kg) | 22) | 160~180 35~ | 55 200~220 35~55 | ||
This table is intended as a guide only, individual tastes and cuts of meat will vary.
1) Set the pot roasting temperature 20 °C higher.
2) Use the 4th level from the bottom when using Top Bottom Heat.
Grilling
For grilling, you have a choice of 2 different operating modes.
Preheat for 5 minutes when grilling.
Large Grill

For larger quantities of flat food for grilling, for top-baking in large tins. Choose power levels (High, Medium, Low), as suitable for the food being grilled.
Small Grill

For smaller quantities of flat food for grilling, for top-baking in small tins. Choose 1 of 3 power levels (1 low, 2 medium and 3 high), as suitable for the food being grilled.
Oven levels
Use levels 5 or 6 for grilling flat pieces of meat.

WARNING
- Exposed parts of the oven can become hot during grilling. Keep children at a distance.
Using the grilling table
The grilling times are intended as approximate values only. The actual times may vary depending on the quality of the actual meat or fish. Grilling is particularly suitable for cooking flat pieces of meat and fish.
Turn the grilled food over about halfway through the cooking time.
Grilling table
| Food for grilling | Oven level | Large grill step 3 | |
| 1st side 2nd side | |||
| Rissoles 5 8-10 | min. 6 | -8 min. | |
| Pork fillet 5 10- | 12 min. | 8-12 min. | |
| Grilling sausages | 5 8- | 10 min. 6-8 min. | |
| Beef or veal steaks | 5 10- | -15 min. 10-15 min. | |
| Fillet of beef (1 kg approx.) | 4 10- | -12 min. 10-12 min. | |
| Toast ^1) | 5 2-4 | min. 2-4 min. | |
| Toast with topping | 4 8- | 10 min. | |
1) Wire grill or deep pan (or baking tray)
Always count the oven levels from the bottom up.
Probe
The probe accurately measures the internal temperature of meat, poultry and casseroles. Always unplug and remove the probe from the oven when removing food. Before using, insert the probe into the centre of the thickest part of the meat or into the inner thigh or breast of poultry, away from fat or bones. Place the food in the oven and connect the probe to the jack. Keep the probe as far away from heat sources as possible.
- The probe can be used with Hot Air, Top Bottom Heat and Roasting modes.
- For thin cuts of meat, insert probe in thickest side of meat.
NOTE
Only use the temperature probe recommended for this oven.

natural_image
Technical line drawing of an oven with internal components and a magnified inset showing internal wiring (no text or symbols)Recommended Probe Placement Chart
| Category | Examples of Food | Probe Placement |
| Ground Meat & Meat Mixtures | Meatloaf | Insert in the thickest part |
| Meatballs | ||
| Fresh Beef, Veal, Lamb | Steaks, Roasts, Chops | Insert in the thickest part, away from bone, fat and gristle |
| Poultry | Whole Chicken or Turkey | Insert in the thickest part of thigh, avoiding bone |
| Poultry Breasts or Roasts | ||
| Duck, Goose, Pheasant | ||
| Stuffing (Alone or in Bird) | Insert in the thickest part of the dish | |
| Pork & Ham | Fresh Pork | Insert in the thickest part, away from bone, fat and gristle |
| Fresh Ham (Raw) | ||
| Precooked Ham (Reheat & Serve) | ||
| Leftovers & Casseroles | Leftovers Insert | in the thickest part of the dish |
| Casseroles | ||
| Seafood | Whole Fish | Insert in the thickest part of the fish |
| Fish Fillet (Side of Fish) | ||
| Fish Steaks or Portions |
Using the Probe
1 Insert the probe into the food.
2 Connect the probe to the jack in the oven, and "Probe is connected" pops up in the display and the probe icon 🔒 appears at the top of the display.
3 Touch an appropriate cooking mode.
4 Scroll through the numbers to set a cooking temperature and a probe temperature or touch the number pad icon 1324 to enter the numbers directly. The default probe temperature is 100 °C (240 °F), but can be changed to any temperature between 40 °C (105 °F) and 230 °C (445 °F).
5 If desired, set the cook time and cooking end time using the same method. Touch the arrow key on the right side of the display to see the additional settings.
6 Touch Start. If the cook time is set, the remaining time appears in the display.
If a cooking end time is set, the start time appears in the display.
7 When the set probe temperature is reached, the oven shuts off automatically.
Changing the Cook Settings
1 Touch Edit in the display to bring up the Cook Settings screen.
2 Adjust the settings as desired.
3 Touch Start.
To Stop Cooking
1 Touch Stop in the display, then select Yes.
IMPORTANT NOTE
Touch Stop on the display at any time to cancel a cooking operation. To avoid breaking the probe, make sure food is completely defrosted before inserting.

CAUTION
- Always use an oven mitt to remove the temperature probe. Do not touch the broil element. Failure to obey this caution can result in severe personal injury.
- To avoid damage to the meat probe, do not use tongs to pull on the probe when removing it.
- Do not store the meat probe in the oven.
Recommended Probe Temperature Chart
| Category Examples of Food | Target Internal Temp. | Desired Doneness | |
| Ground Meat & Meat Mixtures | Meatloaf 71 °C (160 °F) | ||
| Meatballs 74 °C (165 °F) | |||
| Fresh Beef, Veal, Lamb | Steaks, Roasts, Chops 63 °C (145 °F) | Rare: 54 °C (130 °F)Medium Rare: 60 °C (140 °F)Medium: 66 °C (150 °F)Well Done: 71 °C (160 °F) | |
| Poultry | Whole Chicken or Turkey | 74 °C (165 °F) | |
| Poultry Breasts or Roasts | |||
| Duck, Goose, Pheasant | |||
| Stuffing (Alone or in Bird) | |||
| Pork & Ham | Fresh Pork | 63 °C (145 °F)160 °F | Well Done: 77 °C (170 °F) |
| Fresh Ham (Raw) Well Done: 71 °C ( | |||
| Precooked Ham (Reheat & Serve) 60 °C (140 °F) | |||
| Leftovers & Casseroles | Leftovers | 74 °C (165 °F) | |
| Casseroles | |||
| Seafood | Whole Fish | 63 °C (145 °F)Fish Fillet (Side of Fish) | |
| Fish Steaks or Portions Well Done: 71 °C (160 °F) | |||
My Recipe
For frequently used cooking menus, you can combine up to three different temperatures and cooking modes into one hot key.
Creating My Recipe
- When combining two or more cooking modes, a cooking time or probe temperature must be set before selecting an additional cooking mode.
- The Probe function cannot be used with the Large Grill, Small Grill, Warm, Proof or RapidHeat Roast+ modes.
1 Touch My Recipe in the Cooking Modes screen.
2 Touch Create to make a new hot key.
3 Select a first cook mode listed in the display and set the desired cook temperature.
4 Touch Set Cook Time or Set Probe.
5 If there are no additional cooking stages, touch Done. To add another cooking stage, set a cooking time or probe temperature for the first stage. Then touch Add Cook Stage.
6 Repeat steps 3-5 until all desired cooking stages have been entered. Then touch Done.
7 Enter a name for your recipe using the keyboard and touch Save.
8 The recipe name is added to the My Recipes menu.
NOTE
- If the probe was inserted in the oven jack to add a probe temperature, remember to remove it.
- After the steam mode is used for 8 hours, a reminder to descale the product appears in the display the next time the steam mode is selected. You will not be able to use the steam mode until the Descaling function is run. To avoid this delay, run the Descaling function after every 2-3 uses of the steam mode.
- If the descaling reminder appears, press OK to run the Descaling function.
Editing My Recipe
- The Edit function cannot add or remove cooking stages to a recipe. Only the oven temperature, probe temperature and cook time can be changed.
1 Touch My Recipe in the Cooking Modes screen.
2 Select the recipe to edit then touch the pencil icon at the bottom left of the screen.
3 Edit the settings for the first cooking stage and touch Done to proceed to the next cooking stage, if any.
4 Edit the next cooking stage, touch Done, and proceed through all cooking stages in the same way.
5 Once the last cooking stage has been edited, enter a new name for the recipe or keep the previous name, then touch Save.
Deleting My Recipe
1 Touch My Recipe in the Cooking Modes screen.
2 Select the recipe and touch the rubbish bin icon at the bottom left of the screen.
3 Touch Yes.
Auto Cook
The Auto Cook function provides guidance for cooking foods or dishes that may be unfamiliar. It contains preset programs for cooking many popular food items, with information on recommended, accessories, and rack position for optimal results.
Setting Auto Cook Function
1 Touch Auto Cook in the Cooking Modes screen.
2 Touch a category to filter the options.
3 Scroll through or tap the letters to find and select an item.
4 Follow the recommendations in the display regarding accessories and rack position.
5 Touch Start.
Auto Cook Guide
NOTE
- When cooking thin cuts of meat, insert the probe into the thickest part of the meat. If the probe is inserted incorrectly, the oven could turn off too soon. See the Probe section for instructions.
| Menu | Weight Limit | Step | Utensil Food Temp. | Oven Level | Remark Instructions | ||||
| 1 | Chicken (Legs) | 0.6-1.8 kg | 0.2 kg | Wire | grill over the deep pan (or baking tray) | Refrigerated 2 | After the | BEEP “Turn food over” | Brush chicken legs with oil or melted butter, season as desired. Place chicken legs on the wire grill. Put into the oven. To catch drippings or fat from food, pour a big cup of water into the deep pan (or baking tray) and place below the wire gill. After the BEEP, turn food over. After cooking, allow to rest covered with foil for 3 minutes. Use generated juice for gravy or sauce. |
| 2 | Chicken (Whole) | 1.0-2.0 kg | 0.2 kg | Wire | grill over the deep pan (or baking tray) | Refrigerated 2 | After the | BEEP “Turn food over” | Brush chicken with oil or melted butter, season as desired. Place chicken on the wire grill. Put into the oven. To catch drippings or fat from food, pour 1 L of water into the deep pan (or baking tray) and place below the wire grill. Add water to deep pan. After the BEEP, turn food over. After cooking, allow to rest covered with foil for 10 minutes. Use generated juice for gravy or sauce. |
| 3 | Frozen Pizza (Thin) | 0.2-0.4 kg | 0.1 kg | Wire | grill Frozen 1 Place frozen pizza on the wire grill. | Put into the oven. Use only one frozen pizza at a time. | |||
| 4 | Gratinated Potato | 0.5-1.5 kg | 0.5 kg * Heat proof glass dish on the wire grill | Room | 2 Cu | pre-cooked gratin potatoes with slices. Place potatoes in a heat proof glass dish, cover with grated cheese (30 g per 500 g gratin potatoes). Put into the oven. | |||
| 5 | Jumbo shrimps | 0.3-1.0 kg | 0.1 kg | Deep pan (or baking tray) | Refrigerated | 4 After the BEEP “Turn food over” | Brush with oil or melted butter. Season as desired, place shrimps in the deep pan (or baking tray). Put into the oven. After the BEEP, turn food over. | ||
| 6 | Leg of Lamb | 1.0-2.0 kg | 0.5 kg * Heat proof glass dish on the wire grill | Refrigerated 2 | After the | BEEP “Remove lid” | Brush leg of lamb with oil or melted butter, season as desired. Place lamb in a heat proof glass dish. Add a big cup of water, cover with lid. Put into the oven. After the BEEP, remove lid. After cooking, allow to rest covered with foil for 10 minutes. Use generated juice for gravy or sauce. | ||
| 7 | Roast Beef | 1.0-2.5 kg | 0.5 kg * Heat proof glass dish on the wire grill | Refrigerated 2 | After the | BEEP “Remove lid” | Brush beef with oil or melted butter, season as desired. Place beef in a heat proof glass dish. Add a big cup of water, cover with lid. Put into the oven. After the BEEP, remove lid. After cooking, allow to rest covered with foil for 10 minutes. Use generated juice for gravy or sauce. | ||
| Menu | Weight Limit | Step | Utensil Food Temp. | Oven Level | Remark Instructions | |||
| 8 | Roast Pork 1.0-2.5 kg | 0.5 kg * | Heat proof | glass dish on the wire grill | Refrigerated 2 | After the | BEEP“Remove lid” | Brush pork with oil or melted butter, season as desired. Place pork in a heat proof glass dish. Add a big cup of water, cover with lid. Put into the oven. After the BEEP, remove lid. After cooking, allow to rest covered with foil for 10 minutes. Use generated juice for gravy or sauce. |
| 9 | Roast Potatoes | 0.4-1.6 kg | 0.2 kg * Heat proof | glass dish on the wire grill | Room 2 | After the BEEP | “Turn food over” | Choose small potatoes(150-200 g each). Peel, wash, dry and cut potatoes into halves. Mix potatoes with salt, pepper and oil or melted butter. Place potatoes in a heat proof glass dish. Put into the oven. After the BEEP, turn food over. |
| 10 | Salmon Steaks | 0.4-1.2 kg | 0.2 kg Wire | grill over the deep pan (or baking tray) | Refrigerated 4 | After the | BEEP“Turn food over” | Choose salmon steaks of 200 g weight and 2.5 cm thickness each. Brush salmon with oil or melted butter, season as desired. Place salmon on the wire grill. Put into the oven. To catch drippings or fat from food, place the deep pan (or baking tray) below the wire grill. After the BEEP, turn food over. |
Gourmet Steam Guide
| Menu Weight Limit | Step | Utensil Food Temp. Oven | Level | Remark Instructions | |||
| 1 | Asparagus 0.2-0 | 4 kg 0.1 kg | Perforated | pan on the wire grill over the deep pan (or baking tray) | Refrigerated 2 | Fill the water tank to the max line located at the front of the tank. | Wash asparagus. Place asparagus in the perforated pan on the wire grill. Put into the oven. To catch drippings or fat from food, place the deep pan (or baking tray) below the wire grill. |
| 2 | Baguette 1 serving | -* Perforated | baguette pan on the wire grill | Room 2 Fil | the water tank to the max line located at the front of the tank. | Yields : 2 Loaves Ingredients400 g Bread flour100 g All-purpose flour300 g Water10 g Instant yeast8 g SaltIn a mixing bowl of a stand up mixer, whisk together the bread flour, all-purpose flour, yeast and salt. Make sure that the salt and yeast do not come into direct contact. With a paddle attachment, slowly add the water. Then switch to a dough hook and knead for 8 minutes.Turn the dough out onto a lightly flour-dusted countertop. Shape into a ball. Cover with plastic wrap. Let rest for 30 minutes.Knead the dough by hand for 1-3 minutes. Cover the dough and let rest 1 1⁄2 hours.Decompress the dough by gently indenting with fingers into the centre of the dough. Stretch and fold the dough.Working along the length of the dough, start from the upper edge of the dough, pull forward, away from you and then bring it to the centre. Pull the bottom of the dough backwards (towards yourself) and fold to the centre. Do the same for the left and right side of the dough. Flip the dough and cover with plastic wrap. Let rest 1 hour.Divide the dough into two equal portions.Shape the dough into 6" cylinders. Working with one piece of dough at a time (keeping the others covered in plastic wrap), shape into a rectangle. Working along the length of the dough, press with three fingers gently making several indentations into the dough. Repeat the process; roll the dough over onto itself three times until the upper edge meets the lower edge and creates a deep seam. Seal each turn with your fingers. Pinch the seam tight and let rest for about 5 minutes (or until the dough is relaxed enough to roll) with the seam facing up. Cover with a towel.Roll and shape the baguettes to fit a perforated baguette pan. Place on a baguette pan, seam side down, and let rest for about 5 minutes covered with a towel. Make five cuts on the surface of the dough. Place a perforated baguette pan on the wire grill. Put into the oven. | |
| Menu Weight Limit | Step | Utensil Food Temp. Oven | Level | Remark Instructions | ||
| 3 | Broccoli 0.2-0.6 kg | 0.2 kg Perforated pan | on the wire grill over the deep pan (or baking tray) | Refrigerated 2 Fill the water tank to the max line located at the front of the tank. | Cut broccoli into evenly sized pieces (about 15 g for each). Wash the broccoli. Place broccoli in the perforated pan on the wire grill. Put into the oven. To catch drippings or fat from food, place the deep pan (or baking tray) below the wire grill. | |
| 4 | Carrot 0.2-0.6 kg | 0.2 kg Perforated pan | on the wire grill over the deep pan (or baking tray) | Refrigerated 2 Fill the water tank to the max line located at the front of the tank. | Cut carrot into even sizepieces (5 mm thickness). Wash the carrot. Place carrot in the perforated pan on the wire grill. Put into the oven. To catch drippings or fat from food, place the deep pan (or baking tray) below the wire grill. | |
| 5 | Chicken Breasts | 0.2-1.0 kg | 0.2 kg Perforated pan on the wire grill over the deep pan (or baking tray) | Refrigerated 2 Fill the water tank to the max line located at the front of the tank. | Prepare chicken breast (about 200 g each). Place chicken breast in the perforated pan on the wire grill. Put into the oven. To catch drippings or fat from food, place the deep pan (or baking tray) below the wire grill. | |
| 6 | Diced Potatoes | 0.2-0.8 kg | 0.2 kg Perforated pan on the wire grill over the deep pan (or baking tray) | Room 2 Fill the water tank to the max line located at the front of the tank. | Cut potatoes into even size pieces (about 1-2 cm cube shaped). Wash the potatoes. Place diced potatoes in the perforated pan on the wire grill. Put into the oven. To catch drippings or fat from food, place the deep pan (or baking tray) below the wire grill. | |
| 7 | Green Beans | 0.1-0.3 kg | 0.1 kg Perforated pan on the wire grill over the deep pan (or baking tray) | Refrigerated 2 Fill the water tank to the max line located at the front of the tank. | Wash green beans. Place green beans in the perforated pan on the wire grill. Put into the oven. To catch drippings or fat from food, place the deep pan (or baking tray) below the wire grill. | |
| 8 | Spinach | 0.1-0.3 kg | 0.1 kg Perforated pan on the wire grill over the deep pan (or baking tray) | Refrigerated 2 Fill the water tank to the max line located at the front of the tank. | Wash spinach. Place spinach in the perforated pan on the wire grill. Put into the oven. To catch drippings or fat from food, place the deep pan (or baking tray) below the wire grill. | |
| 9 | White Bread 1 serving - * Loaf pan | on the wire grill | Room 2 Fill the water | tank to the max line located at the front of the tank. | Ingredients400 g Bread flour100 g All-purpose flour300 g Water10 g Instant8 g SaltIn a mixing bowl of a stand up mixer, whisk together the bread flour and all-purpose flour, yeast and salt. Make sure that the salt and yeast do not come into direct contact. With a paddle attachment, slowly pour in water. Then switch to a dough hook and knead for 8 minutes.Transfer dough to a lightly flour-dusted work surface. Shape the dough into a ball. Cover with plastic wrap. Let rest for 30 minutes.Knead dough for 5 minutes by hand. Cover the dough and let rest 112 hours.Stretch and fold the dough. Start from the top of the dough and pull forwards (away from you) then bring it to the middle.Then pull bottom of the dough backward (towards yourself) and fold to the middle.Do the same for the left and right side of the dough. Flip the dough over and cover with plastic wrap. Let rest for 1 hour.Divide the dough in half and shape into loaves that are about 10" long and 2" wide and tapered at the ends.Put in a loaf pan. Cover with a towel and rest for 20 minutes.Place the loaf pan on the wire grill. Put into the oven. | |
| 10 | White Rice 0.1-0.3 kg 0.1 kg | * Deep tray on the wire grill | Room 2 Fill the water | tank to the max line located at the front of the tank. | Ingredients100-300 g rice200-600 g water (double amount of rice)Put rice and water in a deep tray and mix well. Place a deep tray on the wire grill. Put into the oven. | |
* Heatproof glass dish, * Perforated baguette pan, * Loaf pan * Deep tray : Use your own cooking containers.

CAUTION
• Take care when opening the oven door during or after steam cooking. Hot steam can cause scalding.
- After any steam cooking cycle, the drying function will run automatically. It is normal to hear the steam pump running during the drying function.
Information for test institutes
This table is only for use by test institutes. It includes the best settings for the test recipes out of the standard IEC 60350-1.
| Dish Heating Mode | Temperature [°C] | Accessories 1 | Level 2 | Levels Preheated | Cooking time [min] | Handlings | |
| Small Cake Top | Bottom Heat 160 | Baking tray 4 yes | 20-30 | ||||
| Small Cake Hot | Air 150 Baking tray | 1 yes | 20-30 | ||||
| Small Cake* | Hot Air 150 Baking tray | 2/5 yes | 30-40 | ||||
| Apple Pie | Top Bottom Heat | 180 | Wire grill | 1 | No | 65-75 | |
| Apple Pie | Hot Air | 170 | Wire grill | 3 | yes | 65-75 | |
| Sponge Cake | Top Bottom Heat | 170 | Wire grill | 2 | yes | 25-35 | |
| Sponge Cake | Hot air | 150 | Wire grill | 2 | yes | 30-40 | |
| Pastry Stripes | Top Bottom Heat | 160 | Baking tray | 4 | yes | 20-25 | |
| Pastry Stripes | Hot Air | 140 | Baking tray | 2 | yes | 20-25 | |
| Pastry Stripes* | Hot Air | 140 | Baking tray | 2/5 | yes | 25-30 | |
| Toast | Large Grill | High | Wire grill | 5 | yes (5Min) | 2-4/2-4 | |
| Beef Steak | Large Grill | High | Wire grill / (Dripping pan) | 5 | yes (5Min) | 10-15/10-15 Turn after half time | |
Steam
| Dish Heating Mode | Temperature [°C] | Accessories 1 | Level 2 | Levels Preheated | Cooking time [min] | Handlings | ||
| Broccoli: 300 g | Steam | 99 | Perforated tray | 3 | No | 12-18 | Baking tray at the 1. from down | |
| Broccoli: 2 x 300 g | Steam | 99 | Perforated tray | 2/5 | No | 12-18 | Baking tray at the 1. from down | |
| Broccoli: max. amount | Steam | 99 | Perforated tray | 3 | No | 15-20 | Baking tray at the 1. from down | |
| Peas; 800 g | Steam | 99 | Perforated tray | 3 | No | Baking tray at the 1. from down | ||
*Remove stronger browned cake earlier.
Steam Function
Steam cooking uses the moist heat of steam to cook food. This is an ideal cooking method for delicate food items such as seafood, which can lose nutrients when boiled.
The oven provides 4 methods of steam cooking: Steam, Steam Assist, Sous-vide, and Gourmet Steam.

CAUTION
• Take care when opening the oven door during or after steam cooking. Hot steam can cause scalding.
• After any steam cooking cycle, the drying function will run automatically. It is normal to hear the steam pump running during the drying function.
- If steam is leaking from the oven door, the door gasket may not be properly seated.
- The ducts in the pressure regulator allow the escape of steam, so these ducts should be regularly checked to ensure that they are not blocked.
• After running the Descaling function, clean the water tank.
- Use the water tank only for its intended purpose of providing water for steam cooking.
- Monitor the water level in the tank and refill as needed for steam cooking. Use oven mitts to avoid burns when handling the hot tank.
Using the Steam Feeder Tank
The steam feeder tank is located over the oven cavity.
1 Gently push the front of the steam feeder tank to slide it out.

natural_image
Illustration showing a hand pressing a button on a device, with no visible text or symbols2 Remove the tank and place it on a flat surface.
3 Remove the tank cover or flip open the fill lid at the front of the tank cover.
4 Open the reservoir cap, and then fill the reservoir with 34 oz.(1 L) of drinkable water. Use softened, filtered water, if possible. Hard water may clog the steam generator more quickly with scale build-up.

Do not exceed the max line.
5 Assemble the cover or snap the fill lid closed.
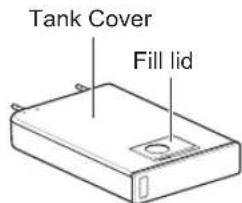

CAUTION
- Make sure the tank cover and fill lid are closed before putting in the oven.
6 Carefully insert the tank into the steam feeder slot, making sure to keep the tank level while carrying it. If the tank is not kept level, water will drain out of the tubes in the back.
7 Slide the tank into the slot until it clicks into place.
Steam Mode
Select the Steam mode to cook food without the assistance of the oven heating elements, using only the moist heat produced by steam. The available temperature range is 80 ^(180 ^) to 99 ^(210 ^) .
Setting Steam Mode
1 Touch Steam Cook.
2 Touch Steam
3 Scroll through the numbers to set a cooking temperature or touch the number pad icon to enter the numbers directly.
4 If desired, set the cook time and cooking end time using the same method. Touch the arrow key on the right side of the display to see the cook time and cooking end time settings.
5 Touch Start.
6 Once cooking is finished, allow oven to cool completely, then wipe up any water on oven interior.
NOTE
- If mineral deposits remain on the oven bottom after steam mode, use a cloth or sponge soaked in vinegar or a weak citric acid solution to remove them before using the steam mode again. See the Maintenance section under Descaling for more info. To remove stubborn hard water scale, use the Descaling function.
- Wipe away excess water left over after cooling.
- To avoid damage and extend product life, descale the steam feeder after every 8 hours of use, or more often if needed.
- After the steam mode is used for 8 hours, a reminder to descale the product appears in the display the next time the steam mode is selected. You will not be able to use the steam mode until the Descaling function is run. To avoid this delay, run the Descaling function after every 2-3 uses of the steam mode.
- If the descaling reminder appears, press OK to run the Descaling function.
Steam-Assist Mode
The Steam-Assist mode heats food gradually, using both the oven heating elements and moist steam heat. Preset temperature options start at 160 °C ( 320 °F ).
Setting Steam-Assist Mode
1 Touch Steam Cook.
2 Touch Steam-Assist.
3 Select the desired temperature and steam level: Low, Medium, or High.
4 If desired, scroll to set the cook time and cooking end time. Touch the arrow key on the right side of the display to see cook time and cooking end time settings.
5 Touch Start.
6 Once cooking is finished, allow oven to cool completely, then wipe up any water left on oven interior.
Once Steam-Assist cooking is started, an indicator on the display shows the status of the steam function.
Make sure the steam feeder tank is filled with water before starting the Steam-Assist mode. If the water in the tank runs out during cooking, a chime sounds and a pop-up appears in the display. The oven continues to cook without steam.
NOTE
- Remember to drain the steam feeder tank after use.
Changing the Steam Cook Settings
1 Touch Edit in the display to bring up the Cook Settings screen.
2 Adjust the settings as desired.
3 Touch Start.
To Stop Steam Cooking
1 Touch Stop in the display, then select Yes.
Sous-vide Mode
The sous-vide mode operates at low cooking temperatures to retain nutrients and flavour. Preset temperature options start at 60 °C (140 °F).
Setting Sous-vide Mode
1 Touch Steam Cook.
2 Touch Sous-vide.
3 Scroll through the numbers to set a cooking temperature or touch the number pad icon to enter the numbers directly.
4 If desired, set the cook time and cooking end time using the same method. Touch the arrow key on the right side of the display to see the cook time and cooking end time settings.
5 Touch Start.
6 Once cooking is finished, allow oven to cool completely, then wipe up any water on oven interior.
Gourmet Steam
Get great results using preset steam cooking recipes that include recommendations for accessories and rack position.
Setting Gourmet Steam Function
1 Touch Steam Cook.
2 Touch Gourmet Steam.
3 Touch a category to filter the options.
4 Scroll through or tap the letters to find and select an item.
5 Follow the recommendations in the display regarding accessories and rack position.
6 Touch Start.
7 Once cooking is finished, allow oven to cool completely, then wipe up any water left on oven interior.
NOTE
It is normal to hear the sound of boiling water from the steam generator while running the steam functions.
Remote Start
If the appliance is registered on a home Wi-Fi network, the preheating function of the oven can be started or stopped using the LG ThinQ smart phone app.
Preparing the Oven for a Remote Start
1 Open the oven door to make sure the oven is empty and ready for preheating. Do not place food in the oven. Close the oven door.
2 Touch SETTINGS, located at the bottom centre of the display. Touch Remote Start on the first Settings screen, then select On. Follow the instructions on the pop-up that opens in the display.
3 Follow the instructions in the LG ThinQ smart phone app for using the Remote Start function.
NOTE
- Remote Start is disconnected in the following situations:
- Remote Start is never set up in the smart phone app.
- The Remote Start status is "ready".
-
Remote Start experiences a problem during operation.
-
The Wi-Fi icon on the display shows the status of the appliance's network connection. If the Wi-Fi icon is not lit, use the smart phone app to select the Wi-Fi network or register the product again.
- A faulty Wi-Fi connection could delay the Remote Start function.
- Disconnect the probe if attached.
SMART FUNCTIONS
LG ThinQ Application
This feature is only available on models with Wi-Fi.
The LG ThinQ application allows you to communicate with the appliance using a smartphone.
LG ThinQ Application Features
Communicate with the appliance from a smartphone using the convenient smart features.
- Smart Diagnosis™
- This function provides useful information for diagnosing and solving issues with the appliance based on the pattern of use.
- Settings
- Allows the user to change oven settings, including the hour mode, preheat alarm light, beeper volume, temperature units, convection auto conversion, thermostat adjustment and language.
- Remote Start
- Remotely start the preheat mode or turn off the oven. After opening and closing the door, place the mode dial back to Remote Start within 30 seconds.
- Monitoring
- This function helps you check the current status, remaining time, cook settings and end time on the smartphone.
- Notification Settings
- Turn on the Push Alerts to receive appliance status notifications. The notifications are triggered even if the LG ThinQ application is not open.
- Timer
- You can set the timer from the application.
NOTE
- If you change your wireless router, internet service provider, or password, delete the registered appliance from the LG ThinQ application and register it again.
- The application is subject to change for appliance improvement purposes without notice to users.
Installing LG ThinQ Application and Connecting an LG Appliance
Models with QR Code
Scan the QR code attached to the product using the camera or a QR code reader application on your smartphone.

Models without QR Code
1 Search for and install the LG ThinQ application from the Google Play Store or Apple App Store on a smartphone.
2 Run the LG ThinQ application and sign in with your existing account or create an LG account to sign in.
3 Touch the add (+) button on the LG ThinQ application to connect your LG appliance. Follow the instructions in the application to complete the process.
NOTE
- To verify the Wi-Fi connection, check that the Wi-Fi indicator on the control panel is lit.
- The appliance supports 2.4 GHz Wi-Fi networks only. To check your network frequency, contact your Internet service provider or refer to your wireless router manual.
- LG ThinQ is not responsible for any network connection problems or any faults, malfunctions, or errors caused by network connection.
- The surrounding wireless environment can make the wireless network service run slowly.
- If the distance between the appliance and the wireless router is too far, the signal strength becomes weak. It may take a long time to connect or installation may fail.
- If the appliance is having trouble connecting to the Wi-Fi network, it may be too far from the router. Purchase a Wi-Fi repeater (range extender) to improve the Wi-Fi signal strength.
- The network connection may not work properly depending on the Internet service provider.
- The Wi-Fi connection may not connect or may be interrupted because of the home network environment.
NOTE
- The appliance cannot be connected due to problems with the wireless signal transmission. Unplug the appliance and wait about a minute before trying again.
- If the firewall on your wireless router is enabled, disable the firewall or add an exception to it.
- The wireless network name (SSID) should be a combination of English letters and numbers. (Do not use special characters.)
- Smartphone user interface (UI) may vary depending on the mobile operating system (OS) and the manufacturer.
- If the security protocol of the router is set to WEP, you may fail to set up the network. Please change it to other security protocols (WPA2 is recommended) and connect the product again.
Smart Diagnosis™ Function
Should you experience any problems with the appliance, it has the capability of transmitting data via your telephone to the SIGNATURE KITCHEN SUITE Customer Information Center. NFC or Wi-Fi equipped models can also transmit data to a smartphone using the LG ThinQ application.

Smart Diagnosis™ through the Concierge Service
This method allows you to speak directly to our trained specialists. The specialist records the data transmitted from the appliance and uses it to analyse the issue, providing a fast and effective diagnosis.
1 Call the SIGNATURE KITCHEN SUITE Concierge Service at 800-978-866.
2 Touch SETTINGS, located at the bottom centre of the main display screen. Swipe to the third settings screen and select Smart Diagnosis™. Follow the instructions in the display.
NOTE
Do not touch any other buttons or icons on the display screen.
3 Touch Start.
4 Keep the phone in place until the tone transmission has finished. This takes about 6 seconds and the display will count down the time.
5 Once the countdown is over and the tones have stopped, resume your conversation with the call agent, who will then be able to assist you in using the information transmitted for analysis.
NOTE
- For best results, do not move the phone while the tones are being transmitted.
- If the agent is not able to get an accurate recording of the data, you may be asked to try again.
LG ThinQ Smart Diagnosis™
Use the Smart Diagnosis feature in the LG ThinQ application for help diagnosing issues with the appliance without the assistance of the SIGNATURE KITCHEN SUITE Customer Information Centre.
Follow the instructions in the LG ThinQ application to perform a Smart Diagnosis using your smartphone.
1 Download the LG ThinQ application on your smart phone.
2 Open the LG ThinQ application on your smart phone. Touch the Smart Diagnosis™ button to advance to the next screen.
3 Follow the directions in the application. If the Wi-Fi method does not work well, follow the instructions for using Audible Diagnosis.
4 Touch [ ] in the LG ThinQ application for a more detailed guide on how to use the Wi-Fi function.
NOTE
- Smart Diagnosis™ cannot be activated unless the appliance can be turned on using the Power button. If the appliance cannot be turned on, troubleshooting must be done without using Smart Diagnosis™.
- Call quality differences by region may affect the function.
- Use a landline telephone for better communication performance, resulting in better service.
- Bad call quality may result in poor data transmission from your phone to the machine, which could cause Smart Diagnosis™ to malfunction.
Open Source Software Notice Information
To obtain the source code that is contained in this product, under GPL, LGPL, MPL, and other open source licenses that have the obligation to disclose source code, and to access all referred license terms, copyright notices and other relevant documents, please visit https://opensource.lge.com.
SIGNATURE KITCHEN SUITE will also provide open source code to you on CD-ROM for a charge covering the cost of performing such distribution (such as the cost of media, shipping, and handling) upon email request to opensource@lge.com. This offer is valid to anyone in receipt of this information for a period of three years after our last shipment of this product.
| Wireless LAN Module Specifications | |
| Model LCW-009 | |
| Frequency Range | 2 412 MHz - 2 472 MHz |
| Output Power (Max) | IEEE 802.11b : 17.64 dBmIEEE 802.11g : 16.81 dBmIEEE 802.11n(HT20) : 15.68 dBmIEEE 802.11n(HT40) : 16.00 dBm |
Wireless function S/W version : V 1.0
For consideration of the user, this device should be installed and operated with a minimum distance of 20 cm between the device and the body.
Declaration of Conformity
C€
Hereby, LG Electronics declares that the radio equipment type Built-in Electric Oven is in compliance with Directive 2014/53/EU. The full text of the EU declaration of conformity is available at the following internet address:
http://www.lg.com/global/support/cedoc/cedoc#
MAINTENANCE
Exterior
Painted and Decorative Trim
For general cleaning, use a cloth with hot soapy water. For more difficult soils and built-up grease, apply a liquid detergent directly onto the soil. Leave it on for 30 to 60 minutes. Rinse with a damp cloth and dry. Do not use abrasive cleaners.
Stainless Steel Surfaces
To avoid scratches, do not use steel wool pads.
1 Place a small amount of stainless steel appliance cleaner or polish on a damp cloth or paper towel.
2 Clean a small area, rubbing with the grain of the stainless steel if applicable.
3 Wipe with a clean, dry paper towel or soft cloth.
4 Repeat as necessary.
NOTE
- Use warm soapy water or a stainless steel cleaner or polish.
- Always wipe in the direction of the metal surface finish.
- To purchase stainless steel appliance cleaner or polish, or to locate a dealer near you, call our toll-free customer service number: 800-978-866 or visit our website at : www.signaturekitchensuite.com/it
Oven interior
NOTE
Clean the appliance after use, as soon as it has cooled down. This makes it easier to remove any deposits and they cannot get burnt on.
- Switch the oven light on.
- Wipe down the oven with water and dishwashing liquid. Allow to dry. Do not use any abrasive cleaners.
- Remove persistent deposits with a special oven cleaning product or use the SpeedClean™ mode.
Accessories
- Clean the wire grill, baking tray, and other accessories with a soft cloth and hot, soapy water.
- Do not clean the accessories in the dishwasher.
Glass cover of the interior lighting
Hot soapy water : Clean with a dish cloth and dry with a soft cloth.
Oven Door
- Use soapy water to thoroughly clean the oven door. Rinse well. Do not immerse the door in water.
- You may use a glass cleaner on the outside glass of the oven door. Do not spray water or glass cleaner on the door vents.
- Do not use oven cleaners, cleaning powders, or harsh abrasive cleaning materials on the oven door.
- Do not clean the oven door gasket. The oven door gasket is made of a woven material that is essential for a good seal. Care should be taken not to rub, damage, or remove this gasket.

CAUTION
Do not use harsh cleaners or harsh abrasive cleaning materials on the oven door. Doing so can cause damage.
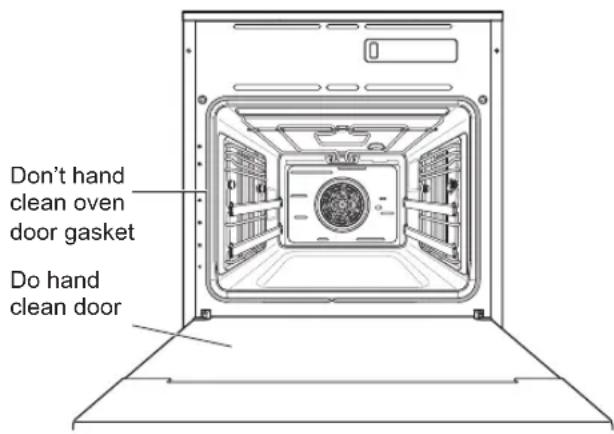
SpeedClean™
SIGNATURE KITCHEN SUITE'S SpeedClean™ enamel technology provides flexibility while cleaning the inside of your oven. The SpeedClean™ feature takes advantage of SIGNATURE KITCHEN SUITE'S new enamel to help lift soils without harsh chemicals, and it runs using ONLY WATER for just 10 minutes in low temperatures to help loosen LIGHT soils before hand-cleaning.
Benefits of SpeedClean™
- Helps loosen light soils before hand-cleaning
- SpeedClean™ only uses water; no chemical cleaners
When to Use SpeedClean™
| Suggested Cleaning Method | Example of Oven Soiling Soil Pattern | Types of Soils | Common Food Items That Can Soil Your Oven | |
| SpeedClean^TM | Small drops or spots | Cheese or other ingredients | Pizza | |
 | Light splatter Fat/grease | Steaks, broiled | ||
| Fish, broiled | ||||
| Meat roasted at low temperatures | ||||
SpeedClean™ Instruction Guide
1 Remove oven racks and accessories from the oven.
2 Scrape off and remove any burnt-on debris with a plastic scraper.
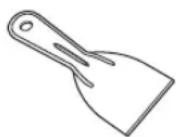
Suggested plastic scrapers:
- Hard plastic spatula
- Plastic pan scraper
- Plastic paint scraper
- Old credit card
3 Fill the steam feeder tank with water to the maximum fill line (34 oz/1 L).
4 Touch Clean and SpeedClean ^™ in that order.
5 Touch Start. The remaining time appears in the display.

CAUTION
- Some surfaces may be hot after the SpeedClean™ cycle. Wear rubber gloves while cleaning to prevent burns.
- During the SpeedClean™ cycle, the oven may become hot enough to cause burns. After the cycle ends, open the oven door and wait 5 minutes before wiping the inside surface of the oven. Failure to do so may result in burns.
- Avoid leaning or resting on the oven door glass while cleaning the oven cavity.
6 A tone will sound at the end of the 10 minute cycle. Touch End of Cleaning to clear the display and end the tone.
7 After the cleaning cycle and during hand-cleaning, enough water should remain on the oven bottom to completely submerge all soils. Add water if necessary. Place a towel on the floor in front of the oven to capture any water that may spill out during hand-cleaning.
8 Clean the oven cavity immediately after the SpeedClean™ cycle by scrubbing with a wet, non-scratch scouring sponge or pad. (The scouring side will not scratch the finish.)
NOTE
Do not use any steel scouring pads, abrasive pads or cleaners as these materials can permanently damage the oven surface.
9 Once the oven cavity is cleaned, wipe any excess water with a clean dry towel. Replace racks and any other accessories.
10 If some light soils remain, repeat the above steps, making sure to thoroughly soak the soiled areas.
NOTE
- If you forget to saturate the inside of the oven with water before starting SpeedClean™. Press Stop to end the cycle. Wait for the range to cool to room temperature and then spray or pour water into the oven and start another SpeedClean™ cycle.
- The cavity gasket may be wet when the SpeedClean™ cycle finishes. This is normal. Do not clean the gasket.
- If mineral deposits remain on the oven bottom after cleaning, use a cloth or sponge soaked in vinegar to remove them.
- It is normal for the fan to operate during the SpeedClean™ cycle.
- It is normal to hear the sound of boiling water from the steam generator while running the SpeedClean™ cycle.
Steam Feeder Tank
The steam feeder tank is used during the steam cooking functions. Use filtered, softened water if possible.
NOTE
- After using the steam function, the steam feeder tank should be drained. To avoid bacteria or odours, clean and dry the steam feeder tank after every use.
- Do not clean in a dishwasher.
Hard Water Scale
If hard water is used in the steam feeder tank, the steam generator may become clogged with hard water scale. In areas with hard water, run the Descaling function frequently or use softened water.
Cleaning Scale on Oven Bottom
To remove mineral deposits that remain on the oven bottom after using the steam mode, use a cloth or sponge soaked in vinegar or a weak citric acid solution. For more stubborn or extensive scaling, use the Descaling function.
Descaling
Use this function to remove the white deposits that form after the steam generator is used for a long period.
The Descaling function runs for 206 minutes. For instructions on removing and filling the steam feeder tank, see "Using the Steam Feeder Tank."
Setting Descaling
1 Fill the steam feeder tank with a 20:1 mixture of water and citric acid. For example, use 4 tsp of citric acid in 4 14 cups water (20 g citric acid in 1 L water).
2 Insert the steam feeder tank into the slot over the oven cavity and push it in until it clicks into place.
3 Touch Clean, Steam Maintenance and Descaling in that order.
4 After 195 minutes of descaling, a pop-up will appear in the display. Following the instructions, drain the tank and fill it with clean water.
5 Insert the tank and start the Rinsing function.
6 Once the Rinsing function is complete, dry the inside of the oven with a soft cloth.
NOTE
The Rinsing function must be completed even if the Descaling function is canceled.
Drying
The Drying function removes residual water inside the steam generator. The function takes a little over 1 minute and runs automatically after any steam cooking cycle. The Drying function can also be started manually, if needed.
Setting Drying
1 Check whether there is water in the steam feeder tank.
2 Touch Clean, Steam Maintenance and Drying in that order.
3 Touch Start to begin Drying. The remaining time appears in the display.
Evaporation
Use the Evaporation function to dry the oven cavity after a steam cooking cycle. Evaporation runs for 20 minutes.
Setting Evaporation
1 Touch Clean, Steam Maintenance and Evaporation in that order.
2 Touch Start to begin Evaporation. The remaining time appears in the display.
TROUBLESHOOTING
FAQs
My new oven doesn't cook like my old one. Is there something wrong with the temperature settings?
No, your oven has been factory tested and calibrated. For the first few uses, follow your recipe times and temperatures carefully. If you still think your new oven is too hot or too cold, you can adjust the oven temperature yourself to meet your specific cooking needs. Refer to the Thermostat Adjustment section in this manual for easy instructions on how to adjust your thermostat.
During convection cooking the fan stops when I open the door. Is that normal?
Yes, this is normal. When the door is opened, the convection fan will stop until the door is closed.
Can I use aluminium foil to catch drippings in my oven cavity?
Never use aluminium foil to line the bottom or sides of the oven. The foil will melt and stick to the bottom surface of the oven and will not be removable. Use a sheet pan placed on a lower oven rack to catch drippings instead. (If foil has already melted onto the bottom of the oven, it will not interfere with the oven's performance.)
Can I use aluminium foil on the racks?
Do not cover racks with aluminium foil. Covering entire racks with foil restricts air flow, leading to poor cooking results. Use a sheet pan lined with foil under fruit pies or other acidic or sugary foods to prevent spillovers from damaging the oven finish.

CAUTION
- Foil may be used to wrap food in the oven, but do not allow the foil to come into contact with the exposed broiling elements in the oven. The foil could melt or ignite, causing smoke, fire, or injury.
What should I do if my racks are sticky and have become hard to slide in and out?
Over time, the racks may become hard to slide in and out. Apply a small amount of olive oil to the ends of the racks. This will work as a lubricant for easier gliding.
My oven is still dirty after running the SpeedClean™ cycle. What else should I do?
The SpeedClean ^™ cycle only helps to loosen light soils in your oven range to assist in hand-cleaning of your oven. It does not automatically remove all soils after the cycle. Some scrubbing of your oven range is required after running the SpeedClean ^™ cycle.
I tried scrubbing my oven after running SpeedClean™, but some soils still remain. What can I do?
The SpeedClean ^™ feature works best when the soils are fully soaked and submerged in water before running the cycle and during hand-cleaning. If soils are not sufficiently soaked in water, it can negatively affect the cleaning performance. Repeat the SpeedClean ^™ process using sufficient water.
Soil on my oven walls is not coming off. How can I get the oven walls clean?
Soil on the side and rear walls of your oven range may be more difficult to fully soak with water. Try repeating the SpeedClean™ process.
Will SpeedClean™ get all of the soil and stains out completely?
It depends on the soil type. Sugar-based and certain grease stains are especially hard to clean. Also, if stains are not sufficiently soaked in water, this can negatively affect cleaning performance.
How often should I use SpeedClean™?
SpeedClean ^™ can be performed as often as you wish. SpeedClean ^™ works best when your oven is LIGHTLY soiled from such things as LIGHT grease splatter and small drops of cheese. Please refer to the SpeedClean ^™ section in your owner's manual for more information.
Can I run the SpeedClean™ cycle on my ovens at once?
Yes. You can run the SpeedClean ^™ cycle on the ovens at the same time. Some oven surfaces will be hot after the cycle completes running. Avoid leaning or resting on the oven door glass while cleaning the oven cavities.
Before Calling for Service
Before you call for service, review this list. It may save you time and expense. The list includes common occurrences that are not the result of defective workmanship or materials in this appliance.
| Symptoms Possible Causes / Solutions | |
| Oven control beeps and displays F1~F10 error code. | Electronic control error. Press OK to clear the display and stop beeping.Reprogram oven. If fault recurs, record fault number. Press OK and contact a Service agent. |
| Oven will not work | Plug on range is not completely inserted in the electrical outlet.- Make sure electrical plug is plugged into a live, properly grounded outlet.A fuse in your home may be blown or the circuit breaker tripped.- Replace the fuse or reset the circuit breaker.Oven controls improperly set.- See the Using the Oven section.Oven too hot.- Allow the oven to cool to below locking temperature. |
| Steam is exhausted through the oven vent. | Cooking foods with high moisture produces steam. This is normal. |
| Appliance does not operate. | Make sure cord is plugged correctly into outlet. Check circuit breakers.Service wiring is not complete. Contact your electrician for assistance.Power outage. Check house lights to be sure. Call your local electric company for service. |
| Oven light does not work. | This oven uses LED lighting which must be repaired or replaced by an authorized technician. |
| Oven smokes excessively during broiling. | Control not set properly. Follow instructions under Setting Oven Controls.Meat too close to the element. Reposition the rack to provide proper clearance between the meat and the element. Preheat broil element for searing.Meat not properly prepared. Remove excess fat from meat. Cut remaining fatty edges to prevent curling.Insert on broiler pan wrong side up and grease not draining. Always place grid on the broiler pan with ribs up and slots down to allow grease to drip into pan.Grease has built up on oven surfaces. Regular cleaning is necessary when broiling frequently.- Old grease or food spatters cause excessive smoking. |
| Food does not bake or roast properly | Oven controls improperly set.- See the Using the Oven section.Rack position is incorrect or the rack is not level.- See the Using the Oven section.Incorrect cookware or cookware of improper size being used.- See the Using the Oven section. |
| Food does not broil properly | Improper rack position being used.See the Broiling Guide.Cookware not suited for broiling.Use broiling pan and grid.Aluminium foil used on the broiling pan and grid has not been fitted properly and slit as recommended.See the Using the Oven section.In some areas the power voltage may be low.Preheat the broil element for 5-7 minutes.See the Broiling Guide. |
| Fan noise | A convection fan may automatically turn on and off.This is normal.The cooling fans are turned on and off according to the temperature of the range.This is normal. |
| Convection Fan stops | Convection fan stops according to cook mode.This is normal and is done to allow for more even heating during the cycle.This is not a failure of the range and should be considered normal operation. |
| Burning or oily odour emitting from the vent | This is normal in a new oven and will disappear in time. |
| Moisture collects on oven window or steam comes from oven vent | This is normal when cooking foods with a high moisture content.Excessive moisture was used when cleaning the window. |
| Trouble connecting appliance and smartphone to Wi-Fi network | The password for the Wi-Fi network was entered incorrectly.Delete your home Wi-Fi network and begin the registration process again.Mobile data for your smartphone is turned on.Turn off the Mobile data on your smartphone before registering the appliance.The wireless network name (SSID) is set incorrectly.The wireless network name (SSID) should be a combination of English letters and numbers. (Do not use special characters.)The router frequency is not 2.4 GHz.Only a 2.4 GHz router frequency is supported. Set the wireless router to 2.4 GHz and connect the appliance to the wireless router. To check the router frequency, check with your Internet service provider or the router manufacturer.The distance between the appliance and the router is too far.If the appliance is too far from the router, the signal may be weak and the connection may not be configured correctly. Move the router closer to the appliance or purchase and install a Wi-Fi repeater. |
| Water pools in the bottom of the oven during or after steam cooking. | During steam cooking, the water in the steam feeder is transferred to the bottom of the oven. It is normal for water to fill the bottom of the oven during or after the Steam mode.If the water leaves mineral deposits on the oven bottom, remove the deposits with a cloth or sponge soaked in vinegar. |
| White residue appears on the oven bottom after steam cooking. | Using hard water in the steam feeder can result in hard water scale on the oven bottom.To remove mineral deposits that remain on the oven bottom, use a cloth or sponge soaked in vinegar or a weak citric acid solution. |
| Noise after steam cooking | After any steam cooking cycle, the drying function will run automatically. It is normal to hear the steam pump running during the drying function. |
| Steam is leaking from around the oven door during Steam cooking. | The oven door gasket may not be seated properly.Wait until the oven is cool before making sure the gasket is smoothly aligned against the oven door. |
| "Crackling" or "Popping" sound | This is the sound of the metal heating and cooling during the cooking- This is normal. |
If the fault cannot be rectified by the above measures, contact the LG Service
NOTE
If faulty, the appliance must not be used. If a fault occurs, the appliance must be isolated by removing the mains plug or switched off by removing the fuse or turning off the circuit breaker in the house fuse box.
The appliance must only be repaired by a specially trained and qualified electrical professional. Repairs carried out improperly may result in considerable damage.

CAUTION
- Repairs to the appliance must be carried out by a specially licensed technician only! Considerable danger may result from incorrect repairs.
- Do not use the appliance if damaged. In the event of a fault or failure, switch off at the mains. In the event of a fault, visits by technicians from Customer Service or dealers may not be covered by the warranty if the cause of failure is the result of abnormal customer use.
Customer service & spare parts
If you require spare parts or a technician, contact the LG Service.
Your call will be automatically passed on to the Customer Service Centre responsible for your post code area. You can find the address of your local Customer Service Centre and other information for customers on the Internet at www.signaturekitchensuite.com/it
Please ensure you have the following details to hand:
- Your name and address, including your post code.
- Your telephone number.
- Exact details of the nature of the problem.
- The model, series and serial number. These details are found on the rating plate located at the left-hand inner edge of the oven door.
- Your dated receipt of purchase. Please note that proof of purchase is required for any warranty claim. Before requesting a warranty claim, please ensure that you have read through the section on “Troubleshooting”. There will be a charge for any inspection carried out by a technician if it should transpire that there is no mechanical or electrical fault present in the appliance.
Customer Service
For general queries on SIGNATURE KITCHEN SUITE, please contact our Customer Service Centre in writing or by telephone or visit our website at www.signaturekitchensuite.com/it
Disposal of your old appliance
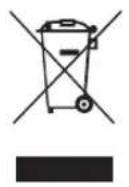
1 This crossed-out wheeled bin symbol indicates that waste electrical and electronic products (WEEE) should be disposed of separately from the municipal waste stream.
2 Old electrical products can contain hazardous substances so correct disposal of your old appliance will help prevent potential negative consequences for the environment and human health. Your old appliance may contain reusable parts that could be used to repair other products, and other valuable materials that can be recycled to conserve limited resources.
3 You can take your appliance either to the shop where you purchased the product, or contact your local government waste office for details of your nearest authorised WEEE collection point. For the most up to date information for your country please see www.lg.com/global/recycling
Product Fiche_COMMISSION DELEGATED REGULATION (EU) No 65/2014 and 66/2014, Applicable Standard EN 60350-1:2016
| Trademark SIGNATURE KITCHEN SUITE | |
| Model identifier SKSOV2411S / SKSOV2421MS | |
| Energy Efficiency Index (EEIcavity) 81.8 | |
| Energy Efficiency Class A+ | |
| Energy consumption(conventional mode) | 0.94 kWh/cycle |
| Energy consumption(fan-forced convection mode) | 0.69 kWh/cycle |
| Number of cavities 1 | |
| Heat source Electricity | |
| Volume 70 L | |
| Mass 57.9 kg |
COMMISSION REGULATION (EU) No 801/2013 and (EU) No 1275/2008 Applicable Standard EN 50564:2011
| Standby power consumption 0.5 W | |
| Network standby power consumption 2.0 W | |
| The period of time after which the power management function, or a similar function, switches the equipment automatically into standby and/or off mode and/or the condition providing networked standby | 5 min. |
MEMO
MEMO
SIGNATURE
KITCHEN SUITE
Customer Information Center
For inquires or comments, call:
800-978-866
- NOTA
- Timer
- TABLE OF CONTENTS
- IMPORTANT SAFETY INSTRUCTIONS
- PRODUCT OVERVIEW
- OPERATION
- SMART FUNCTIONS
- MAINTENANCE
- TROUBLESHOOTING
- IMPORTANT SAFETY INSTRUCTIONS
- ELECTRICAL SAFETY
- WARNING
- DAMAGE
- MAINTENANCE
- SAFETY DURING OPERATION
- USING STEAM FUNCTION
- CAUTION
- DISPOSAL
- USED APPLIANCES
- For the protection of the environment, used appliances must be Disposed of properly.
- INSTALLATION INSTRUCTIONS
- NOTE
- Safety instructions for the installer
- PRODUCT OVERVIEW
- Parts
- Accessories
- Technical specifications
- Emergency Door Unlock
- Information on LED Lighting
- If the LED lighting is not working
- OPERATION
- Control Overview
- Display icons
- Getting Started
- Changing Oven Settings
- Settings
- Location of Settings
- Child lock
- Lock
- Unlock
- Time
- Setting Time
- Wi-Fi
- Setting Up Wi-Fi
- Remote Start
- Remote Start (network port activation/deactivation)
- Brightness
- Setting Display Brightness
- Auto Wake Up (Model SKSOV2411S)
- Setting Auto Wake Up Function
- Lamp
- Selecting the lamp
- Rapid Heat
- Language Selection
- Selecting a Language
- Volume
- Setting the Volume
- Preheat Alarm Light
- Preheat alarm setting
- Units
- Setting Units
- Smart Diagnosis™
- Program Update
- Demo Mode
- Factory Data Reset
- Open Source License
- Using the Oven
- Initial cleaning
- Appliance exterior finish
- Oven interior
- Heating up
- Telescopic Runners
- Attaching the Telescopic Runners
- Oven Cooling
- Opening the door
- Setting the Timer
- Adjusting or Cancelling the Timer
- Switching the oven on (Example : Hot air)
- Setting the Hot air Function
- Changing the Cook Settings
- To Stop Cooking
- Tips for Hot air
- Tips for Using Eco Hot Air
- Switching the oven on (Example : Large Grill)
- Setting the Large Grill Function
- Changing the Grill Settings
- To Stop Grilling
- Smoking
- Switching the oven on (Example : RapidHeat Roast+)
- Setting the RapidHeat Roast+ Function
- Defrosting
- Defrosting dishes
- Oven levels
- Defrosting table
- Baking
- General information
- Baking tins
- Using baking tables
- Baking Tables
- Roasting
- TIP:
- Using roasting tables
- Roasting tables
- Grilling
- Large Grill
- Small Grill
- Using the grilling table
- Probe
- Using the Probe
- IMPORTANT NOTE
- My Recipe
- Creating My Recipe
- Editing My Recipe
- Deleting My Recipe
- Auto Cook
- Setting Auto Cook Function
- Auto Cook Guide
- Information for test institutes
- Steam Function
- Using the Steam Feeder Tank
- Steam Mode
- Setting Steam Mode
- Steam-Assist Mode
- Setting Steam-Assist Mode
- Changing the Steam Cook Settings
- To Stop Steam Cooking
- Sous-vide Mode
- Setting Sous-vide Mode
- Gourmet Steam
- Setting Gourmet Steam Function
- Preparing the Oven for a Remote Start
- SMART FUNCTIONS
- LG ThinQ Application
- LG ThinQ Application Features
- - Smart Diagnosis™
- - Settings
- - Remote Start
- - Monitoring
- - Notification Settings
- - Timer
- Installing LG ThinQ Application and Connecting an LG Appliance
- Models with QR Code
- Models without QR Code
- Smart Diagnosis™ Function
- Smart Diagnosis™ through the Concierge Service
- Touch Start.
- LG ThinQ Smart Diagnosis™
- Open Source Software Notice Information
- Declaration of Conformity
- C€
- Exterior
- Painted and Decorative Trim
- Stainless Steel Surfaces
- Glass cover of the interior lighting
- Oven Door
- SpeedClean™
- Benefits of SpeedClean™
- SpeedClean™ Instruction Guide
- Steam Feeder Tank
- Hard Water Scale
- Cleaning Scale on Oven Bottom
- Descaling
- Setting Descaling
- Drying
- Setting Drying
- Evaporation
- Setting Evaporation
- TROUBLESHOOTING
- FAQs
- Before Calling for Service
- Customer service & spare parts
- Customer Service
- Disposal of your old appliance
- MEMO
- SIGNATURE
Brand : LG
Model : SKSOV2411S
Category : Oven