
SKSWD2421MS - Oven LG - Free user manual and instructions
Find the device manual for free SKSWD2421MS LG in PDF.


| Product Type | Built-in Electric Oven |
| Brand | LG |
| Model | SKSWD2421MS |
| Installation | Slide-in / Built-in |
| Width | 24 inches |
| Height | 22 inches |
| Depth | 24 inches |
| Weight | 150 lbs |
| Power Supply | 240 V / 40 A |
| Oven Capacity | 5.0 cu ft |
| Cooking Modes | Bake, Broil, Convection, Self-Cleaning |
| Control Type | Digital touch display |
| Cleaning Method | Self-cleaning (pyrolytic) |
| Safety Features | Auto shut-off, child lock |
| Oven Racks | 2 full-extension sliding racks |
| Interior Light | Yes, halogen |
| Convection Fan | Yes |
| Door Type | Drop-down, double-glazed |
| Warranty | 1 year parts and labor |
| Repairability Index | 8.2 / 10 |
Frequently Asked Questions - SKSWD2421MS LG
User questions about SKSWD2421MS LG
0 question about this device. Answer the ones you know or ask your own.
Ask a new question about this device
Download the instructions for your Oven in PDF format for free! Find your manual SKSWD2421MS - LG and take your electronic device back in hand. On this page are published all the documents necessary for the use of your device. SKSWD2421MS by LG.
USER MANUAL SKSWD2421MS LG
www.signaturekitchensuite.it
Copyright © 2019 - 2023 Signature Kitchen Suite. All Rights Reserved.
2 INDICE
INDICE
3 ISTRUZIONI IMPORTANTI SULLA SICUREZZA
7 PANORAMICA DEL PRODOTTO
natural_image
Technical line drawings of a screwdriver and a drill bit (no text or symbols)Customer Information Center
BUILT IN WARMING DRAWER
Read this owner's manual thoroughly before operating the appliance and keep it handy for reference at all times.
SKSWD2401S
SKSWD2421MS

MFL70548902_03
www.signaturekitchensuite.it
Copyright © 2019 - 2023 Signature Kitchen Suite. All Rights Reserved.
2 TABLE OF CONTENTS
TABLE OF CONTENTS
3 IMPORTANT SAFETY INSTRUCTIONS
7 PRODUCT OVERVIEW
7 Parts
7 Technical specifications
8 INSTALLATION
8 Before Installing the Oven
9 Installation Information
10 Installation
11 OPERATION
11 Before Using the Warming Drawer
11 Control Unit Overview
11 How to use warming drawer
13 MAINTENANCE
13 How To Clean
14 TROUBLESHOOTING
14 Before Calling for Service
15 Customer service & spare parts


IMPORTANT SAFETY INSTRUCTIONS
READ CAREFULLY AND KEEP FOR FUTURE REFERENCE
Read and follow all instructions before using your warming drawer to prevent the risk of fire, electric shock, personal injury, or damage when using the appliance.
This guide does not cover all possible conditions that may occur. Always contact your service agent or manufacturer about problems that you do not understand.

This is the safety alert symbol. This symbol alerts you to potential hazards that can cause death or serious injury. All safety messages will follow the safety alert symbol and either the word "WARNING" or "CAUTION". These words mean:

WARNING- This symbol will alert you to hazards or unsafe practices which could cause serious bodily harm or death.

CAUTION - This symbol will alert you to hazards or unsafe practices which could cause bodily injury or property damage.

WARNING
- Do not use the warming drawer for the purpose of dehumidification. (ex. Operating the warming drawer with wet newspapers, clothes, toys, electric devices, pet or child etc.) It can be the cause of serious damage to safety such as a fire, a burn or a sudden death due to an electric shock.
This appliance is not intended for use by persons (including children) with reduced physical, sensory or mental capabilities, or lack of experience and knowledge, unless they have been given supervision or instruction concerning use of the appliance by a person responsible for their safety. (Young) Children should be supervised to ensure that they do not play with the appliance.
Improper use may cause damage such as a fire, electric shock or burn.
- Accessible parts may become hot during use. Young children should be kept away.
- They may get a burn.
• The children should not allow to hang down from the door handle.
- They may get hurt.
- It is hazardous for anyone other than a competent person to carry out any service or repair operation that involves the removal of a cover.
When the appliance is operated, children should only use the warming drawer under adult supervision due to the temperatures generated.
Do not operate your warming drawer if it is damaged. It is particularly important that the warming drawer door closes properly and that there is no damage to the door (bent).
If the door is damaged, the warming drawer must not be operated until it has been repaired by a competent person.
• The appliance is supplied from a cord extension set or an electrical portable outlet device, the cord extension set on electrical portable outlet device must be positioned so that it is not subject to splashing or ingress of moisture.
Only allow children to use the warming drawer without supervision when adequate instructions have been given so that the child is able to use the warming drawer in a safe way and understands the hazards of improper use.
4 IMPORTANT SAFETY INSTRUCTIONS
- The appliance and its accessible parts become hot during use. Care should be taken to avoid touching heating elements. Children less than 8 years of age shall be kept away unless continuously supervised.
During use the appliance becomes hot. Care should be taken to avoid touching heating elements inside the warming drawer.
Do not use harsh abrasive cleaners or sharp metal scrapers to clean the warming drawer door glass since they can scratch the surface, which may result in shattering of the glass.
• The appliance must not be installed behind a decorative door in order to avoid overheating. - The appliance should be powered down before replacing the lamp to avoid the possibility of electric shock.
Failure to do so can result in malfunctioning and death or electrical shock during use.
CAUTION
- Small amounts of food require shorter cooking or heating time.
- Over cooking may result in the food catching on fire and subsequent damage to your warming drawer.
An exhaust outlet is located on the top, bottom or side of the warming drawer. Don't block the outlet.
It could result in damage to your warming drawer and poor cooking results.
- Do not cook food wrapped in paper towels, unless your cook book contains instructions for the food you are cooking. And do not use newspaper in place of paper towels for cooking. - Improper use can cause an explosion or a fire.
- Be certain to place the warming drawer so the front of the door is 8 cm or more behind the edge of the surface on which it is placed, to avoid accidental tipping of the appliance. Improper use could result in bodily injury and warming drawer damage.
- Do not attempt deep fat frying in your warming drawer. - This could result in a sudden boil over of the hot liquid.
- If smoke is observed (or emitted), switch off or unplug the appliance and keep the door closed in order to stifle any flame. - It can cause serious damage such as a fire or electric shock.
- When heating food in plastic or paper containers, keep an eye on the warming drawer due to the possibility of ignition.
Your food may be poured due to the possibility of container deterioration, which also can cause a fire.
• The temperature of accessible surfaces may be high when the appliance is operating. Do Not touch the warming drawer door, outer cabinet, rear cabinet, warming drawer cavity and dishes, before clearing make sure they are not hot.
As they will become hot, there is the danger of a burn unless wearing thick culinary gloves.
- The warming drawer should be cleaned regularly and any food deposits should be removed. - Failure to maintain the warming drawer in a clean condition could lead to deterioration of the surface that could adversely affect the life of the appliance and possibly result in a hazardous situation.
- Only use the temperature probe recommended for this warming drawer.
- You can not ascertain that the temperature is accurate with an unsuitable temperature probe.
This model does not provide a temperature probe. - This appliance is intended to be used in household and similar applications such as:
- Staff kitchen areas in shops, offices and other working environments;
- Farm house;
- By clients in hotels, motels and other residential environments;
- Bed and breakfast type environments.
- This appliance can be used by children aged from 8 years and above and persons with reduced physical, sensory or mental capabilities or lack of experience and knowledge if they have been given supervision or instruction concerning use of the appliance in a safe way and understand the hazards involved. Children shall not play with the appliance. Cleaning and user maintenance shall not be made by children unless they are aged from 8 years and above and supervised.
• The warming drawer is intended for heating food. Drying of food or clothing and heating of warming pads, slippers, sponges, damp cloth and similar may lead to risk of injury, ignition or fire.
• The appliance is not intended to be operated by means of an external timer or separate remote-control system.
•This appliance must be earthed.
The wires in the mains lead are coloured in accordance with the following codes
BLUE\~Neutral
BROWN\~Live
GREEN & YELLOW\~Earth
As the colours of the wires in the mains lead of this appliance may not correspond with the coloured markings identifying the terminals in your plug proceed as follows:
The wire which is coloured BLUE must be connected to the terminal which is marked with the letter N or coloured BLACK.
The wire which is coloured BROWN must be connected to the terminal which is marked with the letter L or Coloured RED.
The wire which is coloured GREEN & YELLOW or GREEN must be connected to the terminal which is marked with the letter G or ⏻
If the supply cord is damaged, it must be replaced by the manufacturer, its service agent of similarly qualified persons in order to avoid a hazard.
Improper use may cause serious electric damage. - Only use utensils that are suitable for use in warming drawers.
- This warming drawer should not be used for commercial catering purposes.
- Improper use could result in damage to your warming drawer.
- The connection may be achieved by having the plug accessible or by incorporating a switch in the fixed wiring in accordance with the wiring rules.
Using improper plug or switch can cause an electric shock or a fire. - Only use the temperature probe recommended for this warming drawer.
- You can not ascertain that the temperature is accurate with an unsuitable temperature probe.
This model does not provide a temperature probe. - This appliance is intended to be used in household and similar applications such as:
- Staff kitchen areas in shops, offices and other working environments;
- Farm house;
- By clients in hotels, motels and other residential environments;
- Bed and breakfast type environments.
- This appliance can be used by children aged from 8 years and above and persons with reduced physical, sensory or mental capabilities or lack of experience and knowledge if they have been given supervision or instruction concerning use of the appliance in a safe way and understand the hazards involved. Children shall not play with the appliance. Cleaning and user maintenance shall not be made by children unless they are aged from 8 years and above and supervised.
• The warming drawer is intended for heating food. Drying of food or clothing and heating of warming pads, slippers, sponges, damp cloth and similar may lead to risk of injury, ignition or fire.
• The appliance is not intended to be operated by means of an external timer or separate remote-control system.
•This appliance must be earthed.
The wires in the mains lead are coloured in accordance with the following codes
BLUE\~Neutral
BROWN\~Live
GREEN & YELLOW\~Earth
As the colours of the wires in the mains lead of this appliance may not correspond with the coloured markings identifying the terminals in your plug proceed as follows:
The wire which is coloured BROWN must be connected to the terminal which is marked with the letter L or Coloured RED.
The wire which is coloured GREEN & YELLOW or GREEN must be connected to the terminal which is marked with the letter G or ⏻
If the supply cord is damaged, it must be replaced by the manufacturer, its service agent of similarly qualified persons in order to avoid a hazard.
Improper use may cause serious electric damage. - Only use utensils that are suitable for use in warming drawers.
- This warming drawer should not be used for commercial catering purposes.
- Improper use could result in damage to your warming drawer.
-
The connection may be achieved by having the plug accessible or by incorporating a switch in the fixed wiring in accordance with the wiring rules.
Using improper plug or switch can cause an electric shock or a fire. -
The door or the outer surface may get hot when the appliance is operating.
- Keep the appliance and its cord out of reach of children less than 8 years.
- The contents of feeding bottles and baby food jars shall be stirred or shaken and the temperature checked before consumption, in order to avoid burns.
Keep the inside and outside of the oven clean. For the details of how to clean your oven please reference above content "How To Clean". - According to the installation requirements set, otherwise the impact of heat, prone to danger.
- Steam cleaner is not to be used.
- It is highly recommended that users don't touch such surfaces during use in order to prevent burn hazard.
A special care should be taken for the area very close to the ventilation openings. - The knob is hot during operation. When the warming drawer is in operation, wear gloves and operate the knob.
PRODUCT OVERVIEW
Parts

① Oven
② Warming drawer
③ Drawer
4 Light Viewer Lens
⑤ Warming drawer control unit
6 "Push To Open" label
(You can remove the "Push To Open" label.)
Technical specifications
| Oven Model | SKSWD2401S / SKSWD2421MS |
| Mains connection 230 V / 50 Hz | |
| Power consumption 450 Watts / 2.0 A | |
| Oven installation dimensions (mm) 594 | (W) x 139 (H) x 553 (D) |
INSTALLATION
Before Installing the Oven
Remove all tape and packing materials before using the oven. Dispose of all plastic bags after unpacking the oven.
Never allow children to play with packing materials.

WARNING
- The information in this manual should be followed exactly.
- Failure to do so could result in fire or electrical shock, causing property damage, personal injury or death.
- DO NOT put any weight on the oven door. Never allow anyone to climb, sit, stand or hang on the oven door.
- The oven could be tipped and injury might result from contact with hot food or the oven itself.
- The electrical power must be shut off while the electrical connections are being made.
- Failure to do so can result in severe personal injury, death or electrical shock.
- Mounting screws must be used.
- Failure to do so can result in the oven falling out of the cabinet causing serious injury.

CAUTION
- Make sure the cabinets and wall coverings around the oven can withstand the temperature (up to 90°C[194°F]) generated by the oven.
- Discoloration, delamination or melting may occur.
- During installation, ensure that no persons can come into contact with live components.
- The oven must be installed by a qualified professional electrician, in accordance with the corresponding regulations and standards.
- The oven is a heavy appliance and must be transported with great care.
- Before initial use, remove all packaging, both external and from inside the appliance.
- No modification may be made to the oven's technical characteristics.
- The integrated cooking area or hotplates is/are provided with special connections. These may only be attached to the appropriate corresponding connections of the same type.
NOTE
This installation must be completed by a qualified installer or technician.
Proper installation is the responsibility of the installer and product failure due to improper installation is NOT covered under warranty.
- Installer: please retain these instructions for local inspector's reference, then leave them with the consumer.
- Consumer: please read and keep these instructions for future reference and be sure to read the entire OWNER'S MANUAL prior to use.
- Do not use the parts except for provided components when you install the product.
- Make sure the oven is flush with the front of the enclosure.
Preparing for Installation
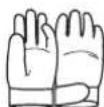
Required Tools

natural_image
Technical line drawings of a screwdriver and a drill bit (no text or symbols)Phillips screwdriver Drill
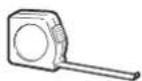
Tape measure Gloves
Materials Included
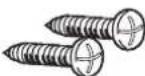
Furniture screw (2ea)
Installation Information
The first step of the installation is measure the current cutout dimensions and compare them to the cutout dimensions shown below. Little or no cabinet work may be necessary.
NOTE
Make sure the base is level and the front of the cabinet is square.
- A gap must be minimum 10 mm between the rear of the installed oven and the connecting wall.
- Kitchen cabinets in contact with the oven must be heat resistant up to 90°C (194°F), and fronts of nearby units up to at least 70°C (158°F).
Installation Drawings (With Oven)
Cutout dimensions
Cutout Depth min. 556 mm
Cutout Width min. 560 mm
Cutout Height min. 595 mm
Ventilation dimension
Cutout Depth min. 50 mm
Cutout Width min. 550 mm
Oven dimensions
Depth 471 mm
Width 594 mm
Height 460 mm
Drawer dimensions
Depth 553 mm
Width 594 mm
Height 139 mm
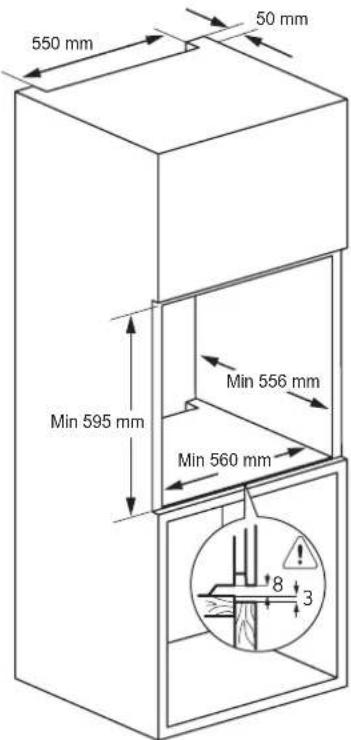
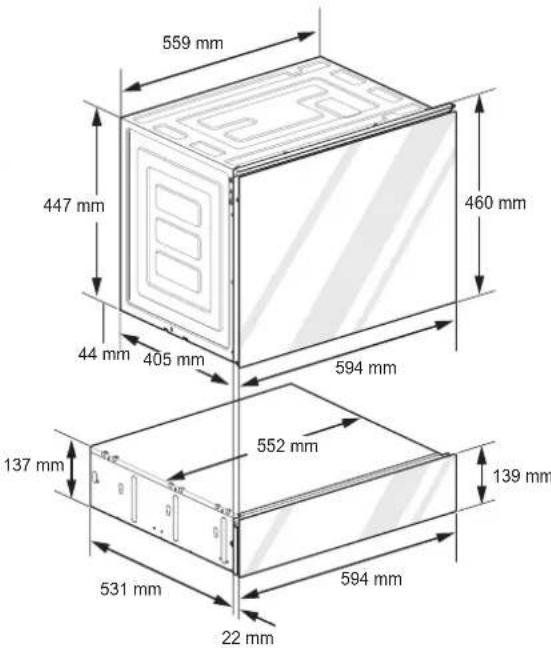
Remove the back wall of the installation cabinet. If it is difficult to remove the back wall, make a hole at least 100 mm in diameter that the drawer power cord can protrude on the back wall.

For correct ventilation, a ventilation opening of 50 mm is required between the back wall and the floor of the installation cabinet.
Installation Drawings (Without Oven)
Cutout dimensions
Cutout Depth min. 556 mm
Cutout Width min. 560 mm
Cutout Height min. 141 mm
Warming Drawer dimensions
Depth 553 mm
Width 594 mm
Height 139 mm
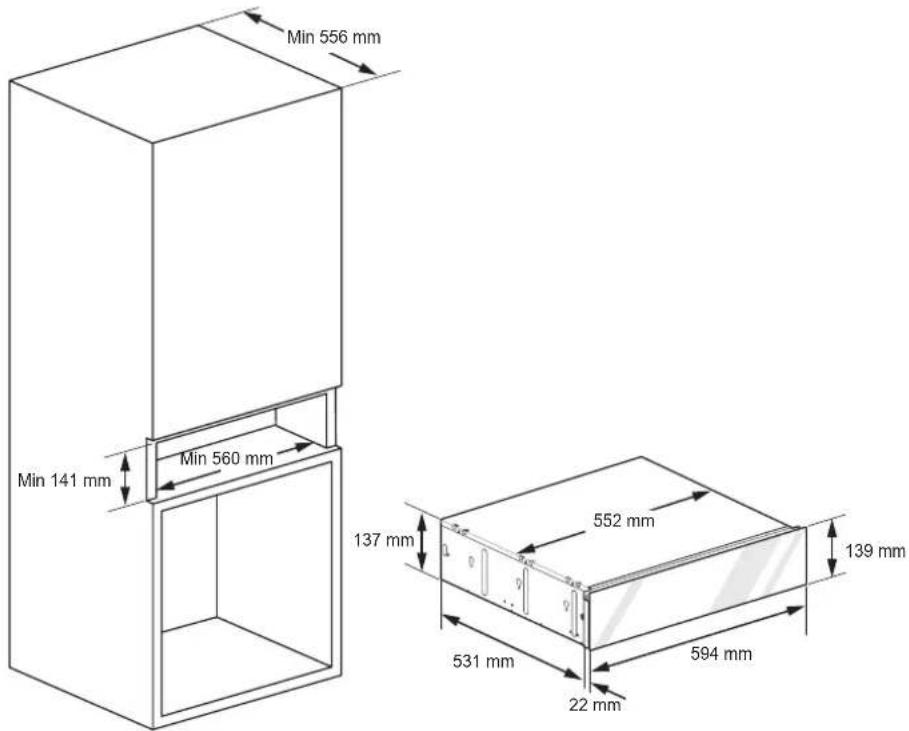
Remove the back wall of the installation cabinet. If it is difficult to remove the back wall, make a hole at least 100 mm in diameter.
Installation
Clean the cabinet before installing the product as it may be dusty. Dust inside the cabinet may seep into the product and cause a breakdown. At least two people must work together.
Installation with oven
1 Install the drawer in the cabinet.
2 Place oven on the drawer.
3 Open the product's door and tighten the screws on the two holes on the left and right sides of the trim bracket.
Installation without oven
1 Install the drawer in the cabinet.
2 Open the product's door and tighten the screws on the two holes on the left and right sides of the trim bracket.

OPERATION
Before Using the Warming Drawer
The Warming Drawer keeps hot cooked foods at serving temperature. All food placed in the Warming Drawer should be covered with an oven-safe lid or aluminum foil to maintain quality. Do not place foil on bottom or sides of drawer. Use only utensils and cookware recommended for oven use in the Warming Drawer.
Control Unit Overview
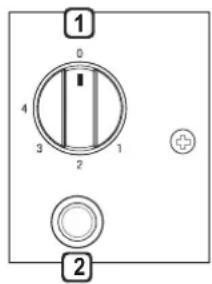
① Operation control knob
- Use it when warming food and warming the ovenware/plate to a good temperature.
② Operation indicator
- Turning the operation control knob in the direction of the arrow will light up to check the operation status. After closing the warming drawer, you can check if the operation indicator is off by the light source lens.
How to use warming drawer
1 Push the drawer to open.
2 Place the food or ovenware/plate in the drawer.
3 Turn the knob to the desired setting.

4 Push the drawer to close.
How long does preheating take
The length of time required for preheating depends on the material the ovenware is made of and it thickness, as well as the quantity, height and arrangement of the ovenware. As far as possible, distribute the ovenware over the entire surface. It takes approximately 15-25 minutes to preheat ovenware for 6 people.
Warming Drawer food/power level recommendations
Different types of food may be placed in the warming drawer at the same time. For best results, do not leave food in the warming drawer for more than one hour. Do not leave smaller quantities or heat-sensitive food, such as eggs, in the warming drawer more than 30 minutes.
The table shows various uses for the warming drawer. Set the function selector to the desired setting. Preheat the ovenware as indicated in the table.
| Setting | Food / Ovenware (Keeping warm) |
| 1 | Proving yeast dough to riseCup/Plates warming |
| 2 | Defrost deep frozen foodKeeping eggs warmKeeping breads warm |
| 3 | Roasting foodMashed potatoBaked potatoes |
| 4 | Dry cakesKeeping food warmKeeping drinks warmFlat dough based foodsMelting cooking chocolatePreheating ovenware |

CAUTION
- Use the utensils when you warm the food.
- Insulation is a function to maintain food temperature.
- The amount of food to be warmed is best for 4 to 6 people.
- When heating, cover or wrap to prevent the surface from drying out. (When you frying French fries, don't use wrap or cover.)
- Please notice that the container may become hot after heating.
- For best results, do not leave food in the warming drawer for more than one hour.
- Always use the plate when using a warm drawer.
- After operating the warming drawer, turn the operation control knob to the OFF State. (0 position)
- The knob is hot during operation. When the warming drawer is in operation, wear gloves and operate the knob.
MAINTENANCE
How To Clean
To Clean Your Warming Drawer
- Keep the inside of the warming drawer clean
- Food spatters or spilled liquids stick to warming drawer walls and between the seal and door surface. It is best to wipe up spill-overs with a damp cloth right away. Use a damp cloth to wipe out crumbs that fall between the door and the frame. It is important to keep this area clean to ensure a tight seal. Remove greasy spatters with a soapy cloth then rinse and dry. Do not use harsh detergent or abrasive cleaners.
- Keep the outside of the warming drawer clean
- Clean the outside of your warming drawer with soap and water, then with clean water and dry with a soft cloth or paper towel. To prevent damage to the operating parts inside the warming drawer, the water should not be allowed to seep into the ventilation openings.
- The door and door seals should be kept clean. Use only warm, soapy water, rinse then dry thoroughly. DO NOT USE ABRASIVE MATERIALS, SUCH AS CLEANING POWDERS OR STEEL AND PLASTIC PADS. Metal parts will be easier to maintain if wiped frequently with a damp cloth.
- Do not use any steam cleaner.
TROUBLESHOOTING
Before Calling for Service
Before you call for service, review this list. It may save you time and expense. The list includes common occurrences that are not the result of defective workmanship or materials in this appliance.
| Symptom Causation | Solutions | |
| The warm drawer does not work. | Is the warm drawer connection connected? | · Check the power cord connection. |
| Is the operation control knob in the position that you want to operate? | · Set the operation control knob to the desired position. | |
| The warm drawer does not open or close smoothly. | Is there a lot of food or tableware in the warming drawer that causes the device to tilt to one side? | · Reduce the weight inside the warming drawer and do not put food or utensils tilted to one side. |
| Water drops form inside the warming drawer. | Is there water on the wall of the warming drawer? | · If there is any water on the bottom of the warming drawer, please remove it. |
| Did it work without wrap, lid or aluminum foil? | · Cover the food with plastic wrap, lid or aluminum foil. (except when frying) | |
| The food becomes dry. | Did it work without wrap or vinyl? | · Cover the food with plastic wrap, lid or aluminum foil. (except frying crispy food) |
| After the operation is completed, the operation indicator lights up and the warming drawer operates. | Is the operation control knob in the OFF position? | · When not in use, set the operation control knob to the power OFF state (O position). |
If the fault cannot be rectified by the above measures, contact the LG service centre
NOTE
If faulty, the appliance must not be used. If a fault occurs, the appliance must be isolated by removing the mains plug or switched off by removing the fuse or turning off the circuit breaker in the house fuse box.
The appliance must only be repaired by a specially trained and qualified electrical professional. Repairs carried out improperly may result in considerable damage.

CAUTION
- Repairs to the appliance must be carried out by a specially licensed technician only! Considerable danger may result from incorrect repairs.
- Do not use the appliance if damaged. In the event of a fault or failure, switch off at the mains. In the event of a fault, visits by technicians from Customer Service or dealers may not be covered by the warranty if the cause of failure is the result of abnormal customer use.
Customer service & spare parts
If you require spare parts or a technician, contact your local LG Customer Service Centre.
Your call will be automatically passed on to the Customer Service Centre responsible for your post code area. You can find the address of your local Customer Service Centre and other information for customers on the Internet at www.signaturekitchensuite.it
Please ensure you have the following details to hand:
- Your name and address, including your post code.
- Your telephone number.
- Exact details of the nature of the problem.
- The model, series and serial number.
- Your dated receipt of purchase. Please note that proof of purchase is required for any warranty claim. Before requesting a warranty claim, please ensure that you have read through the section on “Troubleshooting”. There will be a charge for any inspection carried out by a technician if it should transpire that there is no mechanical or electrical fault present in the appliance.
Customer Service
For general queries on SIGNATURE KITCHEN SUITE, please contact our Customer Service Centre in writing or by telephone or visit our website at www.signaturekitchensuite.it
You can download the owner's manual at www.signaturekitchensuite.it
Disposal of your old appliance

1 This crossed-out wheeled bin symbol indicates that waste electrical and electronic products (WEEE) should be disposed of separately from the municipal waste stream.
2 Old electrical products can contain hazardous substances so correct disposal of your old appliance will help prevent potential negative consequences for the environment and human health. Your old appliance may contain reusable parts that could be used to repair other products, and other valuable materials that can be recycled to conserve limited resources.
3 You can take your appliance either to the shop where you purchased the product, or contact your local government waste office for details of your nearest authorised WEEE collection point. For the most up to date information for your country please see www.lg.com/global/recycling
16 MEMO
MEMO
MEMO


SIGNATURE
KITCHEN SUITE
Customer Information Centre
For inquires or comments, call:
800-978-866
Printed in china
- INDICE
- INDICE
- ISTRUZIONI IMPORTANTI SULLA SICUREZZA
- PANORAMICA DEL PRODOTTO
- BUILT IN WARMING DRAWER
- TABLE OF CONTENTS
- TABLE OF CONTENTS
- IMPORTANT SAFETY INSTRUCTIONS
- PRODUCT OVERVIEW
- INSTALLATION
- OPERATION
- MAINTENANCE
- TROUBLESHOOTING
- IMPORTANT SAFETY INSTRUCTIONS
- READ CAREFULLY AND KEEP FOR FUTURE REFERENCE
- WARNING
- IMPORTANT SAFETY INSTRUCTIONS
- CAUTION
- PRODUCT OVERVIEW
- Parts
- INSTALLATION
- Before Installing the Oven
- NOTE
- Preparing for Installation
- Required Tools
- Materials Included
- Installation Information
- Installation Drawings (With Oven)
- Cutout dimensions
- Ventilation dimension
- Oven dimensions
- Drawer dimensions
- Installation Drawings (Without Oven)
- Warming Drawer dimensions
- Installation with oven
- Installation without oven
- OPERATION
- Before Using the Warming Drawer
- Control Unit Overview
- ① Operation control knob
- ② Operation indicator
- How to use warming drawer
- How long does preheating take
- Warming Drawer food/power level recommendations
- MAINTENANCE
- How To Clean
- To Clean Your Warming Drawer
- TROUBLESHOOTING
- Before Calling for Service
- Customer service & spare parts
- Customer Service
- Disposal of your old appliance
- MEMO
- SIGNATURE
- KITCHEN SUITE
Brand : LG
Model : SKSWD2421MS
Category : Oven