
Pod Transducers - Transducers SIMRAD - Free user manual and instructions
Find the device manual for free Pod Transducers SIMRAD in PDF.


| Product Type | Thru-hull transducer pod |
| Brand | Simrad |
| Model | Pod Transducers |
| Frequency | 83/200 kHz or Chirp (depending on model) |
| Beam Angle | Broadband: 25°/12° or higher |
| Power Rating | 600W RMS (typical) |
| Material | Bronze or plastic housing |
| Cable Length | 10 meters (approx) |
| Mounting Type | Thru-hull with fairing block |
| Depth Rating | Up to 300 meters (depending on frequency) |
| Temperature Range | -10°C to 50°C |
| Weight | 1.5 kg (approx) |
| Dimensions | Diameter: 90 mm, Height: 70 mm |
| Compatibility | Compatible with Simrad NSS, NSO, and GO series |
| Warranty | 2 years |
| Included Accessories | Installation kit, cable, gasket |
| Maintenance | Clean with mild soap and water; avoid abrasive materials |
| Safety | Do not operate out of water; follow installation guidelines |
| Repairability | Replaceable element; service by authorized dealer |
| Certifications | CE, FCC, NMEA 2000 |
Frequently Asked Questions - Pod Transducers SIMRAD
User questions about Pod Transducers SIMRAD
0 question about this device. Answer the ones you know or ask your own.
Ask a new question about this device
Download the instructions for your Transducers in PDF format for free! Find your manual Pod Transducers - SIMRAD and take your electronic device back in hand. On this page are published all the documents necessary for the use of your device. Pod Transducers by SIMRAD.
USER MANUAL Pod Transducers SIMRAD
Technical specifications
| Environmental Pod without temp. sensor | Pod with temp. sensor | Pod with remote temp. sensor | |
| Operating temperature | 0°C to +50°C (32°F to +122°F) | 0°C to +50°C (32°F to +122°F) | 0°C to +50°C (32°F to +122°F) |
| Storage temperature | 30°C to +70°C (-22°F to +158°F) | 30°C to +70°C (-22°F to +158°F) | 30°C to +70°C (-22°F to +158°F) |
| Physical | |||
| Weight | 0.07 kg (0.15 lbs) w/o cable | 0.07 kg (0.15 lbs) w/o cable | 0.18 kg (0.39 lbs) w/ cable |
| Cable length | 6.4 m (21 ft) 3.9 m (12.5 ft) | 6 m (19.5 ft) | |
| Mounting options | Shoot-thru-hull, trolling motor | Shoot-thru-hull, trolling motor | Shoot-thru-hull |
| Sonar | |||
| Output | Depth Depth and | temperature | Depth and temperature |
| Frequency | Medium/High CHIRP (83/200 kHz) | Medium/High CHIRP (83/200 kHz) | Medium/High CHIRP (83/200 kHz) |
| Beam width (at -3dB) | 38° at 83 kHz / 17° at 200 kHz | 38° at 83 kHz / 17° at 200 kHz | 38° at 83 kHz / 17° at 200 kHz |
| Max depth | 304 m (1000 ft) at 200 kHz | 304 m (1000 ft) at 200 kHz | 304 m (1000 ft) at 200 kHz |
| Max speed | 60 knots (70 mph) 60 knots (70 mph) 60 knots (70 mph) | ||
LOWRANCE
SIMRAD

POD
TRANSDUCERS
INSTALLATION GUIDE


For product manuals, technical specifications, certificates and declarations refer to the product website:
www.lowrance.com
www.simrad-yachting.com
www.bandg.com

Parts included
| Pod with/without temp. sensor Pod with remote temp. sensor | ||
| A | 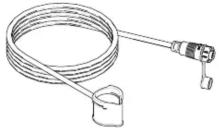 |  |
| B |  Two component epoxy adhesive Two component epoxy adhesive | |
Mounting guidelines
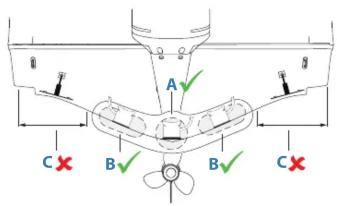
Best mounting location:
A. close to the center line
B. on vee hulls: at max. 10^ deadrise angle
Avoid mounting:
C. close to the trim tabs
Trolling motor installation
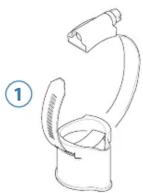

→ Note: Clamp is not supplied.
Shoot-thru-hull installation
Warning: Do not remove any material from your inner hull unless you know the hull's composition. Contact your boat dealer or manufacturer to confirm your hull specifications.
Shoot-thru-hull transducers cannot shoot through:
- wood hulls
- metal hulls
Before you epoxy the transducer to the hull, make sure that:
- the area is clean, dry and free of oil or grease
- the surface of the hull is flat so the entire transducer face is in contact with the hull
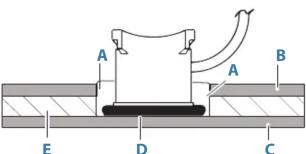
A. Resin
B. Inner hull
C. Outer hull
D. Epoxy
E. Flotation material
- Sand smooth the face of the transducer and the bottom of the inner hull.
→ Note: The sanded area should be about 1½ times the diameter of the transducer.
-
Apply epoxy to the face of the transducer and the bottom of the inner hull.
-
Glue the transducer to the inner hull (D).
-
Apply pressure to the transducer while the epoxy is setting.
When finished, the face of the transducer should be parallel with the hull and with a minimum amount of epoxy in between the hull and the transducer.
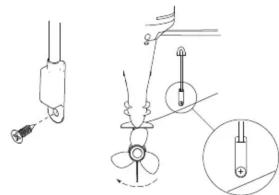
For pods with remote temperature sensor you can route the temperature sensor over the transom or through the transom.
The sensor should be mounted so that it's below the waterline at all times.
Screw the sensor to the transom and seal the mounting screw with the sealant/adhesive compound.
natural_image
Pure electrical circuit lines without any symbolsBrand : SIMRAD
Model : Pod Transducers
Category : Transducers