
HV-C60RS - Range hood HOOVER - Free user manual and instructions
Find the device manual for free HV-C60RS HOOVER in PDF.


| Brand | Hoover |
| Model | HV-C60RS |
| Product Type | Slide-out range hood |
| Dimensions (closed) | 175 (H) x 595 (W) x 280 (D) mm |
| Extended depth | 415 mm |
| Height of front panel | 43 mm |
| Weight | Approx. 9.05 kg |
| Rated voltage / frequency | 220–240 V~ / 50 Hz |
| Rated power | 211.5 W |
| Motor input power | 210 W |
| Lamp power | 1.5 W (LED, self-ballasted) |
| Filters | 2 aluminium mesh filters (charcoal filters optional for recirculation) |
| Installation height (recommended) | 650–750 mm from cooking surface |
| Minimum height | 650 mm (electric or gas cooktop) |
| Venting modes | Outdoor ducting (recommended) or recirculating |
| Control type | Slide-out panel with fan speed (high/low/off) and light on/off |
| Safety features | Safety cut-out device, overheat protection |
| Compliance | AS/NZS 60335.1 and AS/NZS 60335.2.31, RCM Mark |
| Cleaning | Wipe exterior with soft cloth and mild detergent; clean mesh filters every 2 months (dishwasher safe) |
| Charcoal filter replacement | Every 3–6 months, depending on usage |
Frequently Asked Questions - HV-C60RS HOOVER
User questions about HV-C60RS HOOVER
0 question about this device. Answer the ones you know or ask your own.
Ask a new question about this device
Download the instructions for your Range hood in PDF format for free! Find your manual HV-C60RS - HOOVER and take your electronic device back in hand. On this page are published all the documents necessary for the use of your device. HV-C60RS by HOOVER.
USER MANUAL HV-C60RS HOOVER
natural_image
Top-down view of a stainless steel kitchen air conditioner unit (no text or symbols visible)60 cm Slideout Rangehood
Model Number HV-C60RS
INSTRUCTION MANUAL
Contents
03 General Safety Instructions
06 Product Overview
07 Installation
16 Instructions
17 FAQs & Troubleshooting Guide
18 Other Useful Information
General Safety Instructions (Cont.)
IMPORTANT SAFETY INSTRUCTIONS READ CAREFULLY AND KEEP FOR FUTURE REFERENCE
Read this manual thoroughly before first use, even if you are familiar with this type of product. The safety precautions enclosed herein reduce the risk of fire, electric shock and injury when correctly adhered to. Keep the manual in a safe place for future reference, along with the completed warranty card and purchase receipt. If you sell or transfer ownership of this product, pass on these instructions to the new owner.
Always follow basic safety precautions and accident prevention measures when using an electrical appliance, including the following:
Important installation precautions
- WARNING: All electrical work associated with the installation of this rangehood must be carried out by a licensed electrician.
- WARNING: This rangehood must be installed by a suitably qualified person in strict accordance with all instructions in this manual.
- Ventilation: As heat, steam and moisture will be created during use of the appliance, take care to avoid injury and ensure that the room is adequately ventilated. Additional ventilation may be required if the appliance is going to be used for prolonged periods of time or at the same time as appliances burning gas or other fuels. Consult your installer if you are in doubt about the amount of ventilation required.
- Electrical fittings and cables: Do not allow electrical fittings or cables to come into contact with areas on the associated equipment (cooktop or stove) that get hot.
- Air discharge: The exhaust air must not be discharged into a flue which is used for exhausting fumes from appliances burning gas or other fuels.
- External air evacuation: Make sure to follow your local laws that apply to external air evacuation when installing and using the rangehood.
- Clearances: This rangehood is designed for top-mounted installation in a cabinet above a cooking appliance, at a distance of 65-75 cm from the cooking surface. Refer to pages 7–15 for comprehensive installation instructions.
- Installation: Install the rangehood onto the bottom of the cupboard and secure it in place with the four supplied ST5*50 mm screws.
WARNING: Failure to install the screws or fixing device in accordance with these instructions may result in electrical hazards!
General Safety Instructions (Cont.)
Electrical safety and usage conditions
- Voltage and frequency: Before plugging the unit into an appropriate electrical outlet, make sure your outlet voltage and circuit frequency correspond to the voltage stated on the appliance rating label.
- Power cord: Check the cord regularly for damage. Do not use the appliance if any part, including the cord, is damaged. A damaged cord must be replaced by the manufacturer or a similarly qualified person in order to avoid a hazard.
- Winding the cord: If winding the power cord, avoid tight bends as this could damage the cord.
- Disconnect: Before cleaning the rangehood, make sure to switch it off and unplug it from the electrical supply. Do not disconnect the appliance with wet hands. Grip by the plug, do not pull by the cord when disconnecting.
- Domestic use only: This rangehood is designed for indoor domestic use only. It can be built into a standard kitchen cabinet or housing unit following the instructions. Not intended for commercial, trade or industrial use.
- Intended purpose: Only use this rangehood for its intended purpose, in its intended environment and as described in this manual. Any other use may cause fire, electric shock or injury.
- Use common sense: These instructions are not intended to cover every possible condition and situation. As with any electrical household appliance, common sense and caution are therefore always recommended when installing, operating and maintaining the equipment.
- Usage restriction: This rangehood is not intended for use by persons (including children) with reduced physical, sensory or mental capabilities, or lack of experience and knowledge, unless they have been given supervision or instruction concerning use of the appliance by a person responsible for their safety.
- Children: Supervise children to ensure they do not play with the appliance. Close supervision is necessary when any appliance is used by or near children.
- CAUTION: Take care when the rangehood is operating simultaneously with an open fireplace or burner that depend on air from the environment and are supplied by other than electrical energy, as the rangehood removes air from the environment which a burner or fireplace needs for combustion.
- Ventilation: The rangehood removes air from the environment during use. Always provide adequate ventilation for safe operation of the rangehood. This is particularly important when the rangehood is used at the same time as flued heaters burning gas or other fuels.
- Unattended: Do not leave the rangehood unattended during use.
- No timer: The appliance is not intended to be operated by means of an external timer or separate remote control system.
General Safety Instructions (Cont.)
- CAUTION: No open flame cooking! Do not use an open flame for cooking underneath this rangehood; do not flambé under the rangehood. Open flames can damage the filters and present a fire hazard.
- After use: Always switch off the rangehood after use and before cleaning.
- CAUTION: Do not touch the light bulbs after the appliance has been used as they may be hot. Let them cool down before cleaning and maintenance.
- CAUTION: Accessible parts may become hot when used with cooking appliances.
- WARNING: Fire risk! Clean your rangehood regularly as instructed in this manual. There is a fire risk if cleaning is not carried out in accordance with the instructions.
- Cleaning: Before cleaning the rangehood or carrying out maintenance, make sure the operation and light switches are set to the “0” position and the rangehood is disconnected from the power supply. Wipe the exterior surface of the rangehood regularly using a soft cloth moistened with a household solvent such as methylated spirits, or with a sponge dampened with water and a little non-abrasive liquid detergent.
- No steam cleaning: Never use a steam cleaner for cleaning the appliance.
- Filter maintenance: The aluminium mesh filters must be cleaned regularly (at least every two months) in order to prevent a fire hazard. Regular cleaning also ensures better efficiency, as grease and grime can impede the airflow. If you are using the rangehood with the air recirculating back into the room, ensure to change the charcoal filters regularly (every three to six months, depending on usage). Refer to pages 18–19 for comprehensive cleaning instructions.
- Filters: Do not check the status of the filters while the rangehood is in use.
- Lamp: The appliance contains a rectangular 1.5 W LED Lamp (100 V - 240 V, 33.2 x 120 mm). When it needs replacing, only replace it with a lamp of the same type and wattage. Refer to page 19 for replacement instructions, and page 20 for information on how to purchase a replacement lamp.
- Damage: Do not use the rangehood if any part, including the supply cord, has been damaged, is faulty or does not work properly. Only have it repaired by an authorised service centre. Incorrect repair could expose you to the risk of electric shock, fire or injury. Prolonged use of the unit in such conditions could cause fire or electrocution. In case of damage, contact our after sales support line for advice.
- Misuse: We assume no liability for any eventual damages caused by incorrect installation, product misuse or noncompliance with the instructions.
Product Overview
![Scope of delivery Rangehood 1 Rangehood housing 2 Slide out front panel (fascia) 3 Inner aluminium mesh filter 4 Outer aluminium mesh filter 5 Light 6 Fan speed switch [ II / O / I ] 7 Light switch [ [ / (Blank) ]](/content/2026/05/1064096/images/cbee78b0a2833d2d548c05aac9b6bb3f29ba558344ecb0b16370ef0ef466b2d9.jpg)
Installation kit (individual parts are illustrated opposite)
Documentation (not shown)
Instruction manual
Quick start guide
Warranty card
NOTE: Due to continued product improvement, images and illustrations in this manual may vary slightly from the product purchased. All images in this manual are for reference purposes only. Parts are not necessarily pictured to scale.
Installation
Unpacking
- This product has been packaged to protect it against transportation damage. Unpack the appliance and remove all packaging materials from around the rangehood. Keep all packaging materials in a safe place. It will help prevent any damage if the product needs to be transported in the future, and you can use it to store the appliance. Whenever possible, reuse the carton and recycle it when disposing of the packaging materials.
- Plastic wrapping can be a suffocation hazard for babies and young children, so ensure all packaging materials are out of their reach and disposed of safely.
Installation kit
The installation kit contains the following parts (shown not to scale):
| Description | Part Quantity | |
| Rangehood |  | 1 |
| Screws(ST5*50) |  | 4 |
| Wall plugs | 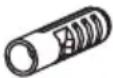 | 4 |
| Flue outlet adaptor |  | 1 |
Installation (Cont.)
Important installation advice
WARNING!
- All electrical work associated with the installation of this rangehood must be carried out by a licensed electrician. Please note the details of your licensed installer on page 22 of this manual.
- This rangehood must be correctly installed by a suitably qualified person in strict accordance with all applicable rules and regulations and following the instructions in this manual.
- Do not try to install the rangehood yourself; doing so will expose you to danger and void the warranty. Improper installation, adjustment, alteration or service can cause injury or damage. We decline any responsibility for injury or damage, to persons or property, as a result of improper installation.
Product dimensions:

NOTE: All dimensions in Fig. 1 are in millimetres (mm).
Installation (Cont.)
Installation height
This rangehood is designed for top or side installation above a cooking appliance. Mounting instructions follow on pages 13-14. For optimum performance, the rangehood should be installed at a distance of 650-750 mm from the cooking surface (Fig. 2). (See Fig. 12 page 12, for detailed minimum distance requirements.)

Venting options
- When installing the rangehood, please check and ensure that the two levers on the motor are set to the desired venting mode (Fig. 3): "DUCTING" or "RECIRCULATING".
- In most cases, steam should be vented outside (Fig. 5, outdoor ducting mode), using an exhaust ducting pipe. However, if this is not possible, the steam can be vented back into the kitchen (Fig. 4, recirculating mode), using odour-absorbing charcoal filters (for information on how to purchase these, see page 20).

flowchart
graph LR
    A["Recirculating mode"] --> B["Venting knob position"]
    B --> C["Ducting mode"]


natural_image
Cross-sectional diagram of a mechanical or hydraulic system with directional arrows indicating flow or movement (no text or labels)Installation (Cont.)
Outdoor ducting mode
This is the recommended extraction mode wherever possible for optimum performance. If you are able to install the exhaust duct to vent the air outside and operate your rangehood in outdoor ducting mode, proceed as follows:
- Ensure the vent cover is in place, as indicated below (Fig. 6).

- Remove the aluminium mesh filters from the underside of the rangehood (Fig. 7) and set the two levers in the centre of the motor housing to the "DUCTING" position (see Fig. 3).
- Install the flue outlet adaptor to the top of the rangehood, by aligning the three tabs of the adaptor with the three insertion points on the top of the rangehood (Fig. 8). Then, turn the adaptor clockwise until it is firmly in place and will not turn any further.


natural_image
Diagram of a mechanical component with a rotating arrow and dashed alignment lines (no text or symbols)- Install the exhaust ducting pipe to the outlet on the top of the rangehood and vent to the outside. You can use either a flexible or rigid pipe with a 120 mm diameter (Fig. 9).
NOTE: When using the outdoor ducting mode, do not use charcoal filters, as they are not required. For information on how to remove charcoal filters, see page 11.

Installation (Cont.)
Recirculating mode
This mode is the default setting. The rangehood must operate with charcoal filters installed, as it will vent the air back into the kitchen. The vent cover should be removed when using this mode (see Fig. 6).
To ensure that the mode is correct, remove the aluminium mesh filters (Fig. 7) and check that the two levers are in the “RECIRCULATING” position (Fig. 4).
Charcoal filters
- If you intend to use the rangehood with the air recirculating back into the kitchen, it is important that you use the charcoal filters to absorb some of the cooking odours.
- To purchase these filters, please contact our after sales support team using the information at the bottom of the page.
Removing and installing charcoal filters
- To install the charcoal filters, first remove the aluminium mesh filters (Fig. 7), then align the charcoal filters with the centre of the motors, push upwards and turn clockwise (Fig. 10) until they lock into place. Replace the mesh filters.
- To remove the charcoal filters, first remove the aluminium mesh filters (Fig. 7), then turn anticlockwise (Fig. 11) and gently pull down. Replace the mesh filters.
NOTE: These charcoal filters cannot be washed and reused. When there is insufficient suction power, or the recirculated air starts to smell, please purchase and install replacement filters.
Fig. 10 Fig. 11

natural_image
Technical line drawing of a vehicle chassis with two motors and fan wheels, showing internal components and red directional arrows indicating motion (no text or symbols)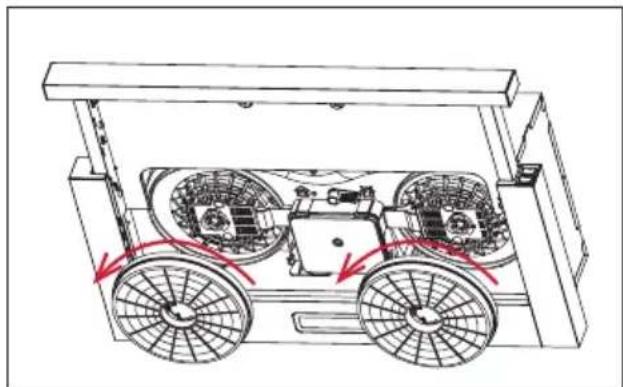
natural_image
Technical line drawing of a vehicle chassis with three wheels and internal components (no text or symbols)Installation (Cont.)
Installing the rangehood
- This rangehood is designed for top or side-mounted installation in a cabinet above a cooking appliance. For optimum performance, the rangehood should be installed at a distance of 650-750 mm from the cooking surface (Fig. 2). The minimum required distance is 650 mm from an electric cooktop and 650 mm from a gas cooktop (Fig. 12).
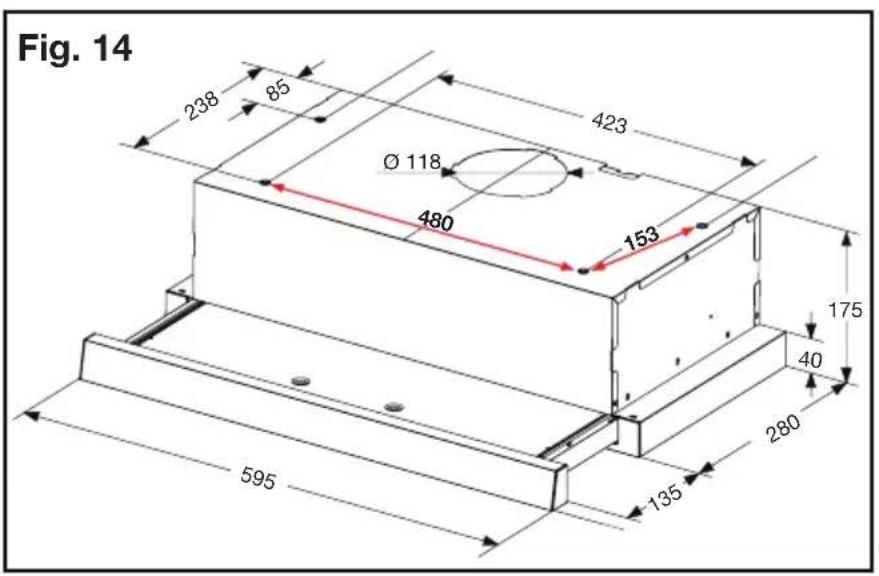
See the diagrams below for more information on the product dimensions (Fig. 13 and Fig. 14)


Installation (Cont.)
Method 1: Top-mounting this appliance

natural_image
Technical line drawing of a mechanical assembly with two views, showing internal components and mounting base (no text or symbols)- With a 10 mm drill bit, pre-drill four holes, 50 mm deep, into the base of a cabinet or into the ceiling using the diagram on page 12 (Fig. 14). They should be 480 mm apart in length and 153 mm apart in depth. Insert the supplied wall plugs.
NOTE: You will also need to make an opening for the power cord and plug and, if the rangehood is to be ducted to the outside, a hole for the ducting.
- In accordance with Fig. 15, align the position of the rangehood with the cabinet. Open the fascia fully for a clearer view, and to ensure the rangehood's holes for the screws align with the pre-drilled holes in the cabinetry.
- Install the four screws (supplied) through the range hood and into the plugs in the cabinetry or ceiling. Ensure they are fastened securely and that the cabinet or ceiling can withstand the weight of the rangehood.
WARNING: Failure to install the screws or fixing device in accordance with these instructions may result in electrical hazards!
WARNING: When cutting or drilling into wall or ceiling, ensure that you do not damage electrical wiring or other hidden utilities.
Installation (Cont.)
Method 2: Back-mounting this appliance

natural_image
Technical line drawing of a mechanical assembly with no visible text or symbols- With a 10 mm drill bit, pre-drill four holes, 50 mm deep, into the wall, using the diagram on page 12 (Fig. 13). They should be 400 mm apart horizontally and 115 mm apart vertically. Insert the supplied wall plugs
NOTE: You will also need to make an opening for the power cord and plug and, if the rangehood is to be ducted to the outside, a hole for the ducting.
- In accordance with Fig. 16, align the position of the rangehood with the wall. Open the fascia fully for a clearer view, and to ensure the rangehood's holes for the screws align with the pre-drilled holes.
- Install the four screws (supplied) through the range hood and into the wall plugs in the wall. Ensure they are fastened securely and that the wall can withstand the weight of the rangehood.
WARNING: Failure to install the screws or fixing device in accordance with these instructions may result in electrical hazards!
WARNING: When cutting or drilling into wall or ceiling, ensure that you do not damage electrical wiring or other hidden utilities.
Installation (Cont.)
Installation Notes:
- Ensure that the rangehood is horizontally aligned. Do not use this appliance if it is not installed at a horizontal angle (Fig. 17). We recommend using a spirit level or similar device to ensure that the rangehood is level before use.

Instructions
After the rangehood has been properly installed, insert the power plug into an appropriate electrical outlet and let the unit run for a few minutes prior to using it while cooking.
Switching on/off
Make sure the rangehood is properly connected to the power supply and the power is switched on at the outlet.

natural_image
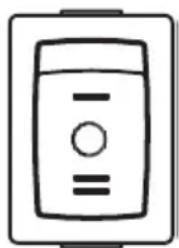
Simple line drawing of a battery with a light bulb symbol inside (no text or labels)This switch turns the rangehood lights either on or off.

Turns the rangehood lights ON.
(Blank) Turns the rangehood lights OFF.
natural_image
Simple line drawing of a battery with three terminals (no text or symbols)This button switches the rangehood on and toggles between the fan speed settings: HIGH, LOW, OFF.
= Turns on the fan motors to HIGH speed for maximum extraction.
- Turns off the fan motors for no extraction; the rangehood is switched OFF.
- Turns on the fan motors to LOW speed for minimum extraction.
Operation
- Pull out the front panel.
- Switch the rangehood lights on, if desired.
- Select the desired fan speed. The rangehood will start operation at the set fan speed.
- Close the front panel and the rangehood will stop working.
- The next time the front panel is pulled back out, the rangehood will start working at the previously set level.
NOTE: The rangehood will only operate once the slide-out panel is pulled outwards towards the kitchen.
FAQs & Troubleshooting Guide
If you experience problems with your rangehood, or it appears not to be operating correctly, check in the list below for answers to frequently asked questions. If none of the solutions offered help you solve your problem, please contact our after sales support centre for advice using the details at the bottom of the page. Do not attempt to repair the appliance yourself!
| Problem Possible cause Solution | ||
| The extractor fan does not work. | There is no electrical current in the network. | Check with other appliances that your electricity supply is in working order. |
| The rangehood fan motors are switched off. | Check and ensure that the fan speed switch is set to “-” or “=”. | |
| The slide-out panel has not been pulled out. | Make sure that the slide-out rail is pulled out. | |
| There is insufficient suction power. | The aluminium mesh filters are clogged. | Remove and clean the aluminium mesh filters and reinstall them when they are dry. |
| Wrong suction speed. | Select suction speed “=” if speed “-” was selected. | |
| The charcoal filters need to be replaced. | If the rangehood is installed for recirculation, check that the charcoal filters are still effective. They need to be replaced if food smells start to become noticeable within your kitchen. | |
| The air outlet is blocked, or the exhaust duct is too long, bending too much or has collapsed. | If the rangehood is installed to vent outside, check that the ducting and outlets are free of blockages. Also ensure that the duct is in proper working condition. | |
| Insufficient ventilation. | Make sure your kitchen is adequately vented to allow the entry of fresh air. | |
| The rangehood has switched off during operation. | The safety cut-out device has been tripped. | Turn off the rangehood and wait for the device to reset. |
| If the rangehood has been installed below the height levels indicated in the “Installation” section, the motor will cut out frequently, which may damage the rangehood. | ||
| The lights do not work. | The lamps are loose, or burnt out. | Tighten the lamps, or replace them, if necessary. |
Other Useful Information
Cleaning and maintenance
CAUTION!
- Before cleaning the rangehood or carrying out maintenance, make sure the operation and light switches are set to the “0” position and the rangehood is disconnected from the power supply.
- It is important to clean the filters regularly as oil and food residues can become a fire hazard.
- Never use a steam cleaner to clean any part of the rangehood.
Cleaning the rangehood exterior
Wipe the exterior surface of the rangehood regularly using a soft cloth moistened with a household solvent such as methylated spirits, or with a sponge dampened with water and a little non-abrasive liquid detergent.
Cleaning the filters
The aluminium mesh filters must be cleaned regularly in order to prevent a fire hazard. Regular cleaning also ensures better efficiency, as grease and grime can impede the airflow. We recommend cleaning them at least every two months.
- Push in the plastic opening latch and take the filters out of their frames (Fig. 18).

- Wash the filters thoroughly in warm, soapy water. For best results, leave them to soak, wash and rinse with warm water. The aluminium mesh filters may also be cleaned in a dishwasher. After cleaning, leave the filters to dry completely before reinstalling them into the appliance.
WARNING: Never reinstall the filters when they are still wet.
NOTE: The aluminum panels may slightly change colour after several washes. This is not a fault and no cause for concern. It does not affect performance and does not warrant replacement of these parts.
Other Useful Information (Cont.)
Charcoal filters
If you are using the rangehood with the air recirculating back into the room, two charcoal filters must be installed before use.
The charcoal filters absorb cooking odours and must be changed regularly. How often you need to change the filters depends on your usage. We recommend changing them every three to six months. An activated charcoal filter cannot be washed or recycled; it must be replaced with a new one.
To obtain replacement filters, contact our after sales support center and arrange for purchase – see page 20 for details.
NOTE: The suction power will be lowered with charcoal filters installed.
NOTE: To remove and/or install new filters, please see page 11.
Replacing a light bulb
If the light bulb needs replacing, proceed as follows:
- Disconnect the appliance from the power supply.
- Slide out the front panel for easier access and remove the two aluminium mesh filters (Fig. 18 and Fig. 19).
- Remove the light by pulling it from the ragehood body (Fig. 20) and disconnect the connector to the light.
- Replace the bulb with one of the same type (self-ballasted LED module, 100 V - 240 V, 33.2 x 120 mm) and wattage (max. 1.5 W), as illustrated (Fig. 20). Ensure the cable is connected correctly.
- Replace the metal filters.

natural_image
Technical line drawing of a device interior with internal components and external compartments (no text or symbols)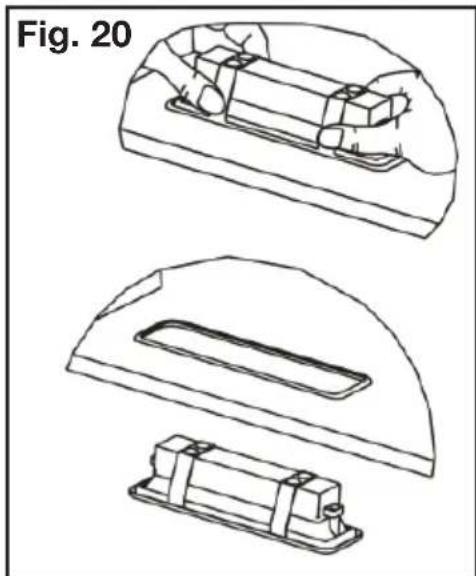
natural_image
Technical line drawings of a mechanical component, showing cross-sectional and top views (no text or symbols)Other Useful Information (Cont.)
Service, repair and spare parts
If the appliance is damaged, do not attempt to repair it yourself. If it requires repair or service, please contact our after sales support centre to arrange for examination and repair.
Our after sales support centre stocks a range of spare parts for the appliance. For more information, or to purchase a spare part, contact the centre using the details at the bottom of the page.
Technical specifications
| Rated voltage / frequency 220–240 V~ / 50 Hz |
| Rated power 211.5 W |
| Dimensions (closed) (mm) 175 (H) x 595 (W) x 280 (D) |
| Extended depth (mm) 415 |
| Height of front panel (mm) 43 |
| Weight (approx.) 9.05 kg |
| Motor Input power 210 W |
| Lamp power 1.5 W |
| Filters 2 Aluminium mesh filters |
Compliance
This appliance has been fully tested and meets all requirements as set out by standards AS/NZS 60335.1 and AS/NZS 60335.2.31.

The RCM Mark (Regulatory Compliance Mark) indicates that the product complies with the relevant guidelines of the ACMA as well as corresponding government requirements for the safety of electrical devices.
Other Useful Information (Cont.)
Responsible disposal


Packaging materials are recyclable. Please dispose of them responsibly for recycling.
At the end of its working life, do not throw this appliance out with your household waste. Electrical and electronic products contain substances that can have a detrimental effect on the environment and human health if disposed of inappropriately. Observe any local regulations regarding the disposal of electrical consumer goods and dispose of it appropriately for recycling.
Contact your local authorities for advice on recycling facilities in your area. Or find recycling scheme services listed on Planet Ark's website at www.recyclingnearyou.com.au, or call Planet Ark on 1300 733 712.
Other Useful Information (Cont.)
Licensed installer/electrician details
We recommend that you ask your licensed installer/electrician to fill in the details below so you have them on record should you need to contact the installer in the future.
Please fill in the details below:
Name of licensed installer: ....
Licence number: ....
Date of installation: ....
Signature: ....
This page has been left blank intentionally.
Warranty returns
Should you for any reason need to return this product for a warranty claim, make sure to include all accessories with the product.
Product does not work?
If you encounter problems with this product, or if it fails to perform to your expectations, make sure to contact our After Sales Support Centre on (AU) 1300 886 649 or (NZ) 0800 836 761 for advice.
Distributed by Tempo (Aust) Pty Ltd ABN 70 106 100 252
PO BOX 132, Frenchs Forest NSW 1640, Australia
Customer Helpline:
(AU) 1300 886 649 (NZ) 0800 836 761
Web Support: tempo.org/support
For an electronic copy of this manual, please contact our after sales support centre.
IM Version No: V1.1
Issue: January 2022

- cm Slideout Rangehood
- INSTRUCTION MANUAL
- Contents
- General Safety Instructions (Cont.)
- IMPORTANT SAFETY INSTRUCTIONS READ CAREFULLY AND KEEP FOR FUTURE REFERENCE
- Important installation precautions
- Electrical safety and usage conditions
- Product Overview
- Installation
- Unpacking
- Installation kit
- Installation (Cont.)
- Important installation advice
- WARNING!
- Product dimensions:
- Installation height
- Venting options
- Outdoor ducting mode
- Recirculating mode
- Charcoal filters
- Removing and installing charcoal filters
- Installing the rangehood
- Method 1: Top-mounting this appliance
- Method 2: Back-mounting this appliance
- Installation Notes:
- Instructions
- Switching on/off
- Operation
- FAQs & Troubleshooting Guide
- Other Useful Information
- Cleaning and maintenance
- CAUTION!
- Cleaning the rangehood exterior
- Cleaning the filters
- Other Useful Information (Cont.)
- Replacing a light bulb
- Service, repair and spare parts
- Compliance
- Responsible disposal
- Licensed installer/electrician details
- Warranty returns
- Product does not work?
Brand : HOOVER
Model : HV-C60RS
Category : Range hood