
KADPFR10WDA - Digital photo frame Kogan - Free user manual and instructions
Find the device manual for free KADPFR10WDA Kogan in PDF.


| Product Type | Digital Photo Frame |
| Brand | Kogan |
| Model | KADPFR10WDA |
| Display Size | 10.1 inches |
| Display Resolution | 1024 x 600 pixels |
| Supported Memory Cards | SD, SDHC, MMC |
| Internal Storage | N/A (relies on external media) |
| Connectivity | Wi-Fi, USB 2.0 |
| Power Supply | DC 5V, 2A (adapter included) |
| Dimensions (with stand) | Approx. 260 x 180 x 25 mm |
| Weight | Approx. 450 g |
| Supported Image Formats | JPEG, BMP, PNG |
| Supported Video Formats | MPEG-4, AVI, MOV |
| Clock & Calendar | Yes, with multiple display modes |
| Slideshow Effects | Fade, slide, zoom, random |
| Remote Control | Yes, included |
| Wall Mountable | Yes (VESA compatible) |
| Operating Temperature | 0°C to 40°C |
| Warranty | 1 year limited |
Frequently Asked Questions - KADPFR10WDA Kogan
User questions about KADPFR10WDA Kogan
0 question about this device. Answer the ones you know or ask your own.
Ask a new question about this device
Download the instructions for your Digital photo frame in PDF format for free! Find your manual KADPFR10WDA - Kogan and take your electronic device back in hand. On this page are published all the documents necessary for the use of your device. KADPFR10WDA by Kogan.
USER MANUAL KADPFR10WDA Kogan
natural_image
Black-framed photo of an elderly couple smiling outdoors, framed in a dark frame (no text or symbols visible)DIGITAL PHOTO FRAME
10.1" TOUCHSCREEN (WOOD)
KADPFR10WDA
SAFETY & WARNINGS
- Read all the instructions in this user guide carefully before using this product. Retain the user guide for future reference. If you pass the unit onto a third party, ensure to include this user guide.
- If this product or its power cord shows any sign of damage, cease use immediately and contact help.Kogan.com for support.
- This product must be placed on a flat stable surface and not subjected to vibrations. Alternatively, the frame can be mounted to a wall using the mounting holes.
- Do not place the product on sloping or unstable surfaces as the unit may fall or tip over.
- Ensure this product is placed near an electrical outlet.
- This product is designed for indoor use only.
- Avoid exposing this product to extreme temperatures.
- Ensure this product is kept away from sources of heat such as radiators or gas/electric fires.
- Avoid exposure to direct sunlight.
- Do not place lit candles or naked flame on the top of or near this product.
- To reduce the risk of fire, electric shock, or product damage, do not expose this product to water or humid environments.
- Do not place objects filled with liquids, such as vases on or near this product.
- Children should be supervised to ensure that they do not play with this product.
- This product does not contain any user-serviceable parts. Do not disassemble or modify this product in any way.
- The supplied power adapter requires 5V/2A to charge the photo frame. Please refrain from using any third-party adapters to charge the tablet.
COMPONENTS
- Digital photo frame
- Kickstand
- Power adapter
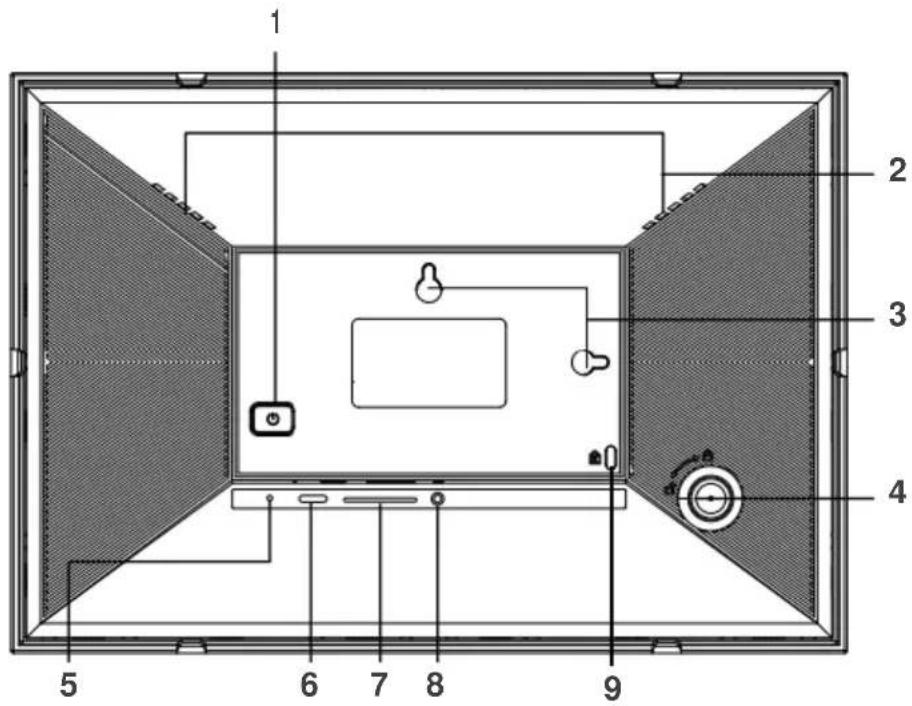
1 Power button 6 USB-C port
2 Speakers 7 MicroSD card slot
3 Mounting hole (x2) 8 Power input
4 Stand insert 9 Anti-theft hole (not used for operation)
5 Reset button
| Power Button | After connecting the power adapter, the device system automatically starts up by default.Press and hold power button 3 seconds to access reboot or power off menu.Short press on power button will turn off/ on screen (but leave the photo frame in on position). |
| Reset | Use a needle or paper clip to reset unit. |
| USB-C Port | You can copy photos from the unit to the USB stick.Note: The USB port is just for data transfer, not for charging. |
| MicroSD Slot | Insert a Micro SD (TF) Card to import photos to the photo frame. |
| DC IN | Connect power adapter to power on the device. |
ASSEMBLY
Installing the Kickstand
Lay the frame face down on a flat surface and align the stand with the stand insert.

Wall Mounting
The rear of the photo frame has two mounting holes which can be used to mount the frame to a wall using a screw (not supplied).
OPERATION
Connecting to Power
- Connect the power adapter to the power input on the frame and then plug it into an electrical outlet.
- Press and hold the power button on the rear of the frame until the frame turns on.
Initial Setup
When using this digital photo frame for the first time, you will need to set up the following:
- Select your desired language.
- Connect the frame to your Wi-Fi network.
- Set the date and time.
- You may be asked to update the frame to the latest firmware version. Note: if prompted, it is highly recommended to update the firmware before continuing.
- Enter your name and the location where you have placed the frame e.g. "John Doe" and "Living room", "Kitchen" or "Office".
Download the Frameo app
- To send photos to your frame, you will need to download the Frameo app on your phone.
- Find the Frameo app by scanning the code below or by searching for "Frameo" on the Google Play Store (android) or the App Store (iOS).

natural_image
Abstract logo design with red and white stylized shapes (no text or symbols)
Connecting your Phone to the Frame
- Once you have downloaded and installed the Frameo app.
- On the digital frame, click the “+” icon. A dialog box will appear showing a connection code. Note: This only code is valid for 12 hours.

natural_image
Illustration of a hand holding a smartphone displaying a red arrow icon with a downward arrow, symbolizing download or download (no text or symbols present)
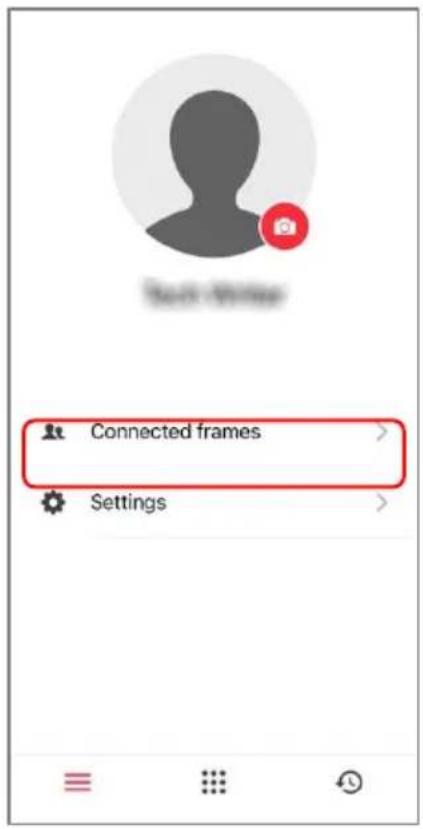
- In the Frame app, tap "Connected frames".
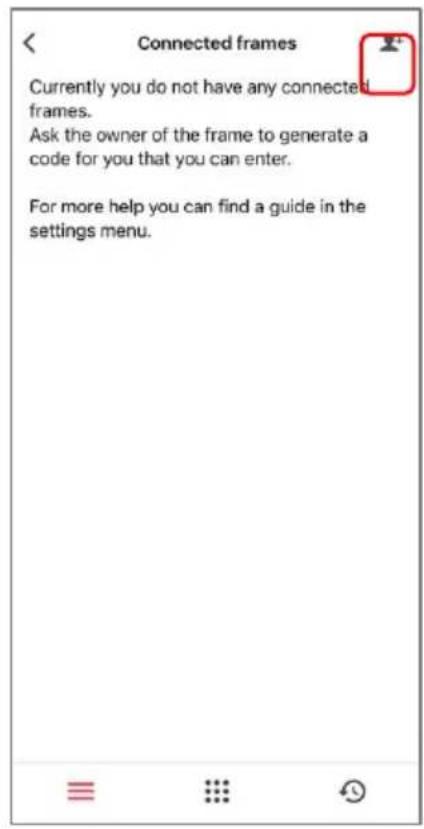
- Tap the “+” icon in the upper right corner.
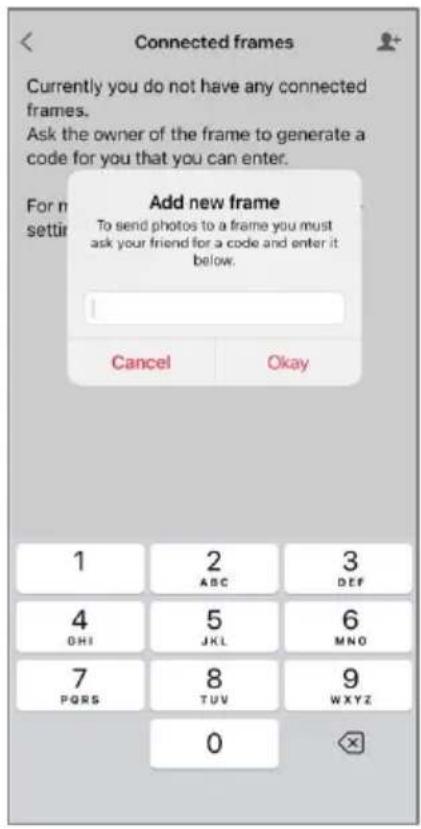
- Okayer the code shown on the digital frame and tap " .
- The digital frame and the Frameo app will commence pairing.
- Once paired, you can now send photos to your frame, using the Frameo app.
Sending Photos to the Frame
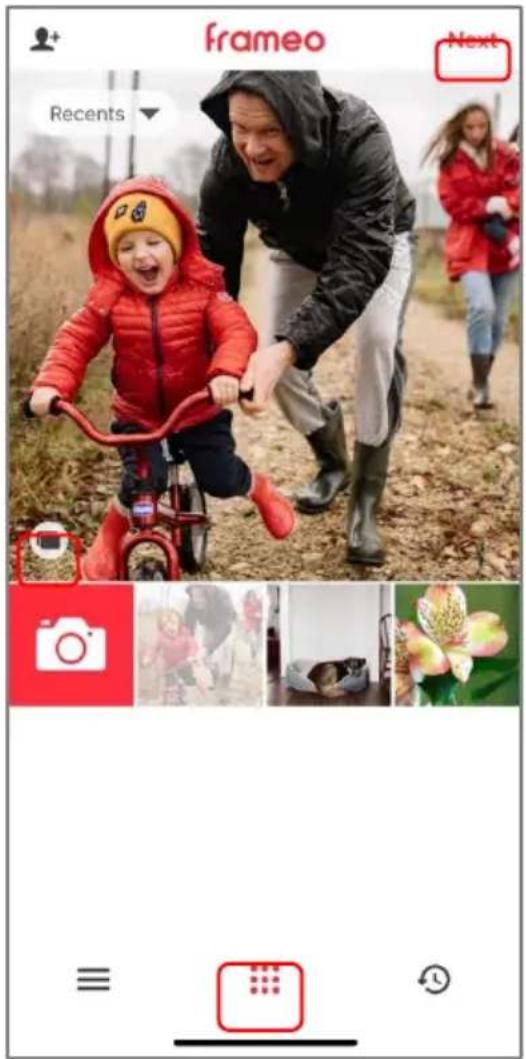
- In the Frameo app, open the gallery by tapping the “■” icon.
- Tap the camera icon to take a new photo or select one of the photos saved in your phones memory and tap "Next".
Note: You may need to go into your phone's settings to ensure you have allowed photo sharing access to the Frameo app.
Note: To select multiple photos, first tap the “☐” then select the photos you wish to send.
- Nextect the frame(s) you wish to send the photo to and tap " .

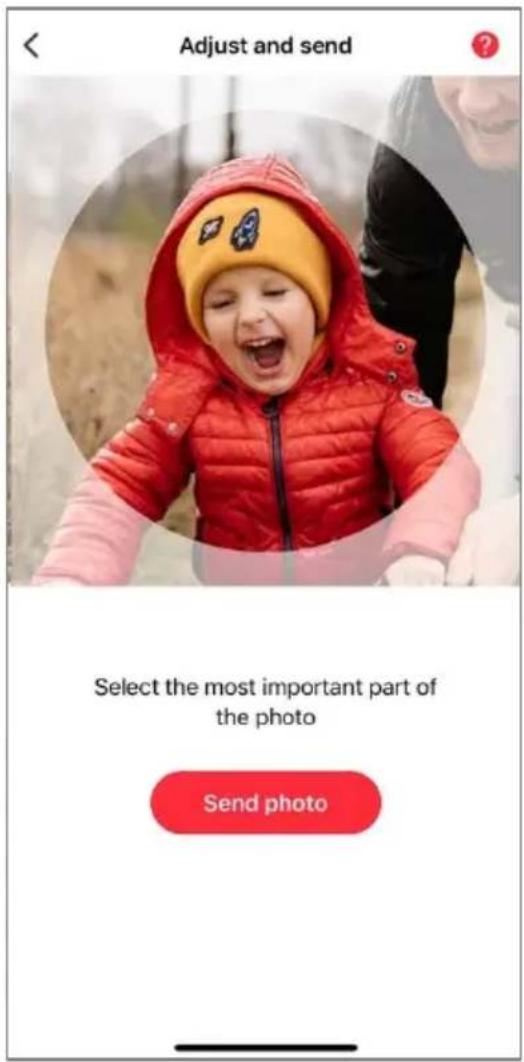
- Write a Nexttion for your photo (this step is optional) and tap "”.
- Send photo focal point of your photo and then tap "”.
- You will get a notification on your frame that a new photo has been received. Tap the notification to view the new photo.

Navigating Photos
- Swipe left or right to go through your photos.
- Without any user input, the photos will cycle through as a slideshow.
- To access the menu, tap once on the screen.
Menu

1 Add friend 5 Hide photo
2 Settings 6 Gallery
3 Power 7 Fit to frame/ Fill frame
4 Reacts 8 Adjust photo
- Add friend: Generates a code that you can share with friends and family so they can connect and shares photos to your frame.
- Settings: Opens the Settings menu.
- Power menu: Opens the Power menu.
- React: Opens the React menu.
Note:
The React menu can also be accessed by double-tapping on the screen.
-
Hide photo: Hides the current photo. The photo will no longer be shown in the slideshow. If needed the photo can be un-hidden through the settings menu.
-
Gallery: Opens the gallery which allows for easy and fast navigation through your photo collection.
-
Fill frame/ Fit to frame: Toggles how the photo is displayed.
- The Fill frame option is the default. The photo is scaled so that it fills the entire screen. It will be centred around what is selected as the most important part. - Fit to frame will ensure that the entire photo is displayed on the screen.

natural_image
Close-up of a bowl of watermelon with a spoon, next to a cut of watermelon (no text or symbols visible)Fill frame

natural_image
Close-up of a halved watermelon cut with a spoon, against a cloudy sky background (no text or symbols visible)Fit to frame
- Adjust photo: Allows you to adjust the position of the photo in the frame for an even better fit.
The rotate tool can be used to rotate the orientation of the selected image. Use the edit tool to change the caption on the imported photo. Note: Photos received from other users will need to be edited by the sender using the Frameo app.
Video Playback
When a video is shown two additional controls are available.
 | Play/ Pause | Start/ stop video playback. |
 | Volume control | Opens the volume slider to adjust the volume level.With the volume slider open:Pressing will mute the video.Pressing will unmute the video. |
Power Menu
On the main menu, tap the power icon "o access the power menu.
 | Power | Turn the frame off. |
 | Restart | Restarts the frame. |
 | Sleep | Places the frame in sleep mode. To bring the frame out of sleep mode, press the power button on the rear of the frame. |
Note:
When turning the frame off, always use either the power button on the rear of the frame or in the power menu. Never disconnect power when the frame is running.
React Menu
Tap one of the four reactions "like, laugh, surprised & sad". This will send a notification to the sender's phone to let them know how you feel about the photo.




Settings
Use the settings menu to personalise your frame to your needs.
1. My frame
Frame name: Changes the name of your frame. This is also the name that connected users will see in their list of connected frames in the Frameo app.
Frame location: Changes the location of your frame. This is the location displayed on your friends' and family's list of connected frames which can help to distinguish frames from each other.
- Set language: Sets the language used on the frame.
- Date: Sets the date used on the frame.
Time: Sets the time used on the frame. Note: The frame will automatically try to set the correct date and time once connected to the internet.
- Time zone: Sets the time zone used on the frame.
○ Enable/ Disable 24-hour format: Enables and disables, 24-hour time format.
2. Manage photos
In the manage photos menu you can see how many photos are stored on your frame and the amount of storage they use. You can also view the amount of storage left available on your device for storing new photos.
○ Show/ hide photos: Select which photos to hide by tapping them. Hidden photos will not be deleted from your frame and you can always select them to be shown again.
Tap ☐ to hide or show all photos.
Delete photos: Select photos that you wish to permanently delete from your frame by tapping the photo.
Tap ☐ to select or deselect all then confirm by tapping the delete icon (☐).
- Import photos: Allows you to import photos from a microSD card. Note: Before trying to import photos, ensure you have a microSD card inserted into your frame with the photos you wish to import.
○ Start by selecting the photos that you want to import onto your frame. Once selected tap the import button ↓ to start the import process.
- Tap ☐ to select or deselect all the photos on the microSD card.
- Tap to sort the order of the photos being imported then tap to sort order by ascending/descending
- Export photos: Allows you to export photos from the frame to the microSD card. The export function will export all photos on the frame as well as any user profile pictures.
3. My friends
Lists all the connected users that have access to send photos to your frame.
Change options for a friend: Click the options icon to open the friend options menu. From here you can allow/deny if a friend may share the code to the frame. If this is enabled, the user can retrieve and share the code to the frame using the Frameo app.
From the options menu you can also delete a user, by pressing the "DELETE FRIEND" button. This will remove the user from the list and thereby remove their permission to send photos to the frame. You will be asked to confirm the removal and if you would like to remove all photos previously received from this user.
- Add person: To allow a new user to send photos to your frame, tap the add friend button + and share the code with the new user.
4. Display
- Brightness level: Adjusts the brightness level of the screen.
- Sleep mode: This frame features a sleep mode which turns off the screen to reduce power consumption. By default, the screen will turn off at 23:00 and then turn back on again at 07:00. To change this just set the sleep mode start/end time.
Note: During sleep mode, your frame is not powered down or in standby, so you are still able to receive photos.
5. Slideshow
Timer: Set the duration that a photo should be displayed before showing the next photo.
- Show caption: Set whether or not to display the captions that other users have sent with the photo. Check to display captions. Uncheck to hide captions.
Fill frame: Set the default frame photo setting. Check to set default to fill which makes the photos fit the device screen according to the most important part of the photo. Uncheck to make the photo fit inside the screen of the device, adding background bars on the sides or top/bottom.
Frame background: Select from several different frame background options to be shown as bars if the photo does not fill the screen.
○ Photo display order: Sets if photos are displayed newest to oldest or oldest to newest.
- By date taken: Photos are shown in order of when it was taken.
By date received: Photos are shown in order of when it was received. - Shuffle: Photos are shuffled and shown in a random order.
Reverse photo display order: Sets if photos are displayed newest to oldest or oldest to newest.
○ Autoplay: Enables/disables autoplay of videos in the slideshow. Videos can always be manually started regardless of this setting.
○ Video playback: Determines how videos are played when autoplay is enabled.
- Loop videos: The video will loop until the slideshow timer is up.
■ Play once: The video will play once and show its thumbnail until the timer is up.
■ Play once and continue: The video will play once and continue to the next photo or video, once it completes.
○ Auto mute: Enable to automatically mute the video volume after a short period of time of not interacting with the frame.
○ Video volume: Adjust the volume level for video on the frames.
6. Wi-Fi
Set which Wi-Fi network the frame connects to. If you are connecting to a network with a captive portal, the connection status will say that Wi-Fi login is required and show displays this icon 📋. Tap the icon to open a login screen where you can enter your login details to access the network.
○ Wi-Fi details: Tap to ⓘ display details about the connected Wi-Fi.
Reset Wi-Fi: Tap : to delete all Wi-Fi information and restart your frame.
7. Notifications
○ Show notifications: Enables/disables whether notifications are shown in the slideshow (e.g. when a new photo is received).
- Notification volume: Adjust the volume level for notifications.
○ Storage space: Enables/disables notifications shown when frame storage is low.
- Backup: Enables/disables notifications shown if automatic backup has failed.
- Network connection: Enables/disables notifications showing network connection status.
- New photos: Enables/disables notifications shown when receiving new photos.
New friends: Enables/disables notifications shown when new users are added.
- Software update: Enables/disables notifications shown when a software update has been installed.
Feature news: Enables/disables notifications shown when new features are added.
- Date and time: Enables/disables notifications shown if time or date is not set correctly.
8. Backup and Restore
- Backup frame to external storage (microSD card): Tap to make a backup of your photos, users and settings. The time of the latest successful backup is also displayed here.
WARNING: Any existing backup on the external storage will be overridden!
○ Automatic backup: If selected, your frame will automatically make a backup within 30 hours of receiving new photos or making changes to your frame.
Restore from backup: Before you attempt to restore your frame, start by confirming that your backup is up to date. This is done by confirming the date under "Backup frame to external storage (microSD card)". If the last backup is too old or if no backup is made, then press the "Backup frame to external storage (e.g. microSD card)" button to make a new backup.
Note: To keep both the old and the new frame operational at the same time after restoring from backup, please make sure that both frames are updated to the latest version beforehand.
If you wish to restore a backup on a frame that has already been setup, then you must first reset the frame. This is done by pressing the "Reset frame" button. This will delete all data on the Frame and reset the to its setup screen.
On the setup screen you can select the "Restore from backup" button which will restore your frame according to the backup.
If the "Restore from backup" button isn't visible, then confirm that the microSD card is correctly inserted.
Reset frame: Removes all data from your frame. This will permanently remove all your photos, users, network connections and settings.
9. Help
Open source libraries: Opens a list of open source libraries used in the app and their licenses.
Share anonymous analytics data: Sharing anonymous analytics data helps improve the Frameo software. If you do not wish to share this dat. Keep it checked if you wish to help us improve Frameo. Set unchecked to deny the sharing of anonymous analytics data.
- Guide: Opens the quick start guide, that was shown when the frame was first started.
10. About
Frameo version: Shows what version of the software is currently installed on your frame.
○ Android version: See what version of Android that is installed on the frame.
- Peer ID: This is a unique ID for your photo frame.
- MAC: Shows the MAC address of your frame.
- Up time: Shows how long the photo frame has been powered on.
- Check for update: Check if an update is available for your frame.
Beta program: If checked the device will join the Beta program where it will receive updates more frequently and before normal release devices.
Share photos
Along with the Frameo app you can also share photos/videos using a PC, an external USB storage device and via an Micro SD card.
Note: When the USB drive is inserted into the iProda photo frame, it will be recognized as an "SD card". If both the Micro SD card and USB drive are inserted, the frame can recognize both the Micro SD (TF) card and USB drive.

flowchart
graph TD
    A["Frameo App"] --> B["PC"]
    B --> C["External Storage"]
    C --> D["Micro SD (TF) Card"]
    D --> E["Display Frame"]
    style A fill:#f9f,stroke:#333
    style B fill:#ccf,stroke:#333
    style C fill:#cfc,stroke:#333
    style D fill:#fcc,stroke:#333
    style E fill:#ffc,stroke:#333
SPECIFICATIONS
| Power adaptor | Adaptor Input: AC 100-240V, 50/60HzAdaptor Output: 5V,2A |
| Operating system | Android 6.0 |
| CPU | Rock chip 3126C |
| RAM | 1 GB DDR3 |
| Internal storage | 16GB EMMC |
| External storage | Micro SD/ USB supports up to 32G |
| Display | 10.1" LCD 1280x800 IPS |
| Touch Panel | 5 Point Capacitive touch screens |
| Wi-Fi | 802.11 b/g/n |
| Picture format | JPEG, PNG |
| Dimensions | 265 x 185 x 23mm |
| Weight | 510g |
NOTES
Need more information?
We hope that this user guide has given you the assistance needed for a simple set-up.
For the most up-to-date guide for your product, as well as any additional assistance you may require, head online to help.kogan.com
kogan.com

- DIGITAL PHOTO FRAME
- SAFETY & WARNINGS
- COMPONENTS
- ASSEMBLY
- Installing the Kickstand
- Wall Mounting
- OPERATION
- Connecting to Power
- Initial Setup
- Download the Frameo app
- Connecting your Phone to the Frame
- Sending Photos to the Frame
- Navigating Photos
- Menu
- Note:
- Video Playback
- Power Menu
- React Menu
- Settings
- My frame
- Manage photos
- My friends
- Display
- Slideshow
- Wi-Fi
- Notifications
- Backup and Restore
- WARNING: Any existing backup on the external storage will be overridden!
- Help
- About
- Share photos
- SPECIFICATIONS
- NOTES
- Need more information?
Brand : Kogan
Model : KADPFR10WDA
Category : Digital photo frame