
VX2407-7 - Screen VIEWSONIC - Free user manual and instructions
Find the device manual for free VX2407-7 VIEWSONIC in PDF.


| Product Type | Monitor |
| Brand | Viewsonic |
| Model | VX2407-7 |
| Screen Size | 24 inches |
| Resolution | 1920 x 1080 (Full HD) |
| Refresh Rate | 75 Hz |
| Panel Type | IPS |
| Aspect Ratio | 16:9 |
| Brightness | 250 cd/m² |
| Contrast Ratio | 1000:1 (typical) |
| Response Time | 5 ms (GTG) |
| Viewing Angles | 178° horizontal / 178° vertical |
| Connectivity | HDMI, DisplayPort, VGA |
| Power Consumption | 25 W (typical), <0.5 W (standby) |
| Weight (with stand) | 4.5 kg |
| Dimensions (WxHxD) | 540 x 410 x 180 mm |
| VESA Mount | 100 x 100 mm |
| Special Features | Blue Light Filter, Flicker-Free, Game Mode |
| Accessories Included | Power cable, HDMI cable, Quick Start Guide |
| Cleaning Instructions | Use a soft, dry cloth. Do not apply liquid cleaners directly. |
| Safety Precautions | Do not open the monitor casing. Use only the provided power adapter. |
| Spare Parts / Repairability | Contact Viewsonic support for service options. No user-serviceable parts. |
| Warranty | 3-year limited warranty |
Frequently Asked Questions - VX2407-7 VIEWSONIC
User questions about VX2407-7 VIEWSONIC
0 question about this device. Answer the ones you know or ask your own.
Ask a new question about this device
Download the instructions for your Screen in PDF format for free! Find your manual VX2407-7 - VIEWSONIC and take your electronic device back in hand. On this page are published all the documents necessary for the use of your device. VX2407-7 by VIEWSONIC.
USER MANUAL VX2407-7 VIEWSONIC
IMPORTANT: Please read this User Guide to obtain important information on installing and using your product in a safe manner, as well as registering your product for future service. Warranty information contained in this User Guide will describe your limited coverage from ViewSonic® Corporation, which is also found on our web site at http://www.viewsonic.com in English, or in specific languages using the Regional selection box in the upper right corner of our website.
Model No. VS19081
P/N: VX2407-7
Thank you for choosing ViewSonic®
As a world-leading provider of visual solutions, ViewSonic® is dedicated to exceeding the world's expectations for technological evolution, innovation, and simplicity. At ViewSonic®, we believe that our products have the potential to make a positive impact in the world, and we are confident that the ViewSonic® product you have chosen will serve you well.
Once again, thank you for choosing ViewSonic®!
Safety Precautions
Please read these instructions completely before using the device.
- Keep these instructions in a safe place for later reference.
- Read all warnings and follow all instructions.
- Sit at least 18" / 45 cm from the device.
- When installing the device, please leave 4" / 10 cm of open space around the device for ventilation safety purposes.
• Always handle the device with care when moving it.
- Always use cabinets or stands or installation methods recommended by the manufacturer of the device.
• Always use furniture that can safely support the device.
- Always ensure the device is not overhanging the edge of the supporting furniture.
- Do not place the device where children are likely to be present.
- Always educate children about the dangers of climbing on furniture to reach the device or related equipment.
- Always route and manage cords and cables connected to your device so they cannot be tripped over, pulled, or grabbed.
- Exercise caution when removing the rear cover of the device. This device contains high-voltage parts.
- Do not use this device near water. To reduce the risk of fire or electric shock, do not expose the device to rain or moisture.
- Avoid exposing the device to direct sunlight or other sources of sustained heat.
- Do not install near any heat sources such as radiators, heat registers, stoves, or other devices (including amplifiers) that may increase the temperature of the device to dangerous levels.
- Clean with a soft, dry cloth. If further cleaning is required, see the "Maintenance" section in this guide for further instructions.
- Avoid touching the screen. Skin oils are difficult to remove.
- Do not touch, rub, or apply pressure to the device screen, as it may permanently damage the screen.
- Do not place the device in an unstable location.
- Do not place the device on tall furniture (for example, cupboards or bookcases) without anchoring both the furniture and the device to a suitable support.
- Do not place the device on cloth or other materials that may be located between the product and supporting furniture.
- Place the device in a well-ventilated area. Do not place anything on the device that prevents heat dissipation.
- Do not place heavy objects on the device, video cable, or power cord.
- Do not place items that might tempt children to climb, such as toys and remote controls, on the top of the device or furniture on which the product is placed.
- If smoke appears, an abnormal noise, or a strange odor is present, immediately switch the device off and contact your dealer or ViewSonic. It is dangerous to continue using the device.
- Do not attempt to circumvent the safety provisions of the polarized or grounding-type plug. A polarized plug has two blades with one wider than the other. A grounding type plug has two blades and a third grounding prong. The wide blade and the third prong are provided for your safety. If the plug does not fit into your outlet, obtain an adaptor and do not attempt to force the plug into the outlet.
- Please confirm the distribution system installed in the building. The system should provide a circuit breaker rated at 120/240V, 20A.
- When connecting to a power outlet, DO NOT remove the grounding prong. Please ensure grounding prongs are NEVER REMOVED.
- Protect the power cord from being treaded upon or pinched, particularly at the plug, and at the point where it emerges from the equipment. Be sure that the power outlet is located near the equipment so that it is easily accessible.
- Only use attachments/accessories specified by the manufacturer.
- Use only with the cart, stand, tripod, bracket, or table specified by the manufacturer, or sold with the device. When a cart is used, use with caution when moving the cart/device combination to avoid injury from tipping over.
- Unplug this device when it will be unused for long periods of time.
- Refer all servicing to qualified service personnel. Service will be required when the unit has been damaged in any way, such as: if the power-supply cord or plug is damaged, if liquid is spilled onto or objects fall into the unit, if the unit is exposed to rain or moisture, or if the unit does not operate normally or has been dropped.
- Excessive sound volume from ear-/headphones may cause hearing damage/ hearing loss.
- Adjustment of the volume control as well as the equalizer may increase the ear-/headphones output voltage and therefore, the sound volume level.
- The factors influencing the ear-/headphones output other than those specified by the manufacturer (e.g. operating system, equalizer software, firmware, driver) may increase the ear-/headphone output voltage and therefore, the sound volume level.
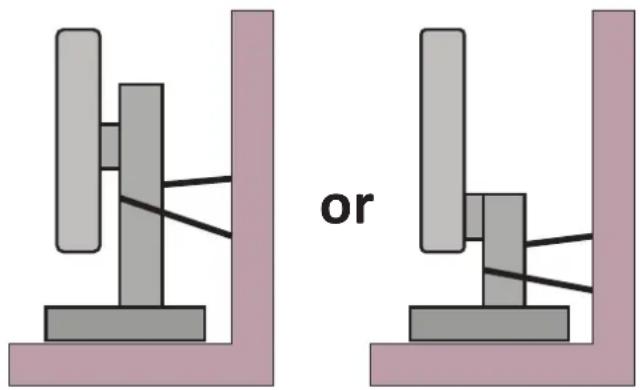
- Fastening the device to a wall or fixed object using cordage or other restraining devices can help support the weight of the monitor in order to prevent the device from falling over.
natural_image
Two identical mechanical or electrical component diagrams showing vertical supports and a diagonal line, labeled 'or' (no text or symbols on components)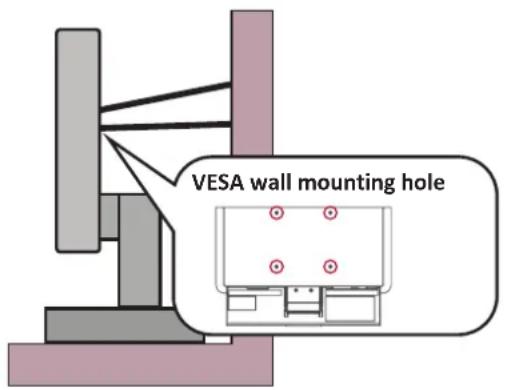
NOTE:
- Restraining device/cordage should be able to withstand 100N force.
- Make sure the cordage is straightened, and any slack is removed. The back of the device shall face the wall to ensure the device cannot tilt under external force.
- Make sure the monitor does not tilt under external force at any height and rotation angle of the device.
- If the existing device is going to be retained and relocated, the same considerations as above should be applied.
Contents
Safety Precautions....3
Contents......6
Introduction 8
Package Contents 8
Product Overview....9
Front and Rear View....9
I/O Ports 9
Initial Setup....10
Installing the Stand....10
Wall Mounting....11
Using the Security Slot....12
Making Connections....13
Connecting to Power 13
Connecting External Devices ....14
Using the Monitor 15
Adjusting the Viewing Angle....15
Tilt Angle Adjustment.... 15
Turning the Device On/Off 16
Using the Control Panel Keys....17
Quick Menu 18
Hot Keys 19
Configuring the Settings 21
General Operations....21
On-Screen Display (OSD) Menu Tree 23
Appendix....26
Specifications....26
Glossary 29
Troubleshooting 34
Maintenance....36
General Precautions.... 36
Cleaning the Screen.... 36
Cleaning the Case 36
Blue Light Filter and Eye Health....37
Calculating Breaks 37
Looking at Distant Objects 37
Eye and Neck Exercises 37
Regulatory and Service Information 38
Compliance Information....38
FCC Compliance Statement.... 38
Industry Canada Statement.... 38
CE Conformity for European Countries 38
Declaration of RoHS2 Compliance.... 39
Indian Restriction of Hazardous Substances 40
Product Disposal at End of Product Life 40
Copyright Information....41
Customer Service....42
Limited Warranty 43
Mexico Limited Warranty.... 46
Introduction
Package Contents
- Monitor
- Power cord
- Video cable
- Quick start guide
NOTE: The power cord and video cables included in your package may vary depending on your country. Please contact your local reseller for more information.
Product Overview
Front and Rear View
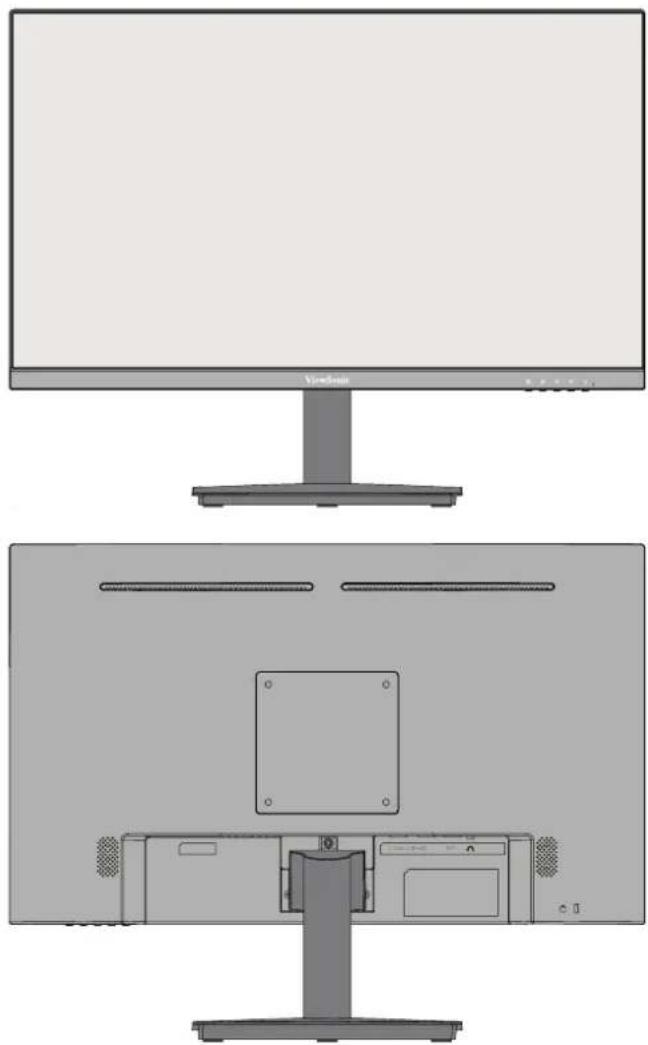
natural_image
Diagram of a desktop computer monitor setup with front and top views, showing internal components (no text or labels)I/O Ports
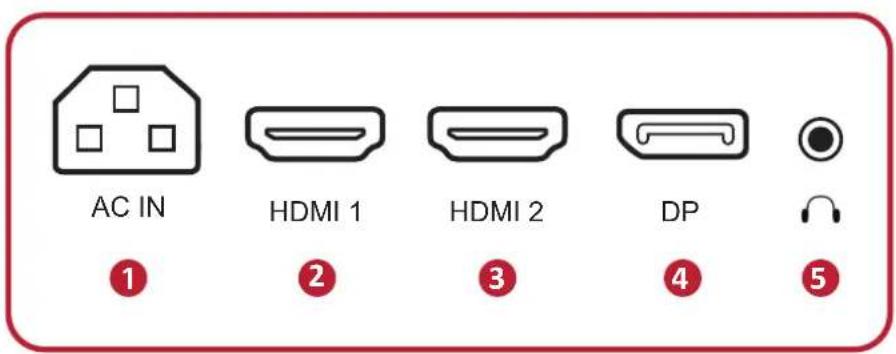
- AC IN 2. HDMI 3. HDMI
- DisplayPort 5. Audio Out
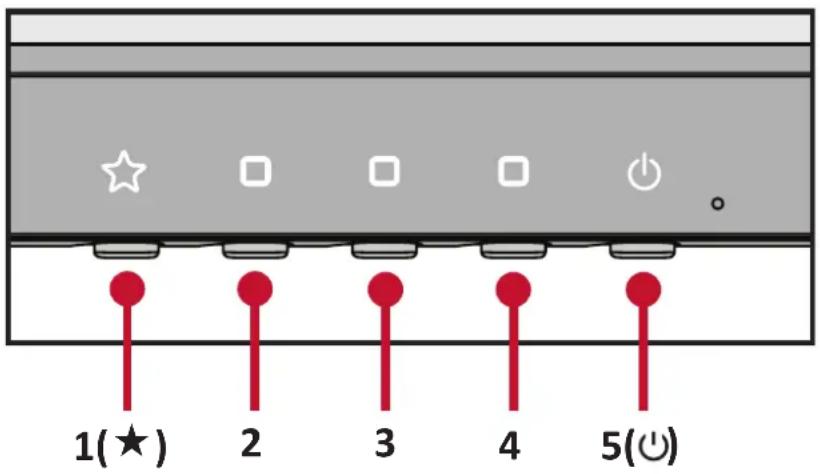
NOTE: For more information about the 1(★)/2/3/4/5(○) key and its functions, refer to "Hot Keys" on page 19.
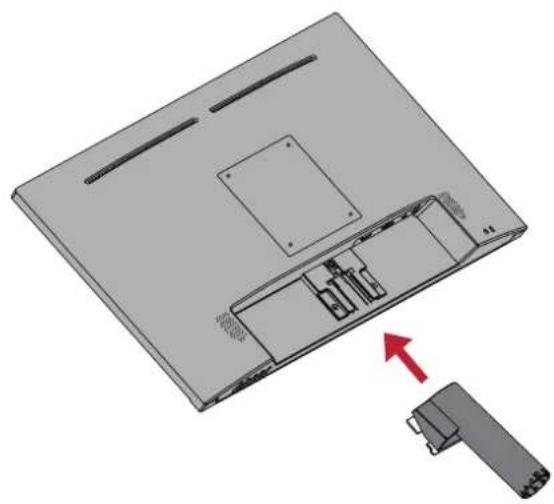
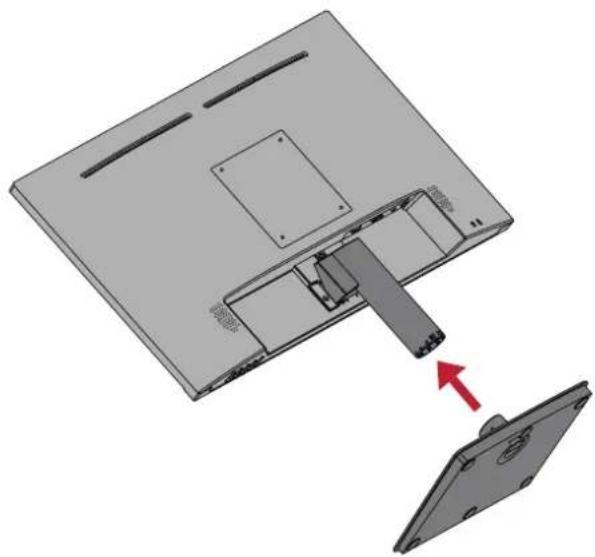
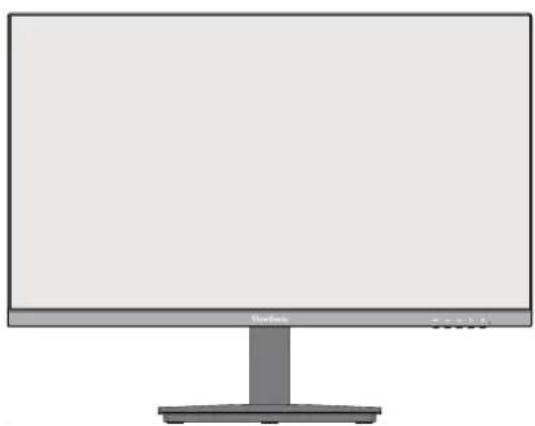
Initial Setup Installing the Stand
1
natural_image
3D diagram of a laptop chassis showing internal components and a separate connector (no text or symbols)2
natural_image
3D diagram of a computer monitor showing internal components and a separate rear panel with a red arrow indicating assembly (no text or symbols present)3
natural_image
Front view of a flat-screen computer monitor with a stand (no visible text or symbols)NOTE: Always place the device on a flat, stable surface. Failure to do so may cause the device to fall and damage the device and/or result in personal injury.
Wall Mounting
NOTE: Only use UL Certified wall mount kits.
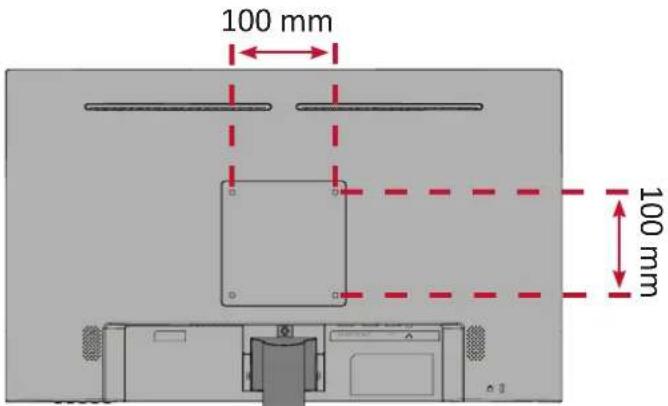
Refer to the table below for the standard dimensions for wall mount kits.
| Maximum Loading | Hole pattern (W x H) | Interface Pad (W x H x D) | Pad Hole | Screw Specification & Quantity |
| 14 kg 100 | x 100 mm 115 | x 115 x 2.6 mm ∅ 5 mm | M4 x 10 mm4 pieces |
NOTE: Wall mount kits are sold separately.
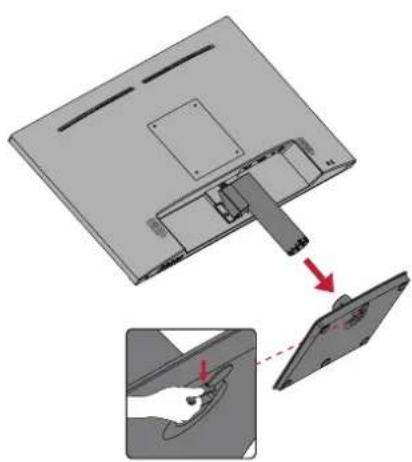
- Turn off the device and disconnect all cables.
- Place the device on a flat, stable surface with the screen facing down.
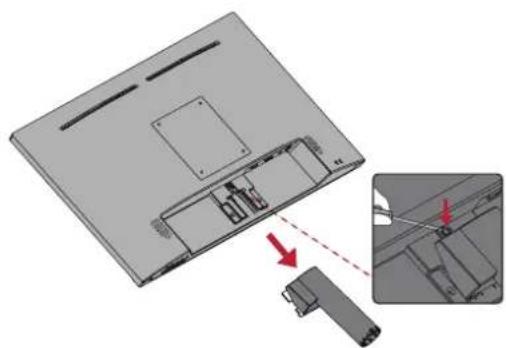
- Remove the monitor stand.
1
natural_image
Diagram showing a device with a handle and internal components, including a close-up view of the handle (no text or symbols present)2
natural_image
3D diagram of a laptop with internal components and an inset showing a close-up of the component (no text or symbols)- Attach the mounting bracket to the VESA mounting holes at the rear of the device. Then secure it with four (4) screws (M4 x 10 mm).
- Follow the instructions that come with the wall mounting kit to mount the device onto the wall.
Using the Security Slot
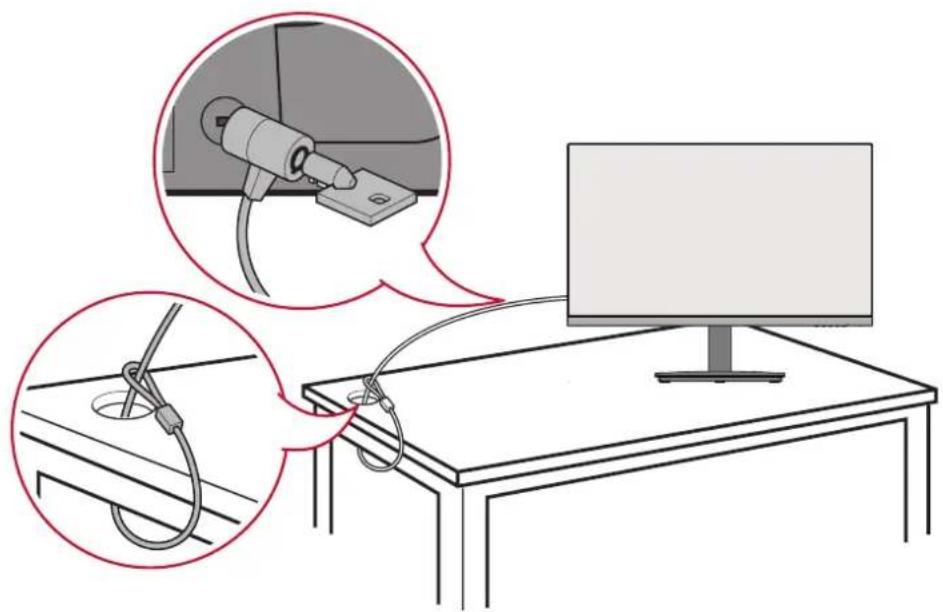
To help prevent the device from being stolen, use a security slot locking device to secure the device to a fixed object.
Additionally, fastening the monitor to a wall or fixed object using a security cable can help support the weight of the monitor in order to prevent the monitor from falling over.
Below is an example of setting up a security slot locking device on a table.
natural_image
Illustration of a computer setup with a monitor, cable cord, and cable clamp (no text or symbols)Making Connections
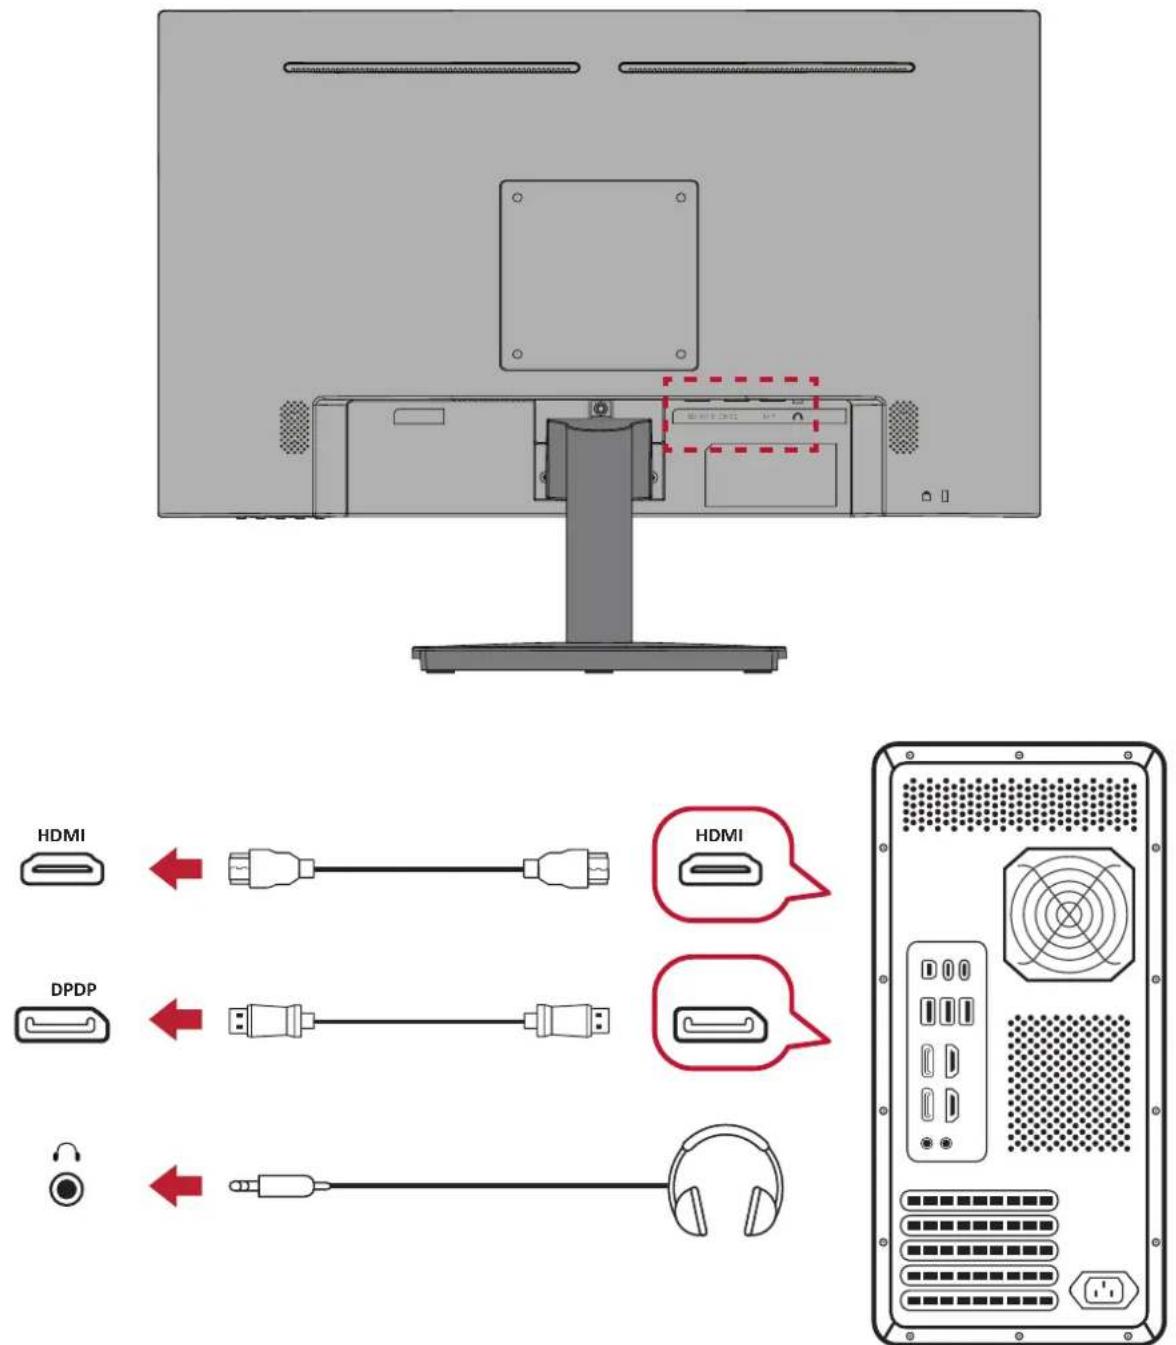
This section guides you on how to connect the monitor with other equipment.
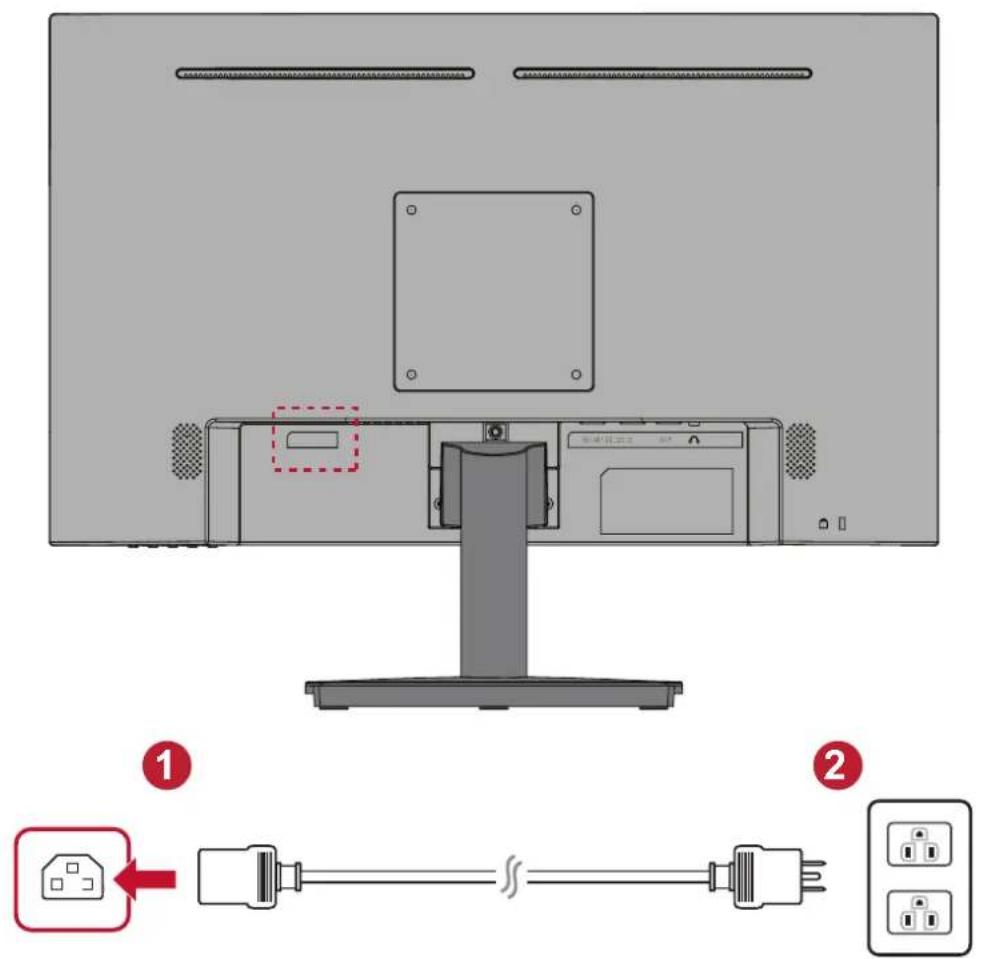
Connecting to Power
-
Connect the power cord to the AC IN jack at the rear of the device.
-
Plug the power cord into a power outlet.
Connecting External Devices
Using the Monitor
Adjusting the Viewing Angle
Tilt Angle Adjustment
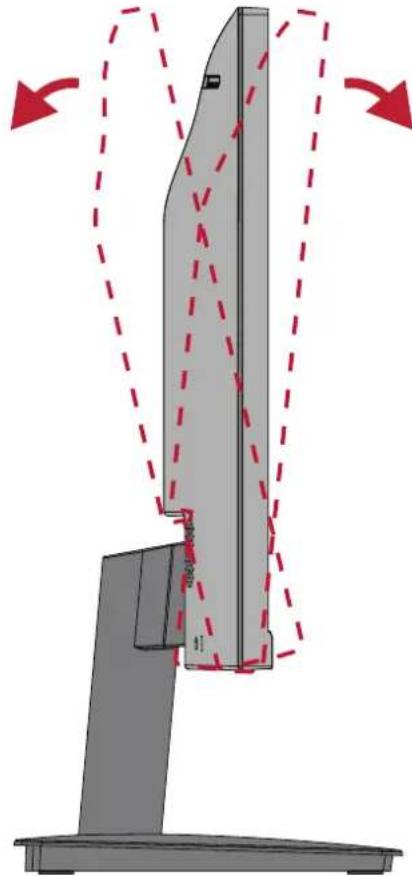
Tilt the monitor forwards or backwards to the desired viewing angle (-5° to 20°).
natural_image
Diagram of a mechanical device with red dashed arrows indicating motion or force direction (no text or symbols)NOTE: When adjusting, support the stand firmly with one hand while tilting the monitor forwards or backwards with the other hand.
Turning the Device On/Off
- Plug the power cord into a power outlet.
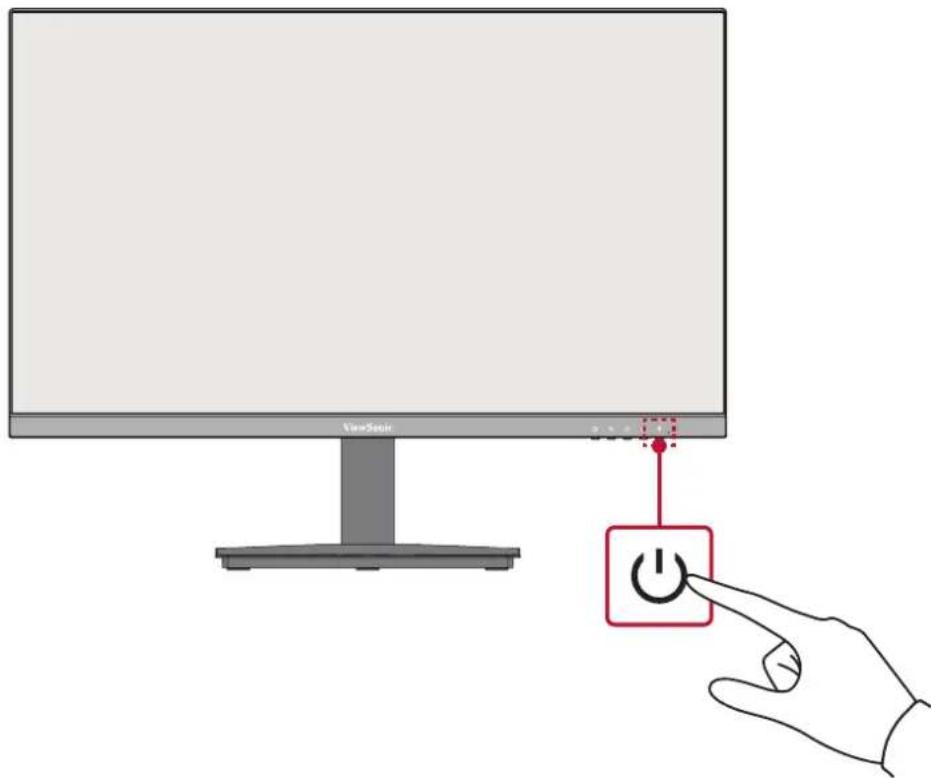
- Press the Power button to turn on the monitor.
- To turn the monitor off, press the Power button again.
NOTE: The monitor will still consume some power as long as the power cord is connected to the power outlet. If the monitor is not being used for a long period of time, please disconnect the power plug from the power outlet.
Using the Control Panel Keys
Use the control panel keys to access the Quick Menu, activate Hot Keys, navigate the On-Screen Display (OSD) Menu, and change settings.
Quick Menu
Press the 1(★) key to activate the Quick Menu.
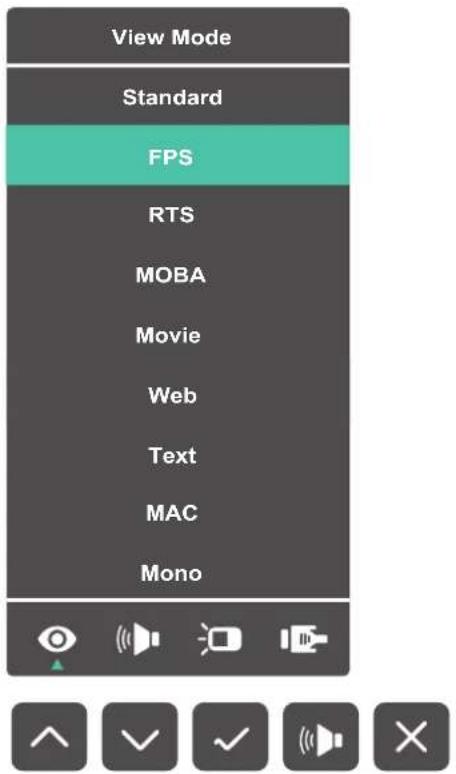
NOTE: Follow the key guide that appears on the screen to select the option or make adjustments.
| Menu Description | ||
 | ViewMode Select one of the preset color settings. | |
 | Volume Adjust the level, or mute the volume. | |
 | Contrast/Brightness Adjust the contrast or brightness level. | |
 | Input Select Select the input source. | |
 | Exit Exit the Quick Menu. | |
Hot Keys
When the On-Screen Display (OSD) Menu is off, you can quickly access special functions by using the control panel keys.
| Key Description | |
| 2 + 4 Press and hold the keys to lock/unlock the OSD Menu.When the menu appears on the screen, continue holding both keys for 10 seconds to lock/unlock the OSD Menu. | |
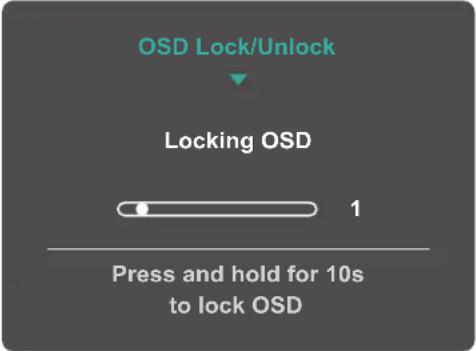 | |
| If the OSD Menu is locked, the below message will appear on the screen: | |
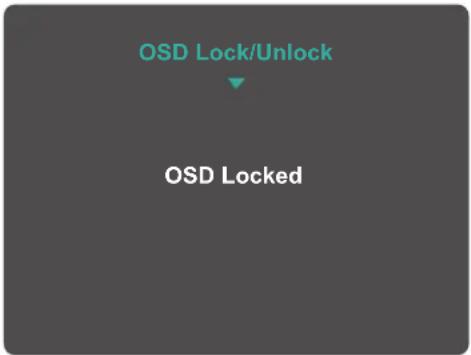 | |
| 1(★) + 2 | Press and hold the keys to lock/unlock thePowerbutton.When the menu appears on the screen, continue holding both keys for 10 seconds to lock/unlock thePowerbutton.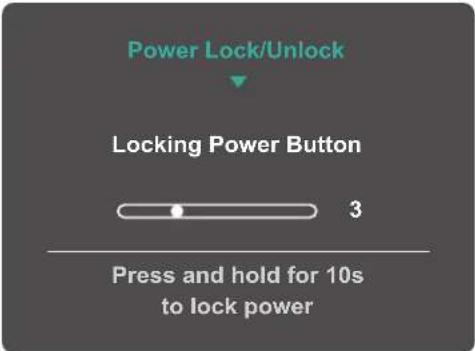 If thePowertbutton is locked, the below message will appear on the screen: If thePowertbutton is locked, the below message will appear on the screen: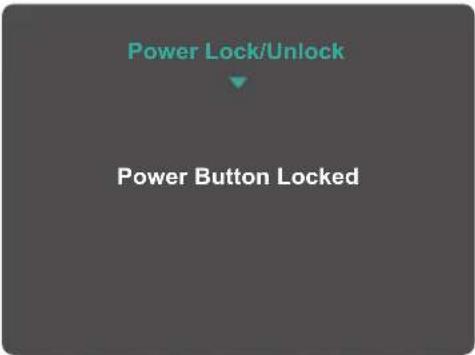 |
2 + 3 Press the keys to display/hide the boot up screen when the device is turned on.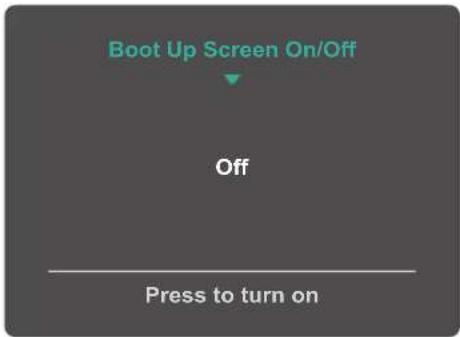 | |
Configuring the Settings General Operations
- Press the 2/3/4 key to display the On-Screen Display (OSD) Menu.
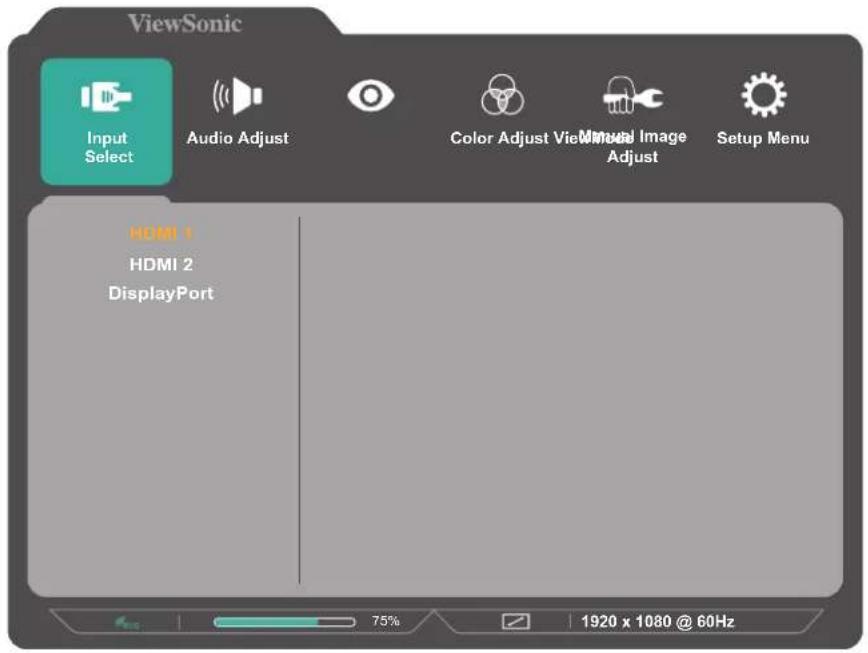
- Press the 1(★) or 2 key to select the main menu. Then press the 3 key to enter the selected menu.
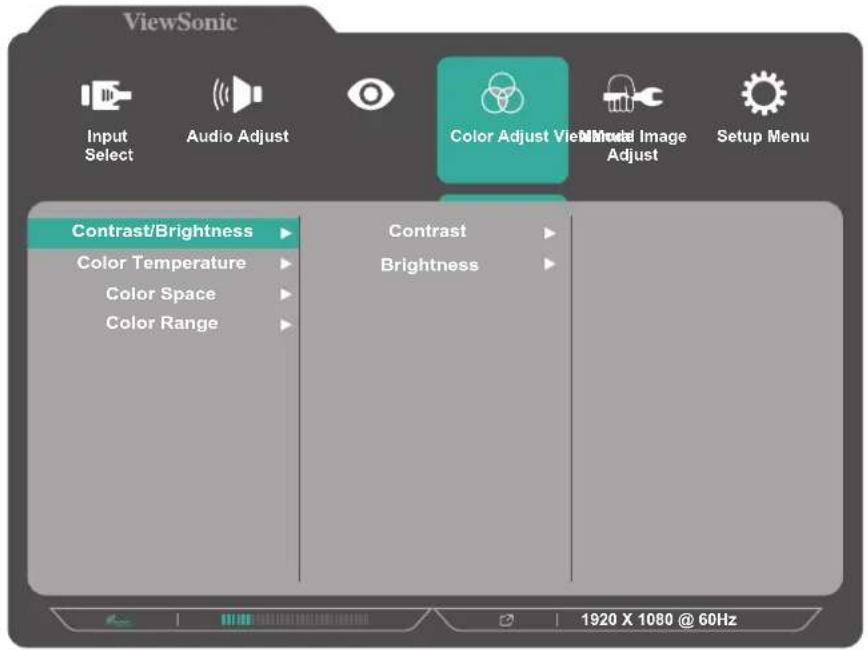
- Press the 1(★) or 2 key to select the desired menu option. Then press the 3 key to enter the sub-menu.
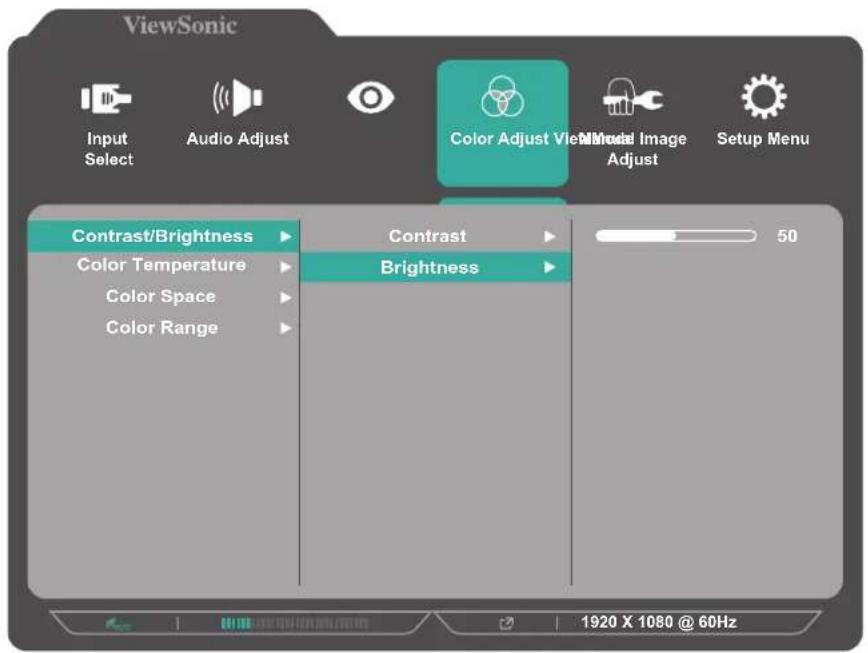
- Press the 1(★) or 2 key to adjust/select the setting. Then press the 3 key to confirm.
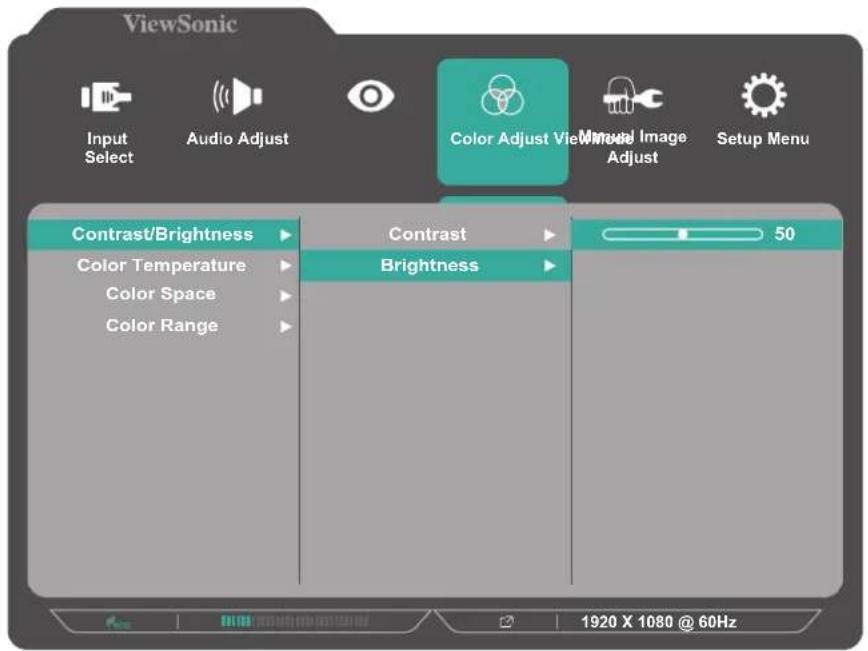
NOTE: Certain menu option adjustments do not require the user to press the 3 key to confirm the selection. Follow the key guide that appears on the bottom of the screen to select the option or make adjustments.
- Press the 4 key to return to the previous menu.
NOTE: To exit the OSD Menu, press the 5(1) key.
On-Screen Display (OSD) Menu Tree
| Main Menu Sub-menu Menu Option | ||||
| Input Select | HDMI 1 | |||
| HDMI 2 | ||||
| DisplayPort | ||||
| Audio Adjust | Volume (-/+, 0~100) | |||
| Mute | On | |||
| Off | ||||
| ViewMode | Standard | |||
| FPS | ||||
| RTS | ||||
| MOBA | ||||
| Movie | ||||
| Web | ||||
| Text | ||||
| MAC | ||||
| Mono | ||||
| Color Adjust | Contrast/Brightness | Contrast (-/+, 0~100) | ||
| Brightness (-/+, 0~100) | ||||
| ColorTemperature | sRGB | |||
| Bluish | ||||
| Cool | ||||
| Native | ||||
| Warm | ||||
| User Color | Red (-/+, 0~100) | |||
| Green (-/+, 0~100) | ||||
| Blue (-/+, 0~100) | ||||
| Color Space | Auto | |||
| RGB | ||||
| YUV | ||||
| Color Range | Auto | |||
| Full Range | ||||
| Limited Range | ||||
| Main Menu Sub-menu Menu Option | |||
| Manual Image Adjust | Sharpness (-/+, 0/25/75/100) | ||
| Blue Light Filter (-/+, 0~100) | |||
| Aspect Ratio | 1:1 | ||
| 4:3 | |||
| Fill Aspect Ratio | |||
| Full Screen | |||
| Overscan | On | ||
| Off | |||
| Black Stabilization | (-/+, 0/10/2/30/40/50/60/70/80/90/100) | ||
| Advanced DCR (-/+, 0/25/50/75/100) | |||
| Response Time | Standard | ||
| Advanced | |||
| Ultra Fast | |||
| Setup Menu | Language | English | |
| Français | |||
| Deutsch | |||
| Español | |||
| Italiano | |||
| Suomi | |||
| Svenska | |||
| Русский | |||
| Türkçe | |||
| Češka | |||
| 日本語 | |||
| 한국의 | |||
| 繁體中文 | |||
| 简体中文 | |||
| Adaptive Sync | On | ||
| Off | |||
| 1ms Mode | On | ||
| Off | |||
| Resolution Notice | On | ||
| Off | |||
| Setup Menu | Information | ||
| OSD Timeout (-/+, 5/15/30/60) | |||
| OSD Background | On | ||
| Off | |||
| Power Indicator | On | ||
| Off | |||
| Auto Power Off | On | ||
| Off | |||
| Sleep | 30 minutes | ||
| 45 minutes | |||
| 60 minutes | |||
| 120 minutes | |||
| Off | |||
| ECO Mode | Standard | ||
| Optimize | |||
| Conserve | |||
| Auto Detect | On | ||
| Off | |||
| DDC/CI | On | ||
| Off | |||
| Memory Recall | |||
Appendix
Specifications
| ItemCategory Specifications | ||
| LCD | Type | IPS, Color a-Si TFT, Active Matrix1920 x 1080 LCD;0.2745 (H)mm x 0.2745 (V)mm pixel pitch |
| Display Size 60.5 | cm (23.8” viewable) | |
| Color Filter RGB Vertical Stripe | ||
| Glass Surface Anti-Glare (Haze 25%), Hard Coating (3H) | ||
| Input Signal Video Sync | TMDS digital (100 Ω)HDMI (v. 1.4): f_h :30~180 kHz, f_v :50~144 HzDP: f_h :30~180 kHz, f_v :50~165 Hz | |
| Compatibility | PC up to 1920 x 1080 | |
| Macintosh up to 1920 x 1080 | ||
| Resolution^1 | Recommended | DP: 1920 x 1080 @ 165HzHDMI: 1920 x 1080 @ 144Hz |
| Supported | 1920 x 1080 @ 50, 60, 75, 120, 144, 165*Hz1680 x 1050 @ 60Hz1600 x 1200 @ 60Hz1600 x 900 @ 60Hz1440 x 900 @ 60, 75Hz1440 x 576 @ 50Hz1400 x 1050 @ 60, 75Hz1366 x 768 @ 60Hz1360 x 768 @ 60Hz1280 x 1024 @ 50, 60 75Hz1280 x 960 @ 50, 60, 75Hz1280 x 800 @ 60, 75Hz1280 x 768 @ 50, 60, 75Hz1280 x 720 @ 50, 60Hz1152 x 900 @ 66Hz1152 x 870 @ 75Hz1152 x 864 @ 60, 75Hz1024 x 768 @ 50, 60, 70, 72, 75Hz1024 x 600 @ 60Hz848 x 480 @ 60Hz832 x 624 @ 75Hz800 x 600 @ 56, 60, 72, 75Hz720 x 576 @ 50Hz720 x 480 @ 60Hz720 x 400 @ 70Hz640 x 480 @ 50, 60, 66, 72, 75Hz640 x 400 @ 60, 70Hz640 x 350 @ 70Hz*DP only | |
| Response^2 Time | Standard GTG Average: 7.5 ms (Typical) | |
| Advanced GTG Average: 5.0 ms (Typical) | ||
| Ultra Fast GTG Average: 3.0 ms (Typical) | ||
| Power Adapter3 | Input Voltage AC | 100-240V, 50/60Hz (auto switch) |
| Display Area Full Scan (H x V) | 527.04 x 296.46 mm(20.75" x 11.67") | |
| Operating conditions | Temperature 0°C to 40°C (32°F to 104°F) | |
| Humidity 20% to 90% (non-condensing) | ||
| Altitude 16,404 feet (5 km) | ||
| Storage conditions | Temperature -20°C to 60°C (-4°F to 140°F) | |
| Humidity 5% to 90% (non-condensing) | ||
| Altitude 40,000 feet (12.1 km) | ||
| Dimensions | Physical(W x H x D) | 539.7 x 422.5 x 189 mm(21.2" x 16.6" x 7.4") |
| Audio Speaker | 2W x 2 | |
| Wall Mount Dimensions | 100 x 100 mm | |
| Weight Physical | 3.6 kg (7.9 lbs) | |
| Power saving modes | On ^4 | 22W (Typical) without audio ^5 24W (Typical) with 50% audio ^5 |
| Off ≤ 0.3W | ||
1 Do not set the graphics card in your computer to exceed these timing modes; doing so may result in permanent damage to the display.
^2 GTG test conditions: Digital input, Brightness = 100, Contrast = 100, Color = User Color (R/G/B = 100).
^3 Please use the power adapter from ViewSonic ^® or an authorized source only.
^4 The test condition follows EEI standards.
^5 ECO Mode set to Standard.
Glossary
This section describes the standard glossary of terms used in all LCD display models. All terms are listed in alphabetical order.
NOTE: Some terms may not be applicable to your monitor.
Advanced DCR
Advanced DCR technology automatically detects the image signal and intelligently controls the backlight brightness and color to improve on the ability to make the black blacker in a dark scene, and make the white whiter in a bright environment.
Audio Adjust
Adjusts the volume, mutes the sound, or toggles between inputs if you have more than one source.
Auto Detect
If the current input source has no signal, the monitor will automatically switch to the next input option. This function, on some models, is disabled by default.
Auto Image Adjust
Automatically sizes, centers, and fine tunes the video signal to eliminate waviness and distortion.
B Black Stabilization
ViewSonic's Black Stabilization provides heightened visibility and detail by brightening dark scenes.
Blue Light Filter
Adjusts the filter that blocks high-energy blue light for a more comfortable viewing experience.
Brightness
Adjusts background black levels of the screen image.
C Color Adjust
Provides several color adjustment modes, to help adjust the color settings to fit the user's needs.
Color Range
The monitor can detect the input signal color range automatically. You can manually change the color range options to fit the correct color range if the colors are not displayed correctly.
| Options Description | |
| Auto | The monitor automatically recognizes the color format and black and white levels. |
| Full Range The | color range of the black and white levels are full. |
| Limited Range | The color range of the black and white levels are limited. |
Color Space
Allows users to choose which color space they would like to use for monitor color output (RGB, YUV).
Color Temperature
Allows users to select specific color temperature settings to further customize their viewing experience.
| Panel Default Panel Original Status | |
| sRGB Standard | color space used for the Windows system. |
| Bluish Set the color temperature to 9300K. | |
| Cool Set the color temperature to 7500K. | |
| Native Default | color temperature. Recommended for general use. |
| Warm Set the color temperature to 5000K. | |
Contrast
Adjusts the difference between the image background (black level) and the foreground (white level).
G Game Mode
Integrating a gaming-oriented OSD design including pre-calibrated FPS, RTS, and MOBA gaming settings. Each mode is functionally customized with in-game testing and adjustments made for the best blend of color and technology.
Gamma
Allows users to manually adjust the brightness level of the monitor's grayscale levels. There are three selections: 1.8, 2.2, and 2.6.
Information
Displays the timing mode (video signal input) coming from the graphics card in the computer, the LCD model number, the serial number, and the ViewSonic® website URL. See your graphics cards's user guide for instructions on changing the resolution and refresh rate (vertical frequency).
NOTE: VESA 1024 x 768 @ 60Hz, for example, means that the resolution is 1024 x 768 and the refresh rate is 60Hz.
Input Select
Toggles between the various input options that are available for the monitor.
Low Input Lag
ViewSonic® offers low input lag, utilizing a monitor process reducer, which decreases signal latency. Under the “Low Input Lag” sub-menu, you can select the appropriate speed for your desired use from the options.
M Manual Image Adjust
Displays the “Manual Image Adjust” menu. You can manually set a variety of image quality adjustments.
Memory Recall
Returns the adjustments back to factory settings if the display is operating in a factory preset timing mode listed in the “Specifications” of this manual.
NOTE:
- (Exception) This control does not affect changes made in the "Language Select" or "Power Lock" setting.
- Memory Recall is the default as-shipped display configuration and settings. Memory Recall is the setting in which the product qualifies for ENERGY STAR®. Any changes to default as-shipped display configuration and settings would change the energy consumption, and may increase energy consumption beyond the limits required for ENERGY STAR® qualification, as applicable. ENERGY STAR® is a set of power-saving guidelines issued by the U.S. Environmental Protection Agency (EPA). ENERGY STAR® is a joint program of the
U.S. Environmental Protection Agency
and the U.S. Department of Energy helping us all save money and protect the environment through energy efficient products and practices.

O Overscan
Refers to a cropped image on your monitor's screen. A setting on your monitor zooms in on movie content, so that you cannot see the outermost edges of the film.
R Recall
Resets the ViewMode monitor settings.
Resolution Notice
The notice tells users that the current viewing resolution is not the correct native resolution. This notice will appear in the display settings window when setting up the display resolution.
Response Time
Adjusts the response time, creating smooth images without streaking, blurring, or ghosting. A low response time is perfect for the most graphic-intense gaming, and provides amazing visual quality while watching sports or action movies.
S Setup Menu
Adjusts On-Screen Display (OSD) Menu settings. Many of these settings can activate on-screen display notifications so users do not have to reopen the menu.
Sharpness
Adjusts the picture quality of the monitor.
ViewMode
ViewSonic's unique ViewMode feature offers "Game", "Movie", "Web", "Text", "MAC", and "Mono" presets. These presets are specifically designed to deliver an optimized viewing experience for different screen applications.
1 1ms mode
Choose whether to activate Moving Picture Response Time (MPRT); default setting is Off.
NOTE:
- Make sure Input Timing detection is >100Hz to turn on 1ms Mode from default.
- If 1ms Mode is set to "On", when turning on FreeSync, MPRT will automatically turn off.
- When 1ms Mode is set to "On", the following functions will be grayed out and disabled: Brightness, Advanced DCR, Eco Mode, sRGB, Response Time, DDC/CI Brightness adjustment.
- sRGB and 1ms Mode will disable each other.
- The IC controls Moving Picture Response Time, so the overall Brightness will be dark.
- 1ms MPRT spec is based on internal testes. Response time may vary depending on test conditions.
Troubleshooting
This section describes some common problems that you may experience when using the monitor.
| Problem or Issue Possible Solutions | |
| No power | Make sure you have turned on the monitor by pressing thePowerbutton.Make sure the power cord is properly and securely connected to the monitor and power outlet.Plug another electrical device into the power outlet to verify that the outlet is supplying power. |
| Power is On, but no image appears on screen | Make sure the video cable connecting the monitor to the computer is properly and securely connected.Adjust the brightness and contrast settings.Make sure the correct input source is selected. |
| Wrong or abnormal colors | If any colors (red, green, or blue) are missing, check the video cable to make sure it is properly and securely connected. Loose or broken pins in the cable connector could cause an improper connection.Connect the monitor to another computer.If you have an older graphics card, contact ViewSonic®for a non-DDC adapter. |
| Screen image is too light or dark | Adjust brightness and contrast settings via the OSD Menu.Reset the monitor to factory settings. |
| Screen image cuts in and out | Make sure the correct input source is selected.Check for bent or broken pins in the video cable connector.Make sure the video cable connecting the monitor to the computer is properly and securely connected. |
| Screen image is blurred | Adjust the resolution to the correct Aspect Ratio.Reset the monitor to factory settings. |
| The screen isn’t centered correctly | Adjust the horizontal and vertical controls via the OSD Menu.Check the Aspect Ratio.Reset the monitor to factory settings. |
| The screen appears yellow | Make sure the “Blue Light Filter” is Off. |
| The OSD Menu does not appear on the screen/the OSD controls are inaccessible | Check whether the OSD Menu is locked.Turn off the monitor, unplug the power cord, plug it back in, and then turn on the monitor.Reset the monitor to factory settings. |
| Control panel keys do not work | Press only one key at a time.Restart the computer. |
| Some menus aren’t selectable in the OSD | Adjust the ViewMode or the input source.Reset the monitor to factory settings. |
| No audio output | If using ear-/headphones, ensure the mini stereo jack is connected.Make sure the volume is not muted, nor set to 0.Check the Audio Input setting. |
| The monitor will not adjust | Make sure there are no obstructions near or on the monitor, and that there is adequate spacing.For more information, see “Adjusting the Viewing Angle”. |
| USB devices connected to the monitor do not work | Make sure the USB cable is connected properly.Try changing to another USB port (if applicable).Some USB devices require a higher electric current; connect the device directly to the computer. |
| The external device is connected, but no image appears on the screen | Make sure the Power is OnAdjust brightness and contrast via the OSD Menu.Check the connecting cable and make sure it is properly and securely connected. Loose or broken pins in the cable connector could cause an improper connection. |
Maintenance
General Precautions
- Make sure the monitor is turned off and the power cable is unplugged from the power outlet.
- Never spray or pour any liquid directly onto the screen or case.
- Handle the monitor with care, as a darker-colored monitor, if scuffed, may show marks more clearly than a lighter-colored monitor.
Cleaning the Screen
- Wipe the screen with a clean, soft, lint-free cloth. This removes dust and other particles.
- If the screen is still not clean, apply a small amount of non-ammonia, non-alcohol based glass cleaner onto a clean, soft, lint-free cloth; then wipe the screen.
Cleaning the Case
- Use a soft, dry cloth.
- If the case is still not clean, apply a small amount of non-ammonia, non-alcohol based, mild non-abrasive detergent onto a clean, soft, lint-free cloth, then wipe the surface.
Disclaimer
- ViewSonic® does not recommend the use of any ammonia or alcohol-based cleaners on the display screen or case. Some chemical cleaners have been reported to damage the screen and/or case of the monitor.
- ViewSonic® will not be liable for damage resulting from use of any ammonia or alcohol-based cleaners.
Blue Light Filter and Eye Health
The Blue Light Filter blocks high-energy blue light for a more comfortable viewing experience.
While using and enjoying your monitor please keep the following in mind:
- Viewing computer screens for extended periods of time may cause eye irritation and discomfort. To reduce these effects, it is recommended to take periodic breaks from viewing to allow the eyes to relax.
- The monitor also supports Flicker-Free, which reduces or eliminates screen flicker, thus easing potential eye strain.
- Setting the filter value to 100 will provide the best performance of the blue light filter, which meets TUV certification standards.
Calculating Breaks
When viewing the monitor for extended periods, it is recommended to take periodic breaks from viewing. Short breaks of at least five (5) minutes are recommended after one (1) to two (2) hours of continuous viewing.
Taking shorter, more frequent breaks are generally more beneficial than longer, less frequent breaks.
Looking at Distant Objects
While taking breaks, users can further reduce eye strain and dryness by focusing on objects that are further away from them.
Eye and Neck Exercises
Eye Exercises
Eye exercises can help minimize eye strain. Slowly roll your eyes to the left, right, up, and down. Repeat as many times as needed.
Neck Exercises
Neck exercises can also help minimize eye strain. Relax your arms and let them hang at your sides, bend forward slightly to stretch the neck, turn your head to the right and to the left. Repeat as many times as needed.
Regulatory and Service Information
Compliance Information
This section addresses all connected requirements and statements regarding regulations. Confirmed corresponding applications shall refer to nameplate labels and relevant markings on the unit.
FCC Compliance Statement
This device complies with part 15 of FCC Rules. Operation is subject to the following two conditions: (1) this device may not cause harmful interference, and (2) this device must accept any interference received, including interference that may cause undesired operation. This equipment has been tested and found to comply with the limits for a Class B digital device, pursuant to part 15 of the FCC Rules. These limits are designed to provide reasonable protection against harmful interference in a residential installation. This equipment generates, uses, and can radiate radio frequency energy, and if not installed and used in accordance with the instructions, may cause harmful interference to radio communications. However, there is no guarantee that interference will not occur in a particular installation. If this equipment does cause harmful interference to radio or television reception, which can be determined by turning the equipment off and on, the user is encouraged to try to correct the interference by one or more of the following measures:
- Reorient or relocate the receiving antenna.
- Increase the separation between the equipment and receiver.
- Connect the equipment into an outlet on a circuit different from that to which the receiver is connected.
- Consult the dealer or an experienced radio/TV technician for help.
Warning: You are cautioned that changes or modifications not expressly approved by the party responsible for compliance could void your authority to operate the equipment.
Industry Canada Statement
CAN ICES-003(B) / NMB-003(B)
CE Conformity for European Countries

The device complies with the EMC Directive 2014/30/EU and Low Voltage Directive 2014/35/EU.
The following information is only for EU-member states:
The mark shown to the right is in compliance with the Waste Electrical and Electronic Equipment Directive 2012/19/EU (WEEE). The mark indicates the requirement NOT to dispose of the equipment as unsorted municipal waste, but use the return and collection systems according to local law.

Declaration of RoHS2 Compliance
This product has been designed and manufactured in compliance with Directive 2011/65/EU of the European Parliament and the Council on restriction of the use of certain hazardous substances in electrical and electronic equipment (RoHS2 Directive) and is deemed to comply with the maximum concentration values issued by the European Technical Adaptation Committee (TAC) as shown below:
| Substance | Proposed Maximum Concentration | Actual Concentration |
| Lead (Pb) 0.1% < 0.1% | ||
| Mercury (Hg) 0.1% < 0.1% | ||
| Cadmium (Cd) 0.01% < 0.01% | ||
| Hexavalent Chromium (Cr6+) 0.1% | < 0.1% | |
| Polybrominated biphenyls (PBB) 0.1% < 0.1% | ||
| Polybrominated diphenyl ethers (PBDE) | 0.1% < 0.1% | |
| Bis (2-ethylhexyl) phthalate (DEHP) | 0.1% < 0.1% | |
| Butyl benzyl phthalate (BBP) 0.1% | < 0.1% | |
| Dibutyl phthalate (DBP) 0.1% < 0.1% | ||
| Diisobutyl phthalate (DIBP) 0.1% < 0.1% |
Certain components of products as stated above are exempted under the Annex III of the RoHS2 Directives as noted below. Examples of exempted components are:
• Copper alloy containing up to 4% lead by weight.
- Lead in high melting temperature type solders (i.e. lead-based alloys containing 85% by weight or more lead).
- Electrical and electronic components containing lead in a glass or ceramic other than dielectric ceramic in capacitors, e.g. piezoelectronic devices, or in a glass or ceramic matrix compound.
- Lead in dielectric ceramic in capacitors for a rated voltage of 125V AC or 250V DC or higher.
Indian Restriction of Hazardous Substances
Restriction on Hazardous Substances statement (India). This product complies with the “India E-waste Rule 2011” and prohibits use of lead, mercury, hexavalent chromium, polybrominated biphenyls or polybrominated diphenyl ethers in concentrations exceeding 0.1 weight % and 0.01 weight % for cadmium, except for the exemptions set in Schedule 2 of the Rule.
Product Disposal at End of Product Life
ViewSonic ^® respects the environment and is committed to working and living green. Thank you for being part of Smarter, Greener Computing. Please visit the ViewSonic ^® website to learn more.
USA & Canada:
http://www.viewsonic.com/company/green/recycle-program/
Europe:
http://www.viewsoniceurope.com/eu/support/call-desk/
Taiwan:
Copyright© ViewSonic® Corporation, 2022. All rights reserved.
Macintosh and Power Macintosh are registered trademarks of Apple Inc.
Microsoft, Windows, and the Windows logo are registered trademarks of Microsoft Corporation in the United States and other countries.
ViewSonic ^® , the three birds logo, OnView, ViewMatch, and ViewMeter are registered trademarks of ViewSonic ^® Corporation.
VESA is a registered trademark of the Video Electronics Standards Association. DPMS, DisplayPort, and DDC are trademarks of VESA.
Disclaimer: ViewSonic® Corporation shall not be liable for technical or editorial errors or omissions contained herein; nor for incidental or consequential damages resulting from furnishing this material, or the performance or use of this product.
In the interest of continuing product improvement, ViewSonic® Corporation reserves the right to change product specifications without notice. Information in this document may change without notice.
No part of this document may be copied, reproduced, or transmitted by any means, for any purpose without prior written permission from ViewSonic® Corporation.
VX2407-7_UG_ENG_1a_20220118
Customer Service
For technical support or product service, see the table below or contact your reseller.
NOTE: You will need the product's serial number.
| Country/Region Website Country/Region Website | |||
| Asia Pacific & Africa | |||
| Australia www.viewsonic.com/au/ Bangladesh www.viewsonic.com/bd/ | |||
| 中国 (China) | www.viewsonic.com.cn | 香港(繁體中文) | www.viewsonic.com/hk/ |
| Hong Kong (English) www.viewsonic.com/hk-en/ India www.viewsonic.com/in/ | |||
| Indonesia www.viewsonic.com/id/ Israel www.viewsonic.com/il/ | |||
| 日本 (Japan) | www.viewsonic.com/jp/ | Korea | www.viewsonic.com/kr/ |
| Malaysia | www.viewsonic.com/my/ | Middle East | www.viewsonic.com/me/ |
| Myanmar | www.viewsonic.com/mm/ | Nepal | www.viewsonic.com/np/ |
| New Zealand | www.viewsonic.com/nz/ | Pakistan | www.viewsonic.com/pk/ |
| Philippines | www.viewsonic.com/ph/ | Singapore | www.viewsonic.com/sg/ |
| 臺灣 (Taiwan) | www.viewsonic.com/tw/ | ประเทศไทย | www.viewsonic.com/th/ |
| Việt Nam | www.viewsonic.com/vn/ | South Africa & Mauritius | www.viewsonic.com/za/ |
| Americas | |||
| United States | www.viewsonic.com/us | Canada | www.viewsonic.com/us |
| Latin America | www.viewsonic.com/la | ||
| Europe | |||
| Europe | www.viewsonic.com/eu/ | France | www.viewsonic.com/fr/ |
| Deutschland | www.viewsonic.com/de/ | Қазақстан | www.viewsonic.com/kz/ |
| Россия | www.viewsonic.com/ru/ | España | www.viewsonic.com/es/ |
| Türkiye | www.viewsonic.com/tr/ | Україна | www.viewsonic.com/ua/ |
| United Kingdom | www.viewsonic.com/uk/ | ||
Limited Warranty
ViewSonic® Display
What the warranty covers:
ViewSonic® warrants its products to be free from defects in material and workmanship during the warranty period. If a product proves to be defective in material or workmanship during the warranty period, ViewSonic® will, at its sole option, and as your sole remedy, repair or replace the product with a similar product. Replacement Product or parts may include remanufactured or refurbished parts or components. The repair or replacement unit or parts or components will be covered by the balance of the time remaining on the customer's original limited warranty and the warranty period will not be extended. ViewSonic® provides no warranty for any third-party software whether included with the product or installed by the customer, installation of any unauthorized hardware parts or components (e.g. Projector Lamps). (Please refer to: "What the warranty excludes and does not cover" section).
How long the warranty is effective:
ViewSonic® displays are warranted for between 1 and 3 years, depending on your country of purchase, for all parts including the light source and for all labor from the date of the first consumer purchase.
Who the warranty protects:
This warranty is valid only for the first consumer purchaser.
What the warranty excludes and does not cover:
- Any product on which the serial number has been defaced, modified, or removed.
- Damage, deterioration, or malfunction resulting from:
» Accident, misuse, neglect, fire, water, lightning, or other acts of nature, unauthorized product modification, or failure to follow instructions supplied with the product.
» Repair or attempted repair by anyone not authorized by ViewSonic®.
» Damage to or loss of any programs, data, or removable storage media.
» Normal wear and tear.
» Removal or installation of the product.
- Software or data loss occurring during repair or replacement.
- Any damage of the product due to shipment.
- Causes external to the product, such as electric power fluctuations or failure.
- Use of supplies or parts not meeting ViewSonic's specifications.
- Failure of owner to perform periodic product maintenance as stated in the User Guide.
- Any other cause which does not relate to a product defect.
- Damage caused by static (non-moving) images displayed for lengthy periods of time (also referred to as image burn-in).
- Software - Any third-party software included with the product or installed by the customer.
- Hardware/Accessories/Parts/Components – Installation of any unauthorized hardware, accessories, consumable parts or components (e.g. Projector Lamps).
- Damage to, or abuse of, the coating on the surface of the display through inappropriate cleaning as described in the product User Guide.
- Removal, installation, and set-up service charges, including wall-mounting of the product.
How to get service:
- For information about receiving service under warranty, contact ViewSonic® Customer Support (Please refer to the “Customer Service” page). You will need to provide your product’s serial number.
- To obtain warranty service, you will be required to provide: (a) the original dated sales slip, (b) your name, (c) your address, (d) a description of the problem, and (e) the serial number of the product.
- Take or ship the product, freight prepaid, in the original container to an authorized ViewSonic® service center or ViewSonic®.
- For additional information or the name of the nearest ViewSonic® service center, contact ViewSonic®.
Limitation of implied warranties:
There are no warranties, express or implied, which extend beyond the description contained herein including the implied warranty of merchantability and fitness for a particular purpose.
Exclusion of damages:
ViewSonic's liability is limited to the cost of repair or replacement of the product. ViewSonic® shall not be liable for:
- Damage to other property caused by any defects in the product, damages based upon inconvenience, loss of use of the product, loss of time, loss of profits, loss of business opportunity, loss of goodwill, interference with business relationships, or other commercial loss, even if advised of the possibility of such damages.
- Any other damages, whether incidental, consequential or otherwise.
- Any claim against the customer by any other party.
- Repair or attempted repair by anyone not authorized by ViewSonic®.
Effect of state law:
This warranty gives you specific legal rights, and you may also have other rights which vary from state to state. Some states do not allow limitations on implied warranties and/or do not allow the exclusion of incidental or consequential damages, so the above limitations and exclusions may not apply to you.
Sales outside the U.S.A. and Canada:
For warranty information and service on ViewSonic® products sold outside of the U.S.A. and Canada, contact ViewSonic® or your local ViewSonic® dealer.
The warranty period for this product in mainland China (Hong Kong, Macao, and Taiwan Excluded) is subject to the terms and conditions of the Maintenance Guarantee Card.
For users in Europe and Russia, full details of warranty provided can be found at: http://www.viewsonic.com/eu/ under "Support/Warranty Information".
Mexico Limited Warranty
ViewSonic® Display
What the warranty covers:
ViewSonic® warrants its products to be free from defects in material and workmanship, under normal use, during the warranty period. If a product proves to be defective in material or workmanship during the warranty period, ViewSonic® will, at its sole option, repair or replace the product with a like product. Replacement product or parts may include remanufactured or refurbished parts or components & accessories.
How long the warranty is effective:
ViewSonic ^® LCD displays are warranted for between 1 and 3 years, depending on your country of purchase, for all parts including the light source and for all labour from the date of the first consumer purchase.
Who the warranty protects:
This warranty is valid only for the first consumer purchaser.
What the warranty excludes and does not cover:
- Any product on which the serial number has been defaced, modified or removed.
- Damage, deterioration, or malfunction resulting from:
» Accident, misuse, neglect, fire, water, lightning, or other acts of nature, unauthorized product modification, unauthorized attempted repair, or failure to follow instructions supplied with the product.
» Causes external to the product, such as electrical power fluctuations or failure.
» Use of supplies or parts not meeting ViewSonic®'s specifications.
» Normal wear and tear.
» Any other cause which does not relate to a product defect.
- Any product exhibiting a condition commonly known as “image burn-in” which results when a static image is displayed on the product for an extended period of time.
- Removal, installation, insurance, and set-up service charges.
How to get service:
For information about receiving service under warranty, contact ViewSonic® Customer Support (Please refer to the attached “Customer Service” page). You will need to provide your product’s serial number, so please record the product information in the space provided below on your purchase for your future use. Please retain your receipt of proof of purchase to support your warranty claim.
For Your Records
Product Name: Model Number:
Document Number: Serial Number:
Purchase Date: Extended Warranty Purchase? (Y/N)
If so, what date does warranty expire?
- To obtain warranty service, you will be required to provide (a) the original dated sales slip, (b) your name, (c) your address, (d) a description of the problem, and (e) the serial number of the product.
- Take or ship the product, in the original container packaging, to an authorized ViewSonic® service center.
- Round trip transportation costs for in-warranty products will be paid by ViewSonic®.
Limitation of implied warranties:
There are no warranties, express or implied, which extend beyond the description contained herein including the implied warranty of merchantability and fitness for a particular purpose.
Exclusion of damages:
ViewSonic®’s liability is limited to the cost of repair or replacement of the product. ViewSonic® shall not be liable for:
- Damage to other property caused by any defects in the product, damages based upon inconvenience, loss of use of the product, loss of time, loss of profits, loss of business opportunity, loss of goodwill, interference with business relationships, or other commercial loss, even if advised of the possibility of such damages.
- Any other damages, whether incidental, consequential or otherwise.
- Any claim against the customer by any other party.
- Repair or attempted repair by anyone not authorized by ViewSonic®.
| Contact Information for Sales & Authorized Service (Centro Autorizado de Servicio) within Mexico: | |
| Name, address, of manufacturer and importers:México, Av. de la Palma #8 Piso 2 Despacho 203, Corporativo Interpalmas,Col. San Fernando Huixquilucan, Estado de MéxicoTel: (55) 3605-1099 http://www.viewsonic.com/la/soporte/index.htm | |
| NÚMERO GRATIS DE ASISTENCIA TÉCNICA PARA TODO MÉXICO: 001.866.823.2004 | |
| Hermosillo:Distribuciones y Servicios Computacionales SA de CV.Calle Juarez 284 local 2Col. Bugambilas C.P: 83140Tel: 01-66-22-14-9005E-Mail: disc2@hmo.megared.net.mx | Villahermosa:Compumantenimietnos Garantizados, S.A. de C.V.AV. GREGORIO MENDEZ #1504COL, FLORIDA C.P. 86040Tel: 01 (993) 3 52 00 47 / 3522074 / 3 52 20 09E-Mail: compumantenimientos@prodigy.net.mx |
| Puebla, Pue. (Matriz):RENTA Y DATOS, S.A. DE C.V. Domicilio:29 SUR 721 COL. LA PAZ72160 PUEBLA, PUE.Tel: 01(52).222.891.55.77 CON 10 LINEASE-Mail: datos@puebla.megared.net.mx | Veracruz, Ver.:CONEXION Y DESARROLLO, S.A DE C.V. Av.Americas # 419ENTRE PINZÓN Y ALVARADOFracc. Reforma C.P. 91919Tel: 01-22-91-00-31-67E-Mail: gacosta@qplus.com.mx |
| Chihuahua:Soluciones Globales en ComputaciónC. Magisterio # 3321 Col. MagisterialChihuahua, Chih.Tel: 4136954E-Mail: Cefeo@soluglobales.com | Cuernavaca:Compusupport de Cuernavaca SA de CVFrancisco Leyva # 178 Col. Miguel HidalgoC.P. 62040, Cuernavaca MorelosTel: 01 777 3180579 / 01 777 3124014E-Mail: aquevedo@compusupportcva.com |
| Distrito Federal:QPLUS, S.A. de C.V.Av. Coyoacán 931Col. Del Valle 03100, México, D.F.Tel: 01(52)55-50-00-27-35E-Mail : gacosta@qplus.com.mx | Guadalajara, Jal.:SERVICRECE, S.A. de C.V.Av. Niños Héroes # 2281Col. Arcos Sur, Sector Juárez44170, Guadalajara, JaliscoTel: 01(52)33-36-15-15-43E-Mail: mmiranda@servicrece.com |
| Guerrero Acapulco:GS Computación (Grupo Sesicomp)Progreso #6-A, Colo Centro39300 Acapulco, GuerreroTel: 744-48-32627 | Monterrey:Global Product ServicesMar Caribe # 1987, Esquina con Golfo PérsicoFracc. Bernardo Reyes, CP 64280Monterrey N.L. MéxicoTel: 8129-5103E-Mail: aydeem@gps1.com.mx |
| MERIDA:ELECTROSERAv Reforma No. 403Gx39 y 41Mérida, Yucatán, México CP97000Tel: (52) 999-925-1916E-Mail: rrrb@sureste.com | Oaxaca, Oax.:CENTRO DE DISTRIBUCION YSERVICIO, S.A. de C.V.Murguía # 708 P.A., Col. Centro, 68000, OaxacaTel: 01(52)95-15-15-22-22Fax: 01(52)95-15-13-67-00E-Mail. gpotai2001@hotmail.com |
| Tijuana:STDAv Ferrocarril Sonora #3780 L-CCol 20 de NoviembrTijuana, Mexico | FOR USA SUPPORT:ViewSonic® Corporation381 Brea Canyon Road, Walnut, CA. 91789 USATel: 800-688-6688E-Mail: http://www.viewsonic.com |
LCD Mexico Warranty Term Template In UG
VSC_TEMP_2008

natural_image
Illustration of three colorful birds perched on a green surface (no text or symbols)ViewSonic®
- Thank you for choosing ViewSonic®
- Safety Precautions
- NOTE:
- Contents
- Safety Precautions....3
- Contents......6
- Introduction 8
- Initial Setup....10
- Making Connections....13
- Using the Monitor 15
- Appendix....26
- Regulatory and Service Information 38
- Introduction
- Package Contents
- Product Overview
- Front and Rear View
- I/O Ports
- Initial Setup Installing the Stand
- Wall Mounting
- Using the Security Slot
- Making Connections
- Connecting to Power
- Using the Monitor
- Adjusting the Viewing Angle
- Tilt Angle Adjustment
- Turning the Device On/Off
- Using the Control Panel Keys
- Quick Menu
- Hot Keys
- Configuring the Settings General Operations
- Appendix
- Glossary
- Advanced DCR
- Audio Adjust
- Auto Detect
- Auto Image Adjust
- B Black Stabilization
- Blue Light Filter
- Brightness
- C Color Adjust
- Color Range
- Color Space
- Color Temperature
- Contrast
- G Game Mode
- Gamma
- Information
- Input Select
- Low Input Lag
- M Manual Image Adjust
- Memory Recall
- O Overscan
- R Recall
- Resolution Notice
- Response Time
- S Setup Menu
- Sharpness
- ViewMode
- 1ms mode
- Troubleshooting
- Maintenance
- General Precautions
- Cleaning the Screen
- Cleaning the Case
- Disclaimer
- Blue Light Filter and Eye Health
- Calculating Breaks
- Looking at Distant Objects
- Eye and Neck Exercises
- Eye Exercises
- Neck Exercises
- Regulatory and Service Information
- Compliance Information
- FCC Compliance Statement
- Industry Canada Statement
- CE Conformity for European Countries
- The following information is only for EU-member states:
- Declaration of RoHS2 Compliance
- Certain components of products as stated above are exempted under the Annex III of the RoHS2 Directives as noted below. Examples of exempted components are:
- Indian Restriction of Hazardous Substances
- Product Disposal at End of Product Life
- USA & Canada:
- Europe:
- Taiwan:
- Customer Service
- Limited Warranty
- What the warranty covers:
- How long the warranty is effective:
- Who the warranty protects:
- What the warranty excludes and does not cover:
- How to get service:
- Limitation of implied warranties:
- Exclusion of damages:
- Effect of state law:
- Sales outside the U.S.A. and Canada:
- Mexico Limited Warranty
- For Your Records
Brand : VIEWSONIC
Model : VX2407-7
Category : Screen