
HDR-8X8-Plus - Router Smart-AVI - Free user manual and instructions
Find the device manual for free HDR-8X8-Plus Smart-AVI in PDF.

| Product Type | HDMI Matrix Switch |
| Brand | Smart-AVI |
| Model | HDR-8X8-Plus |
| Number of Inputs | 8 |
| Number of Outputs | 8 |
| Supported Video Resolution | Up to 4K@60Hz 4:4:4, 1080p, 3D |
| HDR Support | HDR10, Dolby Vision, HLG |
| Audio Support | LPCM 7.1, Dolby Digital, DTS, HDMI audio pass-through |
| Control Interface | Front panel buttons, IR remote, RS-232, Ethernet (TCP/IP) |
| Rackmountable | Yes, 1U rackmount ears included |
| Dimensions (W x D x H) | 17.2 x 10.0 x 1.7 inches (437 x 254 x 43 mm) |
| Weight | 5.5 lbs (2.5 kg) |
| Power Consumption | 36W (max) |
| Input Voltage | 100-240V AC, 50/60Hz via external power adapter (12V DC, 3A) |
| Operating Temperature | 32°F to 104°F (0°C to 40°C) |
| Storage Temperature | -4°F to 140°F (-20°C to 60°C) |
| Relative Humidity | 10% to 90%, non-condensing |
| Warranty | 2 years limited |
| Included Accessories | Power adapter, IR remote, RS-232 cable, rackmount kit, user manual |
| Certifications | FCC, CE, RoHS |
| Cleaning Instructions | Wipe with a soft, dry cloth. Do not use liquid cleaners or aerosols. |
| Safety Instructions | Use only the supplied power adapter. Keep away from liquids and extreme temperatures. |
| Reparability | No user-serviceable parts. Contact Smart-AVI support for service. |
Frequently Asked Questions - HDR-8X8-Plus Smart-AVI
User questions about HDR-8X8-Plus Smart-AVI
0 question about this device. Answer the ones you know or ask your own.
Ask a new question about this device
Download the instructions for your Router in PDF format for free! Find your manual HDR-8X8-Plus - Smart-AVI and take your electronic device back in hand. On this page are published all the documents necessary for the use of your device. HDR-8X8-Plus by Smart-AVI.
USER MANUAL HDR-8X8-Plus Smart-AVI
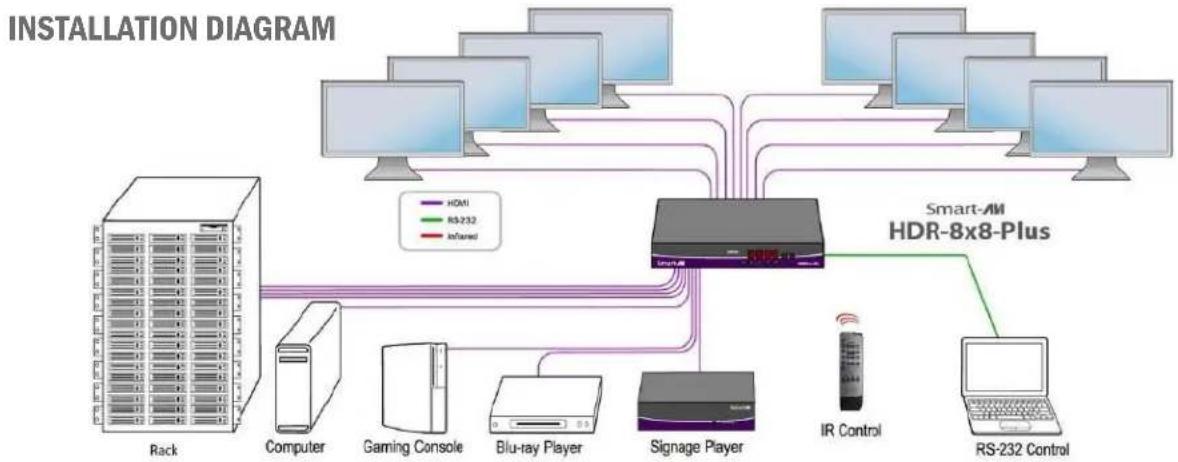
Connect up to eight different HDMI video sources
to eight different outputs.
Smart-AM
SMART AUDIO VIDEO INNOVATION
Table of Contents
| What's in the box? 2 | |
| Introduction 2 | |
| Layout 2 | |
| Connecting the HDR-8X8-PLUS 3 | |
| Using the Front Control Panel 3 | |
| IR Remote Control 4 | |
| LAN (TCP-IP) Control 5 | |
| Smart Control Pro (RS-232) 6 | |
| Technical Specifications 7 | |
| Troubleshooting 7 | |
| LIMITED WARRANTY STATEMENT 8 |
What's in the box?
| PART NO. QTY DESCRIPTION | ||
| HDR-8X8-Plus | 1 | 4K Resolution 8x8 HDMI Switch Matrix |
| PS12VDC3A & CCPWR06 | 1 | Power Supply |
| RMHDR8X8 | 1 | IR Remote |
| HDR8X8-PLUS-EAR | 2 | Mounting Brackets |
| User Manual | 1 | Quick Start Guide |
Introduction
The HDR-8X8-PLUS HDMI switch matrix connects up to 8 HDMI sources to up to 8 display devices and facilitates the creation of different connection schemes. With high reliability, low power consumption and high bandwidth (supports HDMI 1.4 features). The user can control the switch matrix operation by front panel buttons, PC serial port, or web browser via RJ45 (local area network). The input/output connection status is displayed on the front LCD. The HDR-8X8-PLUS has 4K resolution.
Layout

Figure 2-1: Front Panel
Control Panel
Status LCD

natural_image
Front panel of a network switch device showing ports, connectors, and a power outlet (no readable text or symbols)Figure 2-2: Rear Panel
HDMI inputs
HDMI outputs
RJ45 Jack
RS232 Port
Power IN
Power Switch
- Connect HDR-8X8-PLUS HDMI input to signal sources such as PC or DVD players.
- Connect the HDR-8X8-PLUS HDMI outputs to displays, monitors, or projectors.
- Connect HDR-8X8-PLUS to power supply.
- Press the On/Off switch to activate the HDR-8X8-PLUS.
- Switch between signals with either front-panel controls, or via PC with RS232 and TCP/IP web support
flowchart
graph TD
    Rack[" Rack "] -->|HDMI| Smart-AM[" Smart-AM HDR-8x8-Plus "]
    Rack -->|RS-232| Smart-AM
    Rack -->|Infrared| Smart-AM
    Computer[" Computer "] -->|HDMI| Smart-AM
    Computer -->|RS-232| Smart-AM
    Computer -->|Infrared| Smart-AM
    Gaming_Console[" Gaming Console "] -->|HDMI| Smart-AM
    Gaming Console -->|RS-232| Smart-AM
    Blu-ray_Player[" Blu-ray Player "] -->|HDMI| Smart-AM
    Blu-ray Player -->|RS-232| Smart-AM
    Signage_Player[" Signage Player "] -->|HDMI| Smart-AM
    Signage Player -->|RS-232| Smart-AM
    Smart-AM --> IR_Control[" IR Control "]
    Smart-AM --> RS-232Control[" RS-232 Control "]
Using the Front Control Panel
Switch between input signals easily with corresponding numeric buttons. Backlit SAVE, RECALL, LOCK, and EDID function buttons enhance control, as well.

Figure 3-1: Front Control Panel
Numbered Buttons
1,2,3,4,5,6,7,8 respectively corresponding with HDMI output 1 through 8. Click on each output button to toggle the input selected for that output.
Lock
The LOCK button restricts switching with front-panel buttons. It can be deactivated by pressing the LOCK button again.
Save
Assign and store connected signals (ex: signal 1, 2, etc). RecallSwitch between recently used signals.
EDID Learning
Press the EDID learning front-panel button to acquire information about connected display/monitors. Once pressed, the EDID button will illuminate and LED indicators will light up.
Button Combinations
SAVE + n: Save the current connected status to item n. (n=1,2,3,4,5,6,7,8)
RECALL+ n: Recall item n connection status to current display. (n=1,2,3,4,5,6,7,8)
EDID + 1: AUTO LED light. Default EDID "SMEDID" is selected.
EDID + 2: MANUAL LED light. Local monitor in output port 1 EDID is learned.
IR Remote Control
Switching Inputs to Outputs:
When using the remote control the output port or display must be selected first, followed by the input port or source.
- Press the output button first.
- Then press the input button.
It will take a few seconds for the signal to appear on the display.
Resetting to Factory Default:
- Press the Reset button.
- Press the All button.
The default setting is:
INPUT 12345678
OUTPUT 12345678
EDID Selection:
- Press the EDID button followed by the 1 button for AUTO
- Press the EDID button followed by the 2 button for MANUAL
Save Configuration:
- Assign all connected sources to the desired displays.
- Press the SAVE button
- Press a single number to name the configuration.
You can save up to 8 configurations.
Recall Configuration:
- Press the Recall button
- Press the number button you assigned to the configuration you want to load.
It will take a few seconds for the signals to appear on the displays.
NOTE: Empty ports in your saved configurations may cause a reset to factory defaults.
NOTE: Activate the HDR-8X8-Plus with the On/Off switch on the back. The power on, off button on the remote is not functional at this time.
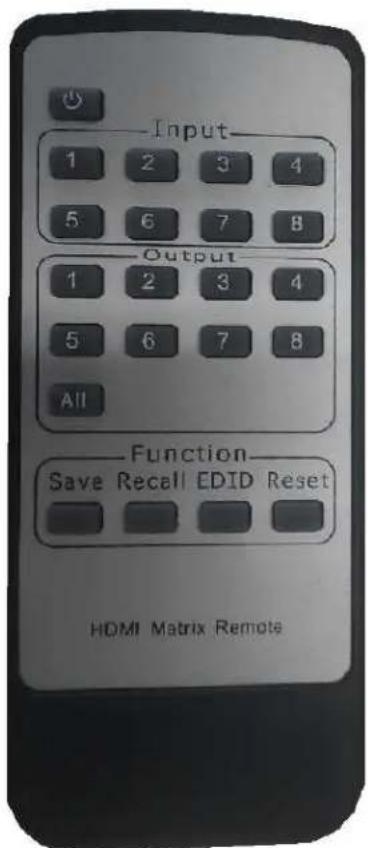
Figure 4-1
LAN (TCP-IP) Control
To enable TCP-IP control, connect an ethernet cable to the HDR-8X8-Plus ethernet port. Refer to page 5 for port information. By default, the HDR-8X8-Plus will connect to the network using DHCP.
Download Matrix Mate-NetworkAssistant software and execute to locate your IP address. Click the Search button. After a few seconds your IP address should appear.
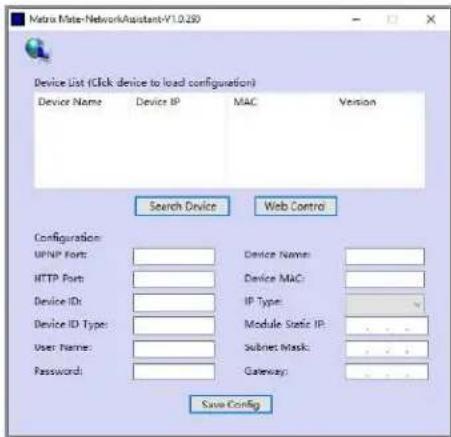
Enter the IP address in a browser of your choice and the Web Control login screen should appear as shown in figure 5-1.
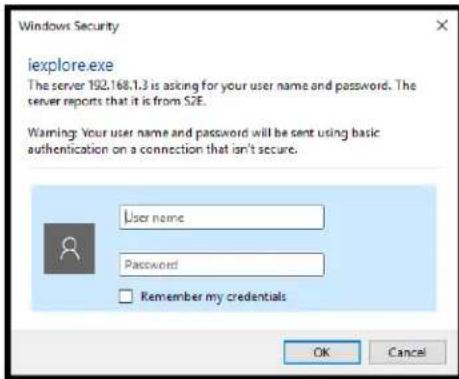
Figure 5-1: SmartAVI HDR-8X8-Plus Login Webpage
The default Username and Password is admin. After logging in successfully, you will be brought to the control screen shown in Figure 5-2.
Control Webpage
To switch an input for an output, select the desired input to the right of the desired output.
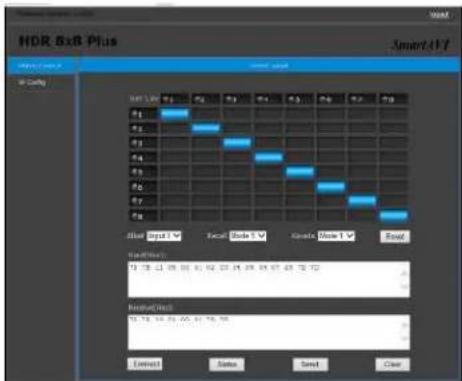
Figure 5-2: Control Webpage
Smart Control Pro (RS-232)
The HDR-8X8-Plus may also be controlled via RS-232 operation using Smart Control Pro; this feature requires an RS-232 card installed on your computer or a USB to RS-232 adapter. First connect the RS-232 cable between your PC and the HDR-8X8-Plus.
Launch the "Smart Control Pro" application. When the dialog box appears, select "No" when prompted if you wish to load an existing configuration.
Next the screen in Figure 6-1 will appear. Under "Router Type", select HDR 8x8. "Inputs" and "Outputs" box should both read "8".
Under "Com Port", select the com port that you have connected to the HDR-8X8-Plus.
If you don't know the COM port number:
From the "Start Menu" select "Control Panel".
From "Control Panel" select "Device Manager".
From "Device Manager" select "Ports (COM & LPT)".
You should see the COM port number listed.
Change "Router Timeout" to 1 second.
Leave all other settings as the defaults and hit "OK".
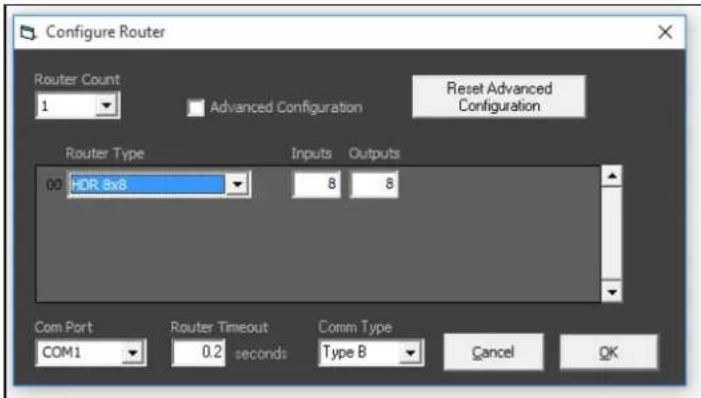
Figure 6-1: SmartControl Pro Configuration
Input/output routing should load automatically and be displayed by blue boxes in the grid as seen in Figure 6-2. Change output/input routing by clicking on the grid for the desired changes. Rename input names on the left and output names on the right. SmartControl Pro also allows you to save a macro. Hit the "Record Macro" button, set up the desired routing, then hit "Save Macro". Next select one of the macro buttons above to assign the routing or hit "Cancel Macro" to cancel. Lastly, to save all input names, output names, macros, and initial configuration; hit "File" then "Save Configuration As". Choose a location, name the configuration, and hit save. Now upon launching SmartControl Pro, you can choose to load an existing configuration to continue where you left off.
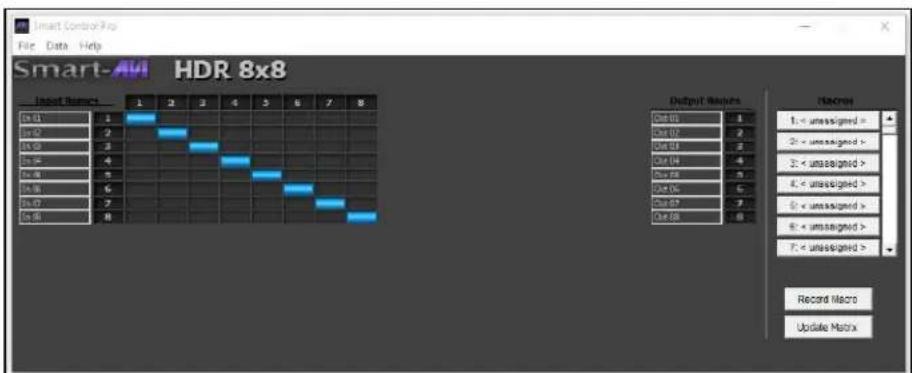
Figure 6-2: SmartControl Pro Routing
Technical Specifications
| VIDEO | |
| Video Bandwidth 300 MHz | |
| Resolution Up to 4Kx2K@30Hz | |
| HDMI Version HDMI 1.4 | |
| Interface HDMI-A | |
| CONTROL | |
| Front Panel Buttons | |
| RS-232 DB9 (female) | |
| TCP-IP LAN accessible website | |
| Remote Control IR | |
| MECHANICAL | |
| Height 2.0 in. | |
| Width 17.25 in. | |
| Depth 9.0 in. | |
| Weight 5.6 | |
| POWER | |
| Max Consumption 20 W | |
| Power Adapter 12 V / 3 A | |
Troubleshooting
If the screen flickers, check if the connection is reliable. Replace HDMI cable if necessary.
If Smart Control Pro cannot control the HDR-8X8-Plus, please ensure correct COM port number is selected.
If the POWER LED is not on and no picture is displayed, please check the power adapter and ensure it is connected well. Also check the power switch and ensure it is in the ON position.
A. Extent of limited warranty
-
Smart-AVI Technologies, Inc. warrants to the end-user customers that the Smart-AVI product specified above will be free from defects in materials and workmanship for the duration of 1 year, which duration begins on the date of purchase by the customer. Customer is responsible for maintaining proof of date of purchase.
-
Smart-AVI limited warranty covers only those defects which arise as a result of normal use of the product, and do not apply to any:
a. Improper or inadequate maintenance or modifications
b. Operations outside product specifications
c. Mechanical abuse and exposure to severe conditions
-
If Smart-AVI receives, during applicable warranty period, a notice of defect, Smart-AVI will at its discretion replace or repair defective product. If Smart-AVI is unable to replace or repair defective product covered by the Smart-AVI warranty within reasonable period of time, Smart-AVI shall refund the cost of the product.
-
Smart-AVI shall have no obligation to repair, replace or refund unit until customer returns defective product to Smart-AVI.
-
Any replacement product could be new or like new, provided that it has functionality at least equal to that of the product being replaced.
-
Smart-AVI limited warranty is valid in any country where the covered product is distributed by Smart-AVI.
B. Limitations of warranty
To the extant allowed by local law, neither Smart-AVI nor its third party suppliers make any other warranty or condition of any kind whether expressed or implied with respect to the Smart-AVI product, and specifically disclaim implied warranties or conditions of merchantability, satisfactory quality, and fitness for a particular purpose.
C. Limitations of liability
To the extent allowed by local law the remedies provided in this warranty statement are the customers sole and exclusive remedies.
To the extant allowed by local law, except for the obligations specifically set forth in this warranty statement, in no event will Smart-AVI or its third party suppliers be liable for direct, indirect, special, incidental, or consequential damages whether based on contract, tort or any other legal theory and whether advised of the possibility of such damages.
D. Local law
To the extent that this warranty statement is inconsistent with local law, this warranty statement shall be considered modified to be consistent with such law.
Smart-AMI
SMART AUDIO VIDEO INNOVATION
NOTICE
The information contained in this document is subject to change without notice. SmartAVI makes no warranty of any kind with regard to this material, including but not limited to, implied warranties of merchantability and fitness for particular purpose. SmartAVI will not be liable for errors contained herein or for incidental or consequential damages in connection with the furnishing, performance or use of this material. No part of this document may be photocopied, reproduced, or translated into another language without prior written consent from SmartAVI Technologies, Inc.
20170316

Designed and Manufactured in the USA
800.AVI.2131
Tel: (818) 503-6200 Fax: (818) 503-6208
11651 Vanowen St. North Hollywood, CA 91605
SmartAVI.com
- Introduction
- Layout
- Using the Front Control Panel
- Numbered Buttons
- Lock
- Save
- EDID Learning
- Button Combinations
- IR Remote Control
- Switching Inputs to Outputs:
- Resetting to Factory Default:
- EDID Selection:
- Save Configuration:
- Recall Configuration:
- LAN (TCP-IP) Control
- Control Webpage
- Smart Control Pro (RS-232)
- Technical Specifications
- Troubleshooting
- Extent of limited warranty
- Limitations of warranty
- Limitations of liability
- Local law
- Smart-AMI
- SMART AUDIO VIDEO INNOVATION
- NOTICE
Brand : Smart-AVI
Model : HDR-8X8-Plus
Category : Router