
KAS26ZINVN - Refrigerator GORENJE - Free user manual and instructions
Find the device manual for free KAS26ZINVN GORENJE in PDF.


| Product Type | Built-in Refrigerator-Freezer |
| Model | KAS26ZINVN |
| Brand | Gorenje |
| Total Net Capacity | 260 L |
| Refrigerator Net Capacity | 200 L |
| Freezer Net Capacity | 60 L |
| Energy Efficiency Class | A+ |
| Annual Energy Consumption | 250 kWh |
| Climate Class | SN, N, ST |
| Noise Level | 40 dB(A) |
| Dimensions (H x W x D) | 177.5 x 54.0 x 55.0 cm |
| Weight | 52 kg |
| Power Supply | 220-240 V / 50 Hz |
| Refrigerant | R600a (Isobutane) |
| No Frost | Yes (Freezer) |
| Cooling System | Static (Refrigerator) |
| Door Material | Stainless Steel |
| Hinge Side | Right, reversible |
| Interior Light | LED |
| Number of Shelves | 4 glass shelves |
| Number of Door Bins | 4 |
| Freezer Drawers | 3 |
| Adjustable Thermostat | Mechanical dial |
| Defrosting | Manual (refrigerator), Auto (freezer) |
| Cleaning | Use mild soap and water; avoid abrasive cleaners |
| Spare Parts Availability | Through authorized service centers |
| Repairability Index | 7.5/10 |
Frequently Asked Questions - KAS26ZINVN GORENJE
User questions about KAS26ZINVN GORENJE
0 question about this device. Answer the ones you know or ask your own.
Ask a new question about this device
Download the instructions for your Refrigerator in PDF format for free! Find your manual KAS26ZINVN - GORENJE and take your electronic device back in hand. On this page are published all the documents necessary for the use of your device. KAS26ZINVN by GORENJE.
USER MANUAL KAS26ZINVN GORENJE
Primer nastavitve časovnega programa VKLOP
▲OPOMBA
NOČNI REŽIM (SLEEP):
Pritisk tipke bo vključil NOČNI REŽIM.
- Please read this owner's manual before operation.
- Save this manual in a safe place for future reference.
Contents
Remote controller specifications....3
Performance features .... 3
Features of the remote controller buttons 4
Indicators on display 6
Operating the remote controller 7
Handling the remote controller
Us the remote controller within 8m distance from the appliance, pointing it towards the receiver. Reception i confirmed by a beep.
CAUTION!
- The air conditioner will not operate if curtains doors or other materials block the signal from the remote controller to the indoor unit.
- Prevent any liquid from falling in to the remote controller. Do not expose remote controller to direct sunlight or heat.
- If the infrared signal receiver on the indoor unit is exposed to direct sunlight, the air conditioner may not function properly. Block the sunlight from falling on the receiver.
- If other electrical appliances react to the remote controller consult your local dealer.
Remote controller specifications
| Model R51I4/BGE,R51I4/BGCE, R51I19/BGE,R51I19/BGCE | |
| Rated voltage 3,0 V / Alkaline dry batteries | AAA,LR03 x 2) |
| Lowest voltage of the CPU emitting signal | 2,0 V |
| Transition distance 8 m (at voltage 3,0 V = 11 m) | |
| Environment -5°C ÷ 60 °C | |
Performance features
- Operating Mode: AUTO, COOL, DRY, HEAT (Cooling only model without) and FAN.
- Timer Setting Function in 24 hours.
- Indoor Setting Temperature Range: 17 C\~30 C.
- Full function of LCD (Liquid Crystal Display)
NOTE
- Button design might be slightly different from the actual one you have purchased depending on individual models.
- If indoor unit does not support specific feature than your unit cannot perform it.
Features of the remote controller buttons

-
UP button (▲ / +): Push this button to increase the indoor temperature setting or to increase hour on the timer setting.
-
DOWN button (▼ / -): Push this button to decrease the indoor temperature setting or to decrease hour on the timer setting.
-
MODE Selection Button: Each time the button is pressed, the operation mode is shifted.
-
Horizontal swing button: Used to stop or start horizontal louver movement and set the desired up / down air flow direction. The louver changes angle of 6° for every press. If keep pushing for more than 2 seconds, the horizontal louver swing feature is activated.
-
No function
-
SELF CLEAN button: Active / disable SELF CLEAN function.
-
FOLLOW ME Button: Push this
button to activate / disable FOLLOW ME function.
-
RESET Button: When you press the recessed RESET button, all current settings are cancelled and the control will return to the initial settings.
-
ON/OFF Button: Push this button to start operation, push the button again to stop operation.
-
FAN SPEED Indicator: Press the FAN SPEED button to select the desired fan speed setting (Auto-Low-Med-High).
-
TIMER ON Button: Press this button to initiate the auto-on time sequence. Each press will increase the auto-timed setting in 30 minutes increments. When the setting time displays 10:00, each press will increase the auto-timed setting 60 minutes increments. To cancel the auto-timed program, simply adjust the auto-on time to 0:00.
-
SLEEP: Active / disable Sleep function.
-
TIMER OFF Button: Press this button to initiate the auto-off time sequence. Each press will increase the auto-timed setting in 30 minutes increments. When the setting time displays 10:00, each press will increase the auto-timed setting 60 minutes increments. To cancel the auto-timed program, simply adjust the auto-off time to 0:00.
-
LOCK Button: When you press the recessed LOCK button, all current settings are locked in and the remote controller does not accept any operation except that of the LOCK. Press again to cancel the LOCK mode.
-
TURBO button: Active / disable TURBO function.
-
LED Button: Push this button to activate / disable display on the indoor unit.
Indicators on display

OPERATION MODE Indicator: When press the MODE button, it shows the current operating mode – AUTO, COOL, DRY, HEAT, FAN.
TRANSMISSION Indicator: This indicator flashes one time when remote controller transmits signals to the indoor unit.
DIGITAL DISPLAY area: This area will show the set temperature and, if in the TIMER mode, will show the ON and OFF settings of the TIMER.
ON/OFF Indicator: This symbol appears when the unit is turned on by the remote controller, and disappears when the unit is turned off.
Mode display (FAN)
Fan speed display: Displays selected fan speed.
FOLLOW ME indicator: When pressing FOLLOWME button in COOL or HEAT mode, the remote sensing function is activated and this indicator displays.
TIMER display: This display area shows the settings of the TIMER. That is, if only the Auto-on time function is set, it will display TIMER ON. If only the Auto-off time function is set, it will display TIMER OFF. If both functions are set, it will display TIMER ON OFF which indicates you have chosen both the Auto-on time and Auto-off time.
LOCK Indicator: LOCK display is displayed by pushing the LOCK button.
NOTE
All indicators shown in the figure are for the purpose of clear presentation. During the actual operation only the relative function signs are shown.
Operating the remote controller
AUTO operation

Switch on the power and the OPERATION indication lamp on the display panel of the indoor unit starts flashing.
- Use the MODE button to select AUTO.
- Push the TEMP button to set the desired room temperature. Temperature can be set between 17° C and 30° C.
- Push the ON/OFF button to start the air conditioner.
NOTE
In the AUTO mode, the air conditioner can logically choose the mode of COOL, FAN and HEAT by sensing the difference between the actual ambient room temperature and the set temperature on the remote controller. In the AUTO mode you cannot switch the fan speed. It is automatically controlled. If the AUTO mode is not comfortable for you, the desired mode can be selected manually.
COOL/HEAT (Cooling only model without) and FAN operation

Ensure that unit is plugged in and power is available.
- Press the MODE button to select COOL, HEAT or FAN mode.
- Press the UP / DOWN buttons to set the desired temperatures within range of 17 to 30°C.
- Push the FAN SPEED to select the FAN mode of AUTO, HIGH, MED or LOW.
- Push the ON/OFF button to start the air conditioner.
NOTE
The FAN mode cannot be used to control the temperature.
While in this mode, only steps 1, 3 and 4 may be performed.

DRY operation
Ensure that unit is plugged in and power is available.
- Push the MODE button to select DRY.
- Push the TEMP button to set the desired temperature from 17° C to 30° C.
- Push the ON/OFF button to start the air conditioner.
NOTE
In dehumidifying mode, you cannot switch the fan speed. It is automatically controlled.
Adjusting air flow direction
Use SWING buttons to adjust desired airflow direction.
- The louver changes angle of 6° for every press. If keep pushing for more than 2 seconds, the horizontal louver swing feature is activated. T
- The louver changes angle of 6° for every press. If keep pushing for more than 2 seconds, the vertical louver swing feature is activated.
NOTE
When the horizontal / vertical louver position would affect the cooling or heating effect of the air conditioner, it would automatically change moving direction.
TIMER operation

Push TIMER ON button to set the auto-on time and TIMER OFF button to set the auto-off time.
TIMER ON:
- Push the TIMER ON button, then the remote controller shows TIMER ON, the last set time for the starting operation and the signal "h" will be shown on the DIGITAL DISPLAY area. You are now ready to reset the time to START the operation.
- Push the TIMER ON button again to set desired unit start time.
- After setting the TIMER ON, there will be a one-half second delay before the remote controller transmits the signal to the air conditioner. Then, after approximately another 2 seconds, the signal "h" disappears and the set temperature will reappear on the digital display.
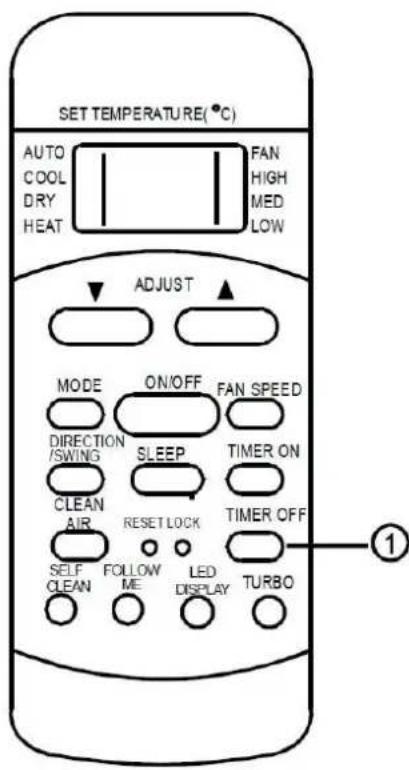
TIMER OFF:
- Push the TIMER OFF button and the remote controller will show TIMER OFF, the last set time for the stopping operation and the signal "h" will be shown on the DIGITAL DISPLAY area. You are now ready to reset the time of the STOP operation.
- Push the TIMER OFF button again to set the time you want to stop the operation.
- After setting the TIMER OFF, there will be a one-half second delay before the remote controller transmits the signal to the air conditioner. Then, after approximately another 2 seconds, the signal "h" disappears and the set temperature will reappear on the digital display.
NOTE
Setting times are limited to 0.5, 1, 1.5, 2, 2.5, 3, 3.5, 4, 4.5, 5, 5.5, 6, 6.5, 7, 7.5, 8, 8.5, 9, 9.5, 10, 11, 12, 13, 14, 15, 16, 17, 18, 19, 20, 21, 22, 23 in 24 hours.
Example of TIMER setting
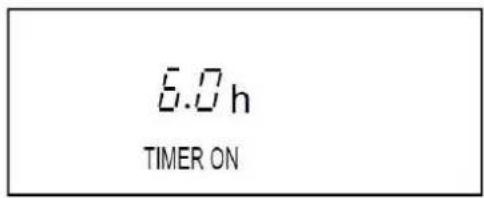

function is activated.
TIMER ON feature is useful for you when you want the unit to turn on automatically before you return home. Air conditioner will automatically start operating at the set time.
Example:
How to start the air conditioner in 6 hours.
- Press the TIMER ON button, the last setting of starting operation time and the signal 'h' will show on the display area.
- Press the TIMER ON button to display '6:0h' on the TIMER ON display.
- Wait for 3 seconds and the digital display will show the temperature again. TIMER ON indicator remains on and this
Example of combined TIMER setting


Example:
To stop the air conditioner in 2 hours and start it again in 10 hours.
- Press the TIMER OFF button.
- Press the TIMER OFF button again and set '2:0h'.
- Press the TIMER ON button.
- Press the TIMER ON button again and set '10:0h'.
- Wait for 3 seconds and the digital display will show the temperature again. TIMER ON OFF indicator remains on and this function is activated.
NOTE
Set time is relative time. This means that you set a delay time.
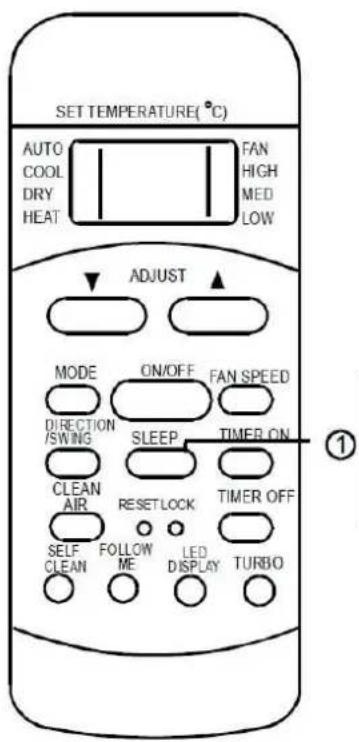
SLEEP:
Press on this button activates / disables SLEEP function.
Sleep function enables the unit to automatically increase (cooling) or decrease (heating) temperature for 1°C per hour for first 2 hours and then hold it steady for 5 hours. After 7 hours unit will strop operation.
NOTE
SLEEP function is only available in COOLING, HEATING and AUTO mode.
Insert / replace batteries
In the remote controller are two dry alkaline batteries AAA(LR03x2).
- Press the cover of the batteries, remove it, insert the batteries in accordance to the + / - signs and put back the plastic cover.
- Replace used batteries in the same order.
NOTE
- When replacing the batteries do not use two different pieces. This can effect on the performance of the remote controller.
- If you plan not to use the remote controller for a longer period of time remove the batteries. Otherwise leaking of the batteries can damage the remote controller.
- Average life expectancy of the batteries is 6 months at normal use.
- Replace the batteries when you do not hear beeping sound from the indoor unit when pressing buttons on the remote controller.
- Dispose used batteries in to the special container.
HRVATSKI
R51
UPUTE ZA UPORABU
DALJINSKI UPRAVLJAČ
Način rada VREMENSKI PROGRAM UKLJUČENO (TIMER ON) koristan je ako želite uključiti klima-uredaj prije povratka kući. Klima-uredaj se automatski uključuje i počinje s radom nakon isteka podešenoga vremena.
Primjer:
НАПОМЕНА
Način rada VREMENSKI PROGRAM UKLJUČENO (TIMER ON) koristan je ako želite uključiti klima-uredaj prije povratka kući. Klima-uredaj se automatski uključuje i počinje s radom nakon isteka podešenoga vremena.
Primjer:
НАПОМЕНА
Način rada VREMENSKI PROGRAM UKLJUČENO (TIMER ON) koristan je ako želite uključiti klima-uredaj prije povratka kući. Klima-uredaj se automatski uključuje i počinje s radom nakon isteka podešenoga vremena.
Primjer:
Timpii setați sunt limitați la 0.5, 1, 1.5, 2, 2.5, 3, 3.5, 4, 4.5, 5, 5.5, 6, 6.5, 7, 7.5, 8, 8.5, 9, 9.5, 10, 11, 12, 13, 14, 15, 16, 17, 18, 19, 20, 21, 22, 23 din 24 de ore.
Exemplu:
Exemplu:
- PRIMER NASTAVITVE ČASOVNEGA PROGRAMA VKLOP
- ▲OPOMBA
- NOČNI REŽIM (SLEEP)
- CONTENTS
- HANDLING THE REMOTE CONTROLLER
- CAUTION
- REMOTE CONTROLLER SPECIFICATIONS
- PERFORMANCE FEATURES
- NOTE
- FEATURES OF THE REMOTE CONTROLLER BUTTONS
- MODE DISPLAY (FAN)
- OPERATING THE REMOTE CONTROLLER
- COOL/HEAT (COOLING ONLY MODEL WITHOUT) AND FAN OPERATION
- DRY OPERATION
- ADJUSTING AIR FLOW DIRECTION
- TIMER OPERATION
- TIMER ON
- TIMER OFF
- EXAMPLE OF TIMER SETTING
- EXAMPLE
- EXAMPLE OF COMBINED TIMER SETTING
- SLEEP
- INSERT / REPLACE BATTERIES
- PRIMJER
- НАПОМЕНА
- EXEMPLU
Brand : GORENJE
Model : KAS26ZINVN
Category : Refrigerator