VS8F-3 - Soundcard ROLAND - Free user manual and instructions
Find the device manual for free VS8F-3 ROLAND in PDF.

| Product Type | Internal DSP Effects Card |
| Brand | Roland |
| Model | VS8F-3 |
| Category | Sound Card / Audio Interface |
| Compatibility | Roland VS Series Digital Recorders |
| Audio Channels | 8 (8-in, 8-out) |
| Bit Depth / Sample Rate | 24-bit / 44.1 kHz |
| DSP Effects | Reverb, Delay, Chorus, Flanger, Phaser, and more |
| Connector Interface | Internal Ribbon Cable |
| Power Supply | Powered by host device via internal connector |
| Dimensions (approx.) | 170 mm x 100 mm x 20 mm (6.7 x 3.9 x 0.8 inches) |
| Weight (approx.) | 150 g (0.33 lbs) |
| Operating Temperature | 5°C to 40°C (41°F to 104°F) |
| Storage Temperature | -20°C to 60°C (-4°F to 140°F) |
| Humidity | 30% to 80% (non-condensing) |
| Installation | Insert into dedicated slot inside VS recorder |
| Maintenance | Keep dry; clean with a soft, dry cloth |
| Safety Precautions | Disconnect power before installation; avoid static discharge |
| Spare Parts / Repairability | Not user-serviceable; contact Roland support |
| General Information | Expands effects processing capability of Roland VS-880, VS-890, VS-1680, etc. |
Frequently Asked Questions - VS8F-3 ROLAND
User questions about VS8F-3 ROLAND
0 question about this device. Answer the ones you know or ask your own.
Ask a new question about this device
Download the instructions for your Soundcard in PDF format for free! Find your manual VS8F-3 - ROLAND and take your electronic device back in hand. On this page are published all the documents necessary for the use of your device. VS8F-3 by ROLAND.
USER MANUAL VS8F-3 ROLAND
Before using this unit, carefully read the sections entitled: "USING THE UNIT SAFELY" and "IMPORTANT NOTES" (Owner's Manual p. 2, p. 3).
These sections provide important information concerning the proper operation of the unit. Additionally, in order to feel assured that you have gained a good grasp of every feature provided by your new unit, the owner's manual should be read in its entirety. The owner's manual should be saved and kept on hand as a convenient reference.
Copyright © 2004 ROLAND CORPORATION
All rights reserved. No part of this publication may be reproduced in any form without the written permission of ROLAND CORPORATION.
Roland Web site http://www.roland.com/
USING THE UNIT SAFELY
INSTRUCTIONS FOR THE PREVENTION OF FIRE, ELECTRIC SHOCK, OR INJURY TO PERSONS
About ⚠ WARNING and ⚠ CAUTION Notices
| ⚠ WARNING | Used for instructions intended to alert the user to the risk of death or severe injury should the unit be used improperly. |
| ⚠ CAUTION | Used for instructions intended to alert the user to the risk of injury or material damage should the unit be used improperly.* Material damage refers to damage or other adverse effects caused with respect to the home and all its furnishings, as well to domestic animals or pets. |
About the Symbols
| The △ symbol alerts the user to important instructions or warnings. The specific meaning of the symbol is determined by the design contained within the triangle. In the case of the symbol at left, it is used for general cautions, warnings, or alerts to danger. | |
| The ⊗ symbol alerts the user to items that must never be carried out (are forbidden). The specific thing that must not be done is indicated by the design contained within the circle. In the case of the symbol at left, it means that the unit must never be disassembled. | |
| The ● symbol alerts the user to things that must be carried out. The specific thing that must be done is indicated by the design contained within the circle. In the case of the symbol at left, it means that the power-cord plug must be unplugged from the outlet. |
ALWAYS OBSERVE THE FOLLOWING
WARNING
- Before using this unit, make sure to read the instructions below, and the Owner's Manual.

- Do not attempt to repair the unit, or replace parts within it (except when this manual provides specific instructions directing you to do so). Refer all servicing to your retailer, the nearest Roland Service Center, or an authorized Roland distributor, as listed on the "Information" page.

- Never use or store the unit in places that are:

- Subject to temperature extremes (e.g., direct sunlight in an enclosed vehicle, near a heating duct, on top of heat-generating equipment); or are

- Damp (e.g., baths, washrooms, on wet floors); or are
- Humid; or are
- Exposed to rain; or are
- Dusty; or are
- Subject to high levels of vibration.
- In households with small children, an adult should provide supervision until the child is capable of following all the rules essential for the safe operation of the unit.

- Protect the unit from strong impact. (Do not drop it!)

- Before installing the VS8F-3, you must first always turn off the VS series device and unplug its power cord.

- DO NOT play a CD-ROM disc on a conventional audio CD player. The resulting sound may be of a level that could cause permanent hearing loss. Damage to speakers or other system components may result.

CAUTION
• Install the circuit board only into the specified unit (VS series device). Remove only the specified screws during the installation.

IMPORTANT NOTES
Placement
- Do not expose the unit to direct sunlight, place it near devices that radiate heat, leave it inside an enclosed vehicle, or otherwise subject it to temperature extremes. Excessive heat can deform or discolor the unit.
Additional Precautions
- Before you open the included CD-ROM, you must read the “license agreement.” Opening the CD-ROM will be taken to mean your acceptance of the license agreement.
Handling CD-ROMs and SETUP DISC
- DO NOT play a CD-ROM disc on a conventional audio CD player. The resulting sound may be of a level that could cause permanent hearing loss. Damage to speakers or other system components may result.
- Avoid touching or scratching the shiny underside (encoded surface) of the disc. Damaged or dirty CD-ROM discs may not be read properly. Keep your discs clean using a commercially available CD cleaner.
- To prevent warping or accidental damage to the disc and recorded data, do not leave the disc in direct sunlight or in a hot, humid location.
- Should the disc become dirty, use a soft, dry cloth to clean it. Commercially available CD cleaning liquids or ethyl alcohol can also be used. Do not use gasoline, kerosene, benzene, lacquer thinner, anti-static agents, or LP record cleaners as they may damage the recording surface.
- To protect recording surface and label side of the disc from scratches, finger-prints, dust and smears, never touch the recording side.
- When writing titles and other information on the label side of the disc, these should be written in the printed area using an oil-based felt-tipped pen. Please do not use a ball-point pen or other writing instruments having a hard tip.
- Do not attach stickers or protective sheets, nor apply any coating fluids to both sides of the disc.
Contents
Introduction......5
Features of the VS8F-3....5
What is a VS plug-in? 5
Checking the included items....5
Before you use the VS8F-3....6
Checking the system version of your VS series....6
Backing up your projects....6
Using the SETUP DISC to update the system version....7
Updating the system program of your VS series....7
Recovering your projects....8
Installing the VS8F-3....8
Cautions When Installing an Effect Expansion Board 8
Rules for installing effect expansion boards 9
What is the Key Card? 9
Rule 1....9
Rule 2....9
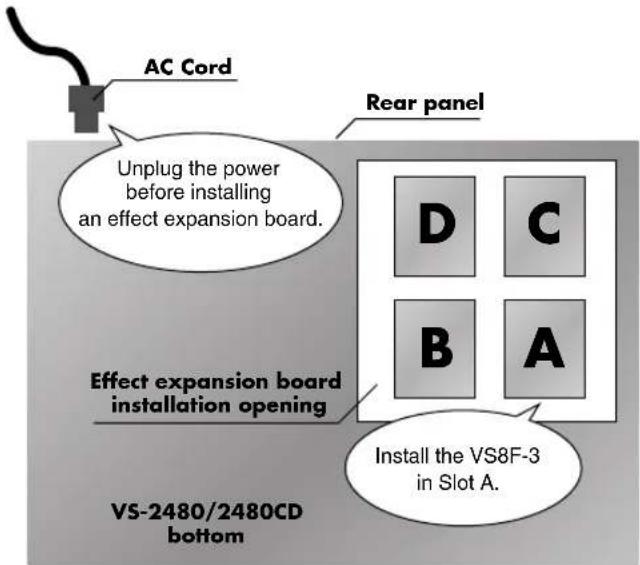
Where to install the VS8F-3 (Checking the first slot)....10
VS-2480/2480CD 10
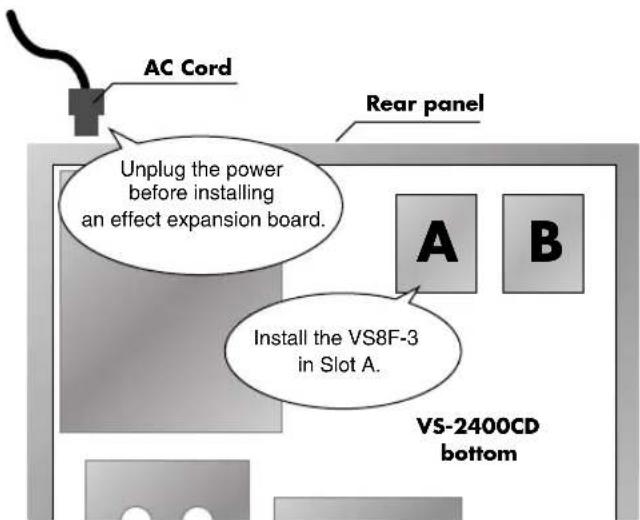
VS-2400CD....10
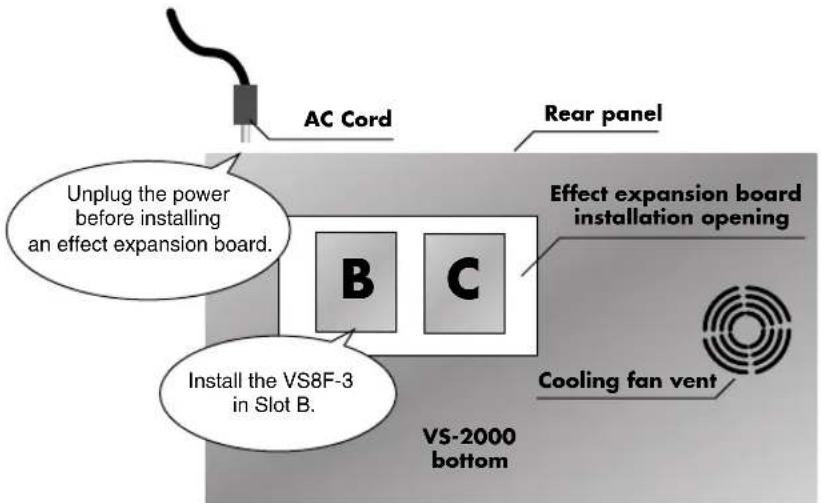
VS-2000....10
Installing plug-in effects in the V Studio....11
Authorized and Trial versions.... 11
Installation examples 12
Installation procedure....15
Backing up your VS plug-in programs....15
Re-installing your plug-ins....16
Uninstalling a plug-in ....16
Using the effects....17
Selecting and editing a plug-in ....17
Selecting a plug-in ....17
Selecting a plug-in's patch....17
Editing the effect parameters....18
Saving an edited patch....18
Effect Algorithm....19
What are VS plug-in Programs? 19
About the effect algorithms....19
About the included Roland VS plug-ins 19
Mastering Tool Kit 20
Tempo Mapping Effect.... 23
Stereo Reverb 26
Vocal Channel Strip 28
Pre-Amp Modeling.... 29
Preset Patch List ....30
Troubleshooting 32
Installation....32
Operation....32
Precautions when requesting service for the VS8F-3....33
Introduction
Features of the VS8F-3
The VS8F-3 is an optional board that can be installed in an effect expansion slot of a supported VS series unit to add or expand its effect-processing capabilities.
- Switching between various effect programs written specifically for the VS8F-3 allows the VS8F-3 to produce different effects.
- 56-bit internal processing and up to 96kHz sound quality.
- Runs up to two plug-ins per card.
- Runs 2-stereo/4-mono plug-ins (at less than 48kHz) or 1-stereo/2-mono plug-in(s) (at 64kHz or over).
- Includes 5 Roland plug-ins.
■ What is a VS plug-in?
VS plug-in is the brand new concept that provides a standardized open-platform development environment for plug-in effects.
Products (plug-in packages) that conform to this standard bear the logo shown at the right (above).
Plug-ins that conform to this standard and are manufactured by software developers other than Roland bear the logo shown at the right (below), indicating that the
plug-in has been certified by Roland as a compatible VS plug-in.
Products bearing either of these logos are guaranteed to work correctly on the VS8F-3.

Checking the included items
The VS8F-3 carton contains the following items.
• VS8F-3 (Effect Expansion Board)
- VS8F-3 SETUP DISC
- Owner's Manual (the document you are reading)
• SOFTWARE LICENSE AGREEMENT (Leaflet)
- Patch List
• Key Card sticker and VS plug-in sticker
MEMO
Only the
VS-2480HD/2480CD/2400
CD support projects with 64kHz or higher sampling rates.

What are plug-ins?
Switching between various effect programs written specifically for the VS8F-3 allows the VS8F-3 to produce different effects. These programs are called "plug-ins" since you use them just as though you were "plugging-in" the particular effect you want to use.
HINT
Please place the Key Card sticker on the VS8F-3 that is designated as the Key Card (To learn about the Key Card, please refer p. 9). When you've installed a VS8F-3 and verified the V Studio's operating system software, affix the plug-in sticker to the V Studio to signify that the unit is now plug-in ready.
Before you use the VS8F-3
To use VS8F-3 in a VS series recorder, the system program version of the V Studio must be compatible with the VS8F-3. Please check the system program version of your VS series recorder before installing the VS8F-3. If you find the version is not compatible with the VS8F-3, please update the software using the SETUP DISC contained in this package. The update should be executed once prior to the installation of the VS8F-3. If you find the system program version is compatible with the VS8F-3, the update is not necessary.
On this chapter, the notes and cautions regarding installation of VS8F-3 are stated. Please read carefully and install the board correctly.
Checking the system version of your VS series
-
On the VS-2480/2480CD/2400CD, power up your VS series device while holding down [CH EDIT 1] + [TRACK STATUS 1]. On the VS-2000, power up your VS-2000 while holding down [HARMONY] + [TRACK/STATUS 1].
Continue holding down these buttons until "Version Information" appears in the display. -
Checking the system version of your VS series device.
If the version is lower than the version numbers given below, you must update the system of your VS series device. Update the system as described below.
• VS-2480/2480CD: Version 2.50 or later
• VS-2400CD: Version 1.50 or later
• VS-2000: Version 1.50 or later
![Version Information Boot Version : 1.002 Create Date : 12/04/2003 Create Time : 14:00:00 System Version : 1.002 Create Date : 12/07/2003 Create Time : 14:00:00 Sub System : 1.001 Version : 1.001 Check Sum Total : D80Ch Boot : 0765h System : 0138h Parameter : 627h Sub System : 6C88h [ENTER] Version number of the current system appears here.](/content/2026/05/1062962/images/366f3e574fdc51bb3ff2713b4c0bc2c0439e32889fa566f7fed2c9be43df0798.jpg)
■ Backing up your projects
To ensure the safety of your data, we recommend that you back up the projects saved on your hard disk to other media, and then initialize your hard disk before updating the system program. You can restore the backed-up projects to your internal hard disk using the project RECOVER command.
-
Back up projects (performance data) saved on the hard disk to CD-R/RW discs. As described in the owner's manual, back up all projects that you want to keep. When doing so, back up not only the projects in the current drive (partition), but also any projects that are saved in other partitions.
-
Initialize the hard disk (Format Drive). Projects saved on the hard disk will be completely erased, and the disk will be free of data. Initialize the hard disk as described in the owner's manual of your VS series device.

When you execute the Format Drive (Make Partition) command, all projects saved on the hard disk will be erased. It will not be possible to use the Undo function to recover the erased projects. If you accidentally erase a project you wanted to keep, there is no way to recover the project. Roland Corporation can assume no responsibility whatsoever concerning the recovery of any lost content. Before you execute the Format Drive (Make Partition) command, you must back up (Project Backup) any project you want to keep.
- Perform the Shutdown procedure (Owner's Manual of V Studio "Turning Off the Power") and turn off the power of all equipment connected to the V Studio device.
MEMO
When starting up in Step 1, you must continue holding down the buttons until the lowest line of the screen shows "Boot Condition: System Information."
MEMO
The explanations in this manual include illustrations that depict what should typically be shown by the display. Note, however, that your unit may use a newer, enhanced version of the system (e.g., including newer features), so what you actually see in the display may not always match what appears in the manual.
MEMO
"Format Drive" may be described as "Make Partition" in the owner's manual if you purchased version 1.xx of VS-2480/2480CD. The name of a function may vary according to changes in specifications, but this will make no difference in its operation.
Using the SETUP DISC to update the system version
Here's how to update the system program of your VS series device so that it will support the VS8F-3. You'll need to perform this step just once for VS series devices whose system does not yet support the VS8F-3. To update the system program of your VS series device, use the "SETUP DISC" included in the package.

If you're using the VS-2480CD/2400CD/2000, you can update your system using the internal CD-R/RW drive. If you're using the VS-2480HD (the model without an internal CD-R/RW drive), you will need an external SCSI CD-RW drive for the update, such as the VS-CDR-II/-III or a compatible Plextor CD drive. The VS-CDR-I can not be used for this update.
■ Updating the system program of your VS series
- Read Backing up your projects (p. 6).
We recommend that you back up the projects saved on your hard disk, and then initialize the hard disk.
-
Turn on the power of the VS series device, and eject the disc tray.
-
Place the SETUP DISC on the disc tray.
-
Close the disc tray.
-
Perform the Shutdown procedure (Owner's Manual of V Studio "Turning Off the Power").
-
Turn on the power of the VS series device.
The opening title screen and the "Setup Drive" message will appear. The CD-R/RW drive will be checked. Please wait. When the checking process is complete, the system will ask "Update Main System Program?"
-
If you want to update the system to the displayed version, press [ENTER/YES]. A message will ask "Keep User Setting?"
-
Specify whether you want to preserve your user routing, system setting and user effect patch settings when the update is performed, or whether all of these settings are to be initialized. Press [ENTER/YES] or [EXIT/NO] to make your selection.
- [ENTER/YES] → settings will be preserved
- [EXIT/NO] → settings will be initialized
The display will indicate "Main Update," and the system update will begin.

If you pressed [EXIT/NO] in Step 8, the display will ask "Init User Setting Sure?" If you are sure you want to initialize the settings, press [ENTER/YES].
If you decide you don't want to proceed with the initialization, press [EXIT/NO]. In this case, you are returned to Step 8.

If you press [ENTER/YES] in response to "Init User Setting Sure?," all settings will be initialized to their factory defaults.
-
When the system update is completed, the disc tray of the CD-R/RW drive will open. Remove the SETUP DISC.
-
Confirm that the "Please Reboot OK" message is displayed, then turn off the power of the VS series device.
-
Turn on the power of the V Studio once again.
-
Check the version number that is displayed at start-up.

If you have already downloaded the most recent system program from the Roland website, or already performed the update using the SETUP DISC (so that your unit supports the VS8F-3), you don't need to update again.

Check the Roland website http://www.roland.com/ for the latest system upgrade for your product.

Projects and backup data you created before updating the system will still be usable in their existing form. (Data compatibility is preserved.)

If you decide not to update, press [EXIT/NO]. The update process will be halted, and the V Studio will start up as usual.

Never turn off the power while the update is in progress. Doing so will destroy the operating program of the VS series device itself, and it will no longer be possible to start it up.
■ Recovering your projects
Restore the data that you had backed up in Backing up your projects (p. 6) back onto the hard disk (Project Recovery).
Refer to the owner's manual of your VS series device, and restore your projects back onto the hard disk.

Projects and backup data you created before updating the system will still be usable in their existing form. (Data compatibility is preserved.)
Installing the VS8F-3
Installation of the VS8F-3 is exactly the same as installing the VS8F-2. Refer to the Quick Start manual for your VS series device and to Rules for installing effect expansion boards (p. 9), and install the VS8F-3 as directed.

Before you continue, you must read Using the SETUP DISC to update the system version (p. 7) and complete the system program update for your VS series device.
■ Cautions When Installing an Effect Expansion Board
- Before installing the effect expansion board, turn off the power of the VS series device and all connected devices, and disconnect all cables from the VS series device.
- When installing effect expansion boards, remove only the specified screws.
- Should you remove screws, make sure to put them in a safe place out of children's reach, so there is no chance of them being swallowed accidentally.
- When turning the unit upside-down, get a bunch of newspapers or magazines, and place them under the four corners or at both ends to prevent damage to the buttons and controls. Also, you should try to orient the unit so no buttons or controls get damaged.
-
To avoid the risk of damage to internal components that can be caused by static electricity, please carefully observe the following whenever you handle the board.
-
Before you touch the board, always first grasp a metal object (such as a water pipe), so you are sure that any static electricity you might have been carrying has been discharged.
- When handling the board, grasp it only by its edges. Avoid touching any of the electronic components or connectors.
- Save the bag in which the board was originally shipped, and put the board back into it whenever you need to store or transport it.
- Use a Phillips screwdriver that is suitable for the size of the screw (a number 2 screwdriver). If an unsuitable screwdriver is used, the head of the screw may be stripped.
- To remove a screw, rotate the screwdriver counter-clockwise. To tighten a screw, rotate the screwdriver clockwise.
- Be careful that the screws you remove do not drop into the interior of the VS series.
- Do not leave the bottom cover in a detached state. Be sure to reattach it after the effect expansion boards have been installed.
- Do not touch any of the printed circuit pathways or connection terminals.
- Be careful not to cut your hand on the edge of the installation bay.
- Never use excessive force when installing a circuit board. If it doesn't fit properly on the first attempt, remove the board and try again.
- When circuit board installation is complete, double-check your work.


tightenloosen
Rules for installing effect expansion boards
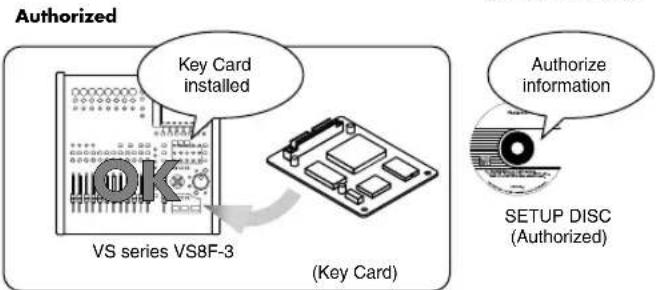
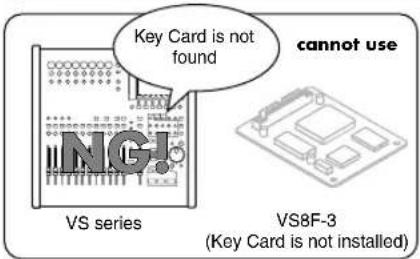
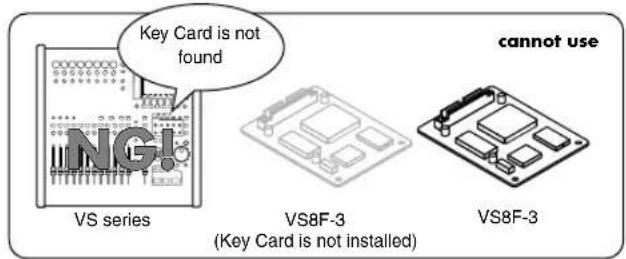
■ What is the Key Card?
It is necessary to authorize the effect programs with individual ID of your VS8F-3 prior to installing and using the effect programs on the VS series device. The VS8F-3 used for the authorization is called the "Key Card." The VS plug-in programs can function when a Key Card is present. To authorize the effects programs with the Key Card correctly, the Key Card must be installed according to the rules stated below.
Rule 1
On the VS-2480/2480CD/2400CD, effect expansion boards must be installed in order starting from EFFECT A (the first one).
On the VS-2000, effect expansion boards must be installed in order starting from EFFECT B (the first one).
You must not leave the first effect slot vacant, or skip any slots when you install boards.
Rule 2
When installing the VS8F-3, you must install it as follows in conformity with Rule 1. When the VS8F-3 in the first slot (the Key Card, shown here in bold type) is authorized, Key Card data is written to the hard disk together with the VS plug-in program.
| VS-2480/2480CD | A B C D | |||
| VS8F-3: x1VS8F-2: not installed | VS8F-3 | |||
| VS8F-3: x1VS8F-2: x1 | VS8F-3 | VS8F-2 | ||
| VS8F-3: x2VS8F-2: not installed | VS8F-3 | VS8F-3 | ||
| VS8F-3: x2VS8F-2: x1 | VS8F-3 | VS8F-3 | VS8F-2 | |
| VS8F-3 | VS8F-2 | VS8F-3 | ||
| VS8F-3: x1VS8F-2: x2 | VS8F-3 | VS8F-2 | VS8F-2 | |
| VS8F-3: x1VS8F-2: x3 | VS8F-3 | VS8F-2 | VS8F-2 VS8F-2 | |
| VS8F-3: x3VS8F-2: not installed | VS8F-3 | VS8F-3 | VS8F-3 | |
| VS8F-3: x3VS8F-2: x1 | VS8F-3 | VS8F-3 | VS8F-3 VS8F-2 | |
| VS8F-3 | VS8F-3 | VS8F-2 VS8F-3 | ||
| VS8F-3 | VS8F-2 | VS8F-3 VS8F-3 | ||
| VS8F-3: x2VS8F-2: x2 | VS8F-3 | VS8F-3 | VS8F-2 VS8F-2 | |
| VS8F-3 | VS8F-2 | VS8F-3 VS8F-2 | ||
| VS8F-3 | VS8F-2 | VS8F-2 VS8F-3 | ||
| VS8F-3: x4VS8F-2: not installed | VS8F-3 | VS8F-3 | VS8F-3 VS8F-3 |
| VS-2400CD | A | B |
| VS8F-3: x1VS8F-2: not installed | VS8F-3 | |
| VS8F-3: x1VS8F-2: x1 | VS8F-3 | VS8F-2 |
| VS8F-3: x2VS8F-2: not installed | VS8F-3 | VS8F-3 |
| VS-2000 | A (internal) B C | ||
| VS8F-3: x1VS8F-2: not installed | equivalent to VS8F-2 | VS8F-3 | |
| VS8F-3: x1VS8F-2: x1 | VS8F-3 | VS8F-2 | |
| VS8F-3: x2VS8F-2: not installed | VS8F-3 | VS8F-3 |

For details, refer to Where to install the VS8F-3 (Checking the first slot) (p. 10)

If you affix the included Key Card sticker to the authorized VS8F-3 installed in the first slot, you'll be able to distinguish it from other VS8F-3 boards.

The VS8F-3 cannot use effects created for the VS8F-2. Nor can the VS8F-2 use plug-in effects created for the VS8F-3.

When the VS-2400CD is shipped from the factory, a VS8F-2 is installed in slot A. If you want to use a VS8F-3, you must move the VS8F-2 to slot B or remove it.

VS8F-3=Key Card VS8F-3=not Key Card
Where to install the VS8F-3 (Checking the first slot)
VS-2480/2480CD
VS-2400CD
VS-2000
Installing plug-in effects in the V Studio
VS plug-in programs for the VS8F-3 are provided on a SETUP DISC, and thus cannot be used by the VS8F-3 without installation to the hard disk.
Before you can use a VS plug-in program, you must write it into the internal hard disk of your VS series unit. This process is referred to as "installing a VS plug-in program."
■ Authorized and Trial versions
The installed VS plug-in programs come in two forms: an Authorized version and a Trial version.
The version that is installed depends on what you select during installation, or on the state of the SETUP DISC you use.
An authorized version lets you use the full functionality of the VS plug-in program, while a trial version imposes several limitations on use.
Authorized version
A VS plug-in program installed as an authorized version lets you use the full functionality of the program.
To install the authorized version, use a SETUP DISC that has not yet been used for authorization, and select "AUTHORIZE" during the installation.
When the authorized version is installed, data describing the combination of the VS8F-3 (Key Card) installed in the first effect slot (p. 10) and the VS plug-in program is stored to the hard disk of V Studio along with the installed program. This means that in order to use an authorized VS plug-in program, you must use it in conjunction with the Key Card
VS8F-3. If the Key Card is not installed, the functions of effects programs will be limited as with the trial version, described below.
Trial version
A VS plug-in program installed as a trial version can be used with several limitations. The program will be installed as a trial version in the following cases.
- When you are using a SETUP DISC that has not yet been used for authorization and you select "TRIAL" during the installation.
- In case you are installing effect programs on a V Studio without a Key Card from a SETUP DISC after authorization or from a backup of a SETUP DISC.
Trial versions have the following limitations.
- Plug-in effect parameters are not saved when you execute Store Current Project on your VS series unit.
- User patches cannot be saved.
- The audio output from VS series will be muted at regular intervals.
- The popup message of "You are using trial version" is displayed at regular intervals.
MEMO
Using the following methods, you can avoid the muting and popup message.
- Uninstall the VS plug-in program trial version
- Reload the current project
- Press [F4 (UnSel)] in PLUG-IN SELECT screen
In both of the above cases, the VS8F-3 will be set to NO PLUG-IN status (no plug in program is loaded).
MEMO
If you're using the VS-2480CD/2400CD/2000, you can install your system using the internal CD-R/RW drive. If you're using the VS-2480HD (the model without an installed CD-R/RW drive), you will need an external SCSI CD-RW drive for the installation, such as the VS-CDR-II/-III or a compatible Plextor CD drive. The VS-CDR-I can not be used for this installation.
MEMO
An already-authorized SETUP DISC cannot be used to install an authorized version for a different VS8F-3 board.
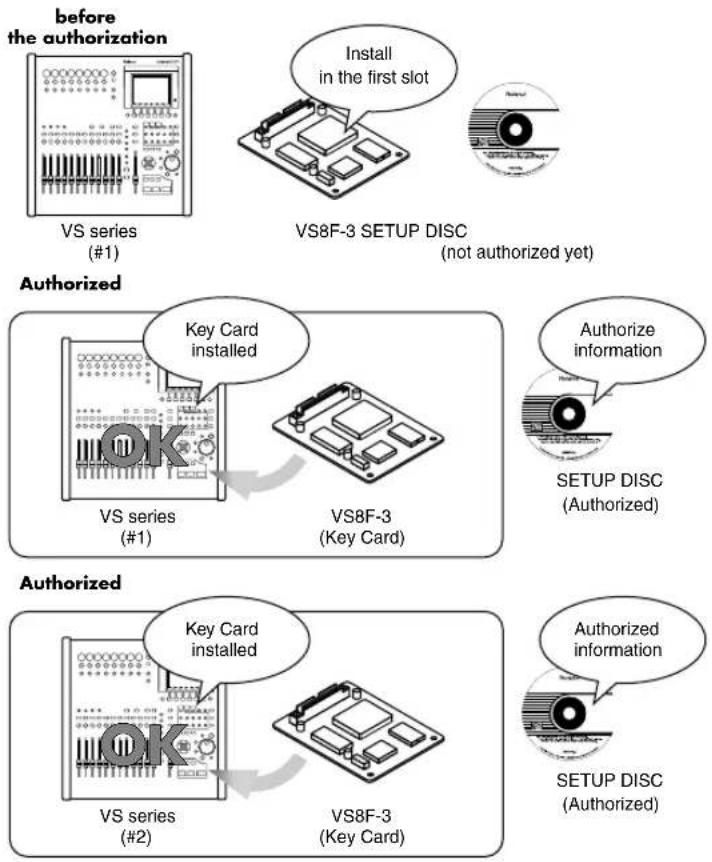
■ Installation examples
If you own one VS series unit and one VS8F-3 board
When authorizing, the VS8F-3 must be installed in the first slot (p. 10).
This VS8F-3 will become the "Key Card" when authorization is completed.

When authorization is performed, data describing the combination of VS plug-in programs and Key Card (VS8F-3) is written to the hard disk during installation.
However, if you use the system without the Key Card VS8F-3 installed, the VS plug-in programs installed on the hard disk cannot be used as authorized plug-ins.
If you own one VS series unit and two (or more) VS8F-3 boards
When authorizing, a VS8F-3 must be installed in the first slot (p. 10).
This VS8F-3 will become the "Key Card" when authorization is completed. Install any remaining VS8F-3 boards in vacant slots in conformity with Rule 1 (p. 9).

After authorization, the VS plug-in programs will work with any installed VS8F-3 board as long as the Key Card is present.

flowchart
graph LR
    A["VS series VS8F-3"] -->|Key Card installed| B["(Key Card)"]
    B --> C["VS8F-3"]
    C -->|Authorized information| D["SETUP DISC (Authorized)"]
If the Key Card VS8F-3 is not installed, the VS plug-in programs installed on the hard disk will not be available for use as authorized plug-ins.
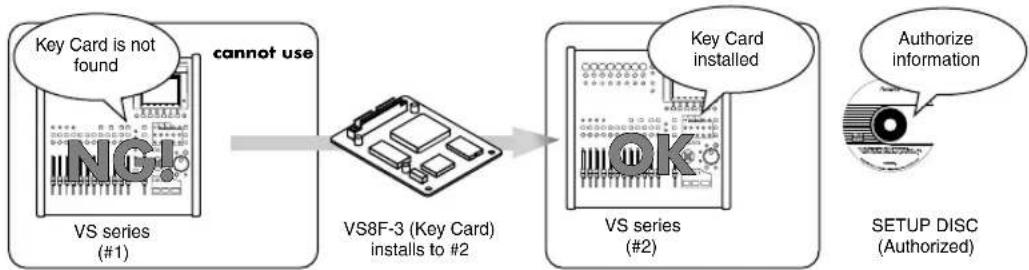
If you own two (or more) VS series units and one VS8F-3 board
For the first VS series unit, you must install the VS8F-3 in the first slot (p. 10) when authorizing. This VS8F-3 will become the "Key Card" when authorization is completed.
When authorization is performed, data describing the combination of VS plug-in programs and Key Card (VS8F-3) is written to the hard disk during installation.
If you move the Key Card from the first VS series unit to another VS series unit, the same VS plug-in programs used on the first unit can then be installed using the already-authorized SETUP DISC. In other words, as long as the Key Card is installed, you can install its VS plug-in programs from the SETUP DISC and use them.
However, since there is only one Key Card, you will not be able to use these VS plug-in programs as authorized plug-ins on two or more VS series units at the same time.
flowchart
graph LR
    A["VS series (#1)"] -->|cannot use| B["VS8F-3 (Key Card) installs to #2"]
    B --> C["VS series (#2)"]
    C -->|Key Card installed| D["SETUP DISC (Authorized)"]
    D -->|Authorize information| E["Output"]
HINT
Please place the Key Card sticker on the VS8F-3 that is designated as the Key Card (To learn about the Key Card, please refer p. 9).
If you own two (or more) VS series units and two (or more) VS8F-3 boards
For the first VS series unit, you must install the VS8F-3 in the first slot (p. 10) when authorizing. This VS8F-3 will become the "Key Card" when authorization is completed. Install the remaining VS8F-3 boards in vacant slots in conformity with Rule 1 (p. 9).
![before the authorization VS series (#1) Install in the first slot VS8F-3 [A] SETUP DI8S8F-3 [B] (not authorized yet)](/content/2026/05/1062962/images/dd18c8a4f638612c8e624e0c69f8c589a388f979c9ec43da6bbc163ebb30b62d.jpg)
When authorization is performed, data describing the combination of VS plug-in programs and Key Card (VS8F-3) is written to the hard disk during installation. After authorization, the VS plug-in programs will work with any installed VS8F-3 board as long as the Key Card is present.
If you move the Key Card from the first VS series unit to another VS series unit, the same VS plug-in programs used on the first
flowchart
graph LR
    A["Key Card installed"] --> B["VS series (#1)"]
    B --> C["VS8F-3 [A"] (Key Card)]
    C --> D["VS8F-3 [B"]]
    D --> E["SETUP DISC (Authorized)"]
    F["Authorize information"] --> D
unit can then be installed using the already-authorized SETUP DISC. In other words, as long as the Key Card is installed, you can install its VS plug-in programs from the SETUP DISC and use them.
However, since there is only one Key Card, you will not be able to use these VS plug-in programs as authorized plug-ins on two or more VS series units at the same time.
flowchart
graph LR
    A["VS series (#1)"] -->|key card is not found| B["VS8F-3 [B"]]
    B --> C["VS8F-3 [A"] (Key Card) installs to #2]
    C --> D["VS series (#2)"]
    D --> E["Key Card installed"]
    E --> F["SETUP DISC (Authorized)"]
    G["Key card is not found"] --> H["VS series (#1)"]
    I["VS8F-3 [B"]] --> J["VS8F-3 [A"] (Key Card) installs to #2]
    K["Key card installed"] --> L["VS series (#2)"]
    M["Key card is not found"] --> N["VS series (#1)"]
    O["VS8F-3 [B"]] --> P["VS8F-3 [A"] (Key Card) installs to #2]
    Q["Key card installed"] --> R["VS series (#2)"]
    S["Key card is not found"] --> T["VS series (#1)"]
    U["VS8F-3 [B"]] --> V["VS8F-3 [A"] (Key Card) installs to #2]
    W["Key card installed"] --> X["VS series (#2)"]
    Y["Key card is not found"] --> Z["VS series (#1)"]
    AA["VS8F-3 [B"]] --> AB["VS8F-3 [A"] (Key Card) installs to #2]
    AC["Key card installed"] --> AD["VS series (#2)"]
    AE["Key card is not found"] --> AF["VS series (#1)"]
    AG["VS8F-3 [B"]] --> AH["VS8F-3 [A"] (Key Card) installs to #2]
    AI["Key card installed"] --> AJ["VS series (#2)"]
    AK["Key card is not found"] --> AL["VS series (#1)"]
    AM["VS8F-3 [B"]] --> AN["VS8F-3 [A"] (Key Card) installs to #2]
    AO["Key card installed"] --> AP["VS series (#2)"]
    AQ["Key card is not found"] --> AR["VS series (#1)"]
    AS["VS8F-3 [B"]] --> AT["VS8F-3 [A"] (Key Card) installs to #2]
    AU["Key card installed"] --> AV["VS series (#2)"]
    AW["Key card is not found"] --> AX["VS series (#1)"]
    AY["Key card is not found"] --> AZ["VS series (#1)"]
    BA["Key card is not found"] --> BB["VS series (#1)"]
If you leave the Key Card in the first VS series unit and install the other (i.e., non-Key Card) VS8F-3 boards in the second VS series unit, the VS plug-in programs installed in the second VS series unit will not be usable. Nor can you use an already-authorized SETUP DISC to install an authorized version of the same VS plug-in programs to any VS without the original Key Card installed.
flowchart
graph LR
    A["Key Card installed"] --> B["VS series (#1)"]
    B --> C["VS8F-3 [A"] (Key Card)]
    C --> D["VS8F-3 [B"] installs to #2]
    D --> E["VS series (#2) cannot use"]
    E --> F["Key Card is not found"]
    F --> G["SETUP DISC (Authorized)"]
    H["Authorize information"] --> I
MEMO
By using a second SETUP DISC to authorize the as-yet-unauthorized VS8F-3 [B], you will be able to use both VS8F-3 boards.
HINT
Please place the Key Card sticker on the VS8F-3 that is designated as the Key Card (To learn about the Key Card, please refer p. 9).
Installation procedure
- Carefully read the included leaflet "License agreement for Roland software" and verify that you accept the conditions.
- Insert the SETUP DISC into the CD-R/RW drive.
- Press [CD-RW].
The CD-RW menu screen will appear.
- Select Page 2 "PLUG-IN Inst," and press [ENTER/YES].
The PLUG-IN INSTALL screen will appear. This shows product information about the VS plug-in program (manufacturer, product name, plug-in version, and size).
MEMO
The drive (partition) in which the plug-in program is to be installed will be decided by the VS series device. The drive information is shown at "DESTINATION" on "PLUG-IN INSTALL" screen. Check that the remaining capacity of the disk is bigger than the size of VS plug-in program to be installed. For installation, a remaining capacity of twice or more than the VS plug-in program size is required.
- Press [F5 (Instal)].
The "Install?" popup will appear. - To begin the installation, press [ENTER/YES].
The "AUTHORIZE?" popup will appear. - If you want to install the authorized version, press [ENTER/YES]. If you want to install the trial version, press [EXIT/NO].
If you press [ENTER/YES], authorization data will be written to the SETUP DISC and the hard disk, and the program will be installed. If you press [ENTER/NO], a trial version will be installed but authorization data will not be written. The "Really, Sure?" popup will appear. - To confirm the installation, press [ENTER/YES].
- When installation is completed, remove the SETUP DISC. The CD-RW menu screen will appear.
Backing up your VS plug-in programs
If the SETUP DISC becomes lost or damaged after you have used it to install the authorized version of a plug-in program, you will be unable to re-install (p. 16) the plug-in. As a safeguard against such problems, we strongly recommend that you back up your VS plug-in programs on a commercially available CD-R/RW disc after authorization. Backing up also lets you save the user patches of the plug-in effect to the CD-R/RW disc.
- Insert a blank CD-R/RW disc into the CD-R/RW drive.
- Press [CD-RW].
The CD-RW menu screen will appear.
- Select Page 2 "PLUG-IN Back," and press [ENTER/YES].
The PLUG-IN BACKUP screen will appear. This lists the VS plug-in programs that are installed on the hard disk. - Use the cursor to select the plug-in that you want to back up, and press [F4 (BACKUP)]. The "Backup?" popup will appear.
- To begin the backing up, press [ENTER/YES].
The "Really, Sure?" popup will appear.
- To confirm the backing up, press [ENTER/YES].
If you press [ENTER/YES], VS plug-in programs will be backed up to CD-R/RW disc. The PLUG-IN BACKUP screen will appear.
MEMO
The contents of the SETUP DISC are recorded in VS format (the dedicated data format of the VS series). Therefore, it is impossible to make a backup disc on a PC.
MEMO
If you are unable to install successfully even when using a not-yet-authorized SETUP DISC, please contact your dealer or a Roland service center listed in the "Information" section of the manual.
MEMO
If the SETUP DISC is not yet inserted after Step 6, a message of "Please Insert Plug-in CD" will appear, and the CD-RW drive tray will open.
MEMO
The plug-in programs will be installed in the drive (partition) that precedes the last drive. For example if you have drives IDE0\~IDE3, the programs will be installed in the IDE2 drive.
MEMO
If you lose or damage the SETUP DISC after authorization, a fee will be charged for a correctly functioning replacement disc. Be sure to back up your VS plug-in programs in order to avoid such an inconvenience.
MEMO
It is able to use the backuped plug-in program as authorized version if installed to VS series with Key Card.
Re-installing your plug-ins
If you initialize (format) the hard disk of your VS series unit, the VS plug-in programs on the hard disk will be lost, leaving you unable to use the VS plug-in programs even if the VS8F-3 is installed. By re-installing the VS plug-in programs you will again be able to use them.
- Perform Steps 1\~5 of Installation procedure (p. 15).
The "Re-Install?" popup will appear.
- To begin the re-installation process, press [ENTER/YES].
The "Really, Sure?" popup will appear.
- To confirm the re-installation process, press [ENTER/YES].
If you press [ENTER/YES], VS plug-in programs will be installed to the hard disk.
- When installation is completed, remove the CD.
The CD-RW menu screen will appear.
Uninstalling a plug-in
Here's how to delete an installed VS plug-in program. This lets you delete a trial version of a VS plug-in program, or obtain more free space on your hard disk if it becomes full.
- Press [CD-RW].
The CD-RW menu screen will appear.
- Select Page 2 "PLUG-IN UnIns," and press [ENTER/YES].
The PLUG-IN UNINSTALL screen will appear. This lists the VS plug-in programs that are installed on the hard disk.
- Use the cursor to select the plug-in that you want to delete, and press [F5 (UNINST)].
The "Uninstall?" popup will appear.
- To start the uninstall process, press [ENTER/YES].
The "Really, Sure?" popup will appear.
- To confirm the uninstallation process, press [ENTER/YES].
If you press [ENTER/YES], the selected VS plug-in program(s) will be deleted.

If you uninstall an authorized version of a VS plug-in program, the user patches will also be deleted. The deleted data cannot be recovered.
Using the effects
Now that you've installed the VS8F-3 in your VS series unit, let's try out the effects.
A VS8F-3 effect can be used as an insert effect or loop effect in the same way as an effect on the VS8F-2. For details, refer to the owner's manual of your VS series unit.
Selecting and editing a plug-in
■ Selecting a plug-in
Before using an effect for the VS8F-3, you'll need to load a VS plug-in program into the VS8F-3.
- On the VS-2480/2480CD, press [EFFECT]. On the VS-2400CD or VS-2000, press [SHIFT] + [F3 (EFFECT)].
The EFFECT VIEW screen will appear. - Use the cursor to select the effect number that you want to use, and press [ENTER/YES]. The PLUG-IN INFORMATION screen will appear.
- Press [F1 (PlugIn)].
The PLUG-IN LIST screen will appear. This lists the VS plug-in programs that are installed on the hard disk. - Use the cursor to select the plug-in that you want to use, and press [F5 (SELECT)].
The PLUG-IN INFORMATION screen will appear. Information about the selected plug-in will appear. The plug-in is now loaded.
■ Selecting a plug-in's patch
Here's how to load a patch (a set of effect settings) for the selected VS plug-in program.
- Load a plug-in as described in Selecting a plug-in.
- Press [F3 (Patch)].
The PLUG-IN PATCH SELECT screen will appear. This lists the patches for the selected VS plug-in program. - If you wish to use a preset patch, press [F1 (PRESET)], and if you wish to use a user patch, press [F2 (USER)].
The PATCH LIST will change to show preset patches or user patches. - Use the cursor to select a patch that you want to use, and press [F5 (SELECT)].
The PLUG-IN INFORMATION screen will appear. Information about the selected plug-in will appear. The patch is now loaded.
MEMO
You can't use a "Single" type effect as an even-numbered effect. Its patch name will be grayed-out for such effects.
MEMO
Depending on the plug-in patch, it may take some time after you press [F5 (SELECT)] until the screen appears.
MEMO
While recording or playback on VS series products, you cannot switch a plug-in's program or patch.
■ Editing the effect parameters
Here's how to edit the effect parameters of the selected patch.
-
Select a patch as described in Selecting a plug-in's patch (p. 17).
-
Press [F4 (Edit)].
The PLUG-IN screen will appear. The controllers operate as follows.
| Controller | How to use (Top panel) How to use (Mouse) | |
 | Move the cursor to the value, and edit it using one of the following methods.Turn the TIME/VALUE dialThe index markings around the knob will change to reflect the current value. | Move the mouse cursor to the knob, and drag upward or downward. |
| (Off)(On) | Move the cursor to the switch, and edit it using one of the following methods.Turn the TIME/VALUE dialPress the [ENTER/YES] button | Click the switch. Depending on the status of the switch, it will change between On and Off.In the VGA screen, the switch will display orange (On) and gray (Off). |
 | Usc [F1 (←)] [F2 (→)] to move between pages. If additional screens are available, a triangle symbol is displayed at both sides. | Click the page tab for the page you want to see. By clicking the triangle shaped button on both sides, you can display the next or previous pages of effect settings. |
| none | Move the cursor to the slide-switch, and edit it using one of the following methods.Turn the TIME/VALUE dialPress the [ENTER/YES] button | Click the slide-switch. The switch knob will move to the left or right. |
■ Saving an edited patch
Here's how to save your user patches so that you'll be able to reuse your edited effect settings when desired.
- Edit a patch as described in Editing the effect parameters.
- Press [F4 (Save)].
The PLUG-IN PATCH SAVE screen will appear.
- Use the cursor to select the location in which you want to save the patch, and press [F5 (SAVE)].
You can save up to one hundred patches; U000--U099.
MEMO
In Step 3, move the cursor to the saved user patch in the PATCH LIST, and then press [F1 (NAME)] –the PLUG-IN NAME EDIT screen will appear. After changing the patch name on this screen, you can press [F5 (SAVE)] to store the patch with its new name on your hard disk. For details on inputting names, refer to owner's manual of VS series devices "Naming."
MEMO
Depending on the VS plug-in program, it may take some time after you press [F4 (EDIT)] until the screen appears.
MEMO
While recording on VS series products, the PLUG-IN screen cannot be displayed.
MEMO
When displaying the PLUG-IN screen, the metronome may sound unstable. This is not a malfunction or problem of the system.
[Non-Text]
For details on all of the parameters and values of the Plug-In effects, refer to the Effect Algorithm (p. 19).
MEMO
When a project with Plug-In effect is loaded, P000 patch (the first one of preset patches) will be highlighted on the PLUG-IN EFFECT SELECT Screen. However, the system re-produces the parameters of Plug-In effect when the project is stored.
Effect Algorithm
■ What are VS plug-in Programs?
VS plug-in programs are programs created specifically for the VS8F-3.
Each of these programs consists of
• Algorithms that produce the effect
- Programs for communication between the VS series unit and the VS8F-3
- Preset patch data that contains settings for each of the plug-in effect's parameters
■ About the effect algorithms
"Effect algorithm" refers to each effect like Reverb or Chorus. It also includes effect packages that contain multiple algorithms. Two effect algorithms (multi-type and single-type) can be simultaneously produced by a VS8F-3.
The "Multi-Type" effect algorithm
Two different multi-type effect algorithms can coexist on a VS8F-3.
You can operate and change these effect algorithms independently.
In this manual, explanations that apply to multi-type effect algorithms are indicated by an Multi
The "Single-Type" effect algorithm
Effect Algorithms of single-type effects require all the processing power of one VS8F-3 board. You can use one single-type plug-in effect on each VS8F-3.
In other words, you can't use two single-type VS plug-in programs on one VS8F-3, nor can a multi-type and a single-type program coexist.
In this manual, explanations that apply to single-type effect algorithms are indicated by an Single
About the spec of VS plug-in programs for input and output
In this manual, explanations that apply to 1stereo in-1stereo out-type programs are indicated by an
In this manual, explanations that apply to 2mono in-2mono out-type programs are indicated by an


■ About the included Roland VS plug-ins
Each VS8F-3 includes five Roland plug-ins that can be installed from a SETUP DISC included in the box. The VS8F-3 recalls the following VS plug-in programs from the hard disk and changes its effect algorithm accordingly.
- Mastering Tool Kit
Multi p. 20 - Tempo Mapping Effect
Single → p. 23 - Stereo Reverb
single → p. 26 - Vocal Channel Strip
Multi → p. 28 - Pre-Amp Modeling
Multi → p. 29
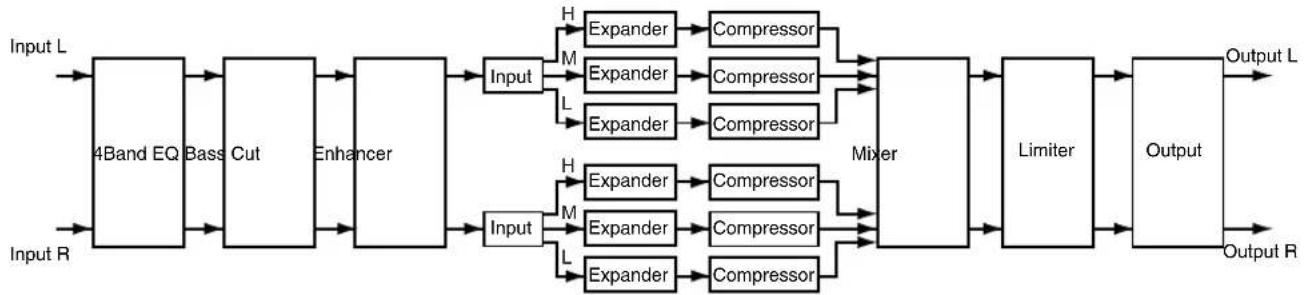
Mastering Tool Kit
Multi

This is a compressor that divides the input signal into frequency bands (High, Middle, and Low) and regulates the volume of each band. When mixing down to MD or DAT, or when using a CD-R disc to produce an original audio CD, you can apply this effect to master your song at the optimal level.
flowchart
graph LR
    A["Input L"] --> B["4Band EQ"]
    C["Input R"] --> D["Bass Cut"]
    B --> E["Adder"]
    D --> E
    E --> F["Input"]
    F --> G["Mixer"]
    H["Input"] --> I["Adder"]
    J["Input"] --> K["Adder"]
    G --> L["Compressor"]
    K --> M["Compressor"]
    L --> N["Mixer"]
    M --> N
    N --> O["Limiter"]
    P["Output L"] --> Q["Output R"]
    style A fill:#f9f,stroke:#333
    style C fill:#f9f,stroke:#333
    style B fill:#ccf,stroke:#333
    style E fill:#ccf,stroke:#333
    style F fill:#cff,stroke:#333
    style H fill:#cff,stroke:#333
    style J fill:#cff,stroke:#333
    style K fill:#cff,stroke:#333
    style L fill:#ffc,stroke:#333
    style M fill:#ffc,stroke:#333
    style N fill:#ffc,stroke:#333
    style O fill:#ffc,stroke:#333
    style Q fill:#ffc,stroke:#333
4band EQ (4band Equalizer)
| Parameter (full name) | Setting Function | |
| Sw (Switch) | OFF, ON Turns the equalizer on or off. | |
| FREQ/TYPE ASSIGN FREQ, TYPE | Switches between FREQ and TYPE as the assignment of the upper row of knobs | |
| GAIN/Q ASSIGN GAIN, Q Switches between GAIN and Q as the assignment of the lower row of knobs | ||
| Band 1 FREQ (Band 1 Frequency) 20~20000 Hz Sets the center frequency in the Band 1 frequency. (*1) | ||
| Band 1 GAIN -15.0~15.0 dB Sets the boost/cut amount in the Band 1 frequency. (*1) | ||
| Band 1 TYPE | PEAK, LSV, HSV, LPFI,HPF1, LPF2, HPF2, BPF,BEF, THRU | Sets the type of the Band 1 frequency equalizer. (*1) |
| Band 1 Q 0.36~16.00 | Sets the width of the area around the Band 1 frequency that will be affected by the gain settings. (*1) | |
| Band 2 FREQ (Band 2 Frequency) 20~20000 Hz Sets the center frequency in the Band 2 frequency. (*1) | ||
| Band 2 GAIN -15.0~15.0 dB Sets the boost/cut amount in the Band 2 frequency. (*1) | ||
| Band 2 TYPE | PEAK, LSV, HSV, LPFI,HPF1, LPF2, HPF2, BPF,BEF, THRU | Sets the type of the Band 2 frequency equalizer. (*1) |
| Band 2 Q 0.36~16.00 | Sets the width of the area around the Band 2 frequency that will be affected by the gain settings. (*1) | |
| Band 3 FREQ (Band 3 Frequency) 20~20000 Hz Sets the center frequency in the Band 3 frequency. (*1) | ||
| Band 3 GAIN -15.0~15.0 dB Sets the boost/cut amount in the Band 3 frequency. (*1) | ||
| Band 3 TYPE | PEAK, LSV, HSV, LPFI,HPF1, LPF2, HPF2, BPF,BEF, THRU | Sets the type of the Band 3 frequency equalizer. (*1) |
| Band 3 Q 0.36~16.00 | Sets the width of the area around the Band 3 frequency that will be affected by the gain settings. (*1) | |
| Band 4 FREQ (Band 4 Frequency) 20~20000 Hz Sets the center frequency in the Band 4 frequency. (*1) | ||
| Band 4 GAIN -15.0~15.0 dB Sets the boost/cut amount in the Band 4 frequency. (*1) | ||
| Band 4 TYPE | PEAK, LSV, HSV, LPFI,HPF1, LPF2, HPF2, BPF,BEF, THRU | Sets the type of the Band 4 frequency equalizer. (*1) |
| Band 4 Q 0.36~16.00 | Sets the width of the area around the Band 4 frequency that will be affected by the gain settings. (*1) | |
| INPUT GAIN -42.0~6.0 dB Sets the overall volume before passing through the equalizer. | ||
| LEVEL -42.0~6.0 dB Sets the overall volume after passing through the equalizer. | ||
(*1) Depending on the TYPE setting for each band, some combinations of FREQ/GAIN/Q values will be invalid, as shown below.
| TYPE | Function FREQ GAIN Q | |||
| PEAK (Peaking) | Creates a peak or valley in the region of FREQ | OK | OK | OK |
| LSV (Low shelving) | Boosts/cuts the region below I:REQ | OK | OK | |
| LISV (High shelving) | Boosts/cuts the region over I:REQ | OK | OK | ---- |
| LPF1 (First low pass filter) | Passes only the sound below FRFQ | OK | ---- | ---- |
| HPF1 (First high pass filter) | Passes only the sound over FRFQ | OK | ---- | ---- |
| LPF2 (Second low pass filter) | Steeper response curve than LPF1 | OK | ---- | OK |
| HPF2 (Second high pass filter) | Stcepcr response curve than HPF1 | OK | ---- | OK |
| BPF (Band pass filter) | Passcs only the sound in the region of FREQ | OK | ---- | OK |
| BEF (Band eliminate filter) | Eliminates only the sound in the region of FREQ | OK | ---- | OK |
| THRU | Passes the sound of all bands. | ---- | ---- | ---- |
BASS CUT (Bass Cut Filter)
Cuts off undesired Low frequency band sounds such as vocal pop or "plosive" noises.
| Parameter (full name) | Setting | Function |
| Sw (Bass Cut Switch) | OFF, ON | Turns the bass cut filter on or off. |
| FREQ (Frequency) | 20~2000 Hz | Sets the frequency for cutting off undesired Low frequency band sounds such as pop noise. |
ENHANCER
Accentuates the sound and pushes the sound forward.
Parameter (full name) Setting Function
| Sw (Switch) | OFF, ON Turns the enhancer on or off. |
| FREQ (Frequency) 200–20000 Hz Sets the frequency at which the enhancer effect starts working. | |
| SENS (Sensitivity) 0–100 Sets the degree of the enhancer effect desired. | |
| MIX LEVEL 0~12.0 dB Sets the amount of the enhancer sound to be added to the direct sound. | |
INPUT
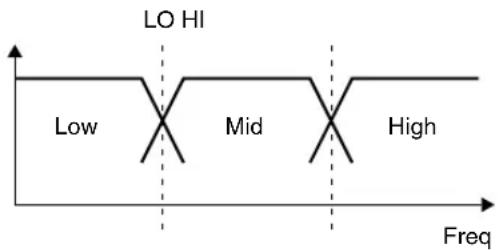
Splits the direct sound into three frequency bands, that is, Low, Middle and High frequency bands.
Parameter (full name) Setting Function
| IN GAIN (Input Gain) | -24.0–12.0dB Sets the overall volume before entering the expander/compressor. | |
| D-TIME (Detect Time) 0~10 ms Sets the length of delay to add to the direct sound input. | ||
| LO (Low Split Point) 20~800 Hz | Sets the frequency at which the direct sound is split into three bands (on the Low frequency band side). | |
| I-II (High Split Point) 1600~16000 Hz | Sets the frequency at which the direct sound is split into three bands (on the High frequency band side). | |
Effect of "Detect Time" under Input
With ordinary compressors, a moment of delay occurs to suppress a "level over" instance after it has been detected. With this algorithm, this problem is bypassed by using the input sound only for level detection and adding a specified length of delay to the sound for processing and output. "Detect Time" under Input is the setting of the delay time for this purpose. Note that supplying Detect Time causes a time difference between input and output of the audio signals, requiring due considerations if used for purposes other than mastering (ex. channel insertion).
Level
Splitting into frequency bands
To split into High, Middle and Low frequency bands, Low Split Point (LO) and High Split Point (HI) under Input are used to specify frequencies.
EXP (Expander)
Expands the entire output signals when the input volume drops below a specified value.
Parameter (full name) Setting Function
| Sw (Switch) OFF, ON Turns the expander on or off. | ||
| HIGH THRE (High Threshold) -80.0~0.0 dB | Sets the volume at which the expander for the High frequency band starts working. | |
| HIGH RATIO 1:1.00~1:16.0, 1:∞ | Sets the ratio at which the output in the High frequency band is increased when the input level has dropped below the High threshold level. | |
| HIGH ATK (High Attack) 0~800.0 ms | Sets the time until when the High frequency band expander starts working after the input level drops below the High threshold level. | |
| HIGH REL (High Release) 50~8000 ms | Sets the time until when the High frequency band expander stops working after the input level exceeds the High threshold level. | |
| MID THRE (Middle Threshold) -80.0~0.0 dB | Sets the volume at which the expander for the Middle frequency band starts working. | |
| MID RATIO (Middle Ratio) 1:1.00~1:16.0, 1:∞ | Sets the ratio at which the output in the Middle frequency band is increased when the input level has dropped below the Middle threshold level. | |
| MID ATK (Middle Attack) 0~800.0 ms | Sets the time until when the Middle frequency band expander starts working after the input level drops below the Middle threshold level. | |
| MID REL (Middle Release) 50~8000 ms | Sets the time until when the Middle frequency band expander stops working after the input level exceeds the Middle threshold level. | |
| LOW THRE (Low Threshold) -80.0~0.0 dB | Sets the volume at which the expander for the Low frequency band starts working. | |
| LOW RATIO 1:1.00~1:16.0, 1:∞ | Sets the ratio at which the output in the Low frequency band is increased when the input level has dropped below the Low threshold level. | |
| LOW ATK (Low Attack) 0~800.0 ms | Sets the time until when the Low frequency band expander starts working after the input level drops below the Low threshold level. | |
| LOW REL (Low Release) 50~8000 ms | Sets the time until when the Low frequency band expander stops working after the input level exceeds the Low threshold level. | |
COMP (Compressor)
Compresses the entire output signals when the input volume exceeds a specified value.
Parameter (full name)
Setting Function
| Sw (Switch) | OFF, ON Turns the compressor on or off. | |
| HIGH THRE (High Threshold) | -24.0~0.0 dB | Sets the volume at which the compressor for the High frequency band starts working. |
| HIGH RATIO 1:1.00~1:16.0, 1: | ∞ | Sets the ratio at which the output in the High frequency band is suppressed when the input level has exceeded the High threshold level. |
| HIGH ATK (High Attack) 0~800.0 ms | Sets the time until when the High frequency band compressor starts working after the input level has exceeded the High threshold level. | |
| HIGH REL (High Release) 50~8000 ms | Sets the time until when the High frequency band compressor stops working after the input level has dropped below the High threshold level. | |
| MID THRE (Middle Threshold) | -24.0~0.0 dB | Sets the volume at which the compressor in the Middle frequency band starts working. |
| MID RATIO (Middle Ratio) 1:1.00~1:16.0, 1: | ∞ | Sets the ratio at which the output in the Middle frequency band is suppressed when the input level has exceeded the Middle threshold level. |
| MID ATK (Middle Attack) 0~800.0 ms | Sets the time until when the Middle frequency band compressor starts working after the input level has exceeded the Middle threshold level. | |
| MID REL (Middle Release) 50~8000 ms | Sets the time until when the Middle frequency band compressor stops working after the input level has dropped below the Middle threshold level. | |
| LOW THRE (Low Threshold) -24.0~0.0 dB Sets the volume at which the compressor for the Low frequency band starts working. | ||
| LOW RATIO 1:1.00~1:16.0, 1: | ∞ | Sets the ratio at which the output in the Low frequency band is suppressed when the input level has exceeded the Low threshold level. |
| LOW ATK (Low Attack) 0~800.0 ms | Sets the time until when the Low frequency band compressor starts working after the input level has exceeded the Low threshold level. | |
| LOW REL (Low Release) 50~8000 ms | Sets the time until when the Low frequency band compressor stops working after the input level has dropped below the Low threshold level. | |
MIXER
Adjusts the volume for each frequency band. (*2)
Parameter (full name)
Setting Function
| HIGH (High Level) | - , - 80.0 6.0 dB | Sets the volume in the High frequency band after passing through the expander and compressor. |
| MID (Middle Level) | - , - 80.0 - 6.0 dB | Sets the volume in the Middle frequency band after passing through the expander and compressor. |
| LOW (Low Level) | - , - 80.0 - 6.0 dB | Sets the volume in the Low frequency band after passing through the expander and compressor. |
(*2) With Compressor, the level is automatically adjusted to the optimal value according to the settings for Threshold (THRE) and Ratio (RATIO). Setting Attack (ATK) to a relatively long time may cause distortion. For this reason, a margin of -6 dB is provided. Adjust the Mixer level as required.
LIMITER
Prevents distortion by suppressing signals at High levels.
Parameter (full name)
Setting Function
| Sw (Switch) | OFF, ON | Turns the limiter on or off. |
| THRE (Threshold) | -24.0~0.0 dB | Sets the volume at which the limiter starts working. |
| ATK (Attack) | 0.0~800.0 ms | Sets the time until when the limiter starts working after the input level has exceeded threshold level. |
| REL (Release) | 50~8000 ms | Sets the time until when the limiter stops working after the input level drops below the threshold level. |
SOFT CLIP
Suppresses conspicuous distortion that may occur when the effect of compressor/limiter has been applied excessively.
Parameter (full name)
Setting Function
| Sw (Switch) | OFF, ON Turns the soft clip on or off. |
OUTPUT
Provides settings concerning overall output.
Parameter (full name)
Setting Function
| LEVEL (Output Level) | -∞, -80.0~6.0 dB Sets the output level of the Mastering Tool Kit. |
This is a stereo delay that lets you specify the delay time relative to the tempo. Since you can set the delay time as a note value length, you don't have to perform annoying manual calculations to determine the time based on the tempo.
Because this can be synchronized to the MIDI clock from the VS series unit, it will automatically follow any tempo changes during the song.
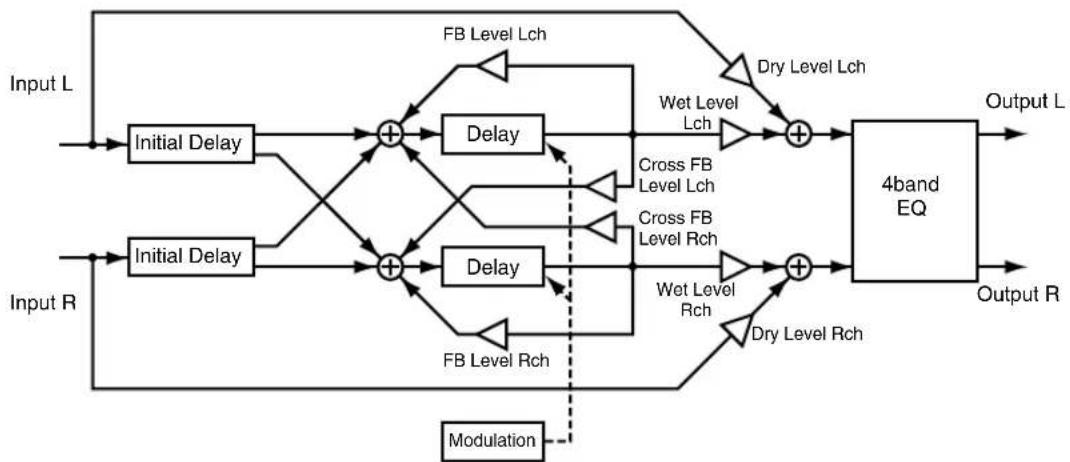
flowchart
graph LR
    A["Input L"] --> B["Initial Delay"]
    C["Input R"] --> D["Initial Delay"]
    B --> E["+"]
    D --> F["+"]
    E --> G["Delay"]
    F --> H["Delay"]
    G --> I["FB Level Lch"]
    H --> J["FB Level Rch"]
    I --> K["Wet Level Lch"]
    J --> L["Wet Level Rch"]
    K --> M["+"]
    L --> N["+"]
    M --> O["4band EQ"]
    N --> P["4band EQ"]
    O --> Q["Output L"]
    P --> R["Output R"]
    S["Modulation"] --> F
    S -.-> F
    T["Dry Level Lch"] --> M
    U["Dry Level Rch"] --> N
■ Synchronizing with the MIDI clock
Here's how you can make the Tempo Mapping Effect synchronize with the MIDI Clock transmitted by the VS series unit.
- On VS-2480/2480CD, press [UTILITY]. On VS-2400CD/2000, press [SHIFT]+[F4 (UTILITY)]. The UTILITY Screen will appear.
- Press [F6 (SYNC)] on Page 1. The SYNC PARAMETER Screen will appear.
- Set the following parameters.
Parameter (full name) Setting
SYNC MODE INT
MIDI OUT SYNC Gen. MIDIclk or Sync Tr ('1)
(*1) If you choose the SyncTr, you must prepare a sync track in advance. When you set the MIDI OUT SYNC Gen. parameter to MIDIclk or SyncTr, the MIDI clock signal will output from the MIDI OUT connector.
TEMPO
Specifies the base tempo for operation.
Parameter (full name) Setting Function
TEMPO
25\~250 Specifies the base tempo
SYNC (Sync Switch) OFF, ON On/off switch for synchronization with the MIDI clock of the VS (*2)
(*2) If SYNC is On, the base tempo (TEMPO) is ignored.

The pitch of the delay sound may vary according to tempo changes. In particular, noise may occur if there are sudden changes in tempo. To avoid this, you'll need to ensure that the effect is not receiving input until the tempo changes have stabilized.

It may take some time for Tempo Mapping Effect to synchronize with the project's tempo if Tempo Map in project is immediately changed.
L-ch DELAY
Parameter (full name) Setting Function
| INT.DLY (Initial delay time) | 1/1, 1/1t, 1/2, 1/2t, 1/4, 1/4t, 1/8, 1/8t, 1/16, 1/16t, 1/32, 1/32t, 1/64, 1/64t, 0.0-1000 ms | Specifics the initial delay time of the L-channel in terms of a note length (*3, *4) With the 0.0 setting, there will be no initial delay. Settings of 0.0-1000 produce a fixed delay of the specified time that is not affected by the tempo. |
| INT.D.PAN (Initial delay pan) L63~C~R63 | Specifics the volume balance at which the L-channel initial delay sound will be sent to the L/R stereo delays. | |
| D.TIME (Delay time) | 1/1, 1/1t, 1/2, 1/2t, 1/4, 1/4t, 1/8, 1/8t, 1/16, 1/16t, 1/32, 1/32t, 1/64, 1/64t, 0-1000 ms | Specifics the delay time for left-side delay in terms of a note value (*3, *4) Settings of 0-1000 produce a fixed delay of the specified time that is not affected by the tempo. |
| MOD DEPTH (Modulation depth) 0-100 | Specifics the amount by which MODULATION will vary the delay time of left-side delay. | |
| FB (Feedback level) -100-0-100 Sets the amount of the left-side delay that will be returned to the left delay input. | ||
| X-FB (Cross feedback level) | -100-0-100 | Sets the amount of the left-side delay that will be returned to the right delay input. |
| LF DAMP GAIN -36.0-0.0 dB | Sets the amount of the left-side attenuation in the Low frequency band for the decay sound fed back. | |
| LF DAMP FREQ 20-2000 Hz | Sets the frequency at which the left-side attenuation in the Low frequency band starts to the fed back delay sound. | |
| HF DAMP GAIN -36.0-0.0 dB | Sets the amount of the left-side attenuation in the High frequency band for the delay sound fed back. | |
| HF DAMP FREQ 200-20000 Hz | Sets the frequency at which the left-side attenuation in the High frequency band starts to the fed back delay sound. | |
R-ch DELAY
| Parameter (full name) | Setting Function | |
| INI.DLY (Initial delay time) | 1/1, 1/1t, 1/2, 1/2t, 1/4, 1/4t, 1/8, 1/8t, 1/16, 1/16t, 1/32, 1/32t, 1/64, 1/64t, 0.0~1000 ms | Specifies the initial delay time of the R-channel in terms of a note length (*3, *4) With the T1IRU setting, there will be no initial delay. Settings of 0~1000 produce a fixed delay of the specified time that is not affected by the tempo. |
| INI.D.PAN (Initial delay pan) L63~C~R63 | Specifies the volume balance at which the R-channel initial delay sound will be sent to the L/R stereo delays. | |
| D.TIME (Delay time) | 1/1, 1/1t, 1/2, 1/2t, 1/4, 1/4t, 1/8, 1/8t, 1/16, 1/16t, 1/32, 1/32t, 1/64, 1/64t, 0.0~1000 ms | Specifies the delay time for right-side delay in terms of a note value (*3, *4) Settings of 0~1000 produce a fixed delay of the specified time that is not affected by the tempo. |
| MOD DEPTH (Modulation depth) 0~100 | Specifies the amount by which MODULATION will vary the delay time of right-side delay. | |
| FB (Feedback level) | -100~0~100 | Sets the amount of the right-side delay should be returned to the right delay input. |
| X-FB (Cross feedback level) | -100~0~100 | Sets the amount of the right-side delay should be returned to the left delay input. |
| LF DAMP GAIN -36.0~0.0 dB | Sets the amount of the right-side attenuation in the Low frequency band for the delay sound fed back. | |
| LF DAMP FREQ 20~2000 Hz | Sets the frequency at which the right-side attenuation in the Low frequency band starts to the fed back delay sound. | |
| HF DAMP GAIN -36.0~0.0 dB | Sets the amount of the right-side attenuation in the High frequency band for the delay sound fed back. | |
| HF DAMP FREQ 200~20000 Hz | Sets the frequency at which the right-side attenuation in the High frequency band starts to the fed back delay sound. | |
| LINK (Channel link switch) OFF, ON (*1) Specifies if channel R follows or does not follow the settings for channel L. | ||
(*3) Initial Delay Time (INI.DLY) and Initial Delay Panpot (INI.D.PAN) are not linked.
MODULATION
| Parameter (full name) | Setting Function | |
| W.F (Wave form) SINE, SQUIRE, +EXP, -EXP Specifies the waveform that will modulate the delay time of the stereo delays | ||
| CYCLE | 1/1, 1/1t, 1/2, 1/2t, 1/4,1/4t, 1/8, 1/8t, 1/16, 1/16t,1/32, 1/32t, 1/64, 1/64t,0.0~10.0 Hz (*4) | Specifies the frequency (cycle) at which the delay time of the stereo delays will be modulated, in terms of a note value (*4) |
| PHASE L-R -180 degree ~180 degree | Specifies the L/R phase difference for the waveform that will modulate the stereo delays | |
OUTPUT
| Parameter (full name) | Setting Function | |
| L/R BAL (L/R balance) | L63~C~R63 Sets the volume balance between the left-side sound and the right-side sound. | |
| WET LEVEL | - , -80.0 6.0 dB | Sets the volume of the delay sound. |
| DRY LEVEL | - , -80.0 6.0 dB | Sets the volume of the direct sound. |
(*4) The note value lengths have the following significance.
| Display | Explanation |
| 0.0 no delay sound. | |
| 1/1 a whole note | |
| 1/1t a whole note triplets | |
| 1/2 a half note | |
| 1/2t half note triplets | |
| 1/4 a quarter note | |
| 1/4t quarter note triplets | |
| 1/8 an eighth note | |
| 1/8t eighth note triplets | |
| 1/16 a sixteenth note | |
| 1/16t sixteenth note triplets | |
MEMO
If the specified note value length exceeds the allowable range of delay time, the delay time will be limited to the allowable range (In this case, in the LCD, a * symbol will appear; in the VGA, the value will display in red).
4band EQ (4band Equalizer) →p. 20
HINT
When using the Tempo Mapping Effect (TME) and a new tempo has been entered into a Tempo Map, please reduce the input signal to the TME by manually switching off the appropriate Aux Send(s) on the source channel(s), prior to the tempo map change. (i.e. On the affected snare drum's channel, set Aux Send 1 Sw to OFF if the TME is in the FX1 position, before the tempo change.)
This will avoid possible pitch changes of the delay effect while changing tempos. Switch on the Aux Send after the new tempo has stabilized to hear the Tempo Mapping Effect again....synchronized with the new tempo. Alternatively, Automix snapshots can be used to automatically perform this function, as well as change Aux Send and FX Return values as needed.
Stereo Reverb


This models the reflections and reverberation of a hall or room, as well as its spatial character. Since both input and output are stereo, you can add reverberation without impairing the stereo image created by panning the input source.
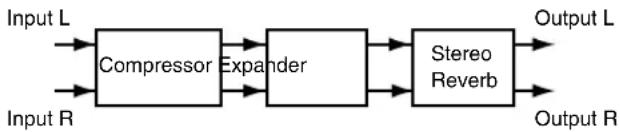
flowchart
graph LR
    A["Input L"] --> B["Compressor"]
    C["Input R"] --> B
    B --> D["Expander"]
    D --> E["Stereo Reverb"]
    E --> F["Output L"]
    E --> G["Output R"]
Sound types
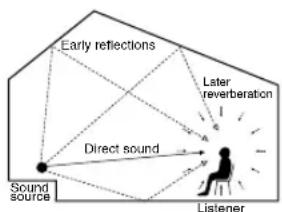
Sounds around us can be analyzed and categorized into three types: direct sounds, early reflections and reverberation. A direct sound is the sound that reaches the listener directly from the source. An early reflection is the sound that has rebounded from the wall once, twice or several times. A reverberation is the sound we hear after sound reflections are repeated many times.
flowchart
graph TD
    A["Sound source"] --> B["Direct sound"]
    B --> C["Laptop"]
    D["Early reflections"] --> E["Late reverberation"]
    E --> F["Listener"]
    style A fill:#f9f,stroke:#333
    style B fill:#ccf,stroke:#333
    style C fill:#cfc,stroke:#333
    style D fill:#fcc,stroke:#333
    style E fill:#cff,stroke:#333
    style F fill:#ffc,stroke:#333
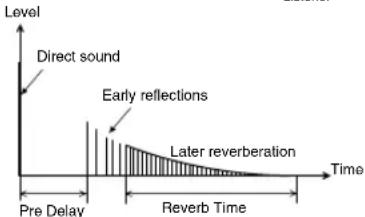
Relationship between sound and time
Reflected sounds reach the listener in the following sequence. The pre-delay is the time from when the direct sound is heard until the reverb is heard. The reverb time is the time over which the reverb decays to silence.
line
| Time Period | Level Label | | ----------------- | ------------------- | | Pre Delay | Early reflections | | Reverb Time | Later reverberation| | After Reverbation | Early reflections |Reverb sound quality
The sound quality of a reverb is affected by materials of the walls and other members from which the sound is reflected. This is because the degree of attenuation in the High and Low frequency bands varies. HF-Damp Gain and LF-Damp Gain are provided so that you can adjust such attenuation degrees. The smaller the value becomes, the steeper the degree of attenuation of the reverberation becomes in the High and Low frequency bands. In addition, in order to obtain softer reverberation, make the frequency lower by using HF-Damp Frequency. In order to obtain harder reverberation, make the frequency higher by using the LF-Damp Frequency parameter.
COMP (Compressor)
If the input volume exceeds the specified threshold, this will compress the dynamic range of the output signal.
Parameter (full name) Setting Function
| Sw (Switch) | OFF, ON Turns the compressor on or off. | |
| TYPE | SOLID, TUBE1 ~TUBE4 (*2) | SOLID: A compressor using solid-state circuitry, with linear responseTUBE 1: A compressor using vacuum tube circuitry. Generates light, cvcn-order harmonicsTUBE 2: A compressor using vacuum tube circuitry. Generates deep, even-order harmonicsTUBE 3: A compressor using vacuum tube circuitry. Generates light, odd-order harmonicsTUBE 4: A compressor using vacuum tube circuitry. Generates deep, odd-order harmonics |
| THRE (Threshold) -24.0~0.0 dB Sets the level at which the compressor starts taking effect. | ||
| RATIO 1:1.00~1:16.0, 1:∞ | Sets the compression ratio applied when threshold level (THRE) is exceeded. | |
| ATK (Attack) 0.0~800.0 ms (*2) | Sets the time from when the input level exceeds the threshold level to when the effect begins to be applied. | |
| REL (Release) 50~8000 ms | Sets the time from when the input level drops below the threshold level (THRE) to when the effect ceases to apply be applied. | |
| SOFT KNEE OFF, ON (*2) | Softens the change in output level at the region of the input threshold (THRE) levelOff: Level will change immediately before and after the threshold (THRE)On: Level will change over a curve in the region of the threshold (THRE) | |
| A-GAIN (Auto Gain) OFF, ON Automatically compensates for the decrease in output volume caused by compression (*1) | ||
| LEVEL -24.0~24.0 dB Sets the volume of the compressor sound. | ||
(*1) Auto Gain automatically adjusts the output level according to the settings of the Threshold (THRE) and Ratio (RATIO) parameters. However, if the parameter of Attack Time (ATK) is set long, this cannot compress a peaky input and may cause distortion. For this reason, a margin of -6 dB is provided. Adjust the LEVEL as required.
(*2) If you've set the TYPE parameter to TUBE1\~TUBE4, the only setting available for the ATK parameter will be 1.0\~800.0 ms, and the SOFT KNEE parameter is set to ON.
EXP (Expander)
If the input volume drops below the specified threshold, this will expand the dynamic range of the output signal.
Parameter (full name) Setting Function
| Sw (Switch) | OFF, ON Turns the expander on or off. | |
| THRE (Threshold) -80.0~0.0 dB | Sets the volume at which the expander starts working. | |
| RATIO 1:1.00~1:16.0, 1: | Sets the ratio at which the output is increased when the input level has dropped below the threshold level (THRE). | |
| ATK (Attack) 0.0~800.0 ms | Sets the time until when the expander starts working after the input level drops below the threshold level (THRE). | |
| REL (Release) 50~8000 ms | Sets the time until when the expander stops working after the input level exceeds the threshold level (THRE). | |
REVERB
Adds reverberation.
Parameter (full name) Setting Function
| TYPE | ROOM1, ROOM2, HALL.1, HALL.2, PLATE | Type of reverbROOM1: Typical room reverbROOM 2: Room reverb with a softer tone than ROOM1HALL1: Typical hall reverbHALL2: Hall revcrb with a softer tone than HALL 1PLATE: Plate reverb |
| SIZE (Room Size) 5~40 m Sets the size of the room. | ||
| PRE-DLY (Pre-Delay) 0~200 ms Sets the time until the reverb sound appears. | ||
| TIME (Reverb Time) 0.1-32.0 sec. Sets the time length of the reverb sound. | ||
| ER LEVEL(Early Reflection Level | 0~100 Sets the volume of the early reflection. | |
| DIFFUSE (Diffusion) 0~100 Sets the extent of diffusion of the early reflection sound. | ||
| DENSITY 0~100 Sets the density of the reverb sound. | ||
| LF DAMP GAIN | -36.0~0.0 dB | Sets the degree of attenuation of the reverb in the Low frequency band. |
| LF DAMP FREQ | 20~2000 Hz | Sets the frequency on which the reverb starts attenuating in the Low frequency band. |
| HF DAMP GAIN | -36.0~0.0 dB | Sets the degree of attenuation of the reverb in the High frequency band. |
| HF DAMP FREQ | 200~20000 kHz | Sets the frequency on which the reverb starts attenuating in the High frequency band. |
| HCF (High Cut Frequency) | 200~20000 kHz | Sets the frequency for which the High frequency band elements of the reverb arc cut. |
| L/R BAL (L/R Balance) | L63~C~R63 | Sets the volume balance between the left-side sound and the right-side reverb sound. |
| WET LEVEL - | ∞,-80.0~6.0 dB | Sets the volume of the reverb sound. |
| DRY LEVEL | -∞,-80.0~6.0 dB | Sets the volume of the direct sound. |
Vocal Channel Strip
Multi

This is a multi-effect suitable for use when recording or processing a vocal. This one algorithm can be used on up to two monaural channels simultaneously with independent controls.

flowchart
graph LR
    A["Input L"] --> B["Compressor"]
    B --> C["Expander"]
    C --> D["Enhancer/De-Esser"]
    D --> E["4band EQ"]
    E --> F["Pitch Shifter"]
    F --> G["Chorus"]
    G --> H["Delay"]
    H --> I["Output L"]

    J["Input R"] --> K["Compressor"]
    K --> L["Expander"]
    L --> M["Enhancer/De-Esser"]
    M --> N["4band EQ"]
    N --> O["Pitch Shifter"]
    O --> P["Chorus"]
    P --> Q["Delay"]
    Q --> R["Output R"]
TARGET (Edit target)
Parameter (full name) Setting Function
| TARGET | L-ch, R-ch | Selects the object that will be shown in the screen and edited. If you want to switch the TARGET, press [F3 (L↔R)]. |
COMP (Compressor) → p. 26
EXP (Expander) → p. 27
ENHANCER/DE-ESSER
Boosts the harmonics in the human voice for improved clarity and realism / Suppresses the annoying "s" consonants.
Parameter (full name)
Setting Function
| Sw (Switch) OFF, ON Turns the enhancer/de-esser on or off. |
| TYPE ENH, DES Switches the type between enhancer or de-esser. |
| SENS (Sensitivity) 0~100 Sets the degree of the enhancer effect desired. |
| FREQ (Frequency) 200~20000 Hz Sets the frequency at which the enhancer effect starts working. |
| ENH (Enhancer Level) 0~12.0 dB Sets the volume of the enhancer sound. (*2) |
| DES (Dc-csscr Rejection Level) -24.0~0dB Sets the volume of the dc-csscr sound. (*2) |
(*2) You cannot use enhancer and de-esser simultaneously.
Type | Function
| ENH | Enhances the harmonic content of the human voice, giving it greater clarity. If the high-frequency region is weak, this will strengthen it. The De-Esser Rejection Level (DES-LVL) has no effect. |
| DES | Suppresses unpleasant sibilance, making the sound smoother. If the high-frequency region is excessive, this will attenuate it. The Enhancer Level (ENH-LVL) has no effect. |
4band EQ (4band Equalizer) → p. 20
P-SHIFT (Pitch Shifter)
Shifts the pitch.
Parameter (full name) Setting Function
| Sw (Switch) | OFF, ON Turns the pitch shifter on or off. | |
| C-PITCH (Chromatic Pitch) | -12~0~12 Pitch variation (by scmitonc) | |
| F-PITCH (Finc Pitch) | -100~0~100 | Pitch variation (by ccnt) |
| WET LEVEL | - , -80.0~6.0 dB | Sets the volume of the pitch shift sound. |
| DRY LEVEL | - , -80.0~6.0 dB | Sets the volume of the direct sound. |
CHORUS
Adds spaciousness and thickness to the sound.
Parameter (full name) Setting Function
| Sw (Switch) OFF, ON Turns the chorus on or off. | ||
| RATE | 0.1~10.0 Hz | Sets the rate of modulation. |
| DEPTH 0~100 Sets the depth of modulation. | ||
| PRE-DLY (Pre-Delay) | 0~50 ms | Sets the time delay from when the direct sound begins until the processed sound is heard. |
| WET LEVEL | - , -80.0 6.0 dB | Sets the volume of the chorus sound. |
| DRY LEVEL | - , -80.0 6.0 dB | Sets the volume of the direct sound. |
DELAY
Adds a delayed sound to the direct sound, adding depth to the sound or creating special effects.
Parameter (full name) Setting Function
| Sw (Switch) | OFF, ON Turns the delay on or off. | |
| TIME | 0~1000 ms Sets the time from direct sound until when the delay sound is heard. | |
| FB (Feed Back Level) | 0~100 | Sets the amount of the delay sound should be returned to the delay input. |
| WET LEVEL | -∞,-80.0~6.0 dB | Sets the volume of the chorus sound. |
| DRY LEVEL | -∞,-80.0~6.0 dB | Sets the volume of the direct sound. |
Pre-Amp Modeling
Multi

This effect simulates the variations in response between different types of preamp, and models the subtle differences in frequency response and distortion.
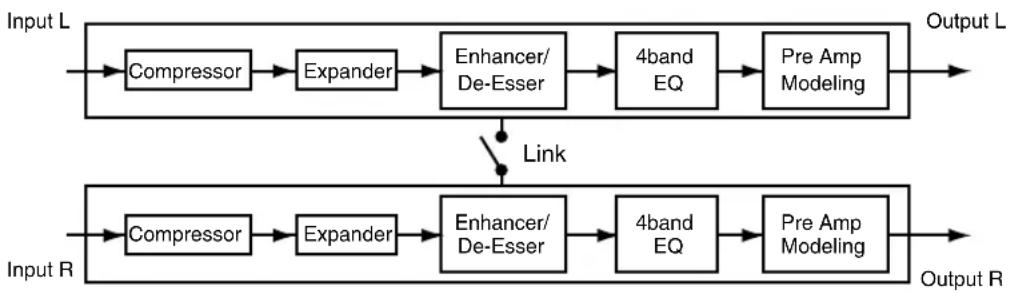
flowchart
graph LR
    A["Input L"] --> B["Compressor"]
    B --> C["Expander"]
    C --> D["Enhancer/De-Esser"]
    D --> E["4band EQ"]
    E --> F["Pre Amp Modeling"]
    F --> G["Output L"]
    H["Input R"] --> I["Compressor"]
    I --> J["Expander"]
    J --> K["Enhancer/De-Esser"]
    K --> L["4band EQ"]
    L --> M["Pre Amp Modeling"]
    M --> N["Output R"]
    O["Link"] --> D
TARGET (Edit target)
Selects the object of editing in the screen.
Parameter (full name) Setting Function
| TARGET | L-ch, R-ch | Selects the object that will be shown in the screen and edited. If you want to switch the TARGET, press [F3 (L↔R)]. |
| LINK R to L-ch OFF, ON (*) Specifies if Input R follows or does not follow the settings for Input L. | ||
(*) If this is On, the settings for R will not be used.
COMP (Compressor) → p. 26
EXP (Expander) → p. 27
ENHANCER/DE-ESSER → p. 28
4band EQ (4band Equalizer) →p. 20
PRE-AMP (Pre-Amp Modeling)
Parameter (full name) Setting Function
| Sw (Switch) | OFF, ON Turns the Pre-Amp modeling on or off. | |
| TYPE | RED7, N1073, MANSS, AVTB,AVSS, HHTB, MILHV, SATB,CSLSS | Selects the type of pre-amp (*4) |
| INPUT (Input Gain) -42.0~6.0 dB Sets the overall volume before passing through the pre-amp. | ||
| WARM FREQ(Warm Frequency) | 20~2000 Hz Frequency at which the lower range will be adjusted to control the warmth (WARM) | |
| WARM GAIN -15.0~15.0 dB Amount of change in warmth (WARM) | ||
| BRIGIT FREQ(Brightness Frequency) | 200~20000 kHz | Frequency at which the high range will be adjusted to control the brightness(BRIGHTNESS) |
| BRIGIT GAIN(Brightness Gain) | -15.0~15.0 dB Amount of change in brightness (BRIGHT) | |
| HRM-THRE(Harmonic Threshold) | -24.0~0.0 dB | Volume threshold at which the harmonics (HRM) will start being regulated to controlthe tone |
| HRM-LEVEL(Harmonic Level) | , -80.0~6.0 dB Amount of change in harmonics (HRM) | |
| HRM-COLOR(Harmonic Color) | -24.0~0dB Adjusts the tonal color of the distortion | |
(*4) Company names and product names appearing in patch names and other places are the trademarks or registered trademarks of their respective owners, and have no connection with Roland Corporation. These names are used in order to convey the character of the sound being simulated by the preamp model.
Preset Patch List
Mastering Tool Kit
| Number | Name Comment |
| P000 | Mixdown Mix down for CD. |
| P001 | PreMastering Pre-master for video editing. |
| P002 | Live Mixing Final mix of live recording. |
| P003 | Pop Mixing for Pop music. |
| P004 | Dance Mixing for Dance music. |
| P005 | Jingle Mixing Jingle for FM radio. |
| P006 | Hard Comp Heavy compression. |
| P007 | Soft Comp Light compression. |
| P008 | Clean Comp Eliminating the background noise and clean up the sound. |
| P009 | Dance Comp Compression for dance music. |
| P010 | Orchestra Comp Compression for orchestra |
| P011 | Vocal Comp Compression for vocal |
| P012 | Acoustic Guitar for Acoustic guitar. |
| P013 | Rock Band for Rock band. |
| P014 | Orchestra for Orchestra. |
| P015 | Low Boost Enhancing the low frequency range. |
| P016 | Brighten Enhancing the high frequency range. |
| P017 | DJ's Voice DJ Microphone. |
| P018 | Phone Vox Telephone voice modeling. |
| Number | Name Comment | |
| P019 Short Delay An ambience effect that adds depth to the sound by doubling. | ||
| P020 Medium Delay | Natural echo optimized for vocals. | |
| P021 Long Delay Long delay suited for brass and analog synth solos. | ||
| P022 Analog Delay | Analog sound with gradually diminishing feedbacking highs. | |
| P023 Tape Echo | Modeled tape echo with distinctive wow flutter. | |
| P024 Karaoke | Intense reverberation that effectively enhances karaoke vocals. | |
| P025 OneShot Delay <1/4 note> | One Shot Delay in 1/4th note. | |
| P026 | OneShot Delay <1/4t note> | One Shot Delay in 1/4th triplets note. |
| P027 OneShot Delay <1/8 note> | One Shot Delay in 1/8th note. | |
| P028 | OneShot Delay <1/8t note> | One Shot Delay in 1/8th triplets note. |
| P029 | OneShot Delay <1/16 note> | One Shot Delay in 1/16th note. |
| P030 HiHat Double | Double time echo effect for repetitive hi-hat and percussion parts. | |
| P031 Vocal Double Creates a stereo, double tracked character for mono vocal tracks. | ||
| P032 Reflections | Warm natural echo found in older studio vocal or drum rooms. | |
| P033 Warm Chorus | Rich chorus effect for keyboards and guitars. | |
| P034 Outdoor Stage | Natural acoustics of an outdoor concert stage. | |
| P035 1/8 Note Echo | One Shot Delay in 1/8 note with warm room ambiance. | |
| P036 1/4 Note Echo | One Shot Delay in 1/4 note with warm room ambiance. | |
| P037 Triplet Echo | Provides a syncopated feel for keyboard or instrument parts. | |
| P038 Clean Delay | Bright, subtle echo to enhance pop, rock or dance vocals. | |
| P039 Synth Lead | Warm, stereo echo and chorus effect for synth lines. | |
| P040 Comp Delay Warm, stereo echo and chorus effect for keyboard chord patterns. | ||
| P041 Pop Voice | Room reflection, with natural doubling effect to enhance vocals. | |
| P042 Infinite Echo | Sound on sound echo effect. | |
Stereo Reverb
| Number | Name Comment |
| P043 | Large Hall Large concert hall reverberation. |
| P044 Small Hall | Small hall reverberation. |
| P045 Strings | Reverberation optimized for delicate highs of strings. |
| P046 Piano Hall Rich and warm reverberation optimized for pianos. | |
| P047 Orchestra Room | Reverberation of large-capacity rooms such as big banquet halls. |
| P048 Vocal Room | Room reverb suitable for vocals and chorus. |
| P049 Medium Room | Warm and naturally spacious room reverb. |
| P050 Large Room | Modeled acoustics of wide rooms with lots of reverberation. |
| P051 Cool Plate | Distinctive bright plate reverb. |
| P052 Short Plate | Shorter plate reverb. |
| P053 Vocal Plate | Crystal-clear reverb optimized for vocals. |
| P054 Soft Ambience | Modeled reverberation of a room with minimal wall reflections. |
| P055 | Room Ambience Natural reverberation of rooms with good acoustics, suitable for drums and guitars. |
| P056 Cathedral | Acoustics of a very large, high-ceilinged church. |
Number Name Comment
| P057 | Long Cave Modeled reverberation of deep caves. |
| P058 | Garage Drums Natural reverb that enhances unique drum sounds. |
| P059 | Rock Kick Reverb with many low-frequency components, suitable for rock kicks. |
| P060 | Rock Snare Rich and thick sounding reverb suitable for rock snares. |
Vocal Channel Strip
| Number | Name Comment | |
| P061 | VO:Vocal Fx Basic setup for recording/mixdown of vocals. | |
| P062 | VO:Jazz Vocal A natural sounding jazz club-like ambience for warm reverb well-suited for vocals. | |
| P063 | VO:Rock Vocal Sound featuring limiter/enhancer processing as well as a unison effect. | |
| P064 | VO:Big Chorus A spacious-sounding stereo effect similar to increasing the number of vocalists. | |
| P065 | VO:Male Vocal Improves the tone quality of a male vocal. | |
| P066 | VO:Rock Male Vocal Equalizer that adds energy to a male vocal. | |
| P067 | VO:Jazz Male Vocal Equalizer that boosts the Low Resonance of a mellow jazz vocal. | |
| P068 | VO:Female Vocal Equalizer that smooths out HiMid and adds sparkle to upper frequencies of female vocal. | |
| P069 | VO:Rock Female Vocal Equalizer that adds energy to a female vocal. | |
| P070 | VO:Jazz Female Vocal Equalizer that accentuates huskiness of intimate female vocal. | |
| P071 | VO:Background Vocal Equalizer that enhances BG Vocals in overall mix. | |
| P072 | VO:Telephone Vox Simulates the frequency response of an old telephone. | |
| P073 | VO:Narration(1) | An effect with heavy compression, used for narration. |
| P074 | VO:Narration(2) | Standard equalizer for male narration. Brings out the character of the voice. |
| P075 | VO:Smooth DJ For a smooth radio announcer's voice. Warm muted lows and attenuated mids. | |
| P076 | VO:Club DJ | A club DJ-tailored effect that uses a pitch shifter to make voices lower. |
| P077 | VO:AM-Radio | Sound featuring hard compression and narrower frequency range. |
| P078 | PS:-4th Voice | Adds sound down a fourth to the direct sound. |
| P079 | GT:DI'cd Clean | Superclean sound like line recording directly into the console. |
| P080 | GT:Acoustic | Optimized for electroacoustic guitars. |
| P081 | GT:Electric Guitar | Settings that keep the lead guitar from being buried in the mix. |
| P082 | GT:Nylon Guitar | Emphasize the tone of nylon strings. Adjust fret sound with HiG. |
| P083 | GT:Blues Guitar | Adds a delicate nuance suitable when playing blues on an acoustic guitar. |
| P084 | GT:Slide Guitar | Adds a rich feel to acoustic slide guitar. |
| P085 | BS:DI'ed Bass | Slight limiting and equalization optimized, ideal for line recording applications. |
| P086 | BS:Jazz Bass | For stand-up bass in an intimate jazz setting. Accentuates finger attack. |
| P087 | BS:Wood Bass | Warms up Lo and LoMid setting to bring out "woodiness" of acoustic bass. |
| P088 | DR:Kick Drum | For Kick drum. Adjust LowQ and HiG. |
| P089 | DR:Snarc Drum | For Snarc drum. Drops the Mid-Lows and emphasizes the attack and snares. |
| P090 | DR:Kick&Snarc Drum | L-ch for Kick Drum, R-ch for Snarc Drum. |
| P091 | DR:Tom Drums | For toms. Adjust LowF and LowMidF. |
| P092 | DR:Hi-Hat For crisper hi-hat. Adjust bell sound with HiMidG. | |
| P093 | DR:Cymbal | For cymbals. Emphasizes the difference in tone between cymbals and adds clarity. |
| P094 | DR:Drum Kit | For drum kit. Use when miking the sound of the entire kit. |
| P095 | ID:Grand Piano | Cleans up muddiness in lower registers and emphasizes harmonics in upper register. |
| P096 | ID:Upright Piano Smooths out frequency response between Lo and Mid registers. | |
| P097 | ID:Trumpet | Evens out the trumpet by attenuating resonant frequencies. Adjust the LoMid frequency and Q. |
| P098 | ID:Saxophone | For alto/soprano sax. Lower HiG for mellow sound. |
| P099 | ID:Clarinet Emphasizes the fundamental tone of the clarinct. | |
| P100 | ID:Flute | Rolls off the lows that can cause "plosives" from breath. |
| P101 | ID:Oboc | Equalizer that smooths out the nasalness of the oboc. |
| P102 | ID:Violin | Slightly enhances the rosin tone of the bow, while attenuating the shrillness of the higher register. |
| P103 | ID:Viola | Brings out the sonority of the lower Midrange. |
| P104 | ID:Cello | Adds roundness to the lower range of the cello. |
Pre Amp Modeling
Number Name Comment
| P105 Amp Red7 For vocal. Post production and voicing processor. | |
| P106 Amp N1073 | Old console sound. |
| P107 Amp ManSS Intended for use with modern capacitor microphones. | |
| P108 Amp AvTube | For acoustic instrument and vocal. High fidelity and natural. |
| P109 Amp AvSolS | Deep, musical sound-stage, transparent amplification. |
| P110 Amp IIIII tube | Vintage tube tone. |
| P111 Amp MillIV | For acoustic recording. Delicate nuance and ambience. |
| P112 Amp SATube | Clean microphone signal, tube guitar distortion and warm bass tone. |
| P113 Amp CSSISt | Musically transparent amplifier. |
Troubleshooting
If the VS8F-3 does not operate correctly even when you've installed it as directed by the owner's manual, or does not operate as you expect, please check the following points.
■ Installation
Can't install
• The VS8F-3 is not inserted.
• The VS8F-3 is inserted incorrectly.
- The system program of the VS series unit you are using does not support the VS8F-3.
- There is not enough free space in the installation destination for the plug-in programs (p. 15).
Can't install the authorized version
- The Key Card VS8F-3 is not the same as the one used during installation and authorization
Operation
Can't select a single-type algorithm effect
- An odd-numbered or even-numbered effect is already being used in the VS8F-3.
- You can't use two single-type effects on a single VS8F-3.
- You can't use a single-type effect on an even-numbered effect.
The Tempo Mapping Effect does not produce an accurate delay
• The allowable delay time has been exceeded.
The pitch changes or noise occurs in the Tempo Mapping Effect
• The tempo is changing rapidly during the song.
Can't use RSS Pan or Analyzer
• RSS Pan and Analyzer will not run on the VS8F-3.
Can't display the PLUG-IN screen
- While recording on VS series products, the PLUG-IN screen cannot be displayed.
Can't select a plug-in's program or patch
- While recording or playback on VS series products, you cannot switch a plug-in's program or patch.
Precautions when requesting service for the VS8F-3
If for some reason the VS8F-3 fails to operate properly, and repair or replacement is necessary, there are some cases in which you will also need to send us the other VS8F-3 unit(s) that you were using at that time, and/or the SETUP DISC.
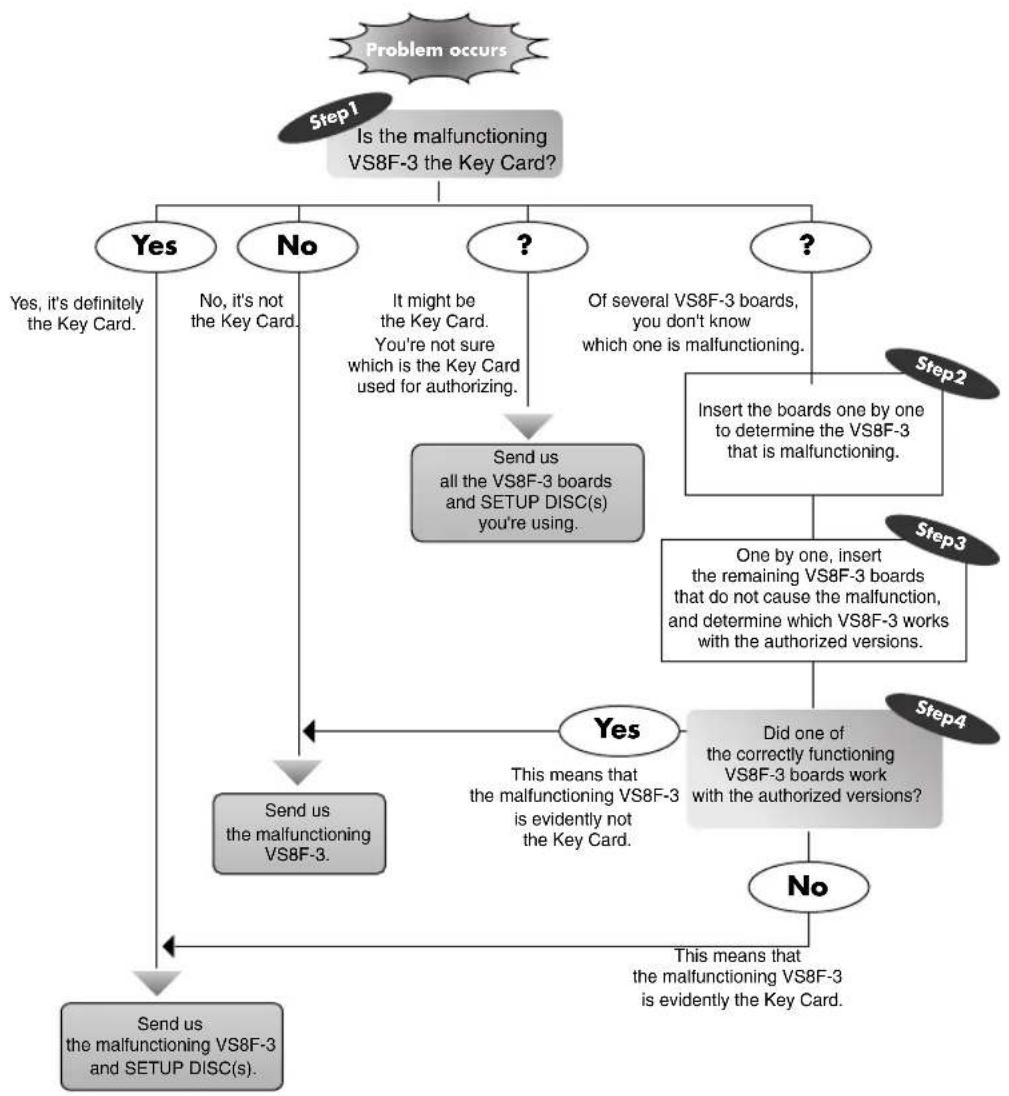
flowchart
graph TD
    A["Problem occurs"] --> B{Is the malfunctioning VS8F-3 the Key Card?}
    B -->|Yes| C["Yes"]
    B -->|No| D{It might be the Key Card. You're not sure which is the Key Card used for authorizing.}
    D -->|Yes| E["Send us all the VS8F-3 boards and SETUP DISC(s) you're using."]
    D -->|No| F{Of several VS8F-3 boards, you don't know which one is malfunctioning.}
    F -->|Yes| G["Insert the boards one by one to determine the VS8F-3 that is malfunctioning."]
    F -->|No| H["Step2"]
    G --> I["One by one, insert the remaining VS8F-3 boards that do not cause the malfunction, and determine which VS8F-3 works with the authorized versions."]
    H --> J["Step3"]
    I --> K{Did one of the correctly functioning VS8F-3 boards work with the authorized versions?}
    J --> L["Step4"]
    K --> M{This means that the malfunctioning VS8F-3 is evidently not the Key Card.}
    L --> N{This means that the malfunctioning VS8F-3 is evidently the Key Card.}
    M --> O["Send us the malfunctioning VS8F-3 and SETUP DISC(s)."]
    N --> P["Send us the malfunctioning VS8F-3 and SETUP DISC(s)."]
    O --> P
HINT
If you affix the included Key Card sticker to the authorized VS8F-3 installed in the first slot, you'll be able to distinguish it from other VS8F-3 boards.
Memo
Information
When you need repair service, call your nearest Roland Service Center or authorized Roland distributor in your country as shown below.
AFRICA
EGYPT
Al Fanny Trading Office
9, EBN Hagar A1 Askalany Street,
ARID E1 Goll, Heliopolis,
Cairo 11341, EGYPT
TEL: 20-2-417-1828
REUNION
That Other Music Shop
(PTY) Ltd.
11 Melle St., Braamfontein
Johannesbourg, SOUTH AFRICA
P.O.Box 32918, Braamfontein 2017
Johannesbourg, SOUTH AFRICA TEL: (011) 403 4105
Paul Bothner (PTY) Ltd.
17 Werdemuller Centre,
Main Road, Claremont 7708
SOUTH AFRICA
P.O.BOX 23032, Claremont 7735,
SOUTH AFRICA
TEL: (021) 674 4030
ASIA
CHINA
Roland Shanghai Electronics
Co., Ltd.
5F. No.1500 Pingliang Road
Shanghai 200090, CHINA
TEL: (021) 5580-0800
Roland Shanghai Electronics
Co., Ltd.
(BEIJING OFFICE)
10F. No.18 Anhuaxili
Chaoyang District, Beijing 100011
CHINA
TEL: (010) 6426-5050
Roland Shanghai Electronics
Co., Ltd.
(GUANGZHOU OFFICE)
2/F., No.30 Si You Nan Er Jie Yi
Xiang, Wu Yang Xin Cheng,
Guangzhou 510600, CHINA
Tel: (020) 8736-1
HONG KONG
Tom Lee Music Co., Ltd.
Service Division
22-32 Pun Shan Street, Tsuen
Wan, New Territories,
HONG KONG
TEL:24150911
Parsons Music Ltd.
8th Floor, Railway Plaza, 39
Chatham Road South, T.S.T,
Kowloon, HONG KONG
TEL: 2333 1863
INDIA
Rivera Digitec (India) Pvt. Ltd.
409, Nirman Kendra Mahalaxm
Flats Compound Off. Dr. Edwin
Moses Road, Mumbai-400011, INDIA
INDIA TEL: (022) 2493 9051
INDONESIA
PT Citra IntiRama
J1. Cideng Timur No. 15J-150
Jakarta Pusat
INDONESIA
TEL: (021) 6324170
KOREA
Cosmos Corporation
1461-9, Seocho-Dong
Seocho Ku, Seoul, KOREA
TEL: (02) 3486-8855
MALAYSIA
G.A. Yupangco & Co. Inc.
339 Gil J. Puyat Avenue
Makati, Metro Manila 1200,
PHILIPPINES
TEL:(02) 899 9801
SINGAPORE
Swee Lee Company
150 Sims Drive,
SINGAPORE 387381
TEL: 6846-3676
CRISTOFORI MUSIC PTE
LTD
Blk 3014, Bedok Industrial Park E,
02-2148, SINGAPORE 489980
TEL: 6243-9555
TAIWAN
ROLAND TAIWAN
ENTERPRISE CO., LTD.
Room 5, 9fl. No. 112 Chung Shan
N.Road Sec.2, Taipei, TAIWAN,
R.O.C
TEL: (02) 2561 3339
THAILAND
Theera Music Co., Ltd.
330 Verng NakornKasem, Soi 2,
Bangkok 10100, THAILAND
TEL: (02) 2248821
VIETNAM
Saigon Music
Suite DP-8
40 Ba Huyen Thanh Quan Street
Hochiminh City, VIETNAM
Tel: (08) 930-1969
AUSTRALIA/ NEW ZEALAND
AUSTRALIA
Roland Corporation
Australia Pty., Ltd.
38 Campbell Avenue
Dec Why West. NSW 2099
AUSTRALIA
TEL: (02) 9982 8266
NEW ZEALAND
Roland Corporation Ltd.
32 Shaddock Street, Mount Eden,
Auckland, NEW ZEALAND
TEL: (09) 3098 715
CENTRAL/LATIN AMERICA
ARGENTINA
Instrumentos Musicales S.A.
Av.Santa Fe 2055
(1123) Buenos Aires
ARGENTINA
TEL: (011) 4508-2700
BRAZIL
Roland Brasil Ltda
Rua San Jose, 780 Sala B
Parque Industrial San Jose
Cotía - Sao Paulo - SP, BRAZIL
TEL: (011) 4615 5666
COSTA RICA
JUAN Bansbach
Instrumentos Musicales
Ave.1. Calle 11, Apartado 10237,
San Jose, COSTA RICA
TEL: 258-0211
CHILE
Comercial Fancy II S.A.
Rut.: 96.919.420-1
Nataniel Cox #739, 4th Floor
Santiago - Centro, CHILE TEL: (02) 608-0540
TEL: (02) 688-9540
EL SALVAD
OMNI MUSIC
Boulevard Andrews, Albrook,
Panama City, REP. DE PANAMA
TEL: 315-0101
PARAGUAY
Distribuidora De
Instrumentos Musicales
J.E. Olear y ESQ. Manduvira
Asuncion PARACUAY
TEL: (021) 492-124
URUGUAY
Todo Musica S.A.
Francisco Acuna de Figueroa 1771
C.P.: 11.800
Montevideo, URUGUAY
TEL: (02) 924-2335
VENEZUELA
Musicland Digital C.A.
155, New National Road
Patras 26442, GREECH
TEL: 2610 435400
HUNGARY
Roland East Europe Ltd.
Warehouse Area 'DEPO' Pf.83
H-2046 Torokbalint, HUNGARY
TEL: (23) 511011
IRELAND
Roland Ireland
G2 Calmount Park, Calmount
Avenue, Dublin 12
Republic of IRELAND
TEL:(01)4294444
ITALY
Roland Italy S. p. A.
Danvik Center 28, 2 tr.
S-131 30 Nacka SWEDEN
TEL: (0)8 702 00 20
SWITZERLAND
Roland (Switzerland) AG
This product complies with the requirements of European Directive 89/336/EEC.
For the USA
FEDERAL COMMUNICATIONS COMMISSION RADIO FREQUENCY INTERFERENCE STATEMENT
This equipment has been tested and found to comply with the limits for a Class B digital device, pursuant to Part 15 of the FCC Rules. These limits are designed to provide reasonable protection against harmful interference in a residential installation. This equipment generates, uses, and can radiate radio frequency energy and, if not installed and used in accordance with the instructions, may cause harmful interference to radio communications. However, there is no guarantee that interference will not occur in a particular installation. If this equipment does cause harmful interference to radio or television reception, which can be determined by turning the equipment off and on, the user is encouraged to try to correct the interference by one or more of the following measures:
- Reorient or relocate the receiving antenna.
- Increase the separation between the equipment and receiver.
- Connect the equipment into an outlet on a circuit different from that to which the receiver is connected.
- Consult the dealer or an experienced radio/TV technician for help.
This device complies with Part 15 of the FCC Rules. Operation is subject to the following two conditions:
(1) This device may not cause harmful interference, and
(2) This device must accept any interference received, including interference that may cause undesired operation.
Unauthorized changes or modification to this system can void the users authority to operate this equipment.
This equipment requires shielded interface cables in order to meet FCC class B Limit.
For Canada
NOTICE
This Class B digital apparatus meets all requirements of the Canadian Interference-Causing Equipment Regulations.
AVIS
* In the interest of product improvement, the specifications and/or contents of this package are subject to change without prior notice.