NMX-ENC-N2122A - Professional audiovisual equipment AMX - Free user manual and instructions
Find the device manual for free NMX-ENC-N2122A AMX in PDF.


| Product Type | Network Video Encoder |
| Model | NMX-ENC-N2122A |
| Brand | AMX |
| Video Input | 1x HDMI |
| Video Output | IP (H.264/H.265) |
| Resolution Support | Up to 4K@60Hz |
| Audio Support | Embedded HDMI audio, analog audio input |
| Network Interface | 1x Gigabit Ethernet |
| Control Interface | RS-232, IR, TCP/IP |
| Dimensions (W x D x H) | 200mm x 160mm x 44mm (1U half-rack) |
| Weight | 1.2 kg |
| Power Supply | 12V DC, 1.5A (external adapter) |
| Power Consumption | 18W max |
| Operating Temperature | 0°C to 40°C |
| Storage Temperature | -20°C to 60°C |
| Humidity | 10% to 90% (non-condensing) |
| Enclosure | Metal chassis, rack-mountable |
| Included Accessories | Power adapter, mounting brackets, quick start guide |
| Primary Functions | Encoding, streaming, recording, and control integration |
| Maintenance | Keep ventilated; clean with dry cloth; avoid liquids |
| Safety | Certified: CE, FCC; use only provided power adapter |
| Repairability & Spare Parts | Contact AMX support for replacement parts |
Frequently Asked Questions - NMX-ENC-N2122A AMX
User questions about NMX-ENC-N2122A AMX
0 question about this device. Answer the ones you know or ask your own.
Ask a new question about this device
Download the instructions for your Professional audiovisual equipment in PDF format for free! Find your manual NMX-ENC-N2122A - AMX and take your electronic device back in hand. On this page are published all the documents necessary for the use of your device. NMX-ENC-N2122A by AMX.
USER MANUAL NMX-ENC-N2122A AMX
The N2122A/N2222A/N2212A JPEG 2000 Video over IP series provides a flexible, feature-rich, and simple-to-deploy Digital Media Distribution and Switching solution satisfying the most demanding applications. N2122A Encoders are used to encode and distribute sources of almost any format onto an existing IP network making that stream available to any endpoint in the facility. N2222A/N2212A Decoders are used to decode the Networked AV streams back to HDMI format for display on any monitor. With the ability to direct any source stream to any display, large, low-cost switching and distribution systems are simple to deploy without proprietary cabling or dedicated switching hardware. These devices are AES67 compatible, which enables high-performance audio-over-IP streaming interoperability. This quick start guide will familiarize you with your new device and step you through initial setup.
N2122A Encoder Rear Panel

N2222A Decoder * Rear Panel

*The N2222A Decoder is pictured above. N2212A Decoders do not have PO, IR, or AUDIO ports.
FIG. 1 ENCODER AND DECODER REAR PANEL PORTS
Basic Installation Guidelines
| Connections Options | |
| Power: | PoE*: Connect the unit's PO port to an active, PoE-enabled network switch. |
| External power supply: If not using PoE for power, connect a 12V regulated power supply (part number N9312) to the unit's two-pin terminal block plug connector labeled +12V 2A. | |
| Network: PoE units: | If using PoE to power the unit, you should already have a network connection. |
| Externally powered units: If not using PoE, connect the PO port to the network using an Ethernet cable, or connect the P1 port to the network with the appropriate cable (fiber transceiver or direct-attach cable is required). | |
| Daisy-chain configuration: Once network connection is established to one unit, you can daisy chain additional units by connecting Ethernet cables between devices using their PO and/or P1 ports. Keep in mind that the number of units supported in this configuration is limited by bandwidth (total aggregate streams must be less than 1 Gb/s).NOTE: PoE power is only supplied to the unit connected directly to the network. All other units in daisy-chain must have external power supply. | |
| Video: N2122A Encoders | For video encoding of a digital source, connect the source to the Encoder's HDMI IN port using a video cable with an HDMI connector (or adapter).For video encoding of an analog source, connect the source to the Encoder's VGA IN port using a video cable with a VGA connector (or component adapter). |
| N2222A DecodersFor video decoding, connect a digital display to the Decoder's HDMI OUT port using a video cable with an HDMI connector (or adapter). | |
| Audio: N2122A Encoders | For audio encoding, connect a line level analog audio source to the Audio* input terminal block plug connector, orUse the embedded audio from the video source, orEnable AES67 Audio to transmit an AES67 audio stream. |
| N2222A DecodersFor analog audio decoding, connect a line level analog audio device to the Audio output terminal block plug connector, orSend embedded digital audio (embedded in the HDMI connection) to a monitor's speakers, orEnable AES67 Audio to receive an AES67 audio stream. | |
Basic Installation Guidelines (Continued)
*The PoE port (P0) and the IR and Audio terminal blocks are not provided on the N2212 Decoder.
Product Specifications
| Models Available: NMX-ENC-N2122A EncodersNMX-DEC-N2222A DecodersNMX-DEC-N2212A Decoders | |
| Power Requirements: PoE: Can be powered via a PoE switch or other equipment with a PoE source. Conforms to IEEE 802.3af Class 3 (802.3at Type 1). Does not apply to the N2212A.External power supply: 2.0 Amp @ 12 Volts DC; 100-240 Volts AC power supply; Part number N9312 (included with the N2212A, but sold separately for the N2122A/N2222A). | |
| Dimensions (HWD): 1.05" x 7.888" x 5.5" (2.67cm x 20.04cm x 14cm) | |
| Weight: 1.55 lbs (0.7kg) | |
| Certifications: FCC, CE, and NRTL | |
| Environmental: Temperature: 32° to 104°F (0° to 40°C)Humidity: 10% to 90% RH (non-condensing) | |
| Mounting Options: | Stand alone, surface mount, wall mount, or rack mount.* |
| NOTE: *Mounting wings (part number N9101) required for surface and wall mounting. Rack shelf (part number N9102) or card cage (part number N9206) required for rack mounting. Shelf accommodates two side-by-side N-Series Encoders and Decoders. Card cage accommodates up to six N-Series Encoder and Decoder cards (mix and match any series). Mounting accessories sold separately and are compatible with most N-Series devices. | |
Establishing Connection
N2000 devices are shipped with DHCP as their default IP mode. The IP address is assigned automatically based on the network DHCP server. If no DHCP server is found, the unit will use Auto IP mode instead (with a default IP address of 169.254.xxx.xxx). Before using your N2000 unit, it must be configured using the free N-Able device management software. However, you will not be able to configure units until they are in the same subnet as the host computer. The sample steps below show how the required changes (to the host computer's IP settings) are made in a Windows environment.
Steps for IP address configuration (for Windows 8):
- From the Control Panel > Network and Internet dialog box, select Network and Sharing Center.
- Select Change adapter settings.
- Select the wired interface connected to your AV network.
- Click the Properties button.
- Scroll down in the list to the Internet Protocol Version 4 (TCP/IPv4) option. Highlight it and click the Properties button.
- Enable the Use the following IP address option, and enter the static IP address provided to you by your network administrator.
NOTE: If the computer does not need Internet access, you can simply enter a unique 169.254.xxx.xxx IP address with a 255.255.0.0 Subnet mask. Please contact your network administrator if you are unsure of how to configure the existing interface. If the computer has a statically-assigned IP address, click on the Advanced button. Then click Add to enter a unique 169.254.xxx.xxx address with a subnet of 255.255.0.0.
Steps for auto discovering devices on the network:
- Use the host computer to download and install the latest version of N-Able: PC version - http://www.amx.com/products/N-ABLE-PC.asp Mac version - http://www.amx.com/products/N-ABLE-MAC.asp
- Attach your N2000 unit(s) to the layer-3 network switch.
- Disable the wireless adapter on your computer (it must be hard-wired to the switch).
- Connect the host computer to the layer-3 network switch.
- Open the N-Able application.
If all devices do not appear automatically, click the Auto Discover button on the Unit Management tab. This issues a broadcast command that will discover all units even if they are not in the same IP subnet.
Logging in Using N-Able Software
Once the host IP address is configured properly, you can view all discovered units using the N-Able software. Access the N2000 units from the following tabs:
- Unit Management tab - N2000 Encoder/Decoder is listed in the Type field.
• Video Matrix tab - N2000 units are found on the N2000 sub-tab of this screen.
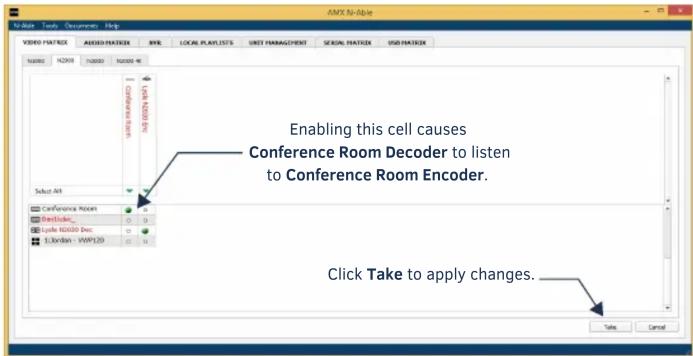
FIG. 2 VIDEO MATRIX
Double-click the unit's name (in one of the lists mentioned above) to view its control pages. If prompted, enter admin and password for the default username and password. Once logged in, you can change the username and password (using the options on the unit's Settings page, shown below).
NOTE: If you would like for N-Able to support auto-login to your units, make sure N-Able's Device Auto-login settings match the unit's username and password (by selecting N-Able > Settings from the N-Able tool bar).

FIG. 3 N2000 SETTINGS PAGE
Troubleshooting Guidelines
| Problem Possible Solution | |
| Video is not transmitting. | ·Verify that the Encoder TX Enable setting is turned on. (Encoders ship from the factory with their video output turned off by default.) |
| Local Play graphic is displayed. | ·Verify Decoder is assigned to view a valid stream in the N-Able matrix.·Verify Decoder is currently in live play mode (black text on matrix view).·Verify network is properly configured and set up. If needed, connect Encoder directly to Decoder to verify network issues. |
| Host Play graphic is displayed. | ·Verify Encoder is in live play mode (black text in matrix).·Verify source is attached and is outputting a valid signal (HDMI LED on Encoder is on). |
| Unsupported Resolution graphic is displayed. | ·Change source resolution to a valid resolution (try 720p60).·Verify cabling is correct. |
| Copy Protected Content screen is displayed. | ·Contact technical support. |
| Black screen/no graphic is displayed. | ·Set Decoder to local play. If the local play graphic does not appear, check the display input settings and cabling.·If local play appears, set Decoder to live play and verify network is configured properly. |
| No audio is detected. | ·If there is no audio on all Decoders, verify audio settings are correct on Encoder.·If there is no audio on a single Decoder, verify audio settings are correct on Decoder. |
Contact SVSI technical support at svsisupport@harman.com or 256.461.7143 x9900 for any installation issues.

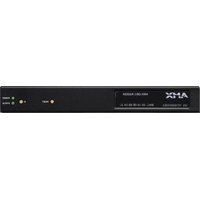

Brand : AMX
Model : NMX-ENC-N2122A
Category : Professional audiovisual equipment