
B65LED - Car speaker BOSS - Free user manual and instructions
Find the device manual for free B65LED BOSS in PDF.


| Product Type | Car Speaker |
| Model | B65LED |
| Brand | Boss |
| Speaker Size | 6.5 inches |
| Speaker Type | Coaxial 2-Way |
| Peak Power Handling | 400 Watts |
| RMS Power Handling | 200 Watts |
| Impedance | 4 Ohms |
| Sensitivity | 92 dB |
| Frequency Response | 40 Hz – 20 kHz |
| Mounting Depth | 2.17 inches (55 mm) |
| Mounting Diameter | 5.6 inches (142 mm) |
| LED Lighting | RGB Multi-Color (with remote control) |
| Grille Included | Yes |
| Woofer Cone Material | Injected Polypropylene |
| Tweeter Type | 1-inch PEI Dome |
| Magnet Type | Ferrite |
| Weight | 2.5 lbs (1.13 kg) per speaker |
| Dimensions (each) | 6.5 x 6.5 x 2.9 inches |
| Power Supply | 12V DC (vehicle electrical system) |
| Installation | Surface mount or flush mount |
| Maintenance | Wipe with dry cloth; avoid moisture |
| Safety | Disconnect battery before installation |
| Spare Parts / Repairability | Contact Boss customer support |
Frequently Asked Questions - B65LED BOSS
User questions about B65LED BOSS
0 question about this device. Answer the ones you know or ask your own.
Ask a new question about this device
Download the instructions for your Car speaker in PDF format for free! Find your manual B65LED - BOSS and take your electronic device back in hand. On this page are published all the documents necessary for the use of your device. B65LED by BOSS.
USER MANUAL B65LED BOSS
Thank you for purchasing a BOSS Audio Systems product. Please read through these instructions carefully so you will know how to install this product properly.
Package Contents
- 2x Speakers with grilles
- 2x Speaker wires with polarity connectors
Specifications
• 3-way full range system
Woofer: 6.5" (165 mm)
polypropylene cone, rubber surround
Midrange: 1" (25 mm)
Tweeter: 0.5" (13 mm)
• Output power: max 300 W
-
8x Mounting screws and clip nuts
• Installation Instructions/ Cut-out Template/Warranty -
Nominal impedance: 4
• Frequency response: 75 Hz – 20 kHz
• Sensitivity: 87 dB (1 watt/1 meter)
• LED Power supply: 12 V/DC
• LED current consumption: 20 mA
Speaker dimensions
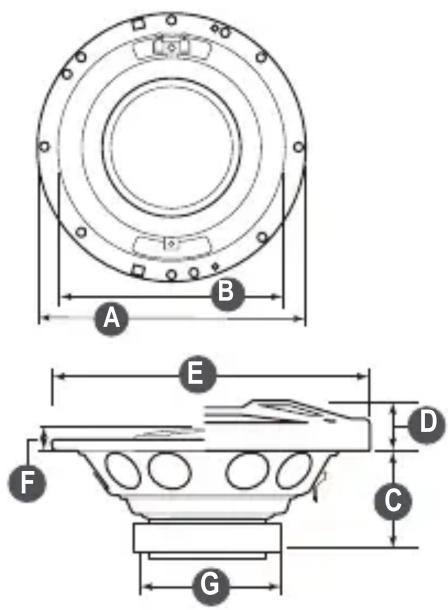
A. Overall diameter: 6.61" (168 mm)
B. Mounting hole diameter: 5.59" / (142 mm)
C. Mounting depth: 2.13" (54 mm)
D. Grill protrusion: 0.79" (20 mm)
E. Overall speaker with grill: 6.89" (175 mm)
F. Tweeter protrusion: 0.5" (13 mm)
G. Outer motor diameter: 3.15" (80 mm)
Installation Precautions
- Consult an expert when in doubt about installation. Professional installation is always recommended.
- Prior to installation, disconnect the negative terminal of the vehicle battery.
- Connect the LED lighting to 12V power supply only. Do not connect to 24V power supply.
- When installing the speakers, take into consideration the risks that can arise from devices being torn away in the case of an accident. Therefore, make sure the speakers are firmly secured and the mounting area is sufficiently stable.
- Avoid routing wires near any sharp or moving parts. Run wires away from other wires that may cause unwanted noise. Insulate bare wires properly.
- If you must modify the vehicle for the speaker installation, make sure you do not impair the safety and structural integrity of the vehicle.
- Before you drill or cut any holes, investigate your vehicle's layout very carefully. Take special care when you work near the fuel tank, fuel lines, hydraulic lines and electrical wiring.
Mounting
You can fit the speakers in the factory speaker openings in a vehicle, or create a cutout in a vehicle for speaker installation.
Option 1: Mounting in the factory speaker location
- Make sure the factory speaker opening (e.g. in the door or kick panel) fits the speaker in size.
- Remove the panel which hides the factory speaker locations, and then remove the old speaker.
- Connect the speaker to the factory speaker wiring with correct polarity. If factory speaker wiring is corroded, use supplied speaker wires.
- Fasten the speaker into the factory opening with the supplied screws. Some vehicles may require a speaker mounting adapter.
Make sure the speaker sits flush across the entire mounting surface.
Make sure the newly installed speaker does not interfere with any operations (e.g. windows rolling all the way down if in a door, or trunk mechanism if in the rear deck, etc.)
- Perform a quick test, then reinstall the panel. Be sure to properly break in speakers and not reach max volume until after two 20-minute cycles at regular volume.
Option 2: Mounting in a new location
- Remove the interior vehicle panel (e.g. from the door or rear deck) where the speakers are to be mounted.
- Cut a mounting hole and screw holes on the mounting surface as follows:
Verify the supplied template matches the speaker and mounting cut-out.
Cut out the template along the cut line. Use the cut-out template to mark the mounting hole and screw holes on the mounting surface. Then cut the holes for the speaker to be mounted. - Slide the speaker from the top into the hole, and correctly place the supplied speaker grill over the top.
- Fasten the speaker with four supplied screws and clip nuts.
Make sure the speaker sits flush across the entire mounting surface.
Make sure the newly installed speaker does not interfere with any operations (e.g. windows rolling all the way down if in a door, or trunk mechanism if in the rear deck, etc.). - Using the supplied speaker wires, connect the speaker to the source unit.
- Perform a quick test, then reinstall the panel. Be sure to properly break in speakers and not reach max volume until after two 20-minute cycles at regular volume.
Wiring
Audio signal wiring
- Using the supplied speaker wires, connect the speakers to the audio outputs on your 12 V/DC source unit (e.g. an amplifier), the red wire to the positive terminal and the black wire to the negative terminal. Make sure the wires are firmly attached to the terminals.

- Make sure the speakers are wired correctly at 4 ohms. Observe speaker polarity when making connections.
Speaker LED wiring
Blue LED light is equipped in the front of each speaker. Wire the LED lights to generate illumination.
- Find the LED connectors labeled as “LED POWER” on the rear part of the speaker. Then using a minimum of 16 gauge wires (not included), connect “−” (negative) connector on the speaker to your vehicle’s metal frame or to the negative battery terminal; connect “+” (positive) connector on the speaker to your vehicle’s electrical circuit with on/off switch.
If connected to the positive battery terminal, install a dedicated toggle/rocker type switch for power control.

- For short-circuit protection, install a fuse of proper rating (not included) to be in-line with the positive wire.
- Negative/Ground wire should be as short as possible.

Brand : BOSS
Model : B65LED
Category : Car speaker