
CH100 - Heating Gasmate - Free user manual and instructions
Find the device manual for free CH100 Gasmate in PDF.


| Product Type | Ducted Camping Heater |
| Model | CH100 |
| Brand | Gasmate |
| Fuel Type | Propane (LPG) |
| Gas Pressure | 2.75 kPa |
| Gas Consumption | 2.80 MJ/h (55 g/h, 2654 BTU) |
| Ignition | Push button electronic ignition |
| Safety Systems | Oxygen Depletion System (ODS), flame failure, tip-over switch |
| Power Supply | Rechargeable sealed battery with 240V charger |
| Included Accessories | Flexible duct, 1 Pound regulator, storage compartment |
| Minimum Clearances | Rear & sides: 200mm, above: 500mm from combustibles |
| Intended Use | Outdoor use only (well-ventilated areas) |
| Certification | Australian standards (AS2469, AS2030.1, DOT39) |
| Service Interval | Every 12 months by authorized person |
| Warranty | 12 months (keep purchase receipt) |
Frequently Asked Questions - CH100 Gasmate
User questions about CH100 Gasmate
0 question about this device. Answer the ones you know or ask your own.
Ask a new question about this device
Download the instructions for your Heating in PDF format for free! Find your manual CH100 - Gasmate and take your electronic device back in hand. On this page are published all the documents necessary for the use of your device. CH100 by Gasmate.
USER MANUAL CH100 Gasmate
DUCTED CAMPING HEATER
Model No. CH100
■ A new revolutionary safe way to heat tents, caravans and camper trailers
■ Warm fan forced air is directed through the ducting pipe
■ Oxygen depletion system for enhanced safety - Senses low oxygen levels and switches unit off
■ Flame failure safety system - If flame goes out, gas shuts off
■ Safety 'tip-over' switch - gas supply stops if unit is accidentally knocked over
■ Operates on propane gas
■ Rechargeable sealed battery with 240V power cord for charging
■ Portable, compact design with carry handle
■ Push button electronic ignition
■ Built-in storage compartment for ducting pipes, regulator and charging cord
■ Complete with 1 Pound regulator
■ Gas certified to Australian standards
FOR YOUR SAFETY
If you smell gas:
- Shut off the gas to the appliance.
- Extinguish any open flame.
- If odour continues, immediately call your gas supplier.
Do not store or use gasoline or other flammable vapour and liquids in the vicinity of this or any other appliance.

natural_image
Gasmate portable electric heater with attached cylindrical heat exchanger (no visible text or symbols on main device)WARNING
Improper installation, adjustment, alteration, service or maintenance can cause injury or property damage.
Read the instructions thoroughly before installing or servicing this equipment.
FOR OUTDOOR USE ONLY
PROPANE GAS
Important: Retain these instructions for future use Caution: Only use the battery charging cable supplied with the heater

these instructions for use carefully. Familiarise yourself with the appliance before connecting it to its gas container. Keep these instructions for future reference.
ONLY USE IN WELL-VENTILATED AREAS.
CARBON MONOXIDE HAZARD-USING THIS APPLIANCE IN AN ENCLOSED SPACE MAY CAUSE DEATH. DO NOT USE INSIDE CARAVANS, TENTS, MARINE CRAFT, CARS, MOBILE HOMES OR SIMILAR LOCATIONS.
- CAUTION: Accessible parts may be very hot. Keep young children away.
- Do not modify this appliance.
- Check that seals between the appliance and the gas container are in place and in good condition before connecting the gas container.
- Do not use the appliance if it has damaged or worn seals.
- Do not use this appliance if it is leaking, damaged or does not operate properly.
- Change the gas cartridge outside and away from people and equipment.
- If the flame height appears excessively high or low or soot is being deposited stop using the heater and have it serviced.
- This appliance must only be serviced by an authorised person every year.
- If the appliance cannot be adjusted to perform correctly it should not be used until serviced or repaired.
- To check that the gas container is filled, when shaken a sloshing sound will be heard.
• DO NOT modify this appliance.
- DO NOT store or use petrol or other flammable liquids in the vicinity of this or any other appliance.
- This appliance is not intended for use by persons (including children) with reduced physical, sensory or mental capabilities, or lack of experience and knowledge, unless they have been given supervision or instruction concerning the use of the appliance by a person responsible for their safety.
- NEVER test for gas leaks with a lit match or open flame.
- Never alter or modify the regulator or gas supply assembly.
- This appliance must not be used indoors.
- DO NOT subject gas cylinder or canister to excessive heat.
USE OUTDOORS ONLY.
This appliance shall only be used with an LPG cylinder certified to AS2469 and AS2030.1 or a disposable LPG canister certified to DOT39.
IT MAY BE HAZARDOUS TO ATTEMPT TO FIT OTHER TYPES OF GAS CONTAINERS.
Only change the gas supply in a well ventilated location, preferably outside, away from people and any source of ignition, such as naked flames, pilot flames, and electric heaters/equipment.
Only use in well ventilated areas to avoid the dangerous build up of unburned gases. This appliance is designed for use outdoors away from any inflammable material. The appliance must be used on a level, stable, non-flammable surface. The appliance should be protected from direct draughts.
If there is a leak on your appliance (smell of gas) and you cannot stop the gas flow, remove the appliance to a well-ventilated location away from any ignition source. Check for leaks using soapy water. Do not try to detect leaks using a flame.

WARNING - DO NOT MOVE NCE WHEN ALIGHT.
FOR OUTDOOR USE ONLY
This product is not a household appliance and its design & manufacture was intended for use with a frequency corresponding to that of a leisure activity, and is not a substitute for a domestic product with a similar function.
IMPORTANT:
Read these instructions for use carefully.
Familiarise yourself with the appliance before connecting it to its gas container.
Keep these instructions for future reference.
WARNING:
Improper installation, adjustment, alteration, service or maintenance can cause injury or property damage.
CAUTION:
Only use the battery charging cable supplied with this appliance. Over charging may occur otherwise.
FOR YOUR SAFETY
If you smell gas:
- Shut off the gas to the appliance, by turning the unit switch to OFF.
- Extinguish any open flame.
- Unscrew and remove the gas canister.
Do not store or use gasoline or other flammable vapour and liquids in the vicinity of this or any other appliance.
GENERAL INFORMATION
CLEARANCES WHILE IN USE
Minimum Clearances from combustible materials must be:
Rear - 200mm Sides - 200mm Above - 500mm
Check that the seals between the appliance and gas container are in place and in good condition before connecting to the gas container:
DO NOT use this appliance if it has damaged or worn seals.
DO NOT use this appliance if it is leaking, damaged or does not operate properly.
Check that burner is extinguished before disconnecting gas container.
Check the seals before connecting a new gas container to the appliance.
If there is a leak on your appliance (smell of gas) and you cannot stop the gas flow, remove the appliance to a well ventilated location away from any ignition source. Only check for leaks outdoors using soapy water. DO NOT try to detect leaks using a flame.
If you store your appliance indoors, ALWAYS disconnect the gas cylinder first and store the cylinder safely outside. Cylinders must be stored outdoors in a well ventilated area out of reach of children, and must not be stored in a building, garage or any other enclosed area.
This appliance shall only be used with an LPG cylinder certified to AS2469 and AS2030.1 or a disposable LPG canister certified to DOT39.
IT MAY BE HAZARDOUS TO ATTEMPT TO FIT OTHER TYPES OF GAS CONTAINERS.
Maximum gas hose length is 1000mm.
LOCATION
This appliance shall not be installed or used indoors.
DO NOT place articles on or against this appliance.
DO NOT use or store flammable materials near this appliance.
Locate the appliance at least 200mm away from any combustible material or surface. With tents keep as far away as practical.
CARE & MAINTENANCE
Only use the regulator assembly supplied with the appliance for direct connection to the cylinder. DO NOT USE ADAPTORS.
DO NOT operate or store the appliance outdoors when raining. If exposed to rain tilt the appliance to allow any water ingress to escape.
For any queries or assistance call

Customer Service
(Australia Only)
1300 174 876
Hours of operation:
Monday to Friday 8am - 5pm EST
Do not return to place of purchase.
Keep your purchase receipt, this will be required to make any claims under the 12 month warranty.
UNPACKING FOR FIRST USE
- Remove any transit protection material.
- Position heater near a 240V AC power point.
- Plug the 240V AC \~ 12V DC power charger into the power point.
- Plug the cord end in to the heater socket. Note this has a rubber push in cover which you can just lift off and it will dangle.
- Flick the Power Switch to "O" (CHARGE). The RED LED will flash while charging. Once charged, the RED LED will go to a steady glow. NOTE: it will take up to 6 hours from flat.
- Your heater is now ready for your first use.
SET UP
- Position the heater 200mm away from any combustible surface and as far as practical from the tent.
Always position the air inlet and gas canister away from your tent and always in clean air.
NOTE: Never block or cover any of the ventilation holes, air inlet or air outlet. If any of these are cover poisonous CO and CO2 may built up to a hazardous level and may cause death. - Attach the flexible duct to the outlet fitting. It pushes on to the fitting and twist anti-clockwise to lock in position.
Avoid twisting or kinking the flexible duct allow it pull out naturally.
- Position the very end of the flexible pipe inside your tent.
Never position the duct facing the appliance or the gas cylinder. If you need to have the duct outside your tent face the duct away from both the appliance and the gas cylinder.
- Attach the regulator to the side of the heater. Whilst holding the silver bracket down, push the long small end fully into the side of the appliance and screw in until tight. This will ensure the regulator valve is seated correctly.
NOTE: never remove the bracket it must always be used to support the regulator.
- Screw on a disposable propane cartridge or use a Gasmate GM110 hose and P.O.L gas cylinder.
Then leak test all connections using a soapy water solution.
NOTE: If using POL gas cylinder, ensure gas cylinder is at least 650mm away from the heater and in the same side as the regulator
OPERATING INSTRUCTIONS
- Ensure that the inlet and outlet air flow is not restricted, ensure that the outlet duct is connected correctly.
- Push the Power switch to the ON position, the green working light will glow GREEN and the fan will start.
- Push the gas knob in and hold to ignite the pilot flame and burner.
- Release the control knob after 10 seconds and check for a pilot through the viewing window.
- If no pilot is visible in window push switch to centre position, POWER OFF.
- Leave for 2 minutes and re-try from step 2.
TO STOP & PACK UP
- Push switch to centre position, POWER OFF UNIT OFF.
- The pilot flame should go out.
- Allow the appliance to completely cool down.
- Ensure the gas cylinder valve has been turned off fully.
- Remove the gas canister or gas hose.
- Remove the flexible duct, rotate clockwise and pull off fitting. Store the flexible duct and regulator in the storage compartment on the side of the heater.
NOTE: Unit will not operate if the flexible duct are not connected.

IMPORTANT
Ensure the appliance is set up on a level ground.
Never block or cover any of the ventilation holes, air inlet or air outlet. If any of these are cover poisonous CO and CO2 may built up to a hazardous level and may cause death.
Do not move the appliance while in use or when hot.
Before connecting and disconnecting to gas source, make sure burner control is in OFF position.
CAUTION: When the appliance is not in use, the gas must be turned off at the cylinder or the cartridge is disconnected.
Accessible parts may become hot. Keep young children away!
CONNECTING & DISCONNECTING TO GAS SOURCE
Familiarise yourself with the general information and safety guidelines located at the front of this manual.
Check:
- Gas cylinder is filled. A sloshing sound will be heard when shaken.
- The switch is in the POWER OFF UNIT OFF centre position.
Connecting Using a Disposable Propane Canister
- Attach the regulator to the side of the appliance, refer Page 4.
- Regulator will be held in the bracket.
- Screw in the disposable propane canister.
Connecting Using a Hose & LPG Cylinder
- Ensure the cylinder valve is in its full off position.
- Position the gas cylinder as far as practicable from the appliance and also as far as practicable from your tent.
- Check for any damage to either the cylinder connection or the hose. NEVER attempt to use damaged equipment.
- When connecting the hose to the cylinder tighten the nut to a positive stop by hand.
- Attach the regulator to the side of the ducted heater then attach the hose to regulator.
- Open cylinder valve. Use a soapy water solution to check the joints. If bubbles appear the connection will need to be re-tightened.
NOTE: If using POL gas cylinder, ensure gas cylinder is at least 650mm away from the heater and in the same side as the regulator
PRODUCT MARKINGS

BURNER VIEWING WINDOW

PILOT VIEWING WINDOW
(GREEN LED) (RED LED)
ON
POWER OFF
UNIT OFF
CHARGE


ON
PUSH AND HOLD
TO IGNITE
PILOT

FLASHING - CHARGING
SOLID - CHARGED

MAINTENANCE
This appliance is not designed to be serviced or repaired by the user.
All servicing MUST be carried out by the manufacturer or the manufacturer's service agent.
This appliance must be serviced every 12 months to ensure that the gas system is operating correctly and safely.
| Problem Possible Reason Solution | ||
| Appliance does not work (Green LED is not glowing) | Flexible ducting not attached | Fully attach the outlet flexible duct. Ensure it is locked in place - twist anti-clockwise |
| No fuse Insert 5A fuse | ||
| Faulty fan Check fuse & battery charge | ||
| Battery flat Charge battery | (6 hours) | |
| Tilt switch activated Place | on level ground and in area it can't be knocked over. Turn off and restart. | |
| ODS activated Ensure appl | liance is in an open area and not subject to a strong direct breeze. Turn off and restart. | |
| Appliance fuse blown Re | ace fuse (5 AMP) | |
| Appliance does not work (Green LED is glowing) | Faulty Fan Check fuse & b | battery charge |
| Igniter not working Push kn | nob in and hold in with the switch on. This takes about 10 seconds | |
| Burner will not light but fan is running | Air in gas line Purge gas line | |
| Low gas pressure Install full canister or cylinder | ||
| Gas turned OFF | Turn gas ON | |
| Tilt switch activated Place | on level ground and in area it can't be knocked over | |
| ODS activated Ensure appl | liance is in an open area and not subject to a strong direct breeze | |
| Burner will not stay lit | Suspect thermocouple | Repair or replace |
| Suspect valve | Repair or replace | |
| Wind exceeding 15kph | Shelter from wind | |
| ODS activated Ensure appl | liance is in an open area and not subject to a strong direct breeze | |
| Appliance fuse blown Re | ace fuse (5 AMP) | |
| Unit switches off during use | Battery flat Charge battery | |
| Temperature exceeded safety cut off device | Turn off, wait 5 minutes and restart | |
| Ambient temperature above 20°C | ||
NOTE: If the appliance cannot be adjusted to perform correctly it should not be used until serviced or repaired.
WARNING: Improper installation, adjustment, alteration, service or maintenance can cause injury or property damage. Any modifications or adjustments made to product without prior authority from the manufacturer will void any warranty claims. Read the set up and operating instructions thoroughly before installing or servicing this equipment.
NOMINAL HOURLY GAS CONSUMPTION
| Model | Injector Orifice | Injector Qty | Gas Type | Gas Pressure | Gas Consumption | BTU | |
| CH100 | 0.45mm | 1 | LPG | 2.75kPa | 2.80 MJ/h | 55g/h | 2654 |
SAFE APPLIANCE LOCATIONS
This appliance shall only be used in an above ground open-air situation with natural ventilation, without stagnant areas, where gas leakage and products of combustion are rapidly dispersed by wind and natural convection.
Any enclosure in which the appliance is used shall comply with the following:
An enclosure with walls on all sides, but at least one permanent opening at ground level and no overhead cover.
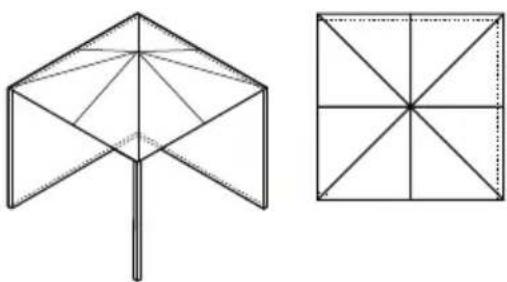
Within a partial enclosure that includes an overhead cover and no more than two walls.
Within a partial enclosure that includes an overhead cover and more than two walls, the following will apply:
at least 25% of the total wall area is completely open, and
at least 30% of the remaining wall area is open and unrestricted.
In the case of balconies, at least 20% of the total wall area shall be and remain open and unrestricted.
DIAGRAMMATIC REPRESENTATIONS OF OUTDOOR AREAS
The following figures are diagrammatic representations of outdoor areas. Rectangular areas have been used in these figures – the same principles apply to any other shaped area.

natural_image
Simple line drawing of a 3D rectangular box with an open door and a separate empty rectangle (no text or symbols)Outdoor Area - Example 1
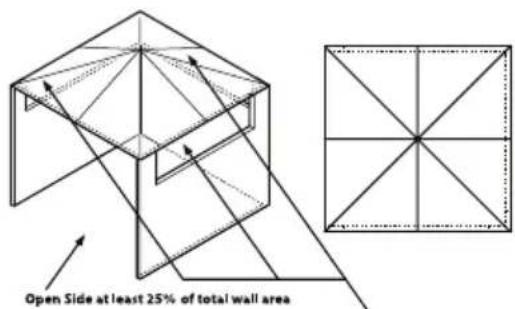
30% or more in total of the remaining wall area is open and unrestricted
Outdoor Area - Example 4
natural_image
Two geometric diagrams: a simple triangular structure with diagonal lines and a square divided into eight triangles (no text or symbols)Outdoor Area - Example 2

30% or more in total of the remaining wall area is open and unrestricted
Outdoor Area - Example 5

Outdoor Area - Example 3
- DUCTED CAMPING HEATER
- FOR YOUR SAFETY
- WARNING
- Important: Retain these instructions for future use Caution: Only use the battery charging cable supplied with the heater
- ONLY USE IN WELL-VENTILATED AREAS.
- CARBON MONOXIDE HAZARD-USING THIS APPLIANCE IN AN ENCLOSED SPACE MAY CAUSE DEATH. DO NOT USE INSIDE CARAVANS, TENTS, MARINE CRAFT, CARS, MOBILE HOMES OR SIMILAR LOCATIONS.
- USE OUTDOORS ONLY.
- IT MAY BE HAZARDOUS TO ATTEMPT TO FIT OTHER TYPES OF GAS CONTAINERS.
- FOR OUTDOOR USE ONLY
- IMPORTANT:
- WARNING:
- CAUTION:
- GENERAL INFORMATION
- CLEARANCES WHILE IN USE
- LOCATION
- CARE & MAINTENANCE
- UNPACKING FOR FIRST USE
- SET UP
- OPERATING INSTRUCTIONS
- TO STOP & PACK UP
- IMPORTANT
- CONNECTING & DISCONNECTING TO GAS SOURCE
- Check:
- Connecting Using a Disposable Propane Canister
- Connecting Using a Hose & LPG Cylinder
- PRODUCT MARKINGS
- MAINTENANCE
- SAFE APPLIANCE LOCATIONS
- Any enclosure in which the appliance is used shall comply with the following:
- Within a partial enclosure that includes an overhead cover and more than two walls, the following will apply:
- DIAGRAMMATIC REPRESENTATIONS OF OUTDOOR AREAS
Brand : Gasmate
Model : CH100
Category : Heating