
iP12iPA - Alarm Clock Palsonic - Free user manual and instructions
Find the device manual for free iP12iPA Palsonic in PDF.


| Product Type | Electronic Device |
| Brand | Palsonic |
| Model | iP12iPA |
| Manual Language | English |
| Number of Pages | 12 |
| File Format | |
| Power Supply | As per device specifications |
| Main Functions | User manual providing instructions for operation, safety, and maintenance |
| Care and Cleaning | Cleaning instructions included in manual |
| Safety | Safety precautions detailed in manual |
| Spare Parts and Repairability | Information on spare parts and repairability may be included; refer to manual |
| General Information | General information about the device and manufacturer |
| Manufacturer | Palsonic |
| User Rating | 6.5 / 10 |
| Download Availability | Free download from notice-facile.com |
| Category | Uncategorized |
| Translation Option | Available upon request via email |
| Document Type | User Manual |
| Target Audience | End users |
| Included Sections | Setup, Operation, Troubleshooting |
Frequently Asked Questions - iP12iPA Palsonic
User questions about iP12iPA Palsonic
0 question about this device. Answer the ones you know or ask your own.
Ask a new question about this device
Download the instructions for your Alarm Clock in PDF format for free! Find your manual iP12iPA - Palsonic and take your electronic device back in hand. On this page are published all the documents necessary for the use of your device. iP12iPA by Palsonic.
USER MANUAL iP12iPA Palsonic
The AUSTRALIAN Company
User's Manual
iP12iPA
Docking System with FM PLL Radio and Radio Alarm Clock

natural_image
Exterior view of a modern analog-style electronic device with digital display and control buttons (no readable text or symbols)





Important safety instructions

These warnings are in the interests of your safety, ensure that you understand them all before installing or using this appliance. Please read this user manual carefully and retain for future reference. Your safety is of paramount importance. If you are unsure about any of the meanings or these warnings contact Palsonic Customer Service 1300 657 888.
- Before plugging your appliance in check that the electric supply complies with the rating (voltage, frequency) of the electric appliance. The rating plate is usually on the back of the appliance.
- The appliance should always be plugged into an individual power socket to prevent overloading, which could cause a possible fire hazard from overheated wires.
- The appliance should be serviced or repaired only by Palsonic's Customer Service department or by an authorised service centre as appointed by Palsonic. Only genuine spare parts should be used. Under no circumstances should you attempt to repair the appliance yourself. Contact Palsonic Customer Service 1300 657 888.
- Do not use the appliance if the power cord is damaged. It must be replaced immediately with a new power cord. Contact Palsonic Customer Service 1300 657 888. The appliance must be properly earthed. Palsonic is not responsible for any accident caused by improper earthing or operation.
- The appliance must be positioned so that the power plug is accessible.
- Never pull the power cord to disconnect it from the power socket, grasp the plug and pull it from the power socket.
- Never drag the appliance by the power cord.
- Keep the power cord away from heated surfaces.
-
It is NOT recommended to use the appliance with an extension cord or power board. Please ensure that it is plugged directly into the power socket.
-
This is an electrical appliance, to avoid injury or death from electrical shock do not operate the appliance with wet hands, while standing on a wet surface or while standing in water. Do not use outdoors or in wet conditions.
- The rating label for this product located on the bottom of the unit.
- When electrostatic discharge (ESD) occurs at the front surface (whether metal or plastic) or near any part or any button of this unit, or at the USB port and / or SD-card slots (if they exist on this product), there may be a possibility that the product may stop operation and / or shut down immediately. This is a normal condition and intended to protect the unit and internal components against damage. In such a case, please reset the unit (by disconnecting and reconnecting AC-power source) to revert the unit to normal operation.
- Danger of explosion if battery is incorrectly replaced. Replace only with the same or equivalent type.
- 'Made for iPod' and 'Made for iPhone' mean that an electronic accessory has been designed to connect specifically to iPod, iPhone, respectively, and has been certified by the developer to meet Apple performance standards. Apple is not responsible for the operation of this device or its compliance with safety and regulatory standards. Please note that the use of this accessory with iPod, iPhone may affect wireless performance.
Description of the appliance 2
Using the appliance 4
Digital Clock Function 4
How to Set the Clock 4
Alarm Function 5
How to Set the Alarm 5
Alarm Mode Setting 5
Snooze Function 5
Automatic Power Off Sleep Finction 6
Volume Control 6
Music Equaliser 6
Dimmer Function 6
Operating the Radio 7
Radio Memory 7
Operating the iPod, iPhone or iPad 8
Repeat Playback Function of the iPod, iPhone or iPad 9
Using the Audio Line In Connection (AUX nput) 9
iPod, iPhone or iPad Rear Support Stand 9
Specifications
Due to ongoing modifications to our products, your appliance may vary slightly from this user manual.
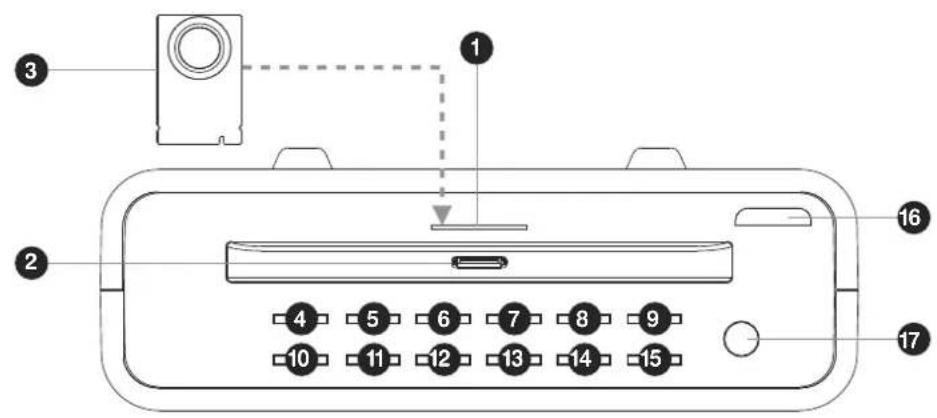


1 Cavity for iPod, iPhone or iPad Rear Support Stand
2 iPod, iPhone or iPad dock
3 iPod, iPhone or iPad Rear Support Stand
4 Dimmer
5 Eq / Sleep
6 Display / Clock Set
7 Alarm On / Off
8 Function
9 Volume Up +
10 Snooze
11 Back / Tune Down - / memory -
12 Play / Pause / FM Mode
13 Next / Tune Up + / memory +
14 Memory / Rrecall
15 Volume Down -
16 Storage Dock for Remote Control
17 Standby / On
18 LCD Display
19 Remote Control Sensor
20 Speakers (left / right)
21 Ambient Lighting (bottom of unit)
22 FM Antenna Wire
23 Aux Input Socket
24 DC Jack (DC 12v)
25 Back up Battery Compartment (bottom of unit)

Remote Control
1 Standby / On
② Eq / Sleep
3 Function
4 Back / Tune -
5 Play / Pause / FM Mode
6 Next / Tune +
7 Alarm On / Off
8 Memory / Recall
9 Volume Up +
10 Snooze
11 Display / Clock Set
12 Volume Down -
13 Battery Compartment
The remote control can be found in the battery compartment.
Remove (gently pull out) the plastic 'tab' from the battery compartment at the rear of the remote control.
Test the remote control by pressing the 'Standby / On' button.
Power supply

This unit is equipped with a 'DC Jack' capable of accepting AC adaptors with a rating of DC = 12V, 2a, Please only use the supplied AC adaptor to operate the unit. Use of other adaptors may damage the unit.
Make sure the voltage of the AC adaptor operates at the same voltage as your local household voltage.
Insert the plug of the power cord into a power socket and the tail end of the AC adaptor into the DC Jack socket on the rear of the main unit.
Press the 'Standby / On' button 1 on the remote control or 17 on the main unit to switch the unit on.
This unit is designed to operate without ever being totally powered 'Off'. It will either be 'On' or in 'Standby' mode. To save energy unplug the power cord from the power socket.
Batteries
Open the battery door 25 found at the bottom of the unit.
Insert 1 pc cr-2032 lithium cell battery in the battery compartment. This battery is for backup for the 'Real Time Clock' and 'Radio Memory' preset stations during brief power outages.
Digital Clock Function
The unit has a built-in digital clock, which is displayed when the unit is in 'Standby / On' mode. The display will continuously show the current time except in the following instances:
- When the 'Dimmer' function is set to '0' (display lights off / fully dimmed).
- When using the 'Function' button to select the 'Radio FM' mode, the display will momentarily show the FM Frequency before returning to the digital clock.
- When using functions / controls that require information to be momentarily displayed i.e. Volume Control, FM Frequency Tuning, setting the Alarm etc.
When the digital clock is not set the digital clock display will continuously flash to indicate that the correct time has not yet been set.
How to Set the Clock
| Press Function / Result | |
| The ‘Standby’ 1 button on the remote control or the ‘Standby’ 17 button on the unit. | Switch unit to ‘Standby / On’ mode. |
| The ‘Clock Set’ 11 button on the remote control or the ‘Clock Set’ 6 button on the unit.HOLD FOR 3 SECONDS. | The display flashes ‘12 Hour’ or ‘24 Hour’. |
| The ‘Back’ 4 or the ‘Next’ 6 button on the remote control. Or the ‘Back’ 11 or the ‘Next’ 13 button on the unit. | To select 12 hour or 24 hour clock display, then press ‘Clock Set’ 11 button on the remote control or the ‘Clock Set’ 6 button on the unit to confirm your selection.The ‘Hour’ will start to flash in the display. |
| The ‘Back’ 4 or the ‘Next’ 6 button on the remote control. Or the ‘Back’ 11 or the ‘Next’ 13 button on the unit. | Press repeatedly to set the correct hour in the display, then press ‘Clock Set’ 11 button on the remote control or the ‘Clock Set’ 6 button on the unit to confirm your selection.The ‘Minute’ will start to flash in the display. |
| The ‘Back’ 4 or the ‘Next’ 6 button on the remote control. Or the ‘Back’ 11 or the ‘Next’ 13 button on the unit. | Repeatedly to set the correct minute in the display, then press ‘Clock Set’ 11 button on the remote control or the ‘Clock Set’ 6 button on the unit to confirm your selection.The Clock is now set and will be shown in the display. |
Alarm Function
This unit has a alarm function to enable you to program the unit to automatically switch on at 2 different preset times, it will automatically turn off after an hour. It is equipped with 3 alarm modes: Buzzer, Radio or iPod / iPhone. Before setting the alarm, make sure to set the clock.
How to Set the Alarm
| Press Function / Result | |
| On Standby mode press and hold the ‘Alarm’ button 7 on the remote control or 7 on the unit. | The ‘Alarm’ symbol appears in the display and the ‘Hour’ will flash. |
| The ‘Back’ 4 or the ‘Next’ 6 button on the remote control. Or the ‘Back’ 11 or the ‘Next’ 13 button on the unit. | To adjust the hour of the desired ‘On’ time, then press the ‘Alarm’ button 7 on the remote control or 7 on the unit to confirm. The ‘Minute’ will start to flash in the display. |
| The ‘Back’ 4 or the ‘Next’ 6 button on the remote control. Or the ‘Back’ 11 or the ‘Next’ 13 button on the unit. | To adjust the minutes of the desired ‘On’ time, then press the ‘Alarm’ button 7 on the remote control or 7 on the unit to confirm. The ‘Wake Up Source’ will start to flash in the display. |
| The ‘Back’ 4 or the ‘Next’ 6 button on the remote control. Or the ‘Back’ 11 or the ‘Next’ 13 button on the unit. | To select the wake up source – Buzzer, Radio or iPod / iPhone, then press the ‘Alarm’ button 7 on the remote control or 7 on the unit to confirm and complete the Alarm Setting 1. The ‘Alarm Setting 2’ will start to flash in the display, repeat the above steps to set the ‘Alarm Setting 2’. |
| On Standby mode repeated;y press the ‘Alarm’ button 7 on the remote control or 7 on the unit. | To select your preferred Alarm Setting 1 or 2. |
Alarm Mode Setting
Radio
Tune in the desired radio station you would like to wake up to.
iPod or iPhone
Connect the iPod, iPhone or iPad as described on page 9. Select a song or playlist you would like to wake up to and select 'PAUSE'. If you fail to connect the iPod or iPhone then the Buzzer will sound at the set time.
Wake up volume
The wake up volume level will automatically rise from 0 - 16 (maximum). If you would like the volume level to be higher then you will have to manually set it. See page 6.
Snooze Function
Whenever the alarm comes on it can be temporarily suspended for a short period of time (approximately 10 minutes), by pressing the 'Snooze' 10 button on the remote control or 10 on the unit. The unit will then automatically come on again after approximately 10 minutes. This procedure can be repeated for approximately an hour.
Automatic Power Off Sleep Function
This unit has a special sleep timer function which can automatically switch off the unit after a selected period of time. while the unit is on, follow instructions below.
| Press Function / Result | |
| The ‘Sleep’ button 2 on remote control or 5 button on the unit. | Pressing this button repeatedly will scroll though different time selections:90 MINS, 80 MINS, 70 MINS, 60 MINS, 50 MINS, 40 MINS, 30 MINS, 20 MINS,10 MINS, 00 (this means the sleep timer is deactivated). |
Volume Control
| Press Function / Result | |
| The ‘Volume Up’ button9 on remote control or9 on the unit. | To increase the volume of unit, release the button when you reach the desired volume level. |
| The ‘Volume Down’ button12 on remote control or15 on the unit. | To decrease the volume of unit, release the button when you reach the desired volume level. |
Please Note: Sometimes, especially while listening to the radio, you may notice a repeated clicking noise while you are adjusting the volume level, this is normal and the sound will disappear when you release the Volume Up / Down Buttons.
Music Equalizer
Anytime during playback, the 'Eq' button ② on remote control or ⑤ on the unit repeatedly to choose the desired sound effect according to the music you are listening to, for example Classic, Rock, Pop, Jazz or Off.
Dimmer function
This unit has a dimmer function to independently adjust the brightness level of the control buttons, unit display and ambient under lighting.
| Press Function / Result | |
| The ‘Dimmer’ button 4 on the unit. | Press this button repeatedly to chose between the ‘Lighting Area’ you wish to change the brightness level:L1 = ambient under lighting, L2 = control keys lighting, L3 = display backlight. |
| The ‘Back’ 4 or the ‘Next’ 6 button on the remote control. Or the ‘Back’ 11 or the ‘Next’ 13 button on the unit. | To adjust the brightness level of that area. When brightness settings are confirmed, the unit will display the clock time.Note: the display will always return to normal-dimmer after resetting the unit. |
Operating the Radio
| Press Function / Result | |
| The ‘On / Standby’ button1 on remote control or17 on the unit | To switch on the unit. |
| The ‘Function’ button3 on remote control or8 on the unit | Press this repeatedly until the display shows ‘Radio’. |
| Adjust the antenna22 on the unit | To improve FM radio reception. |
| The ‘FM Mode’ button5 on remote control or12 on the unit | To select the desired mode i.e. ‘Mono’ or ‘Stereo’. In some cases, where reception is poor, it may be advisable to select the ‘Mono’ mode, to improve the clarity of the radio signal. |
| The ‘Back’ 4 or the ‘Next’6 button on the remote control. Or the ‘Back’ 11 or the ‘Next’ 13 button on the unit.RELEASE IMMEDIATELY. | To ‘Scan’ (manually adjust) the radio’s frequency ‘Up’ or ‘Down’ by 1-step at a time. The radio’s LCD will indicate the exact frequency position. When a desired frequency or station is reached. It can be saved into one of the ‘Memory’ positions (see ‘Radio Memory’). |
| The ‘Back’ 4 or the ‘Next’6 button on the remote control. Or the ‘Back’ 11 or the ‘Next’ 13 button on the unit.HOLD FOR 2 SECONDS. | To ‘Seek’ (automatically adjust) the radio’s frequency ‘Up’ or ‘Down’ to the next available radio station. The radio’s LCD will indicate the exact frequency of the station it has found. When a desired frequency or station is reached. It can be saved into one of the ‘Memory’ positions (see ‘Radio Memory’). |
Radio Memory
At any time, the currently displayed radio station or frequency can be stored into one of the memory positions. There are 30 memory positions for FM band. Switch your radio on and tune it to the desired radio station then follow the instructions below.
| Press Function / Result | |
| The ‘Memory / Recall’ button 8 on the remote control or 14 on the unit. | This activates the ‘Radio Memory’ programming mode. Press MEM + 13 or MEM - 11 button on the unit to select desired Memory Position. |
| The ‘Memory / Recall’ button 8 on the remote control or 14 on the unit.PRESS ONCE | To save the radio station to the selected ‘Memory Position’.To recall any saved radio station, simply press MEM + 13 or MEM - 11 button on the unit to scroll through saved radio stations.To clear the memory of any radio stations simply save a new radio station to the same Memory Position. |
Operating the iPod, iPhone or iPad
This unit is designed to allow you to connect an iPod, iPhone or iPad without the need for dock connectors. The design of the unit has been structured to provide support to the connector under normal usage without excessive pressure on the ipod/ iphone/ ipad when controlling playback using the ipod/ iphone/ ipad screen.
You can operate the iPod, iPhone or iPad using either the unit, remote control or directly with the iPod, iPhone or iPad. When the iPod, iPhone or iPad is connected to the unit, it will start charging the battery of the iPod, iPhone or iPad.
Connect the iPod, iPhone or iPad with the dock connector, see page 12 –13, turn everything on and follow the instructions below.
| Press Function / Result | |
| The ‘Function’ button3 on remote control or8 on the unit | Press this repeatedly until the display shows ‘iPod’. The unit will automatically playback the songs from your iPod, iPhone or iPad. The screen or the iPod, iPhone or iPad will display information of the current song. |
| The ‘Play / Pause’ button5 on the remote control or 12 on the unit. | To pause the operation of the unit.To resume operation press the ‘Play / Pause’ button 5 on the remote control or 12 on the unit again and the unit will resume operation at the same song as it was paused on. |
| The ‘Back / Tune Down’4 or the ‘Next / Tune Up’6 button on the remote control or the “Back / Tune Down’ 11 or the ‘Next / Tune Up’ 13 button on the the unit. | If you press and RELEASE the buttons it will skip forward or backwards by one track.If you press and HOLD the buttons it will fast forward or fast reverse. |
| The ‘Play / Pause’ button5 on the remote control or 12 on the unit.HOLD BUTTON | To stop playback.Note: Never remove (or unplug) the iPod, iPhone or iPad from the unit during playback, always stop playback first or change the funtion to ‘Radio’. |
‘Made for iPod’, ‘Made for iPhone’ and ‘Made for iPad’ mean that an electronic accessory has been designed to connect specifically to iPod, iPhone, iPad, respectively, and has been certified by the developer to meet Apple performance standards. Apple is not responsible for the operation of this device or its compliance with safety and regulatory standards. Please note that the use of this accessory with iPod, iPhone, iPad may affect wireless performance.
NOTE: Due to restriction by Apple for any iPad accessories (such as this product), please note that the following iPods will not charge when docked in this product: iPod Classic, iPod 4G or iPod 5G.
Repeat Playback Function on the iPod, iPhone or iPad
| Press Function / Result | |
| or on the iPod, iPhone or iPad screen. | to repeat the current trackto repeat all songs |
| on the iPod, iPhone or iPad screen. | To shuffle all songs on the iPod, iPhone or iPad and play them back in random order. |
Using the ‘Audio Line In’ Connection (AUX Input) Does this unit have this function - can’t see the USB Socket or SD Card Socket on the diagram?
You can connect the audio output of an external device such as a MP3 Player or a TV to this unit. This enables you to listen to the audio of that device through the high quality amplifier of this unit. To connect the external device please use a standard stereo headphone (3.5Mm to 3.5Mm plugs) cable to connect the 'Headphone-out or audio line-out' of the device to the aux-input socket of this unit.
| Press Function / Result | |
| The ‘On / Standby’ button1 on remote control or17 on the unit | To switch on the unit. Insert either a USB drive into the USB Socket 2 or an SD card into the SD Card Socket 3. |
| The ‘Function’ button3 on remote control or8 on the unit | Press this repeatedly until the display shows ‘AUX’.Switch on the external device eg. MP3 player or TV. Start playback of the external device and adjust the volume control of the main unit to the desired level.Remember to switch off the unit when you are finished using the external device. |
iPod, iPhone or iPad Rear Support Stand
This unit is designed to allow you to connect an iPod, iPhone or iPad without the need for dock connectors. The design of the unit has been structured to provide support to the connector under normal usage without excessive pressure on the iPod, iPhone or iPad when controlling playback using the iPod, iPhone or iPad screen.
iPod rear support stand can be adjusted by the 'Screw-control' which is located at the back of the rear support stand.
Rotate the 'Screw-control' in clock wise, to stretch out the rubber pad.
To reverse the rubber pad backward, simply rotate the 'Screw-control' in anti-clock wise.
Side of the support stand

Back of the rear support stand

Side of the support stand

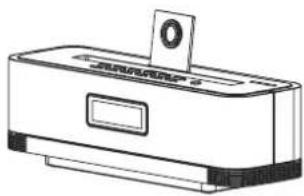
Insert the rear support stand back to the cavity gently after adjusted the rubber pad level as desired.

natural_image
Line drawing of a printer with a paperclip and label (no text or symbols)Power Requirements: DC 12V, 2A through built-in DC jack,
External AC/DC power adaptor 110V-240V \~ 50/60Hz
Power Consumption: 30W
Frequency: FM 87.5 - 108 MHz
Speaker: Main speaker 2 1/2 " x 2
Unit Dimensions: 330(W) x 106(H) x 110(D) mm
Unit Net Weight (approx.): 1.2 kgs
APN: 9312202842113
Design and specifications are current as of July 2011 (V.1), but are subject to change without notice. Specifications for Australia & New Zealand Only.
Palsonic
The AUSTRALIAN Company
Palsonic Customer Service
Telephone (Australia) 1300 657 888
Palsonic Corporation Pty Ltd ABN 34 000 474 108
1 Joynton Avenue, Waterloo NSW 2017 Australia
Telephone (02) 9313 7111 Facsimile (02) 9697 0655
www.palsonic.com.au
- The AUSTRALIAN Company
- User's Manual
- iP12iPA
- Important safety instructions
- Description of the appliance 2
- Using the appliance 4
- Specifications
- Remote Control
- Power supply
- Batteries
- Digital Clock Function
- Alarm Function
- Alarm Mode Setting
- Radio
- iPod or iPhone
- Wake up volume
- Snooze Function
- Automatic Power Off Sleep Function
- Volume Control
- Music Equalizer
- Dimmer function
- Radio Memory
- Operating the iPod, iPhone or iPad
- Using the ‘Audio Line In’ Connection (AUX Input) Does this unit have this function - can’t see the USB Socket or SD Card Socket on the diagram?
- iPod, iPhone or iPad Rear Support Stand
- Palsonic
Brand : Palsonic
Model : iP12iPA
Category : Alarm Clock