
HIC95600T - Hob BEKO - Free user manual and instructions
Find the device manual for free HIC95600T BEKO in PDF.


| Product Type | Built-in Induction Hob |
| Brand | Beko |
| Model | HIC95600T |
| Dimensions (W x D x H) | 59 cm x 52 cm x 5.5 cm |
| Weight | Approx. 10 kg |
| Power Supply | 220-240 V, 50-60 Hz, 16 A |
| Total Power | 7.2 kW |
| Number of Cooking Zones | 4 |
| Control Type | Touch Controls |
| Booster Function | Yes, on all zones |
| Timer | Yes, with auto-off |
| Safety Lock | Yes, child lock |
| Residual Heat Indicator | Yes |
| Automatic Shut-Off | Yes |
| Cleaning | Wipe with damp cloth; do not use abrasive cleaners |
| Spare Parts Availability | Contact Beko customer service |
| Installation Type | Built-in (cut-out required) |
| User Manual | Free download at notice-facile.com |
Frequently Asked Questions - HIC95600T BEKO
User questions about HIC95600T BEKO
0 question about this device. Answer the ones you know or ask your own.
Ask a new question about this device
Download the instructions for your Hob in PDF format for free! Find your manual HIC95600T - BEKO and take your electronic device back in hand. On this page are published all the documents necessary for the use of your device. HIC95600T by BEKO.
USER MANUAL HIC95600T BEKO
Your new Beko hob was manufactured in a state of the art facility and has passed the strictest quality control procedures.
Please read this manual carefully before using your hob for the first time and then store it within easy reach for future reference.
This manual will provide you with information on how to operate and care for your hob to gain the maximum benefit from it.
We trust you will enjoy years of trouble free use.
EXPLANATION OF SYMBOLS

Important information

Warning—Hazardous situations

Warning—Electric shock

Caution; Warning for fire hazard

Caution; Warning for hot surfaces
1. General information 4
Technical Specifications 4
2. Important Safety Instructions 5
General safety 5
Electrical safety 5
Product safety 6
Intended use 7
Safety for children 7
Disposing of the old product 8
Packaging information 8
3. Installation 9
Before installation 9
Installation and connection 9
4. Preparation 11
Tips for energy saving 11
Initial use 11
First cleaning of the appliance 11
5. Controls 12
Switching on/off the cooktop 13
Selecting a power level for
the heater 14
Selecting an extension zone for
a radiant heater 16
Key lock 17
Residual heat 18
Stop & Go function 18
Operating the timer 21
Selecting the time 22
Errors/Alarms 25
6. Maintenance and care 27
Recommendations 28
1 Technical Specifications
| Model | HOB 900 CERAN CP T/CON |
| Volts 220V -240V 50/60Hz~Amperes 38.5 A | |
| Plate power rating (ø, mm/ W)Middle cooking zone 270 mm 3 StageFront cooking zone left 140 mm Ceran Front cooking zone right 175 mm Ceran Rear cooking zone right 140 mm Ceran Rear cooking zone left 175 mm Ceran Plate 1800 W | Ceran Plate 2700 WPlate 1200 WPlate 1800 WRear Cooking Zone Plate 1200 WRear Cooking Zone Plate 1800 W |
| Total power (W) 8700 W | |
| Type of switch Electronic sensorsWidth Depth | 900 mm510 mm |
| Cable type H07RN-F 3G6 | |
| Cable length 2 M |


The manufacturer strives for continuous improvement. For this reason, the text and illustrations in this manual are subject to change without notice.
Figures in this manual are schematic and may not exactly match your product.
Values stated on the product labels or in the documentation accompanying it are obtained in laboratory conditions in accordance with relevant standards. Depending on operational and environmental conditions of the product, these values may vary.
2 Important safety instructions
This section contains safety instructions that will help you avoid risk of injury and damage. All warranties will become void if you do not follow these instructions.
General safety
- This appliance is not intended for use by persons (including children) with reduced physical, sensory or mental capabilities, or lack of experience and knowledge, unless they have been given supervision or instruction concerning the use of the appliance by a person responsible for their safety.
- Young children should be supervised to ensure that they do not play with the appliance. • Installation and repair procedures must always be performed by Authorized Service Agents. The manufacturer shall not be held responsible for damages arising from procedures carried out by unauthorized persons which may also void the warranty. Before installation, read the instructions carefully.
- Do not operate the product if it is defective or has any visible damage.
- Ensure that the product function knobs are switched off after every use.
Electrical safety
- If the product has a failure, it should not be operated unless it is repaired by the Authorized Service Agent. There is the risk of electric shock!
- Only connect the product to a grounded outlet/line with the voltage and protection as specified in the “Technical specifications”. Have the grounding installation made by a qualified electrician while using the product with or without a transformer. Our company shall not be liable for any problems arising due to the product not being earthed in accordance with the local regulations.
- Never wash the product by spreading or pouring water onto it! There is the risk of electric shock!
- Never touch the plug with wet hands! Never unplug by pulling on the cable, always pull out by grabbing the plug.
- The product must be unplugged during installation, maintenance, cleaning and repairing procedures.
- If the power connection cable for the product is damaged, it must be replaced by the manufacturer, its service agent or similarly qualified persons in order to avoid a hazard.
- The appliance must be installed so that it can be completely disconnected from the network. The separation must be provided either by a mains plug or a switch built into the fixed electrical installation, according to construction regulations.
- Any work on electrical equipment and systems should only be carried out by authorized and qualified persons.
- In case of any damage, switch off the product and disconnect it from the mains. To do this, turn off the fuse at home.
- Make sure that the fuse rating is compatible with the product.
Product safety
- The appliance and its accessible parts become hot during use. Care should be taken to avoid touching heating elements. Children less than 8 years of age shall be kept away unless continuously supervised.
- Never use the product when your judgment or coordination is impaired by the use of alcohol and/or drugs.
- Be careful when using alcoholic drinks in your dishes. Alcohol evaporates at high temperatures and may cause fire since it can ignite when it comes into contact with hot surfaces.
- Do not place any flammable materials close to the product as the sides may become hot during use.
- Keep all ventilation slots clear of obstructions.
- Do not use steam cleaners to clean the appliance as this may cause an electric shock.
- Do not use or store flammable products (alcohol, petrol, benzene, etc.) near the appliance as these pose a fire risk.
- Danger of fire: Do not store items on the cooking surfaces.
- Unattended cooking on a hob with fat or oil can be dangerous and may result in fire. NEVER try to extinguish a fire with water, but switch off the appliance and then cover the flame, e.g., with a lid or a fire blanket.
- Do not spray aerosols in the vicinity of this appliance while it is in operation.
- Do not modify this appliance.
- Where this appliance is installed in a marine craft or in caravans, it shall not be used as a space heater.
- Do not use the appliance for heating closed tins and glass jars. The pressure that would build up in the tin/jar may cause it to burst. Always keep children and infirm persons away from the appliance when it is in use.
- Use a deep pan, large enough to cover the appropriate cooking zones. Always dry food thoroughly before placing it in hot oil or fat. Frozen food in particular will spit and splatter if added too quickly.
- Never fill the pan more than one third full of fat or oil.
- Never heat fat or fry with a lid on the pan.
- Do not fry too much food at once. This lowers the temperature of the oil or fat and results in fatty foods.
- Do not leave hot fat or oil unattended. If overheating occurs, these could catch fire.
Intended use
- This product is designed for domestic use. Commercial use will void the guarantee.
- This appliance is for cooking purposes only. It must not be used for other purposes, for example room heating.
- The manufacturer shall not be liable for any damage caused by improper use or handling errors.
Safety for children
- Accessible parts may become hot during use. Young children should be kept away.
- The packaging materials are dangerous for children. Keep the packaging materials away from children. Please dispose of all parts of the packaging according to environmental standards.
- Electrical and/or gas products are dangerous to children. Keep children away from the product when it is operating and do not allow them to play with the product.
- Do not place any items above the appliance that children may reach for.
Disposing of the old product
- Compliance with the WEEE Directive and Disposing of the Waste Product:

This product complies with EU WEEE Directive (2012/19/EU). This product bears a classification symbol for waste electrical and electronic equipment (WEEE). This product has been manufactured with high quality parts and materials which can be reused and are suitable for recycling. Do not dispose of the waste product with normal domestic and other waste at the end of its service life. Take it to the collection centre for the recycling of electrical and electronic equipment. Please consult your local authorities to learn about these collection centres.
Compliance with RoHS Directive:
The product you have purchased complies with EU RoHS Directive (2011/65/EU). It does not contain harmful and prohibited materials specified in the Directive.
Package information
- Packaging materials of the product are manufactured from recyclable materials in accordance with our National Environment Regulations. Do not dispose of the packaging materials together with the domestic or other wastes. Take them to the packaging material collection points designated by the local authorities.
3
Installation
The appliance must be installed by a qualified person in accordance with national regulations.
Installation is the buyer's responsibility.
The manufacturer accepts no liability for this service.
Any action that the manufacturer has to take as a result of an erroneous installation will not be covered by the warranty.
 | Preparation of location and electrical installation for the appliance is the customer's responsibility. |
 | DANGER: The appliance must be installed in accordance with all local electrical regulations. |
 | DANGER: Prior to installation, visually check if the appliance has any defects on it. If so, do not have it installed. Damaged appliances cause risks for your safety. |
Before installation
The appliance is designed for installation in a commercial worktop. A safety distance must be left between the appliance and the kitchen walls and furniture. See figure overleaf (values in mm).
It can also be used in a free standing position. Allow a minimum distance of 750 mm above the hob surface.
(*) If a cooker hood is to be installed above the appliance, refer to cooker hood manufacturer' instructions regarding installation height (min 650 mm)
Remove packaging materials and transport locks.
Surfaces, synthetic laminates and adhesives used must be heat resistant (100 °C minimum).
The worktop must be aligned and fixed horizontally.
Cut aperture for the hob in worktop as per installation dimensions.
Cupboard design
Cooking appliances generate considerable heat. The layout and materials of the mounting cabinet should take account of these characteristics.
Surfaces and surrounding edges immediately adjacent to the appliance should be able to withstand temperatures of up to 100°C without delaminating or discolouring.
Installation and connection
The appliance must be installed in accordance with local electrical regulations.
Connection to the power supply must be carried out by a licensed electrician, who will ensure that the hob is correctly connected and safely earthed. The rated current is printed on the serial number label attached to the base cover.
The hob must be connected to the mains through a double pole isolating switch which has a minimum clearance between the contacts of 3 mm in both poles. A means for disconnection must be provided in the fixed wiring.

This appliance must be earthed and the manufacturer and the seller do not accept responsibility for any damage due to incorrect installation or electrical connection.
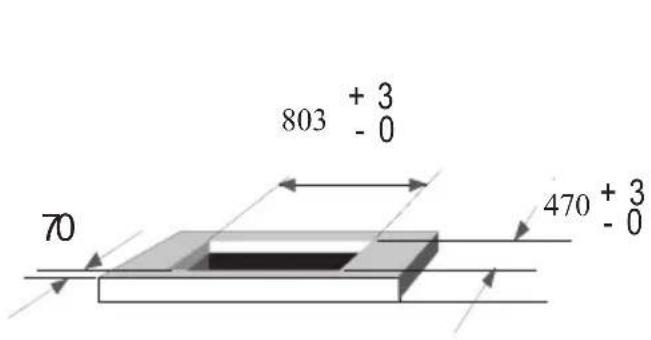


Risk of broken glass!
Do not put the ceramic hob down on a corner or edge.
Electrical connection
Connect the appliance to a grounded outlet/line protected by a fuse of suitable capacity as stated in the "Technical specifications" table.
Have the grounding installation made by a qualified electrician. Our company shall not be liable for any damages that arise due to using the appliance without a grounding installation in accordance with national regulations.
| DANGER Risk of electric shock!Before working on the electrical installation, disconnect the appliance from the mains supply. | |
| DANGER Risk of electric shock, short circuit or fire by unprofessional installation!The appliance may be connected to the mains supply only by an authorized qualified person and the hob is only guaranteed after correct installation. |
| DANGER Risk of electric shock, short circuit or fire by damage of the mains lead!The mains lead must not be clamped, bent or trapped or come into contact with hot parts of the hob. If the mains lead is damaged, it must be replaced by a qualified electrician. |
The connection must comply with national regulations.
The mains supply data must correspond to the data specified on the type label of the appliance.
Safety installation for hob with control panel
- A removable horizontal board must be fitted below the hob and 75mm away from the worktop bottom face.
- Space between this board and the appliance must be empty and no objects may be stored or kept there.
- This board will effectively shield the user from the base of the hob which gets hot during use. The board needs to be removable for service purposes as the hob, once installed, can only be loosened from below.
- If the appliance is installed with a side adjacent to a vertical kitchen cabinet, the distance between the edge of the appliance and that of the cabinet side must be at least 150mm. The distance between the back wall and the rear edge of the hob must be at least 55mm.
Tips for energy saving
The following information will help you to use your hob in an ecological way, and to save energy:
- Defrost frozen dishes before cooking them.
- Select the burner which is suitable for the bottom size of the pot to be used. Always select the correct pot size for your dishes. Larger pots require more energy.
- Pots with a thick base will provide better heat conduction. You can obtain energy savings up to 1/3.
- Pots must be compatible with the cooking zones. The bottom of the pots must not be smaller than the hotplate. Use pots with a base diameter slightly larger than that of the thermal area. This will ensure even heat distribution and prevent spillage from dripping onto and staining the hot zone.
- Keep the cooking zones and the bottom of the pots clean. Dirt will decrease the heat conduction between the cooking zone and the bottom of the pot.
- Use only pots with a solid, level base. An uneven base will prolong cooking time and waste energy.
- Always cover the pot with a lid. This will conserve energy and minimize spillage.
- Save energy by switching the plate off 5 to 10 minutes before the end of a lengthy cooking period. The hob will retain sufficient residual heat to complete the cooking process.
- A pot with rough edges could scratch the appliance surface if it were dragged across the surface of the appliance.
- Any spillage of sugar solution such as jam must be removed immediately. If allowed to cool on the surface, it could pit and damage the surface.
- Do not cover the appliance surface with aluminium foil and do not use poor quality aluminium pots. These will leave unsightly deposits which, in time, could adhere to the surface of the hob.
Initial use
First cleaning of the appliance

The surface may get damaged by some detergents or cleaning materials.
Do not use aggressive detergents, cleaning powder/cream or any sharp objects.
- Remove all packaging materials.
- Wipe the surfaces of the appliance with a damp cloth or sponge and dry with a cloth.
Since the following are not factory faults, they are the owner's responsibility.
- Damage to exterior finish.
- Breakage of glass and other components.
- Damage through improper use or installation of the appliance.
- Damage caused by moving the appliance.
Basic functions
The control allows different layout configurations:
- Control for up to 5 Radiant heaters. • KeyLock function.
- Stop & Go function.
- Indication of residual heat for each heater. • Thermal control protection.
- Protection from accidental activation of keys:
- One or more keys activated for more than 10 sec. -> Switching off the touch control. A warning beep sounds every 10 sec., while the key/s is/are activated.
- With all heaters at zero power during 10 sec. -> The Cooktop is switched off. If the switching off is due to an accidental activation of keys, the touch control actuates as above.
- Acoustic warning to attract the user's attention.
Infrared keys
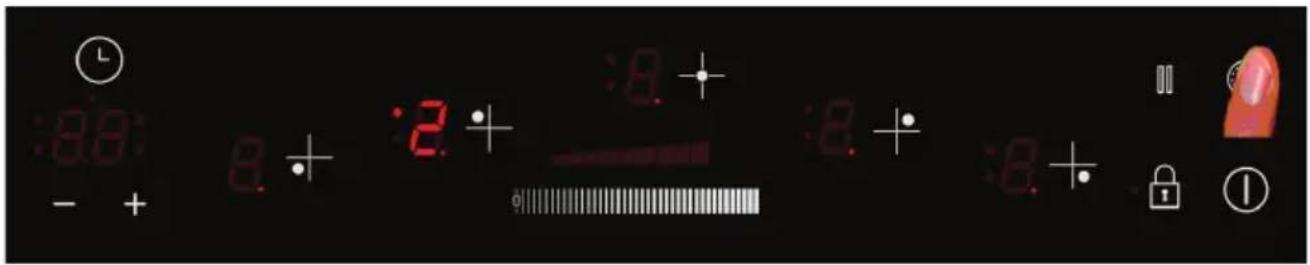
1 key for switching On/Off the Cooktop [ON_OFF_KEY].
1 key for locking/unlocking the keyboard [KEYLOCK_KEY].
1 key for Stop & Go function [STOP_GO_KEY].
1 key for enabling/disabling extensions [DOUBLE_ZONE_KEY].
2 keys for timer timeset [-TIMER_KEY] [+TIMER_KEY].
5 keys for heater selection [HEATER_n_KEY] n=0..5
1 Infrared slider key [SLIDER] for heater cookset selection.


Displays and LED's
5 7-segment displays [HEATERn_DISPLAY] n=1..5 to show the actual set on each heater, show heater and cooktop special statuses and show errors.
2 7-segment displays
[TIMER_TENTHS_DISPLAY] and [TIMER_UNITS_DISPLAY] to show the timer remaining time.
10 LEDs [HEATERn_ZONE1_LED] and [HEATERn_ZONE2_LED] (n=1..5) for radiant heater double and triple zone on/off indication.
1 LED [CHILDLOCK_LED] to show if the cooktop is locked/unlocked.
1 LED [STOP_GO_LED] to show if the Stop & Go function is active.
5 LEDs [HEATERn_TIMED_LED] (n=1..5) to show the association between the timer and the cooking zones.
1 Bargraph LED [BARGRAPH_LED] to show the selected power for the selected heater.
Sounds
3 beeps for switching off the cooktop [OFF_SOUND]. 2 beeps for activating Stop&Go function [STOP&GO_SOUND]. 3 short beeps to indicate a disabled key [KEYBOARD_ERROR_SOUND]. Scrolling sound for power selection on the slider [SLIDER_SOUND].

Switching On/Off the Cooktop.
The cooktop is switched ON by touching the [ON_OFF_KEY] key for 1 second. A beep sounds and all the heater displays show a '0'.
Switching ON the cooktop
If the selection of a cook set for a heater is not done in 10 seconds, the cooktop will be turned off automatically.
The cooktop is switched OFF by touching the [ON_OFF_KEY] key for 1 second. An [OFF_SOUND] sounds and all the heaters are switched off. The purpose of these [OFF_SOUND] is to distinguish the OFF action over all others.
Switching OFF the cooktop
When the cooktop is OFF, after 5 seconds without any error/alarm to display and without any message to indicate (residual heat), the control switches off the [KEYLOCK_LED] in order to reduce as much as possible the power consumption. As soon as we touch a key, the [KEYLOCK_LED] goes ON and you can continue to operate as normal, unlocking the keyboard if necessary and touching the [ON_OFF_KEY] key to switch ON the cooktop.
The [ON_OFF_KEY] key will be locked to switch on the cooktop if the key lock is activated, or if there is any appliance error.
Selecting a power level for a heater
To switch on a heater, it is necessary to actuate every cooking zone by means of two operations:
Select a heater
Select the desired cookset
Selecting a heater
A heater is selected by touching the heater [HEATER_n_KEY] key for 160 ms. A beep sounds, and the heater display shows the power level.
The heaters that are not selected are shown with a dot point.
Heater selection
The [HEATER_n_KEY] key will be locked to select a heater:
- If the cooktop is off (all the heater displays off), or
- if the key lock is activated, or
- if there is any heater or appliance error.
The heater selection will finish:
• 10 seconds after the last touch over the [SLIDER] key - if another heater is selected - or if the [HEATER_n_KEY] key is touched for 160 ms.
When the heater selection is finished after 10 seconds, a beep sounds and all the heater displays show the power levels again.
Selecting a power level for a heater
Once the heater is selected, the power level can be selected by touching the [SLIDER].
Each position over the slider surface corresponds to a cooking level. The power level selection is done by sliding the finger or by placing the finger on a specific position of the slider surface.
The power set will be shown by displays [HEATER_n_DISPLAY] and the [BARGRAPH_LED].
The [SLIDER] keys will be locked:
- If no heater is selected, or
- if the key lock is activated, or
- if there is any heater or appliance error.

Depending on the configuration of the model, the scroll over the slider makes a specific sound [SLIDER_SOUND].
Selecting an extension zone for a radiant heater
To switch on a heater it is necessary to actuate every cooking zone by means of two operations:
- Select a heater
- Select the [DOUBLE_ZONE_KEY] key for enabling/disabling extensions.
Selecting an extension zone
Once the heater is selected, the extension zones can be enabled or disabled by touching the [DOUBLE_ZONE_KEY] key.
Double zone
Triple zone
Key lock
The key-lock is always activated at the start-up of the control.
The locking function can be activated at any time if the Stop&Go function is OFF.
Touching the [KEYLOCK_KEY] key for 1 second activates or deactivates the key lock function.
If the cooktop is ON, the key lock function locks all keys except the general
[ON_OFF_KEY] key and the [KEYLOCK_KEY].
When the cooktop is OFF, the key lock function locks all keys, including the general [ON_OFF_KEY] key.
Key Lock activated when cooktop is ON
If the keyboard is locked, the [CHILDLOCK_LED] is ON. With the exception of:
when the Cooktop is OFF, after 5 sec without any error/alarm to display and without any message to indicate (residual heat), the control switches off the [KEYLOCK_LED] in order to reduce power consumption as much as possible.
As soon as we touch a key, the [KEYLOCK_LED] goes on and we can continue to operate as normal, unlocking the keyboard if necessary and touching the [ON_OFF_KEY] key to switch ON the Cooktop.
If the cooktop is OFF and locked, the Key Lock LED is ON when we touch any key

Residual Heat
Radiant Heaters Residual Heat
Once cooking has finished, the user interface indicates if there is remaining heat in the corresponding heater.
Remaining heat will be indicated only when the heater temperature goes beyond 65°C (149°F). To ensure that a heater reaches a temperature greater than this, it is necessary that the heater is working for more than 7 seconds in a power level greater than zero.
As radiant heaters temperatures are not read directly, it is necessary to estimate the time that the heater will be hot after cooking.
During this time, shown in table 1, letter 'H' will be shown alternatively with '0', indicating hot remaining.
Automatic actions
Protection from accidental activation of keys
If any key/s is continually pressed for more than 10 seconds, the cooktop is switched off automatically. A warning beep sounds every 10 sec., while the key/s is/are activated.
Heater auto switch off in a specific time
After the maximum time of operation at the same power level, the heater is switched off automatically.
The heater auto switch off time is automatically reset when the power level is changed.
Thermal protection of the control.
When the control user interface detects an ambient temperature above 96°C (±5%), it switches off the cooktop. Any heater switched off by the thermal protection can only be reactivated when the temperature falls below 89°C (±5%).
When the heater power control detects an unusually high operating temperature for its devices, it switches off all the heaters until the temperature reaches normal operating values, thereafter continuing with their previous power level values.
Stop & Go function
The Stop and Go function allows temporary pausing of the cooking process, allowing the user to answer the door or the telephone without having to be concerned about contents of pots boiling over.
This function is also useful to clean the user interface surface without changing the cooking set up.
If the [STOP_GO_KEY] is pressed for more than 120 milliseconds:
- The [STOP_GO_LED] flashes, a [STOP&GO_SOUND] sounds and the cooktop is stopped,
- the heaters actual power setting is stored and all the active heaters power is set to power level 0,
- the heaters auto switch off time is stopped,
- all timers running count downs are stopped,
- all keys are locked except [STOP_GO_KEY] and [ON_OFF_KEY],
- timer displays nothing, and all the heaters displays are switched on and display "0".
Stop & Go


The stop function will finish:
- if the [STOP_GO_KEY] is touched for more than 120 milliseconds a beep sounds and the heaters actual power setting is restored, or
- if the cooktop is stopped for more than 10 minutes the cooktop is switched off automatically.
Operating the timer
The timer value can be selected between 1 and 99 minutes. It is possible to set the time for any heater at any power level, including power level 0.
The user can select only one heater at a time on which the timer function is to operate. The timer's last minute will be displayed in seconds.
The [+TIMER] [-TIMER] keys will be locked: o If the Cooktop is off, or o if the key lock is activated (KEYLOCK LED on).
Selecting a timer for a heater
Once a heater is selected, a switch-off time can be selected by touching the [+TIMER] or [-TIMER]. When the timer is off, it is activated by pressing the timer keys [+TIMER] or [-TIMER]. A beep sounds, the timer display shows a "00" flashing and the timed heater LED flashes.
Activating the timer
The [+TIMER] or [-TIMER] keys will be locked:
- If no heater is selected, or
- if the key lock is activated, or
- if there is an error.
Selecting the time
The timer display flashes whilst the timer is awaiting a time selection. The timer value can be selected between 1 and 99 minutes touching the [+TIMER] or [-TIMER] keys. If the key [+TIMER] or [-TIMER] associated with the timer is held down, the change speed is increased automatically. This makes it possible to reach the desired time setting more quickly. Depending on the configuration of the model, the time may be increased in increments of 1 by 1 or 5 by 5.
Selecting the time
If the time is not selected before 5 seconds, the timer is switched off.
If the selected time is "00" after 5 seconds the timer is switched off.
Starting Timer Countdown
The countdown starts 5 seconds after the last operation over the [+TIMER] or [-TIMER] key.
A beep sounds and the timer display stops flashing and the led heater also stops flashing if any power level is selected.
The last minute will be displayed in seconds.
Changing the time
When the timer is in countdown the user can change the time at any time by selecting the heater and touching the timer [+TIMER] or [-TIMER] key, the countdown stops and the timer changes to time selection status awaiting a time selection.
Timer Countdown End
When the time set on the timer has run out, the timed heater is switched off, the timer display and the timed heater led starts flashing and a timer alarm beep sounds for one minute.
Timer countdown end

The timer alarm can be cancelled at any time, even during the first minute of the alarm. When the timer is in the alarm status, by pressing any key of the touch control the timer is switched off.
Switching off the timer
To cancel the operation of the timer, select the time value of "00" using the [-TIMER] key or pressing the [+TIMER] and [-TIMER] keys at the same time.
More than one heater timed
When more than one heater is timed the timer displays will show the timer that is going to elapse first. The active heater timer LED will be flashing.
More than one heater timed

Autokey-lock
When all the heaters are not powered, and one heater is temporized at zero power level, the key-lock function is activated after 1 minute.
Selecting Independent Minute Minder
The Independent Minute Minder is available only if enabled in the configuration of the touch model. It cannot run at the same time with any heater timer.
When attempting to temporize a selected heater when the Minute Minder is running, or to select the Minute Minder when a heater is already timed, an audible beep sounds [KEYBOARD_ERROR_SOUND], disabling the action.

When selecting a heater power level and the Minute Minder is running, the selected heater cannot be temporized.

If any heater is timed then the Minute Minder cannot be selected.
Remember it is possible to set the time for any heater at power level 0.
If no heater is selected, touching the Timer [+TIMER] or [-TIMER] a beep sounds, the timer display shows a "00" flashing and the display unit digit point flashes.
The Minute Minder is selected

It works exactly like a heater timer. When the Independent Minute Minder is selected, touching the Timer [+TIMER] or [-TIMER] key the independent minute minder is selected.
The countdown starts 5 seconds after the last operation over the [+TIMER] or [-TIMER] key, or any key is touched.
A beep sounds and the timer display digit stops flashing; the digit unit digit dot however continues flashing.

Errors/Alarms
Appliance errors
Appliance errors are the errors which generate the deactivation of the whole cooktop.
When an appliance error is detected, all heaters are switched off, a beep sounds (only if one or more heaters are active) and all displays show an 'F' letter and the error code alternately.
While in error status all the heater keys are not operative.
Except for EEPROM and microcontroller errors, all errors are recoverable. That is, when the cause of the error disappears all displays are deactivated and the cooktop returns to normal operation.


| Appliance errors | ||||
| Event that generates the error(Visualization Priority Order) | Description | Heater Display(fore 0.5 sec./ back 0.5 sec) | Effect in the appliance | Normal status recovery |
| Microcontroller fault | Microcontroller Internal Error | ‘FO’ | App. off | ---- |
| On/Off key emitter fault | Security Key Error | ‘FA’ | App. off | When the fault disappears |
| On/Off key receiver fault | Security Key Error | ‘FC’ | App. off | When the fault disappears |
| User interface temperature sensor short-circuit | Touch NTSC Error | ‘FE’ | App. off | When the fault disappears |
| User interface temperature sensor open-circuit | Touch NTc Error | ‘Ft’ | App. off | When the fault disappears |
| User interface overtemperature >96°C | Touch NTc Error,switching off all heaters. | ‘Fc | App. off | When user interface temperature <89°C |
| EEPROM fault | Eeprom Checksum Error | ‘FH’ | App. off | ---- |
| Microcontroller A/D converter multiplexer fault | Security Key Error | ‘FJ’ | App. off | When the fault disappears |
| Ambient Light fault | Keyboard Error | ‘FL’ | App. off | When satisfactory ambient lighting is detected |
| Microcontroller A/D converter conversion fault | Security Key Error | ‘FU’ | App. off | When the fault disappears |
Heater control errors
Heater control errors are the errors which generate the switch off of one or more heaters.
When a heater error is detected, the involved heaters are switched off, a beep sounds (only if one or more heaters are active) and the displays corresponding to these heaters show an 'F' letter and the error code alternately.
While in error status the keys of the corresponding heaters are not operative.
All errors are recoverable. That is, when the cause of the error disappears the corresponding displays are deactivated and the heaters return to normal operation.


| Radiant Heater errors | ||||
| Event that generates the error(Visualization Priority Order) | Description | Heater Display(fore 0.5 sec./ back 0.5 sec) | Effect in the appliance | Normal status recovery |
| Microcontroller fault | Microcontroller Internal Error | ‘F0’ | App. off | ---- |
| Communication fault | Communication Error | ‘F5’ | Heaters Off | When the fault disappears |
| Heater control board temperature sensor short-circuit | HC NTSC Error | ‘F3’ | Heaters Off | When the fault disappears |
| Heater control board temperature sensor open-circuit | HC NTSC Error | ‘F4’ | Heaters Off | When the fault disappears |
| Heater control board overtemperature >96°C | HC NTc Error, | ‘Fc | Heaters Off | When HPC temperature < 89°C |
| Heater control relay fault | HC Relays Failure | ‘Fr’ | Heaters Off | When the fault disappears |
Problem check
Before calling a service technician to assist with a problem:
PROBLEM
The plates do not work
SOLUTION
Check there is power to the wall switch.
Remember that you may be charged for a service call even during the warranty period if the fault is due to or caused by the above.
WARNING: In the unlikely event of the Ceran sustaining accidental damage or cracks, switch off the appliance at the mains to avoid electric shock and have the panel replaced before further use.
Caring for the Ceran hob
- Ceran is a tough, durable material, which provides a beautiful, functional and long lasting cooking surface. To keep it looking good, it needs to be treated with care and cleaned regularly.
- Wipe spillage off as soon as possible with a damp cloth, preferably while the hob is still warm.
- Clean the hob with a nylon pad and a suitable smooth top cleaning solution, which is available from all Beko Service Centres. Remove calcium stains (yellow stains) by applying a small amount of lime remover such as vinegar or lemon juice. Other suitable commercially available products can also be used.
- If necessary stubborn spills may be removed using the blade scraper provided.
- Do not use metal scourers or coarse abrasive powders as these could scratch the Ceran.
- Regular cleaning after use will prevent dirt build up and ensure that the hob remains bright and attractive.
- Wipe the hob surround with a damp hot soapy cloth and dry. • DO NOT USE A STEAM CLEANER.
Recommendations
- Use only pots with a solid level base. An uneven base will prolong cooking time and waste energy.
- Use pots with a base diameter slightly larger than that of the thermal area. This will ensure even heat distribution and prevent spillage from dripping onto and staining the hot zone.
- Always cover the pot with a lid. This will conserve energy and minimize spillage.
- Save energy by switching the plate off 5 to 10 minutes before the end of a lengthy cooking period. The Ceran hob will retain sufficient residual heat to complete the cooking process.
- A pot with rough edges could scratch the Ceran if it were dragged across the surface of the hob.
- Any spillage of sugar solution such as jam must be removed immediately. If allowed to cool on the Ceran, it could pit and damage the surface.
- Do not cover the Ceran with aluminium foil and do not use poor quality aluminium pots. These will leave unsightly deposits which, in time, could adhere to the Ceran.

- EXPLANATION OF SYMBOLS
- GENERAL INFORMATION
- IMPORTANT SAFETY INSTRUCTIONS
- INSTALLATION
- PREPARATION
- CONTROLS
- MAINTENANCE AND CARE
- TECHNICAL SPECIFICATIONS
- GENERAL SAFETY
- ELECTRICAL SAFETY
- PRODUCT SAFETY
- INTENDED USE
- SAFETY FOR CHILDREN
- DISPOSING OF THE OLD PRODUCT
- COMPLIANCE WITH ROHS DIRECTIVE
- PACKAGE INFORMATION
- BEFORE INSTALLATION
- CUPBOARD DESIGN
- INSTALLATION AND CONNECTION
- RISK OF BROKEN GLASS
- ELECTRICAL CONNECTION
- SAFETY INSTALLATION FOR HOB WITH CONTROL PANEL
- TIPS FOR ENERGY SAVING
- INITIAL USE
- FIRST CLEANING OF THE APPLIANCE
- SINCE THE FOLLOWING ARE NOT FACTORY FAULTS, THEY ARE THE OWNER'S RESPONSIBILITY
- BASIC FUNCTIONS
- INFRARED KEYS
- DISPLAYS AND LED'S
- SOUNDS
- SWITCHING ON/OFF THE COOKTOP
- SELECTING A POWER LEVEL FOR A HEATER
- SELECTING A HEATER
- THE [HEATER_N_KEY] KEY WILL BE LOCKED TO SELECT A HEATER
- THE HEATER SELECTION WILL FINISH
- SELECTING AN EXTENSION ZONE FOR A RADIANT HEATER
- SELECTING AN EXTENSION ZONE
- KEY LOCK
- RESIDUAL HEAT
- RADIANT HEATERS RESIDUAL HEAT
- AUTOMATIC ACTIONS
- PROTECTION FROM ACCIDENTAL ACTIVATION OF KEYS
- HEATER AUTO SWITCH OFF IN A SPECIFIC TIME
- THERMAL PROTECTION OF THE CONTROL
- STOP & GO FUNCTION
- STOP & GO
- THE STOP FUNCTION WILL FINISH
- OPERATING THE TIMER
- SELECTING A TIMER FOR A HEATER
- SELECTING THE TIME
- STARTING TIMER COUNTDOWN
- CHANGING THE TIME
- TIMER COUNTDOWN END
- SWITCHING OFF THE TIMER
- MORE THAN ONE HEATER TIMED
- AUTOKEY-LOCK
- SELECTING INDEPENDENT MINUTE MINDER
- ERRORS/ALARMS
- APPLIANCE ERRORS
- HEATER CONTROL ERRORS
- PROBLEM CHECK
- PROBLEM
- SOLUTION
- CARING FOR THE CERAN HOB
- RECOMMENDATIONS
Brand : BEKO
Model : HIC95600T
Category : Hob