
WW12TP44DSX - Washing machine SAMSUNG - Free user manual and instructions
Find the device manual for free WW12TP44DSX SAMSUNG in PDF.


| Product Type | Washing Machine |
| Brand | Samsung |
| Model | WW12TP44DSX |
| Capacity | 12 kg |
| Spin Speed | 1400 rpm |
| Energy Class | A |
| Dimensions (W x D x H) | 600 x 550 x 850 mm |
| Weight | 75 kg |
| Power Consumption | 2000 W |
| Water Consumption | 49 L per cycle |
| Noise Level (Wash/Spin) | 52 dB / 74 dB |
| Functions | AI Wash, Quick Wash, EcoBubble, Self Clean, Delay End, Smart Control |
| Safety | Child Lock, Overheating Protection, Overflow Protection |
| Maintenance | Drum Clean, Filter Cleaning, Emergency Drain |
| Spare Parts | Drum, Motor, PCB, Hoses |
| Repairability Score | 7/10 |
Frequently Asked Questions - WW12TP44DSX SAMSUNG
User questions about WW12TP44DSX SAMSUNG
0 question about this device. Answer the ones you know or ask your own.
Ask a new question about this device
Download the instructions for your Washing machine in PDF format for free! Find your manual WW12TP44DSX - SAMSUNG and take your electronic device back in hand. On this page are published all the documents necessary for the use of your device. WW12TP44DSX by SAMSUNG.
USER MANUAL WW12TP44DSX SAMSUNG
What you need to know about the safety instructions 4
Important safety symbols 4
Important safety precautions 5
Critical installation warnings 6
Installation cautions 8
Critical usage warnings 8
Usage cautions 9
Critical cleaning warnings 12
Installation 13
What's included 13
Installation requirements 15
Step-by-step installation 17
Before you start 27
Initial setup 27
Laundry guidelines 28
Detergent drawer guidelines 31
Operations 35
Control panel 35
Operating a cycle 37
Cycle overview 38
Additional functions 41
System functions 44
Special features 46
SmartThings 49
Open Source Announcement 50
Maintenance 51
Drum clean+ 51
Emergency drain 52
Cleaning 53
Defrosting your washing machine 58
Care against an extended time of disuse 58
English2
Troubleshooting 59
Checkpoints
Information codes 63
59
Specifications 66
Fabric care chart 66
Protecting the environment 67
Specification sheet 68
Safety information
Congratulations on your new Samsung washing machine. This manual contains important information on the installation, use and care of your appliance. Please take some time to read this manual to take full advantage of your washing machine's many benefits and features.
What you need to know about the safety instructions
Please read this manual thoroughly to ensure that you know how to safely and efficiently operate the extensive features and functions of your new appliance. Please store the manual in a safe location close to the appliance for future reference. Use this appliance only for its intended purpose as described in this instruction manual.
Warnings and Important Safety Instructions in this manual do not cover all possible conditions and situations that may occur. It is your responsibility to use common sense, caution and care when installing, maintaining and operating your washing machine.
Because the following operating instructions cover various models, the characteristics of your washing machine may differ slightly from those described in this manual and not all warning signs may be applicable. If you have any questions or concerns, contact your nearest service centre or find help and information online at www.samsung.com.
Important safety symbols
What the icons and signs in this user manual mean:

WARNING
Hazards or unsafe practices that may result in severe personal injury, death and/or property damage.

CAUTION
Hazards or unsafe practices that may result in personal injury and/or property damage.

NOTE
Indicates that a risk of personal injury or material damage exists.
These warning signs are here to prevent injury to yourself and others.
Please follow them explicitly.
After reading this manual, store it in a safe place for future reference.
Read all instructions before using the appliance.
As with any equipment that uses electricity and moving parts, potential hazards exist. To safely operate this appliance, familiarize yourself with its operation and exercise care when using it.
English4
Important safety precautions

WARNING
To reduce the risk of fire, electric shock, or injury to persons when using your appliance, follow basic precautions, including the following:
- This appliance is not to be used by persons (including children) with reduced physical, sensory or mental capabilities, or lack of experience and knowledge, unless they have been given supervision or instruction concerning use of the appliance by a person responsible for their safety.
- For use in Europe: This appliance can be used by children aged from 8 years and above and persons with reduced physical, sensory or mental capabilities or lack of experience and knowledge if they have been given supervision or instruction concerning use of the appliance in a safe way and understand the hazards involved. Children shall not play with the appliance. Cleaning and user maintenance shall not be made by children without supervision.
- Children should be supervised to ensure that they do not play with the appliance.
- If the supply cord is damaged, it must be replaced by the manufacturer, its service agent or similarly qualified persons in order to avoid a hazard.
- The new hose-sets supplied with the appliance are to be used and old hose-sets should not be reused.
Safety information
- For appliances with ventilation openings in the base, a carpet must not obstruct the openings.
- For use in Europe: Children of less than 3 years should be kept away unless continuously supervised.
- CAUTION: In order to avoid a hazard due to inadvertent resetting of the thermal cut-out, this appliance must not be supplied through an external switching device, such as a timer, or connected to a circuit that is regularly switched on and off by the utility.
- This appliance is intended to be used in household only and it is not intended to be used such as:
–staff kitchen areas in shops, offices and other working environments;
-farm houses;
-by clients in hotels, motels and other residential type environments;
—bed and breakfast type environments;
-areas for communal use in blocks of flats or in launderettes.
Critical installation warnings

WARNING
The installation of this appliance must be performed by a qualified technician or service company.
- Failure to do so may result in electric shock, fire, an explosion, problems with the appliance, or injury.
The appliance is heavy, therefore take care when lifting it.
Plug the power cord firmly into a wall socket that meets local electrical specifications. Use the socket for this appliance only, and do not use an extension cord.
- Sharing a wall socket with other appliances using a power strip or extending the power cord may result in electric shock or fire.
- Ensure that the power voltage, frequency, and current are the same as those of the product specifications. Failure to do so may result in electric shock or fire.
English6
Remove all foreign substances such as dust or water from the power plug terminals and contact points using a dry cloth on a regular basis.
- Unplug the power plug and clean it with a dry cloth.
- Failure to do so may result in electric shock or fire.
Plug the power plug into the wall socket so that the cord is running towards the floor.
- If you plug the power plug into the socket in the opposite direction, the electric wires within the cable may be damaged and this may result in electric shock or fire.
Keep all packaging materials out of the reach of children as these may be dangerous.
- If a child places a bag over its head, it may suffocate.
When the appliance, power plug or power cord is damaged, contact your nearest service centre.
This appliance must be properly grounded.
Do not ground the appliance to a gas pipe, plastic water pipe, or telephone line.
- This may result in electric shock, fire, an explosion, or problems with the appliance.
- Never plug the power cord into a socket that is not grounded correctly and make sure that it is in accordance with local and national regulations.
Do not install this appliance near a heater or any inflammable material.
Do not install this appliance in a humid, oily or dusty location, or in a location exposed to direct sunlight or water (rain drops).
Do not install this appliance in a location exposed to low temperatures.
- Frost may cause the tubes to burst.
Do not install this appliance in a location where gas may leak.
• This may result in electric shock or fire.
Do not use an electric transformer.
• This may result in electric shock or fire.
Do not use a damaged power plug, damaged power cord, or loose wall socket.
• This may result in electric shock or fire.
Do not pull or excessively bend the power cord.
Do not twist or tie the power cord.
Do not hook the power cord over a metal object, place a heavy object on the power cord, insert the power cord between objects, or push the power cord into the space behind the appliance.
• This may result in electric shock or fire.
Do not pull the power cord when unplugging the power plug.
- Unplug the power plug by holding the plug.
- Failure to do so may result in electric shock or fire.
This appliance should be positioned so that the power plug, the water supply taps, and the drain pipes are accessible.
Safety information
Following the repair by a non-authorized service provider, self-repair or non-professional repair of the product, Samsung is not liable for any damage to the product, any injury or any other product safety issue caused by any attempt to repair the product which does not carefully follow these repair and maintenance instructions. Any damage to the product caused by an attempt to repair the product by any person other than a Samsung certified service provider will not be covered by the warranty.
Installation cautions

CAUTION
This appliance should be positioned in such a way that the power plug is easily accessible.
- Failure to do so may result in electric shock or fire due to electric leakage.
Install your appliance on a solid, level floor that can support its weight. - Failure to do so may result in abnormal vibrations, movement, noise, or problems with the appliance.
Critical usage warnings

WARNING
If the appliance is flooded, turn off the water & power supplies immediately and contact your nearest service centre.
- Do not touch the power plug with wet hands.
- Failure to do so may result in electric shock.
If the appliance generates a strange noise, a burning smell, or smoke, unplug the power cord immediately and contact your nearest service centre.
- Failure to do so may result in electric shock or fire.
In the event of a gas leak (such as propane gas, LP gas, etc.), ventilate immediately without touching the power plug. Do not touch the appliance or power cord.
- Do not use a ventilating fan.
- A spark may result in an explosion or fire.
Remove the washing machine door lever before disposing the appliance.
- If trapped inside the appliance, children may suffocate to death.
Make sure to remove the packaging (sponge, styrofoam) attached to the bottom of the washing machine before using it.
Do not wash items contaminated with gasoline, kerosene, benzene, paint thinner, alcohol or other inflammable or explosive substances.
- This may result in electric shock, fire, or an explosion.
English8
Do not open the washing machine door by force while it is operating (high-temperature washing/drying/spinning).
- Water flowing out of the washing machine may result in burns or cause the floor to be slippery. This may result in injury.
- Opening the door by force may result in damage to the appliance or injury.
Do not touch the power plug with wet hands.
• This may result in electric shock.
Do not turn the appliance off by unplugging the power cord while an operation is in progress.
- Plugging the power cord into the wall socket again may cause a spark and result in electric shock or fire.
Do not let children climb in or onto the appliance.
- This may result in electric shock, burns or injury.
Do not insert your hand or a metal object under the washing machine while it is operating.
• This may result in injury.
Do not unplug the appliance by pulling the power cord. Always grip the plug firmly and pull it straight out of the outlet.
- Damage to the power cord may cause a short-circuit, fire and/or electric shock.
Do not attempt to repair, disassemble, or modify the appliance yourself.
- Do not use a fuse (such as copper, steel wire, etc.) other than a standard fuse.
- When the appliance needs to be repaired or reinstalled, contact your nearest service centre.
- Failure to do so may result in electric shock, fire, problems with the appliance, or injury.
If the water supply hose comes loose from the water tap and floods the appliance, unplug the power cord.
- Failure to do so may result in electric shock or fire.
Unplug the power cord when the appliance is not being used for long periods of time or during a thunder or lightning storm.
- Failure to do so may result in electric shock or fire.
If any foreign substance enters into the appliance, unplug the power cord and contact your nearest Samsung Customer Service.
• This may result in electric shock or fire.
Do not let children (or pets) play in or on your washing machine. The washing machine door does not open easily from the inside and children may be seriously injured if trapped inside.
Usage cautions
CAUTION
When the washing machine is contaminated by a foreign substance such as detergent, dirt, food waste, etc., unplug the power cord and clean the washing machine using a damp, soft cloth.
- Failure to do so may result in discolouration, deformation, damage, or rust.
Safety information
The front glass may be broken by a strong impact. Take care when using the washing machine.
- If the glass is broken, it may result in injury.
Open the water tap slowly after a long period of non-use, water supply failure, or when reconnecting the water supply hose.
- The air pressure in the water supply hose or the water pipe may damage a part of the appliance or result in a water leak.
If a draining error occurs during an operation, check if there is a draining problem.
- If the washing machine is used when it is flooded because of a draining problem, it may result in electric shock or fire.
Insert the laundry into the washing machine completely so that the laundry does not get caught in the door.
- If laundry gets caught in the door, it may result in damage to the laundry or the washing machine, or result in a water leak.
Turn the water supply off when the washing machine is not being used.
- Ensure that the screws on the water supply hose connector are properly tightened.
Ensure that the rubber seal and front door glass are not contaminated by a foreign substance (e.g. waste, thread, hair, etc.).
- If a foreign substance is caught in the door or the door is not completely closed, it may cause a water leak.
Open the water tap and check if the water supply hose connector is firmly tightened and that there is no water leak before using the appliance.
- If the screws on the water supply hose connector are loose, it may result in a water leak.
The appliance you have purchased is designed for domestic use only.
Using the appliance for business purposes qualifies as an appliance misuse. In this case, the appliance will not be covered by the standard warranty provided by Samsung and no responsibility can be attributed to Samsung for malfunctions or damages resulting from such misuse.
Do not stand on the appliance or place objects (such as laundry, lighted candles, lighted cigarettes, dishes, chemicals, metal objects, etc.) on the appliance.
- This may result in electric shock, fire, problems with the appliance, or injury.
Do not spray volatile material such as insecticide onto the surface of the appliance.
- As well as being harmful to humans, this may result in electric shock, fire or problems with the appliance.
Do not place objects that generate electromagnetic fields near the washing machine.
- This may result in injury due to a malfunction.
Water drained during a high-temperature wash or drying cycle is hot. Do not touch the water.
• This may result in burns or injury.
English10
Draining time may vary depending on the water temperature. If the water temperature is too high, the draining process starts after the water cools down.
Do not wash, spin, or dry water-proof seats, mats, or clothing (*) unless your appliance has a special cycle for washing these items.
(*): Woollen bedding, rain covers, fishing vests, ski pants, sleeping bags, diaper covers, sweat suits, and bicycle, motor cycle and car covers, etc.
- Do not wash thick or hard mats even if the washing machine mark is on the care label. This may result in injury or damage to the washing machine, walls, floor, or clothing due to abnormal vibrations.
- Do not wash throw rugs or doormats with rubber backing. The rubber backing may come off and stick to inside the drum, and this may result in malfunction such as a drainage error.
Do not operate the washing machine when the detergent drawer is removed.
- This may result in electric shock or injury due to a water leak.
Do not touch the insides of the drum during or just after drying as it is hot.
• This may result in burns.
The door glass becomes hot during washing and drying. Therefore, do not touch the door glass.
Also, do not allow children to play around the washing machine or touch the door glass.
• This may result in burns.
Do not insert your hand into the detergent drawer.
- This may result in injury as your hand may be caught by the detergent input device.
Remove the liquid detergent guide (applicable models only) when using powdered detergent.
- If not, water may leak through the front of the detergent drawer.
Do not place any objects (such as shoes, food waste, animals) other than laundry into the washing machine.
- This may result in damage to the washing machine, or injury and death in the case of pets due to the abnormal vibrations.
Do not press the buttons using sharp objects such as pins, knives, fingernails, etc.
• This may result in electric shock or injury.
Do not wash laundry contaminated by oils, creams or lotions usually found in skincare shops or massage clinics.
- This may cause the rubber seal to become deformed and result in a water leak.
Do not leave metal objects such as safety pins, hair pins or bleach in the drum for long periods of time.
• This may cause the drum to rust.
- If rust starts appearing on the surface of the drum, apply a (neutral) cleansing agent to the surface and use a sponge to clean it. Never use a metal brush.
Do not use dry cleaning detergent directly and do not wash, rinse, or spin laundry contaminated by dry cleaning detergent.
- This may result in spontaneous combustion or ignition due to the heat from the oxidation of the oil.
Safety information
Do not use water from water cooling/heating devices.
- This may result in problems with the washing machine.
Do not use natural hand-washing soap for the washing machine.
- If it hardens and accumulates inside the washing machine, it may result in problems with the appliance, discolouration, rust, or bad odours.
Place socks and brassieres in a washing net and wash them with the other laundry.
Do not wash large laundry items such as bedding in the washing net.
- Failure to do so may result in injury due to abnormal vibrations.
Do not use hardened detergent.
- If it accumulates inside the washing machine, it may result in a water leak.
Make sure that the pockets of all the clothing items to be washed are empty.
- Hard, sharp objects such as coins, safety pins, nails, screws, or stones can cause extensive damage to the appliance.
Do not wash clothing with large buckles, buttons or other heavy metal objects.
Sort the laundry by colour on the basis of its colorfastness and select the recommended cycle, water temperature and additional functions.
- This may result in discolouration or fabric damage.
Take care that children's fingers are not caught in the door when you close it.
- Failure to do so may result in injury.
To prevent odours and mould, leave the door open after a wash cycle to allow the drum to dry.
To prevent limescale build up, leave the detergent drawer open after a wash cycle and dry inside it.
Critical cleaning warnings

WARNING
Do not clean the appliance by spraying water directly onto it.
Do not use a strong acidic cleaning agent.
Do not use benzene, thinner or alcohol to clean the appliance.
- This may result in discolouration, deformation, damage, electric shock or fire.
Before cleaning or performing maintenance, unplug the appliance from the wall socket.
- Failure to do so may result in electric shock or fire.
English12
Installation
Follow these instructions carefully to ensure proper installation of the washing machine and to prevent accidents when doing laundry.
What's included
Make sure all the parts are included in the product package. If you have a problem with the washing machine or the parts, contact a local Samsung customer centre or the retailer.

01 Auto dispenser
02 Release lever
03 Detergent drawer
04 Control panel 05 Door 06 Drum
07 Debris filter
08 Emergency drain tube
09 Filter cover
10 Worktop 11 Power plug 12 Drain hose
13 Levelling feet
Installation
* The design of the drawer and/or the lever differs with the model.
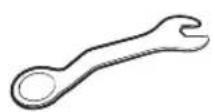


Spanner Bolt caps Hose guide


Cold water hose Hot water hose
Accessories (not supplied)
- Stacking kit
- SKK-DF (WW**T5*****, WW7*T*****, WW8*T6*****, WW8*T7*****, WW9*T6*****, WW9*T7***** Models only)
- SK-DH (WW1*T******, WW8GT6******, WW8*T6*6***, WW8*T7*6***, WW**T8******, WW**T9******, WW9*T6*6*** Models only)
-SKK-UR (WW12T*****, WW13T*****, WW14T***** Models only)
-Staking kit is required to stack a dryer on a washing machine.
NOTE
- Spanner: For removing the shipping bolts and levelling the washing machine.
- Bolt caps: For covering the holes after removing the shipping bolts. The provided number of bolt caps (3 to 6) depends on the model.
- Hose guide: For hanging the drain hose in the drainpipe or wash-basin.
- Cold/Hot water hose: For supplying water to the washing machine. (Hot water hoses is for applicable models only.)
English14
Installation requirements
Electrical supply and grounding
- AC 220-240 V / 50 Hz fuse or circuit breaker is required.
- Use an individual branch circuit specific to the washing machine.
To ensure proper grounding, the washing machine comes with a power cord featuring a three-prong grounding plug for use in a properly installed and grounded outlet.
Check with a qualified electrician or service person if you are not sure about the grounding.
Do not modify the provided plug. If it does not fit the outlet, call a qualified electrician to install a suitable outlet.

WARNING
- Do NOT use an extension cord.
- Use only the power cord that comes with the washing machine.
- Do NOT connect the ground wire to plastic plumbing, gas lines, or hot water pipes.
- Improperly connected grounding conductors may cause electric shock.
Water supply
A proper water pressure for this washing machine is between 50 kPa and 800 kPa. Water pressure less than 50 kPa may cause the water valve to not close completely, or it may take longer to fill the drum, causing the washing machine to turn off.
Water taps must be within 120 cm from the rear of the washing machine so that the provided inlet hoses reach the washing machine.
To reduce the risk of leaks:
- Make sure water taps are easily accessible.
- Turn off the taps when the washing machine is not in use.
- Check for any leaks at the water inlet hose fittings on a regular basis.

CAUTION
Before using the washing machine for the first time, check all connections at the water valve and taps for any leaks.
Drain
Samsung recommends a standpipe 60-90 cm high. The drain hose must be connected through the hose clip to the standpipe, and the standpipe must fully cover the drain hose.
Installation
Flooring
For best performance, the washing machine must be installed on a solid floor. Wood floors may need to be reinforced to minimise vibration and/or unbalanced loads. Carpeting and soft tile surfaces do not resist vibration well and may cause the washing machine to move slightly during the spin cycle.
CAUTION
Do NOT install the washing machine on a platform or a poorly supported structure.
Water temperature
Do not install the washing machine in areas where water may freeze as the washing machine always retains some water in its water valves, pumps, and/or hoses. Frozen water left in the connection parts may cause damage to belts, the pump, and other components of the washing machine.
Alcove installation
Minimum clearance for stable operation:
| Sides 25 mm | |
| Top 25 mm | |
| Rear 50 mm | |
| Front 550 mm |
If both the washing machine and a dryer are installed in the same location, the front of the alcove must have at least a 550 mm unobstructed air opening. Your washing machine alone does not require a specific air opening.
English16
Step-by-step installation
STEP 1 Select a location
Location requirements:
- Solid, level surface without carpeting or flooring that may obstruct ventilation
- Away from direct sunlight
- Adequate room for ventilation and wiring
- The ambient temperature is always higher than the freezing point (0 °C)
- Away from a heat source
NOTE
- To prevent excessive vibration while operating the washing machine, consider stability before anything else.
• Install your washing machine on a solid and level floor. - Do not install your washing machine on soft floors or floor coverings.
- If you install your washing machine on a wood floor, install a water-resistance wooden panel (min 1.18 in. / 30 mm thick) to the floor. Also, we recommend installing your washing machine on the corner of the wood floor.
STEP 2 Remove the shipping bolts
Unpack the product package and remove all shipping bolts.
NOTE
Number of shipping bolts may differ depending on the model.
WARNING
- Packaging materials can be dangerous to children. Dispose all packaging material (plastic bags, polystyrene, etc.) out of children's reach.
- To avoid injury, cover the holes with bolt caps after removing the shipping bolts. Do not move the washing machine without the shipping bolts in place. Assemble the shipping bolts before moving the washing machine to another location. Keep the shipping bolts in a safe place for future use.
Installation
English
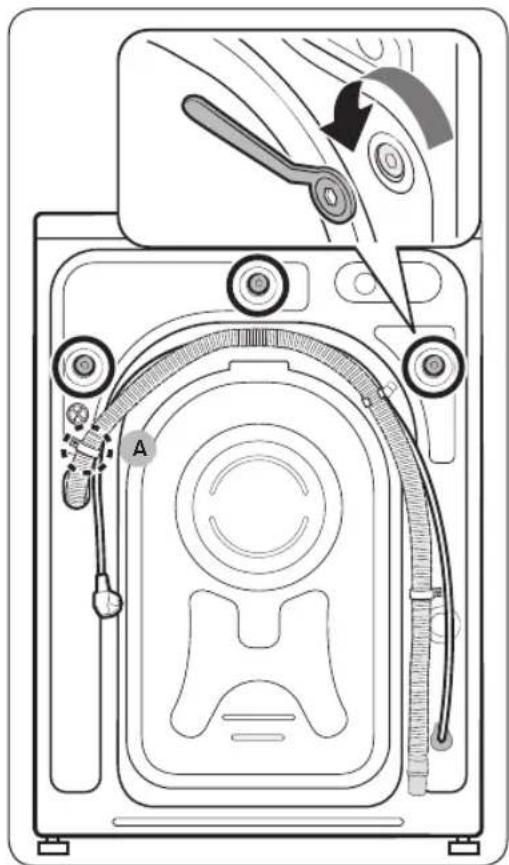
- Locate the shipping bolts (marked with circle in the figure) on the rear side of the washing machine.
CAUTION
Do not remove the screw (A) that fixes the hose clip.
- Using the supplied spanner, loosen all the shipping bolts by turning them anticlockwise.
NOTE
You must keep the shipping bolts for future use.
English18-

- Insert the bolt caps (B) to the holes (marked with circle in the figure).
Installation
STEP 3 Adjust the levelling feet

natural_image
Diagram showing two mechanical assembly states: left with hand turning a knob, right with valve mechanism and upward arrows indicating motion (no text or symbols)-
Gently slide the washing machine into position. Excessive force may damage the levelling feet.
-
Level the washing machine by manually adjusting the levelling feet.
-
When levelling is complete, tighten the nuts using the spanner.

natural_image
Diagram showing a wrench and nut assembly with directional arrows indicating movement (no text or symbols)
natural_image
Diagram of a washing machine with attached cable and a disassembled component (no text or symbols)CAUTION
When installing the product make sure the levelling feet is not pressing the power cord.
CAUTION
Make sure all the levelling feet are seating on the floor surface to avoid the washing machine from moving or generating noise due to vibration. Then, check if the washing machine is rocking. If the washing machine is not rocking, tighten the nuts.
English20
STEP 4 Connect the water hose
The provided water hose may differ depending on the model. Please follow the instruction according to the provided water hose.
Connecting to a threaded water tap

natural_image
Diagram of a faucet with a valve and central hub, showing fluid flow direction (no text or labels)- Connect the water hose to the water tap, and then turn it to the right to tighten.
CAUTION
Before connecting the water hose, make sure there is a rubber washer in the hose connector. Do not use the hose if the washer is damaged or missing.
natural_image
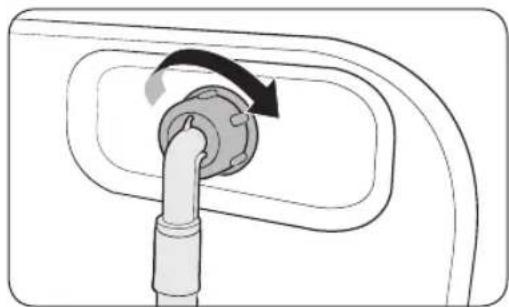
Diagram of a car fuel plug being inserted into a door panel, showing rotational direction (no text or symbols)- Connect the other end of the water hose to the inlet valve on the back of the washing machine, and then turn it to the right to tighten.

natural_image
Diagram of two pipe fittings with circular annotations highlighting their features (no text or symbols present)- Slowly open the water tap and check if there are any leaks around the connection areas. If there are water leaks, repeat step 1 and 2.
WARNING
If there is a water leak, stop operating the washing machine and disconnect it from the electrical supply. Then, contact a local Samsung service centre in case of a leak from the water hose, or contact a plumbing technician in case of a leak from the water tap. Otherwise, this may cause electric shock.
Installation

CAUTION
Do not stretch the water hose by force. If the hose is too short, replace the hose with a longer, high-pressure hose.
Connecting to a non-threaded water tap
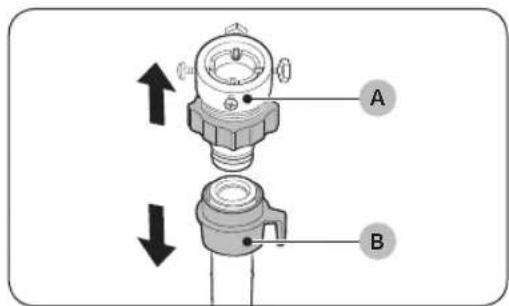
- Remove the adaptor (A) from the water hose (B).
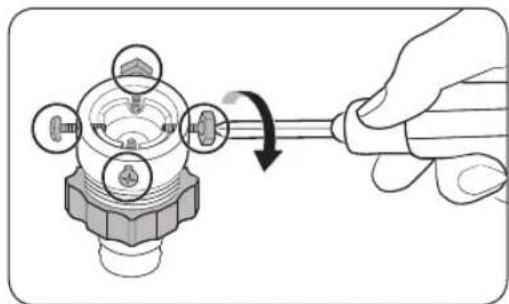
natural_image
Illustration of a hand using a screwdriver to adjust a mechanical component (no text or symbols present)- Use a Phillips screwdriver to loosen four screws on the adaptor.

- Hold the adaptor and turn part (C) in the arrow direction to loosen it by 5 mm (*).
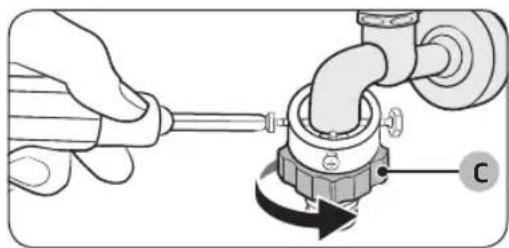
natural_image
Illustration of a hand using a tool to adjust a pipe fitting with a directional arrow (no text or symbols)-
Insert the adaptor onto the water tap, and then tighten the screws while lifting the adaptor.
-
Turn part (C) in the arrow direction to tighten it.
English22-
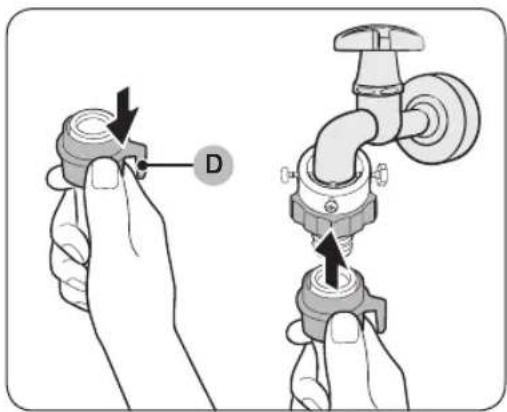
-
While pulling down part (D) on the water hose, connect the water hose to the adaptor. Then, release part (D). The hose fits into the adaptor with a clicking sound.
-
To complete connecting the water hose, see 2 and 3 on the "Connecting to a threaded water tap" section.
NOTE
- After connecting the water hose to the adaptor, pull the water hose down to check if it is connected properly.
- Use a popular type of water taps. If the tap is square-shaped or too big, remove the spacer ring before inserting the tap into the adaptor.
For models with an additional hot water inlet:

natural_image
Diagram of two connected electrical plug connectors with a curved arrow indicating rotation (no text or symbols)- Connect the red end of the hot water hose to the hot water inlet on the back of the machine.
- Connect the other end of the hot water hose to the hot water tap.
Installation
Aqua stop hose (applicable models only)
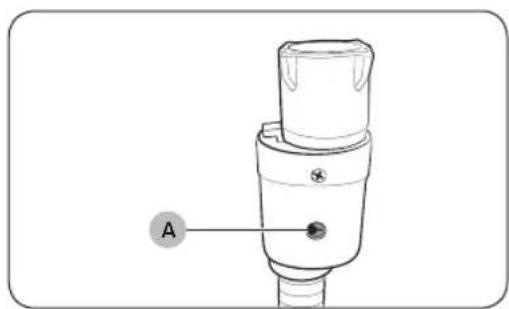
The aqua stop hose alerts users of a risk of water leaks. It senses the water flow and turns red on the centre indicator (A) in case of a leak.

NOTE
The end of the aqua stop hose must be fitted to the water tap and not the machine.
English24
STEP 5 Position the drain hose
The drain hose can be positioned in three ways:

Over the edge of a wash basin
The drain hose must be placed between 60 cm and 90 cm (*) above from the floor. To keep the spout of the drain hose bent, use the supplied plastic hose guide (A). Secure the guide to the wall using a hook to ensure stable drainage.

natural_image
Line drawing of a washing machine next to a vertical pipe with a star symbol (no text or labels)In a drain pipe
The drain pipe should be between 60 cm and 90 cm high (*). It is advisable to use a 65 cm high vertical pipe.
- To ensure the drain hose stays in position, use the plastic hose guide provided (see the figure).
• To prevent the siphoning of water flow during drainage, make sure to insert the drain hose 15 cm in the drain pipe. - To prevent the drain hose from moving around, secure the hose guide to the wall.
Drain standpipe requirements:
• Minimum diameter of 5 cm
• Minimum carry-away capacity of 60 litres per minute
Installation

In a sink drain pipe branch
The drain pipe branch must be above the sink siphon so that the end of the hose is at least 60 cm above the ground.
(*): 60 cm
CAUTION
Remove the lid on the sink drain pipe branch before connecting the drain pipe to it.
STEP 6 Power on
Plug the power cord into a wall socket that is correctly rated, grounded, and protected by a fuse or circuit breaker. Then, tap and hold for 3 seconds to turn on the washing machine.

natural_image
Diagram of a washing machine with labeled component A (no text or symbols beyond label)NOTE
Door latch (lever) (A) is originally designed to be loose a little, because it may makes the door latch be inserted into the door more easily.
NOTE
If the door is locked during installation, plug the power cord, and turn on the power. The door will unlock.
English26
Before you start
Initial setup
- When you turn on the washing machine for the first time, the screen shows the initial setup process. Follow the on-screen instructions to complete it.
- Initial setup will not repeat after you've finalized it. In order to finalize the initial setup, you must run a wash cycle at least once.
- The initial setup includes language selection, calibration, and a brief tutorial.
- Tap or turn the Navigation dial to skip to the next screen.
Run Calibration
- Initial setup includes the calibration process which comes after the language selection. You must proceed calibration before using the washing machine.
- Empty the drum, and then tap and hold to start calibration.
- When calibration is complete, power turns off and then turns on automatically.
- If you want to proceed calibration again, tap and hold ⚣ for 3 seconds to enter the system function and select Calibration.
| 01 Language selection | 02 Calibration | 03 Welcome screen |
 ☑ EnglishSuomiTurn dial & Tap O ☑ EnglishSuomiTurn dial & Tap O | Empty drum before cailbrating[Tap O to skip] | Welcome! |
| 04 Tutorial | ||
| Let's explore your new washer![Tap O to skip] | Turn the dial to explore cycles[Tap O to skip] |  Now hold to start a cycle[Tap O to skip] Now hold to start a cycle[Tap O to skip] |
 Tap to see additional functions[Tap O to skip] Tap to see additional functions[Tap O to skip] | Try saving favorites in My Cycles | — A washer that knows you! — AllDone! |
Before you start
Laundry guidelines
STEP 1 Sort
Sort the laundry according to these criteria:
- Care Label: Sort the laundry into cottons, mixed fibres, synthetics, silks, wools, and rayon.
• colour: Separate whites from colours. - Size: Mixing different sized items together in the drum improves the washing performance.
- Sensitivity: Wash delicate items separately using an Easy Iron option for pure, new woollen items, curtains, and silk items. Check the labels on the items.
NOTE
Make sure to check the care label on the clothing, and sort them accordingly before starting the wash.
STEP 2 Empty pockets
Empty all the pockets of your laundry items
- Metal objects such as coins, pins, and buckles on clothing may damage other laundry items as well as the drum.
Turn clothing with buttons and embroideries inside out
- If trousers or jacket zippers are open while washing, the drum may be damaged. Zippers should be closed and fixed with a string.
- Clothing with long strings may become entangled with other clothes. Make sure to tie the strings before starting the wash.
STEP 3 Use a laundry net
- Brassieres (machine washable) must be placed in a laundry net. Metal parts of the brassieres may break through and tear other laundry items.
- Small, light clothing such as socks, gloves, stockings, and handkerchiefs may become caught around the door. Place them inside a fine laundry net.
- Do not wash the laundry net by itself without other laundry. This may cause abnormal vibrations that could move the washing machine and result in injury.
STEP 4 Prewash (if necessary)
Select the Prewash option for the selected cycle if the laundry is heavily soiled. Do not use the Prewash option when detergent is manually added into the drum.
English28
STEP 5 Determine the load capacity
Do not overload the washing machine. Overloading may cause the washing machine to not wash properly. For the load capacity for the type of clothing, see page 38.
NOTE
When washing bedding or bedding covers, the wash time may be lengthened or the spin efficiency may be reduced. For bedding or bedding covers, the recommended maximum spin cycle speed is 800 rpm, and the load capacity is 2.0 kg or less.
CAUTION
- Unbalanced laundry may reduce the spinning performance.
- Make sure the laundry is fully inserted in the drum and not caught in the door.
- Do not slam the door. Close the door gently. Otherwise, the door may not be closed properly.
STEP 6 Apply a proper detergent type
The type of detergent depends on the type of fabric (cotton, synthetic, delicate items, wool), colour, wash temperature, and degree of soiling. Make sure to use the laundry detergent that is designed for automatic washing machines.
NOTE
- Follow the detergent manufacturer's recommendations based on the weight of the laundry, the degree of soiling, and the hardness of the water in your local area. If you are not sure about the water hardness, contact a local water authority.
- Do not use detergent that tends to be hardened or solidified. This detergent may remain after the rinse cycle, blocking the drain outlet.
CAUTION
When washing wool using the Wool cycle, use a detergent dedicated to wool items. If used with the Wool cycle, powder detergent may remain on the laundry and discolour the laundry.
Before you start
Laundry capsules
To get the best results from using laundry capsules, please follow these instructions.

natural_image
Line drawing of a washing machine with two circular components and a small appliance on the side (no text or symbols)- Put the capsule in the bottom of the empty drum towards the rear.

natural_image
Diagram showing a door opening and a pair of clothes being inserted, with an arrow indicating the direction (no text or symbols present)- Put the laundry in the drum on top of the capsule.

CAUTION
For cycles using cold water or cycles that complete in less than one hour, the capsule may not dissolve completely.
English30
Detergent drawer guidelines
The automatic dispenser models provide a three-compartment dispenser: two compartments for auto-dispensing and another part for manual input. With the automatic dispensing option on, the washing machine dispenses an adequate amount of detergent or fabric softener for each load. See below for details:
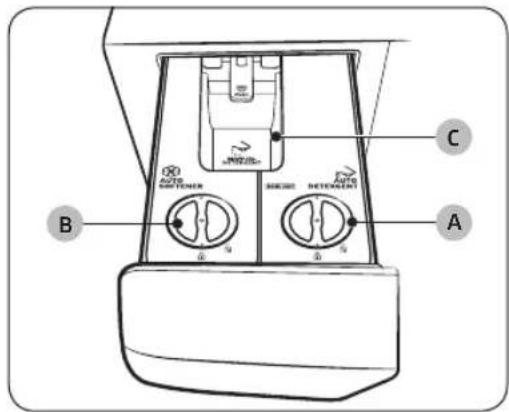
A. Auto detergent compartment
-Use liquid detergent only.
B. Auto softener compartment ✿
-Use fabric softener only.
C. Manual detergent compartment
-If necessary, add detergent manually as instructed by the detergent manufacturer. You can use powdered and liquid detergent in this compartment.
-To use the detergent in this compartment, make sure the auto-dispensing option is off. (For more information on turning the auto-dispensing off, see the "Dose per Wash" and "Dose per Rinse" section on page 42.
- Do not exceed the max line (D) when adding detergent.

CAUTION
- Do not add an excessive amount of detergent. This may affect the washing results adversely.
- Do not use any cleaning agents for cleaning the drum. Chemical residue in the drum deteriorates the washing performance.
Before you start

CAUTION
- Do not operate the washing machine with the compartments not placed in the detergent drawer. -A water leak may cause electric shock or injury.
- Do not use the following types of detergent in the drawer.
- Tablet, capsule, ball, or net types.
- Do not use gel-type or viscous detergent/softener in the detergent drawer as they may not flow well.
- Read the detergent/softener manufacturer's instructions before using them in the washing machine.
- Do not carry any removed compartment. Put the compartment back in place.
- Otherwise, the compartment may shake and cause the content to spill out.
- Empty the compartments in the detergent drawer before moving the washing machine to prevent any content from spilling out on the floor.

NOTE
- The "Detergent drawer is open" message appears if the detergent drawer is not completely closed. Close the detergent drawer before you start the washing machine.
- If message "Refill detergent", "Refill softener", or "Refill detergent & softener" appears on the display, refill the corresponding compartment.
- Detergent/softener is not automatically dispensed in the Wool cycle. To dispense detergent/softener in the Wool cycle, you must manually set the input level of detergent/softener.
- Do not exceed the max line when filling detergent and softener.
- For special detergent or softener (for wool, baby clothes, etc.), purchase additional compartments and use the new compartments exclusively for the special detergent or softener.
- It may be hard to open the detergent drawer with just your fingertips. Grab the detergent drawer handle firmly with your hand and pull to open it.
- Push the detergent drawer all the way to the end to close it. You will hear a click sound when the drawer is properly closed.
- If the you feel softener scent is weak, set the softener input level to High.
To apply washing agents to the auto dispenser

NOTE
- If message "Refill detergent", "Refill softener", or "Refill detergent & softener" appears on the display, refill the corresponding compartment.
- Once you refill the auto detergent/softener compartments, the washing machine will start to detect the detergent/softener amount when you tap and hold.
- The detection time may vary depending on the type of the detergent/softener.
English32

- Pull the detergent drawer to open.
- Turn the auto detergent compartment cover (A) anticlockwise to open.

natural_image
Diagram of a hand washing machine with a bottle and label B (no text or symbols on the diagram itself)- Apply an appropriate amount of detergent to the auto detergent compartment (B).
-After you finish, put the cover back and turn it clockwise to close.

- Turn the auto softener compartment cover (C) anticlockwise to open.
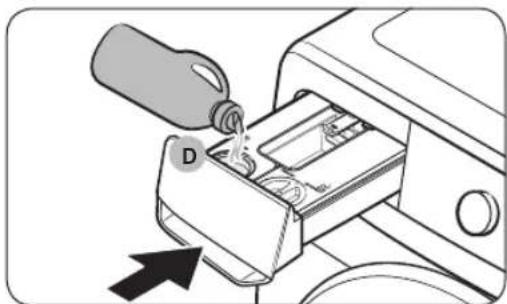
natural_image
Illustration of a hand pouring liquid into a device with an arrow indicating direction (no text or symbols)- Apply an appropriate amount of softener to the auto softener compartment (D).
-After you finish, put the cover back and turn it clockwise to close.
- Push the detergent drawer to close.
-Push the detergent drawer all the way to the end. You will hear a click sound when the drawer is properly closed.
Before you start
CAUTION
- Do not apply detergent/softener to the drawer without the detergent/softener compartment.
- If you do, clean the drawer and then reinsert both compartments.
- Use only liquid detergent/softener with the detergent/softener compartments. Do not use powdered detergent.
- Make sure both detergent/softener compartments are inserted completely.
- If they are not, the washing machine may not start operating or fail to dispense washing agents.
- Clean the detergent/softener compartment before refilling them with the same or a different type of detergent or softener.
- Do not leave detergent/softener in the detergent/softener compartments for more than 6 weeks.
- Do not mix detergent with fabric softener in either compartment.
- To prevent detergent/softener from hardening, do not open the cover once the detergent/softener has been applied to the compartment.
- Do not use any bleach that may cause corrosion and/or generate the gas.
- Do not turn any compartment upside down.
- The content may spill.
- Do not press the outlet at the rear of either compartment while moving it. -The content may leak.
- Use caution when inputting detergent or fabric softener in the applicable compartment.
- The content may spill.
- When removing the detergent/softener compartment to check the remaining content (upon an error message or before the message appears), the drawer may have content remaining or leaking from the bottom of the drawer.
- Make sure all the compartments in the detergent drawer are empty before moving the washing machine.
- The input or refill level of the detergent/softener depends on the type or the remaining amount of detergent/softener.
- If you see the "Refill detergent", "Refill softener", or "Refill detergent & softener" message on the display, immediately refill the corresponding compartment. A later refill may cause the input level of the agent to decrease.
- Applying detergent directly on laundry cause discolouration. Apply detergent in the detergent compartment.
- Do not use hardened detergent/softener.
NOTE
- Moisture on powder detergent compartment causes the powered detergent to stick. Therefore, wipe the moisture with dry cloth before adding the powdered detergent.
- Use detergent and bleach for washing machine only.
- Do not use gel-type or viscous detergent/softener in the detergent drawer as they may not flow well. - Read the detergent/softener manufacturer's instructions before using them in the washing machine.
English34
Operations
Control panel

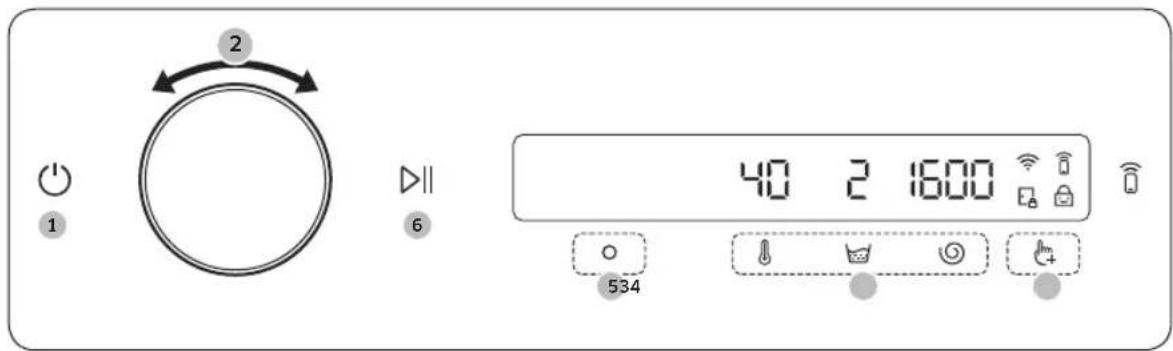
| 01 Power | Tap to turn the washing machine on or off.If you do not manipulate the control panel for 10 minutes after the washing machine is turned on, the washing machine automatically turns off.The washing machine automatically turns off when the cycle completes.CAUTIONDo not tap to turn the washing machine off while the wash cycle is in progress. Tap and hold to pause the cycle first, and then tap to turn the washing machine off. |
| 02 Navigation dial | Turn the navigation dial left or right to navigate through cycles and functions.When you turn the navigation dial, LCD displays your selection (such as cycle, additional functions, and system functions). |
| 03 Start/Pause ▷ | Tap and hold to start or pause an operation. |
| 04 Display | The display shows current cycle information and estimated time remaining, or an information message when a problem occurs. |
| 05 OK | Tap to confirm your selection of function or setting. |
| 06 Temp. | Tap to change the water temperature for the selected cycle.The indicator above the button indicates the default or selected setting. |
| 07 Rinse | Tap to change the rinse count for the selected cycle.The indicator above the button indicates the default or selected setting. |
| 08 Spin | Tap to change the spin speed for the selected cycle.The indicator above the button indicates the default or selected setting. |
| 09 Additional function | Tap to enter the additional functions menu.Tap and hold for 3 seconds to enter the system functions menu. |
Operations
| 10 Smart Control | Tap to activate or deactivate the Smart Control function.Tap and hold to enter pairing mode to connect to the SmartThings app.When the Smart Control function is activated, you can control your washing machine remotely using the SmartThings app on your smartphone or tablet (Android or iOS). |
Icon descriptions
 | Wi-Fi | This icon indicates that the washing machine is connected to Wi-Fi. |
| [Swrrxd] | Smart Control | This icon indicates that Smart Control is on.For more information on Smart Control, see page 47. |
 | Door Lock | This icon indicates the door is locked and cannot be opened.The door locks automatically during a cycle and this indicator turns on.You can open the door when this icon disappears. |
| [Asst1] | Child Lock | This icon indicates that Child Lock is on.For more information on Child Lock, see page 43. |
Operating a cycle
English
- Tap turn on the washing machine.
- Turn the Navigation dial to select the cycle you want. For more information on Cycle overview, see page 38.
- Tap , or to change the default cycle settings.
- Tap ⚠, and then turn the Navigation dial to select additional function.
- For more information on Additional functions, see page 41.
- Tap ○ to change the settings for selected additional function.
- Not all cycles have additional functions available.
- Tap and hold Did start operation.
- Once you set the cycle you want, the screen displays a brief cycle description, maximum laundry load, and cycle time. You can also check the cycle progress, remaining cycle time, and information codes.
Operations
Cycle overview
| Cycle Description | Max load (kg) | ||
| 12.0 kg | 9 / 8 / 7 kg | ||
| Cotton | For cottons, bed linens, table linens, underwear, towels, or shirts. The washing time and the rinse count are automatically adjusted according to the load.For cleaning lightly soiled cotton items at a nominal temperature of 20 °C. | Max Max | |
| E Cotton | Optimal performance with lower energy for cotton fabrics, bed linens, table linens, underwear, towels, or shirts.For energy saving, the actual washing temperature may be lower than specified. | Max Max | |
| AI Wash(WW**T*9****,WW**T*4**** models only) | Adjusts the amount of detergent and the cycle according to the load and the soil severity. This cycle is best used with the Auto Dispense function. | - Max | |
| 15' Quick Wash | For lightly soiled items in less than 2.0 kg that you want to wash quickly.Use less than 20 g of detergent. Using more than 20 g of detergent may leave detergent residue.For liquid detergent, use a max of 20 ml of liquid detergent. | 2 | 2 |
| Super Speed(WW**T9****,WW**T8****,WW**T7****,WW**T6****,WW**TP**** models only) | Fast completion for everyday items such as underwear and shirts.The cycle time will differ depending on the water supply conditions, load, and type of laundry. | 5 | 5 |
| Super Eco Wash | Low temperature ecobubble cycle helps reduce power consumption. | 4 | 4 |
| Wool | Specific for machine-washable wool.The Wool cycle features fine pulsating and soaking to protect the wool fibres from shrinkage/distortion.A neutral detergent is recommended. | 2 | 2 |
English38-
| Cycle Description | Max load (kg) | |
| 12.0 kg | 9 / 8 / 7 kg | |
| Bedding | For bed spreads, bed sheets, bedding covers, etc.For best results, wash only 1 type of bedding. | 2.5 2 |
| Outdoor | For outdoor clothes, skiwear, and sportswear that are made of functional materials such as spandex, stretch, and micro-fibre. | 2 |
| Shirts | For shirts, blouses that are made of cotton, synthetic fiber. | 2 |
| Towels | For bath towels, washcloths, and mats. | 4 |
| Hygiene Steam | Cotton and linen fabric which have been in direct contact with the skin, such as underwear.For optimum hygiene results select a temperature of 60 °C or above.Steam cycles feature allergy care and bacteria elimination (sterilize). | 6 |
| Baby Care | Featuring a high-temperature wash and extra rinses to help remove the remaining detergent effectively. | 6 |
| Rinse+Spin | Featuring an additional rinse process after applying fabric softener to the laundry. | Max Max |
| Drain/Spin | For draining the water inside the drum and running an additional spin process to effectively remove moisture from laundry. | Max Max |
| Drum Clean+(WW**T9******, WW**T8******, WW**T7******, WW**T6******, WW**TP****** models only) | Cleans the drum by removing dirt and bacteria from it.Cleans the rubber door gasket by removing dirt from the gasket.Perform once every 40 washes with no detergent or bleach applied. Notification message appears after every 40 washes.Make sure the drum is empty.Do not use any cleaning agents for cleaning the drum. | - |
Operations
| Cycle Description | Max load (kg) | ||
| 12.0 kg | 9 / 8 / 7 kg | ||
| Drum Clean(WW**T5***** model only) | · Cleans the drum by removing dirt and bacteria from it.· Perform once every 40 washes with no detergent or bleach applied. Notification message appears after every 40 washes.· Make sure the drum is empty.· Do not use any cleaning agents for cleaning the drum. | - | - |
| Cloudy Day | · For optimum spin drying at high humid condition. | Max | Max |
| Activewear | · For exercise wear such as sports jerseys, training pants, shirts/tops and other performance clothing. This cycle provides effective soil removal with controlled drum rotation for special fabric care. | 2 | 2 |
| Colors | · Featuring additional rinses and reduced spinning to ensure that the laundry is washed gently and rinsed thoroughly. | 4 | 4 |
| Synthetics | · For fabrics that are made of polyester (diolen, trevira), polyamide (perlon, nylon), or the like. | 6 | 4 |
| Delicates | · For sheer fabrics, bras, lingerie (silk), and other handwash-only fabrics.· For best performance, use liquid detergent. | 2 | 2 |
| Jeans | · Featuring a higher water level in the main wash and an extra rinse cycle to ensure that no powder detergent remains. | 3 | 3 |
| Silent Wash | · For reducing operating noise and vibration. | 4 | 4 |
| DAILY WASH(WW**T5***** model only) | · For everyday items such as underwear and shirts. 5 4 | ||
English40
Additional functions
Using Additional Functions
- Tap .
- Turn the Navigation dial to select the desired additional function.
- Tap to change the selected function's settings or start the function.
NOTE
- To return to the main screen, tap 📋 again or turn the Navigation dial to select Back and tap ○.
- If the selected function is not supported, the "This function is currently not supported" message is displayed, and the Button is not activated.
- When you select an additional function, a brief help message appears for the first ten times of use.
Quick Drive (WW\*\*T7\*\*\*\*\* model only)
You can reduce the overall washing time of the selected cycle settings.
Quick Drive may not be available for certain cycles.
- Select a cycle and change the cycle settings as necessary.
- Tap
- Turn the Navigation dial to select Quick Drive, and then tap O.
- Tap and hold ▷∥
Prewash
You can add a preliminary washing cycle before the main wash cycle.
- Select a cycle and change the cycle settings as necessary.
- Tap
- Turn the Navigation dial to select Prewash, and then tap O.
- Tap and hold ▷∥
Intensive
For badly soiled laundry. The operation time for each cycle is longer than normal.
- Select a cycle and change the cycle settings as necessary.
- Tap 🎨+
- Turn the Navigation dial to select Intensive, and then tap O.
- Tap and hold ▷||
Operations
Bubble Soak
This function helps remove a wide variety of stubborn stains. With Bubble Soak selected, laundry is thoroughly soaked in water bubbles for effective washing.
- Select a cycle and change the cycle settings as necessary.
- Tap
- Turn the Navigation dial to select Bubble Soak, and then tap O.
- Bubble Soak is available with and adds up to 30 minutes to these cycles: Cotton, Synthetics, Bedding, and Super Speed.
- Tap and hold ▷∥
Dose per Wash
You can increase or decrease the amount of detergent dispensed automatically.
- Tap .
- Turn the Navigation dial to select Dose per Wash, and then tap O.
- Tap to select the desired setting. Default setting is Med. (Medium). -You can select from Med., High, Off, or Low.
Dose per Rinse
You can increase or decrease the amount of detergent dispensed automatically.
- Tap .
- Turn the Navigation dial to select Dose per Rinse, and then tap O.
- Tap to select the desired setting.
- Default setting is Med. (Medium).
- You can select from Med., High, Off, or Low.
My Cycles
Add or remove cycles to create a personal cycle list.
- Tap .
- Turn the Navigation dial to select My Cycles, and then tap O.
- You can only edit a cycle to create a personal cycle when the washing machine is not operating.
- Turn the Navigation dial to select a desired cycle.
- Tap to add or remove the selected cycle. -Addition and removal of the course is saved automatically.
- Once you finish creating My Cycles, tap 📋 to return to the cycles screen.
NOTE
- The Eco 40-60 and Drum Clean+ cycles cannot be removed from the cycles list.
- You can also edit My Cycles in the SmartThings app.
English42
Delay End
You can set the washing machine to finish your wash automatically at a later time, choosing a delay of between 1 to 24 hours (in 1 hour increments). The hour displayed indicates the time the wash will finish.
- Select a cycle and change the cycle settings as necessary.
- Tap
- Turn the Navigation dial to select Delay End, and then tap O.
- Turn the Navigation dial to select the desired time, and then tap O.
- Tap and hold ▷∥
- Status shows in the display and the washing machine tumbles the drum to sense the weight of the load (if load sensing is preset for the selected cycle). When load sensing is complete, the display shows the remaining time until the end of the wash cycle.
- To cancel Delay End, tap ⏻ to restart the washing machine.
Real-life case
You want to finish a two-hour cycle 3 hours later from now. For this, you add the Delay End option to the current cycle with the 3-hour setting, and press Start/Pause at 2:00 p.m. Then, what happens? The washing machine starts operating at 3:00 p.m., and ends at 5:00 p.m. Provided below is the time line for this example.
2:00 pm
Set Delay End to 3 hours
3:00 pm
Start
5:00 pm
End
Child Lock
To prevent children or infants from accidentally starting or setting the washing machine, Child Lock locks all buttons except for and .
- Tap .
- Turn the Navigation dial to select Child Lock, and then tap O.
- Tap ○ to select On or Off.
-The Child Lock icon turns on when the function is on.
NOTE
- When Child Lock is on, all buttons are disabled except for ⏻ and ⏻. The washing machine door also locks.
- Tapping a button while Child Lock is on triggers an alarm with the "Child Lock On" message.
- You cannot open the door after a wash cycle when the Child Lock is on. Turn the function off before opening the door to take out the laundry.
Operations
System functions
Using System Functions
- Tap and hold for 3 seconds.
- Turn the Navigation dial and select the desired system function, and then tap O.
- Tap to change the selected function's settings or start the function.
NOTE
To return to the main screen, tap 📋 again or turn the Navigation dial to select Back and tap ○.
Water Hardness
Set the water hardness according to your region. The detergent concentration level adjusts automatically according to the water hardness setting.
- Tap and hold for 3 seconds.
- Turn the Navigation dial to select Water Hardness, and then tap O.
- Tap to select the desired setting. -The default setting is Med. (Medium). -You can select from Med., Hard, or Soft.
Softener
You can change the concentration level of the softener.
-
Tap and hold for 3 seconds.
-
Turn the Navigation dial to select Softener, and then tap O.
-
Tap to select the desired setting.
-The default setting is 1x.
- You can select from 1x, 2x, or 3x.
NOTE
The dispense amount of softener decreases as the concentration level increases.
AI Pattern
This function saves frequently used cycles and settings. When you turn the function on, the washing machine remembers the cycles you use most and their settings (Temp., Rinse, Spin) and displays them in frequency order.
- Tap and hold for 3 seconds.
- Turn the Navigation dial to select AI Pattern, and then tap O.
- Tap ○ to select On or Off.
- The default setting is On. Set it to Off if you do not want to use this function. - When you turn off the function, all the saved data resets.
English44-
Alarm
You can turn on or off the sound from the washing machine. When this function is set to Off, the AddWash alarm, the melody of cycle completion, and the power-off beep does not sound. However, the other sounds stay active.
- Tap and hold for 3 seconds.
- Turn the Navigation dial to select Alarm, and then tap O.
- Tap ○ to select On or Off.
-The default setting is On.

NOTE
The setting remains unchanged even if you restart the washing machine.
Calibration
You can run calibration again for accurate weight detection.
- Tap and hold for 3 seconds.
- Turn the Navigation dial to select Calibration, and then tap O.
-Calibration does not start if the door is not closed properly.
The drum rotates clockwise and anticlockwise for about 3 minutes.
- When calibration is complete, the "Calibration complete" message appears on the display and the washing machine turns off automatically.
Wi-Fi
You can turn the washing machine's Wi-Fi on or off.
- Tap and hold for 3 seconds.
- Turn the Navigation dial to select Wi-Fi, and then tap O.
-
Tap ○ to select On or Off.
-
The washing machine's Wi-Fi is off as a factory default setting. However, the washing machine's Wi-Fi turns on automatically when you turn on the washing machine for the first time. Then, the final Wi-Fi setting maintains regardless of the washing machine power status.
- Once you turn on the washing machine's Wi-Fi and connect to a network, the washing machine remains connected to the network even when you turn off the power.
- The Wi-Fi 📋 indicates that the washing machine is connected to the router through the Wi-Fi connection.
Operations
Language
You can change the system language.
- Tap and hold for 3 seconds.
- Turn the Navigation dial to select Language, and then tap O.
- Turn the Navigation dial to select the desired language, and then tap O.
Factory Reset
You can reset the washing machine.
- Tap and hold for 3 seconds.
- Turn the Navigation dial to select Factory Reset, and then tap O. -Your washing machine resets to the factory setting.
Special features
AddWash (applicable models only)
To add laundry after the wash starts, use the AddWash door.

natural_image
Hand placing a gray rectangular object into a circular container (no text or symbols visible)- Tap and hold lidstop the wash cycle.
- Press the upper area of the AddWash door to unlock the door. The door will move inward slightly when you press it and then open.

natural_image
Line drawing of a hand placing a square block into a circular container (no text or symbols)-
Open the AddWash door fully, and then insert additional laundry through the AddWash door into the drum.
-
Lift the AddWash door back into position, and then lock the door by pushing the upper area of the door until you hear a click. Then, tap and hold again to resume the wash cycle.
CAUTION
Do not put excessive force on the AddWash door. It may break.
NOTE
The water inside the drum does not leak if the AddWash door is closed properly. Water drops may form around the AddWash door, but water will not leak from inside the drum. This is normal.
English46
CAUTION
- Do not open the AddWash door if suds have formed inside the drum that rise above the level of the AddWash door.
- Do not attempt to open the AddWash door while the machine is operating without first tapping and holding ▷. Please note that the AddWash door can be opened unintentionally (without tapping and holding ▷ when the wash is complete.
- Do not add an excessive load through the AddWash door. Performance may be degraded.
- Do not use the lower area of the AddWash door as a handle. Your fingers may be caught.
- Make sure that no laundry is caught in the AddWash door.
- Keep your pets out of the washing machine, especially the AddWash door.
- When using hot water for the wash, the AddWash door may appear to leak water after opening and closing the AddWash door. This is normal, simply because steam emerging from the open AddWash door has cooled and formed water drops on the surface.
- When the AddWash door closes, the door seals up and no water can leak. However, you may encounter what appears to be water leak around the door - some residual water remaining around the AddWash door may form water drops. This is normal.
- Neither the main door nor the AddWash door can be opened when the water temperature is over 50 °C. If the water level inside the drum is over a certain point, the main door cannot be opened.
- If an information code of "AddWash door is open" appears on the display, see the Information codes section for further actions.
- Keep the AddWash door and its surroundings clean at all times. Debris or detergent on or around the seals of the AddWash door may cause a leak.
Adding laundry for non-AddWash models (applicable models only)
- Tap and hold to stop the wash cycle.
- Open the door and add the laundry into the drum.
- Close the door, and then tap and hold ▷ again to resume the wash cycle.
Smart control (applicable models only)
You can connect to the SmartThings app and control your washing machine remotely.
Connecting your washing machine
- Download and open the SmartThings app on your smartphone or tablet (Android & iOS).
- Tap to turn on the washing machine.
- Tap and hold .
a. The washing machine enters AP mode and connects to your smartphone or tablet.
b. Tap to authenticate your washing machine.
c. Once the authentication process is complete, your washing machine is successfully connected to the app. - You can use various features available in the SmartThings app.
NOTE
- If your washing machine fails to connect with the SmartThings app, try again.
English
Operations
- Check your router if you experience any Internet connection problem after connecting your washing machine with the SmartThings app.
- If the Wi-Fi is off, tap and hold ⏻ for 3 seconds to enter the System functions menu, and select Wi-Fi to turn it on.
- Turning the washing machine's Wi-Fi on allows you connect to the washing machine via SmartThings app on your smartphone or tablet, regardless of the power status of the washing machine. However, the washing machine appears offline on the SmartThings app if the washing machine's Wi-Fi is off.
- Close the door before starting the Smart Control function.
- If you use your washing machine for a while without connecting it to the SmartThings app, a pop-up message about Smart Control will show for 3 seconds.
- If the washing machine's Wi-Fi is not connected to an AP (access point), the Wi-Fi will turn off when you turn of the power.
Stay Connect
Set up the Stay Connect function in your SmartThings app to keep Smart Control turned on at the end of a cycle. Your washing machine stays connected to the app so you can send additional instructions, whether you are at home or away.
- If you turn on the Stay Connect function on the SmartThings app, the washing machine will stay in standby power saving mode after completing a cycle.
- The Stay Connect function will remain active for up to 7 days if the door remains closed.
- When the Stay Connect function is active, the Smart Control, Door Lock, and Wi-Fi icons are illuminated on your washing machine display.
- You can conveniently control your washing machine, adding rinse, spin or dry cycles using the SmartThings app.
NOTE
- The washing machine switches to standby power saving mode when operation is paused even if the machine is not connected to the SmartThings app.
- In some circumstances, only the Door Lock icon may be illuminated.
English48-
SmartThings
Wi-Fi connection
On your smartphone or tablet, go to Settings and turn on the wireless connection and select an AP (Access Point).
- This appliance supports the Wi-Fi 2.4 GHz protocols.
Download
On an app market (Google Play Store, Apple App Store, Samsung Galaxy Apps), find the SmartThings app with a search term of "SmartThings". Download and install the app on your device.
NOTE
The app is subject to change without notice for improved performance.
Log in
You must first log into SmartThings with your Samsung account. To create a new Samsung account, follow the instructions on the app. You don't need a separate app to create your account.
NOTE
If you have a Samsung account, use the account to log in. A registered Samsung smartphone or tablet user automatically logs in.
To register your appliance to SmartThings
- Make sure your smartphone or tablet is connected to a wireless network. If not, go to Settings and turn on the wireless connection and select an AP (Access Point).
- Open SmartThings on your smartphone or tablet.
- If a message of "A new device is found.", select Add.
- If no message appears, select + and select your appliance in a list of devices available. If your appliance is not listed, select Device Type > Specific Device Model, and then add your appliance manually.
- Register your appliance to the SmartThings app as follows.
a. Add your appliance to SmartThings. Make sure your appliance is connected to SmartThings.
b. When registration is complete, your appliance appears on your smartphone or tablet.
Operations
Open Source Announcement
The software included in this product contains open source software. You may obtain the complete corresponding source code for a period of three years after the last shipment of this product by contacting our support team via http://opensource.samsung.com (Please use the "Inquiry" menu.)
It is also possible to obtain the complete corresponding source code in a physical medium such as a CD-ROM; a minimal charge will be required.
The following URL http://opensource.samsung.com/opensource/SMART_AT_051/seq/0 leads to the open source license information as related to this product. This offer is valid to anyone in receipt of this information.
NOTE
When Wi-Fi is activated, the energy consumption increases in comparison to the values specified in the indicative information.
English50-
Maintenance
Keep the washing machine clean to prevent deteriorated performance and to preserve its life cycle.
Drum clean+
Perform this cycle regularly to clean the drum by removing bacteria from it. This cycle heats the water between 60 °C and 70 °C, and it also removes accumulated dirt from the rubber door gasket.
- Tap ⏻
- Turn the Navigation dial to select Drum Clean+.
- Tap and hold ▷∥
CAUTION
- Do not use any cleaning agents for cleaning the drum. Chemical residue in the drum may cause damage to the laundry or the drum of the washing machine.
- To prevent limescale, add the proper amount of detergent according to your local water hardness or add a water softener additive together with the detergent.
Drum Clean+ reminder
Depending on the model, the Drum Clean+ reminder is either an icon or an LED.
For icons, the icon lights up on the control panel.
For LEDs, the LED lights up next to Drum Clean+, or on the option area of the control panel.
- The Drum Clean+ reminder blinks on the control panel once every 40 washes. It is advisable to perform Drum Clean+ regularly.
- When you first see this reminder blinking, you can ignore the reminder for 6 consecutive washes. From the 7th wash, the reminder no longer appears. However, it appears again on the second 40th wash.
• Even after the last process is terminated, the "0" message may remain. - You can record the running count of the Drum Clean+ cycle by tapping ⏻. This does not stop or turn off the machine but marks your cycle count.
• Even if "0" does not disappear, the machine operates normally. - It is recommended to run the cycle regularly for hygienic purposes.
Maintenance
Emergency drain
In case of a power failure, drain the water inside the drum before taking out the laundry.

- Power off and unplug the washing machine from the electrical outlet.
- Gently press the top area of the filter cover to open.

natural_image
Diagram of a mechanical device with a tool and labeled component A, showing no text or symbols beyond the label.- Put an empty, spacious container around the cover, and stretch the emergency drain tube to the container while holding the tube cap (A).

natural_image
Illustration of a hand holding a pen inserted into a device component, with no visible text or symbols- Open the tube cap and let water in the emergency drain tube (B) flow into the container.
- When done, close the tube cap, and reinsert the tube. Then, close the filter cover.
NOTE
Use a spacious container because the water in the drum may be more than expected.
English52
Cleaning
Surface of the washing machine
Use a soft cloth with a nonabrasive household detergent. Do not spray water onto the washing machine.
AddWash door (applicable models only)

natural_image
Illustration of a hand cleaning a circular object with a labeled component (A), no text or symbols present.- Open the AddWash door.
-
Use a wet cloth to clean the AddWash door.
-
Do not use cleaning agents. Discolouration may occur.
Use caution when cleaning the rubber packing and the locking mechanism (A).
-Dust off the door area regularly. -
Wipe up and close the AddWash door until you hear a clicking sound.
CAUTION
- Do not apply force on the AddWash door. It may break.
- Do not leave the AddWash door open while the machine is operating.
- Do not put heavy objects on the AddWash door at any time.
• To prevent physical injury, do not touch the AddWash door while the drum is rotating. - Do not open the AddWash door while the machine is operating. This may cause physical injury.
- Do not manipulate the feature panel while the AddWash door is open. This may cause physical injury or system failure.
- Do not input objects other than laundry.
- Do not input bulky items to the drum through the AddWash door.
- Do not pull out the rubber packing of the AddWash door when cleaning. This may cause damage.
Maintenance
Mesh filter
Clean the mesh filter of the water hose once or twice a year.

natural_image
Diagram of a plug inserted into a socket with a black arrow indicating rotation (no text or symbols)- Turn off the washing machine, and unplug the power cord.
- Close the water tap.
- Loosen and disconnect the water hose from the back of the washing machine. Cover the hose with a cloth to prevent water from gushing out.

natural_image
Illustration of a hand using a tool to adjust a component with a magnified inset showing threaded parts (no text or symbols)-
Use pliers to pull out the mesh filter from the inlet valve.
-
Submerge the mesh filter deeply in water so that the threaded connector is also submerged.
-
Dry the mesh filter completely in the shade.
-
Reinsert the mesh filter into the inlet valve, and reconnect the water hose to the inlet valve.
-
Open the water tap.
NOTE
If the mesh filter is clogged, an information code of "Check water supply" appears on the screen.
English54
Debris filter
It is advisable to clean the debris filter every 2 months to prevent its clogging. A clogged debris filter may reduce the bubble effect.
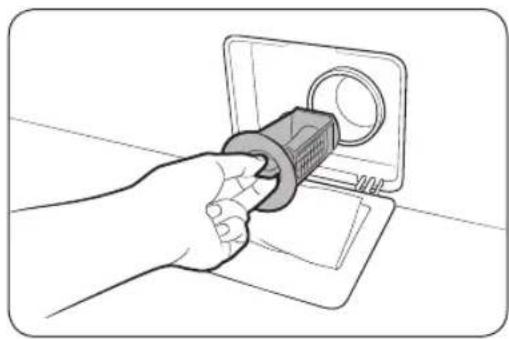
natural_image
Line drawing of a hand inserting a cable into a device (no text or symbols)- Turn off the washing machine, and unplug the power cord.
- Drain the remaining water inside the drum. See the Emergency drain section.
- Gently press the top area of the filter cover to open.
- Turn the debris filter knob to the left, and drain off the remaining water.
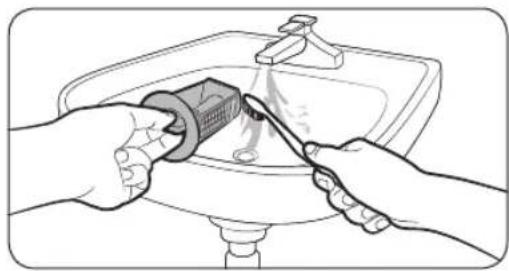
natural_image
Illustration of hands using a tool to clean or wash a basin sink (no text or symbols visible)- Clean the debris filter using soft brushes. Make sure the drain pump propeller inside the filter is unclogged.
- Reinsert the debris filter, and turn the filter knob to the right.

natural_image
Technical line drawing of a mechanical component with concentric circular features (no text or symbols)NOTE
- Some debris filters feature a safety knob that is designed to prevent accidents by children. To open the safety knob of the debris filter, push in and turn it anticlockwise. The spring mechanism of the safety knob helps open the filter.
- To close the safety knob of the debris filter, turn it clockwise. The spring makes a rattling sound, which is normal.
NOTE
If the pump filter is clogged, an information code of "Check drainage" appears on the screen.
CAUTION
• Make sure the filter knob is closed properly after cleaning the filter. Otherwise, this may cause a leak.
- Make sure the filter is inserted properly after cleaning it. Otherwise, this may cause an operational failure or a leak.
Maintenance
Detergent drawer

natural_image
Mechanical device diagram showing a mechanical component with arrows indicating motion or force (no text or symbols)- While holding down the release lever on the inner of the drawer, pull the detergent drawer to remove.

- Open the cover and clean inside the auto detergent/softener compartments with water. -Wipe the water and close the covers when you finish cleaning them.

natural_image
Line drawing of a mechanical component with a tool inserted, showing no text or symbols- Clean the drawer recess using a bottle brush to remove detergent residues and limescale on the drawer recess.
English56
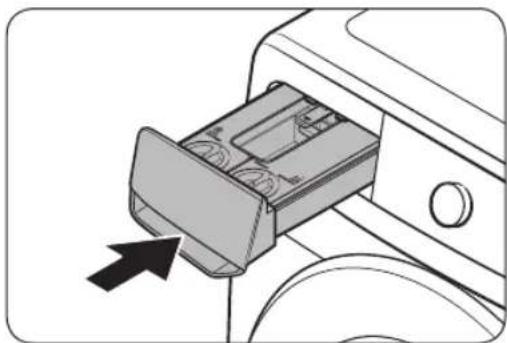
natural_image
Diagram of a device's internal component being inserted into a housing, with an arrow indicating the direction (no text or symbols present)- Insert the detergent drawer back into the washing machine.
NOTE
Make sure the drawer recess is completely dry before inserting the detergent drawer.
CAUTION
Do not spray water into the detergent drawer recess. It may cause electric shock or fire.
Maintenance
Defrosting your washing machine
The washing machine may freeze when it drops below 0 °C.
- Turn off the washing machine, and unplug the power cord.
- Pour warm water over the water tap to loosen the water hose.
- Disconnect the water hose, and soak it in warm water.
- Pour warm water into the drum and leave it for about 10 minutes.
- Reconnect the water hose to the water tap.
NOTE
If the washing machine still doesn't operate normally, repeat the above steps until it operates normally.
Care against an extended time of disuse
Avoid leaving the washing machine unused for an extended time. If this is the case, drain the washing machine and unplug the power cord.
- Turn the Navigation dial to select Rinse+Spin.
- Empty the drum, and then tap and hold ▷∥
- When the cycle is complete, close the water tap and disconnect the water hose.
- Turn off the washing machine, and unplug the power cord.
- Open the door to let air circulate through the drum.
English58
Troubleshooting
If there is any problem, check the information message on the LCD screen and follow the on-screen instructions.
If the problem persists, please contact the service center.
Checkpoints
If you encounter a problem with the washing machine, first check the table below and try these suggestions.
| Problem Action | |
| Does not start. | Make sure the washing machine is plugged in.Make sure the door is properly closed.Make sure the water taps are open.Tap and hold ▷start the washing machine.Make sure Child Lock is not activated.Before the washing machine starts to fill, it will make a series of clicking noises to check the door lock and will do quick drain.Check the fuse or reset the circuit breaker.Check if power is supplied properly.Low voltage detected.-Check if the power cord is plugged in.Make sure laundry is not caught in the door.The “AddWash door is open” message appears when you open the AddWash door without tapping and holding ▷If this happens, do one of the following:Press the AddWash door to close properly. Then, tap and hold ▷and try again.To add laundry, open the AddWash door and put in laundry. close the AddWash door completely. Then, tap and hold ▷to resume operation. |
| Water supply is insufficient, or no water is supplied. | Fully open the water tap.Make sure the door is properly closed.Make sure the water supply hose is not frozen.Make sure the water supply hose is not kinked or clogged.Make sure there is sufficient water pressure.Make sure that the cold water tap and the hot water tap are properly connected.Clean the mesh filter as it may be clogged. |
| After a cycle, detergent remains in the detergent drawer. | Make sure the washing machine is running with sufficient water pressure.Make sure the detergent is added to the centre of the detergent drawer.Make sure the rinse cap is inserted properly.If using granular detergent, make sure the detergent selector is in the upper position.Remove the rinse cap and clean the detergent drawer. |
Troubleshooting
| Problem Action | |
| Excessive vibrations or makes noise. | Make sure the washing machine is installed on a level, solid floor that is not slippery. If the floor is not level, use the levelling feet to adjust the height of the washing machine.Make sure the shipping bolts are removed.Make sure the washing machine is not in contact with any other object.Make sure the laundry load is balanced.The motor can cause noise during normal operation.Overalls or clothes with metallic decorations can cause noise while being washed. This is normal.Metal objects such as coins can cause noise. After washing, remove these objects from the drum or filter case.Redistribute the load. If only one item of clothing needs washing, such as a bathrobe or pair of jeans, the final spin result might be unsatisfactory, and a “Unbalanced laundry detected” check message will be shown in the display. |
| Does not drain and/or spin. | Make sure the drain hose is straightened all the way to the drain system. If you encounter a drain problem, call for service.Make sure the debris filter is not clogged.Close the door and tap and hold ▷For your safety, the washing machine will not tumble or spin unless the door is closed.Make sure the drain hose is not frozen or clogged.Make sure the drain hose is connected to a drain system that is not clogged.If the washing machine is not supplied with sufficient power, the washing machine will temporarily not drain or spin. As soon as the washing machine regains sufficient power, it will operate normally.Make sure the drain hose is positioned correctly, depending on the connection type.Clean the debris filter as it may be clogged. |
| The door does not open. | Tap and hold ▷stop the washing machine.It may take a few moments for the door lock mechanism to disengage.The door will not open until 3 minutes after the washing machine has stopped or the power has been off.Make sure all the water in the drum is drained.The door may not open if water remains in the drum. Drain the drum and open the door manually.Make sure the door lock light is off. The door lock light turns off after the washing machine has drained. |
English60-
| Problem Action | |
| Excessive suds. | Make sure you use the recommended types of detergent as appropriate.Use high efficiency (HE) detergent to prevent oversuding.Reduce the detergent amount for soft water, small loads, or lightly soiled loads.Non-HE detergent is not recommended. |
| Cannot add additional detergent. | Make sure the remaining amount of detergent and fabric softener is not over the limit. |
| Stops. | Plug the power cord into a live electrical outlet.Check the fuse or reset the circuit breaker.Close the door, and tap and hold start the washing machine. For your safety, the washing machine will not tumble or spin unless the door is closed.Before the washing machine starts to fill, it will make a series of clicking noises to check the door lock and will do quick drain.There may be a pause or soak period in the cycle. Wait briefly, and the washing machine may start.Make sure the mesh filter of the water supply hose at the water taps is not clogged. Periodically clean the mesh filter.If the washing machine is not supplied with sufficient power, the washing machine will temporarily not drain or spin. As soon as the washing machine regains sufficient power, it will operate normally. |
| Fills with the wrong water temperature. | Fully open both taps.Make sure the temperature selection is correct.Make sure the hoses are connected to the correct taps. Flush water lines.Make sure the water heater is set to supply a minimum of 49 °C hot water at the tap. Also, check the water heater capacity and recovery rate.Disconnect the hoses and clean the mesh filter. The mesh filter may be clogged.While the washing machine fills, the water temperature may change as the automatic temperature control feature checks incoming water temperature. This is normal.While the washing machine fills, you may notice just hot and/or just cold water going through the dispenser when cold or warm temperatures are selected. This is a normal function of the automatic temperature control feature as the washing machine determines the water temperature. |
| Load is wet at the end of a cycle. | Use the High or Extra High spin speed.Use high efficiency (HE) detergent to reduce oversuding.Load is too small. Small loads (one or two items) may become unbalanced and not spin completely.Make sure the drain hose is not kinked or clogged. |
Troubleshooting
| Problem Action | |
| Leaks water. | Make sure the door is properly closed.Make sure all hose connections are tight.Make sure the end of the drain hose is correctly inserted and secured to the drain system.Avoid overloading.Use high efficiency (HE) detergent to prevent oversuding.Check the drain hose.-Make sure the end of the drain hose is not placed on the floor.-Make sure the drain hose is not clogged. |
| Has odours. | Excessive suds collect in recesses and can cause foul odours.Run cleansing cycles to sanitise periodically.Clean the door seal (diaphragm).Dry the washing machine interior after a cycle has finished. |
| No bubbles are seen(Bubble models only). | You may not be able to see bubbles if there is too much items in the drum.Severely contaminated laundry may not generate bubbles. |
| Can I open the AddWash door at any time? | The AddWash door can be opened only when the Indicator appears.However, it does not open in the following cases:-When the boiling or drying process is running and the internal temperature becomes high-If you set the Child Lock for safety reasons-When the drum wash or drum drying cycle that does not involve additional laundry is running. |
| A message appears on the display to alert that dispenser is open. | Check if the detergent drawer is closed properly.- Open the detergent drawer and close it again. Make sure it's closed properly. |
If a problem persists, contact a service center. The number of the service center is on the label attached to the product.
English62
Information codes
If the washing machine fails to operate, you may see an information code on the screen. Check the table below and try the suggestions.
| Code Action | |
| Check drainage | Water is not draining.Make sure the drain hose is not frozen or clogged.Make sure the drain hose is positioned correctly, depending on the connection type.Clean the debris filter as it may be clogged.Make sure the drain hose is straightened all the way to the drain system.If the information code remains, contact a customer service centre |
| Check water supply | Water is not supplied.Make sure the water taps are open.Make sure the water hoses are not clogged.Make sure the water taps are not frozen.Make sure the washing machine is operating with sufficient water pressure.Make sure that the cold water tap and the hot water tap are properly connected.Clean the mesh filter as it may be clogged.All buttons will be disabled for 3 minutes after the information code appears.When the "Check water supply" message appears, the machine drains water for 3 minutes. In the meantime, the Power button will be disabled. |
| Check water lines | Make sure the cold water supply hose is firmly connected to the cold water tap. If it is connected to the hot water tap, the laundry may be deformed with some cycles. |
| Unbalanced laundry detected | Spinning does not work.Make sure laundry is spread out evenly.Make sure the washing machine is on a flat, stable surface.Redistribute the load. If only one item of clothing needs washing, such as a bathrobe or pair of jeans, the final spin result might be unsatisfactory, and an "Unbalanced laundry detected" check message will be shown in the display. |
| Door is open | Operating the washing machine with the door open.Make sure the door is properly closed.Make sure laundry is not caught in the door. |
Troubleshooting
| Code Action | |
| AddWash door is open (applicable models only) | This message appears when you open the AddWash door without tapping and holding ▷ If this happens, do one of the following:Press the AddWash door to close properly. Then, tap and hold ▷ and try again.To add laundry, open the AddWash door and input laundry. Close the AddWash door properly. Then, tap and hold ▷ to resume operation. |
| OC | Water has overflowed.Restart after spinning.If the information code remains on the display, contact a local Samsung service centre. |
| LC, LC1 | Check the drain hose.Make sure the end of the drain hose is not placed on the floor.Make sure the drain hose is not clogged.If the information code remains, contact a customer service centre. |
| 3C | Check the drum motor for operation.Try restarting the cycle.If the information code remains, contact a customer service centre. |
| 3CP | The electronic control needs to be checked.Try restarting the cycle.If the information code remains, contact a customer service centre. |
| UC | Check the pulsator motor for operation.Check if power is supplied properly.If the information code remains, contact a customer service centre. |
| Low voltage detected.Check if the power cord is plugged in.If the information code remains, contact a customer service centre. | |
| HC | High temperature heating check.If the information code remains, contact a customer service centre. |
| 1C | The Water Level sensor is not working properly.Turn the machine off, and restart the cycle.If the information code remains, contact a customer service centre. |
| AC | Check communications between main and sub PBAs.Turn the machine off, and restart the cycle.If the information code remains, contact a customer service centre. |
English64
| Code Action | |
| 8C | The MEMS sensor is not working properly.Turn the machine off, and restart the cycle.If the information code remains, contact a customer service centre. |
| AC6 | Check communications between the main and the inverter PBAs.Depending on the state, the machine may automatically returns to normal operation.Turn the machine off, and restart the cycle.If the information code remains, contact a customer service centre. |
| DC1 | The Main Door lock/unlock is not working properly.Turn the machine off, and restart the cycle.If the information code remains, contact a customer service centre. |
| DC3 | The AddWash door lock/unlock is not working properly.Turn the machine off, and restart the cycle.If the information code remains, contact a customer service centre. |
If any information code keeps appearing on the screen, contact a local Samsung service centre.
Specifications
Fabric care chart
The following symbols provide garment care direction. The Clothing care labels include symbols for drying, bleaching, drying and ironing, or dry cleaning when necessary. The use of symbols ensures consistency among garment manufacturers of domestic and imported items. Follow care label directions to maximize garment life and reduce laundering problems.
Washing
| 95 °C boil wash. | |
| 60 °C coloured wash. | |
| 60 °C coloured wash. ("Easy care" coloured wash) | |
| 40 °C coloured wash. | |
| 40 °C mild wash. | |
| 40 °C very mild wash. | |
| 30 °C fine wash. | |
| 30 °C mild fine wash. | |
| 30 °C very mild fine wash. | |
| Hand wash. | |
| Do not wash. |
NOTE
The numbers in the wash tub specify the maximum washing temperatures in degrees celsius Celsius which must not be exceeded.
Bleaching
| Any bleach allowed. | |
| Only oxygen bleach allowed. | |
| Do not bleach. |
Drying
| Tumble drying / Drying at a temperature of 80 °C with a normal drying process. | |
| Tumble drying / Drying at a temperature of 60 °C with a mild drying process. | |
| Do not tumble dry | |
| Line drying. | |
| Drip line drying. | |
| Flat drying. | |
| Drip flat drying. | |
| Line drying in the shade. | |
| Drip line drying in the shade. | |
| Flat drying in the shade. | |
| Drip flat drying in the shade. |
NOTE
- The dots indicate the drying level of the dryer.
- The lines indicate the type and place of the drying.
English66
Ironing
 | Iron at maximum sole plate temperature of 200 °C. |
 | Iron at maximum sole plate temperature of 150 °C. |
 | Iron at maximum sole plate temperature of 110 °C.Caution when using steam irons (work without steam). |
 | Do not iron. |
NOTE
The dots indicate the temperature ranges for ironing (regulator, steam, travel irons and ironing machines).
Professional care
 | Professional dry-cleaning in perchloroethylene and/or hydrocarbons (heavy benzines) with normal process. |
 | Professional dry-cleaning in perchloroethylene and/or hydrocarbons (heavy benzines) with gentle process. |
 | Professional dry-cleaning in hydrocarbons (heavy benzines) with normal process. |
 | Professional dry-cleaning in hydrocarbons (heavy benzines) with gentle process. |
 | Do not dry-clean. |
 | Professional wet-cleaning. |
 | Mild professional wet-cleaning. |
 | Very mild professional wet-cleaning. |
 | Do not wet-clean. |
NOTE
- The letters in a circle indicate the solvents (P, F) used in dry cleaning or wet cleaning (W).
- Generally, the line under the symbol indicates a milder treatment (e.g. gentle cycle for easy-care items). The double line indicates care levels with particularly gentle treatment.
Protecting the environment
- This appliance is manufactured from recyclable materials. If you decide to dispose of it, please observe local waste disposal regulations. Cut off the power cord so that the appliance cannot be connected to a power source. Remove the lid so that animals and small children cannot get trapped inside the appliance.
- Do not exceed the detergent quantities recommended in the detergent manufacturers' instructions.
- Use stain removal products and bleaches before the wash cycle only when necessary.
- Save water and electricity by only washing full loads (the exact amount depends upon the program used).
Specifications
Specification sheet
“*” Asterisk(s) means variant model and can be varied (0-9) or (A-Z).

natural_image
Line drawing of a front-loading washing machine with control panel and door (no text or symbols)
| Type Front loading washing machine | ||||
| Model name WW12T****** WW9*T****** | ||||
| Dimensions | A (Width) 600 mm | |||
| B (Height) 850 mm | ||||
| C (Depth) 650 mm 550 mm | ||||
| D 733 mm 635 mm | ||||
| E 1170 mm 1072 mm | ||||
| Water pressure 50-800 kPa | ||||
| Net weight | 76.0 kg (WW**T*9****,WW**T*8****,WW**T*5****,WW**T*4****,WW**T*3****)74.0 kg (WW**T*0****) | 67.0 kg (WW**T*8****,WW**T*5****,WW**T*3****)65.0 kg (WW**T*0****) | ||
| Maximum load capacity | Washing and spinning | 12.0 kg | 9.0 kg | |
| Power consumption | Washing and heating | AC 220-240 V / 50 Hz | 1900-2300 W | |
| Spin revolutions | 1400 RPM | |||
English68
| Type Front loading washing machine | ||||
| Model name WW8*T****** WW7*T****** | ||||
| Dimensions | A (Width) 600 mm | |||
| B (Height) 850 mm | ||||
| C (Depth) 550 mm | ||||
| D 635 mm | ||||
| E 1072 mm | ||||
| Water pressure 50-800 kPa | ||||
| Net weight | 67.0 kg (WW**T*8****, WW**T*5****, WW**T*3****)65.0 kg (WW**T*0****) | |||
| Maximum load capacity | Washing and spinning | 8.0 kg 7.0 kg | ||
| Power consumption | Washing and heating | AC 220-240 V / 50 Hz | 1900-2300 W | |
| Spin revolutions 1400 RPM | 1400 RPM(WW7*T**4***)1200 RPM(WW7*T**2***) | |||

NOTE
The design and specifications are subject to change without notice for quality improvement purposes.
Memo
Memo
SAMSUNG
QUESTIONS OR COMMENTS?
| COUNTRY CALL OR VISIT US ONLINE AT | ||
| THAILAND | Hotline no : 12821800-29-3232 (Toll free for all product) | www.samsung.com/th/support |
| MYANMAR +95-1-2 | 399-888 www.samsung.com/mm/support | |
| CAMBODIA 1800-2 | 20-3232 (Toll free) www.samsung.com/th/support | |
| LAOS +856-214 | 17333 www.samsung.com/th/support | |

DC68-04284K-01
เครื่องซักผ้า
คู่มือผู้ ใช้
WW12T*****/WW9*T*****/WW8*T*****/WW7*T*****
SAMSUNG
สารบัญ
natural_image
Diagram showing two mechanical assembly states: left with hand turning a knob, right with valve mechanism and directional arrows (no text or symbols)natural_image
Diagram showing a wrench and nut assembly with directional arrows indicating movement (no text or symbols)natural_image
Diagram of a washing machine with attached cable and a disassembled outlet (no text or symbols)ข้อควรระวัง
natural_image
Diagram of a faucet with valve and base, showing internal components and directional arrows (no text or labels)natural_image
Diagram of a car fuel plug being inserted into a valve, showing airflow direction (no text or symbols)natural_image
Diagram of two pipe fittings with circular annotations highlighting their features (no text or symbols present)natural_image
Illustration of a hand using a screwdriver to adjust a mechanical component (no text or symbols present)natural_image
Illustration of a hand using a tool to adjust a pipe fitting with a rotating valve (no text or symbols)natural_image
Diagram of a plug socket with two connectors and a directional arrow indicating rotation (no text or symbols)พาดขอบอ่างซักล้าง
natural_image
Line drawing of a washing machine next to a vertical pipe with a star symbol (no text or labels)ในท่อระบายน้ำ
natural_image
Diagram of a washing machine with labeled component A (no text or symbols beyond label)หมายเหตุ
natural_image
Line drawing of a washing machine with two circular components and a small appliance on the side (no text or symbols)natural_image
Diagram showing a door opening and a pair of clothes hanging from a machine, with an arrow indicating direction (no text or symbols)ข้อควรระวัง
natural_image
Diagram of a kitchen appliance with a bottle pouring liquid into a drawer (no text or symbols)natural_image
Diagram of a car air conditioner unit with a labeled component (no text or symbols present)natural_image
Diagram showing a hand pouring liquid into a device with an arrow indicating direction (no text or symbols present)natural_image
Hand placing a gray rectangular object into a circular container (no text or symbols visible)natural_image
Line drawing of a hand placing a square block into a circular container (no text or symbols)หมายเหตุ
natural_image
Diagram of a mechanical device with a tool and labeled component A, showing no text or symbols beyond the label.natural_image
Illustration of a hand cleaning a circular object with a labeled component (A), no text or symbols present.natural_image
Diagram of a plug inserted into a socket, showing a black arrow indicating rotation (no text or symbols present)natural_image
Illustration of a hand using a tool to adjust a component with a magnified inset showing threaded parts (no text or symbols)natural_image
Hand inserting a cable into a socket (no text or symbols visible)natural_image
Illustration of hands using a tool to clean or wash a basin (no text or symbols visible)natural_image
Technical line drawing of a mechanical component with concentric circular features (no text or symbols)หมายเหตุ
natural_image
Mechanical device diagram showing a mechanical component with arrows indicating motion or force (no text or symbols)natural_image
Line drawing of a mechanical component with a tool inserted, showing no text or symbolsnatural_image
Diagram of a device's internal component being inserted into a housing, with an arrow indicating the direction (no text or symbols present)natural_image
Line drawing of a front-loading washing machine with control panel and side door (no text or symbols)
a2c = d2g c2m = e2p = f2u = g2h = s2o = d2q = d2r = d2s = o2g = o2h = o2u = o2v = o2w = o2u = o2v = o2w = o2u = o2v = o2w = o2u = o2v =
01 02 03
04 08:05 05 06 07
18
07 08 09 10 11 12 13 14 15 16 17 18 19 20 21 22 23 24 25 26 27 28 29 30
10 ๑๐๐๕๔๖๖๗๙ ๑๘๐ํξ: 11 ๑๐๐๕๔๖: 12 ๑๐๐๕๔๖
- අඉංක්ජාන් අඉංක්ජාන් අඉංක්ජාන් අඉංක්ජාන් අඉංක්ජාන්
- grades: grades in the quality of the quality of the quality of the quality of the quality of the quality of the quality of the quality of the quality of the quality of the quality of the quality of the quality of the quality of the quality of the quality of the quality of the quality of the quality of the quality of the quality of the quality of the quality of the quality of the quality of the quality of the quality of the quality of the quality of the quality of the quality of the quality of the quality of the quality of
- දාජ්යික්යා දාජ්යික්යාවේශ්යාවේශ්යාවේශ්යාවේශ්යාවේශ්යාවේශ්යාවේශ්යාවේශ්යාවේශ්‴
⚠️ ∞∞
- རාඩිං්යේන්විඩිඩාඩිඩිඩිඩිඩිඩිඩිඩිඩිඩිඩිඩිඩිඩිඩිඩිඩිඩිඩිඩිඩිඩිඩිඩිඩිඩී རාඩිඩිඩිඩිඩිඩිඩිඩිඩිඩිඩිඩිඩිඩිඩිඩිඩිඩිඩිඩිඩිඩී
⚠️ ∞∞
natural_image
Mechanical assembly diagram showing two stages of a valve mechanism with directional arrows indicating motion (no text or symbols)natural_image
Diagram showing a wrench adjusting a mechanical component with an upward arrow indicating motion (no text or symbols present)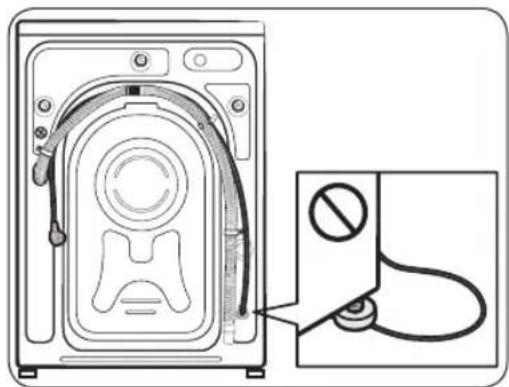
natural_image
Diagram of a washing machine with attached cable and switch, showing internal components (no text or labels)natural_image
Diagram of a faucet with a valve and handle, showing internal components and directional arrows (no text or labels)natural_image
Diagram of a car fuel plug being inserted into a valve, showing airflow direction (no text or labels)natural_image
Illustration of two pipe fittings with circular insets showing different installation states (no text or symbols)natural_image
Hand using a screwdriver to adjust a mechanical component (no text or symbols visible)natural_image
Illustration of a hand using a tool to adjust a pipe fitting with a rotating arrow (no text or symbols)natural_image
Diagram of two connected electrical plug connectors with a directional arrow indicating rotation (no text or symbols)natural_image
Line drawing of a washing machine next to a vertical pipe with a star symbol (no text or labels)ජාඩි අංක්ජාජාජාජියා
natural_image
Diagram of a washing machine with labeled component A (no text or symbols beyond label)© ๐๐๐๐๐๐
| 01 02 03 | ||
 EnglishSuomiTurn dial & Tap O EnglishSuomiTurn dial & Tap O | Empty drum before cailbrating[Tap O to skip] | Welcome! |
| 04 05 | ||
| Let's explore your new washer![Tap O to skip] | Turn the dial to explore cycles[Tap O to skip] | Now hold to start a cycle[Tap O to skip] |
| [Tap to see additional functions[Tap O to skip] | Try saving favorites in My Cycles | A washer that knows you! AllDone! |
natural_image
Line drawing of a washing machine with two circular components and a small appliance on the side (no text or symbols)- amplitude of the image of the image is a standard graphic design and does not contain any specific text or symbols.

natural_image
Diagram showing a door opening with a black arrow pointing to a pair of clothes (no text or symbols present)- amplitude: 1 and the equation of the sum of the sum of the sum of the sum of the sum of the sum of the sum of the sum of the sum of the sum of the sum of the sum of the sum of the sum of the sum of the sum of the sum of the sum of the sum of the sum of the sum of the sum of the sum of the sum of the sum of the sum of the sum of the sum of the sum of the sum of the sum of the sum of the sum of the sum
⚠️ corridors
$$ {\mathfrak {g}} {\mathfrak {s}} {\mathfrak {w}} {\mathfrak {m}} {\mathfrak {d}} {\mathfrak {o}} {\mathfrak {d}} {\mathfrak {i}} {\mathfrak {o}} {\mathfrak {d}} {\mathfrak {e}} {\mathfrak {l}} {\mathfrak {u}} {\mathfrak {n}} {\mathfrak {r}} {\mathfrak {s}} {\mathfrak {a}} {\mathfrak {v}} {\mathfrak {n}} {\mathfrak {d}} {\mathfrak {i}} {\mathfrak {s}} {\mathfrak {g}} {\mathfrak {o}} {\mathfrak {d}} {\mathfrak {n}} $$
⚠️ ∞∞
natural_image
Diagram of a washing machine handle with a bottle pouring liquid into a container (no text or symbols)natural_image
Diagram of a device's internal processing unit with a circular component and directional arrow (no text or symbols)natural_image
Illustration of a hand pouring liquid into a washing machine with an arrow indicating direction (no text or symbols)natural_image
Hand placing a small rectangular object on a circular surface, no text or symbols visibleWi-Fi distinguishes
© φοδίσμού
natural_image
Diagram of a mechanical device with a lever and labeled component A, no text or symbols presentnatural_image
Illustration of a hand using a screwdriver to adjust or install a device with a circular component (no text or symbols visible)natural_image
Hand cleaning a circular object with a cloth, labeled 'A' (no text or symbols on the object itself)natural_image
Diagram of a car charging plug with a rotating button (no text or symbols)- ഉོན་སྐྱི་བཅིན་པོད་ལྟོ། അཞིགྱེ་བཟོང་འབའོར་གྱིན་།
- අඉල්යියු:ංශ වාවිය
- gradesgradesgradesgradesgradesgradesgradesgradesgradesgradesgradesgradesgradesgradesgradesgradesgradesgradesgradesgradesgradesgradesgradesgradesgradesgradesgradesgradesgradesgradesgradesgradesgradesgradesgradesgradesgradesgradesgradesgradesgradesgradesgradesgradesgradesgradesgradesgradesgradesgradesgradesgradesgradesgradesgradesgradesgradesgradesgradesgradesgradesgradesgradesgradesgradesgradesgradesgradesgradesgradesgradesgradesgradesgradesgradesgradesgradesgradesgradesGradeGradeGradeGradeGradeGradeGradeGradeGradeGradeGradeGradeGradeGradeGradeGradeGradeGradeGradeGradeGradeGradeGradeGradeGradeGradeGradeGradeGradeGradeGradeGradeGradeGradeGradeGradeGradeGradeGradeGradeGradeGradeGradeGradeGradeGradeGradeGradeGradeGradeGradeGradeGradeGradeGradeGradeGradeGradeGradeGradeGradeGradeGradeGradeGradeGradeGradeGradeGradeGradeGradeGradeGradeGradeGradeGradeGradeGradeGradeGradeGradeGradeGradeGradeGradeGradeGradeGradeGradeGradeGradeGradeGradeGradeGradeGradeGradeGradeGradeGrade grades grade grades grade grades grade grades grade grades grade grades grade grades grade grades grade grades grade grades grade grades grade grades grade grades grade grades grade grades grade grades grade grades grade grades grade grades grade grades grade grades grade grades grade grades grade grades grade grades grade grades grade grades grade grades grade grades grade grades grade grades grade grades grade grades grade grades grade grades grade grades grade grades grade grades grade grades grade grades grade grades grade grades grade grades grade grades grade grades grade grades grade grades grade grades grade grades grade grades grade grades Grade Grade Grade Grade Grade Grade Grade Grade Grade Grade Grade Grade Grade Grade Grade Grade Grade Grade Grade Grade Grade Grade Grade Grade Grade Grade Grade Grade Grade Grade Grade Grade Grade Grade Grade Grade Grade Grade Grade Grade Grade Grade Grade Grade Grade Grade Grade Grade Grade Grade Grade Grade Grade Grade Grade Grade Grade Grade Grade Grade Grade Grade Grade Grade Grade Grade Grade Grade Grade Grade Grade Grade Grade Grade Grade Grade Grade Grade Grade Grade Grade Grade Grade Grade Grade Grade Grade Grade Grade Grade Grade Grade Grade Grade Grade Grade Grade Grade Grade Grade Grades
3. 2018-2019-2019-2019-2019-2019-2019-2019-2019-2019-2019-2019-2019-2019-2019-2019-2019-2019-2019-2019-2019-2016-2016-2016-2016-2016-2016-2016-2016-2016-2016-2016-2016-2016-2016-2016-2016-2016-2016-2016-2016-2015
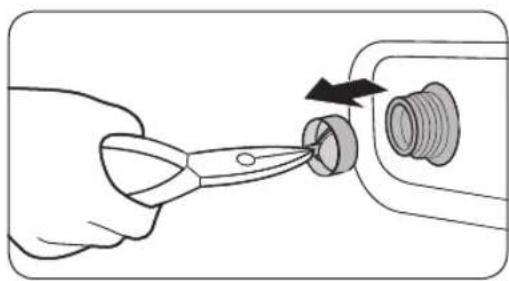
natural_image
Illustration of a hand using a pliers to adjust a component with a black arrow indicating rotation (no text or symbols)natural_image
Line drawing of a hand inserting a plug into a socket (no text or symbols)- ഉංක්යාන්යි ഉංක්යි: ഉංක්යාන්යි ഉංක්යාන්යි
- 0256:031 0466005 049:07 040511 0399507 040058: 0386:07 [m]
- අජාවි අඩේ: ස්රී අජිජිය අජාවියශ අජාවියශ අජාවියශ
- grades of the role of the quality of the quality of the quality of the quality of the quality of the quality of the quality of the quality of the quality of the quality of the quality of the quality of the quality of the quality of the quality of the quality of the quality of the quality of the quality of the quality of the quality of the quality of the quality of the quality of the quality of the quality of the quality of the quality of the quality of the quality of the quality of the quality of the quality of the quality

natural_image
Illustration of hands using a tool to clean or wash a sink (no text or symbols visible)- კითვადინიდრმიტი თიებექადლიაულ:დუ:დუ თაწენ:მო დიბიშე დიდიშუ აწლიღა ბიაშელიდალონ: ლიადოსლი।
- సంఖారియ్రణిన్న ర్ష్టాప్రు: అలున వారిధి: గే ప్రునానిచ్రుని
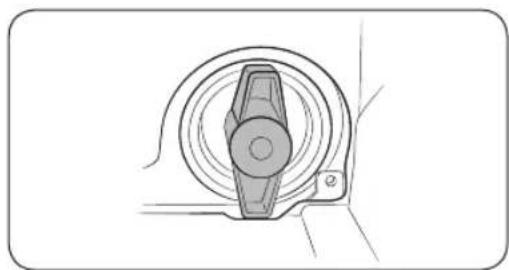
natural_image
Mechanical component diagram showing a circular dial with a central shaft and mounting bracket (no text or symbols)© φοδίστος
natural_image
Mechanical device diagram showing a drawer with arrows indicating movement or force (no text or symbols)- axgou:q:q:q [q]dau:qung g##on a###n###d###:qung d ###y##d###d##n a###p#d### d##u

natural_image
Line drawing of a mechanical component with a tool inserted, showing no text or symbolsnatural_image
Diagram of a device's internal compartment with an arrow pointing to it, no text or symbols presentnatural_image
Line drawing of a front-loading washing machine with control panel and side buttons (no text or symbols)
ඩාජන්:උිජීඩුවිය
| ###:###: ###: ###: ### | ||||
| ###:###: ###: WW12T********WW9*T****** | ||||
| ###:###: A (###) 600 mm | ||||
| B (###) 850 mm | ||||
| C (###) 650 mm 550 mm | ||||
| D 733 mm 635 mm | ||||
| E1170 mm 1072 mm | ||||
| ###: 50-800 kPa | ||||
| ###:###: ###:### | 76.0 kg(WW**T*9****1WW**T*8****1WW**T*5****1WW**T*4****1WW**T*3****)74.0 kg(WW**T*0****) | 67.0 kg(WW**T*8****1WW**T*5****1WW**T*3****)65.0 kg(WW**T*0****) | ||
| ###:###:###:###:### | ###:###:###:###:###: | 12.0 kg 9.0 kg | ||
| ###:###:###:###: | AC 220-240 V /50 Hz | 1900-2300 W | ||
| ###:###:###:###: | ||||
| ### | ||||
| ### | ||||
| ###:###: ###: ###: ###: ###: ###: ###: ###: ###: ###: ###: ###: ###: ###: ###: ###: ###: ###: ###: ###: ###: ###: ###: ###: ###: ###: ###: ###: ###: ###: ###: ###: ###: ###: ###: ###: ###: ###: ###: ###: ###: ###: ###: ###: ###: ###: ###: ###: ###: ###: ###: ###### | ||||
| A (###) 600 mm | ||||
| B (###) 850 mm | ||||
| C (###) 550 mm | ||||
| D 635 mm | ||||
| E1072 mm | ||||
| ###: 50-800 kPa | ||||
| ###:###: ###:###: ###:###: ###:###: ###:###: ###:###: ###:###: ###:###: ###:###: ###:###: ###:###: ###:###: ###:###: ###:###: ###:###: ###:###: ###:###: ###:###: ###:###: ###:###: ###:###: ###:###: ###:###: ###:###: ###:###: ###:###:###: ###:###: ###:###: ###:###: ###:###: ###:###: ###:###: ###:###: ###:###: ###:###: ###:###: ###:###: ###:###: ###:###: ###:###: ###:###: ###:###: ###:###: ###:###: ###:###: ###:###: ###:###: ###:###: ###:###: ###:###; 1400 RPM | 67.0 kg (WW**T*8****, WW**T*5****, WW**T*3****)65.0 kg (WW**T*0****) | |||
| ###:###:###:###:###:###:###:###:###:###:###:###:###:###:###:###:###:###:###:###:###:###:###:###:###:###:###:###:###:###:###:###:###:###:###:###:###:###:###:###:###:###:###:###:###:###:###:###:###:###:###; 1400 RPM | ###:###:###:###:###:###:###:###:###:###:###:###:###:###:###:###:###:###:###:###:###:###:###:###:###:###:###:###:###:###:###:###:###:###:###:###:###:###:###:###:###:###:###:###:###:###:###:###:###: | |||
| ###:###:###:###:###:###:###:###:###:###:###:###:###:###:###:###:###:###:###:###:###:###:###:###:###:###:###:###:###:###:###:###:###:###:###:###:###:###:###:###:###:###:###:###:###:###:###:###; 14,000 RPM | 1400 RPM(WW7*T**4****)1200 RPM(WW7*T**2****) | |||
- Installation 13
- Before you start 27
- Operations 35
- Maintenance 51
- Troubleshooting 59
- Specifications 66
- Safety information
- What you need to know about the safety instructions
- Important safety symbols
- WARNING
- CAUTION
- NOTE
- Important safety precautions
- Critical installation warnings
- Installation cautions
- Critical usage warnings
- Usage cautions
- Critical cleaning warnings
- Installation
- What's included
- Accessories (not supplied)
- Installation requirements
- Electrical supply and grounding
- Water supply
- Drain
- Flooring
- Water temperature
- Alcove installation
- Step-by-step installation
- STEP 1 Select a location
- STEP 2 Remove the shipping bolts
- STEP 3 Adjust the levelling feet
- STEP 4 Connect the water hose
- Connecting to a threaded water tap
- Connecting to a non-threaded water tap
- For models with an additional hot water inlet:
- STEP 5 Position the drain hose
- Over the edge of a wash basin
- In a drain pipe
- In a sink drain pipe branch
- STEP 6 Power on
- Before you start
- Initial setup
- Run Calibration
- Laundry guidelines
- STEP 1 Sort
- Sort the laundry according to these criteria:
- STEP 2 Empty pockets
- Empty all the pockets of your laundry items
- Turn clothing with buttons and embroideries inside out
- STEP 3 Use a laundry net
- STEP 4 Prewash (if necessary)
- STEP 5 Determine the load capacity
- STEP 6 Apply a proper detergent type
- Laundry capsules
- Detergent drawer guidelines
- To apply washing agents to the auto dispenser
- Operations
- Operating a cycle
- Additional functions
- Using Additional Functions
- Quick Drive (WW\*\*T7\*\*\*\*\* model only)
- Prewash
- Intensive
- Bubble Soak
- Dose per Wash
- Dose per Rinse
- My Cycles
- Delay End
- Real-life case
- 2:00 pm
- 3:00 pm
- 5:00 pm
- Child Lock
- System functions
- Using System Functions
- Water Hardness
- Softener
- AI Pattern
- Alarm
- Calibration
- Wi-Fi
- Language
- Factory Reset
- Special features
- AddWash (applicable models only)
- Adding laundry for non-AddWash models (applicable models only)
- Smart control (applicable models only)
- Connecting your washing machine
- Stay Connect
- SmartThings
- Wi-Fi connection
- Download
- Log in
- To register your appliance to SmartThings
- Open Source Announcement
- Maintenance
- Drum clean+
- Drum Clean+ reminder
- Emergency drain
- Cleaning
- Surface of the washing machine
- AddWash door (applicable models only)
- Mesh filter
- Debris filter
- Detergent drawer
- Defrosting your washing machine
- Care against an extended time of disuse
- Troubleshooting
- Checkpoints
- Information codes
- Specifications
- Fabric care chart
- Protecting the environment
- Specification sheet
- Memo
- SAMSUNG
- เครื่องซักผ้า
- สารบัญ
- ข้อควรระวัง
- พาดขอบอ่างซักล้าง
- ในท่อระบายน้ำ
- หมายเหตุ
- ⚠️ ∞∞
- © φοδίστος
- ඩාජන්:උිජීඩුවිය
Brand : SAMSUNG
Model : WW12TP44DSX
Category : Washing machine