
LPC-M130X - Printer LG - Free user manual and instructions
Find the device manual for free LPC-M130X LG in PDF.

| Product Type | Monochrome Laser Printer |
| Print Technology | Laser |
| Print Speed | Up to 20 ppm (est.) |
| Resolution | 600 x 600 dpi |
| Paper Input Capacity | 150 sheets (est.) |
| Paper Output Capacity | 50 sheets (est.) |
| Media Sizes Supported | A4, Letter, Legal, Envelopes |
| Connectivity | USB 2.0 |
| Dimensions (W x D x H) | 331 x 215 x 178 mm (est.) |
| Weight | 4.5 kg (est.) |
| Power Consumption | Print: 310W, Standby: 30W, Sleep: 2W (est.) |
| Power Supply | AC 100-240V, 50/60Hz |
| Operating Temperature | 10-32°C |
| Noise Level | Print: < 50 dB(A) |
| Warm-Up Time | Less than 30 seconds |
| First Print Out Time | Less than 10 seconds |
| Monthly Duty Cycle | Up to 5,000 pages (est.) |
| Toner Cartridge Yield | Standard: 1,500 pages (est.) |
| Supported Operating Systems | Windows, macOS, Linux (est.) |
| Maintenance | Clean exterior with soft cloth; replace toner when prompted |
| Safety | Do not block vents; use only supplied power cord |
| Spare Parts Availability | Contact LG support for replacement parts |
Frequently Asked Questions - LPC-M130X LG
User questions about LPC-M130X LG
0 question about this device. Answer the ones you know or ask your own.
Ask a new question about this device
Download the instructions for your Printer in PDF format for free! Find your manual LPC-M130X - LG and take your electronic device back in hand. On this page are published all the documents necessary for the use of your device. LPC-M130X by LG.
USER MANUAL LPC-M130X LG
Please read this manual carefully before operating your set.
Retain it for future reference.
Designs and specifications are subject to change without notice for improvement.
Precautions

CAUTION
RISK OF ELECTRIC SHOCK DO NOT OPEN

CAUTION: TO REDUCE THE RISK OF ELECTRIC SHOCK DO NOT REMOVE COVER (OR BACK) NO USER SERVICEABLE PARTS INSIDE. REFER SERVICING TO QUALIFIED SERVICE PERSONNEL.
Explanation Graphical Symbols:

The lightning flash with arrowhead symbol, within an equilateral triangle is intended to alert the user to the presence of uninsulated dangerous voltage within the product's enclosure that may be of sufficient magnitude to constitute a risk of electric shock to persons.

The exclamation point within an equilateral triangle is intended to alert the user to the presence of important operating and maintenance(servicing) instructions in the literature accompanying the appliance.
WARNING
TO REDUCE THE RISK OF FIRE OF ELECTRIC SHOCK, DO NOT EXPOSE THIS APPLIANCE TO RAIN OR MOISTURE. To avoid electrical shock, do not open the cabinet, Refer servicing to qualified personnel only.
The apparatus shall not be exposed to dripping or splashing and that no objects filled with liquids, such as vases, shall be placed on the apparatus.
Warning:
Do not install this equipment in a confined space such a book case or similar unit.
CAUTION
Use of controls or adjustments or performance of procedures other than those specified herein may result in hazardous radiation exposure.
Laser component in this product is capable of emitting radiation exceeding the limit for Class 1.
CAUTION:INVISIBLE LASER RADIATION WHEN OPEN AND INTERLOCKS DEFEATED. AVOID EXPOSURE TO BEAM. WARNING:OSYNLIG LASERSTRALNING NAR DENNA DEL AR OPPNAD STRALEN AR FARLIG Attention:Quand l'appareil est ouvert, ne pas s'exposer aux radiations invisibles du faisceau laser
This label is located on the interior.
CLASS 1
KLASSE 1
LUOKAN 1
KLASS 1
CLASSE 1
LASER PRODUCT
LASER PRODUKT
LASER LAITE
LASER APPARAT
PRODUIT LASER
This Compact Disc player is classified as a CLASS 1 LASER product. The CLASS 1 LASER PRODUCT label is located on the exterior.
Table of Contents
INTRODUCTION
Precautions 2
Table of Contents 3
Before Use 4
Safety Precautions....4
Notes on Discs 4
Notes on Tapes 4
Up Panel/ Front Panel 5
Rear Panel/ Display Window 6
BEFORE OPERATION
Power Source 7
The AC Power Cord Connection....7
Adjusting the voltage (OPTIONAL) ..... 7
Battery Installation 7
Audio Adjustment....7
Volume Adjustment 7
Headphone Socket 7
OPERATION
Radio Operation 8
Listening to the radio 8
Setting STEREO/ MONO 8
Tape Operation 8
Basic Playback 8
To Pause Play 8
To Stop Play 8
To Play Rewind or Fast Forward ..... 8
CD Operation 9
Basic Playback 9
To Pause Play 9
To Stop Play 9
To Skipping the Track. 9
To Searching the Track 9
To Repeat Play 9
Track+10 9
Recording 10
Basic Recording....10
CD Synchronized Recording ..... 10

Disposal of your old appliance
-
When this crossed-out wheeled bin symbol is attached to a product it means the product is covered by the European Directive 2002/96/EC.
-
All electrical and electronic products should be disposed of separately from the municipal waste stream via designated collection facilities appointed by the government or the local authorities.
-
The correct disposal of your old appliance will help prevent potential negative consequences for the environment and human health.
-
For more detailed information about disposal of your old appliance, please contact your city office, waste disposal service or the shop where you purchased the product.
REFERENCE
Specifications 11
About the symbols for instructions
Indicates hazards likely to cause harm to the unit itself or other material damage.
N Indicates special operating features of this unit.
Indicates tips and hints for making the task easier.
Before Use
Safety Precautions
Handling the unit
When shipping the unit
The original shipping carton and packing materials come in handy. For maximum protection, re-pack the unit as it was originally packed at the factory.
To keep the surface clean
Do not use volatile liquids, such as insecticide spray, near the unit. Do not leave rubber or plastic products in contact with the unit for a long period of time. They will leave marks on the surface.
Cleaning the unit
To clean the cabinet
Use a soft, dry cloth. If the surfaces are extremely dirty, use a soft cloth lightly moistened with a mild detergent solution. Do not use strong solvents, such as alcohol, benzine, or thinner, as these might damage the surface of the unit.
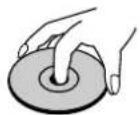
Notes on Discs
Handling discs
Do not touch the playback side of the disc.
Hold the disc by the edges so that fingerprints will not get on the surface.
Do not stick paper or tape on the disc.

Storing discs
After playing, store the disc in its case.
Do not expose the disc to direct sunlight or sources of heat, or leave it in a parked car exposed to direct sunlight, as there may be a considerable temperature increase inside the car.
Cleaning discs
Fingerprints and dust on the disc can cause poor picture quality and sound distortion. Before playing, clean the disc with a clean cloth. Wipe the disc from the center out.
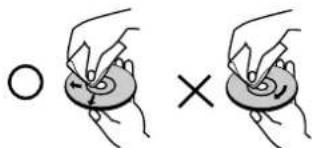
Do not use strong solvents such as alcohol, benzine, thinner, commercially available cleaners, or anti-static spray intended for analog records.
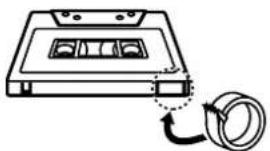
Notes on Tapes
Preventing record
Removing the tab(s) of the cassette (with a small screwdriver) will prevent accidental erasure.
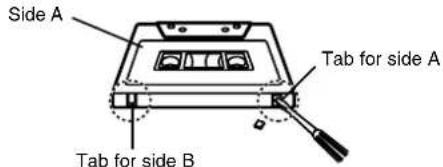
To record again, cover the hole of the tab with adhesive tape.
natural_image
Line drawing of a cassette tape with a coiled cable (no text or symbols)Adhesive tape.
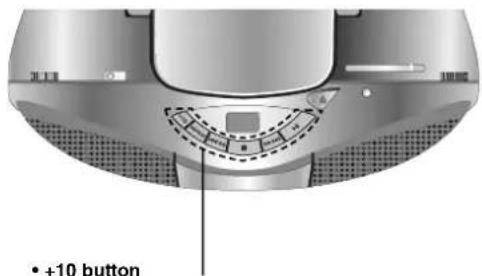
Up Panel/Front Panel
Up Panel

INTRODUCTION
Front Panel
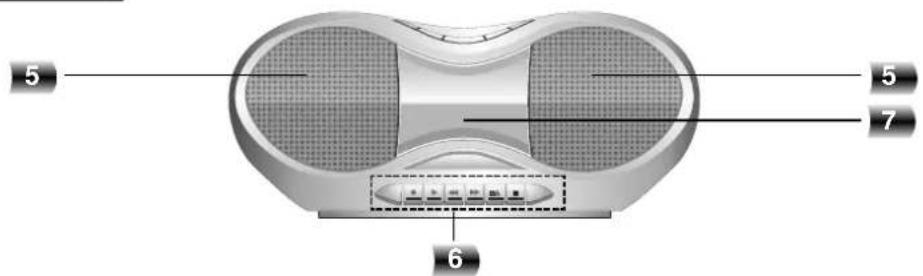
- CD DOOR
- FUNCTION SWITCH [CD/ FM/ AM/ TAPE]
- VOLUME CONTROL DIAL
- DISPLAY WINDOW indicator
- LEFT/ RIGHT SPEAKER
-
TAPE FUNCTION buttons
-
RECORD (button
• TAPE PLAY (▶ button - REWIND ( ) button
-
FAST FORWARD (▶ button
• TAPE STOP/EJECT(□ button
• TAPE PAUSE (I) button -
TAPE DOOR
-
CD FUNCTION buttons
• +10 button
- CD REPEAT button
- CD BACKWARD SKIP/SEARCH ( ) button
- CD STOP (■button
- CD FORWARD SKIP/SEARCH (▶button)
• CD PLAY/PAUSE (▶) button
-
CD DOOR OPEN ( PUSH OPEN) button
-
STEREO indicator
- TUNING DIAL
- FREQUENCY indicator
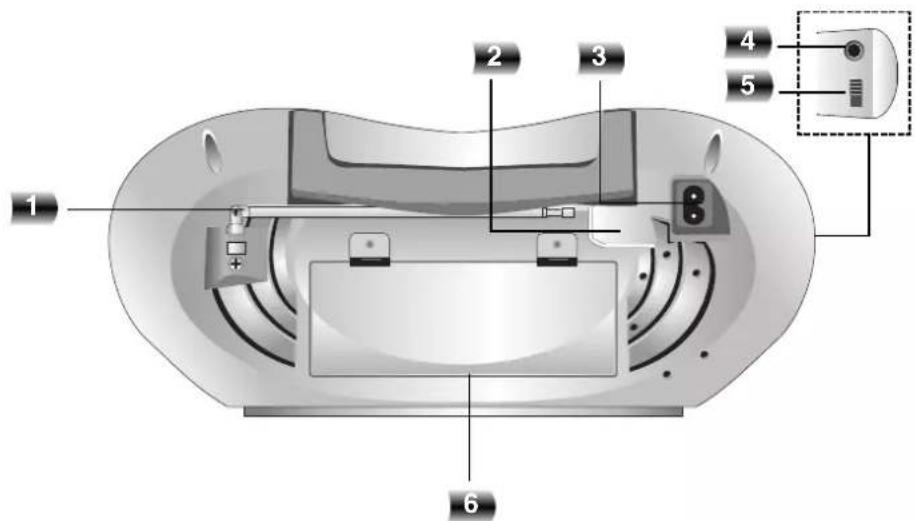
Rear Panel/Display Window
Rear Panel
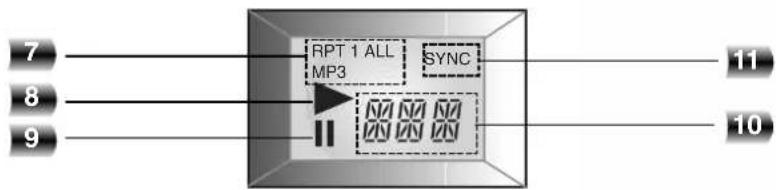
Display Window
flowchart
graph LR
    A["RPT 1 ALL MP3"] --> B["SYNC"]
    C["7"] --> A
    D["8"] --> A
    E["9"] --> A
    F["10"] --> A
    G["11"] --> A
- FM ANTENNA
- VOLTAGE SELECTOR (OPTIONAL)
- AC POWER INPUT SOCKET
- HEADPHONE SOCKET ( ):3.5mm
-
RIF/FM MODE SWITCH (ST./MONO)
-
BATTERY COMPARTMENT
- • CD REPEAT PLAY indicator
- MP3 indicator
- CD PLAY indicator
- CD PAUSE indicator
- CD TRACK NUMBER indicator
- CD SYNCHRONIZED RECORDING indicator
Power Source
The AC Power Cord Connection
11 Before connecting the AC power cord, check that the operating voltage of your unit is identical with the voltage of your local power supplied.
22 Connect one end of the AC power cord (supplied) to the AC IN socket located at the backside of your unit.
35 Plug the other end into the wall outlet.
VOLTAGE SELECTOR
Note
Unplug the AC power cord from the wall outlet if you do not to use for an extended period of time.
Adjusting the voltage (OPTIONAL)
If your unit is equipped with a voltage selector at the back side, be sure to set it to your local power supplied before connecting the AC power cord.
Battery Installation
11 Press and open the battery cover.
22 Put six "C"(R14) batteries (not supplied) into the compartment making sure the + and - are correctly positioned.
33 Replace the battery cover.
Note
- To avoid damage from possible battery leakage, remove the batteries if you do not plan to use the unit for an extended period of time.
- When the batteries are weak, replace all the batteries with new ones.
- During the AC power cord connect to the wall outlet, the batteries are not worn out.
Audio Adjustment
Volume Adjustment
Turn VOLUME CONTROL DIAL clockwise to increase the sound level, or counterclockwise to decrease it.
Headphone Socket
- Connect a stereo headphone plug (3.5mm) into the headphone jack.
- The speakers are automatically disconnected when you plug in the headphones (not supplied).
Radio Operation
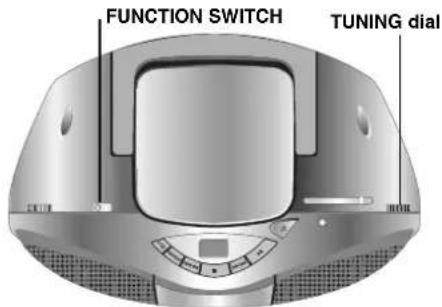
RIF/FM MODE SWITCH (ST./MONO)
natural_image
Top-down view of a device casing with internal components and no visible text or symbolsListening to the radio
11 Set FUNCTION SWITCH to select AM or FM.
22 Set a station by turning TUNING dial.
To turn off the radio
Set FUNCTION SWITCH to TAPE or CD (OFF) to turn off your unit.
Setting STEREO/ MONO
11 Set RIF/ FM MODE SWITCH to ST. to listening to an FM stereobroadcast.
22 Set RIF/ FM MODE SWITCH to MONO when listening to an FM stereo broadcast.
Selecting this function will substantially reduce the noise, however the stereo effect will be lost.
Notes
Adjust the antenna to get more clear reception.
- AM antenna
This antenna is built within the unit and rotate the unit for better reception.
- FM antenna
Pull the telescopic antenna out and adjust the angle and direction for better reception.
Tape Operation
natural_image
3D rendering of a modern electronic device with two speakers and a control panel (no text or symbols visible)- RECORD (button)
• TAPE PLAY (button - REWIND ( ) button
- FAST FORWARD ( ) button
• TAPE STOP/EJECT( button
• TAPE PAUSE (I) button
Basic Playback
11 Set FUNCTION SWITCH to TAPE.
22 Open the cassette door by pressing TAPE STOP/EJECT (Button.
3 Insert a cassette and push close the TAPE door.
44 Press TAPE PLAY (→ to playback.
To Pause Play
Press TAPE PAUSE (I) button to pause. Press the button again to resume play.
To Stop Play
Press TAPE STOP/EJECT (Button to stop play. (Your cassette deck will automatically stop at the end of the tape.)
To Play Rewind or Fast Forward
After pressing and holding REWIND/FAST FORWARD
(◀)button during playback, press TAPE PLAY
(▶ at the point you want.
CD Operation

• +10 button
- CD REPEAT button
• CD BACKWARD SKIP/SEARCH ( ) button
- CD STOP (button)
• CD FORWARD SKIP/SEARCH (▶Button)
- CD PLAY/PAUSE (▶)/button
Basic Playback
1 Set FUNCTION SWITCH to CD.
22 Press CD DOOR OPEN ( ☐USH OPEN) button to open the disc compartment.
3 Load a disc with the printed side facing up.
4 Close the disc compartment. The display will show the total number of tracks.
5 Press CD PLAY/PAUSE (▶) button to begin play.
The track number will be shown in the display.
To Pause Play
Press CD PLAY/PAUSE (▶)/button to pause during playback.
When a track is paused "I" will flash in the display. Press CD PLAY/PAUSE (▶) button again to resume play.
To Stop Play
Press CD STOP (button during playback.
To Skipping the Track
- Press CD FORWARD SKIP/SEARCH ( )▶▶/▶▶ button to go to the next track.
- When CD BACKWARD SKIP/SEARCH ( )◀◀/◀◀ button is pressed once midway through a track, the player returns to the start of that track. When it is pressed again, a track is skipped each time the button is pressed.
To Searching the Track (CD only)
After pressing and holding CD SKIP/SEARCH (button during playback, then release at the point you want.
Notes
- Do not tilt or move your unit with discs loaded. If you do you may damage the discs and your unit.
- Do not touch the playing side of CD; the side without any printing on it.
- Clean your CD from the middle outward with a soft lint free cloth.
- Playable number of music including folders and files is 512 musics.
- Playable number of music per folder is 255 musics.
To Repeat Play
To play one track repeatedly
Press CD REPEAT button once during playback. - "REPEAT 1" appears in the display.
To play all tracks repeatedly
Press CD REPEAT button again during playback. - "REPEAT ALL" appears in the display.
To cancel repeat play
Press CD REPEAT button once more during playback. - Repeat indicator disappears.
Track +10
Durning playback, press the +10 button to go forward to the next 10th track.
Recording
Wind the tape to the point recording starts. (Use only normal tapes.)
natural_image
3D rendering of a modern electronic device with two speakers and a central button (no visible text or symbols)- RECORD (button)
• TAPE PLAY (▶ button - REWIND ( ) button
- FAST FORWARD (▶ button
• TAPE STOP/EJECT( button
• TAPE PAUSE (1) button
• +10 button
• CD REPEAT button
- CD BACKWARD SKIP/SEARCH ( ) button
- CD STOP (button)
- CD FORWARD SKIP/SEARCH (button)
• CD PLAY/PAUSE (▶) button
Basic Recording
11 Select a function you wish to record by setting FUNCTION SWITCH except TAPE function.
2 Insert a blank tape.
33 Press RECORD (▶button.
TAPE PLAY (▶button is pressed automatically.
44 Start playing your CD or RADIO.
CD Synchronized Recording
This feature automatically records an entire CD into a cassette.
11 Load a CD disc and Set FUNCTION SWITCH to CD.
22 Insert a blank tape.
33 Press RECORD (▶button.
TAPE PLAY (▶button is pressed automatically.
44 The synchronized recording is started automatically after about 7 seconds.
To pause recording
Press TAPE PAUSE (II) button. Press TAPE PAUSE
(II) button again to resume recording.
To stop recording
Press TAPE STOP/EJECT (■ ▲) button.
(Your cassette deck will automatically stop at the end of the tape.)

- If you wish to record from the desired track, select the desired track with CD SKIP/SEARCH (◀◀/◀◀
▶▶/▶▶) button before commencing CD recording. - If bear noises sound when AM broadcast recording, reset RIF on the rear panel.
Specifications
| SECTION | MODEL | LPC-M130A | LPC-M130X | |
| [General] | Power supply Refer to the back panel of the unit. | |||
| Power consumption 8W | ||||
| Mass | 2.6kg | |||
| External dimensions (W x H x D) 374 x 178 x 255 mm | ||||
| Output Power 1W X 2 T.H.D 10% | ||||
| Speakers 8Ω X 2 | ||||
| Battery Operation DC 9V, six "C"(R14) batteries (not supplied) | ||||
| [CD] | Frequency response 100 - 18000 Hz | |||
| Signal-to-noise ratio 55 dB | ||||
| T.H.D | 0.5 % | |||
| [Tuner] | FM | Tuning Range 87.5 -108 MHz 87.5 | -108 MHz/65 -108 MHz | |
| Intermediate Frequency 10.7 MHz | ||||
| Antenna | Telescopic antenna | |||
| AM(MW) | Tuning Range 522 - 1620 kHz or 520 - 1720 kHz | |||
| Intermediate Frequency 455 kHz | ||||
| Antenna | Ferrite bar antenna | |||
| [TAPE] | Recording System | 4 Tracks 2 channel stereo | ||
| Frequency Response | 125 - 8000Hz | |||
| Signal to Noise Ratio 35/40dB (REC/PLAY) | ||||
REFERENCE
Designs and specifications are subject to change without notice for improvement.
About MP3
- An MP3 file is audio data compressed by using the MPEG1 audio layer-3 file-coding scheme. We call files that have the ".mp3" file extension "MP3 files".
- The unit can not read an MP3 file that has not ".mp3" file extension.
MP3 Disc compatibility with this unit is limited as follows:
- Sampling Frequency / 8 - 48kHz
- Bit rate / 8 - 320kbps
- CD-R physical format should be "ISO 9660"
-
If you record MP3 files using the software which cannot create a FILE SYSTEM, for example "Direct-CD" etc., it is impossible to playback MP3 files. We recommend that you use "Easy-CD Creator", which creates an ISO9660 file system.
-
File names should be named using 30 letters or less and must incorporate ".mp3" extension e.g. "*******.MP3".
- Do not use special letters such as "/ : * ? " < >" etc.
About MULTI SESSION
- This function recognizes the multi session disc according to a disc of CD-ROM type.
ex) If there are MP3 files in the first session, the MP3 file in the first session is only played.
If there are only MP3 files in the whole session, all of the MP3 files in the session are played.
If there is Audio CD in the first session, only the Audio CD in the first session is played.
Notice (the date of the production of goods).
First figure ( of the left ) of series number means Year, next 2 figures
- Month of the production of this goods.


- Precautions
- CAUTION
- Explanation Graphical Symbols:
- WARNING
- Warning:
- Table of Contents
- INTRODUCTION
- BEFORE OPERATION
- OPERATION
- Disposal of your old appliance
- REFERENCE
- About the symbols for instructions
- Before Use
- Safety Precautions
- Handling the unit
- When shipping the unit
- To keep the surface clean
- Cleaning the unit
- To clean the cabinet
- Notes on Discs
- Handling discs
- Storing discs
- Cleaning discs
- Notes on Tapes
- Preventing record
- Rear Panel/Display Window
- Power Source
- The AC Power Cord Connection
- Note
- Adjusting the voltage (OPTIONAL)
- Battery Installation
- Audio Adjustment
- Volume Adjustment
- Headphone Socket
- Radio Operation
- Listening to the radio
- To turn off the radio
- Setting STEREO/ MONO
- Tape Operation
- Basic Playback
- To Pause Play
- To Stop Play
- To Play Rewind or Fast Forward
- CD Operation
- To Skipping the Track
- To Searching the Track (CD only)
- Notes
- To Repeat Play
- To play one track repeatedly
- To play all tracks repeatedly
- To cancel repeat play
- Track +10
- Recording
- Basic Recording
- CD Synchronized Recording
- To pause recording
- To stop recording
- About MP3
- MP3 Disc compatibility with this unit is limited as follows:
- About MULTI SESSION
Brand : LG
Model : LPC-M130X
Category : Printer